1
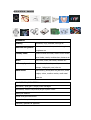
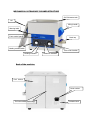
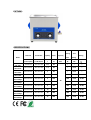
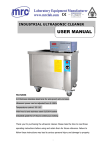
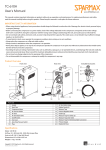
MECHANICAL ULTRASONIC CLEANER
USER MANUAL
FEATURES
Stainless steel housing, tank and lid, nice looking.
Stamp tank without welding gap for better waterproof.
Overheat protector
Cooling fan
Moisture-proofed PCB
Industrial grade IC & ultrasonic transducer
Thank you for purchasing the ultrasonic cleaner. Please take the time to read these
operating instructions before using and retain them for future reference. Failure to
follow these instructions may lead to serious personal injury and damage to property.
INTRODUCTION
Ultrasonic cleaning is based on the cavitation effect caused by high
frequency ultrasonic wave vibration signal in the fluid. Microscopic
bubbles are formed, and they implode violently causing the cavitation
which create an intense scrubbing action on the surface of the item
being cleaned. The bubbles are small enough to penetrate microscopic
crevices, cleaning them thoroughly and consistently.
Ultrasonic cleaning is extremely effective at removing dirt and grime
which would normally require tedious manual cleaning by hand. It has
been used to clean a wide variety of instruments and mechanical parts
such as carburetors, returning them to almost “like new” condition
without damage to delicate parts.
PREPARATION:
1. Carefully unpack the cleaner and remove all traces of packing materials from it.
Visually inspect the cleaner for any parts that may have become loose or damaged
during transit.
Contents:
a: Main machine
b: Sound proof lid.
c: Power lead
d: Outlet filter
e: Mesh basket (Optional)
2. Place the cleaner on a flat, clean surface where the cooling fans will receive adequate
ventilation and ensure all controls are set to off. Also ensure the drain tap is in the
closed position.
3. Ensure the power lead is securely plugged into the cleaner and that no part of the lead
is likely to come into contact with moisture.
4.
Carefully fill at least 1/2 of the tank with a solvent solution. For demanding
cleaning we recommend a small amount of washing up liquid, this will help
increase the cleaning performance. The cleaner is now ready for use.
Attention
a)While the machine is working normally, ultrasonic and tank syntony gives a well-proportioned sound,
and no shudder on the surface of the water, yet there is spray made by the tiny bubbles. If there are
discontinuous surges, please add or release a little of washing solution in the tank, stopping the surges is
better for the objects cleaning.
b)On the condition of making sure the cleaning object is cleaned, please run the machine discontinuously
as far as possible(not more than 30min.),for long-time running will cause temperature increment of the
case .
SAFETY PRECAUTIONS
Keep it away from children !
This device is not intended to use by individuals with restricted physical sensory or
metal capacities or those with lack of experience or knowledge, include children,
unless they are supervised by an individual who is responsible for their safety or have
received training in operating the device.
PLEASE READ THE FOLLOWING VERY CAREFULLY AS FAILURE
TO COMPLY MAY INVALIDATE YOUR GUARANTEE
1)
DO NOT run the cleaner continuously for more than one hour at a time, as doing so
can damage the internal components.
2)
DO NOT operate the unit without fluid in the tank. Always ensure the fluid is no
higher than the max mark, Always ensure there is a minimum depth of 7cm.
3)
DO NOT drop any item into the tank as this may cause damage to the transducer.
Always place the items gently into the tank and use the basket whenever possible.
4)
The more items that you place in your cleaning bath the less efficient it will clean.
It is not advised to overlap items. Always allow plenty of clear space between the
items.
5)
Do keep the lid on during use. This will prevent splashes and reduce evaporation
of the fluid.
6)
Never immerse the machine or power cord in water or other liquid.
7) DO NOT touch the power plug with wet hands, especially when inserting or
removing the plug.
8) DO NOT touch the unit if the machine has fallen into water during operation.
Remove the power plug from the socket first.
9) DO NOT disassemble the machine, except by professionals.
10) UNPLUG the power source while filling or emptying the tank.
11) DO NOT spray water or liquid over the device and the control panel
12) DO NOT operate the cleaner without proper grounding.
13) DO NOT place the device on a soft surface, where the vents could be blocked.
14) Always turn the heater off after using as leaving it on can cause the fluid to
evaporate and damage the internal components.
15) Upon completion of the cleaning cycle, turn the heater knob off and isolate the
machine from the electrical supply.
16) Take care when adding or removing items from the cleaning tank as the fluid is
likely to be hot and displaced fluid can damage the internal components. Any
displaced fluid must be dried up immediately.
17) In the event of failure/emergency, disconnect the mains supply by removing the plug
from the mains socket.
APPLICATION RANGES
DOMESTIC
Jewelry
Necklaces, rings, bracelets, earrings etc
Watches and glasses
Waterproof wristwatches, watch chains, glasses,
sunglasses etc
Toiletry items
Electric toothbrush heads, electric shaver heads,
razor blades, combs, toothbrushes, dentures etc
Discs
CDs, DVDs, DVDs, CD-R discs, laserdisc etc
Office equipment
Printed heads, fountain pen nibs, wax or rubber
stamps , Calligraphic pens/ nibs etc
Metal items
Metal cutlery (knives/forks etc),old coins, metal
badges, valves, machine nozzles, small metal
parts etc
COMMERCIAL/INDUSTRIAL
Airbrushes / Spray guns / Inkjet printer cartridges
Automotive/ Aviation components/Engine cylinder heads
Motorcycle radiators
Dental & surgical instruments
Lenses & other optical components
Laboratory glassware & apparatus
MECHANICAL ULTRASONIC CLEANER STRUCTURE
SUS 304 water tank
Lid
Lifting handle
Warning label
Front control panel
Drain tap
Heating control switch
Time control switch
Heating indicator
Ultrasonic indicator
Back of the machine
Cool device
Power socket
The best welding technology
Relation label
OPERATION
1. START UP ULTRASONIC FUNCTION:
1) Fill stainless steel tank with water
2) Plug the cleaner into grounded outlet;
3) Turn the “Timer switch”
left wards to “ON” for continuous working. Or
turn the switch right wards to set the 0-20 min working time. During working,
you will hear the “ sizzling” voice ,that means the cleaner running properly.
2. START UP HEATING FUNCTION:
1) Set temperature (if have): Turn the “Heating switch”
button for setting
temperature 20°C-80°C. Please set the temperature switch to the degree that
needed, normally 40-60℃.
3. STOP ULTRASONIC & HEATING PROCESS:
1) Switch “Ultrasonic” button to “OFF”, the cleaner will stops working, indicator
light turn off. And then disconnect the power supply.
2) Switch “Heating” button to “OFF”, the heating function will stop.
3) Empty the tank and clean both the outside and inside of the cleaner with clean
and dry cloth for next use.
DIFFERENT WAYS OF CLEANING
GENNRAL CLEANING—use only tap water. Use warm temperature about 50℃ .
ENHANCED CLEANING—add few drops of standard washing up liquid, liquid soap, or
detergent into water, other non-acidic cleaning agents can also be used.
EXTENSIVE CLEANING—removing tarnish, carbon & rust from non-plated metals, it is
recommended to use specialist cleaning solution in associated using ultrasonic cleaner.
WARNING : Strong acid or alkaline cleaning solution will cause corrosion, rust and
even puncture of tank or machine body. To overcome this problem, dilute to mild PH
solution or request for tank made of specific grade of stainless steel like SUS304.
PICTURE:
SPECIFICATIONS
Tank Size
Overall Size
Capacity
Power
Model
VGT-1607
VGT-1613T
VGT-1620T
VGT-1730T
VGT-1730QT
VGT-1860QT
VGT-1990QT
VGT-2013QT
VGT-2120QT
VGT-2227QT
(L×W×H)mm
(L×W×H)mm
L
W
150×85×65
175×110×185
0.7
150×140×65
190×170×185
150×140×100
Heating
Time
power
Setting
Frequency
KHz
Heating
℃
W
Min
50
--
--
--
1.3
50
--
0-15
--
190×170×220
2
50
--
0-15
--
240×140×100
270×170×200
3
100
--
0-15
--
240×140×100
270×170×200
3
100
100
0-20
20-80
40
300×155×150
330×180×310
6
150
300
0-20
20-80
300×240×150
330×270×310
9
200
300
0-20
20-80
330×300×150
360×330×310
13
300
400
0-20
20-80
500×300×150
550×330×310
20
400
500
0-20
20-80
500×300×200
550×330×360
27
500
500
0-20
20-80