1
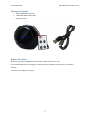
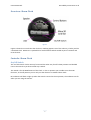
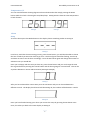
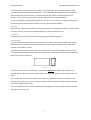
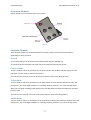
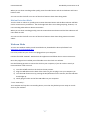
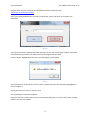
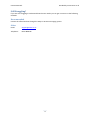
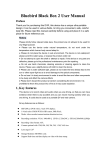
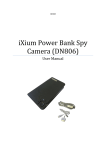
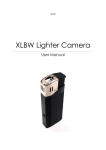
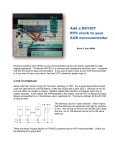
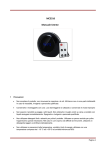
IXIUM
iXium M8 DVR Alarm
Clock
User Manual
Custom Manuals
Provided by www.ixium.co.uk
Contents
Package Contents.................................................................................................................................... 2
Before You Start ...................................................................................................................................... 2
Overview: Alarm Clock ............................................................................................................................ 3
Controls: Alarm Clock.............................................................................................................................. 3
On/Off Switch ..................................................................................................................................... 3
Micro SD Card Slot (TF) ....................................................................................................................... 4
USB: Syncing and Charging ................................................................................................................. 4
Microphone......................................................................................................................................... 4
Everyday Alarm Clock Controls ........................................................................................................... 4
Year, Month/Day and Time ............................................................................................................. 4
12/24 Hour ...................................................................................................................................... 5
Temperature C/F ............................................................................................................................. 6
Alarm ............................................................................................................................................... 6
Tell Time .......................................................................................................................................... 7
Nature Mode ................................................................................................................................... 7
Overview: Remote .................................................................................................................................. 8
Controls: Remote .................................................................................................................................... 8
On/Off ................................................................................................................................................. 8
Camera Mode ..................................................................................................................................... 8
Video Mode......................................................................................................................................... 8
Audio Mode ........................................................................................................................................ 8
Motion Detection Mode ..................................................................................................................... 9
Webcam Mode........................................................................................................................................ 9
Timestamp Edit ..................................................................................................................................... 10
Still Struggling?...................................................................................................................................... 12
Recommended .................................................................................................................................. 12
Other ................................................................................................................................................. 12
1
Custom Manuals
Provided by www.ixium.co.uk
Package Contents
•
•
•
iXium M8 DVR Alarm Clock
USB Cable (USB to Mini USB)
Remote Control
Before You Start
Make sure you have charged the device for 8 or more hours prior to use.
It is recommended that you charge for at least 24 hours; however we know this is not always
possible.
Turn over for charging instructions…
2
Custom Manuals
Provided by www.ixium.co.uk
Overview: Alarm Clock
Figure 1
Figure 1 shows the controls that the clock uses. Nothing appears out of the ordinary, it looks just like
a standard clock. However it is packed full of useful features which enable anyone to monitor and
record events.
Controls: Alarm Clock
On/Off Switch
This is a flick switch. Flick it one way for On and the other way for Off. These positions are labelled
next to the switch so you know which way is which.
This switch is for the DVR features of this clock. In the on position you are able to use the DVR
functions, in the off position you can only use the device as a standard alarm clock.
No indicators will flash or light up when the switch is turned to the on position, the indicators are for
when you are using the remote.
3
Custom Manuals
Provided by www.ixium.co.uk
Micro SD Card Slot (TF)
You are able insert a Micro SD card (TF) up to 32GB into this alarm clock.
When holding the clock with the back facing you, make sure the Micro SD card is facing down so the
contact points are not visible (Figure 2). Make sure the On/Off switch is set to the off position
whenever you insert or remove a Micro SD card.
Figure 2
USB: Syncing and Charging
Supplied with the clock is a USB cable which enables you to charge the battery and transfer the files
that are saved on the Micro SD Card.
When charging a red indicator will light up.
To access the files on the clock make sure the On/Off switch is in the On position. Plug the USB cable
into your computer and press the On button on the remote. This will now appear as a removable
disk.
Microphone
The microphone works just like any other; it will capture the sound for the videos and audio
recorder
Everyday Alarm Clock Controls
**THE CLOCK BY DEFAULT CYCLE BETWEEN THE TIME, DATE AND TEMPERATURE**
Year, Month/Day and Time
You can set the full date and time by pressing the Set button on the back of the clock.
The first option is to set the year; a year will flash on the screen in the same format as shown in
Setting 1. Use the Up and Down buttons to change the year accordingly.
Setting 1
4
Custom Manuals
Provided by www.ixium.co.uk
When you have set the year press the Set button again and you will move onto the month and date
(same format as Setting 2). The first part to change is the month; much like the setting of the year,
use the Up and Down buttons to change the month. When you have selected the correct month
press the Set button again and you move on to the date, repeat the process as you have already
used until you get the correct date.
Setting 2
Once you have finished changing the month/date you can press the Set button again, this moves you
on to changing the time.
The first option is to change the hour (Setting 3); again use the Up and Down buttons to find the
correct hour. Once you have set the hour you press the set button again to move on to the minutes.
Repeat the setup process until you have the correct time.
Setting 3
To finish press the Set button and you get taken back to the standard clock which now has the
correct date and time.
12/24 Hour
You can switch between the 12 hour and 24 hour display by simply pressing the Up button whilst the
clock is showing the time/date/temp. Setting 4 and 5 show the same time but in the different
formats.
Setting 4
Setting 5
5
Custom Manuals
Provided by www.ixium.co.uk
Temperature C/F
You can switch between showing degrees Celsius and Fahrenheit but simply pressing the Down
button whilst the clock is showing the time/date/temp. Setting 6 and 7 show the same temperature
in both formats.
Setting 6
Setting 7
Alarm
Setup
To set the alarm press the Mode button so the display shows something similar to Setting 8.
Setting 8
From here, much like the time setting process, press the Set button, you will then be able to choose
the hour of which you want the alarm to go off at. The hour figures should be flashing; use the Up
and Down arrows to set the hour accordingly. Press the Set button again and change the minutes to
whatever time you would like.
Once you are happy with the time you have set, press the Set button and you can change the time
that is given between pressing the snooze button and the alarm going off a second time. This can be
anywhere between 1 minute and 60 minutes (Setting 9 example).
Setting 9
After you have selected the snooze time press the set button and you can choose between 6
different sounds. The display should now look like Setting 10; this number will be between 1 and 6.
Setting 10
Once you have finished setting your alarm you can exit the setup by pressing the Set button once
more, this takes you back to the same display as Setting 8.
6
Custom Manuals
Provided by www.ixium.co.uk
The alarm time is now set up, you can enable it by pressing Up from the Setting 8 display; it will
show the time that you have set the alarm for. If you only press the Up button once you enable to
alarm without the snooze function, if you press it twice you enable to alarm with the snooze
function. You can press Up a third time and the display will turn back to Setting 8.
To return to default time/date/temp display you can leave the clock and it will automatically return
to this screen after 30 second to 1 minute or you can press the Mode button.
Turn Off
When the alarm goes off at the desired time you simply press the Off/Snooze button. This will either
stop your alarm or go into snooze mode depending on which mode you are in.
Tell Time
You can get the clock to tell you the time by pressing the Off/Snooze button.
Nature Mode
In this mode you are able to have the clock play nature sounds. With sounds emulating a tropical
rainforest you can close your eyes, relax and enjoy the atmosphere enabling you turn ‘get away’
from day to day life for a while.
To make use of this function simply press the Time button to the desired length of time. You can
choose from 10 minutes to 1 hour (10 minute increments). The display will show the time period in
the format shown in Setting 11.
Setting 11
Once you have chosen your desired time period press and hold the Off/Snooze button for 3-4
seconds and the clock will start this nature mode. The clock will display the time remaining in this
mode.
If you would like stop the nature mode you can press the Off/Snooze button, this will pause the
mode for 20-30 seconds so you can continue with the nature mode (press Off/On again) or leave it
to go back to displaying the time.
You can completely exit the nature mode without pausing by pressing the Mode button twice, this
will return you to the time.
7
Custom Manuals
Provided by www.ixium.co.uk
Overview: Remote
Figure 3 shows the controls that are on the remote.
Figure 3
Controls: Remote
These buttons enable you to switch between the camera, video and audio recorder features
depending on what you need.
On/Off
To turn on quickly press the power button and the blue indicator will light up.
To switch the device off follow the same process and the blue indicator will go out.
Camera Mode
Turn the clock on. When on, quickly press the photo button and the blue indicator will go out and
light back up when ready to take the next photo.
You can turn the clock off or use one of the other features when done taking pictures.
Video Mode
Turn the clock on. When on, quickly press the video button and the indicator will flash 3 times and
then go out. The clock might look like it is not doing anything; however, it is now recording video.
When you are done recording video quickly press the video button and the blue indicator will come
back on solid.
You can turn the clock off or use one of the other features when done taking videos.
Audio Mode
Turn the clock on. When on, quickly press the audio button and the blue indicator will flash once and
then go out. The clock might look like it is not doing anything; however, it is now recording audio.
8
Custom Manuals
Provided by www.ixium.co.uk
When you are done recording audio quickly press the audio button and the red indicator will come
back on solid.
You can turn the clock off or use one of the other features when done taking audio.
Motion Detection Mode
Turn the clock on. When on, quickly press motion detection button and the blue indicator will flash
until it cannot see any movement. The clock might look like it is not doing anything; however, it is
now recording video when it detects movement.
When you are done recording quickly press the motion detection button and the blue indicator will
come back on solid.
You can turn the clock off or use one of the other features when done taking motion activated
videos.
Webcam Mode
To enter into webcam mode you will need the driver; download the drivers/software from
www.ixium.co.uk/downloads.php
First of all, make sure your clock is not plugged into your computer.
Find the file called “STK03N”. Double click this application and follow the on screen instructions.
Once this program has installed you will be able to use the clock as a webcam.
Use the following process to connect the clock to your computer; if you do not do it exactly as
instructed then it will not work.
1) Turn the On/Off switch on the clock to the On position.
2) Plug the USB cable into the back of the clock only, do not plug it into your computer yet.
3) Turn the DVR functions on by pressing the On/Off button on the remote, the blue indicator
should light up.
4) Finally plug the other end of the USB cable into your computer.
**First Time Only**
Your computer will say that it is installing drivers, once this has finished you are ready to use the
clock as your webcam.
9
Custom Manuals
Provided by www.ixium.co.uk
Timestamp Edit
You may need to update the internal clock for the timestamp shown in images and videos.
To do this, you will need a small program that will access the clock on your computer and transfer
the data to the clock.
PLEASE NOTE: Your virus scan might think this is a virus; however, we can assure you that this is not
the case.
You might need to tell your virus scan program to ignore the threat. Or to disable your virus scan
program temporarily.
**due to the varied nature of virus scans we cannot help you through this part of the process**
(next page)
10
Custom Manuals
Provided by www.ixium.co.uk
Plug the clock into your computer and download the drivers/software from
www.ixium.co.uk/downloads.php
Once you have downloaded the find and run WriteTime_Ch.exe file which is included in the
download.
Figure 4
You should now have a window that looks like Figure 4. You may have foreign symbols or question
marks depending, this does not matter because the program will still work.
Click the button highlighted in blue and a window (Figure 5) will appear.
Figure 5
The time files have now been put onto the clock. Click OK and then click the button highlighted in
red from Figure 2.
Unplug the clock from your PC and turn it on.
The timestamp has now been updated.
Plug the clock back in and in the main part of the Removable Disk; if you see a file named “setdate”
delete it and you are finished.
11
Custom Manuals
Provided by www.ixium.co.uk
Still Struggling?
If you are still struggling to understand how this item works you can get in contact via the following
methods.
Recommended
Contact the official stockist through the eBay or Amazon messaging system.
Other
Email:
[email protected]
Telephone:
0115 9899516
12