1
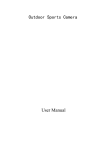
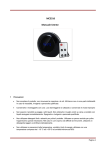
Car DVR User Manual
Preface
Thank you for purchasing this DVR, this device has a unique ultra-portable
design; it can be used in various fields, to bring you convenient, safe, colorful
daily life. Please read this manual carefully before using and place it in a safe
place for future reference use.
Notes
Please strictly follow relevant state laws, this product are not allowed to be used for
any illegal purpose.
● Please use the device under natural temperature, do not work under the
temperature which human body cannot adapt to.
● Please do not place the device in wet environment. The device is not waterproof,
please avoid the water spray, or expose the product under rain
● Do not attempt to open the shell or attempt to repair, if the device or any parts are
defective, please go to the professional maintenance point for repairing.
● Do not use harsh chemicals, cleaning solvents or cleaning agents to clean the
device. Please use a slightly damp soft cloth to clean the device.
● Please use it under sufficient light, please do not make the lens directly face to the
sun or other super-light so as to avoid damage to the optical components.
● Do not use it in dusty environment in order to avoid the lens and other components
to be dusty and affect the camera effects
● Please don’t discard the product at random considering the environment. It is
prohibited to throw this product into a fire as it may cause explosion.
1, Key features
This device is to record video and audio when you are driving, so that you can have
evidence when there is any accident and you can record moving scenery when you
are driving. It could also be used as a portable DV and web camera.
Its key features are as follows:
z
z
z
z
z
z
z
z
z
z
z
HD720P car DVR with 2.5 inch TFT display;
1/4 inch color CMOS WXGA HD sensor, 300k Pixel;
Mode: video recorder/camera/motion detection/review;
Recording resolution: VGA(640x480)
、QVGA(320x240)、SXGA(1280x960) @30fps
Recording video format: AVI;
Camera optional with 12M, 8M, 5M, 3M, 2M, 1.3M, VAG size
Lens angel: 120°
Storage Medium: SD/MMC card;
Support Real-time and date display on video with time stamp.
Recording automatically after the car powered-up when connect the car adaptor;
The device records in cycles, it will automatically cover old memory, scroll and always
keep the newest recording by sections optional with 1 minute, 3 minutes and 5 minutes;
Support motion detect, it will automatically record as long as there is any human or objects
movement in front of the device.
Built-in rechargeable battery;
The device supports video output, live playback, through the car display you can check the
record video content on the spot. It also supports TV and PC output via AV output and
USB2.0 interface to review recording files;
Built-in MIC and speaker;
Can be used as Web camera after install the driver in the PC and connect to PC by USB
cable.
z
z
z
z
z
2, Operation
1) Appearance and button descriptions
1.
2.
3.
4.
5.
6.
7.
8.
Lens
IR LED Lights
SD/MMC card slot
On / Off
MENU
REC/SNAP
UP
DOWN
10. Green LED indicator
11. DC 5V Slot
12. USB slot
13. AV Out
14. Reset hole
15. Microphone
16. Speaker
17. Mount Hole
9. Mode (Record, Camera, MD, Playback)
18. 2.5-inch LCD
Note: when the light is dim, press and hold ON / OFF button to turn on the
infrared light.
Note: it is not allowed to switch on/off the infrared light when recording.
3.System Settings
Before using this device, it is necessary to make some basic settings, such as date
and time, language, auto power off, reset the system etc.
After power on, press MODE button to switch to camera mode. Double press the
MENU key to enter the function setup menu.
press the MENU button again to exit setup menu and return to camera
mode.
1) Format
Use this feature to format the current storage media; this function will
delete any information in the storage media.
In the system setup menu, press the UP or DOWN button and select
'Format' option. Press the REC/SNAP button, then press the UP or DOWN
button to select 'Execute ' option, then press the REC/SNAP button to
begin formatting.
2) Beep
In the setup menu, press UP or DOWN button to select 'Beep'. Press the
REC/SNAP button to enter the selection screen, then press the UP or
DOWN button to select 'On' or 'Off' option, then press REC/SNAP to
confirm selection and exit.
When ‘On’ is selected, there will be ‘Beep’ sound comes out when pressing
keys. When ‘Off’ is selected, there won’t be any sound when pressing keys.
3) Language setting
On the setup interface, press the UP or DOWN key to select the 'Language'
option.
Press REC/SNAP to enter the selection interface, press the UP or DOWN
button to select the following languages: English, French, German, Italian,
Spanish, Portuguese, Traditional Chinese, Simplified Chinese, Japanese,
Russian and etc. Then press REC/SNAP key to confirm selection of
language and get out to main menu.
4) Auto Off
In the setup interface, press the UP or DOWN button to select the 'Auto Off'
option, press the REC/SNAP button to enter the auto off interface, press
UP or DOWN to select among 1 minute, 3 minutes, 5 minutes, and Off,
then press the REC/SNAP button to confirm auto-off time selection and get
back to main menu. For example, when you select 1 minute, if you don’t
operate the device for 1 minute, it will be powered off automatically.
5)
Motion Detection
This feature is to set the time of the saving section under motion detection
mode.
In the setup interface, press the UP or DOWN button to select the 'Motion
Detect' option, press the REC/SNAP button to enter the sub-menu, press
UP or DOWN to select 1 minute, 3 minutes, 5 minutes, then press the
REC/SNAP button to confirm. For example, when you select 3 minutes, it
will save each recording sections in every 3 minutes.
6) System Reset
This feature will make all settings back to default.
In the system setup menu, press the UP or DOWN button to select ' Sys.
Reset ' option. Press REC/SNAP, select 'Cancel' or 'Execute' option, then
press REC/SNAP button to confirm.
7) Light Frequency
Under the light frequency option, you can set it suitable for local places.
In the system setup menu, press the UP or DOWN button to select 'Light
Freq.' option, press REC/SNAP, then select 60Hz or 50Hz, press the
REC/SNAP button to confirm. Make the outside light frequency to be
corresponding light frequency in the device, you will get better display
effect.
8) TV Output
In the system setup menu, press the UP or DOWN button to select 'TV
Output' selection, press REC/SNAP, then press the UP or DOWN button to
select NTSC or PAL, select the TV mode used in your local place, then
press REC/SNAP button to confirm the selection.
9) Date Input
In the system setup menu, press the UP or DOWN button to select 'Date
Input ' choices.
Press REC/SNAP, then press the UP or DOWN button to select ‘Off’, press
REC/SNAP to confirm and exit. When press the UP or DOWN button to
select ‘Set’, then press REC/SNAP to enter the time and date settings, in
this interface press MENU button to select the places need to be adjusted
and press the UP or DOWN button to adjust the data, after adjusting, press
REC/SNAP to save and exit. The date and time set will be displayed on the
photos and recording videos.
10) USB
This option is to select the device to do as a disk drive or PC camera after
connecting with a computer.
In the system setup menu, press the UP or DOWN button to select 'USB'
selection, press REC/SNAP button, then press the UP or DOWN button to
select 'PC camera' or 'disk drive' , then press REC/SNAP button to confirm.
When select “PC camera” option, the device can be used as PC camera;
when select ‘disk drive’, you can review files in the memory on PC;
4. Motion detection recording mode
Please make sure that the SD card is inserted to the product.
Short press the On/Off button to enter the MD recording mode, the device
will record automatically and save in sections every 3 minutes
automatically in default, you can also set the time of the sections to be 1
minute, 3 minutes, 5 minutes same as the way setting the Motion detection
in system setting.
Under this mode, when there is any movement of human or objects before
the camera of the device, it will automatically detect and record.
Press UP or DOWN key to select the digital zoom function.
Note: This setting is available only when the device is not recording.
Press MODE key to enter camera mode.
To change the menu parameters, such as (SIZE, etc.), press MODE key to
switch to manual recording mode, then press MENU button to enter menu
settings.
Note: After finishes recording of a file, it won’t record if there is no
movement before the camera of the device.
Under motion recording mode, please make sure the memory remaining
time is more than 5 minutes, if less than 5 minutes, it will automatically
overwrite the old files.
5. Camera mode
After powered on and in the motion detection recording mode, short press
MODE button to switch to camera mode. Under this mode, you can use it
as camera to take photos.
Short press the REC/SNAP button to take photos and save;
Press UP or DOWN button to do digital zoom;
Press MODE button to enter the recording mode.
Press MENU button to enter the camera menu.
6. Manual Recording
Power on and switch MODE button to enter recording mode. Under this
mode, you can record files manually.
Short-press REC/SNAP button to start recording and press REC/SNAP
again to stop recording and save.
Press UP or DOWN button to do digital zoom.
Press MODE button to enter preview / playback mode.
Press MENU button to enter the recording menu.
Under recording mode, please make sure the memory remaining time is
more than 5 minutes, if less than 5 minutes, it will not continue recording.
7. Preview / Playback Mode
Power on and switch MODE button to enter Preview / Playback mode.
Under this mode, you can review recording files and photos in the memory.
Press UP or DOWN to select photos or videos. Under playback video files,
press REC/SNAP button to start playback or stop.
Then short press MODE button to exit playback mode.
When playing video files, press the UP button to select 1X/2X/4X/8X rewind
here. Press the DOWN button to select 1X/2X/4X/8X fast forward here.
8. Camera menu
Under camera mode, press MENU to enter the camera menu. Twice press
MENU to exit camera menu and return to camera mode. Under this menu,
you can adjust settings to get photo effect you need.
1) Resolution
Use this option to set the size of the image to be taken, clearer image
contains the more details and requires the bigger storage space.
In the camera menu, press the UP or DOWN button to select 'size' option,
press the REC/SNAP button to enter sub-menu, press the UP or DOWN
button to select 12M, 8M, 5M, 3M, 2M, 1.3M, VGA, then Press REC/SNAP
button to confirm.
If you select 12M, the photo size would be the biggest, when you select
VGA, the photo size would be the smallest.
2) Quality
This option sets the image quality, better quality will require the bigger
storage space.
Under the camera menu, press the UP or DOWN button to select 'quality '
option, press the REC/SNAP button to enter sub-menu, press UP or
DOWN key to select Fine, standard or Economy, then press REC/SNAP
button to confirm.
3) Scene mode
Depending on different environments, choose different scene modes, in
order to reach the best camera effects.
In the camera menu, press UP or DOWN button to select the 'scene mode'
option, press the REC/SNAP button to enter sub-menu, press UP or
DOWN button to select Auto, Sport, Night, people, landscape, backlight
etc., then press the REC/SNAP Button to confirm.
When you select Auto mode, it will automatically adjust to the suitable
status according to different outside environments. When you select Sport
mode, it is suitable when you are doing sports. When you select Night
mode, it is suitable for night.
4) Exposure Compensation
Select different EV according to different light conditions.
In the camera menu, press the UP or DOWN button to select 'EV' option,
press the REC/SNAP button to enter sub-menu, press the UP or DOWN
button to select different exposures, then press REC/SNAP button to
confirm.
When the outside light source is strong, you could decrease to lower EV
value, and when the outside light source is weak, you could increase to
higher EV value.
5) White Balance
Under this menu, you can adjust the selection according to the outside
environments.
Under camera menu, press the UP or DOWN button to select the 'white
balance' option, press the REC/SNAP key to enter sub-menu, press UP or
DOWN button to select Auto, Daylight, Cloudy, Tungsten, Fluorescent, and
then press REC/SNAP button to confirm.
When select ‘Auto’, it will adjust automatically according to the outer
environment. When select ‘Daylight’, it is suitable for fine day. When select
‘Cloudy’, it is suitable for cloudy day. When select ‘Tungsten’, it’s suitable
under Tungsten light. When select ‘Fluorescent’, it’s suitable under
Fluorescent light.
6) Sensitivity
Select the corresponding ISO value according to different light conditions.
In the camera menu, press the UP or DOWN key to select 'ISO' option,
press the REC/SNAP key to enter sub-menu, press the UP or DOWN
button to select automatic, 100,200, and then REC/SNAP button to
confirm.
When select Auto, it will adjust the value according to the outer
environment. When the outer light source is strong, please select 100.
When the outer light source is weak, please select 200 to get better photo
effect.
7) Color
The device can snap standard and vivid colorful images, it can also take
Sepia and Monochrome. Please select the effect you need.
In the camera menu, press the UP or DOWN button to select the 'color'
option, press the REC/SNAP key to enter sub-menu, press UP or DOWN
key to select ‘Standard’, ‘Vivid’, ‘Sepia’, ‘Monochrome’, then press
REC/SNAP button to confirm.
8 ) Saturation
In the camera menu, press the UP or DOWN button to select the
'Saturation' option, press the REC/SNAP key to enter sub-menu, press UP
or DOWN key to select High, Normal, Low, then press REC/SNAP button
to confirm.
9) Sharpness
In the camera menu, press the UP or DOWN button to select the
'sharpness' option, press the REC/SNAP key to enter sub-menu, press UP
or DOWN key to select Hard, Normal, Soft, then press REC/SNAP button
to confirm.
10)
Preview
Open the preview function, you can have a preview of the image effects
when taking pictures. In the camera menu, press the UP or DOWN button
to select the 'Preview' option, press the REC/SNAP key to enter sub-menu,
press UP or DOWN button to select ‘On’ or ‘Off’ , then press REC/SNAP
button to confirm.
When you select ‘On’, you can preview the current photos taken. When you
select ‘Off’, you could not preview photos taken.
11) Time stamp
Open the time stamp function, the snapped image will have time stamp on
it.
In the camera menu, press the UP or DOWN button to select the 'Time
Stamp' option, press the REC/SNAP key to enter sub-menu, press UP or
DOWN button to select Off, Date Only, Date & Time, then press
REC/SNAP button to confirm and to exit.
When you select ‘Off’, there won’t be date or time on the image you take.
When you select ‘Date Only’, the image will only have date stamp.
When you select ‘Date &Time’, the image will have date and time stamp.
12) Burst
Turn on the Burst option, it will snap three images continuously each time.
In the camera menu, press the UP or DOWN button to select the ‘Burst’
option, press the REC/SNAP key to enter sub-menu, press the UP or
DOWN key to select ‘On’, ‘Off’, then press REC/SNAP button to confirm
and return.
9. Recording menu
Under the recording standby mode, press the MENU key to enter the
recording menu. Twice press MENU to exit recording menu and return to
recording mode.
1) Recording resolution
Use this option to set the recording resolution, the bigger the screen, the
bigger the required storage space.
In the recording function menu, press UP or DOWN button to select 'Size'
option, press the REC/SNAP key to enter sub-menu, press UP or DOWN
button to select VGA(640*480 pixels), QVGA(320*240 pixels),
SXGA(1280*960 pixels), then press REC/SNAP button to confirm.
2) Exposure Compensation
Selected different EV according to different light conditions.
In the recording function menu, press UP or DOWN key to select 'EV'
option, press the REC/SNAP key to enter sub-menu, press the UP or
DOWN buttons to select different exposures, then press REC/SNAP button
to confirm.
When the outside light source is strong, you could decrease to lower EV
value, and when the outside light source is weak, you could increase to
higher EV value.
3) White Balance
Based on the light condition, use this option to amend different shades.
In the recording function menu, press the UP or DOWN button to select the
'white balance' option, press the REC/SNAP key to enter sub-menu, press
UP or DOWN button to select Auto, Daylight, Cloudy, Tungsten,
Fluorescent, and then press REC/SNAP button to confirm.
When select ‘Auto’, it will adjust automatically according to the outer
environment. When select ‘Daylight’, it is suitable for fine day. When select
‘Cloudy’, it is suitable for cloudy day. When select Tungsten, it’s suitable
under Tungsten light. When select Fluorescent, it’s suitable under
Fluorescent light.
4) Time stamp
In the recording function menu, press the UP or DOWN button to select the
'Time Stamp' option, press the REC/SNAP key and select ‘Off’, ‘Date Only’,
‘Date & Time’, then press REC/SNAP button to confirm.
When you select ‘Off’, there won’t be date or time on the video you record.
When you select ‘Date Only’, the video will only have date stamp. When
you select ‘Date& Time’, the video will have date and time stamp.
Note: The settings of motion detection can only be set here.
5) Audio Recording Control
In the recording function menu, press the UP or DOWN button to select the
' Audio Control ' option, press the REC/SNAP key and select ‘Off’ or ‘On’,
then press REC/SNAP button to confirm.
When you select ‘ON’, the device will also record audio when recording
video. When you select ‘OFF’, the device will not record audio.
10. Preview / playback menu
In preview / playback standby mode, press the MENU button to enter the
preview/playback menu, and repeat press MENU to exit preview/playback
mode. Under this menu, you can playback video recorded and photos.
1) Delete
Use this function to delete the saved file in storage media.
In the preview/playback menu, press UP or DOWN button to select 'delete'
option, press the REC/SNAP key to enter sub-menu
Delete Single: Press UP or DOWN button to select ‘single’ then press
REC/SNAP to confirm delete.
Delete All: Press UP or DOWN button to select ‘All’ then press REC/SNAP
to enter to sub-menu, press UP or Down to cancel or execute, then press
REC/SNAP to confirm.
Select: Press UP or Down button to enter Select menu, press REC/SNAP
to enter to ‘thumbnail mode’, press UP or Down button to select the file to
delete, then press REC/SNAP to confirm deletion.
2) Protect
This feature can protect the locked files to avoid being deleted
unexpectedly.
In the preview / playback menu, press UP or DOWN button to select
'Protect' option, press the REC/SNAP key to enter sub-menu
Protect Single: Press UP or DOWN button to select single then press
REC/SNAP to enter to sub-menu, press UP or DOWN button to select
Cancel or Execute, then press REC/SNAP confirm protection or cancel
protection.
Protect All: Press UP or DOWN button to select All then press REC/SNAP
to enter to sub-menu, press UP or DOWN button to select Cancel or
Execute, then press REC/SNAP confirm protection All or cancel protection
All.
Select ‘Protect’: Press UP or Down to select ‘Protect’, press REC/SNAP to
enter to ‘thumbnail mode’, press UP or Down button to select the file to
protect, then press REC/SNAP to confirm protection.
3) Thumbnail
This feature can show the images in thumbnail, you can preview
photos/videos easily.
In the preview/playback menu, press UP or DOWN button to select
'thumbnail' option, press the REC/SNAP key to enter the thumbnails, press
the UP or DOWN button to select the file, press the REC/SNAP button to
exit;
4) Volume
In the preview/playback menu, press UP or DOWN button to select
'Volume' option, press the REC/SNAP to enter the sub-menu, press UP or
DOWN button to select playback volume and the maximum is 8, then press
the REC/SNAP button to confirm.
11. TV-OUT Mode
After connected the device with TV via TV-OUT cable (cable is not included),
the TV screen will show the videos or photos at the same time. Under TV-OUT
mode, you can also take pictures, record, preview / playback and set menu.
Pulling out TV-OUT cable will exit TV-OUT mode automatically.
12. Connect to the computer
In the system setup menu, when you select USB as disk driver, it can be used
as U disk when connect to the computer, and you can copy, cut and paste,
delete the files freely.
After connecting to a computer USB port, the computer will pop up portable
disk icon after a few seconds.
Tips:
a, Connection to PC. If the computer does not recognize or doesn’t pop up the
portable disk icon in 30 seconds, please re-plug.
b, It is recommended to copy, cut or paste the recorded video file to your
computer hard drive firstly then to play, directly playing the video file saved in
the internal memory of the device might not play smoothly because the
transmission cannot keep up for large data.
13.PC Camera
Please install the driver firstly before using this camera as PC camera in
the first time, the driver name is ‘STK03N.exe’ stored in CD Driver,
double-click the file and follow the instruction to complete the installation.
In the system setup menu, select the USB as PC camera, connecting to the
computer, click ‘Standard Camera’ icon in ‘My Computer’ to use as the
computer camera.
Technical Specifications
Video sensor
Lens
Storage Media
Photo format
Photo resolution
Video format
Recording
resolution
TFT screen
Zoom
White balance
Exposure
Compensation
Saturation
sharpness
Auto power off
Battery
Battery capacity
Charging Voltage
Support system
PC Camera
High resolution CMOS lens
Fixed Lens,120 degree angle
SD card up to 32G
JPG
12M、8M、5M、3M、2M、1.3M、VGA
AVI
VGA(640x480)、QVGA(320x240)、SXGA(1280x960)
@30fps
2.5 inch TFT LCD
8 times digital zoom
Auto、daylight、Cloudy、Tungsten、Fluorescent
-2.0 EV ~ +2.0 EV
high、normal、low
hard、normal、soft
1 minute、3 minutes、5 minutes
High-capacity lithium polymer battery
650mAh
DC-5V
Windows me/2000/2003/XP/vista/Win7/Mac OS/Linux
Resolution 320X240