1
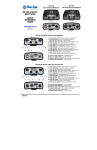
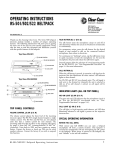
RS-702
Dual-Channel Beltpack
RS-703
TW Dual-Channel Beltpack
Top view
Top view
Bottom view
Bottom view
RS-702 & RS-703
BELTPACKS
QUICK
REFERENCE
GUIDE
www.clearcom.com
HME# 399G054
Rev A 7/9/13
RS-702 Controls, LEDs and Connectors
1 Ch-A volume control – adjusts channel A volume level
2 Ch-A talk button – talk to all on intercom channel A
Press and hold while talking, or tap to latch on
1
2
11
3
4
5
12
6
13
7
8
14
9 10
15
3 Ch-A talk LED – lights when intercom channel A talk is active
4 Ch-A call LED – lights when channel A call is active
5 Ch-A call button – activates call on intercom channel A
6 Power LED – lit when beltpack power is on
7 Ch-B call button – activates call on intercom channel B
8 Ch-B call LED – lights when channel B call is active
9 Ch-B talk LED – lights when intercom channel B talk is active
10 Ch-B talk button – talk to all on intercom channel B
Press and hold while talking, or tap to latch on
11 Ch-B volume control – adjusts channel B volume level
12 Intercom cable receptacle – 6-pin XLR female
13 Intercom cable loop-thru – 6-pin XLR male
14 Program audio level control – adjusts program audio input level
15 Headset cable receptacle – 4-pin XLR male
RS-703 Controls, LEDs and Connectors
1 Ch-A volume control – adjusts channel A volume level
2 Ch-A talk button – talk to all on intercom channel A
1
2
11
3
4
12
5
6
13
7
14
15
8
16
9 10
Press and hold while talking, or tap to latch on
3 Ch-A talk LED – lights when intercom channel A talk is active
4 Ch-A call LED – lights when channel A call is active
5 Ch-A call button – activates call on intercom channel A
6 Power LED – lit when beltpack power is on
7 Ch-B call button – activates call on intercom channel B
8 Ch-B call LED – lights when channel B call is active
9 Ch-B talk LED – lights when intercom channel B talk is active
10 Ch-B talk button – talk to all on intercom channel B
Press and hold while talking, or tap to latch on
11 Ch-B volume control – adjusts channel B volume level
12 Intercom cable receptacle – 3-pin XLR female
13 Intercom cable loop-thru – 3-pin XLR male
14 Program audio level control – adjusts program audio input level
15 Program audio input – 3.5mm balanced input jack
Note: Does not work with stereo audio
16 Headset cable receptacle – 4-pin XLR male
DIP Switch and Side-Tone adjustments
1
Swivel belt clip and slide it up and down to expose
DIP switch and sidetone adjustment.
DIP Switch
Side-Tone A and Side-Tone B
Use small, flat-blade screwdriver to
adjust screws inside holes.
DIP Switch Settings
Loosen slotted screw inside keyhole in belt clip, on
back of beltpack.
NOTE: It is not necessary to completely remove
the belt clip to change DIP switch settings.
Mic Type
* = defaults
* ON = Dynamic
OFF = Electret
2
Headset Output Level
ON = High
* OFF = Low
3
Min Volume, Ch-A
* ON = Mute at min level
OFF = Not silent at min level
4
LEDs On/Off
* ON = LEDs normal operation
OFF = All LEDs dark
5
Call-on Talk Enable, Ch-A
ON = Call occurs when talk on
* OFF = No call when talk on
6
Talk Latch Enable, Ch-A
* ON = Latch enabled
OFF = Latch disabled
7
Min Volume, Ch-B
* ON = Silent at min level
OFF = Not silent at min level
8
RTS/Clear-Com Select (RS-703 only)
ON = RTS compatible
(use if connecting to a standard RTS line)
* OFF = Clear-Com compatible
9
Call-on Talk Enable, Ch-B
ON = Call occurs when talk on
* OFF = No call when talk on
10 Talk Latch Enable, Ch-B
* ON = Latch enabled
OFF = Latch disabled
Connector Pins
RS-702
RS-703
Headset connector pins
Headset connector pins
1 Mic− / DC−
1 Mic− / DC−
2 Mic+
2 Mic+
3 Spkr−
3 Spkr−
4 Spkr+ / DC+ (15V nom 20mA)
4 Spkr+ / DC+ (15V nom 20mA)
Intercom connector pins
Intercom connector pins
1 Common
2 Power
(15V-30V)
3 Ch-B Audio
4 Ch-A Audio
5 & 6 Program Audio (balanced)
1 Common
TRS Jack
Tip and Ring =
Program Audio
(balanced)
Tip
Sleeve = Ground
Sleeve
Ring
NOTE: Does not work
with stereo audio
2 Power
(15V-30V)
+Ch-A Audio
3 Ch-B Audio
Note: Does not work with stereo audio
The Clear-Com product that you have purchased is covered by the Clear-Com Standard Limited Warranty, the terms and conditions of
which can be found at www.clearcom.com/support/warranty-support-policies.
We encourage you to review the Standard Limited Warranty to determine its coverage, exclusions from coverage and duration.
EXCEPT AS SET FORTH IN THE STANDARD LIMITED WARRANTY, CLEAR-COM MAKES NO WARRANTIES REGARDING THE
PRODUCT, EXPRESS, IMPLIED OR STATUTORY, INCLUDING WITHOUT LIMITATION ANY WARRANTIES OF
MERCHANTABILITY, NONINFRINGEMENT OF THIRD PARTY RIGHTS, OR FITNESS FOR A PARTICULAR PURPOSE, ALL OF
WHICH ARE EXPRESSLY DISCLAIMED.
For your own records, complete the following information:
_____________________________________________________________________________________________________________
Serial number
Purchase date
Reseller
FCC Regulation
This device complies with Part 15 of the FCC rules. Operation is subject to the following two conditions: (1) This device may not cause hrmful
interference, and (2) This device must accept any interference received, including interference that may cause undesired operation.
Waste Electrical and Electronic Equipment (WEEE)
The European Union (EU) WEEE Directive (2002/96/EC) places an obligation on producers (manufacturers, distributors and/or retailers) to takeback electronic products at the end of their useful life. The WEEE Directive covers most HME products being sold into the EU as of August 13, 2005.
Manufacturers, distributors and retailers are obliged to finance the costs of recovery from municipal collection points, reuse, and recycling of
specified percentages per the WEEE requirements.
Instructions for Disposal of WEEE by Users in the European Union
The symbol shown below is on the product or on its packaging which indicates that this product was put on the market after August 13, 2005 and must not be
disposed of with other waste. Instead, it is the user’s responsibility to dispose of the user’s waste equipment by handing it over to a designated collection point
for the recycling of WEEE. The separate collection and recycling of waste equipment at the time of disposal will help to conserve natural resources and ensure
that it is recycled in a manner that protects human health and the environment. For more information about where you can drop off your waste equipment for
recycling, please contact your local authority, your household waste disposal service or the seller from whom you purchased the product.