1
Integrity Instruments 485–PLG User Manual
INTRODUCTION
The 485-PLG mates to our line of rs-485 products. It is designed to attach directly to the
terminal strip of the unit via the header connector pins. RS-485 connections and power
are then made by plug connectors to all units on the rs-485 multi drop link. This reduces
field wiring time and makes any field de-bugging simple and easy. Future additional units
can easily be inserted into the system by just plugging them in, no messy re-wiring.
Physical properties
Power connector
Modular plug
2.5mm center positive
6-4 modular plug
amp/TYCO electronics 5-641335-3
or equivalent.
.025 inch square pins
Header connector
Schematic
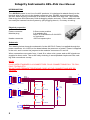
The drawing below shows the schematic for the 485-PLG. Power is supplied through the
power connector J4. A LED on the board shows the presence of power. Power is supplied
to the unit, and is routed via jumpers to the modular connectors J1 and J2.
When connections are made from J1 and J2 to other units, power and rs-485 signals are
supplied to those units. The rs-485 daisy chaining is accomplished simple and fast, making field connections a snap.
NOTE:
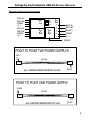
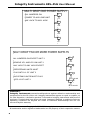
PLUG USES STANDARD 6-4 CONNECTORS. PLUG CONNECTIONS PIN 1 TO PIN 1,
PIN 2 TO PIN 2 ETC.
DO NOT USE PREMADE TELEPHONE CORD AS THE CONNECTIONS ARE REVERSED.
J1
1
2
3
4
5
6
6 PIN RJ11
J2
1
2
3
4
5
6
J3
J1
SIG A
SIG B
GND
V+
1
2
3
4
SIG A
SIG B
GND
V+
4 PIN RJ11
JP1
D1
LED
1
2
3
4
SIG A
SIG B
GND
V+
4 PIN RJ11
J4
3
2
1
V+
GND
POWER JACK 2.5MM
JUMPER
JUMPER
JP3
JP4
JUMPER
JUMPER
1
2
3
4
5
5 PIN HEADER
JP2
J2
SIG A
SIG B
GND
V+
6 PIN RJ11
2
SIG A
SIG B
SHIELD
GND
V+
R1
1.2K