1
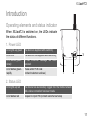
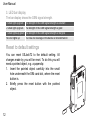
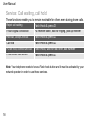
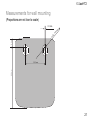
XSJack T2
®
User Manual
Version 1.1
User Manual
XSJack®T2
Welcome
Thank you for choosing our product XSJackT2.
The compact XSJackT2 is suitable for permanent wall mounting or can be placed
on a flat surface.
This manual will help you to easily understand the possibilities and functions that
XSJackT2 has to offer.
Scope of delivery
Your XSJack T2 package contains:
■ 1 XSJackT2 with 2 RJ-11 connectors
■ 1 power supply with connection cable to connect to the mains supply
■ 2 GSM antennas
■ 1 user manual
3
User Manual
Guidelines for Safe and Efficient Use
These instructions are intended for your safety. If the product has been subject
to any of these conditions or if you have any doubt, make sure you have the
product checked by a certified service person before charging or using it. Failure
to do so may result in product malfunction or a potential hazard to your health.
Please observe the following instructions when handling and using XSJackT2 to
prevent damage to yourself and to the device:
■ XSJackT2 is a device which is designed for use only in heated and dry
places. It may not be exposed to either fire or flames and may not be
used in areas with a potentially explosive atmosphere.
■ The device may not be mounted or set up in a place which is exposed to
direct sunlight or direct heat impact. The slits and vents serve to ventilate
the device. These vents should not be covered. The device must not
come into contact with liquids, as this could lead to electric shocks, shortcircuits or amongst other things destruction of the device.
■ Do not open the housing of XSJackT2. This could lead to damage for the
user and for the device.
■ Do not switch on where wireless phone use is prohibited or when it may
cause interference or danger.
4
XSJack®T2
■ Dispose of XSJackT2 according to legal regulations. Current disposal
guidelines for electrical devices are available at every recycling centre.
(see also “Disposal information” on page 23)
■ All wireless devices may be susceptible to interference, which could
affect performance.
■ Do not operate the device in the vicinity of medical equipment to avoid
interference.
■ Use sensibly. Use only as explained in the product manual. Do not touch
the antenna unnecessarily.
■ Only qualified personnel may repair this equipment.
■ Use only approved enhancements and batteries. Do not connect incompatible products.
■ The device is not water resistant. Do not paint.
■ Before cleaning or maintaining the device, turn off and disconnect from
power as you may be susceptible to electric shock or short circuiting the
device. Do not use chemical detergent powder or chemical agent.
■ Do not place magnetic storage media such as magnetic cards and floppy
disks near the device. Information stored on them may be erased.
■ Keep the device and charger out of reach of children.
5
User Manual
Medical Equipment
Operation of any radio transmitting equipment, including wireless phones, may
interfere with the functionality of inadequately protected medical devices. Consult a physician or the manufacturer of the medical device to ensure that they are
adequately shielded from external RF Energy or if you have any questions.
Hearing Aids
Some digital wireless devices may interfere with some hearing aids. If interference occurs, please contact your hearing aid provider or physician.
Implanted Medical Devices
Manufacturers of medical devices recommend a minimum separation of 15 centimetres should be maintained between a wireless device and an implanted
medical device such as a pacemaker or implanted defibrillator to avoid potential
interference with the medical device. If you have any questions about using your
wireless device with an implanted medical device, please consult your physician
or health care provider.
6
XSJack®T2
Emergency Calls
Wireless devices operate using radio signals and wireless networks. Connections in all conditions cannot be guaranteed. You should not rely on any wireless
device for essential communications such as medical emergencies. Give your
location.
Separation Distance
This device should be operated with separation distance of 20 cm from the body
at all times.
7
User Manual
8
XSJack®T2
Table of Contents
Welcome
Scope of delivery
Guidelines for Safe and Efficient Use
Medical Equipment
Hearing Aids
Implanted Medical Devices
Emergency Calls
Separation Distance
3
3
4
6
6
6
7
7
Table of Contents
Introduction
9
11
Operating elements and status indicator
Reset to default settings
11
12
First Steps
13
Step 1 - Insert the SIM card
Step 2 - Connect the external antenna
Step 3 - Connecting electricity
Step 4 - Connecting telephone
13
14
14
14
9
User Manual
10
Telephoning
15
Emergency calls
When making a call
Caller Identification (caller ID)
Service: Call forwarding (CF)
Service: Call waiting, call hold
Service: Voicemail
15
15
16
16
18
19
Appendix
20
Technical Data
Measurements for wall mounting
FAQ
Declaration of conformity
Disposal information
20
21
22
23
23
XSJack®T2
Introduction
Operating elements and status indicator
When XSJackT2 is switched on, the LEDs indicate
the status of different functions.
1. Power LED
LED lights up green
The device is supplied with electricity
LED is off
The device is not supplied with electricity
LED flashes green slowly
A new voicemail message has been
received.
LED flashes green rapidly
Please enter PUK code
(contact customer services)
3
1
2
2. Status LED
LED lights up red
The device has successfully logged into the mobile network
and a voice connection has been made.
LED flashes red
Request to input PIN (contact customer services)
11
User Manual
3. LED bar display
The bar display shows the GSM signal strength.
3 LEDs light up green
The strength of the GSM signal strength is excellent
2 LEDs light up green
The strength of the GSM signal strength is good
1 LEDs lights up green The strength of the GSM signal strength is marginal
No LED lights up
You have no coverage or the device is not switched on
Reset to default settings
You can reset XSJackT2 to the default setting. All
changes made by you will be reset. To do this you will
need a pointed object, e.g. a paperclip:
1. Insert the pointed object carefully into the small
hole underneath the SIM card slot, where the reset
button is.
2. Briefly press the reset button with the pointed
object.
12
XSJack®T2
First Steps
The XSJackT2 should be placed in a suitable place which fulfils the following criteria:
■ Ensure reception is good using the signal indicator.
■ The place must be dry and free of dirt with no exposure to direct sunlight.
■ Ensure sufficient distance to potential interference sources such as
microwaves or electrical devices with metal housing.
■ You can mount the XSJackT2 on the wall. A drill template can be found at the
end of this manual (see also “Measurements for wall mounting” on page 21).
■ If you need a stronger signal, replace antenna with the additional
extended antenna provided.
Step 1 - Insert the SIM card
The SIM card should be inserted into the SIM card slot on the
side of the device until it locks into place.
Ensure that the power is not connected when you insert or
remove the SIM card.
Point the SIM card contacts to the base of the housing, insert
the SIM card into the card slot with the slanted corner first.
When the SIM card is provisioned it is coded so that it can
only be used in the XSJackT2 device. The SIM card cannot be
used in a mobile phone.
13
User Manual
Step 2 - Connect the external antenna
The high performance antenna supplied is necessary to
achieve good transmission and reception. Please screw the
antenna connector to the antenna connection. Use extended
antenna if required.
Step 3 - Connecting electricity
Use only the power supply supplied.
■ Connect the power supply to the XSJackT2.
■ Plug the power supply into a mains socket.
Step 4 - Connecting telephone
■ Connect the telephone cable from the
XSJackT2 device to the telephone.
Note: The telephone which is to be connected to the
XSJackT2 must support dual tone multi-frequency
(DTMF). Modems cannot be connected to XSJackT2.
For proper operation the maximum connecting cord
length between phone and XSJackT2 should be between 1 and 3 metres.
14
XSJack®T2
Telephoning
You can immediately make calls once a telephone is connected to the XSJackT2
and the SIM card is activated.
Pick up the telephone receiver. The device checks the strength of the GSM signal. The signal strength is shown by three LEDs on the front of the XSJackT2.
You can hear the dial tone if the connection is good.
Enter the desired telephone number using all 9 digits, including the area codes
even for a local call (e.g.: 09, 07, 04 and 03). Once a telephone number is
entered, the connection is made automatically after a 4 second pause. This is
due to technical reasons and could take some getting used to.
Note: The telephone which is to be connected to the XSJackT2 must support dual tone
multi-frequency (DTMF)
Emergency calls
You can make emergency calls at all times even when the SIM card is barred.
When making a call
Please add in the area code at all times, even when making a local call
Local call
Dial area code, e.g. 03, 04, 06, 07 and 09.
National call Dial area code, e.g. 03, 04, 06, 07 and 09.
15
User Manual
Caller Identification (caller ID)
Incoming calls
You can see the telephone number of the caller on the display of your telephone
with the call number indicator and providing the telephone is equipped appropriately (CLIP capable and display). The precondition for this is that the caller has
not suppressed his ID.
Service: Call forwarding (CF)
Call Customer Care to get call forwarding set up. It is an option available to you
and is a chargeable service. Standard GSM call forwarding services can be set
up on your device.
All in-coming calls can be automatically forwarded to a connection of your
choice. You have the following options:
CF-immediate: immediately
CF-20: after 20 seconds
CF-busy: should the line be busy
CF-device switched off: when your XSJackT2 is switched off
16
XSJack®T2
All numbers are permitted when entering the desired number to activate call forwarding.
Note: Should CF immediate be activated on your connection, then you will hear a special
dial tone. The versions CF-20, CF-busy and CF-device switched off can be activated
simultaneously - each to a different number.
CF-immediate has priority over the other three versions and cannot be overwritten by one of the other three versions. In order to switch on another CF after
activating CF-immediate, first deactivate CF-immediate and then switch on the
new CF.
.
Call Forward Type
Activating
CF-immediate
*21*, desired number, #
CF-20
*61*, desired number, #
CF-busy
*67*, desired number, #
CF-device switched off *62*, desired number, #
Deactivate all CFs
Deactivating
#21#
#61#
#67#
#62#
#22#
17
User Manual
Service: Call waiting, call hold
These functions enable you to remain reachable for others even during phone calls.
Reject call waiting
Flash-Hook & press 0
Finish original connection
Put receiver down, wait for ringing, pick up receiver
Hold call, accept 2nd call
Flash-Hook & press 2
Call hold
Put on hold, connect 2nd call
Finish active connection
Flash-Hook & press 2
Flash-Hook, wait for dial tone, dial number
Flash-Hook & press 1
Note: Your telephone needs to have a Flash-hook button and it must be activated by your
network operator in order to use these services.
18
XSJack®T2
Service: Voicemail
Voicemail is set up so that a call will divert to voicemail after ringing for 20 seconds.
If you are already on a call, and receive a second call, you have 20 seconds to
react to a call waiting before the caller is diverted to voicemail. Once you have
put the receiver down and should the caller still be on the line, then a ringing
sound is heard to remind you of an active call waiting.
You will know that a message has been received when the power LED flashes
green. The dial tone changes also when a message is waiting to 2 tones.
If you use your own answer machine, set your answer machine to go to voicemail in less than 20 seconds (approx. 6 rings) and contact your service provider
to decommission the voicemail via the network.
To call voicemail: just call 707 and follow the voice prompts.
19
User Manual
Appendix
Technical Data
Frequency band
Security
GSM-Modem
Antenna
Connections
Operating
environment
Box
Energy
requirements
Standards
supported
20
GSM-Dualband 900/1800 MHz
GSM Compatible, GSM phase 2/2+
Automatic self-diagnosis (watchdog)
Factory Default Fallback for hardware and software reset
Triple Rate Code for HR, FR, EFR
Echo Cancellation
Noise Reduction Processor
AMR Narrow-band Codes
GSM
SIM-Slot,
RJ-11-Jacks for DTMF-analogue telephone,
SMA jack for antenna
Working temperature: 0° to 40°C
Humidity: 10 % to 70 %
Housing measurements (W x D x H): 80 x 30 x 90 mm
Weight: 200 g
Operating voltage: 220–230 V/50 Hz
Maximum power consumption: 6 W
Average power consumption: 4,5 W
European CE
GCF Type Approval
NZ approval
XSJack®T2
Measurements for wall mounting
(Proportions are not true to scale)
3.5 mm
.0
.7
mm
13.0 mm
x
ma
80.0 mm
50.0 mm
21
User Manual
FAQ
LEDs do not light up
Your telephone does not have
an Flash-hook key
Status LED flashes red
Power LED flashes green rapidly
Power LED flashes green slowly
No dial tone
Check power supply between mains socket
and XSJackT2.
Use a different telephone or you will have to do
without the functions which need an Flash-hook key
Call customer service.
Call customer service.
You have a new Voicemail Message waiting
Check the telephone connection to your
XSJackT2; check the status of XSJackT2.
You have a new voicemail message waiting
Dial tone is interrupted with
background beep.
Strange dial tone can be heard Call forward (CF) is activated.
Can I make emergency calls Yes, you can dial 111, even if barred.
when the connection is barred?
22
XSJack®T2
Declaration of conformity
4G Systems GmbH declares herewith, that XSJackT2 fulfils the basic
requirements in accordance with EN 301 511 (R&TTE Regulatory Radio
Testing), EN 301 489 - 1, EN 301 489 - 7 (EMC testing), EN 60950 (Safety
Testing) and other relevant provisions of the Directive 1999/5/EC. A copy
of the original CE declaration of conformity can be found under the following internet address: http://www.4g-systems.com
Disposal information
The logo (
) for this law on this device or the packaging indicates that this product may
not be disposed of in the household waste system. You are responsible for ensuring that
all electronic and electrical waste is disposed of via the appropriate facilities, e.g. recycling depots. Separate collection and correct processing of your electronic and electrical
waste helps to conserve our natural resources. Furthermore, the correct disposal of electronic and electrical waste protects you and your environment. For more information
about the disposal of electronic and electrical waste, please contact local authorities such
as the city council, the waste disposal services, the shop in which you purchased the
device or the manufacturer of the device.
23
Copyright © 2007 4G Systems GmbH. All rights reserved worldwide. (Doc. Number: 4601.000011.02)
This document and the related software are property of 4G Systems GmbH or its suppliers and protected by copyright and other laws. They are distributed under licenses restricting their use, copying,
distribution, and decompilation. Neither receipt nor possession of this document confers or transfers
any right to reproduce or disclose any part of the contents hereof. No part of this document may be
reproduced in any form by any means without prior written authorization of 4G Systems GmbH.
Moreover, the regulations of the software license agreement apply to this documentation. All brand
names and trademarks mentioned are the property of their respective owners.
http://www.4g-systems.com