1
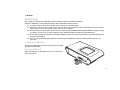
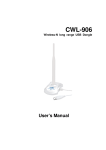
XSBox R4v ® user manual version 1.1 XSBoxR4v Welcome Discover the advantages of HSDPA and use the XSBoxR4v for high speed internet! Use mobile DSL speed to surf the internet, to read and write emails, for fast downloads or to access your company network anywhere where HSDPA is available. Connect one or more PCs or laptops to your XSBoxR4v - wireless using WLAN or via a network cable. You can connect an analogue telephone, thus making mobile telephony possible. The integrated firewall and the adjustable WLAN radio encryption make surfing safe. Speed Use HSDPA for mobile DSL speed to surf the internet on your PC or laptop. Flexibility XSBoxR4v enables you to set up internet access quickly and easily from the most diverse places - at home, in the office or on the road; a power source is all you need. Mobile project teams can thus set up their usual network environment anywhere. Networking The XSBoxR4v is configured so that you can use internet access with several devices at the same time, such as laptop, PDA or PC. Furthermore it is possible to exchange data amongst the devices connected. Thus it is simple and safe to synchronise emails from your laptop to your PC, using either LAN or WLAN - the XSBoxR4v is already prepared for this. All computers which are connected to the XSBoxR4v form a network and each computer can access the data and printers which are authorised in the network. Security The XSBoxR4v offers comprehensive security functions. On the one hand they are protected against attacks from the internet by the integrated firewall. On the other hand the XSBoxR4v offers comprehensive protection for the WLAN network. WEP, WPA1, WPA2 und WPA1+2 encryptions are available. Thus you have more flexibility to decide which protection is best for you (the particular support depends on your computer's WLAN interface). 3 User Manual Simple installation There are only a few steps involved in installing your XSBoxR4v, then you can start immediately: Insert your SIM card, connect to the power supply and enter your SIM card PIN number. Check the HSDPA/GPRS reception quality: six bars show excellent reception. Should you need to improve reception quality, then move the position of your XSBoxR4v. Enjoy surfing the internet! Flexible configuration The administration interface is the central contact point for the configuration of your XSBoxR4v. All you need to access the administration interface is a browser on your computer, no additional software needs to be installed. You can log on comfortably using the protected administration interface and change for example the security settings for WLAN or your IP address. Each configuration step is supported by a context sensitive help function. It is possible to reset the XSBoxR4v at anytime back to factory settings. All-in-one device XSBoxR4v is a real multi-talent. It unites a WLAN access point, a router/a bridge, a firewall, a DHCP server, a telephone connector and a HSDPA/GPRS modem in one device. Power consumption is approximately 5W. Scope of delivery ■ XSBoxR4v ■ Power supply with connecting cable for electricity network (220 - 230 V/50 Hz) ■ LAN cable (Length 3m) ■ CD Rom 4 XSBoxR4v Safety instructions Please observe the following instructions when handling and using XSBoxR4v to prevent damage to yourself and to the device. Switching on Do not switch on your XSBoxR4v in places where the use of mobile telephones and mobile radio devices is forbidden, where malfunctions or danger may occur. Power supply Use only the power supply supplied with your XSBoxR4v. Interference errors in mobile devices can occur, which could affect the connection performance and quality. Hospitals/ medical devices Please note all instructions and bans. Switch off your XSBoxR4v device when you are close to medical devices. The use of radio devices, including XSBoxR4v, could possibly interfere with the functionality of medical devices which are not sufficiently shielded. Contact a doctor or the medical device manufacturer to establish whether the device is sufficiently shielded against external high frequency energy. Switch off your device in health centres and hospitals. Please note further the relevant regulations in the institution. Hospitals or also other health institutions could possibly use devices which react sensitively to external high frequency energy. Hearing aids could possibly be affected by mobile devices. In the case of interference it is recommended to increase the distance between the hearing aid and XSBoxR4v. To avoid interference please follow the recommendations of each manufacturer of heart pacemakers. These recommendations are in agreement with the independent research and the recommendations of Wireless Technology Research. Persons with a pacemaker should: ■ always keep a distance of at least 20cm between XSBoxR4v and the pacemaker when XSBoxR4v is switched on and ■ switch off your XSBoxR4v immediately if you suppose that interference could happen. 5 User Manual Aeroplanes The device may not be used during flights in an aeroplane. Switch off the device before entering an aeroplane. Usage of mobile telecommunications devices on board can be dangerous for the operation of the aeroplane. Petrol stations Do not use the XSBoxR4v at petrol stations. Do not use the device near to fuel or chemicals. 6 XSBoxR4v Table of Contents Welcome Speed Flexibility Networking Security Simple installation Flexible configuration All-in-one device Scope of delivery Safety instructions Switching on Power supply Hospitals/ medical devices Persons with a pacemaker should: Aeroplanes Petrol stations Table of Contents Operating elements and connectors 3 3 3 3 3 4 4 4 4 5 5 5 5 5 6 6 7 11 LCD display Keys Reset key LAN connection Power supply 11 11 11 12 12 Instructions for use 13 General LAN cabling Wireless Local Area Network (WLAN) Administration interface DHCP server Initial setup Positioning XSBoxR4v 13 13 14 14 14 15 15 7 User Manual Inserting SIM card Connecting to power supply Initial setup only with telephone Activating SIM card Initial setup with PC and telephone Connecting PC/laptop to the XSBoxR4v Network setup Starting the setup assistant Setup assistant - Step 1 The setup assistant - Step 2 Setup assistant - Step 3 Setup assistant - Step 4 Access point setup (APN) SMS service centre setup Voicemail setup Network setup WLAN connection setup Step 1 - Configure WLAN connection Step 2 - Establish WLAN connection Step 3 - Deactivate proxy server Step 4 - Configure encryption for the XSBoxR4v Step 5 - Configure encryption for your computer LAN connection set-up Step 1 - Connect network cable Step 2 - Configure LAN connection Step 3 - Deactivate proxy server Administration Administration interface log-in Administration interface log-off Disconnecting from the internet Change password Change the SIM card PIN Unblock SIM card 8 15 16 16 16 17 17 17 17 17 18 18 19 19 19 20 21 21 22 22 23 23 24 25 25 25 26 27 27 27 27 28 28 28 XSBoxR4v Automatic disconnection Access point Configuration (APN) Time and date setup Rebooting XSBoxR4v Resetting factory settings Perform a self-test Firmware Update Exchange SIM card Security settings Basic protection through firewall Firewall rules Network Address Translation (NAT) Denial-of-Service attack (DoS) Limiting out-going services Additional protection with encryption WPA encryption WEP encryption Changing SSID Deactivating SSID transmission Controlling Access with the help of address filters Settings for experts Change fixed IP addresses Configure DHCP Server Dynamic IP addresses Static IP addresses Configure dynamic DNS Configure port forwarding Select WLAN channel Adjust WLAN Signal strength Diagnosis tools Status of the XSBoxR4v Tools Ping Diagnosis Trouble shooting 29 29 29 30 30 31 31 32 33 33 33 33 33 34 34 35 35 36 36 37 38 38 38 38 39 39 40 40 40 41 41 41 42 42 9 User Manual Delete temporary internet files Activate JavaScript in your browser Configure your computer to fetch dynamic IP addresses. Identifying your computer's IP address. Check whether the WLAN card is correctly installed on your computer. Telephoning Activate SIM card Unblocking SIM card Changing SIM card PIN Emergency call Caller identification Service: Call forward (CF)* Service: Call waiting, call hold, three party conference * SMS Centre Register "SMS mailbox" Register "write SMS " SMS Centre set-up Voicemail set-up Appendix Specification/Technical data Drilling measurements Information about conformity Disposal information 10 42 43 43 43 44 45 45 45 46 46 46 47 48 49 49 49 50 50 51 51 56 57 57 XSBoxR4v Operating elements and connectors LCD display 1. Bar indicators of network reception quality U or G The more bars shown, the better the reception. Boxes with black background show activity. 2. current time - shown in 24 hour format 3. current date in format: DD.MM.YYYY 4. Status indicator for local network connection to computer: WLAN or LAN 5. Status indicator for network availability and kind: G or U (G = GPRS/EDGE, U = UMTS/HSDPA) 6. Indication of SMS receipt Keys 1. This key serves to regulate the brightness of the display. 2. You can switch the device on and off here. 3. Use this key to manually establish or disconnect the online connection. Reset key When the XSBoxR4v is standing up, the reset key can be found in a small hole above the telephone jack. The following functions are available depending on how long the reset key is pressed for: ■ XSBoxR4v reboot (quick press) ~ ■ Reset factory settings (see also “Resetting factory settings” on page 30). 11 User Manual LAN connection The LAN connection serves to connect the XSBoxR4v to a PC/laptop by means of a network cable. The menu point 4 of the section LCD display described above shows the connection type between your XSBoxR4v and a connected PC/ laptop. In this case the box for LAN has a black background when both the XSBoxR4v and your computer are switched on. Power supply Put the smaller end of the power supply in this connector (the SIM card must be inserted before set-up). 12 XSBoxR4v Instructions for use General ■ XSBoxR4v is a device which is designed for use only in heated, dry and dust-free buildings. The device may not be mounted or set up in a place which is exposed to direct sunlight or direct heat impact. The slits and vents serve to ventilate the device. These vents should not be covered. The device should not come into contact with fire or flames and may not be used in areas with a potentially explosive atmosphere. ■ The device must not come into contact with liquids, as this could lead to electric shocks, short-circuits or destruction of the device. ■ Do not open the housing of XSBoxR4v. Warranty claims become void on unauthorised opening of the housing or improper repairs. In addition this could lead to damage for the user and for the device. ■ The device should not be installed during a thunder storm and should be disconnected from the electricity network. LAN cabling XSBoxR4v cabling can be extended without a problem. Cables in the appropriate length can be bought at computer trade shops. However please note the following instructions. ■ Use a so-called Cross-Link network cable 10BT with STP (Shielded Twisted Pair = shielded), should you wish to connect your computer directly to the XSBoxR4v without using a switch or hub. ■ Use a network cable 10BT, 1:1-wired and with STP (Shielded Twisted Pair = shielded), should you wish to operate the XSBoxR4v on a switch or hub. ■ Maximal cable length is 100 m. 13 User Manual Wireless Local Area Network (WLAN) Both WLAN standards IEEE 802.11b and IEEE 802.11g have been developed by the Institute of Electrical and Electronic Engineers (IEEE). The 802.11b technology can reach a transmission rate of up to 11 Mbit/s, 54 Mbit/s are possible with the 802.11g technology. The XSBoxR4v supports both standards. WLAN adapters, which are based on one of these standards can establish connections to XSBoxR4v. Coverage within WLAN depends very much on the WLAN adapter used as well as the structural conditions. WLAN devices with differing standards can establish a connection simultaneously and in parallel to the XSBoxR4v. XSBoxR4v has an internal WLAN antenna, which is not visible on the housing. Administration interface The XSBoxR4v administration interface can be reached with a browser. Enter this address in the address line of your browser: http://192.168.0.1. The browser must be JavaScript and CSS enabled (e.g. Microsoft Internet Explorer from version 5.5 or Mozilla Firefox). Note: Please configure your browser so that Javascript is enabled. DHCP server XSBoxR4v has its own DHCP server. This is activated in the factory settings. Every computer which is connected hereto will be allocated an IP address from the DHCP server. It is possible to allocate fixed IP addresses directly to the network set-up for computers, which are connected to the XSBoxR4v. The following IP addresses are reserved and may not be used, as the operating mode depends upon these: ■ 192.168.0.1 ■ 192.168.0.10 up to 192.168.0.200 Note: Should the XSBoxR4v be used in a network, then no other DHCP server should be operated in this network. 14 XSBoxR4v Initial setup It is possible to operate the XSBoxR4v with a PC/laptop and/or an analogue telephone. Setup the XSBoxR4v in an appropriate place, which fulfils the following criteria: ■ The place must be dry and free of dirt with no exposure to direct sunlight. ■ Should you wish to connect the device to your computer using a network cable, then please note the maximum cable length is 100m and choose a place close to your computer. ■ Place the device in central place in the office or at home with good HSDPA/UMTS/EDGE/GPRS coverage, should you wish to connect one or more computers using wireless WLAN connections to the XSBoxR4v. ■ Ensure there is enough distance to potential interference sources such as microwaves or electrical devices with a large metal housing. ■ You can use the drill template supplied to wall mount the XSBoxR4v (see also “Drilling measurements” on page 56). Positioning XSBoxR4v Position the XSBoxR4v as close to the window as possible. Reception is best there. Inserting SIM card Push the SIM card completely into the slot on the device base until it locks. 15 User Manual Connecting to power supply Always use only the original XSBoxR4v power supply. Other power supplies could damage or destroy the device. 4G Systems disclaims all liability if other power supplies are used. First place the small plug in the upper round port on the XSBoxR4v. Then insert the large plug in to the power outlet. Initialisation could take 60 - 90 seconds. Initial setup only with telephone Plug the telephone cable into the jack marked Phone on the XSBoxR4v. Status and error messages can be seen on the display of the XSBoxR4v. Activating SIM card 1.Pick up the telephone receiver. 2.Please enter PIN is shown on the display. And you can hear a peep tone in addition to the dial tone. 3.Press the # key, enter your PIN and confirm with the # key. 4.Should the PIN be correct, you will hear a confirmation tone and the time, date and network reception bars will appear on the display. Should the PIN be incorrect, you will hear a warning tone and the following information will appear on the display: Incorrect PIN. X more attempts. Note: Should the SIM card PIN be entered wrongly three times, then the SIM card will be blocked for your security. The SIM card can be unblocked by entering the PUK (Personal Unblocking Key). You will have received both the PIN and the PUK with your mobile contract (see also “Unblock SIM card” on page 28). 16 XSBoxR4v Initial setup with PC and telephone Connecting PC/laptop to the XSBoxR4v You have two possibilities: ■ LAN (Network cable). Plug one end of the network cable into the XSBoxR4v (the network jack is above the power jack). Plug then the other end of the cable into your PC or laptop. ■ WLAN (wireless). Note: You do not need to switch on your PC first in order to plug in the network cable. Network setup See the user manual for further details on setting-up a network on your computer of your operating system's help texts. (see also “Network setup” on page 21) Starting the setup assistant ■ Log on to the XSBoxR4v's administration interface. Enter the following address in your browser's address line: http://192.168.0.1 or use the log-in link on the CD supplied. ■ You will be requested to change your password the first time you log in to the administration interface. The user name is always admin and cannot be changed. Enter your new password in the fields marked new password and confirm new password and click OK. Setup assistant - Step 1 For the first initialisation, you need the PIN number for the SIM card which is inserted in the device. Your PIN is included in the personal documents received with your SIM card contract. Activate the SIM card. Enter the SIM card PIN number 17 User Manual in the fields marked Enter your PIN code and Repeat SIM card PIN code. Click on Continue. Note: The SIM card automatically chooses the fastest available network connection. The PIN remains stored in the XSBoxR4v. Should you exchange the SIM card, then you must enter the new PIN. The setup assistant - Step 2 ■ Mobile interface activated Once you have activated the mobile interface: automatic, the device will in future automatically connect to the internet/intranet when the PC/laptop is booted. ■ Disconnect on inactivity Should you not use the online connection during the time preset, then the connection will be disconnected to save cost. Setup assistant - Step 3 It is very important that the encryption for your network is activated, as it is otherwise not protected against misuse. Unexpected cost could arise for you as a result. ■ WLAN network name (SSID) The SSID is the name with which the device identifies itself in the wireless network. You can then select this name on your computer to be connected to the device. ■ SSID Broadcast The device usually sends its SSID to offer itself to client computers. It is possible to switch this off to increase security. In this case, the SSID known to you must then be entered manually on the client computer. ■ Encryption It is imperative to encrypt WLAN data traffic, in order to avoid third parties connecting to your device via WLAN or tapping into your data traffic. The safest methods are in this order: WPA 1+2, WPA 1, WEP 128 Bit, WEP 64 Bit. You should set-up the safest method supported by your computer. Incidentally the current Windows and Mac OS versions support both WPA 1+2. For simple access the XSBoxR4v is delivered from the factory without encryption. 18 XSBoxR4v ■ Key You still need to choose a key once you have decided which encryption to use. When using WPA method, you can register either a password (e.g.mustermann) or a hexadecimal string as the key. Note: You should activate the WPA1+2 encryption in order to guarantee the highest possible protection. Furthermore we warn you of the fact that an unencrypted connection can create high cost as anyone from outside can use your network. Setup assistant - Step 4 Security level The security level enables you to decide in favour of a certain pre-set security configuration. These configurations have a bearing on which type of data traffic the device allows, e.g. WWW or FTP services, Email etc. Should you need a detailed configuration of these security settings, then you can later extend the selected basic settings in the menu security (see also “Security settings” on page 33). Note: Should the PIN query on your SIM card be deactivated, please highlight the field ignore PIN/SIM error and do not enter anything under "set-up assistant - step 1" on page 18. Click then on the button finish. Note: Once you have activated the encryption in the setup assistant - Step 3, then you must configure the encryption in your operating system's control panel and continue from here (see also “Step 5 - Configure encryption for your computer” on page 24). Access point setup (APN) Administration interface >> Mobile >> Access point Enter the access point which you have received from your mobile operator in the field named HSDPA/UMTS/EDGE/ GPRS access point (APN). SMS service centre setup Administration interface >> SMS Centre >> SMS Settings Enter the telephone number of the service centre (SMS broadcast), which you have received from your mobile operator, in the field named SMS Service Centre Number. 19 User Manual Voicemail setup Administration interface >> SMS Centre >> Voicemail Enter your voicemail telephone number which you have received from your mobile operator in the field named Voicemail number. You have now finished configuring your XSBoxR4v. You can now close your browser to leave the administration interface or you can enter the desired web address in the address line of your browser to surf in the internet. The internet connection will automatically be disconnected should it not be used for a long time. You can see the HSDPA/UMTS/EDGE/GPRS connection status under Administration interface >> Status >> Mobile Note: Firmware Update: We are constantly further developing the XSBoxR4v and would like you to profit from these optimisations and new features. We suggest you check whether a new firmware update is available to be downloaded, then to download and install it at regular intervals (see also “Firmware Update” on page 31). 20 XSBoxR4v Network setup You can connect your PC/laptop to the XSBoxR4v either by using WLAN (wireless) or over a network cable. In this section you will find the following instructions: ■ Setting-up WLAN connection ■ Setting-up a LAN connection Please read the user documentation of the relevant manufacturer, should you use an operating system other than Microsoft Windows XPTM (Service Pack 2) or Microsoft Internet Explorer 5.5 or higher. WLAN connection setup The PC/laptop you wish to connect to must support either the WLAN standard IEEE 802.11b or IEEE 802.11g in order to connect to the XSBoxR4v over WLAN. Should your PC/laptop not support either of these standards, then you can extend your computer with an external WLAN adapter (e.g. based on USB) or with an internal WLAN plug-in card. The following steps are necessary in order to use a WLAN connection between your PC/laptop and the XSBoxR4v: 1. Configure WLAN connection 2. Establish WLAN connection 3. Deactivate proxy server 4. Configure encryption for the XSBoxR4v 5. Configure encryption for your PC/laptop Note: The following description for setting-up a WLAN connection is described here exemplarily for the WLAN-Adapter Intel® PRO/ Wireless 2200BG Network Connection. Should you use a different WLAN adapter or a WLAN card, then please read in addition the user documentation from the relevant manufacturer. 21 User Manual Step 1 - Configure WLAN connection START >> System control >> Network connections 1. 2. 3. 4. 5. 6. 7. 8. Click with the right-hand mouse button on wireless network connection and select the entry properties in the context menu. The dialogue Wireless network connection properties appears. Ensure that the control box Internet protocol (TCP/IP) is activated in the register General. Highlight the internet protocol (TCP/IP), and click on the button Properties. The dialogue Internet Protocol properties (TCP/IP) will appear. Activate the option field get IP address automatically in the General register (Standard setting) and click on the button OK. Click in the dialogue Wireless network connection properties on the button Close. you will then be requested to reboot the computer again if necessary. Step 2 - Establish WLAN connection START >> System control >> Network connections 1. 2. 3. 4. 22 Click with the right-hand mouse button on wireless network connection and select the entry Show available wireless networks in the context menu. The dialogue Wireless network connection appears. Highlight the wireless network XSBoxR4v and click on the button connect. It will take approximately 10 seconds until the connection between your PC/laptop and the XSBoxR4v is established. XSBoxR4v Step 3 - Deactivate proxy server Internet Explorer >> Extras >> Internet options >> Connections If you use a proxy server to access the internet, please deactivate it. Note: The following description is described here exemplarily for the procedure in Microsoft Internet Explorer. Should you use a browser, then please read the relevant user documentation. 1. 2. 3. Click on the button properties in the area LAN settings. The dialogue Properties for local network (LAN) appears. Deactivate the following control boxes: ■ Automatic setting search 4. 5. In order to save the configuration, click on the button OK. Close the dialogue Internet options by clicking on the button OK. ■ Use proxy server for LAN. Step 4 - Configure encryption for the XSBoxR4v Administration interface >> Security >> Encryption (see also "Administration interface log-in" on page 27) Note: The WPA encryption should be favoured ahead of the WEP encryption. Thus the following description is exemplarily written for the configuration of WPA encryption. 1. 2. 3. Select the entry WPA1+2 from the selection list encryption mechanism. Activate the option field Pass phrase in the area WPA settings. Enter a user-defined string in the field Key or select one of the four generated keys. The string serves to dynamically create a WPA code (eg. mustermann). Caution! Please make note of the string entered. You will need this in the next step for configuring your PC/laptop. 4. Click on the button OK. The encryption is now activated for the XSBoxR4v, however not for your computer. Therefore the WLAN connection is disrupted between the devices. Your browser could show the message The document contains no data. 23 User Manual Step 5 - Configure encryption for your computer START >> System control >> Network connections 1. 2. 3. 4. 5. 6. 7. With the right-hand mouse button click on wireless network connections and select the entry Properties in the context menu. The dialogue Wireless network connection properties appears. Click on the register wireless networks. Highlight the entry XSBoxR4v in the area preferred networks and click on the button Properties. The dialogue XSBoxR4v properties appears. Carry out the following settings in this dialogue: ■ Select the entry WPA-PSK in the selection list Network authentication. ■ Select the entry AES in the selection list data encryption. ■ Enter the string in both the network key and confirm network key fields, as chosen in the previous step for encryption of the XSBoxR4v. Click on the button OK. Click on the button close in the wireless network connection properties dialogue. Encryption for the XSBoxR4v and your computer is now activated. The WLAN connection between the devices will now be automatically established. Note: A double click on the encrypted wireless network XSBoxR4v could request you to enter your individual key. Further connection settings then take place automatically. 24 XSBoxR4v LAN connection setup The following steps are necessary to use a LAN connection between your PC/laptop and the XSBoxR4v: 1. Connect network cable 2. Configure LAN connection 3. Deactivate proxy server Step 1 - Connect network cable ■ Plug one of the network cable ends into the appropriate connector on your PC. ■ Plug the other end in to the jack marked LAN on the XSBoxR4v. Step 2 - Configure LAN connection START >> System control >> Network connections 1. 2. 3. 4. 5. 6. 7. 8. With the right-hand mouse button click on LAN connection and select the entry Properties in the context menu. The dialogue LAN connection properties appears. Ensure the control box Internet protocol (TCP/IP) is activated on the register General. Highlight Internet protocol (TCP/IP) and click on the button Properties. The dialogue Internet protocol properties (TCP/IP) appears. Activate the option field get IP address automatically in the General register (Standard setting) and click on the button OK. Click in the dialogue LAN connection properties and click on the button Close. You will then be requested to reboot the computer again if necessary. 25 User Manual Step 3 - Deactivate proxy server Internet Explorer >> Extras >> Internet options >> Connections Should you use a proxy server for internet access, please deactivate this. Note: The following description is described here exemplarily for the procedure in Microsoft Internet ExplorerTM. Should you use a different browser, then please read the relevant user documentation. 1. 2. 3. 4. 5. 6. 26 Click on the button properties in the area LAN settings. The dialogue Properties for local network (LAN) appears. Deactivate the control box: Use Proxy server for LAN Activate the control box: Automatic settings search In order to save the configuration, click on the button OK. Close the dialogue Internet options by clicking on the button OK. XSBoxR4v Administration The XSBoxR4v is configured and managed using the administration interface. No installation is necessary on your PC/ laptop in order to be able to work with the administration interface. All you need is a browser. Administration interface log-in You log-in to the XSBoxR4v's administration interface as follows: 1. Start your browser. 2. Enter http://192.168.0.1 into your browser's address line and confirm by pressing ENTER. Note: Should you have allocated another IP address for the XSBoxR4v, please enter this address here. 3. 4. You will be requested to change the password the first time you log in to the administration interface. The user name is admin and can not be changed. Enter your new password in the field marked New password and confirm new password and click OK. From now on you will log in with the user name admin and your new password. Note: The password may have a maximum of 50 characters. Please be aware of case sensitivity in password. For example "password" and "Password" are different passwords for the XSBoxR4v. Administration interface log-off Administration interface >> Simply close your browser to leave the administration interface. Disconnecting from the internet Administration interface >> You can disconnect from the internet at anytime simply by pressing the button disconnect, which can be found in the bottom of the status bar. 27 User Manual Change password Administration interface >> password You should change the password regularly in order to avoid unauthorised access to your device. 1. 1. Enter your current password in the field marked old password. 2. 2. Enter your new password in the field marked new password, confirm new password and click OK. Note: Please select your password carefully. The password should contain letters, numbers and special characters. It may be up to 50 characters long. Should you forget your password once it has been changed, then please reset the XSBoxR4v back to factory settings. Change the SIM card PIN Administration interface>> Mobile >> change PIN 1. 2. Enter the current PIN in the field marked PIN Code. Enter the new PIN in the fields marked New PIN Code and Confirm new PIN Code and click OK. Note: You must re-enter your PIN after the following actions: ■ exchanging SIM card inserted ■ installing new firmware ■ Changing inserted SIM card PIN ■ resetting XSBoxR4v back to factory settings Unblock SIM card Administration interface >> Mobile >> entering PUK 1. 2. 1. Enter your SIM card PUK in the fields marked PUK Code and Confirm PUK Code. 2. Enter the new PIN in the fields marked New PIN Code and Confirm new PIN Code and click OK Note: If you have entered your SIM card PIN incorrectly three times, then the SIM card will be blocked. You can remove the block by entering the PUK (Personal Unblocking Key) 28 XSBoxR4v Automatic disconnection Administration interface >> Mobile >> connection The XSBoxR4v is configured from the factory in such a way that the online connection must be established manually. You have however the possibility for the online connection to be established automatically. The connection will then be automatically disconnected after 8 minutes inactivity. (the automatic disconnection timing can be automatically adjusted to suit your needs). The session is considered inactive when e.g. no access to web sites takes place or no data traffic occurs. The connection is then automatically re-established as soon as activity occurs: ■ Enter the time span after which inactivity the connection should be automatically disconnected in the field marked disconnect after not being used (maximum 999 minutes, 0 minutes = continuous connection) and click OK. Note: Should you use a programme on your PC/laptop which automatically establishes a connection to the internet in the background, then this is data traffic and the connection will not be disconnected. Additional cost can occur through this. It is recommended to switch off the internet connection if the internet is not being used. This makes it impossible also for programmes to connect to the internet in the background. The XSBoxR4v is configured from the factory in such a way that the internet connection manually requests the online connection on appropriate activity on your computer, (e.g.: should you call up a website in your browser). Access point Configuration (APN) Administration interface >> Mobile >> Access point You have access to the internet through the access point (APN = Access Point Name) of the XSBoxR4v. You can freely configure the access point: ■ Enter the identification of the new access point in the field marked HSDPA/UMTS/EDGE/GPRS access point (APN) (you received this information in the personal data from your mobile operator) and click OK. Time and date setup Administration interface >> Tools >> Time The XSBoxR4v stores the current time and the current date. You can manually enter the time and date or synchronise using the so-called Network Time Protocol (NTP). 29 User Manual Manually setting time and date: 1. 2. Enter the appropriate data in the fields marked Time and Date. Click on the button Manual time/date. Obtaining time and date automatically using NTP: 1. 2. 3. Enter the desired NTP server in the field marked Primary NTP Server and optionally in the field marked Secondary NTP Server. Click on the button change configuration. Click on the button Time query. Note: A connection to the internet will be established. Rebooting XSBoxR4v Administration interface >> Tools >> reboot ■ Click on the button reboot and after the security enquiry click OK. Note: Rebooting the XSBoxR4v takes approximately 60 seconds. Should you recall the administration interface then you must reenter your user name and password. Resetting factory settings You can reset the XSBoxR4v back to its factory settings (so-called reset). In doing so all user defined settings are deleted including the password for the administration interface. The reset function can be called up either using the administration interface or by holding down the reset button directly on the device for at least 5 seconds. Reset (Software) Administration interface >> Tools >> Reset 1. Click on the button start reset. 2. Confirm the following security enquiry by clicking the button OK. 3. The settings made by you for the XSBoxR4v will be deleted. The device will then be automatically rebooted. 30 XSBoxR4v Reset (Hardware) To reset the device you need a sharp implement, e.g. a paper clip. Insert the sharp implement carefully into the small hole found on the left hand side of the telephone jack when the device is horizontal. Press the rest button for at least 5 seconds with the sharp implement. Note: The reset takes approximately 60-90 seconds until the device reboots. Perform a self-test Administration interface >> Tools >> Diagnosis The XSBoxR4v can implement a self-test if necessary. This test checks primarily the establishment of the internet connection. Select the diagnosis method, the destination (computer name, IP Address or Internet address) and click the button Perform Test. Firmware Update Administration interface >> Tools >> Firmware Download the update file from http://www.4g-systems.com and store this on your PC/laptop. 1. Select the update file which you have downloaded by using the button search. You can also enter the path to the file location manually in the field. 2. Click on Start update and wait until the firmware update installation has finished. The XSBoxR4v will be automatically rebooted. Caution! The installation of the firmware update is a critical procedure. Ensure the update file is completely downloaded and is not damaged. In addition it is important that the XSBoxR4v is not switched off during the updates. Note: The firmware update installation resets the XSBoxR4v back to factory settings. All user defined settings (e.g. new password) are lost. 31 User Manual Exchange SIM card 1. 2. 3. 4. 5. 6. 7. 32 Unplug the power supply from the wall socket and from the device. The SIM card slot is on the base of the device. Move the SIM card sliding catch carefully to the right until the SIM card is released. Remove the SIM card. Insert the new SIM card. To do this move the SIM card slot catch carefully to the right and insert the SIM card in the slot. The SIM card contacts must face upwards, the SIM card must lock into place. Once the SIM card is completely inserted, the sliding slot catch is back in the same position as before. Plug the XSBoxR4v power supply into the wall socket and plug the small end into the XSBoxR4v's round Power input. Open the administration interface: Administration interface >> Mobile >> enter PIN Enter the PIN for the newly inserted SIM card in the fields marked PIN and Confirm PIN and click OK. XSBoxR4v Security settings Basic protection through firewall The XSBoxR4v is equipped with a firewall and is configured from the factory so that a basic protection for your data is given even whilst connecting your PC/laptop. It prevents internet access to the XSBoxR4v and thus to your PC/laptop. You can deactivate the XSBoxR4v's firewall if necessary. (Administration interface >> Security >> Firewall). The port forwarding is determined through firewall rules internally in the system. Firewall rules Administration interface >> Security >> Firewall The XSBoxR4v's firewall is rule-based. He rules determine the incoming and outgoing data flow. Basically the firewall is thus configured that unauthorised incoming data connections from the internet are blocked and outgoing data connections to the internet are allowed. This configuration enables free navigation on web sites. Caution! These basic security settings do not guarantee connection protection between the XSBoxR4v and your PC/laptop. This is especially important if you use a WLAN connection. Network Address Translation (NAT) The XSBoxR4v supports NAT. NAT describes the decoupling of the public IP address and the private IP address range. All PCs/laptops in your network can together use one public IP address through NAT. This IP address is allocated to the XSBoxR4v over the network. It is the only IP address which is visible for third parties outside of your network. (e.g. in internet). The local IP addresses, which the XSBoxR4v's DHCP server allocates to the computers in your network remain private and cannot be reached from the internet. Thus they are protected from external attacks. Denial-of-Service attack (DoS) DoS attacks flood your network with more enquiries than it can deal with. Even though this kind of attack cannot damage your PCs/laptops, such DoS attacks still lead to network operation slowdown or stop. The XSBoxR4v automatically blocks the attacks. You need not set-up any firewall rules for incoming data traffic. 33 User Manual Limiting out-going services Firewall factory settings are configured so that all out-going services are allowed. You can however configure it in such a way that only certain out-going services are activated. Service which are not specified can then not be used by your network users. This is how to limit out-going services: 1. Activate next to Services the option field Allow the following outgoing services. 2. Click on the button Add service. 3. Describe the service you wish to activate in the fields marked Name, Type, Start Port and End Port. 4. Click on the button OK. 5. Add further services in this way to the list if desired. 6. Click on the button OK. Additional protection with encryption Your data is transmitted in plain text in computer networks if it is not encrypted. This does not depend whether you use a LAN or a WLAN connection. Anyone who has access to your network can read and manipulate these data files. You can minimise this security risk by using encryption software. Your data files are then automatically transformed into an indecipherable form. The XSBoxR4v supports two encryption types for WLAN connections: ■ WPA (WiFi Protected Access) ■ WEP (Wired Equivalent Privacy) Note: If your PC/laptop supports die WPA encryption (eg. WPA1, WPA2, WPA1+2), then this should be preferred over WEP encryption. If you are not sure which standards your PC/laptop supports then please contact your computer manufacturer. In addition the XSBoxR4v offers you the following possibilities to increase the security of your WLAN access: ■ Change the SSID ■ Deactivate the SSID transmission ■ Access control over MAC addresses 34 XSBoxR4v WPA encryption Administration interface >> Security >> Encryption WPA encryption protects your network from unauthorised access. It works in a similar way to WEP encryption, however it has dynamic encryption keys which change. To configure WPA encryption you can choose between WPA1, WPA2 and WPA1+2. In general WPA1+2 are to be preferred: 1. Enter any string in the field marked key (e.g. mustermann). 2. Click on the button OK. The WLAN connection to the XSBoxR4v is disconnected. The list of available wireless network connections already shows, that it is a WPA encrypted wireless network. 3. Reconnect to your PC/laptop using WLAN and enter the key generated in your PC/laptop. WEP encryption Administration interface >> Security >> Encryption WEP encryption arranges for a key to be generated which is disclosed to all network participants and which is used for data encryption and decryption. The encryption code should be regularly changed in order for WEP effeciency to be retained. This is how to configure WEP encryption: 1. Select the entry WEP 152 from the selection list Encryption mechanism. 2. This is the highest security level for WEP, which allows the most secure encryption. Enter any string in the field marked Pass phrase (e.g. mustermann). The pass phrase serves to generate a WEP key automatically. The string entered may be up to 31 characters long and may not include space characters. 3. Click on the button Create key. Your pass phrase will be converted hexadecimal. The length of the key generated depends on the security level: ■ WEP 64: 10 characters ■ WEP 128: 26 characters ■ WEP 152: 31 characters 35 User Manual 4. 5. Make note of the key generated and click on the button OK. The WLAN connection to the XSBoxR4v is disconnected. The list of available wireless network connections already shows, that it is a WEP encrypted wireless network. Reconnect to your PC/laptop using WLAN and enter the key generated in your PC/laptop. Changing SSID Administration interface >> WLAN >> Connection The SSID (Service Set Identifier) is the XSBoxR4v's WLAN network identification. From the factory the SSID is XSBoxR4v. You should change the SSID in order to avoid mix up between boxes which use the same SSID and are placed nearby each other. Changing the SSID means you avoid accidentally connecting to an XSBoxR4v close-by. How to change the SSID: 1. Enter the desired identification in the field marked SSID. The SSID may be up to 31 characters long; it can contain letters and numbers. The SSID is case sensitive. 2. Make a note of the SSID and click on the button OK. The WLAN connection to the XSBoxR4v is disconnected. The new SSID is shown in the list of available wireless network connections. Deactivating SSID transmission Administration interface >> WLAN >> Connection By default the XSBoxR4v transmits the SSID. This means the WLAN network is easy to find on the computer in order to connect to it. You can however switch off the SSID transmission if you know the XSBoxR4v's SSID and you don't want it to be visible for other users. Caution! Deactivate the SSID transmission only then when you have already been successful in establishing a connection between the XSBoxR4v and your computer. Deactivation should be the last step planned. How to deactivate the SSID transmission: 1. 1. Activate the option field Off next to SSID Broadcast 2. 2. Click on the button OK. The WLAN connection to the XSBoxR4v could be disrupted. In this case enter the SSID known to you in the field marked SSID. 36 XSBoxR4v Controlling Access with the help of address filters Administration interface >> Security >> WLAN address filter Each PC/laptop, which is connected to the XSBoxR4v over the WLAN interface or over LAN, has a clear MAC address (Media Access Control); these addresses are defined by the device manufacturer. You can control the access of devices to the WLAN network of the XSBoxR4v by adding the relevant MAC address to the filter lists. You need the MAC addresses of the computers connected in order to compile filter lists. These are usually found on a sticker on the built-in WLAN card. If in doubt contact your PC/laptop manufacturer. How to control access using filter lists: 1. If you wish to allow or refuse the computer access, then activate the option field marked Allowed adresses or Blocked Addresses next to Active Filter lists. 2. Click on Add address. Enter the Computer MAC Address for which you would like to allow or refuse access. 3. Click on the button OK. 4. The MAC address will be added to the appropriate filter list. 5. Add further MAC addresses to the filter lists in this way if desired. 37 User Manual Settings for experts This section and the configuration possibilities described herein are directed at network administrators. Changing fixed IP addresses. You can change the fixed IP address of the XSBoxR4v, which is used for access over LAN or WLAN. Factory setting for the IP address is 192.168.0.1. Change fixed IP addresses Administration interface >> IP address 1. Activate the option field Static next to Address. 2. Enter the desired configuration in the fields IP Address, IP Subnetwork mask and IP Broadcast Address. 3. Click on the button OK. The connection to the XSBoxR4v's administration interface is disrupted as the IP address has changed. Should you wish to access the administration interface in future, then you must enter the new IP address in your browser's address line. Note: Please be aware that the IP address area of the DCHP server is automatically changed when the static IP address is changed. This takes place to avoid IP address conflicts. Configure DHCP Server The XSBoxR4v contains an integrated DHCP server. This server dynamically allocates an IP address to computers connected to the network. The IP address area of the DHCP server has the factory settings 192.168.0.1 to 192.168.0.200. You can change the DHCP server IP address range or switch off the DHCP server. Furthermore you can configure the DHCP server so that certain computers which are connected to the XSBoxR4v are always allocated the same IP address. This is useful for example if you wish to address this computer using the IP address. Dynamic IP addresses Administration interface >> DHCP Server >> Dynamic Addresses 1. Highlight the desired entry and click on edit or, should you wish to create a dynamic address area then Add. 2. Enter the desired IP addresses in the fields marked IP range. 3. Click on the button OK. The connection to the XSBoxR4v's administration interface is disrupted. 4. Please enter the new IP address in your browser's address line. 38 XSBoxR4v Static IP addresses Administration interface >> DHCP Server >> Static addresses 1. 2. 3. 4. Click on the button Add. Enter the MAC address of the computer connected to the XSBoxR4v in the field marked MAC Address, to which you would like to allocate a static IP address. Enter the last numbers of the IP address which you would like to allocate to the computer in the field marked give IP address. The first part of the IP address which you allocate is pre-set by the XSBoxR4v's IP address, as IP addresses must derive from the same address range. Click on the button OK. You can change the given static IP address. Highlight the appropriate entry in the list and click on the button Edit. In order to delete a given IP address, highlight the relevant entry in the list and click on the button Delete. Configure dynamic DNS Administration interface >> Tools >> DynDNS You can configure the service DynDNS with the XSBoxR4v. You can select a domain name and DynDNS assigns this name to the allocated dynamic HSDPA/UMTS/EDGE/GPRS IP address. It is thus possible that enquiries from the internet are forwarded to your dynamic HSDPA/UMTS/EDGE/GPRS IP address. If an internet connection is established using the device, then this IP address is automatically conveyed to DynDNS every time a HSDPA/UMTS/EDGE/GPRS connection is established, thus also if XSBoxR4v is rebooted. How to configure the dynamic DNS: 1. Enter your data in the fields marked Domain Name, Login and Password. 2. Click on the button OK. Note: You need a user account at www.dyndns.org in order to use the DynDNS service. 39 User Manual Configure port forwarding Administration interface >> Security >> Port Forwarding You can determine the service which should be forwarded to a computer in your local network from the internet. Note: Port forwarding is only possible if the XSBoxR4v 's firewall is activated. 1. 2. 3. Click on the button Add service. Enter your data in the fields. Click on the button OK. Select WLAN channel Administration interface >> WLAN >> Channel selection You can select a WLAN channel and thus determine which WLAN frequency is used by the XSBoxR4v for sending and receiving. Connection speed between the XSBoxR4v and PCs/laptops connected over WLAN can be improved if a channel with good transmission quality is selected. ■ If you want the XSBoxR4v to automatically choose the channel with the best transmission quality, then click on automatic channel selection and then click on OK. The automatic channel selection checks the quality of all available channels one after another; this procedure takes approximately 12 seconds. Should the connection between PC/laptop and the XSBoxR4v be disrupted, simply reconnect. ■ If you would like to appoint the channel yourself, choose the desired entry from the selection list manual channel selection. Click on the button OK. Adjust WLAN Signal strength Administration interface >> WLAN >> Signal strength You can change the coverage of your WLAN network by adjusting the WLAN signal strength. ■ Select the desired value from the selection list signal strength. 100 % means full WLAN signal strength, 25 % means minimum WLAN signal strength. The WLAN interface also transmits a very low output at 25%. If you do not wish to use the WLAN interface, deactivate the interface under: Administration interface >> WLAN >> Connection 40 XSBoxR4v Diagnosis tools The XSBoxR4v contains various diagnosis tools with which the status of the device and the internet connection can be checked. Status of the XSBoxR4v Mobile Administration interface >> Status >> Mobile Here you can find all the information about XSBoxR4v's network status and online access. WLAN Administration interface >> Status >> WLAN Access point Here you will find information about XSBoxR4v's WLAN access point. DHCP Server Administration interface >> Status >> DHCP Server Here you will find information about XSBoxR4v's DHCP server and about the MAC and IP addresses of the PCs/laptops connected. Security. Administration interface >> Status >> Security Here you will find information about WEP and WPA encryption of the WLAN connections. Tools Administration interfaces >> Tools >> Firmware Here you can update the firmware which is installed on the XSBoxR4v. In addition you can reboot the XSBoxR4v using the web interface. 41 User Manual Ping Diagnosis Administration interface >> Tools >> Diagnosis You can determine whether you are able to set up a connection to the internet from your XSBoxR4v with help from the Ping Diagnosis. 1. 1. Enter an internet address in the destination field (Computer name or IP Address) (e.g. www.google.de). 2. 2. Click on the button Perform test. 3. 3. You will get a message whether the Ping test was successful. Trouble shooting If you have problems to access the XSBoxR4v's administration interface, try the following measures: Note: The following description is described here for the procedure under Microsoft Windows XPTM (Service Pack 2). Should you use a different operating system, then please read the relevant user documentation. What should you do if you have forgotten the XSBoxR4v's IP address? 1. 2. 3. Start your browser. Enter http://192.168.0.1 in the address line of the browser and confirm the entry with ENTER. This is the preset factory setting IP address for the XSBoxR4v. Should your browser show an error message after a short time, then the IP address is no longer valid as it has been changed in the administration interface. If you have forgotten the current IP address, then reset to factory settings (see also "Resetting factory settings" on page 30). What is to be done if you have forgotten your password? If you have forgotten the password for the administration interface, then you have to reset the XSBoxR4v to factory settings(see also "Resetting factory settings" on page 30). Delete temporary internet files Internet Explorer >> Extras >> Internet options >> General 1. 2. 3. 42 Click on the button Delete files. The dialogue Delete files appears. Activate the selection box Delete all offline content and click on the button OK. Close the dialogue Internet options by clicking on the button OK. XSBoxR4v Activate JavaScript in your browser Internet Explorer >> Tools >> Internet options >> Security 1. 2. 3. Highlight the symbol Internet and click on the button Custom level. Activate the option field Activate under active Scripting and click on the button OK. Close the dialogue Internet options by clicking on the button OK. Configure your computer to fetch dynamic IP addresses. START >> Control panel >> Network connections 1. 2. 3. 4. Click with the right-hand mouse button on LAN connection and select the entry properties from the context menu. Ensure that the control box Internet protocol (TCP/IP) is activated on the register general. Highlight Internet protocol (TCP/IP) and click on the button Properties. Activate the following option field on the register General: ■ Obtain IP address automatically ■ 5. Obtain DNS Server address automatically Click on the button OK to store the configuration. You could possibly be requested to reboot your computer. Identifying your computer's IP address. START >> Programs >> accessories >> command prompt 1. 2. Enter ipconfig in the window and confirm your entry with ENTER. The IP address issued must be between 192.168.0.10 and 192.168.0.200 or in the IP address range set by you (see also "Configure DHCP Server" on page 38). Reboot your computer and the XSBOxR4v if this isn't the case. 43 User Manual Check whether the WLAN card is correctly installed on your computer. START >> System control >> System >> Hardware 1. 2. 3. 4. 44 Click on the button Device Manager. The dialogue Device Manager appears. Open the entry Network adapter. Double click on your WLAN or WiFi card entry. Your WLAN or WiFi card is correctly installed if the message device ready appears in the area Device status. Click on the button OK. XSBoxR4v Telephoning You can immediately make phone calls once an analogue telephone has been connected to the XSBoxR4v and the PIN has been entered. This section describes the use of telephone functions. Note: XSBoxR4v does not support fax machines 1. 2. Pick up the telephone receiver. The device checks the GSM signal strength. The signal strength is shown by the bar indicator on the XSBoxR4v's display. You will here a dial tone if the signal is good. Enter the desired telephone number in the usual way. Note: The telephone connected to XSBoxR4v must support dual tone multi frequency (DTMF). Activate SIM card 1. 2. 3. 4. 5. 6. Pick up the telephone receiver. Please enter PIN appears on the display and you can hear an broken dial tone. Press the #-key, enter your PIN, and confirm with the #-key. Should the PIN entered be correct, you will hear a confirmation tone and the time, date and network signal strength bars will appear on the display. Should the PIN entered be incorrect, you will hear a warning tone and the following hint will appear on the display: wrong PIN. X attempts left Ring off. Note: Should the SIM card PIN be entered wrongly three times, then the SIM card will be blocked for your security. The SIM card can be unblocked by entering the PUK (Personal Unblocking Key). You will have received both the PIN and the PUK with your mobile contract. Unblocking SIM card 1. 2. 3. Pick up telephone receiver. Please enter PUK appears on the display and you will hear a broken dial tone. Press #, your PUK, *, your new PIN, #. 45 User Manual 4. 5. 6. Should the PUK entered be correct, you will hear a confirmation tone and the time, date and network signal strength bars will appear on the display. Should the PUK entered be incorrect, you will hear a warning tone and the following hint will appear on the display: wrong PUK. X attempts left Ring off. Note: Should you enter the PUK incorrectly 10 times, then the PUK will be blocked. Changing SIM card PIN 1. 2. 3. 4. 5. 6. 7. 8. 9. Pick up the telephone receiver and wait for the dial tone. Enter the key sequence #99*. Enter the old PIN. Press the *-key. Enter the new PIN (you can freely select a four to eight digit number). Press the *-key. Enter the new PIN again to confirm. Press the #-key, and wait for the confirmation signal Ring off Emergency call Emergency calls can also be made with a blocked SIM card or without a SIM card. The XSBoxR4v supports the international emergency call number 112 (GSM standard). Caller identification In-coming calls You can see the telephone number of the person calling you on your telephone's display thanks to call identification and a telephone which is equipped accordingly. (CLIP enabled and with a display). The precondition for this is that the caller has not suppressed his caller identification. 46 XSBoxR4v Out-going calls Your telephone number also appears on the display of the person you are calling. Should the person being called not answer the telephone, then he can simply call you back at the touch of a button, as your telephone number remains stored in the caller list. You can suppress your caller ID being displayed either in general or for certain calls. Show caller ID #31# Suppress caller ID *3131* Suppress caller ID for next call *31#, enter desired number Service: Call forward (CF)* *not supported by all mobile network operators All in-coming calls can be automatically forwarded to a connection of your choice. You have the following options: ■ CF immediate: immediately ■ CF-20: after 20 seconds ■ CF-busy: should the line be busy ■ CF device switched off: when your XSJackT2 is switched off All numbers are permitted when entering the desired number to activate call forwarding except blocked numbers. Note: Should CF immediate be activated on your connection, then you will hear a special dial tone. The versions CF-20, CF-busy and CF-device switched off can be activated simultaneously - each to a different number. CF-immediate has priority over the other three versions and cannot be overwritten by one of the other three versions. In order to switch on another CF after activating CF-immediate, first deactivate CF-immediate and then switch on the new CF. Deactivate call forward Activate call forward CF-immediate #21# CF-immediate *21*, desired number, # CF-20 #61# CF-20 *61*, desired number, # CF-busy #67# CF-busy *67*, desired number, # CF-device switched off #62# CF-device switched off *62*, desired number, # deactivate all CFs #22# 47 User Manual Service: Call waiting, call hold, three party conference * *not supported by all mobile network operators These functions enable you to remain reachable for others even during phone calls. Activate call waiting *43# Deactivate call waiting #43# Reject call waiting R0 Finish original connection Put receiver down, wait for ringing, pick up receiver Hold call, accept 2nd call R2 Call hold R2 Hold call, connect 2nd call R, wait for dial tone, dial number Finish active connection R1 Three party conference (connect participants) R3 Note: Your telephone needs to have an R key (hold key with hook-flash-function between 170 and 310 ms flash time) and it must be activated by your mobile operator in order to use these services. You basically have 30 seconds to react to a call waiting before the caller is dismissed. Once you have put the receiver down and should the caller still be in the line, then a ringing sound is heard to remind you of an active call waiting. 48 XSBoxR4v SMS Centre The XSBoxR4v contains an SMS administration interface which enables you: ■ To have an overview of SMS received ■ To use an editor form for sending SMS ■ To set up the SMS Broadcast Note: Should the SMS functionality of your XSBoxR4v be limited or lead to errors, then we recommend you to download and install the most recent firmware update (see also "Firmware Update" on page 31). Register "SMS mailbox" Administration interface >> SMS Centre >> SMS Mailbox A complete overview of the SMS received can be found here. You can use this to do the following with SMS already received: ■ Answer; opens the register write SMS with recipients already listed. ■ Forward; opens the register write SMS with the text which is to be forwarded. ■ Delete; deletes the highlighted SMS. Register "write SMS " Administration interface >> SMS Centre >> write SMS You can compose SMS with this form based editor and enter the telephone number of the recipient in the upper form field. Press the button Send SMS to send the SMS. Note: Only numbers between 0 -9 can be entered in the form field marked telephone number, special characters (e.g.: ! § & = # * + @, etc.) lead to error messages. Sending SMS to more than one recipient is possible, however a separator comma or semicolon must be entered between each telephone number. Example: 0171012345678; 0151123456789. 49 User Manual SMS Centre set-up Administration interface >> SMS Centre >> SMS configuration Enter the service centre telephone number (SMS broadcast) in the field marked SMS service centre number, which you have received from your mobile operator. Voicemail set-up Administration interface>> SMS Centre >> Voicemail Enter your voicemail telephone number in the field marked Voicemail number, which you have received from your mobile operator. 50 XSBoxR4v Appendix Specification/Technical data Areas of use ■ Complete solution for private sector, ideal for households without DSL ■ In business sector for VPN secured access to emails and intranet - for complete teams, also on the road ■ In public sector for a fast installation of a temporary infrastructure - for trade fairs, folk festivals and other such events ■ In the infrastructure sector as a fall back solution: Over the Air, for DSL and ISDN Features ■ Internet access using HSDPA/UMTS/EDGE/GPRS ■ Telephone function using GSM mobile ■ Only one SIM card for internet and telephone ■ Security through integrated firewall ■ WLAN encryption (WEP and WPA1/2) ■ Multiple Access for up to 253 users ■ Access using WLAN and Ethernet ■ Administration with PIN/PUK administration ■ SMS function: Send, receive, forward ■ Automatic system diagnosis (Watchdog) ■ Factory Default Fallback for hardware and software reset 51 User Manual ■ Router with unlimited VPN pass through ■ High system security and high permanent operation security ■ Extensive WLAN coverage ■ Low power consumption ■ Suitable for stationary and mobile use Frequency bands ■ HSDPA/UMTS: 2100 MHz ■ EDGE/GPRS/GSM: 900/1800 MHz ■ WLAN: 802.11b/g 2.4/2,5 GHz Data rates ■ HSDPA: up to 1.8 Mbit/s DL & 384 KB/s UL ■ UMTS: up to 384 KB/s, DL & UL ■ EDGE: up to 237 KB/s, DL & 118 KB/s UL ■ GPRS: up to 85.6 KB/s, DL & 42.8 KB/s UL ■ WLAN: up to 54 MB/s (802.11b/g), DL & UL Security ■ WLAN: ■ WEP 64/128/154 ■ WPA 1+2 ■ 802.11x/EAP ■ MAC Access Control Lists ■ Router: 52 XSBoxR4v ■ Firewall ■ Stateful-Packet-Inspection, ■ NAT ■ Port Forwarding ■ Automatic self diagnosis (Watchdog) ■ Factory Default Fallback for hardware and software reset ■ System: Telephone ■ Make and receive calls ■ Calling Line ID Presentation (CLIP) Router ■ DHCP Server ■ DynDNS Client ■ VPN Pass through unlimited ■ Ethernet/USB/WLAN Bridge Antenna ■ HSDPA/UMTS/EDGE/GPRS/GSM folding antenna: Frequency range 900 to 2100 MHz ■ WLAN: internal: Frequency range 2400 to 2500 MHz Administration ■ Configuration and status message over browser and LCD display ■ Updatable 53 User Manual ■ Firmware update via software upload Compatibility ■ Independent of operating system used (e.g. Microsoft, Apple, Linux) ■ Can be operated with all popular browsers (e.g. Microsoft Internet Explorer, Mozilla Firefox, Apple Safari) Connections ■ Ethernet 10/100 Base-T over RJ45 jack ■ Analogue telephone over RJ-11 jack Network connection ■ WLAN or over cable ■ VPN compatible ■ Always on, Network Re-connect Short Message Service (SMS) ■ Send ■ Receive ■ Forward Operating environment ■ Working temperature: 0 to 40 degrees centigrade ■ Humidity: 0% to 70% System requirements ■ Ethernet 10/100 BaseT Port or 802.11b/g WLAN ■ Browser ■ TCP/IP Protocol Stack 54 XSBoxR4v Housing ■ Measurements (W/D/H): 185 x 49 x 100 mm ■ Weight: 350 g Design ■ Attractive polycarbonate housing in various models ■ Suitable for desktop set-up and for wall mounting um Status indicators ■ UMTS/GSM signal strength on LCD display ■ Device status on LCD display Power consumption ■ Operating voltage 220-230 V/50 Hz Standards supported ■ Europe CE ■ GCF Type Approval ■ WiFi© certified WLAN module 55 User Manual Drilling measurements (Proportions are not true to scale) 4,0 mm 125,0 mm 56 XSBoxR4v Information about conformity 4G Systems GmbH declares herewith, that XSBoxR4v fulfils the basic requirements in accordance with TS 51.010-1 (GSM/GPRS), EN 301 511, EN 301 908-1 (R&TTE Regulatory Radio Testing), EN 301 489-1, EN 301 489-7, EN 301 489-24 (EMC Testing), EN 60950 (Safety Testing) and other relevant provisions of the Directive 1999/5/EG. A copy of the original CE declaration of conformity can be found under the following internet address: http://www.4g-systems.com Disposal information The European directive which became effective on February 13th 2003 and which was implemented in the Federal Republic of Germany on August 18th 2005 for the prevention of electronic and electrical waste has led to a considerable change in the handling of electrical devices at the end of their useful lives. The fundamental reason for this directive is the prevention of electronic and electrical waste. This includes waste management strategies that focus on reuse, recycling, reconditioning or other forms of recycling of such waste to reduce waste materials. The use of the symbol ( ) indicates that this product may not be treated as household waste. You are responsible for disposing of all your electrical and electronic waste correctly in the appropriate disposal service e.g. recycling ground. . By ensuring this product is disposed of correctly, you will help prevent potential negative consequences for the natural resources, environment and human health which could otherwise be caused by inappropriate waste handling of this product. For more detailed information about recycling of electronic and electrical waste, please contact your local city office, your household waste disposal service, the shop where you purchased the product or the product manufacturer. 57 Copyright © 2007 4G Systems GmbH (Document number: 4500.000012.00 ) All rights reserved worldwide. This document as well as the related software are property of 4G Systems GmbH or its suppliers and are protected by copyright and other laws. They are distributed under licenses restricting their use, copying, distribution, and decompilation. Neither receipt nor possession of this document confers or transfers any right to reproduce or disclose any part of the contents hereof on paper, electronically or by any other medium. No part of this document may be reproduced in any form by any means without prior written authorisation of 4G Systems GmbH. Moreover, the regulations of the software license agreement apply to this documentation. All brand names and trademarks mentioned in this document are the property of their respective owners. http://www.4g-systems.com