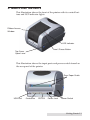
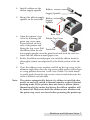
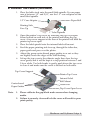
1
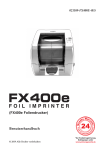
021109-FX400E-(01)
(FX400e Foil Imprinting System)
User's Manual
© 2009 All rights reserved
*after registering your
product. See
www.primerawarranty.com
Notices: The information in this document is subject to change without notice. NO WARRANTY OF ANY
KIND IS MADE WITH REGARD TO THIS MATERIAL, INCLUDING, BUT NOT LIMITED TO, THE IMPLIED
WARRANTIES OF MERCHANTABILITY AND FITNESS FOR A PARTICULAR PURPOSE. No liability is
assumed for errors contained herein or for incidental or consequential damages in connection with the furnishing, performance, or use of this material. This document contains proprietary information that is protected
by copyright. All rights are reserved. No part of this document may be photocopied, reproduced, or translated
into another language without prior written consent.
Trademark Acknowledgments: Windows is a registered trademark of Microsoft Corporation. All other
trademarks are the property of their respective owners.
Printing History
Edition 1.0, #021109, Copyright 2009, All rights reserved.
FCC Compliance Statement: This device complies with part 15 of the FCC rules. Operation is subject to
the following two conditions: (1) this device may not cause harmful interference, and (2) this device must
accept any interference received, including interference that may cause undesired operation.
CAUTION!
TO PREVENT FIRE OR SHOCK HAZARD, DO NOT EXPOSE THE UNIT TO RAIN OR MOISTURE. TO
REDUCE THE RISK OF ELECTRIC SHOCK, DO NOT REMOVE EXTERIOR PANELS. NO USERSERVICEABLE PARTS INSIDE. REFER SERVICING TO QUALIFIED SERVICE PERSONNEL. OPERATE
THE UNIT WITH ONLY THE PROPER ELECTRICAL SPECIFICATIONS AS LABELED ON THE PRINTER AND AC ADAPTER.
CAUTION!
THIS PRODUCT CONTAINS A LASER DIODE OF A HIGHER CLASS THAN 1. TO ENSURE CONTINUED SAFETY, DO NOT REMOVE ANY COVERS OR ATTEMPT TO GAIN ACCESS TO THE INSIDE OF
THIS PRODUCT. REFER ALL SERVICING TO QUALIFIED PERSONNEL. THE FOLLOWING LABEL
APPEARS INSIDE YOUR UNIT:
CLASS 1 LASER PRODUCT LASER KLASSE 1
CAUTION!
USE OF CONTROLS OR ADJUSTMENTS OR PERFORMANCE OF PROCEDURES OTHER THAN
THOSE SPECIFIED HEREIN MAY RESULT IN HAZARDOUS RADIATION.
ii
Table of Contents
Section 1: Getting Started ......................................................................................1
A. Choosing a Good Location ........................................................................1
B. Unpacking and Inspection.........................................................................2
C. Identifying the Parts ...................................................................................3
D. Computer Specifications ............................................................................4
Section 2: Hardware and Software Setup ...........................................................5
A. Installing NiceLabel....................................................................................5
B. Installing the Printer...................................................................................5
C. Loading the Ribbon .....................................................................................6
D. Loading the Labels (external)....................................................................8
E. Loading the Labels (internal) ....................................................................9
F. Diagnostic Tool. .........................................................................................10
G. Adjusting the Stock Sensor ......................................................................11
Section 3: Printing..................................................................................................12
A. Using NiceLabel........................................................................................12
B. Printer Driver Settings .............................................................................16
Section 4: Troubleshooting ..................................................................................18
A. Creating a Full Bleed Print (Clear Film Sealing) .................................18
B. Factory Defaults........................................................................................18
C. Cleaning the Printer .................................................................................18
D. Technical Support .....................................................................................19
Section 6: Label Specifications............................................................................20
Section 7: Technical Specifications ....................................................................22
Index .........................................................................................................................23
iii
iv
Section 1: Getting Started
THANK YOU…
...for choosing an FX400e Foil Imprinting System. The FX400e Foil
Imprinter adds brilliant, shiny metallic gold and silver highlights to
your inkjet-printed labels.
This User's Manual is your complete step-by-step guide to quickly
and easily setting up and printing with your new Foil Imprinting
System.
A. CHOOSING A GOOD LOCATION
•
•
•
•
Place the printer on a flat surface in a location with adequate air
circulation to prevent internal heat build up.
Do not place the printer near heat sources such as radiators or
air ducts, or in a place subject to direct sun light, excessive dust,
mechanical vibration or shock.
Allow for adequate clearance in front of the printer to accommodate the printed label stock as it is leaving the printer to avoid
the possibility of binding or jamming of the label stock.
Allow for adequate overhead clearance for opening the top
cover to allow easy access to the label stock and ribbons.
Getting Started 1
B. UNPACKING AND INSPECTION
While unpacking your printer, inspect the carton to ensure that no
damage has occurred during shipping. Make sure that all supplied
accessories are included with your unit. The following items should
be included:
• Foil Imprinter
• Power Adapter
• Separate Power Cord
• USB Cable
• Software Installer CD
• One sample roll of TuffCoat Shiny Metallic Gold Foil
• One Ribbon Rewind Paper Core
• Two Ribbon Core Spindle
• One Internal Label Supply Spindle with a Core Adapter
• One External Label Supply Spindle incl. External Mount
Save the carton and packing materials. They will come in handy when transporting the printer.
2 Getting Started
C. IDENTIFYING THE PARTS
This illustration shows the front of the printer with its control buttons and LED indicator lights:
Ribbon Access
Window
LED Indicator
Feed / Pause Button
Top Cover
Open Lever
This illustration shows the input ports and power switch found on
the rear panel of the printer.
Rear Paper Guide
USB Port
Centronics
RS-232
Power Jack
Power Switch
Getting Started 3
D. COMPUTER SPECIFICATIONS
Minimum PC Specifications
For optimal printing speed you must have a PC with the following
minimum specifications:
•
•
•
•
•
Windows XP/Vista
Pentium IV Processor
512 MB of RAM
5 GB of Free Hard Drive Space
Available USB Port
If your computer does not have at least these minimum system
requirements, system performance may not be acceptable.
4 Getting Started
Section 2: Hardware and Software Setup
A. INSTALLING NICELABEL
1.
Place the Installer CD in your CD-Rom Drive.
2.
Double-click the My Computer Icon, then double-click the icon
of the appropriate CD drive containing the Software Installer
disc.
3.
Double-click on the folder Nicelabel and double-click again on
the NiceLabel-SE5.exe
4.
The on screen instructions will guide you step-by-step through
the installation process.
B. INSTALLING THE PRINTER
1.
Place this printer on a flat stable surface and make sure the
power switch is turned off.
2.
Connect the printer to the host computer with the USB cable.
3.
Plug the power cord into the power jack connector at the rear of
the printer, then plug the power cord into a properly grounded
outlet. Once the power cord is connected, the printer can be
switched on and off using the power switch.
4.
After a few moments, Windows will tell you it has found new
hardware and is looking for software to install it. The Found
New Hardware Wizard will ask you to connect to Windows
Update. Select on No, not this time and click Next.
Hardware and Software Setup 5
5.
Then select Install the software automatically and click Next.
You may see a notice like the one shown here stating that the
printer has not passed Windows Logo Testing. Click Continue
Anyway to continue installing the printer driver for your printer.
C. LOADING THE RIBBON
1.
Push down the ribbon
access window to open
the cover.
2.
Place a paper core on a
ribbon rewind spindle.
Ribbon Access
Window
Paper Core
Rewind Spindle
3.
Mount the ribbon rewind
paper core on the front
hubs.
6 Hardware and Software Setup
Front Hub
Ribbon Rewind
Paper Core
4.
Install a ribbon on the
ribbon supply spindle.
Ribbon
Supply Spindle
5.
6.
Mount the ribbon supply Ribbon
spindle on the rear hubs. Supply
Spindle
Rear Hub
Open the printer’s top
Printer Top Cover
cover by releasing the
green top cover open
levers located on each
side of the printer and
lifting the top cover. Pull Printhead
the ribbon from the ribbon supply spindle cross the print head and stick the end centered onto the ribbon rewind paper core.
7.
Rotate the ribbon rewind paper core until the ribbon leader is
thoroughly, firmly encompassed by the black section of the ribbon.
8.
Close the ribbon access window and lift up the top cover to the
ultimate angle then close the top cover gently and it will be kept
at a stop position between 1 and 2 for a while. Use both hands
to gently push down the top cover to close it and make sure the
cover is latched on both sides.
Note:
The printer automatically detects if a ribbon is installed after
power on and will switch to thermal transfer or direct thermal
printing mode. If the printer does not detect a ribbon (direct
thermal mode), the motor that drives the ribbon spindles will
be turned off. Make sure both the ribbon access window and
the printer top cover are closed when powering the printer up.
Hardware and Software Setup 7
D. LOADING THE LABELS (EXTERNAL)
1.
2.
Place the printer onto the two pegs of the external label roll
mount.
Depending on the inner diameter of the paper core of the label
stock, take the apropriate label spindle and insert it into the
paper roll. If your paper core is between 1,5” and 2,95“, use the
1.5” core adapters to hold the . If your paper core is 2,95“ or
wider use the external lable spindle.
Paper Roll
1.5” Core Adapter
Printing Side
Face Up
1” Label Spindle
3.
4.
Place the label spindel onto the external label roll mount.
Feed the end of the label stock into the external lable feed
opening at the back of the printer.
4. Open the printer’s top cover by releasing the top cover open
levers located on each side of the printer and lifting the top
cover. A top cover support at the rear of the printer will hold the
printer top cover open.
5. Feed the paper, printing side face up, through the teflon bar,
paper guide and pass over the platen.
6. Adjust the rear and the center-biased paper guides in or out so
they are slightly touch the edges of the label backing.
7. Lift up the top cover to the ultimate angle then close the top
8. Use the “Diagnostic tool” to set the media sensor type and calibrate the selected sensor. (See Section 2F.)
Printer Top Cover
External Label
Roll Mount
Rear Paper
Guides
Top Cover Support
Center-biased
Paper Guides
Note:
Teflon Bar
Top Cover Open Lever
1. Please calibrate the gap/black mark sensor when changing
media.
2.
Failure to securely close and lock the cover will result in poor
print quality.
8 Hardware and Software Setup
E. LOADING THE LABELS (INTERNAL)
1.
Place the lable stock onto the small lable spindle. If your paper
core is between 1,5” and 2,95“, use the 1.5” core adapters on the
small label spindle.
Paper Roll
1.5” Core Adapter
Printing Side
Face Up
2.
1” Label Spindle
Open the printer’s top cover by releasing the top cover open
levers located on each side of the printer and lifting the top
cover. A top cover support at the rear of the printer will hold the
printer top cover open.
3.
Place the label spindel onto the internal label roll mount.
4.
Feed the paper, printing side face up, through the teflon bar,
paper guide and pass over the platen.
5.
Adjust the green center-biased paper guides in or out so they
are slightly touch the edges of the label backing.
6.
Lift up the top cover to the ultimate angle then close the top
cover gently and it will be kept at a stop position between 1 and
2 for a while. Use both hands to gently push down the top cover
to close it and make sure the cover is latched on both sides.
Top Cover Support
Printer Top Cover
Internal Label
Roll Mount
Center-based
Paper Guides
Teflon Bar
Top Cover Open Lever
Note:
1. Please calibrate the gap/black mark sensor when changing
media.
2.
Failure to securely close and lock the cover will result in poor
print quality.
Hardware and Software Setup 9
F. DIAGNOSTIC TOOL
The Diagnostic Utility is a toolbox that allows users to explore the
printer's settings and status; change printer settings; download
graphics, fonts, and firmware; create printer bitmap fonts; and to
send additional commands to the printer. Using this convenient
tool, you can explore the printer status and settings and troubleshoot the printer. The Diagnostic Tool is included on the Installer
Disc.
Note:
This utility works with printer firmware V6.00 and later versions.
1.
Insert the Installer Disc into your CD-ROM Drive.
2.
Browse the content of the Installer Disk and double click on the
DiagTool.exe to start the software.
3.
There are four features (Printer Configuration, File Manager,
Bitmap Font Manager, Command Tool) included in the
Diagnostic utility.
10 Hardware and Software Setup
4.
The detail functions in the Printer Function Group are listed as
below.
Description
Calibrate the sensor specified in the Printer Setup group media sensor field.
Setup the IP address, subnet mask, gateway for the on board Ethernet.
Synchronize printer Real Time Clock with PC.
Print a test page.
Ignore the downloaded AUTO.BAS program.
Initialize the printer and restore the settings to factory default.
To activate the printer dump mode.
Ignore the downloaded AUTO.BAS program.
Print printer configuration.
G. ADJUSTING THE LABEL STOCK SENSOR
If you are using label stock with black marks on its back, it may
become necessary to adjust the label stock sensor. The sensor is situated between the paper guides in the internal of the printer.
Normally the sensor is placed in the middle where the small arrow
is pointing towards the sensor. But some label stock has its black
marks only at the rims of the linen and the sensor needs to be
moved to this position.
Hardware and Software Setup 11
Section 3: Printing
A. USING NICELABEL
Your printer ships with a version NiceLabel SE for Primera. This
easy-to-use software is designed to allow you to create full color
labels with text and barcodes quickly and simply. The following is
a tutorial to guide you through creating and printing a sample label.
Launch NiceLabel from your computer's Start Menu.
Note: You are not required to print from the NiceLabel software. You
can print from any application that prints to a Windows Printer. In some
cases it be even easier to print with a software that supports multiple layers.
Adding highlights to a label
1.
Load a golden or silver ribbon. For instructions see Section 2C.
2.
Choose Create a new Label from the New Label Wizard and
click on Finish
3.
You will see the Label Setup Wizard. This will guide you
through setting up your label
a.
4.
Set the dimensions of your label and unit of measure and
click Next.
b. Select your printer. This should be the Primera FX400e.
Then choose the orientation of the labels and click Finish.
Now you will see your label in the Document Window. You can
start to design your label using Tools from the Tool Box. First,
we will use the Text Tool.
a.
12 Printing
Click the Text Button in your Toolbox, then move the text
cursor over the Document Window and click in the location
where you want to enter text. There is no need to be exact,
once you enter your text it can easily be resized and/or
moved about the label. Upon clicking in the Document
Window, the Text Wizard appears.
5.
b. When finished typing, click on Finish and you will see the
text appear in a box with "edit handles". You can drag and
resize the text anywhere in the document window. If the
text is dragged off of the printable area, NiceLabel will turn
the text red as a warning. This will not change the color the
text prints out as when sent to the printer but is only used
as a warning to let you know you may not be printing the
full text on your label.
Now, insert a picture.
a.
Click the Picture Button from the Toolbox. You will now
have a Picture Cursor that can be positioned anywhere
within the Document Window. Drag the cursor to the
general area where you wish to place the picture and click
to get an Open dialog box. You will be prompted to browse
for picture files. NiceLabel will accept bitmap graphics
formatted as BMP, JPG, TIF, WMF, PNG and many more.
b. Click Open and the graphic will be imported with edit
handles so you can easily move and resize your graphic.
c. There are other tools at your disposal to align the object or
add shapes. On the right side of the screen you will see
alignment tools so you can align the objects on your label in
relation to each other. Select objects by clicking on them or
clicking and dragging a "lasso" around multiple objects or
by holding down the SHIFT key and clicking on each object
individually. You can also center these objects by right
clicking on a selected object and choosing Align from the
drop-down menu. If you wish to center your object on the
label choose the appropriate centering options and check the
Align to Label checkbox.
d. If you are adding silver or golden highlights to a label you
can open the label file that you have used to print the labels.
Afterward you can add the picture for the highlights for easier positioning of the highlights. While dragging the box
with the highlights, it becomes transparent and you can
easily position it at the desired position.
By using the label file you can make sure, that the highlights
will be printed at the desired position. This helps you
saving time and money.
Printing 13
While dragging:
At desired position:
14 Printing
When the highlights box is covering the whole label, you
can leave the label underneath the highlights box:
If the original label is still visible you should delete it after
positioning the details box.
6. Now insert rectangles, lines or ellipses.
a. Drag the cursor to the general area where you wish to place
the object, click and drag it to the desired size. The object
appears in a box with "edit handles". You can drag and
resize the object anywhere in the document window. If the
object is dragged off of the printable area, NiceLabel will
turn its color into red as a warning. This will not change the
color the object prints out as when sent to the printer but is
only used as a warning to let you know you may not be
printing the full object on your label.
b. You can define the thickness by right clicking on a rectangle
or ellipse and choosing Properties.. In the appearing window you can change the values and apply them by clicking
on Finish. For changing the thickness of lines, you have to
pull the "edit handles".
c. You are now ready to print your label. Click File - Printer
Settings to adjust quality, color matching etc. See Section
3B for more information. Click File then Print from the
main menu. Choose your number of copies and click OK.
Congratulations! You have successfully created and printed your
first label. The rest of this section will explain how to seal labels
with clear film and the printer settings. Also, you can find more tips
and hints by simply clicking Help then Contents in the main menu.
Note: Objects will be layered in the order they are added to your document.
There is no ability to change the layering order in the SE version of
NiceLabel. This feature is available in upgraded versions.
Sealing labels with clear film
Clear film is also available for FX400e. It lets you produce labels
with a high degree of resistance to water, chemicals, cleaning solutions, UV and other harsh environmental factors.
1. Load a clear film ribbon. For instructions see Section 2B.
Printing 15
2. Choose Create a new Label from the New Label Wizard and
click on Finish
3.
You will see the Label Setup Wizard. This will guide you
through setting up your label
a.
Set the dimensions of your label and unit of measure and
click Next.
b. Select your printer. This should be the Primera FX400e.
Then choose the orientation of the labels and click Finish.
4. Click the Line Button, then click on a corner of the label and
pull the line to the other corner of the label. Then spread the
line with the "edit handles" over the whole label until it is
completely covered.
5. You are now ready to print your label. Click File - Printer
Settings to adjust quality, color matching etc. See Section 3B for
more information. Click File then Print from the main menu.
Choose your number of copies and click OK.
B. PRINTER DRIVER SETTINGS
Once the printer driver has been successfully installed, you will
need to setup the driver with the appropriate print options. Refer to
the following steps to change or verify your default printer driver
preferences. These settings will apply to all new designs created in
NiceLabel or other programs after the preferences were changed.
Existing labels saved in NiceLabel will not be affected since the preferences are saved with the label. To change these preferences you
will have to change printer preferences through Nice Label. (File
Menu - Printer Settings)
To find Driver Settings:
Click the Start button, choose Printers and Faxes. Right-click on the
Primera FX400e Icon and select Printing Preferences from the dropdown menu.
The preferences screen will appear.
NOTE: Most applications allow you to change these same printer driver options
from their "Print" and/or "Printer Setup" screens. Some applications such
as NiceLabel save your settings with the label,
others use settings only for the current print job just sent to the printer.
16 Printing
The Printing Preferences menu includes plenty of options, but not
all of them are really necessary to change or they even don’t have
any effects. This is because the driver was originally designed for
professional use. So only the involved options will be explained.
Options Tab
In the Options tab you can set general print Settings, the Paper
Format, the Size of the labels and the Unprintable Area. Adjust all
these values to your needs.
Advanced Setup Tab
In the first area you can set the Sensor type to the kind of label stock
you are using. We recommend leaving the default settings in Media
settings, Options and Graphics options.
Dithering Tab
In the Dithering Tab you can adjust the Dithering type to your
needs.
Stocks Tab
In this tab you can pre-define settings for specific label stock. The
pre-defined settings are available in the Stocks drop-down menu in
the Options Tab.
Import/Export settings Tab
In this tab you can export your driver settings into a file and import
this file on any other computer with this driver installed.
Printing 17
Section 4: Troubleshooting
A. CREATING A FULL BLEED PRINT (CLEAR FILM SEALING)
1.
If you are having trouble making the image cover the entire
label, first make sure the image is printing at least as big as the
label size you have selected. To accomplish this using Nice
Label, make the image a few millimeters larger than the label by
dragging the image over the edge of the label on all sides. The
bounding box around the image will turn red when it is over
the edge of the label. Try printing again to see if it covers the
entire label. If not, move on to step two.
2.
Adjust these settings in the printer driver preferences:
Size. Increase the hight and/or width of the size in the Options
tab a little bit. If you are using Nice Label, simply change the
size under the File Menu - Label Setup. Increase the size of the
image to fit the new larger page size. If you are using other
graphics programs you will need to change the page size in the
application and in the printer driver preferences.
TOF. Decrease the Top of form by 10. This will cause the printer
to start printing before the label and ensure a fully printed label.
Note: Over bleeding too much will cause the printer to skip labels. This is
because the printer stops printing too late to sense the next label.
B. FACTORY DEFAULTS
If the printer prints only one label at a time and doesn’t accept any
new jobs, you have to restore the printer drivers Factory Defaults.
To restore the Factory Defaults, launch the Diagnostic Tool (See
Section 2F) and click on Factory Default.
C. CLEANING THE PRINTER
Use a clean, white rag with a small amount of water or isopropyl
alcohol to clean the printer's outside case. Stronger cleaning solutions are NOT recommended because they may damage the paint
and plastic materials from which the parts are manufactured.
Always disconnect your Autoloader's power cord before cleaning.
Resume operation only after the surfaces are completely dry.
18 Troubleshooting
D. TECHNICAL SUPPORT
If you have difficulties in operating your Printer, the procedures in
this manual and the software User's Guide should, in most cases,
solve the problem. If you still have difficulty, contact the technical
support number using one of the methods listed below.
Source
Location
NiceLabel Software Help files
Open the software. Click on the Help Menu Contents
Email Support
[email protected]
Phone Support
+49-(0)611-92777-0 (Mon - Thu 9 a.m. - 5.00 p.m,
Fri 9 a.m. - 3.00 p.m. CET)
Troubleshooting 19
Section 6: Label Specifications
Label Sensing Methods
Label Width
Liner Width
Gap Between
Labels
Method 1: Label
Gap Sensing
Distance from
edge of Media
Method 2: Thru-Hole
Sensing
Width of Opening
Distance from
edge of Media
to edge of Label
Label Height
Method 3: Reflective/Black
Mark Sensing
(Black Mark must be printed
on back side of label stock)
Black Mark
Width
Note: See table below for Max and Min values in inches and mm..
Max
Min
Label/Print width
101,6 mm (4,00“)
19 mm (0,75“)
Liner width
108 mm (4,25“)
25,4 mm(1“)
Label height/length
609,6 mm (24“)
19 mm (0,75“)
Gap between labels
19 mm (0,75“)
2,5 mm (0,10“)
20 Label Specifications
Max
Min
Distance from edge of
48,3 mm (1,90“)
media to edge of thru-hole
5,1 mm (0,20“)
Reflective/Black Mark
Equal to distance
Width*
between labels
Max Outer Diameter (OD) 127 mm (5,0“)
25,4 mm(1“)
N/A
Inner Core Diameter (ID)
see roll specifications below
Stock Thickness
152 Mikron (0,006“) N/A
Distance from edge of
media to edge of label
Printer driver assumes 2 mm gap.
However, this is adjustable via the left
margin offset.
* The Reflective/Black Mark should be opaque to infared light. The
mark should be between the labels. The end of the mark should correspond with the beginning of the label.
Label Specifications 21
Section 7: Technical Specifications
Thermal transfer
300 dpi (12 dots/mm)
5.0, 6.3 and 7.6 cm per second
19mm (.75") to 104mm (4.125")
Moveable see-through sensor for die-cut
labels and reflective for tags with black
stripe sensing
Operating Systems:
Windows XP/Vista®
Data Interface:
USB 1.1 or 2.0
Minimum System:
Pentium® IV computer or better, 512MB RAM,
5GB free hard drive space, USB 1.1/2.0 port
Label Design Software: NiceLabel™ SE Primera Edition included.
Can also be used with most other popular
Windows-based label design software programs.
DC output:
24 VDC @ 3.75A
AC input:
100-240 VAC, 50/60 Hz
Certifications:
FCC Class B, UL, UL-C, TUV/GS, C-Tick,
CCC,CE, WEEE
Weight:
8.4 kg/18.5 lbs.
Dimensions:
220 mmW x 185 mmH x 315 mmD
(8.66"W x 7.28"H x 12.4"D)
Foil Supplies:
TuffCoat Gold Foil, TuffCoat Silver Foil,
TuffCoat Clear Foil
Warranty:
Two years on parts and labor after product
registration on www.primerawarranty.com
Note:
LX-Series printers are not included in the price of
the FX400e Foil Imprinting System.
Imprint Method:
Print Resolutions:
Print Speed:
Imprint Width:
Media Sensing:
22 Technical Specifications
Index
Adjusting Label Stock Sensor ...............................................................................11
Centronics ..................................................................................................................3
Computer Specifications..........................................................................................4
Connecting Power ....................................................................................................5
Diagnostic Tool........................................................................................................10
External Label Roll Mount ......................................................................................8
Factory Defaults ......................................................................................................10
Feed Button................................................................................................................3
Installing Label Stock (External) ............................................................................8
Installing Label Stock (Internal) .............................................................................9
Installing NiceLabel..................................................................................................5
Installing the Printer.................................................................................................5
Installing the Printer Driver....................................................................................5
Internal Label Roll Mount .......................................................................................9
Label Size .................................................................................................................20
LED Indicator ............................................................................................................3
Loading Ribbon.........................................................................................................6
Location......................................................................................................................1
Parts ............................................................................................................................3
Pause Button..............................................................................................................3
Power Switch.............................................................................................................3
Power Jack .................................................................................................................3
Printer Driver Settings ...........................................................................................16
Printing.....................................................................................................................12
Ribbon Access Window ...........................................................................................3
RS-232 .........................................................................................................................3
Technical Specifications .........................................................................................22
Technical Support ...................................................................................................19
Top Cover Open Lever.............................................................................................3
Troubleshooting ......................................................................................................18
USB Port .....................................................................................................................3
Using NiceLabel......................................................................................................12
Index 23
P/N FX400E