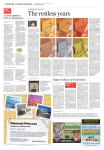
1
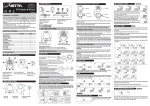
CRANE MACHINES
Generalized User Manual
Copyright by Guangzhou Sealy Electronic Technology Co., Ltd.
Guangzhou Sealy Electronic Technology Co., Ltd. All rights reserved. Except for purely personal purposes, otherwise the said manual may not be
copied. Guangzhou Sealy Electronic Technology Co., Ltd. reserves the right to revise this publication without prior notice of such changes. Guangzhou
Sealy Electronic Technology Co., Ltd. endeavor to provide the latest and accurate information in this manual. Guangzhou Sealy Electronic Technology
Co., Ltd. reserves the right to make changes to any specifications and product configuration, without obligations of prior notice, and no obligations to
reflect the changes on this manual.
This user manual is intended to get users familiar with our Crane Machines. It contains details about the proper use and precautions. It also provides
solutions to problems you may encounter while using our games. Users can find more information about this product through other means by contacting
our Company. Your valuable opinions and advice are greatly appreciated.
SEALY ELECTRONIC TECHNOLOGY CO., LTD.
Address: C7-C11 Startoon City, 143 Yingxin East rd., Panyu District, Guangzhou, China
Company Web:Http://www.sealygame.com
Sales Tel/Fax:020-22887068
email:[email protected]
1
Operating Instructions (claw grip strength calibration):
For a smooth operation of the crane machine, please pay attention to the following precautions:
Prior to putting the crane machine in operation or every time a different prize (shape, size, weight) is being used, be sure to calibrate the
claw’s grip strength based on the prize being used.
The calibration of the grip strength is as followed:
1. While machine is on standby, press the S1 key of the main board to access back end Setup mode.
2. Press the S1 key to change the digits on the Digit Panel of the main board, until you see “50” (50 indicates the strong grip calibration option, the right
side of the digit panel shows the strong grip value being set).
3. Adjust the strong grip value, up or down, by operating the joystick (the right side of the digit panel shows the strong grip value being set).
4. When calibrating the strength, put the prize within the claw. Press the "OK" button on the control panel to set the value. Observe the strong grip;
press the “OK” button to let the claw grab the prize and release your hand from the prize (for about 3 seconds). If the claw can hold the prize firmly and
the prize does not fall, it means the strong grip is appropriate.
5. After the strong grip has been calibrated, press the S1 key of the main board to switch to “60” (60 indicates the weak grip calibration option, the right
side of the digit panel shows the weak grip value being set).
6. When calibrating the strength, put the prize within the claw. Press the "OK" button on the control panel to set the value. Observe the weak grip; press
the “OK” button to let the claw grab the prize and release your hand from the prize (for about 3 seconds). If the claw can slightly hold the prize but the
prize falls smoothly, also observe that the claw closes after the prize dropped, it means the weak grip is appropriate.
7. After calibration is complete, reboot the machine.
Suggested prize size
Make sure you buy the prize (plush toy) based on the claw size.
L * W * H: (10 ~ 15) * (10 ~ 15) * (15 ~ 25) cm
Or purchase plush toy sizes 5 or 6.
2
50 means strong grip calibration mode If claw can firmly hold the prize without dropping it, this means strong grip is appropriate. 40 means current strong grip value Operate w/ joystick & OK button
S1 button INAPPROPRIATE
Press S1 key to change the digits on the main board Digit Panel, switch to strong grip calibration mode. While machine is on standby, press main board S1 key to access backend Setup mode. 60 means weak calibration mode
Adjust the strong grip value, up or down, by operating the joystick. Put prize within the claw, press "OK" & let go of the prize then observe the claw
APPROPRIATE
grip If the claw can slightly hold the prize and the prize smoothly drops, also the claw would close itself after the prize dropped. This means the weak grip is appropriate. 25 means current weak grip value Operate w/ joystick & OK button INAPPROPRIATE Press main board S1 key again to switch menu number, switch to weak grip calibration mode. Put the prize within the claw, press the "OK" buttong & let go of the prize then observe the claw. APPROPRIATE
The pictures above are methods for calibrating the strong/weak claw
3
After calibration is complete, reboot machine.
Prize Probability Settings:
DIP Coding Switches Settings as below: Recommended settings (the recommended settings are as figure on the right) The result of these settings are: 1
○
Free prize (consolation) mode, Win one prize per 10 plays; if player does not win after 10 plays, free 100% winning rate will be activated until player wins the prize. 2 1 coin for 1 play ○
Free Prize Mode Winning rate settings No Consolation Mode Vending A Mode Mode
settings Vending C Mode Number of wins
Number of plays
Game duration setup
Coin per play setup
For more detailed settings, refer to the user manual. 4
(1) Winning rate and mode settings (main board DIP switch SW1)
1
2
3
4
5
6
7
8
Mode, winning rate
(2) Coin settings, function settings (main board DIP switch SW2)
1
2
3
4
5
-
settings (SW1)
-
-
Free prize mode
ON
-
No consolation mode
-
ON
Vending A mode
ON
ON
Vending C mode
-
-
Number of wins = 1
ON
-
Number of wins = 3 times
-
ON
Number of wins = 5 times
ON
ON
Number of wins = 7 times
-
-
-
-
Number of plays = 5 times
ON
-
-
-
Number of plays =10 times
-
ON
-
-
Number of plays =15 times
ON
ON
-
-
Number of plays =20 times
-
-
ON
-
Number of plays =25 times
ON
-
ON
-
Number of plays =30 times
-
ON
ON
-
Number of plays =35 times
ON
ON
ON
-
Number of plays =40 times
-
-
-
ON
Number of plays =45 times
ON
-
-
ON
Number of plays =50 times
-
ON
-
ON
Number of plays =55 times
ON
ON
-
ON
Number of plays =60 times
-
-
ON
ON
Number of plays =65 times
ON
-
ON
ON
Number of plays =70 times
-
ON
ON
ON
Number of plays =75 times
ON
ON
ON
ON
Number of plays =80 times
6
7
8
Coin settings, function settings SW2
During standby, continuous 10 minutes
background sound playing
ON
During standby, at interval 10 minutes
background sound playing
-
No midair claw control function (when the
claw is being lowered, no effect when
pressing the OK button)
ON
With midair claw control function (when
the claw is being lowered, pressing the OK
buttong will close the claw)
-
Game duration is 15 seconds
ON
Game duration is 30 seconds
-
Crane synchronous return to start position
ON
Crane
asynchronous
return
to
start
position
-
-
1 coin for 1 game
ON
-
1 coin for 2 games
-
ON
2 coins for 1 game
ON
ON
3 coins for 1 game
Note: "ON" means push to the ON side, "-" means pushed to the opposite side of ON.
Note: "ON" means push to the ON side, "-" means pushed to the opposite side of ON.
5
(3) Main board DIP switch SW3 (not functional)
The new program does not use SW3, so there is no need to set SW3.
Mode setting instructions:
Example: If setting Number of wins = 1, Number of plays = 10 times, the different modes are as followed:
Free prize mode: 1 chance of winning in every 10 plays; if no win after 10 plays, the free prize is activated, from the 11th play there is a high chance of winning until prize is caught. The
count will be reset after prize is won.
No consolation mode: 1 chance of winning in every 10 plays; if no win after 10 plays, no free prize and no accumulation, meaning another 1 chance of winning in the next 10 plays.
Vending A mode: 1 chance of winning in every 10 plays; if no win after 10 plays, accumulate the previous chance, meaning in the next 10 plays there are 2 chances of winning and so on.
VendingC mode: insert 1 coin per play, the first 9 times will not let the player win, only from the 10th times will the winning odds start. If no winning on the 10th time, free play onward until
the prize is caught. Once prize is caught, the count is reset.
Audit :
During standby, press S2 button to access audit settings
The audit settings are divided into 4 options, the audit page is displayed on the control panel digital panel while the data is displayed on the main board digital panel.
Specific audit content are as followed:
Page (control panel digital panel)
Audit content (main board digital panel)
1
Total inserted coins
2
Total number of prizes won
3
Permanent inserted coins
4
Permanent number of prizes won
Note :Pressing the OK button on the control panel switches the audit page.
Clear data:
Press and hold S2 button while booting up, this will clear the statistical data.
This action will only clear the total inserted coins and total number of prizes won, and will not clear the permanent data. After clearing, the digital panel will repeatedly
display 00-99, background sound will also keep playing, press the OK button of the control panel to return to the game.
6
Test:
During standby, press the S1 button to access the test options. The test menu is mainly used for installation or troubleshooting.
Test is divided into 6 options, test content and items as shown in table below:
Testing content (test code displayed on
Test Item Description (press S1 key to switch test items)
the main board)
10
— Sensor, micro-movement, buttons test
Code value of switches and buttons displayed on the control panel digital pad, see [Sensor key test code table 2]
20
— Front/back movement test
Test forward/backward motor, control circuit, forward/backward micro-stopping switch, joystick forward and backward
keys, press OK button to return to the game.
30
— Left/right movement test
Test left and right motor, control circuit, left and right micro-stopping switch, joystick left and right keys, press OK
button to return to the game
40
— Up/down movement test
Test up and down motor, control circuit, up and down micro-stopping switch, joystick up and down keys, press OK
button to return to the game
50
— Strong claw grip calibration test
Set the strong grip strength when picking up, meaning when the claw is closing on the prize and right before it lifts up.
Range is 16-40, default value 24.
60
— Weak claw grip calibration test
70 — Grip height calibration
Set the weak grip strength maintained when the crane is moving horizontally, from pick up location to home position.
When the claw is lifting the grip strength will gradually reduce from strong to weak, the higher the value set the higher
position the strong grip will be maintained. Range is 0-15, default 8. 0 meaning random height.
80 — Crane moving speed
Sensor key test code table 2
Crane moving speed. Range is 0-20, default value 5.
Key value
Key name
Key value
Key name
1
Forward button
9
Forward stop button
2
Backward button
10
Backward stop button
3
Left key
11
Right stop key
4
Right key
12
Left stop key
5
Price collected key
13
Up stop key
6
Lower claw key
14
Down stop key
7
Insert coin key
15
Motherboard data clear key
8
Sensor key
16
Motherboard test button
7
Note: Before putting machine in operation, please access test menu to calibrate the claw grip strength.
Children music setting:
Push the switch 7 of the SW2 coding switch set to the up position to enable (note: toward the ON position opposite to the number position).
Free automatic game system:
Press and hold S1 button while booting up, this will access the free automatic game. This function is mainly used for QC of the machine during production.
The system performs an automatic game each 99 seconds interval, operating the joystick or automatically catching the prizes at random locations.
Software upgrade:
The software version is displayed on the main board digital panel (year, month) and on the control panel digital pad (day) when machine boots up.
Please use the new program of the version number 131108.
Common errors and solutions:
In a case of a failure the Error message flashes on the control panel or main board digital panels.
Specific error information and solutions:
Error
number
Error information
Solutions
Open the crane lid and check whether the down stop micro-switch (the one on top) is responsive, whether
02
Down stop micro-switch failure
the cable rewinded or is deadlocked, whether cable motor is operating normally, whether relating wiring is
intact.
Open the crane lid and check whether the up stop micro-switch (bottom one) is responsive, whether the
03
Up stop jogging switch fault
cable rewinded or is deadlocked, whether cable motor is operating normally, whether relating wiring is
intact.
04
05
When crane is returning to initial position,
Check whether the left stop micro-switch of the crane is responsive, whether the motor controlling left/right
left stop micro-switch failure
is operating, whether relating wiring is intact.
When crane is returning to initial position,
Check whether the forward stop micro-switch of the crane is responsive, whether the motor controlling
front stop micro-switch failure
forward/backward is operating, whether relating wiring is intact.
8
24
Motherboard EEPROM failure
30
Coin acceptor failure
Check whether solder of the motherboard memory chip U41 is intact. Otherwise motherboard will need
repair.
Check whether wiring of coin acceptor is intact, whether there are stucked coins (NO signal format, slow
speed of 45ms-65ms)
Check whether wiring to the sensors are correct, whether sensors are being blocked by prizes, whether
32
Prize out sensor detection failure
sensors are aligned during installation, whether sensors are damaged; press S1 button to enter the test
menu (10) sensors will perform a self-test, the receivers (3 lights) red and yellow will alternately flash to
indicate sensors are normal.
33
Prize out sensor detection failure
Cable
rewind
Cable winding failure
Check whether wiring to the sensors are intact, whether they are being interfered by strong external lights,
whether sensors are damaged.
Press and hold the up micro-step (bottom one) then reboot, then release the micro-step, the rope will
automatically calibrate itself. Repeat a few more times if needed, no need to manually cut the rope.
Note: whenever one of the above problems occur, press the S1 key of the main board to access the test menu for troubleshooting.
Thank you for purchasing our company's product. We constantly improve our products, therefore we reserve the rights to make changes to the content of this manual,
without notice. If during the use of our product, you encounter a problem not mentioned in this manual or need an upgrade, feel free to contact us and we will be more
than happy to provide our best service and respond to you promptly. We appreciate your strong support.
If you need help or want to know more information, please contact:
Address :C7-C11Startoon City, 143 Yingxin East Rd., Panyu District, Guangzhou
Phone: 020-2288-7068
Website:http://www.sealygame.com
Email:[email protected]
(Please contact relevant department, if you have any inquiries).
9