1
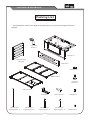
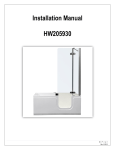
Installation & User Manual
HY-1042
!
HY-1242
HY-1342
Important :
Read this manual carefully before installing this product.
This manual contains important product and safety
information. Do not discard the manual after reading
Installation & User Manual
Index
< Packing list.............................................................1
< Assembly Instructions..............................................2
< E l e c t r i c a l i n s t a l l a t i o n . . . . . . . . . . . . . . . . . . . . . . . . . . . . . . 11
< Safety guidelines...................................................12
< Specifications.............................................13
< Accessories..............................................13
< Bathtub usage..................................................14
< Maintenance.............................................16
< Troubleshooting guide...........................................16
< Component list......................................................17
We keep improving and upgrading the product. All rights
reserved. Specifications are subject to change without
notice.
Installation & User Manual
Packing详
List
零部件
图
Check the parts in the boxes against the packing list, if any part is missing contact the
supplier.
Hand-held
shower x1
Tub body x1
Skirts(left/right)
(optional)
lower skirt x1
Hexagon nut
Middle frame x1
Cross flat
head screw
Bottom frame x1
Bracket x2
780 aluminum
supporting pole x 4
452 aluminum
supporting pole x1
280 aluminum
supporting pole x4
1
Skirt screw x16
257 aluminum
supporting pole x2
Feet(tall) x6
Feet(short) x4
Installation & User Manual
Assembly Instructions
¾ Step 1:
1. Take bottom frame and place it on the ground.
2. Insert four #780 support poles in the corner holes of the frame. (figure 1 and 2)
3. Align the screw holes and secure the support poles tight in the frame. (figure 3)
1
2
5
780 aluminum
supporting pole
Bottom frame x1
3
2
Installation & User Manual
¾ Step 2:
1. Turn the frame upside down.
1
2. Take 4 short feet and install them
on the end of #780 support pole at
bottom frame.(figure 1)
3. Adjust the feet so the bottom frame
is level.
2
3
Keep the bottom frame level
1 5/8 in
3
Installation & User Manual
¾ Step 3:
1. According to figure 1 install #280 , #257 supporting poles and tall feet to the bottom
frame.
2. As shown in figure 2 and figure 3, adjust the height of feet and secure with hexagon
nuts. Make sure the bottom frame is level and all feet are supporting the frame. Failure
to do so will compromise the door seal.
3. Make sure all feet have the hex nut tight. This will add to stability of unit.
1
280 aluminum
supporting pole
257 aluminum
supporting pole
280 aluminum
supporting pole
280 aluminum
supporting pole
Feet(tall)
257 aluminum
supporting pole
280 aluminum
supporting pole
3
2
4
Installation & User Manual
¾ Step 4:
1. Align the supporting poles to the corner connectors on middle frame, slide the frame on
the supporting poles as shown in figure 1.
2. Align and secure the four #780 supporting poles with screws on the corner connectors as
shown in figure 2.
3. Align the rest of supporting poles on the beams of middle frame with nuts.(shown in figure
3)
1
Middle frame
2
3
5
Installation & User Manual
¾ Step 5:
1. Install #452 supporting poles on the middle frame. (Shown in figure 1 to 3)
1
452 aluminum
supporting pole x1
2
3
6
Installation & User Manual
¾ Step 6:
1. Place the installed tub supporting structure into its final resting place.
2. Tub frame MUST be secured to the back wall and/or to the floor, to prevent tipping upon
entering and exiting the tub.
3. It is advised to set the frame to the position to determine the best way to secure the
frame. After the determination is made, the frame can be moved out from the final resting
place and assembly can resume.
2
1
7
Installation & User Manual
¾ Step 7:
1.Lift up the tub body and place it on the supporting frame, position the corner poles to
connect to the 4 corner connection . Shown in figure 1 and 2.
2.Place the two U channels on the bottom of tub body into the support beams on the
middle supporting frame. Shown in figure 3.
3.Secure the beam to the U channels from below. Shown in figure 4.
2
1
Tub body
3
4
II
U channel
Beam
Wedge together
8
Installation & User Manual
¾ Step 8:
1. Connect water supply (and power, if applicable). See image below.
2. Install side skirts (optional) if needed. figure 1
Note, make sure the power and water supplies are connected before moving the tub into
it’s final place.
1
Power cord
Cold connector
Hot connector
Skirt(left)
(optional)
Skirt(right)
(optional)
Tub frame MUST be secured to the back
wall and/or to the floor, to prevent tipping
upon entering and exiting the tub.
9
Installation & User Manual
¾ Step 9:
1. Move the installed tub in to it’s permanent position. Make sure the frame is secure to the
back wall and/or floor. Shown in figure 1.
2. Connect the drain. Shown in figure 2
3. Install the lower skirt on the tub body with screws. Figure 3
1
2
Drain hose
Press on the lower frame
Floor drain
Drain
Drain connector
Drain hose connector
Drain hose
3
Finish
10
Installation & User Manual
Installation of electrical devices
Power outlet wiring, connections, and junction box must conform to IEC standards as well as those of State and
local regulations.
1. The power supply cord used must be rated to handle a voltage of 450/750V 80oC to meet the walk-in bathtub
power requirements.
2.The rated current of connection switch/ junction box has to meet the voltage requirements according to the airblower power specification. Use dedicated line only.
3. GFCI must be rated according to the air-blower power specifications, and do not share with other electric devices
4. Connection switch/ junction box must be installed according to electric-safety regulations and kept in a safe
location.
5. Connection switch/ junction box has to be grounded.
6. Power supply circuit must have a GFCI breaker or outlet.
7.Walk-in bathtub must be installed by professionals in accordance to IEC standards as well as relevant State and
local regulations.
8. Inspect power cord before connecting.
9. Tub drain has to have at least 2" drain connection.
10.3/4” water supply connection on wall. ( install hot and cold water shut off supply valve.)
11.Water pressure supply minimum 45 PSI.
12. Attach Hot and Cold water supply lines according to the labels.
! Note: This device has to have an independent power switch with ground connection!
Connecting terminal for power supply wire
(According to the electric specification)
7 .8
(Unit:in)
7
47
.24
Connections of hot/cold
water pipe
4
■ Water and electric connections illustration
Bathtub size:59x32x34in
19.7
34
This illustration applies to right hand
side drain.
49
The position of the drain determines the left
or right side.
.2
15
59
.7 5
32
>2"Connection of
drain pipe
11
Installation & User Manual
Safety Guidelines
! Warning
-Do not use the product if you have high blood pressure, are suffering heart disease, or
intoxicated.
! Must
-Electric system must be grounded.
-The product should be installed by qualified professional personnel as per the safety
regulations regarding water and electricity installation and consumption requirements
prescribed by the local laws and regulations.
o
o
- The temperature of hot water supplied to the product should stay under 50 C (122 F).
-Shut off the power supply and close the cold/hot water supply valves if tub will not be
used for a long period of time.
- Contact your distributor regarding any problems.
Prohibition:
- Only qualified professional personnel are to assemble, or service the product.
- The product is for indoor use only. It can not be used outdoors.
Exclusions:
The manufacturer of the product shall be in no case liable for any problem or accident
arising out of or in connection with the failure to comply with the above-mentioned
regulations or the requirements stipulated in this manual.
Note: The Company reserves the right to make changes to the product without prior notice.
12
Installation & Use Manual
Specification
Size
Pack
Weight
Electric power supply
Power
59x32x34 in
1500x810x860mm
59x32x34 in
1500x810x860mm
59x32x34 in
1500x810x860mm
16.5x9.5x84.6 in
430x240x2150mm
G.W:65kg
N.W:65kg
G.W:65kg
N.W:65kg
G.W:65kg
N.W:65kg
According to the
electric specification
According to the
electric specification
Model
HY-1042
HZ-1242
HZ-1342
16.5x9.5x84.6 in
430x240x2150mm
16.5x9.5x84.6 in
430x240x2150mm
Accessories
Air Jet
Fill spout
Drain knob
Hand-held shower head
Floor drain stopper
Grab bar
Faucet
On/off
switch for blower
Handle
Pillow
13
Installation & User Manual
Usage
¾ Door system
! Please follow the steps to open and close it.
Safe lock
Press and pull
1. Before entering the tub, hold door handle with the
safety button pressed down and push it toward door
hinge to open the door(figure 1).
2. After entering the tub, with one hand hold the door
closed and with other hand pull the door handle. The
locking bolt and safety lock will engage automatically.
3. Repeat step 1 to open the door after bath.
Warning:
Figure1
Door handle
① Before closing the door, please make sure that the
crossbar is completely in the door. Otherwise the
crossbar will hit and scrape the bathtub.
② When using sit-in tub, please make sure the door is
closed properly and the safety lock is engaged.
③ The door handle is only for opening and closing the
door. Do not sit or rest any heavy objects on the door.
④Make sure the safety lock is engaged when the bathtub
is full or being filled with water. Please, avoid contact
with the door handle to avoid accidently opening the
door. Otherwise the water will pour out.
⑤ Do not close the door when the tub is not in use.
Thermostic mixing knob
Figure2
Fill spout
Figure3
+ Thermostatic valve use guide
1. Connect to the water supply, turn on the faucet knob
(figure 2,3,4).
2. Turning mixing knob for desirable temperature setting
(the red and blue marks indicate hot and cold water on
the mixer knob).
3. Turn off the water when tub is filled. (note: the water
level should be above the jets)
4. When using the hand-held shower, turn on the handheld shower knob and follow the step 2 to adjust water
temperature.
Thermostic mixing knob
Hand shower knob
Warning:
Fill spout knob
Before filling with water, please set temperature to its Hot
lowest setting, to avoiding scalding. Then adjust the mixer
knob to the temperature you desire.
14
Figure4
Cold
Installation & User Manual
+ Handheld shower use guide
Full shower spray
1. Shower head has two spray patterns, full shower spray
and massage spray (figure 5).
Figure5
2. Turn the face of hand-held shower spray clockwise or
counter-clockwise for the desired shower pattern.
Massage spray
Hand-held shower head
+ Bath types
Two types: Air massage(HY-1242), and soaking bath(HY1042,HY-1342).
+ Air pumps control
Press On/Off button to start the air blower system to
begin your massage. Press it again to shut the system off
(Figure7).
Bubble massage jet
Figure6
+ Heated air Pump
The heated air pump will run 20 minutes before shutting
off on its own. The pump can be immediately restarted if
more time is desired by pressing the on/off button. After
the air pump has been off for 20 minutes, it will
automatically start up again and will run about 20 minutes.
This is normal.
The unit is blowing out any water in the system and drying
the airlines. If you press the on/off button the cycle will
repeat itself.
Air blower switch
Figure7
+ Drain knob use guide
1. When filling the tub, turn the drain knob clockwise to
close the floor drain stopper ( figure 8).
2. To drain the tub water, turn the drain knob counterclockwise to open the floor drain stopper(figure 9).
(Note: DO NOT open the door until all water is drained
out.)
Drain knob
Figure 8
Floor drain stopper
Figure 9
+ Maintenance opening
Remove the screws on the plate of skirt to access the
maintenance opening(figure 10).
Figure10
Skirt (maintenance opening)
15
Installation & User Manual
Maintenance
!
Must make sure the power is disconnected before doing any maintenance.
1. Keep the bathtub clean and neat.
2. DO NOT use strong acids or alkali liquids to clean the bathtub or other parts.
3. When cleaning the shell and floor of the bathtub, please use a soft and dry cloth;
If there is slight dirt, please use the soft cloth or sponge to clean with a non
abrasive cleanser; Use rubbing alcohol to remove stubborn stains.
4. Use detergent that is specially made for acrylic tubs. The following substances are not to
be used: acids or alkali solutions, alcohol, acetone product. If these products are used,
damage to the tub and accessories may occur and the warranty will be void.
5. Don't use corrosive liquids to clean the surface of acrylic, glass and metal parts to avoid damaging
the finish. Don't use the coarse or abrasive cleaners to clean the surface of acrylic, glass and
metal parts to avoid damaging the surface.
6. Frequently check power lines, switches, water supply lines, drain pipes for possible damaged.
Replace as needed.
7. DO NOT allow the tub to run for more then 3 hours continuously.
Troubleshooting guide
Faults
Pump does not work
Cause of faults
Disposal
1. Check the circuit and reset or
1. Fuse is tripped due to short
circuit or overload
replace fuse if needed
2. Control system malfunction
2. Contact supplier
GFCI breaker / outlet
trips
1. Short circuit or other electrical issue.
Water from door
1.The door seal, is cracked or torn
1. Check the circuit
2. Replace or fix defective part
16
1. Replace seal
Installation & User Manual
Component List
Accessories
Model
HY-1042
HY-1242
HY-1342
Door
1
1
1
Safe lock
1
1
1
Door handle
1
1
1
Handle
2
2
2
Grab bar
1
1
1
Fill spout
1
1
1
Air jet
16
Hand-held shower head
1
1
Shower head mount
1
1
1
1
Pillow
1
1
Air blower switch
Drain
1
1
1
1
1
Air blower
Faucet
17
Caresee Equipment of Relaxation(Panyu,Guangzhou)Co.,Ltd.
Wanxing Industry Area Nanpu Island Panyu Guangzhou China
2011.12.12