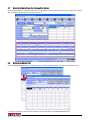
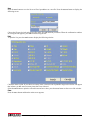
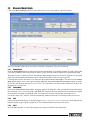
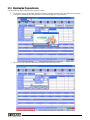
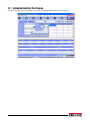
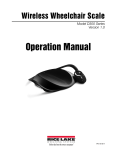
1
Body Pass Plus
Body Composition Scale Software
Software Program
User’s Manual
163290
Contents
About This Manual ................................................................................................................................... 1
System Specifications for Installing the Body Pass Plus Software Program......................................... 1
1.0
Body Pass Plus Software Installation ......................................................................................... 2
1.1
1.2
1.3
1.4
USB Driver Installation . . . . . . . . . . . . . . . . . . . . . . . . . . . . . . . . . . . . . . . . . . . . . . . . . . . . . . . . . . . . 5
Alternate USB Driver Installation. . . . . . . . . . . . . . . . . . . . . . . . . . . . . . . . . . . . . . . . . . . . . . . . . . . . 12
Un-installing the Software Program . . . . . . . . . . . . . . . . . . . . . . . . . . . . . . . . . . . . . . . . . . . . . . . . . 13
Data Backup and Restoration . . . . . . . . . . . . . . . . . . . . . . . . . . . . . . . . . . . . . . . . . . . . . . . . . . . . . 15
1.4.1
1.4.2
2.0
Data Backup. . . . . . . . . . . . . . . . . . . . . . . . . . . . . . . . . . . . . . . . . . . . . . . . . . . . . . . . . . . . . . . . . . . . 15
Data Restoration . . . . . . . . . . . . . . . . . . . . . . . . . . . . . . . . . . . . . . . . . . . . . . . . . . . . . . . . . . . . . . . . . 16
How to Use Body Pass Plus Software Program......................................................................... 17
2.1 Log-in . . . . . . . . . . . . . . . . . . . . . . . . . . . . . . . . . . . . . . . . . . . . . . . . . . . . . . . . . . . . . . . . . . . . . . . 17
2.2 Registering, Modifying, and Deleting . . . . . . . . . . . . . . . . . . . . . . . . . . . . . . . . . . . . . . . . . . . . . . . . 17
2.2.1
2.2.2
2.2.3
Member Registration. . . . . . . . . . . . . . . . . . . . . . . . . . . . . . . . . . . . . . . . . . . . . . . . . . . . . . . . . . . . . . 18
Member Modification . . . . . . . . . . . . . . . . . . . . . . . . . . . . . . . . . . . . . . . . . . . . . . . . . . . . . . . . . . . . . 18
Member Deletion . . . . . . . . . . . . . . . . . . . . . . . . . . . . . . . . . . . . . . . . . . . . . . . . . . . . . . . . . . . . . . . . 19
2.3 Search for a Member. . . . . . . . . . . . . . . . . . . . . . . . . . . . . . . . . . . . . . . . . . . . . . . . . . . . . . . . . . . . 19
2.3.1
2.3.2
Individual Member Search / Deletion . . . . . . . . . . . . . . . . . . . . . . . . . . . . . . . . . . . . . . . . . . . . . . . . . . 19
Entire Member Search . . . . . . . . . . . . . . . . . . . . . . . . . . . . . . . . . . . . . . . . . . . . . . . . . . . . . . . . . . . . 20
2.4 Setting the Communication Port . . . . . . . . . . . . . . . . . . . . . . . . . . . . . . . . . . . . . . . . . . . . . . . . . . . 21
2.5 Making and Transmitting a Logo . . . . . . . . . . . . . . . . . . . . . . . . . . . . . . . . . . . . . . . . . . . . . . . . . . . 22
2.5.1
2.6
2.7
2.8
2.9
Example of Making a Logo . . . . . . . . . . . . . . . . . . . . . . . . . . . . . . . . . . . . . . . . . . . . . . . . . . . . . . . . . 23
Transmitting Member. . . . . . . . . . . . . . . . . . . . . . . . . . . . . . . . . . . . . . . . . . . . . . . . . . . . . . . . . . . .
Receiving Data From the Body Composition Analyzer . . . . . . . . . . . . . . . . . . . . . . . . . . . . . . . . . . .
Measured Result List . . . . . . . . . . . . . . . . . . . . . . . . . . . . . . . . . . . . . . . . . . . . . . . . . . . . . . . . . . . .
Measured Result Graph. . . . . . . . . . . . . . . . . . . . . . . . . . . . . . . . . . . . . . . . . . . . . . . . . . . . . . . . . .
26
27
27
30
2.9.1
2.9.2
2.9.3
2.9.4
30
30
30
30
Viewing Graph . . . . . . . . . . . . . . . . . . . . . . . . . . . . . . . . . . . . . . . . . . . . . . . . . . . . . . . . . . . . . . . . . .
Saving Image . . . . . . . . . . . . . . . . . . . . . . . . . . . . . . . . . . . . . . . . . . . . . . . . . . . . . . . . . . . . . . . . . . .
Print . . . . . . . . . . . . . . . . . . . . . . . . . . . . . . . . . . . . . . . . . . . . . . . . . . . . . . . . . . . . . . . . . . . . . . . . . .
Close . . . . . . . . . . . . . . . . . . . . . . . . . . . . . . . . . . . . . . . . . . . . . . . . . . . . . . . . . . . . . . . . . . . . . . . . .
2.10 Checking the Program Version. . . . . . . . . . . . . . . . . . . . . . . . . . . . . . . . . . . . . . . . . . . . . . . . . . . . 31
2.11 Exiting the Body Pass Plus Program . . . . . . . . . . . . . . . . . . . . . . . . . . . . . . . . . . . . . . . . . . . . . . . 32
Technical training seminars are available through Rice Lake Weighing Systems.
Course descriptions and dates can be viewed at www.ricelake.com/training
or obtained by calling 715-234-9171 and asking for the training department.
© Rice Lake Weighing Systems. All rights reserved. Printed in the United States of America.
Specifications subject to change without notice. Rice Lake Weighing Systems is an ISO 9001 registered company.
October 2014
i
Rice Lake continually offers web-based video training on a growing selection
of product-related topics at no cost. Visit www.ricelake.com/webinars.
ii
Body Pass Plus Software Program
About This Manual
This manual can be viewed and downloaded from the Rice Lake Weighing Systems website at
www.ricelakehealth.com. Rice Lake Weighing Systems is an ISO 9001 registered company.
System Specifications for Installing the Body Pass Plus Software
Program
To run the program the following computer specifications must be in place.
• CPU: Pentium III, 600 MHz or greater
• Memory: 128MB
• Monitor resolution: 1024 x 768
• Operating system: Windows® 2000, XP, 7 (x86 x 64), Vista (x 86 x 64), Bluetooth or USB for
communication
To properly install and successfully use the software:
• PC must be connected to the Competitor Series body composition analyzer
• Have Body Pass Plus CD
• USB cable available for communication (not included)
Body Pass Plus Software Program —
1
1.0
Body Pass Plus Software Installation
Use the following steps to install the Body Pass Plus software on your PC.
1. Put the program installation CD into the PC CD-ROM drive. Check the contents of the CD.
2. Program installation is started by double-clicking the setup.exe file on the installation CD.
2
Body Pass Plus Software Program
3. The InstallShield Wizard screen will appear. Press the Next button on the screen displayed below.
4. The install program will determine a destination file for the Body Pass Plus software program. Press the
Next button to continue.
Body Pass Plus Software Program — Body Pass Plus Software Installation
3
5. Once the destination file is found, press the Install button to continue the installation.
6. The InstallShield Wizard will install the software to the desired destination and when complete, press the
Finish button.
4
Body Pass Plus Software Program
7. Once the program installation is complete, a Body Pass Plus shortcut icon is created on the PC desktop and
the program is added in the program tray.
1.1
USB Driver Installation
The Competitor Series can be directly connected to a PC using a USB cable. Use the following steps to install the
USB driver on the PC.
1. Connect the USB cable to the PC using the picture below.
Body Pass Plus Software Program — Body Pass Plus Software Installation
5
2. Once connected, a message appears that indicates new hardware is detected and the Found New Hardware
Wizard window appears. Put the Body Pass Plus program CD into the CD-ROM and choose [Install from a
list or specific location (Advanced)] and press Next.
3. When the window changes, choose Include this location in the search, and press Browse.
6
Body Pass Plus Software Program
4. In the Browse for Folder screen, choose the USB driver folder (located in the Body Pass Plus program CD
folder) and press OK.
5. Confirm that the folder which was chosen in Step 4 is assigned in the window shown below. Press Next.
Body Pass Plus Software Program — Body Pass Plus Software Installation
7
6. The software program will search for the USB driver and will automatically install.
7. Once installed, the following screen appears. Press the Continue Anyway button.
8
Body Pass Plus Software Program
8. Press the Finish button on the screen shown below when the USB serial port software has been installed.
9. After the USB serial driver has been installed, the Found New Hardware Wizard is executed again and starts
installing the USB serial port driver. This may be repeated two to four times.
10. Once the installation is complete, go to the Start —> Setup —> Control Panel —> System —> Device
Manager —> List and press the USB Serial Port (COM 3). The port number can be assigned another number.
Body Pass Plus Software Program — Body Pass Plus Software Installation
9
11. To change the port number, double click USB Serial Port (COM 3) then the Port Settings tab as shown in the
following picture and press OK.
12. Default settings are displayed below and press the Advanced button to change the COM port setting.
10
Body Pass Plus Software Program
13. Select the desired COM port setting from the drop down list and press OK. COM 2 is the port used as an
example in this manual.
14. Once the port number is changed and completed, communication is possible between the Competitor
Series body composition analyzer and the PC when connected together using the USB cable.
Body Pass Plus Software Program — Body Pass Plus Software Installation
11
1.2
Alternate USB Driver Installation
In the event that the Found New Hardware Wizard does not automatically appear, use the following steps:
1. Go to the My Computer icon on the PC desktop and right-click the mouse to access the pop up menu.
2. Press the Properties tab to access Device Manager.
3. When the Device Manager window appears, right-click your mouse to pop open the Scan for Hardware
Changes screen and start installing the software program from the beginning.
12
Body Pass Plus Software Program
1.3
Un-installing the Software Program
Important
Data backup should be done prior to un-installing the software program. Refer to Section 1.4 on
page 15 for information on backing up data.
1. Press the Start —> Setup —> Control Panel —> Add or Remove Programs. Choose Body Pass Plus in the
list of installed programs and then press the Remove button.
2. Select Remove and press the Next button as shown below.
Body Pass Plus Software Program — Body Pass Plus Software Installation
13
3. Press the Yes button to completely remove the selected application and features.
4. Press the Finish button to signify that the software program has been deleted.
14
Body Pass Plus Software Program
1.4
Data Backup and Restoration
The Body Pass Plus software program can be backed up and/or restored using the following steps.
1.4.1
Data Backup
It is preferable to back up all of the data if the software program needs to be reinstalled. Use the following steps to
do a data backup.
1. Copy My Computer —> local disk (C:) —> Body Pass (Eng) folder —> Database folder.
2. Make a database backup folder in the location where the file is to be saved and paste the database folder
copied in the database backup folder.
Body Pass Plus Software Program — Body Pass Plus Software Installation
15
1.4.2
Data Restoration
In order to check previous data after reinstalling the Body Pass Plus program, restore the backup data. Use the
following steps to restore data.
1. Before restoration, execute the Body Pass Plus program and exit out of it. That is because program related
files are created when the Body Pass Plus program is executed.
2. Copy the backup data (database folder) in the data backup folder that was made.
3. Overwrite the database folder in the following location: MyComputer —> local disk (C:) —> Body
Pass(ENG)folder.
4. If prompted to replace existing files, check Yes to all.
16
Body Pass Plus Software Program
2.0
How to Use Body Pass Plus Software Program
The following steps explain how to use the Body Pass Plus software program.
2.1
Log-in
At initial start up of Body Pass Plus, the following screen is displayed. Input the ID and the password given to you
and click on the Log-in button. The main screen of the program appears.
2.2
Registering, Modifying, and Deleting
Once logged into the Body Pass Software software program, the main screen menu appears.
Body Pass Plus Software Program — How to Use Body Pass Plus Software Program
17
2.2.1
Member Registration
Input personal information of a member and press the Save button. Enter the ID number, gender, name, date of
birth, and height of the member in the following fields.
1. ID number: enter the ID number of a new member. The ID is unique to that member and should not be
duplicated. If the ID number is duplicated, a warning window displays that the ID number is duplicated.
2. Name: Enter the name of the member.
3. Gender: Check the gender of the member.
4. Birthdate: Enter the date of birth of the member.
Telephone: Enter the phone number of the member.
Height: Enter the height of the member.
Activity: Choose one according to the amount of daily activity of the member. This is applied to the total
energy expenditure calculation of the member and is composed of six items.
• Target PBF
• Address
• Wrestler mode
• Email
5. After inputting all of the basal information of the member, press the Save button. All of the information
appears on the right hand side of the screen confirming the member information is registered.
2.2.2
Member Modification
Click a member to change personal information for. That member’s data is then listed under the information button.
After modifying the items you want to change, press the Modify button, then the member’s data is changed and
displayed again in the right hand list.
18
Body Pass Plus Software Program
2.2.3
Member Deletion
Like with modification, click a member to delete in the list and then click the Delete button. When the confirmation
window for member deletion appears, click the Yes button and the member is deleted. When deleting a member, all
measured data for the member is removed and it is not possible to restore that data back.
2.3
Search for a Member
There are several different ways to search for a member in the database. Those ways are explained in the following
sections.
2.3.1
Individual Member Search / Deletion
To do an individual member search, place the cursor on any part of the right hand list and right-click the mouse. A
pop up menu appears for Search Option/Delete. There are ID and name fields in each search option. Input ID or
name of the member to search for and then the member’s information is displayed. The search option can be
chosen by clicking the cc button beside the member list button. To see the latest measured result of the member,
press Measure Result in the menu buttons.
To see the measurement list of the member, double click on the member.
Searched Member Deletion
A member deletion is possible through a member search. Place your mouse on any part of the right hand list and
right-click your mouse. A pop up menu appears for Search Option/Delete. It is possible to delete the data of a
searched member or the entire member. When you choose Delete, a confirmation window for deletion is shown and
if you click Yes, in that window, the member information is deleted.
Body Pass Plus Software Program — How to Use Body Pass Plus Software Program
19
2.3.2
Entire Member Search
Click on the Entire Member List button on the right side of the main screen, then the entire member search screen
appears as shown below.
1. There are several ways to search for a member.
• Place the cusor in the middle of the screen and right-click the mouse to choose the searching option.
• Or click the Displaying button and the search option window appears.
• Or click Search Option button between the three tables and the search option window appears.
Assign all data, ID or measured date to be searched in the search option window and click the Search button, then
the searched member appears in the upper table like the graphic shown below.
2. Click on a member in the upper table; measured information of that member is displayed in the lower table.
3. Double-click one in the lower table, the result sheet of the measurement appears.
20
Body Pass Plus Software Program
2.4
Setting the Communication Port
Use the following steps to set the communication port between the Competitor Series body composition analyzer
and the Body Pass Plus software program.
1. Click on the Connect Port button in the menu buttons.
2. Click on the Port Scan button as shown below.
3. Available ports are searched and displayed.
4. Double-click the port connected with the body composition analyzer and CONNECTION OK appears.
5. Click the Apply button in the confirmation window for the chosen port. Click the OK button in the
confirmation window then the communication connection is completed. The Body Pass Plus shows the
state of applied communication port at the bottom right of the main screen.
Body Pass Plus Software Program — How to Use Body Pass Plus Software Program
21
2.5
Making and Transmitting a Logo
A logo can be attached to a result sheet. It is printed on the upper right hand portion of the result sheet and is
printed in black and white from the body composition analyzer. It can be printed in color when the printing is done
through the Body Pass Plus program. The following steps illustrate how to make a logo.
1. Press the Function —> Making Logo button located in the menu bar of the upper left part of the main
screen or Make Logo button in the menu buttons.
2. The following screen is displayed.
3. You can use the following menus in Logomaker.
File
Format
Edit
Background Color — Chooses the color of the
background.
Color — Chooses the color for the letter or line. It is
possible to choose a color from the color table at the
bottom of the Logo Maker window. The color selection
window appears by clicking on Format —>
Background color or Color or double clicking the left
side of the color table at the bottom of the Logo Maker
window. Choose the color you want and click OK. The
color is applied to the following job.
22
Body Pass Plus Software Program
Font — This allows you to choose the style, size, and color of the letter for the logo. The font window appears by
clicking Font. Choose the items you want and click OK. The font is applied to the following job.
Toolbox Menus
2.5.1
Example of Making a Logo
Use the following steps to make a logo like the one shown below.
Body Pass Plus Software Program — How to Use Body Pass Plus Software Program
23
1. Click the blue box in the color table at the bottom of the screen and click on the rectangle in the tool box to
draw a rectangle in the canvas area.
2. Open the font window by clicking Format —> Font. In the font window, choose Tahoma, Bold, 14 and red
color and press the OK button.
3. Press the T (text) button, place the cursor in the desired location on the canvas and enter RICELAKE.
24
Body Pass Plus Software Program
4. To move the text to the center of the canvas, click the arrow (select area) button in the toolbox. Place and
drag the mouse around the area to move, then a rectangular dotted line appears. To move the rectangular
area:
Click the rectangular area marked with the dotted line with the left -side of the mouse and move the mouse
without releasing the left side mouse, then the area is moved.
5. Open the font window by clicking Format —> Font. In the font window, choose Tahoma, Bold, 12, and
clack color and press OK.
6. Click on the T (Text) button, place the cursor in the desired location on the canvas and enter Weighing
Systems. If you want to change the location, do it in the same way as shown in Step 4.
Body Pass Plus Software Program — How to Use Body Pass Plus Software Program
25
7. After the logo is made, click on File —> Save in the menu bar on the upper left side of the logo marker
window then the logo is saved and converted to the image transmitted to the body composition analyzer.
8. Transmit the logo to the body composition analyzer by pressing the Transmitting Logo button in the logo
maker window, then the logo maker is closed and the transmitting logo file window appears. (Transmitting
logo file window also appears by clicking Transmit Logo button in the menu buttons of the main screen.
When the logo transmission is complete, the body composition analyzer sends a completion message along
with an audible signal.
2.6
Transmitting Member
Transmit the information of the member who will be measured to the body composition analyzer. Click on the
member in the right hand side of the list of the main screen and press the Transmit Member button to show the screen
(below). When the member transmission is complete, the body composition analyzer sends a completion message
along with an audible signal.
26
Body Pass Plus Software Program
2.7
Receiving Data From the Competitor Series
Once measurements are complete and member information has been transmitted, the body composition analysis
data is displayed on the main screen (shown below).
2.8
Measured Result List
Press the Measured Result button in the main screen to display the Measured Result List screen (shown below).
Or click on a member in the right list of the main screen first and press the Measured List button.
Body Pass Plus Software Program — How to Use Body Pass Plus Software Program
27
The following fields can be adjusted.
Search
Choose ID number or Name and set the search range, then press the Search button. The list of measured results
appear in the table.
Measure Result
Press the data to be viewed in the list first and press the Measure Result button then a preview of the result sheet
appears as shown below. Or double click the data then the preview screen appears.
F (Whole Body)
Name/ID
Matt / 000000005
Height
Weight
Date
5 ft
169.5
10.0
Age
27
Gender Male
in
yrs
08/11/2014 04:36:39
Body Composition
[lb]
Weight /Over
1. Body Composition
Standard Weight
153.2
L. B. M. /Over
30.2 [22.9~30.6]
/Over
T. B. W.
L. B. M.-T. B. W.
100.3 [88.1~93.6]
E. C. W.
62.3 [59.9~65.6]
T.B.W.: Total Body Water
30.2 lbs.
169.5 lbs.
39.0
/Optimal
I. C. W.
/Optimal
Body Fat
139.3 [122.5~130.0]
62.3 lbs.
38.0 lbs.
100.3 lbs.
/Optimal
38.0 [34.6~40.3]
I.C.W.: Intra Cellular Water
2. Assessment of Weight Control
E.C.W.: Extra Cellular Water
Assessment of Weight Control
Item
Under
Weight
B. M. I.
70
lb
Optimal
80
90
110
120
130
27.50
30.00
32.50
140
25
30
35
150 (%)
169.5
14.50
16.50
18.50
21.75
10
12.5
15
17.5
25.00
kg/m2
P. B. F.
Over
100
35.00 (kg/m 2)
24.3
%
20
40
0.75
W. H. R.
B.M.I.: Body Mass Index
P.B.F.: Percent of Body Fat
0.90
0.80
M.B.F.: Mass of Body Fat
L.B.M.: Lean Body Mass
W.H.R.: Waist to Hip Ratio
Segmental Analysis
Item
(%)
17.8
L.B.M.
L
9.41
[lb]
Under
Optimal
3. Ratio of E.C.W / T.B.W.
Over
70
80
90
100
110
120
130
140
150 (%)
70
80
90
100
110
120
130
140
150 (%)
70
80
90
100
110
120
130
140
150 (%)
Arm
R
9.54
L
25.56
R
25.90
Leg
Trunk
4. Segmental Analysis
68.99
L : Left R : Right
Goal Setter
5. Goal Setter
Wrestler Mode
7
TARGET P.B.F.
%
5
TARGET P.B.F.
Predicted Weight
149.7
lb
Min Weight
Predicted Fat Mass
10.4
lb
Fat Mass
Control
19.8
lb
L.B.M.
%
146.6
lb
7.3
lb
139.3
lb
Ratio of E.C.W. / T.B.W.
Normal
Borderline
Over
B.M.R.
1656
Kcal
376
:
B.M.R. : Basal Metabolic Rate
0.378
28
Body Pass Plus Software Program
Impedance
6. Basal Metabolic Rate
100.3 lbs.
139.3 lbs.
39.0 lbs.
139.3 lbs.
Save
Press the Save button to save the list as an Excel spreadsheet or a text file. Press the Save As button to display the
following screen.
Choose the file type desired and assign a file name, file path and then press Save. When the confirmation window
for saving the file appears, press OK to finish saving the file.
Print
To print the list, press the Print button to display the following window.
Check the items to print. If you choose too many items, it becomes out of printable range and a window will appear
that informs you that states too many items have been selected.
Select the Print button to print the selected items and once done, press the Close button to close out of the window.
Close
Press the Close button and then the main screen appears.
Body Pass Plus Software Program — How to Use Body Pass Plus Software Program
29
2.9
Measured Result Graph
Click on the Measured Graph button from the main menu to access the graph for a specific member.
There are four tabs which can be accessed for a member’s information. They are listed below.
2.9.1
Viewing Graph
Press the Viewing Graph button to select measurement items and dates of a particular member. A graph is shown that
is divided according to the selected items by means of a tab. Pressing each tab displays the corresponding graph.
When the graph is completely drawn, the Print and Save Images buttons are activated. Right above the graph
marked are the maximum and minimum values with the items under search over a given period.
Choosing other items in this same level, inactivates the buttons Print and Save Images. You must click the Viewing
Graph button again to view a new graph containing additional items and the Print and Save Images buttons are ready.
In case the measurement data pieces are 10 or less, the related dates are all presented. Otherwise the dates are
displayed on a weekly basis.
2.9.2
Saving Image
Pressing the Saving Image button enables saving the graph as an image file. After pressing the button and selecting
the location to save it to, save the graphs with BMP file extensions for each item chosen to be printed out. Graphs
are included in one image and when the entire seven items are selected, a total of three images are saved.
For the file name, First - Second - Third is automatically attached to the head of each name of files to be saved.
2.9.3
Print
Upon pressing the Print button, a messages appears, Do you want to print out the selected items? Selecting the OK
button will print a page with three graphs on it. The contents printed are the same as the saved.
2.9.4
Close
Press the Close button to exit out of the graphs screen and proceed back to the main menu.
30
Body Pass Plus Software Program
2.10 Checking the Program Version
Use the following steps to check on the program version.
1. To check the version of the Body Pass Plus software program currently used, press Body Pass program —
> Program information, then the program version window appears as shown below.
2. The version is also shown at the bottom left hand side of the main screen.
Body Pass Plus Software Program — How to Use Body Pass Plus Software Program
31
2.11 Exiting the Body Pass Plus Program
The Body Pass Plus software program is closed by pressing the Exit button in the main screen.
32
Body Pass Plus Software Program
230 W. Coleman St. Rice Lake, WI 54868 USA
U.S. 800-472-6703 Canada/Mexico 800-321-6703 International 715-234-9171
Europe +31 (0) 88 2349171
www.ricelake.com www.ricelake.mx www.ricelake.eu www.ricelake.co.in m.ricelake.com
© Rice Lake Weighing Systems
10/2014
PN 163290