1
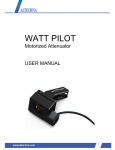
WATT PILOT
Motorized Attenuator
USER MANUAL
1
WATT PILOT
October 2011
Copyright Altechna R&D Co. Ltd. All Rights Reserved
No part of this manual, including the products and software described in it, may be
reproduced, transmitted, transcribed, stored in a retrieval system, or translated into any
language in any form or by any means, except documentation kept by the purchaser for
backup purpose, without the express written permission of Altechna R&D Ltd.
(“ALTECHNA R&D”).
Product warranty or service will not be extended if:
1- The product is repaired, modified or altered. Unless such repair, modification of
alteration is authorized in writing by ALTECHNA R&D; OR
2- The serial number of the product is defaced or missing.
ALTECHNA PROVIDES THIS MANUAL “AS IS“ WITHOUT WARRANTY OF ANY KIND,
EITHER EXPRESS OR IMPLIED, INCLUDING BUT NOT LIMITED TO THE IMPLIED
WARRANTIES OR CONDITIONS OF MERCHANTABILITY FOR A PARTICULAR
PURPOSE. IN NO EVENT SHALL ALTECHNA, ITS DIRRECTORS, EMPLOYEES OR
AGENTS BE LIABLE FOR ANY INDIRECT, SPECIAL INCIDENTAL, OR
COSEQUENTIAL DAMAGES (INCLUDING DAMAGES FOR LOSS OF PROFITS, LOSS
OF BUSINESS, LOSS OF USE OR DATA, INTERPUTION OF BUSINES AND THE LIKE),
EVEN IF ALTECHNA HAS BEEN ADVISED OF THE POSSIBILITY OF SUCH DAMAGES
ARISING FROM ANY DEFECT OR ERROR IN THIS MANUAL OR PRODUCT.
SPECIFICATIONS AND INFORMATION CONTAINED IN THIS MANUAL ARE
FURNISHED FOR INFORMATIONAL USE ONLY, AND ARE SUBJECT TO CHANGE AT
ANY TIME WITHOUT NOTICE, AND SHOULD NOT BE CONSTRUED AS A
COMMITMENT BY ALTECHNA. ALTECHNA ASSUMES NO RESPONSIBILITY OR
LIABILITY FOR ANY ERRORS OR INACCURACIES THAT MAY APPEAR IN THIS
MANUAL, INCLUDING THE PRODUCTS AND SOFTWARE DESCRIBED IN IT.
THIS MANUAL IS DIRECTLY CONNECTED TO FIRMWARE VERSION. LATEST
FIRMWARE AND MANUAL VERSIONS CAN BE DOWNLOADED FROM
www.wophotonics.com.
Products and corporate names appearing in this manual may or may not be registered
trademarks or copyrights of their respective companies, and are used only for identification
or explanation and to the owner’s benefit, without intent to infringe.
2
Contents
1.
Introduction ............................................................................................................. 4
1.1 Watt Pilot short description .................................................................................. 4
1.2 General safety requirements ............................................................................... 4
Symbols .................................................................................................................. 4
Regulation............................................................................................................... 5
1.3 Operating and storage conditions ....................................................................... 6
2.
Operation principle ................................................................................................ 6
2.1 Watt Pilot main components ................................................................................ 7
3.
Assembling ............................................................................................................. 8
4.
Software installation .............................................................................................. 9
5.
Firmware upgrade ............................................................................................... 13
6.
Watt pilot control software .................................................................................. 17
6.1 Calibrate/Direct Control tab................................................................................ 17
6.2 Watt Pilot tab ........................................................................................................ 18
6.3 Settings tab ........................................................................................................... 19
7.
Watt Pilot controller ............................................................................................. 22
7.1 Watt Pilot controller specifications .................................................................... 22
7.2 Watt Pilot controller connections ....................................................................... 23
7.3 Connecting stepper motor to Watt Pilot controller.......................................... 26
7.4 Watt Pilot controller internal block diagram ..................................................... 28
7.5 Controller operation modes................................................................................ 29
7.6 STEP/DIR mode .................................................................................................. 30
7.7 STEP/DIR INTERFACE connector pin out. ..................................................... 31
7.8 Input signal timing requirements ....................................................................... 34
7.9 USB mode............................................................................................................. 34
7.10 Watt Pilot controller connection examples and input circuit diagram .......... 35
8.
Watt Pilot controller serial command summary .............................................. 36
8.1 Serial command usage in windows. ................................................................. 45
9.
Watt Pilot controller dimensions ........................................................................ 47
10. Watt Pilot dimensions ......................................................................................... 48
11. Revision history.................................................................................................... 49
3
1. Introduction
This manual is designed to help to install and operate Watt Pilot. Before
installing and operating Watt Pilot please read installation and operation
instructions carefully. Safety instruction must be read especially careful. If there
are
any
questions
about
manual
contents
please
contact
[email protected]. Altechna reserves the right to update contents of the
manual without notification.
1.1 Watt Pilot short description
Motorized Watt Pilot is a computer controlled laser beam attenuation device. It
attenuates free space laser beam/pulse continuously without introducing
additional energy fluctuations. Watt Pilot communicates with computer via USB.
Also it has STEP/DIR interface for controlling via other devices.
1.2 General safety requirements
Motorized Watt Pilot is designed to operate in conjunction with laser system. All
applicable rules and regulations for safe operation of lasers must be known and
applied while installing and operating Watt Pilot. The customer is solely
responsible for laser safety while using Watt Pilot as standalone or integrated
into system. The customer must use suitable protective measures.
While assembling or operating Watt Pilot, cannot be stared into direct or
scattered laser beam. All parts of the body must be kept away from the laser
radiation. While adjusting laser beam path through Watt Pilot laser power must
be low as possible. The risk of hazardous laser radiation can increase while
optical components or instruments are used in combination with Watt Pilot.
Appropriate eye protection must be worn all times. Electrical safety
requirements must be complied while assembling and operating Watt Pilot.
Symbols
WARNING!
Sections marked with this symbol explain dangers that might result in personal
injury or death. Always read the associated information carefully, before
performing the indicated procedure.
ATTENTION!
Paragraphs preceded by this symbol explain hazards that could damage the
instrument and the connected equipment or may cause loss of data.
NOTE
This manual also contains "NOTES" and "HINTS" written in this form.
4
Regulation
ATTENTION!
The following statement applies to the products covered in this manual, unless
otherwise specified herein. The statement for other products will appear in the
accompanying documentation.
These limits are designed to provide reasonable protection against harmful
interference in a residential installation. This equipment generates, uses, and
can radiate radio frequency energy and, if not installed and used in accordance
with the instructions, may cause harmful interference to radio communications.
However, there is no guarantee that interference will not occur in a particular
installation. If this equipment does cause harmful interference to radio or
television reception, which can be determined by turning the equipment off and
on, the user is encouraged to try to correct the interference by one or more of
the following measures:
- Reorient or relocate the receiving antenna.
- Increase the separation between the equipment and receiver.
- Connect the equipment into an outlet on a circuit different from that to which
the receiver is connected.
- Consult the dealer or an experienced radio/TV technician for help.
ALTECHNA R&D is not responsible for any radio television interference caused
by modifications of this equipment or the substitution or attachment of
connecting cables and equipment other than those specified by ALTECHNA
R&D. The correction of interference caused by such unauthorized modification,
Substitution or attachment will be the responsibility of the user.
ATTENTION!
Cellular phones or other radio transmitters are not to be used within the range
of three meters of this unit since the electromagnetic field intensity may then
exceed the maximum allowed disturbance values according to IEC 61326-1.
5
1.3 Operating and storage conditions
ATTENTION!!!
For proper Watt Pilot functioning please use assigned controller (found in the
same package). Using unassigned controller might be harmful to the device.
Environmental conditions that must be hold while storing, servicing and
operating are:
• Storage temperature should be between -35 °C and +60 °C.
• Operating temperature is 25 °C ± 10 °C.
• Watt Pilot must be protected from humidity, dust and corrosive vapors to avoid
damaging optical components and electronics.
• Avoid strong static electricity and electromagnetic fields.
2. Operation principle
Figure 1. Watt Pilot operation principle. Color differences shows intensity of laser beam.
Brighter red means more intensive laser beam.
The motorized Watt Pilot incorporates 2 high performance Brewster type thin
film polarizers, which reflect s-polarized light while transmitting p-polarized light.
Rotating phase retardation of λ/2 wave plate is placed in the incident polarized
laser beam. The intensity ratio of those two beams may be continuously varied
without alteration of other beam parameters by rotating the wave-plate. The
intensity of either exit beam, or their intensity ratio, can be controlled over vide
dynamic range. P-polarization could be selected for maximum transmission, or
high purity s-polarization could be reflected when maximum attenuation of the
transmitted beam takes place. Proper functioning of Watt Pilot requires optimal
configuration of optical elements regarding to incident laser beam polarization
contrast. Higher incident laser beam polarization contrast, leads to higher Watt
Pilot output polarization contrast.
6
2.1 Watt Pilot main components
Optical components are placed into mechanical holders. Main mechanical
components of motorized Watt Pilot are shown in Figure 2. Waveplate mount is
designed to 1 inch diameter waveplate λ/2.
Figure 2. Watt Pilot main components.
Wave plate mount is attached to micro step motor. Waveplate inside the
waveplate holder is rotating around the optical axis of incident laser beam.
Micro step motor and waveplate mount are shipped together in one piece, if
there is no other request. Brewster type thin film polarizers are placed into
adapter for polarizers. Polarizers to the mount are fixed using 6 plastic bolts (3
for each polarizer). Adapter for polarizers and waveplate mount are fixed while
using M4 screw with vinyl cap. Watt Pilot might be fixed to an optical table using
posts and clamps or to the custom system while using M6 or M4 screw on the
bottom and M4 screw on the side (see “10. Watt Pilot dimensions”).
7
3. Assembling
Figure 3. Assembling the Watt Pilot.
NOTE: Powder free gloves must be worn while mounting optical components.
Avoid touching and scratching optical surfaces.
STEP 1
Place polarizers into mechanical adapter. Polarizers must face each other with
surfaces coated with polarizing coating. Polarizing coating is marked with an
arrow, so you have to put the polarizers with the arrows on the sides facing
each other. Then fix polarizers with the plastic bolts (use all 3 plastic bolts to fix
one polarizer).
NOTE: do not tighten up the bolts too much since it can bend the polarizer and
thus distort the laser beam.
STEP 2
Put wave plate into attenuator between two mounting rings as shown. Be sure
the wave plate is immobilized tightly.
8
STEP 3
Attenuator consists of two mechanical parts. You should assemble both
mechanical parts together.
STEP 4
Use fixing screw for tightening both parts together.
4. Software installation
Watt Pilot Controller software is compatible ONLY with LATEST controller’s
firmware. User MUST UPGRADE firmware right after installing “Watt Pilot
Controller” software (for Watt pilot purchased before 2011-06-29, after this date
all Watt pilots are compatible with control software, keeping up to date will
improve operationality).
To set up Watt Pilot:
1. Disconnect any Watt Pilot Controllers from computer.
2. Browse to “\Watt Pilot Installer\” folder and run setup.exe. (user get
USB flash stick with all necessary files, or user can download all files
from www.wophotonics.com)
3. Setup window should appear, press “Next” to continue, select
installation directory and press next.
4. Click next.
9
5. Press “Next” to start installation. USB drivers are installed/updated
automatically if needed.
6. Click next.
7. Wait to finish.
10
8. Press Close to exit installer. Watt Pilot Controller icons should appear
on desktop and start menu.
9. Plug in DB-9 Watt Pilot motor connector.
10. Connect Watt Pilot controller with PC via USB cable.
11. Connect 12V adapter (power source) to Watt Pilot controller.
12. Turn on device by switching to “ON” position. Green LED indicates
that device is turned on (Figure 4).
Figure 4. “ON/OFF” switch is marked in red.
13. Figure 5 shows the way to the COM port selection. Firstly right click
on “Computer”, then “Properties”, “Device Manager” and “Ports (COM
& LPT)”.
11
Figure 5. Finding the USB port.
NOTE: by default settings COM1 is always reserved by WINDOWS, and must
not be used by this device.
14. One port will be called “Silicon Labs”. Remember its number in the
brackets. Attenuator is installed and ready to use.
15. Start “Watt pilot controller.exe” (See “6. Watt pilot control software”).
12
5. Firmware upgrade
Before using “Watt Pilot Controller” software, user must have the latest firmware
in controllers. There are two versions of controller hardware. User always
purchase latest firmware version. For up to date version check
www.wophotonics.com. Version can be distinguished by controller appearance:
Firmware upgrade
button
Controller version 2.1 (Black plastic front panel)
NOTE: For older version controllers contact ALTECHNA R&D, via email
[email protected].
Each controller which firmware is going to be updated must be tied to COM2
serial port in windows. To change com port of controller, go to device manager,
under section “Ports (COM & LPT)”:
13
Double click on “Silicon Labs” port name, press “Port Settings” tab and click
“Advanced”. Choose “COM Port Number” and select “COM2”. Then click ok on
all of this windows.
Disconnect and reconnect USB cable after changing COM port number.
Controller and computer are ready to upgrade firmware.
14
NOTE: By default settings COM1 is always reserved by WINDOWS, and must
not be used by this device.
To upgrade firmware, follow instructions below according to hardware version.
For controller version 2.1:
1. Connect controller to computer;
2. Turn off controllers power;
3. Press and keep pressed firmware upgrade button, located under
small hole in front panel (as shown in picture before);
4. Turn on the power, while keeping firmware upgrade button
connected. Button can be released after 5 seconds after applied
power supply;
Step I) Go to “\Firmware and tools\” folder and run “AvrProg.exe”. Firmware
upgrade window should appear. If not, restart pc ant start from
firmware beginning.
1
2
3
Upgrade
upgrade
utility
window
before
Upgrade
utility
successful upgrade
window
after
Step 2) Browse for “Firmware v2.1 [date].hex” files in appreciate folder
“\Firmware and tools\Firmware v2.1 [date]\”, according to controller
version, and open it.
15
Step 3) Press “Program” button under flash section to upgrade firmware.
Progress bar should move and “OK” should be displayed after
“Verifying…” if upgrade was successful.
Step 4) To Restore controller to default settings, browse for “Settings v2.1
[date].hex” or “Settings v2.0 [date].hex” file in according folder by
version. Press “Program” button under EEPROM section. Default
settings are shown in the picture below.
Figure 6. Default settings for v2.1 controller.
Step 5) Close firmware upgrade utility and restart controller. Watt Pilot is
ready to use.
16
6. Watt pilot control software
This chapter will guide you through control software, functions, and settings.
When starting device for the first time, it will automatically ask to calibrate Watt
Pilot.
6.1 Calibrate/Direct Control tab
2
4
3
1
6
5
7
8
Figure 7. Calibrate/Direct Control tab.
Calibrate/Direct Control menu options:
1) Connection menu, when program starts it automatically scans for
plugged in COM ports. Select your Watt pilot COM port and press
Connect. By user decision, watt pilot can be named. Double click on text
(“DoubleClick to Renam”), max 20 characters’ (spaces counts in). Also
this menu shows current position by steps. Connection menu will be
shown on all other menu.
2) Once pressed it will move Watt pilot to zero position.
3) Show current angular position.
4) When check box is checked, it unlocks direct control buttons. User may
move waveplate by his decision to find minimal attenuation position.
5) “Stop” button stop motor and waveplate stops rotating.
6) Show current position by steps.
7) Press this button when you find minimal attenuation. Controller will be
calibrated by this position
17
8) When check box is checked, it unlocks attenuation parameters. User can
enter real measured lowest/peak attenuation parameters; program will
calibrate attenuation settings by this setting. Also user can define
measurement units (percent by peak and lowest energy, by mili Joules or
by mili Watts).
6.2 Watt Pilot tab
1
2
3
4
5
Figure 8. Watt Pilot tab.
Watt Pilot menu options:
1) User can enter direct value of energy (mJ or mW).
2) Other possibility for setting energy value can be done by sliding bar.
3) When user set energy (by direct value or sliding bar), user must press
“set Energy” button to move waveplate.
4) “Stop” button stop motor and waveplate stops rotating.
5) For user decision motor can be turned off/on. It will cut power for motor.
NOTE: When motor is turned off, it will not move. So user can not set energy or
calibrate. User must turn on motor before moving it. Also reduce amount
of heat generated from step motor, it servers as longer lifetime of device.
18
6.3 Settings tab
1
2
6
3
7
4
8
5
9
Figure 9. Watt Pilot settings tab.
Settings menu options:
1) User can select motor resolution. It means that step to turn wave plate
360o is variable from 15600 steps to 249600 steps, but only by certain
values (15600, 31200, 62400, 124800, 249600 step per 360o).
NOTE: Setting bigger resolution will change waveplate angular speed, the
bigger resolution the slower waveplate turns.
NOTE: All step motors has resonance. Resonances are a physical effect, which
depend on many facts. All Stepper have this issue. Changing the
frequency only a small bit most time solve this problem. One way which
often helps is to change the step mode. Setting halfstep mode mostly (for
99% of stem motors) corrects resonance problem.
2) When this check box is checked, motor power is enabled, when not,
motor power disabled.
3) Motor turning parameters: speed, acceleration and deceleration.
a. Speed – motor turning speed, varies from 1 – 65000. 1 is slowest,
65000 is fastest. When user changes this parameter, software
automatically will show speed in degrees per second.
19
b. Acceleration – how fast motor achieve definite speed.
Acceleration varies from 0 to 255. When user set it to 0, where is
no acceleration, 1 is slowest acceleration and 255 is fastest.
c. Deceleration – how fast motor stops. Deceleration varies from 0 to
255. 0 is no deceleration, 1 is slowest deceleration and 255 is
fastest.
NOTE: Changing these parameters will change device operationality.
4) Motor current regulation. User can define how much current can flow
through motor. Watt pilot use motion current – 0.95A and stop power
0.30A.
WARNING! Watt Pilot uses only these current values. When user changes
these parameters, motor can overheat and damage Watt Pilot
permanently. RMA are not available when user damages Watt
Pilot.
If Watt Pilot controller is used to drive step motors not for
attenuator, current values can be changed to meet motor
requirements.
5) Zero position options. This device can report when Watt Pilot hits zero
position and show how many steps were made to turn 360o. But where is
no possibility in this program to show these zero position values. It is
created for users which develop their own programs, or control device by
terminal. When checked:
a. Report Hardware zero position – device show how many steps
were made when hitting zero position.
b. Reset zero position if in zero position – device start counting step
from 0 (reset value).
NOTE: By default these options are disabled.
20
6) STEP/DIR mode settings:
a. Overwrite enable input. When it is checked, controller ignores
STEP/DIR D-SUB15 connectors 3 pin (see “7.7 STEP/DIR
INTERFACE connector pin out.”) logic level. User can choose to
enable/disable motor in STEP/DIR operating mode.
b. Overwrite DIR input. When checked, controller ignores STEP/DIR
D-SUB15 connectors 2 pin (see “7.7 STEP/DIR INTERFACE
connector pin out.”) logic level. User can choose in which direction
motor turns when operating in STEP/DIR mode.
NOTE: By default this settings is turned off.
7) STEP/DIR current. When in STEP/DIR mode user can select current
value.
8) Read settings. Program reads settings from device.
9) Save settings. When user set desired values, it is saved in program, but
only for time when device is turned on. When device is turned off, it
automatically changes values to last saved. By clicking this button user
saves all setting in device, and they do not change if device is turned off.
NOTE: When user made some modifications in settings and it gives desired
effect, user must save it, because modified settings can be lost.
NOTE: User can reload default settings from a file (see “5. Firmware
upgrade”).
21
7. Watt Pilot controller
7.1 Watt Pilot controller specifications
Virtual serial port (“COM port”) settings then attached to USB:
Baud Rate 38400
8 data bits
1 stop bit
Parity: None
Flow control: None
Controller input (“STEP/DIR INTERFACE” connector):
Input pins
Description
UartRx
UartTx
UART baud rate 38400, 8 data bits, 1 stop bit, no parity. RXD and
TXD pins are 5V compatible with reference to GND pin. Maximal
input voltage +5.5 V
Step/Dir/En
These pins are optically isolated, 3.3 V – 5 V compatible.
Input current requirement per pin:
4.6 mA @ 2.8V
5.2 mA @ 3.3V
6.8 mA @ 5 V
ModeSel
These logic pins are not optically isolated. 5V compatible with
UartOn
reference to GND. Maximal input voltage +5.5 V
Motor output:
Characteristic
Rating
Max output voltage
12 V
Max output current
2A
Current regulation type
Pulse Width Modulation
Microstepping capability
Full, Half, Quarter, Eight, Sixteen steps
Step frequency
Up to 4 kHz
Controller has internal overheat protection.
Open loop operation: this means there is no feedback about absolute motor
position, only internal position counters value can be acquired
22
7.2 Watt Pilot controller connections
Watt Pilot front and rear connectors are shown in the pictures below.
Figure 10. USB-B connector, Firmware upgrade button (hidden
undersmall hole, highlighted by arrow) and “STEP/DIR INTERFACE”
D-SUB15 connectors are located in front.
•
USB is used to control Watt Pilot with computer.
•
Firmware upgrade button must be pressed with needle in order to
upgrade firmware – see this document “5. Firmware upgrade” about
firmware upgrade.
“STEP/DIR INTERFACE” connector can be used to control Watt Pilot
•
with microcontroller via UART in USB mode or in STEP/DIR mode –
see “
23
•
7.6 STEP/DIR mode” about STEP/DIR mode and “STEP/DIR
INTERFACE” connectors pinout.
Figure 11. Power supply connector, power switch and D-SUB9
connector for connecting Watt Pilot motor are located in rear of
controller.
•
•
Controller requires +12VDC 2A power supply
See “7.3 Connecting stepper motor to Watt Pilot controller” for details
about “MOTOR” connector
NOTE: Watt Pilot controller can be used to drive most of stepper motors, not
only from WATT PILOT. For example most linear stages are driven by
stepper motors, so these controllers can be used to control them. More
about such capability see section “7.3 Connecting stepper motor to
Watt Pilot controller”
24
Watt Pilot controller wiring scheme is shown in Figure 12.
Figure 12.
12 Wiring diagram of Watt Pilot controller.
Computer/microcontroller
microcontroller or both can be used with it.
25
7.3 Connecting stepper motor to Watt Pilot controller
There are two types of stepper motors: unipolar – with six wires, and bipolar –
with 4 wires. Controller is designed to drive bipolar stepper motors. To connect
unipolar motor common wires from both windings should be left unconnected.
“A”, “A\”, “B”, “B\” wires should be connected to “Motor” connector as described
in Figure 13.
Unipolar stepper motor
A Black
Com Yellow
Shaft
Shaft
B\ Blue
B Red
B\ Blue
Com White
A\ Green
B Red
A\ Green
Motor wire
Controller
number
A
4
Com (Yellow)
Leave unconnected
A\
3
B
1
Com (White)
Leave unconnected
B\
2
Bipolar stepper motor
A Black
pin
Figure 13. Connecting unipolar stepper motor to Watt Pilot controller.
Resistance of motor windings usually is less than 10 Ohms, so connecting
cable wires must be as short as possible and with significant wire diameter
(>0.75 mm2). Small resistance of wires reduce noise and power loss.
Table 1. Watt Pilot controller “MOTOR” connector pin out (DB-9 Female).
Pin No.
1
2
3
4
5
6
7
8
9
Description
Motor winding B (usually red wire)
Motor winding B\ (usually blue wire)
Motor winding A\ (usually green wire)
Motor winding A (usually black wire)
No connection
Zero position switch (return, see Figure 16)
No connection
No connection
Zero position switch (+5V, see Figure 16)
26
5
1
9
6
NOTE: Watt pilot drivers were tested with other, more powerful stepper motor
and performed well, but better for consumers to contact ALTECHNA
R&D for more info. Controller was tested with step motor at 2.4V and
2.8A per phase.
27
7.4 Watt Pilot controller internal block diagram
1-4 6, 9
Zero position switch
Motor
6, 9
Feedback from zero position switch
560 Ω
5
ModeSel
8
NC
15
+5V
SW B
Internal +5V
Internal GND
4
ZeroPosC
Internal or external STEP
Step (A)
Step (K)
Internal or external DIR
1
9
Internal Step/Dir
signal generation
Motor
driver
Internal or external ENABLE
Step/Dir connector
560 Ω
Int. EN
Dir (A)
Dir (K)
Software overwrite
ENABLE and DIR inputs
USB
mode On
2
10
Int. DIR
560 Ω
Int. STEP
3 Enable (A)
11 Enable (K)
GND
Set motor
power
Command
parser
UartTx
UartRx
UartOn
13
1, 4
SW A
USB
connector
14
7
6
Motor
connector
SW E
SW F
SW C
SW D
12 ZeroPosE
Figure 14. Block diagram of Watt Pilot controller
Watt Pilot controller consists of:
1.
Motor driver
a.
This block drives motor directly, according to
Step/Dir/Enable/Motor power signals
2.
Command parser
a.
This block parses commands, acquired from USB or UART,
depending on switch A state (SWA). The state of switch A can
be changed by logic level on input “UartOn” in “STEP/DIR
INTERFACE” connector
b.
This block can select which Enable and Dir signals to use in
STEP/DIR mode: internally generated or picked up from
“STEP/DIR INTERFACE” connector pins. Switch E and F are
used for this purpose
3.
Internal Step/Dir signal generator
a.
This block generates acceleration, steady speed and
deceleration step pulses, dir and enable signals if working in
USB mode
28
7.5 Controller operation modes
Watt Pilot controller is able to operate in two modes:
•
USB mode
o In USB mode, motor is turned by computer software. Controller is
attached to computer via USB cable.
•
STEP/DIR mode
o In STEP/DIR mode, motor is turned by external 3.3V – 5V signals,
applied to front “STEP/DIR INTERFACE” connector on controller.
Controller can be attached to non typical devices, for example
signal generators, microcontrollers.
NOTE: There are 5V UART protocol pins in “STEP/DIR INTERFACE”
connector. UART is alternative to USB connection with computer,
and can be used to attach Watt Pilot controller to microcontroller
which has UART support, so computer can be replaced by
microcontroller.
Operation mode can be selected by interconnecting 13 (GND) and 5 (ModeSel)
pins in “STEP/DIR INTERFACE” D-SUB15 female connector. If 13 and 5 pins
are interconnected controller works in STEP/DIR mode. If 13 and 5 pins are not
connected, controller works in USB mode.
29
7.6 STEP/DIR mode
Controller works in STEP/DIR mode if 13 (GND) and 5 (ModeSel) pins are
interconnected in D-SUB15 female connector (shown in Figure 15). In this
mode USB connection and computer is not necessary, Watt Pilot is controlled
by 5 V level signals applied to “STEP/DIR INTERFACE” connector. These
signals are called “STEP” (pins 1, 9), “DIR” (pins 2, 10), and “ENABLE” (pins 3,
11). “DIR” signal sets turn direction of motor (0V – motor turns
counterclockwise, 3.3V – 5V – motor turns clockwise). Voltage transitions from
0 V to +5 V on “STEP” input advances motor per one step. +5 V on “ENABLE”
input shuts down motor and step input is ignored, use this input to reduce motor
heating. Controller STEP/DIR interface input circuit is shown in Figure 18.
ATTENTION!!!
“ENABLE” pin must be switched to 0 V then operating in STEP/DIR mode and if
motor is not to be used. In STEP/DIR mode, a fixed current is applied to the
motor all the time and motor can overheat if “ENABLE” pin is not handled.
Another solution to overheat is to reduce TTL current in Watt Pilot controller
current settings using PC software.
Feedback about zero position switch state can be read from “STEP/DIR
INTERFACE” connector pins “ZeroPosE” and “ZeroPosC”. These pins are
phototransistor’s emitter (pin 12) and collector (pin 4). Phototransistor is open
(low resistance state) if zero position switch is pressed, and closed (resistance
between emitter and collector is high) if zero position switch is not pressed
(most of the time). Zero position switch is mechanical and located near the
attenuators waveplates holder. Holder pushes it then turning, and pressed state
can last up to 5 degrees (equal to 150 – 500 steps with half stepping
resolution). In USB mode, when returning to zero position, controller turns
waveplate counterclockwise and seeks when switch is pressed. Controller
reacts to zero position only in one way, which directly improves zero position
precision. After switch pressed, controller slowly turns waveplate until switch is
released. When working in STEP/DIR mode and user needs to return to
hardware zero position, must use “ZeroPosC” and “ZeroPosE” pins in similar
way.
It is necessary to mention that motor shaft is inert. Frequency of STEP signal
must be controlled linearly, especially at high motor speeds. Motor should
accelerate and decelerate smoothly. For instance, control logic must sweep
down STEP frequency before changing DIR level. Similarly, frequency must be
swept up then reaching high motor speed.
All step motor has resonance frequency, for watt pilot motor it is from 100 to
300 Hz. At some frequency motor starts to vibrate. It is natural for motors.
Vibration can be reduced or eliminated by using micro stepping or avoiding
resonance frequency.
30
7.7 STEP/DIR INTERFACE connector pin out.
8
1
15
9
Figure 15. STEP/DIR INTERFACE D-SUB15 female connector.
Table 2. STEP/DIR INTERFACE connector pin out.
Pin No.
1
2
3
4
5
6
7
8
9
10
11
12
13
14
15
Name
Step (A)
Dir (A)
Enable (A)
ZeroPosC
ModeSel
UartOn
UartRx
Not Connected
Step (K)
Dir (K)
Enable (K)
ZeroPosE
GND
UartTx
+5V
Type
In (Optocoupler anode)
In (Optocoupler anode)
In (Optocoupler anode)
Open Collector
In (Pulled up to +5 V)
In (Pulled up to +5 V)
In
In (Optocoupler cathode)
In (Optocoupler cathode)
In (Optocoupler cathode)
Open Emitter
Controller ground
Out
Power output
Below is the description of connectors’ pins.
Step (A), Step (K)
3.3 V - 5 V compatible input to optocouplers anode Step (A) and cathode Step
(K). Rising edge on Step (A) pin with reference to Step (K) advances motor by 1
step in STEP/DIR mode. Motion direction depends on Dir signal level.
Dir (A), Dir (K)
3.3 V - 5 V compatible input to optocouplers anode Dir (A) and cathode Dir (K).
This input controls motor direction in STEP/DIR mode. +5 V on Dir (A) pin with
reference to Dir (K) sets motor direction clockwise. This input can be
disconnected by command parser – see command line summary in Table 3 and
Figure 14 (SW F) for details.
31
Enable (A), Enable (K)
3.3 V - 5 V compatible input to optocouplers anode Enable (A) and cathode
Enable (K). This input can disable controllers output in STEP/DIR mode. +5 V
on Enable (A) pin with reference to Enable (K) disables motor – no current is
applied to the motor. This input can be disconnected by command parser – see
command line summary in Table 3 and Figure 14 (SW E) for details.
ZeroPosC, ZeroPosE
These pins can be used to detect hardware zero position. When mechanics is in
zero position - phototransistor is closed (resistance between pins ZeroPosC and
ZeroPosE is low). Zero position feedback schematic diagram is shown in Figure
16.
MOTOR connector
D-SUB9 Female
Watt Pilot
controller
Users +5V
STEP/DIR INTERFACE
connector D-SUB15 Female
R1 560 Ω
U
Users zero
position signal
Switch
released
Switch
pressed
1
9
Internal +5V
To internal logic
100 nF
6
9
ZeroPosC
LTV817C
5
Zero position
switch
1
560 Ω
ZeroPosE
8
15
t
Figure 16. Zero position feedback diagram. +5 V output means that
zero position switch is released in this example
NOTE: Because of mechanical zero position switch, zero position optocouplers
signal should be debounced or used only first voltage spike detected for
accurate zero position detection.
ModeSel
Then this pin is connected to GND pin (13), controller switches into STEP/DIR
mode. If this pin is left unconnected or applied +5 V with reference to controllers
ground (pin 13), Step/Dir/Enable inputs become disconnected and controller
works in USB mode. ModeSel pin controls internal switches SW B, SW C, SW
D (See Figure 14 for details). ModeSel pin is not optically isolated and is pulled
up to internal +5 V (See Figure 19).
32
UartOn
This pin controls internal switch SW A, which sets command path to the
command parser (see Figure 14). Then this pin is connected to GND pin (13),
controller can be controlled by 5V UART interface via “UartRx” and “UartTx”
pins in “STEP/DIR INTERFACE” connector instead of USB port. Useful, if
controller is operated by user’s microcontroller/FPGA. All USB mode commands
are valid. If this pin is left unconnected or applied +5 V with reference to
controllers ground (pin 13), command parser gets commands via USB port.
UartOn pin is not optically isolated and is pulled up to internal +5 V (see Figure
19).
UartRx, UartTx
5 V UART input and output. Pins can be used to control controller by external
microcontroller, if pins UartOn and GND are interconnected. These pins are not
optically isolated. If optoisolation is needed, special integrated circuits can be
used, for example ADUM1201.
GND
Ground pin of controller internal circuit. It is reference for ModeSel, UartOn,
UartRx and UartTx pins.
+5V
Internal controllers +5V. Can be used to drive optocouplers if implementing
optoisolated uart, or external circuitry. Max 25 mA output.
33
7.8 Input signal timing requirements
tA
tB
STEP
tC
tD
DIR, ENABLE
tE
ModeSel
Figure 17. Input signal timing requirements.
Symbo
l
Typ.
Unit
STEP minimum, HIGH pulse width
tA
25
µs
STEP minimum, LOW pulse width
tB
25
µs
Setup time, input change to STEP
tC
30
µs
Hold time, input change to STEP
tD
30
µs
Delay to enter STEP/DIR mode after ModeSel
low.
tE
1
s
Time Duration
7.9 USB mode
Controller operates in USB mode when pin 5 and pin 13 are not connected. In
this mode, Watt Pilot is controlled by commands, acquired from USB or UART
and Step/Dir/Enable inputs are disconnected in this mode. “Watt Pilot
Controller” software should be used for attenuation control (see “6.2 Watt Pilot
tab”). Then controller is attached to computer, a new serial port (“COM” port)
appears in the system. All commands are passed through this serial port, so
user can control Watt Pilot by opening this port with any kind of terminal
program (for example “Hyper terminal”, which is preinstalled in windows XP),
and manually entering required commands (see “8.1 Serial command usage in
windows.”). Or third option to communicate with controller is to write software
which automatically sends commands by using virtual serial port. All Watt Pilot
controller commands are described in section “8. Watt Pilot controller serial
command summary”.
34
7.10 Watt Pilot controller connection examples and
input circuit diagram
Wiring if outputs can supply enough
current to drive LED’s (5-7 mA per output)
+5 V
Custom
Electronics
board
560 Ω
5V digital
Inputs/outputs
Output 1 (En)
Output 2 (Dir)
Output 3 (Step)
Input 1 (Zero pos)
GND
13
ModeSel 5
Enable (A) 3
Enable (K) 11
Dir (A)
2
Dir (K)
10
Step (A) 1
Step (K) 9
ZeroPosC 4
ZeroPosE 12
Step/Dir connector
Connect pins 5 and 13 to
activate STEP/DIR mode
Controller internal
circuitry
Ground
+5 V
Custom
Electronics
board
560 Ω
5V digital
Inputs/outputs
Output 1 (En)
Output 2 (Dir)
Output 3 (Step)
Input 1 (Zero pos)
GND
13
ModeSel 5
Enable (A) 3
Enable (K) 11
Dir (A)
2
Dir (K)
10
Step (A) 1
Step (K) 9
ZeroPosC 4
ZeroPosE 12
Step/Dir connector
Connection for low current outputs (<5 mA).
N channel mosfets can be used to amplify output current
Ground
Figure 18. Connecting external equipment to use Watt Pilot
controller in STEP/DIR mode. Such connections are optically
isolated. Most microcontrollers can drive optocouplers directly, so
upper wiring is preferred.
.
35
Rx (input)
Tx (output)
Output (turn on UART)
Output (turn on
Step/Dir mode if needed)
Output
Output
May be timer driven Output
Input
+5V internal 15
ZeroPosC
4
UartTx
UartRx
14
7
UartOn
6
ModeSel
5
Enable (A)
Dir (A)
Step (A)
NC
3
2
1
8
Enable (K)
Dir (K)
Step (K)
ZeroPosE
GND
11
10
9
12
13
Step/Dir connector
Microcontroller
UART module
Inputs/Outputs
External +5 V
power supply
Pull-Up for zero position
560 Ω
Weak pull-ups
~10 kΩ
Internal circuitry
Watt Pilot controller
Figure 19. Connecting Watt Pilot controller to microcontroller
employing all of Watt pilot features. Such connection is not optically
isolated, pins 13 and 15 can be used as power supply for external
circuitry, optocouplers for instance
8. Watt Pilot controller serial command summary
Each command is executed after pressing “ENTER” key (or sending byte 0x0D
in hexadecimal, “carriage return”). Controller echoes back each symbol
received except for 0x0D. Note, that there is no need to send “New line” – 0x0A
symbol, because it is treated as ordinary symbol. Command parameters are
separated with “Space” – 0x20 symbol.
Usually controller does not send any data to computer, only responses for
commands are sent. There are two cases where controller can send data
unexpectedly. Firstly, each time controller starts, it sends string (finished with
0x0A and 0x0D symbols) “STEP/DIR mode” or “USB mode” according to state
of pin “ModeSel”. This includes and software restart using “j” command. This
string is sent on mode change also (if “ModeSel” pin is pulled low. Secondly,
controller can report that zero position switch was pressed if such option is
enabled by “zr 1” command. Zero position report string mask is “zp: x”, there x
is integer number, followed by 0x0A and 0x0D symbols. So if there is no need
for zero position reporting, all command responses can be handled by
“ReadLine” function in most of programming languages.
36
Table 3. Command line summary.
Comman
d
ent x
Description
This command is effective only in STEP/DIR mode.
Controls software disconnecting of “Enable” input pin (switch
SW E – see Figure 14).
Parameter x:
1
“Enable” pin is disconnected, motor is enabled.
0
“Enable” pin is disconnected, motor is disabled.
off
motor power is controlled by signals on “Enable” input pin
in DB-15 connector.
Example:
“ent off” – motor power is controlled by input pin. Now
send “ss” to save this setting to controller.
dir x
This command is effective only in STEP/DIR mode.
Controls software disconnecting of “Dir” input pin (switch SW F –
see Figure 14).
Parameter x:
cw
“Dir” pin is disconnected, motor direction is clockwise.
ccw “Dir” pin is disconnected, motor direction is
counterclockwise.
off
motor direction is controlled by signals on “Dir” input pin in
DB-15 connector.
Example:
“dir ccw” – set motor direction counterclockwise. Now send
“ss” to save this setting to controller.
mx
Move motor by x steps.
Parameter x:
Integer number. Can be positive (motor turns clockwise)
and negative (motor turns counterclockwise). Place “-“ for
negative
notation.
x
can
be
in
range
of
-2 147 483 646..+2 147 483 646.
Example:
“m 1000” to move 1000 steps clockwise and “m -1000” to
move 1000 steps counterclockwise.
37
gx
Go to absolute coordinate.
Parameter x:
Integer number. Can be positive and negative. Place “-“ for
negative
notation.
x
can
be
in
range
of
-2 147 483 646..+2 147 483 646.
Example:
“g -400” – motor turns while internal step counter reaches
-400. Then send “m 1000” to move 1000 steps clockwise.
Now motor stands in 600 position.
ix
Set coordinate counter to specific value.
Parameter x:
Integer number. Can be positive and negative. Place “-“ for
negative
notation.
x
can
be
in
range
of
-2 147 483 646..+2 147 483 646.
Example:
“i 625” – set coordinate to 625. Now send “so” to save
position to controller.
h
Resets coordinate counter to 0.
st
Stop motor smoothly if it is currently running.
This is preferred command to stop motor instead of “b”.
b
Break movement immediately.
This command stops motor, but step counter accuracy can
degrade using watt pilot.
zp
Go to hardware zero position and reset step counter.
Use this command to return waveplate to its home position,
determined by zero position switch. Then motor stops controller
stores 0 in coordinate counter and saves this value.
38
rx
Set motor micro stepping resolution.
Parameter x:
1
Motor is driven in full steps mode. Waveplate holder turns
once in 15600 steps.
2
Half step mode. Waveplate holder turns once in 31200
steps.
4
Quarter step mode. Waveplate holder turns once in 62400
steps.
8
Eight step mode. Waveplate holder turns once in 124800
steps.
6
Sixteen step mode. Waveplate holder turns once in
249600 steps.
Higher micro stepping levels demonstrate better position
accuracy and no motor resonance. It is advisable to use half
stepping operation mode.
ws x
Set motor current then it is idles. This removes motor heat. Some
amount of current must be left in order to keep position accuracy.
Parameter x:
Integer number in range of 0..255. Motor current can be
calculated using such equation: I = 0.00835x (A)
wm x
Set motor current then it moves.
Parameter x:
Integer number in range of 0..255. Motor current can be
calculated using such equation: I = 0.00835x (A)
wt x
Set motor current then controller operate in “STEP/DIR” mode.
There is no automatic current control like stand by current in
“USB” mode. Current can be cut only by logic high on “Enable”
input.
Parameter x:
Integer number in range of 0..255. Motor current can be
calculated using such equation: I = 0.00835x (A)
ax
Set acceleration.
Parameter x:
Integer number in range of 0..255. 1 is the lowest
acceleration and 255 is the highest. 0 turns off
acceleration. Turning on acceleration helps to increase
position repeatability.
39
dx
Set deceleration.
Parameter x:
Integer number in range of 0..255. 1 is the lowest
deceleration and 255 is the highest. 0 turns off
deceleration. Turning on deceleration helps to increase
position repeatability.
sx
Set maximal motor speed.
Parameter x:
Integer number in range of 1..65500. Watt Pilot waveplate
rotation angular speed can be calculated using such
formula:
;
Here ω – angular waveplate rotation speed (degrees per
second), r – micro stepping resolution – 1, 2, 4, 8 or 16.
Controller advances motor per one step in time intervals
equal to: 65535 x/8 µs
p
Show controller settings, related to USB mode. Type this
command only when using terminal and manual command
entering. This is the way to see fundamental settings in
“eye friendly” fashion. To get controller settings for
software programming, use “pc” command instead. This
command can be used to “ping” controller (to check if
controller is attached to particular COM port). If device
response to “p\r” string begins with “pUSB:“, it means that
Watt Pilot is attached and is turned on.
Return string (finished with 0x0A and 0x0D symbols):
USB: [1] a=[2] d=[3] s=[4] wm=[5] ws=[6] wt=[7] r=[8] en:[9]
zr:[10] zs:[11]
[1]
[2]
[3]
[4]
[5]
[6]
[7]
[8]
[9]
Boolean 1 or 0. Current operating mode: USB mode if 1,
and STEP/DIR mode if 0;
Integer 0..255. Acceleration value;
Integer 0..255. Deceleration value;
Integer 1..65500. Speed value;
Integer 0..255. Motor motion current value;
Integer 0..255. Motor idle current value;
Integer 0..255. Motor current value in STEP/DIR mode;
Integer 1, 2, 4, 8 or 6. Micro stepping resolution value (full,
half, quarter, eight or sixteen);
Boolean 1 or 0. Motor enable: motor is enabled if 1 and
motor is disconnected if 0; [next page]
40
[10]
[11]
Boolean 1 or 0. Whether to report coordinate then hitting
zero position switch (if 1) or do not report (if 0). If this
option is on (1), controller sends string “zp:
[integer_position]” on each zero position button press;
Boolean 1 or 0. Whether to reset position counter on each
zero position switch press or no. If this option is disabled
(0), zero position button press does nothing to step
counter. If waveplate holder turned twice, command “o” will
show us that position is more than 15600 (15600 is full
waveplate turn in full stepping mode). If this position is
enabled (1), position counter will become 0 on each zero
position switch press.
Response example (default controller settings):
USB: 1 a=232 d=232 s=55000 wm=114 ws=36 wt=114 r=2
en:1 zr:0 zs:0
pt
Show controller settings, related to STEP/DIR mode. Type this
command only when using terminal and manual command
entering. This is the way to see settings in “eye friendly”
fashion. To get controller settings for software
programming, use “pc” command instead.
Return string (finished with 0x0A and 0x0D symbols):
swEn:[1] en:[2] swDir:[3] dir:[4] zr:[5] zs:[6] cs:[7]
All returned parameters are boolean: 0 or 1.
[1]
Boolean 1 or 0. Status of switch SW E (see Figure 14). 1
means that “Enable” pin is disconnected and motor is
enabled if [2] parameter is 1 or disabled if [2] is equal to 0.
If [1] is 0, then controller output state is dependent on logic
level on “Enable” input;
[2]
Boolean 1 or 0. Motor enable: motor is enabled if 1 and
motor is disconnected if 0. This setting is meaningful if
parameter [1] is On;
[3]
Boolean 1 or 0. Status of switch SW F (see Figure 14). 1
means that “Dir” pin is disconnected and motor turns
clockwise if [4] parameter is 1 or counterclockwise if [4] is
equal to 0. If [3] is 0, then motor direction is dependent on
logic level on “Dir” input;
[4]
Boolean 1 or 0. Motor direction: motor turns clockwise if [4]
parameter is 1 or counterclockwise if [4] is equal to 0. This
setting is meaningful if parameter [3] is On;
[5]
Reserved;
[6]
Reserved;
[7]
Reserved;
Response example (default controller settings):
swEn:0 en:1 swDir:0 dir:1 zr:0 zs:0 cs:0
41
pc
Show all controller settings, separated by semicolon (;). Use this
command when programming computer software to read
all settings.
Return string (finished with 0x0A and 0x0D symbols):
[1];[2];[3];[4];[5];[6];[7];[8];[9];[10];[11];[12];[13];[14];[15];[16]
;[17];[18];[19];[20];[21];[22];[23];[24];
Character meaning:
[1]
Boolean 1 or 0. Current operating mode: USB mode if 1,
and STEP/DIR mode if 0;
[2]
Integer 0, 1, 2 or 3. Current motor run state: 0 – motor is
stopped, 1 – accelerating, 2 – decelerating 3 – running at
constant speed;
[3]
Integer 0..255. Acceleration value;
[4]
Integer 0..255. Deceleration value;
[5]
Integer 1..65500. Speed value;
[6]
Integer 0..255. Motor motion current value. I = 0.00835x
(A);
[7]
Integer 0..255. Motor idle current value. I = 0.00835x (A);
[8]
Integer 0..255. Motor current value in STEP/DIR mode.
I = 0.00835x (A);
[9]
Integer 1, 2, 4, 8 or 6. Micro stepping resolution value (full,
half, quarter, eight or sixteen);
[10] Boolean 1 or 0. Motor enable: motor is enabled if 1 and
motor is disconnected if 0;
[11] Reserved;
[12] Boolean 1 or 0. Whether to reset position counter on each
zero position switch press or no. If this option is disabled
(0), zero position button press does nothing to step
counter. If waveplate holder turned twice, command “o” will
show us that position is more than 15600 (15600 is full
waveplate turn in full stepping mode). If this position is
enabled (1), position counter will become 0 on each zero
position switch press;
[13] Boolean 1 or 0. Whether to report coordinate then hitting
zero position switch (if 1) or do not report (if 0). If this
option is on (1), controller sends string “zp:
[integer_position]” on each zero position button press;
[14] Reserved;
[15] Reserved;
[16] Reserved;
[17] Boolean 1 or 0. Motor direction setting in STEP/DIR mode:
motor turns clockwise if [17] parameter is 1 or
counterclockwise if [17] is equal to 0. This setting is
meaningful if parameter [20] is On;
[18] Boolean 1 or 0. Motor enable setting in STEP/DIR mode:
motor is enabled if 1 and motor is disconnected if 0. This
setting is meaningful if parameter [1] is On; [next page]
42
[19]
[20]
[21]
[22]
[23]
[24]
Reserved;
Boolean 1 or 0. Status of switch SW F (see Figure 14). 1
means that “Dir” pin is disconnected and motor turns
clockwise if [17] parameter is 1 or counterclockwise if [17]
is equal to 0. If [20] is 0, then motor direction is dependent
on logic level on “Dir” input;
Boolean 1 or 0. Status of switch SW E (see Figure 14). 1
means that “Enable” pin is disconnected and motor is
enabled if [18] parameter is 1 or disabled if [18] is equal to
0. If [21] is 0, then controller output state is dependent on
logic level on “Enable” input;
Reserved;
Reserved;
Reserved.
Response example (default controller settings):
1;0;232;232;55000;114;36;114;2;1;1;0;0;0;1;0;1;1;1;0;0;0;
0;1;
o
Return running state of the motor and current position.
Return string (finished with 0x0A and 0x0D symbols):
[1];[2]
[1]
[2]
Integer 0, 1, 2 or 3. Current motor run state: 0 – motor is
stopped, 1 – accelerating, 2 – decelerating 3 – running at
constant speed;
Integer in range of -2147483646..+2147483646. Current
motor position;
Response example:
3;4437
Use this command to determine if motor has done its movement.
After issuing any move command, poll “o” command in time
intervals about 250 ms and decode response. If [1] parameter
become 0, it means that motor has stopped and is ready for next
move command.
zr x
Report zero position when hitting zero position switch.
Parameter x:
1
Controller sends string “zp: [integer_position]” on each
zero position button press;
0
Turn off zero position reporting.
43
zs x
Reset coordinate counter then hitting hardware zero position
switch.
Parameter x:
1
Position counter will become 0 on each zero position
switch press;
0
Position counter increases position continuously.
en x
Motor enable in USB mode.
Parameter x:
1
Motor is enabled.
0
Motor is disconnected.
j
Reset controller.
Controller resets in 4 s after issuing this command. It is
equivalent to power switch press. This command can also
enter into firmware upgrade mode if firmware upgrade
button is pressed (see “5. Firmware upgrade”). All
changed settings and position are restored in previous
state, if “ss” and/or “so” commands was not issued before
reset.
Then controller starts, it sends string “STEP/DIR mode” or
“USB mode” according to state of pin “ModeSel”.
a0
Turn off acceleration.
d0
Turn off deceleration.
ss
Save settings of controller.
Save configuration mentioned in “pc” command description
to controller memory. Configuration saved by “ss”
command will be restored on controller power on.
so
Save current position.
Save current position to controller memory. Position saved
by “so” command will be restored on controller power on.
sn x
Write 20 character long name to controller
Parameter x:
20 characters. If x is not 20 symbols, then returned name
can consist of unreadable characters. Please space pad
trailing name.
n
Show name.
Returns 20 character string, saved by “sn” command.
Return: 20 character string
44
8.1 Serial command usage in windows.
In order to use commands, described in Table 3, user must fallow the steps
below.
1. Then controller is attached to computer, a new serial port (“COM” port)
appears in the system. Figure 20 shows the way to the COM port selection.
Firstly right click on “Computer”, then “Properties”, “Device Manager”. Under
“Ports (COM & LPT)” look for port named “Silicon Labs”. Remember its
number.
Figure 20. Finding the Watt Pilot controller virtual serial port.
NOTE: COM1 is always reserved by WINDOWS by default, and must not be
used by this device.
2.
Run HyperTerminal or alternative software, for instance more
advanced terminal can be downloaded from here:
https://sites.google.com/site/terminalbpp/
45
1. Choose
COM port
3. Select 8
5. Select 1
6. Select
none
2. Set 38400
7. Press Connect
4. Select
none
Response from controller
8. Enter commands here
Figure 21. “Terminal.exe” control window.
3. Choose “Silicon Labs” port number, mentioned in step 1.
•
“Baud Rate” 38400
•
Data bits – 8
•
Stop bits – 1
•
Handshaking – none
Then click “Connect” Enter symbol “p” in lower (4) application pane and press
“Enter”. Response from driver should pop up in middle pane of “Terminal.exe”.
Please see Figure 21.
46
9. Watt Pilot controller dimensions
94 mm
39 mm
Figure 22. Watt Pilot controller dimensions
47
10. Watt Pilot dimensions
Figure 23. Mechanical dimensions of Watt Pilot.
48
11. Revision history
49