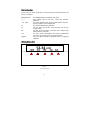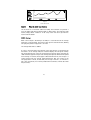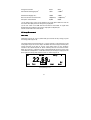
1
LASERSTAR
C
M
Y
CM
MY
CY CMY
LASERSTAR
LASER POWER/ENERGY MONITOR
USER MANUAL
OPHIR OPTRONICS
w w w. o p h i ro p t . c o m
Composite
K
Table of Contents
Chapter 1 Introduction: How to Use This Manual .................................................. 3
Chapter 2 Quick Reference ........................................................................................ 4
2.1
2.2
2.3
2.4
Getting Started.................................................................................................. 4
Thermal Heads.................................................................................................. 6
Photodiode Heads............................................................................................ 9
Pyroelectric Heads ........................................................................................ 11
Chapter 3 The Laserstar Display Unit ..................................................................... 15
3.1
General Description....................................................................................... 15
3.2
Smart Connectors and Multi head Operation ........................................... 16
3.3
Soft Keys .......................................................................................................... 16
3.4
Power up and Shut Down ............................................................................. 18
3.5
Laserstar Functions which are independent of Head Type ................... 18
3.6
Hardware Functions ...................................................................................... 21
Chapter 4 Operation with Thermopile Absorber Heads....................................................... 23
Thermopile Absorber Heads ........................................................................ 23
4.1
4.2
Selecting Settings from the Laserstar Screen.......................................... 24
4.3
Startup and Configuration of Defaults........................................................ 25
4.4
Power Measurement..................................................................................... 26
4.5
Energy Measurement .................................................................................... 34
4.6
Advanced Display Screens .......................................................................... 40
4.7
Special Thermopile Heads............................................................................ 42
Chapter 5 Operation with Photodiode Type Heads.............................................. 44
5.1
5.2
5.3
5.4
5.5
Photodiode Heads.......................................................................................... 44
Setting up the PD300 to display the user's chosen wavelengths ......... 45
Startup Defaults.............................................................................................. 46
Selecting Settings from the Laserstar Screen.......................................... 47
Special Photodiode Heads ........................................................................... 51
Chapter 6 Operation with Pyroelectric Heads ...................................................... 53
6.1
6.2
6.3
6.4
6.5
6.6
6.7
Pyroelectric Detector Heads ....................................................................... 53
Selecting Settings from the Laserstar Screen.......................................... 53
Startup and Configuration of Defaults........................................................ 56
Energy, Power or Exposure Measurement................................................ 57
Measuring Repeating Pulses of High Energy ........................................... 62
Energy Log ....................................................................................................... 63
Pyro Scope Adapter....................................................................................... 63
1
Chapter 7 Operation with RP heads........................................................................ 64
7.1
7.2
7.3
7.4
7.5
7.6
7.7
7.8
7.9
7.10
7.11
General Description....................................................................................... 64
Principle of Operation.................................................................................... 64
Advantages of the RP .................................................................................... 66
Temporal Pulse Shape .................................................................................. 67
Measuring Repetitively Pulsed Lasers with the RP ................................. 67
Setup for RP - Rapid Pulse measurement.................................................. 68
Choosing Default Pulse Width Setting ....................................................... 71
Configuration for Power and Single Shot Energy..................................... 72
Zeroing ............................................................................................................. 73
Customizing Gain ............................................................................................ 73
Data Logging ................................................................................................... 74
Chapter 8 Operation with the Dual Channel Laserstar........................................ 78
8.1
8.2
8.3
Operation with One Head Plugged in Only ................................................ 78
Single Head Operation with Two heads Plugged In ................................ 78
Dual Head Operation with Two heads Plugged In. .................................. 78
Chapter 9 Circuit Description................................................................................... 80
Chapter 10 Calibration, Maintenance and Troubleshooting............................... 82
10.1
10.2
10.3
10.4
10.5
10.6
Calibration of Thermopile or RP Heads ...................................................... 82
Calibration of Photodiode type Heads........................................................ 90
Calibration of Pyroelectric type Heads ...................................................... 92
Error Messages .............................................................................................. 95
Troubleshooting.............................................................................................. 95
Maintenance ................................................................................................... 97
Chapter 11 Laserstar Specifications..................................................................... 100
11.1
11.2
Laserstar System/Display Specifications ................................................ 100
Head Specifications..................................................................................... 101
2
Chapter 1 Introduction: How to Use This Manual
The Ophir Laserstar is a microprocessor-based Laser Power/Energy Meter providing a
broad range of measurements, displays, and data handling options. It operates with
thermopile, pyroelectric and photodiode heads, and uses smart connector technology.
Just connecting the head configures and calibrates the instrument. The Laserstar also
is available with the multihead option where it can work with 2 heads at once as well
as other options.
This manual tells you what you need to know to make full use of the Laserstar for all
your laser measurement needs. It includes a "Quick Reference", (Chapter 2) to allow
you to perform basic measurements immediately, without reading the whole manual.
The main measurement sections, Chapters 4, 5 and 6 include a general description and
a section detailing operating options.
3
Chapter 2 Quick Reference
2.1 Getting Started
The Laserstar is equipped with "soft keys." That is, the functions of the keys change
as indicated by the legend above each key. (See Figure 2).
To connect head to the Laserstar Display
Insert the 15 pin D type connector of the measuring head cable into the socket marked
"Head Input" on the rear panel of the Laserstar display. (See Figure 1) If you are using
the multihead version of the Laserstar and are using only one head, it is preferable to
use head input A .
LCD
OUTPUT
HEAD INPUT
12VDC
BACK
LIGHT
OFF/ON
Standard Model Rear Panel
HEAD INPUT B
LCD
OUTPUT
HEAD INPUT A 12VDC
BACK
LIGHT
OFF/ON
Ratio/Multihead model rear panel showing head input A and head input B
Figure 1
Laserstar Rear Panel View
4
off/on/backlight
energy
12.34 mW
zoom
offset
range
menu
Figure 2
LaserStar Top View
To switch the Laserstar on:
1. Flick the toggle switch on the right side of the rear panel up. Note that there are
three positions, down is off, the center is on and the upper position is on with
backlight on. (See Figure 2).
The unit will switch on, and the display will appear. Note that the head must be
plugged in before the unit is switched on.
To switch the Laserstar off:
1. Return the toggle switch to its lowest position.
2. If you wish to save the current Laserstar configuration, use the "configure"
function. (See section2.2.2).
5
To set line frequency:
1. Disconnect the head and switch off then on again. "Head Disconnected" will
appear.
2. Select “line frequency”.
3. Press "value" to change to the correct line frequency.
4. Press "save" and the line frequency will be saved.
To zero instrument:
1.
2.
3.
4.
Disconnect the head, turn off then on again. "Head Disconnected" will be
displayed.
Make sure instrument is not in an electrically noisy environment and is
undisturbed.
Press "zero" and then press “go”. When zeroing is completed, “zeroing
completed will be displayed.
For thermal heads, zeroing with the head may also be necessary. See section
3.5.6.
2.2 Thermal Heads
2.2.1 Use of Laserstar with thermal type heads
To set type of laser being used:
1.
2.
3.
4.
While the Laserstar is off, plug in the head then switch it on again.
From the main measurement screen, press the menu button. "laser" will be
highlighted. Press "go" and select the appropriate laser wavelength.
If you want to save this new wavelength as the startup default, press "save".
Return to main screen by pressing "exit" then "esc".
To choose manual or automatic ranging in power measurement:
1.
2.
3.
4.
From the main measurement screen, press "range".
Select the appropriate manual range or autorange.
If you want to save this new range as the startup default, press "save".
Press "exit" to return to the main measurement screen. The range will be
displayed in the lower right corner of the main measurement screen.
6
To choose power or energy measurement:
1.
2.
To go from the main power measurement screen to the energy measurement
screen, press "energy".
To go from the energy measurement screen to power measurement, press
“power”.
2.2.2 Setting and Saving the Startup Configuration
1.
2.
3.
4.
5.
6.
7.
8.
9.
10.
Turn on the Laserstar with the head disconnected and press “value” to select
the type of screen you wish to start up with. (This choice is saved in the
instrument and not the head so the Laserstar will start up from the screen
selected for all heads).
Connect the head, turn the Laserstar off and on and from the main
measurement screen, press "menu".
Using the arrow keys, select "config". Press "go".
Press "value" to choose "power" or "energy" for the desired startup screen.
Select “Laser”: Now press "value" to select the laser type you wish to be the
default.
Now select “Average over” to select what period you wish to average power
over or select the default, "none". See section 4.4.2.4 for details.
Now select “Power range” and press "value" to choose the manual power
range you wish to be the default or choose autorange.
Now select “Energy Range” and choose the default energy range.
Now select “Energy threshold” if you wish to change the energy threshold. See
section4.5.3 for details.
Press "save" to save all present settings then "exit" and "esc" to get back to the
main measurement screen.
Further details on configuration in section 4.3.
7
2.2.3 Power or Single Shot Energy Measurement
Warning:
Do not exceed maximum head limits for power, energy, power density and
energy density as listed in tables 6 and 7 in section 11.2 Otherwise, there is a
risk of damaging the absorber.
To use the Laserstar to measure Laser power:
1.
2.
Verify that the display shows "power" in the upper right hand side of the display.
If the display shows "energy" and units of J, mJ etc. then press "power" to
switch to the power measurement mode.
To expand the bargraph scale ±5x about the present reading:
1.
2.
Press the "zoom” button .
Press the "zoom” button again to return to the ordinary bargraph..
To subtract background and set current reading to zero:
1.
2.
From the main power measurement screen press "offset".
Press "offset" again to cancel. See Section 4.4.2.2 for full details.
To use the Laserstar to fine-tune Laser power:
1.
2.
3.
4.
From the main power measurement screen press the menu button then select
"tune". Now press "go" then "setup".
Set the percentage range of the power scale to be displayed by repeatedly
pressing the value key.
Now select the horizontal sweep time you desire. Now select if you want an
audio tone for tuning or not.
Now press "exit" and use the screen to tune the laser power. See Section 4.4.2.3
for full details.
8
To use the Laserstar to measure Laser energy:
1.
2.
3.
4.
Verify that the display shows "energy" in the upper right hand side of the display.
If the display shows "power" and units of W, mW etc. then press "energy" to
switch to the energy measurement mode.
The energy mode is manual ranging. Press "range" then use the arrow soft keys
to select the proper range. Press save if you want this range to be the startup
default. Now press "exit". The correct range is the lowest one that is larger than
the pulse energy measured. Note that the range will be displayed in the lower
right corner of the main display.
When the Laserstar screen flashes "ready," on and off, fire the laser. See
Section 4.5 for full details.
To save configuration:
To save configuration, follow directions in Section 2.2.2 above.
2.3 Photodiode Heads
2.3.1 Use of Laserstar with photodiode type heads:
1.
2.
3.
While the Laserstar is off, plug in the head then switch it on again.
From the main measurement screen, press "laser" to select the correct laser
wavelength. If the wavelength you want is not listed, see section 0 below.
If you want to save this new wavelength as the startup default, follow the
directions on configuration in section 2.3.3 below.
To choose manual or automatic ranging or dBm in power measurement:
1. Press "range" and then select the appropriate manual range, autorange or dBm
(logarithmic scale).
2. Press "exit" to return to the main measurement screen. If you wish to save the
selected range as the startup default, press "save" before exiting.
9
2.3.2 Selecting Chosen Wavelengths
1.
2.
3.
4.
5.
From the power measurement mode, press "menu" and select "wavelength".
Press "go".
Select the wavelength you wish to change and press "go.
Using the up/down buttons, change to the desired wavelength. Now press exit.
Repeat steps 2 and 3 for other wavelengths desired. Up to 6 wavelengths may
be selected.
When finished, press "save", “exit”, "esc" to return to the main measurement
screen. If you only want a temporary change, Press “esc” without “save”.
2.3.3 Setting the Startup Configuration
1.
2.
3.
4.
5.
6.
7.
From the power measurement mode, press the menu button and select
“configure”.
Press "go".
Now press "value" to select filter in or out to be the default.
Now select “Power Range:” and choose the manual power range you wish to be
the default or choose autorange or dBm.
Now select “Average Over:” and choose what period to average power over or
leave the default “NONE”.
Now select “Wavelength” to choose the startup laser wavelength.
When finished press “save” and “exit”. If you wish to save these values only
until the instrument is turned off exit without saving. For further details on
configuration see Section 5.3.
Power Measurement
Warning:
Do not exceed maximum head limits for power, energy, power density and
energy density as listed in tables 6 and 7 in section 11.2 Head Specifications.
Otherwise, there is a risk of damaging the absorber.
To expand the bargraph scale ±5x about the present reading:
1.
2.
Press the "zoom” button.
Press the "zoom” button again to return to the ordinary bargraph.
10
To subtract background and set current reading to zero:
1.
2.
From the main power measurement screen press "offset".
Press "offset" again to cancel. See Section 5.4.5 for full details.
To use the Laserstar to fine-tune Laser power:
1.
2.
3.
4.
5.
From the main power measurement screen press the menu button then select
"tune". Now press "go" then "setup".
Set the percentage range of the power scale to be displayed by repeatedly
pressing the value key.
Now select the horizontal sweep time you desire.
Now choose audio tone to be on or off.
Now save and exit to use the tune screen. See Section 4.4.2.3 for full details.
2.4 Pyroelectric Heads
2.4.1 Zeroing Instrument Against Head
For most accurate calibration, you should zero the pyroelectric head against the
Laserstar it is being used with. Proceed as follows:
Make sure the head is in a quiet environment and not subject to pulsed radiation. Plug
head into Laserstar and turn on. Press “menu”, select “advanced”, press “go” and
“go” again. Press “start”. When “zeroing completed” appears, press “save”.
2.4.2 Selecting Chosen Wavelengths (metallic type only)
1.
2.
3.
4.
5.
Press "menu" and select "wavelength". Press "go".
Select the wavelength you wish to change and press "go.
Using the up/down buttons, change to the desired wavelength. Press “exit”.
Repeat steps 2 and 3 for other wavelengths desired. Up to 6 wavelengths may
be selected.
When finished, press “save”, “exit” and “esc” to return to the main
measurement screen. If you only want a temporary change, Press “esc” without
“save”.
11
2.4.3 To set type of laser being used
From main measurement screen, press "laser" until the correct laser type or
wavelength is displayed.
2.4.4 Setting Startup Configuration
1.
2.
3.
4.
5.
With the head disconnected, switch on the Laserstar and press the “value”
button to select the type of startup screen you wish. (Note that this choice is
stored in the Laserstar and not the head so will be operative for all heads).
Now switch the Laserstar off, connect the head and switch on again. From the
main energy measurement mode, press “menu” and select “configure”. Press
“go”.
Press "value" to choose "power" or "energy" for the desired startup screen.
With the arrow keys select “Laser” and with “value” select the laser type you
wish to be the default.
Now select “Max PulseLen” and with “value” select the maximum pulse length
you wish to allow. Only choose the long value if your laser pulse is too short for
the short value.
Warning:
Incorrect readings will result if pulse length is not set up correctly.
Note:
Some heads have only the long pulse setting for all pulse lengths. In that case
N/A appears.
6.
7.
8.
9.
Now select “Mode” and with “value” select the mode of operation. Select
“scope” if you wish to use the scope adapter.
Now select “Energy Range” and with “value” select the energy range you wish
for the startup default.
Now select “Average Over” and with “value” select the time period you wish to
average over or leave the default “NONE”.
When finished press “save” and “exit”. If you wish to save these values only
until the instrument is turned off, exit without saving. For further details on
configuration see Sections 6.2 and 6.3.
12
2.4.5 Energy or Average Power Measurement
Warning:
Do not exceed maximum head limits for power, energy, power density and
energy density as listed in tables 6 and 7 in section 11.2 Head Specifications.
Otherwise, there is a risk of damaging the absorber.
With the pyroelectric head, you have been supplied a test slide with the same coating
as on your pyroelectric detector. You can also obtain this slide from your dealer. You
should use this slide to test the damage threshold with your laser pulses. If the slide is
damaged, then either enlarge your beam or lower the laser energy until damage is no
longer seen.
2.4.5.1 To choose Energy or Average Power Measurement:
1.
2.
To go from the main energy measurement screen to power measurement, press
"power".
To go from the main power measurement screen to energy measurement, press
"energy".
2.4.5.2 To use the Laserstar to measure Laser Energy and Frequency:
1.
2.
3.
In measurement mode, verify that the units are mJ, µJ etc. and “energy” is
displayed in the upper right corner. If not, press the “energy” key.
Press "range" then use the arrow keys to select the proper energy range. The
correct range is the lowest one that is larger than the pulse energy measured.
See Section 6.4 for details.
Press "exit" to return to the bargraph measurement screen.
2.4.5.3 . To use the Laserstar to measure Average Power:
1.
2.
Verify that the display shows power units in W, mW etc. and “power” is
displayed in the upper right corner.
If the display shows energy units of J, mJ etc. then press "power" to switch to
the power measurement mode.
13
2.4.5.4 To measure Total Energy Exposure:
1.
2.
3.
4.
Press the menu button and select “exposure”. Press “go”.
Select parameters then press “start”. Press “start” again. The Laserstar will
start summing laser energy exposure. If you wish to stop before the chosen
period, press ”stop”.
If you wish to reset the reading to zero before another reading, press
"reset".
To return to the main screen, press “exit” and “esc”.
14
Chapter 3 The Laserstar Display Unit
3.1 General Description
The model Laserstar laser power/energy meter represents a new level of
sophistication, sensitivity, compactness and accuracy, coupled with ease of operation.
It can operate with thermal, pyroelectric and photodiode heads. It has smart
connector technology. Simply plugging in the head configures and calibrates the
Laserstar to operate with that head.
The Laserstar can graph power or energy vs. time. It displays power measurements in
both digital and analog form at the same time. It will also autorange, so you do not
have to set scales; or it can manual range if you wish. It will remember what mode you
were using before you turned it off and will return to that mode when turned on. You
can zoom in on the present reading, or subtract background. Although the calibration
information is stored in the smart connector, you can recalibrate from the screen and
store the new calibration in the head. You can also zero the Laserstar at the touch of a
button.
The main instructions are clearly shown on the screen so you should not have to refer
to this manual very often. Above all, the Laserstar has advanced circuitry and digital
signal processing for excellent sensitivity, signal to noise ratio, accuracy, and
response time. It also has special circuitry to reject electromagnetic interference.
The multi head version of the Laserstar also allows you to measure two heads
independently or measure the ratio sum or difference of two heads. The Laserstar is
also available with IEEE 488 GPIB interface as an optional extra. Contact your Ophir
agent for details.
15
3.2 Smart Connectors and Multi head Operation
The Laserstar display is versatile and can operate with either thermal, pyroelectric or
photodiode type laser measuring heads. The head configuration and calibration
information is stored in an EEROM in the head connector plug. This means that when
the head is plugged in, the Laserstar automatically identifies the head type, calibration
and configuration. The user does not have to adjust anything.
Note:
The Laserstar automatically loads the head information when first turned on, so
when changing heads, the display should be turned off, the new head plugged in
and then be turned on again.
When no head is plugged in and the Laserstar is turned on, the display indicates "Head
Disconnected" and gives the user the opportunity to change the power line frequency
and baud rate, re-zero the instrument or other features. See section 3.5.
3.3 Soft Keys
3.3.1 Soft Keys- An Instruction
The soft keys accessed by the menu button have functions defined by the legend
above the key. The legend usually indicates what will happen when pressing the key.
For example, if "energy" appears above a key, pressing that key will change the
Laserstar into energy mode. Some functions operate when the key is pressed and are
canceled when the key is pressed again. Those keys show reverse highlighting when
operational. Pressing the same key again cancels the operation and the highlighting.
16
3.3.2 Key Functions
The Laserstar has certain conventions as to the meaning of standard keystrokes and
these are as follows:
Highlighted item :
<--,-->
--> or select
go
esc
exit
save
up/down
The highlighted item is the item presently active.
These buttons move to the next active item leftwards,
rightwards.
This selects available values of present item choice in acyclical
fashion as button is pressed repeatedly.
This puts into operation the active item.
This gets you to the previous screen and does not save any
changes made.
This gets you to the previous screen and saves changes made
until instrument is turned off.
This saves changes permanently. The change is implemented
now and is also saved for future use of the instrument.
These keys allow continuous changing of values as in adjusting
calibration.
off/on/backlight switch
energy
12.34 mW
zoom
offset
Figure 3
Laserstar Top View
17
range
menu
3.4 Power up and Shut Down
To turn the Laserstar on:
Flick the toggle switch on the left side of the rear panel up. The unit will switch on, and
the display will appear. If no head is connected, a display showing "Head
Disconnected" will appear. If a head is connected, the appropriate default
measurement screen will appear.
Note:
There are three positions, the center is on and the upper position is on with the
backlight lit (See Figure 4).
To switch the Laserstar off:
1.
2.
Return the toggle switch to its lowest position.
If you wish to save the current Laserstar configuration, use the "configure"
function before switching off. For measurements of the same type, the
Laserstar does not need to be set up each time. See the appropriate section
in the chapter dealing with the head type you intend to use.
3.5 Laserstar Functions which are independent of Head Type
When no head is connected to the Laserstar and it is turned on, the message "Head
Disconnected" appears. In this mode, the user can adjust the startup screen, either
the standard power/energy screens or other specialized screens. He can choose the
power line frequency so the instrument can be adjusted for minimum interference at
the power line frequency. He can also adjust the baud rate for optimum
communication with PC, or the user can zero the instrument to eliminate any offsets.
He also can set the Laserstar to give an audible warning if the head power/energy
limits are exceeded and if the battery is low.
18
3.5.1 Startup Screen
The Laserstar can operate in the standard power/energy measurement screen or can
display the information in specialized forms: an attenuation screen, a power/energy
density screen or a screen with limits. Set the screen to the type you want the
instrument to start up in and press select to go to the next option (For more details on
the various screen options, see section 4.6).
3.5.2 Line Frequency
The Laserstar is factory set for 50 Hz. If your country uses 60 Hz you must reset the line
frequency.
To set the line frequency, press “select” to get to the line frequency option, then press
value to select the correct line frequency then press save.
3.5.3 RS232 Baud Rate
If you are using the Laserstar for RS232 communication with PC, the baud rate can be
set by selecting "baud rate" and selecting the appropriate rate then pressing save.
3.5.4 Audio Warning
The audio warning indicates when you are over range on the highest range and also if
the battery is low. When audio warning is activated and the maximum power or energy
rating is exceeded, a beeping tone will sound. If the battery is low, a beep will sound
every 5 seconds. To activate the audio warning, select “audio warning” and then
press "value" to set to "on". Then press "save".
3.5.5 IEEE Address
If you are using the Laserstar for IEEE 488 communications, the IEEE adapter should be
plugged in and the instrument switched on. The IEEE address should be set by
selecting "IEEE address", choosing the appropriate number and then pressing save.
19
3.5.6 Zero Adjustments
In the Laserstar, all adjustments, including zeroing internal circuits, are done from the
software. This ensures simple and accurate realignment. It is recommended to rezero the Laserstar every 2 months for best performance. The simple zeroing
procedure follows.
1. If a head is connected, disconnect the head, turn off the instrument then back on
again so the Laserstar can identify that no head is connected. "Head
Disconnected" will be displayed.
2. Let the Laserstar run for at least 30 seconds before performing zero adjustment.
3. Press "zero".
4. Make sure the instrument is not in an electrically noisy environment and is
undisturbed. Press "go" and wait for message, "zeroing completed". Now press
"save" and the new zero will be saved. Press "esc" to return to the main screen.
Note (for Thermal Heads only):
For best results with thermal heads, it may be necessary to do the procedure
once with the head disconnected then afterwards again with the head
connected.
After completing steps 1 - 4 above, Connect the head and make sure it is at room
temperature and well shielded from any stray thermal power. It may be best
advised to lay the head with the absorber face down on the table.
5. Switch the instrument off then on again with the head connected.
6. Press the menu button then select "advanced". Press "go". “zero” should be
highlighted.
7. Press "go" and follow steps 2- 4 above.
20
3.6 Hardware Functions
3.6.1 Backlight
The backlight illuminates the display from the rear and is operated by the same switch
as turns the instrument on and off (See Figure 4). The Laserstar backlight consumes
considerably less power than competing instruments and therefore it can operate from
the battery even when the charger is not plugged in. Nevertheless, since it does
shorten the time between charges, it is recommended to operate the instrument
without the backlight when the instrument is operated without the charger. The electro
luminescent backlight also does have a finite lifetime of about 10,000 hours. Therefore,
it is recommended to use only when necessary.
3.6.2 Swivel LCD
The Laserstar is equipped with a swivel LCD so the display can be tilted for easy
viewing. The display angle is variable from 0 to 55 degrees. The LCD can fold down flat
for transportation and when the Laserstar is folded flat, it is only 225 x 190 x 52 mm, the
most compact unit of this type on the market.
3.6.3 Charging
The Laserstar is operated by a rechargeable battery. To charge the battery, plug the
charger into the jack labeled "12VDC" on the back panel, (See Figure 4). Note the
polarity of the charger. The Laserstar charges fully in about 14 hours when switched
off and longer when on. It is not recommended to leave the charger plugged in for
much longer than 14 hours when it is off, in order to preserve the battery lifetime.
The approximate time between charges is given below for various configurations:
One thermal head, no backlight:
18 hrs.
Same, with backlight
12 hrs.
Multi head configuration, two non-pyro heads, no backlight:
14 hrs.
One pyro head, no backlight:
14 hrs.
Two pyro heads, no backlight:
9 hrs.
Same, with backlight:
7 hrs.
21
When the battery is low, "BAT" flashes on and off and if the audio warning is activated,
a warning beep will sound every 5 seconds. When this happens, the charger should
be plugged in. In order to charge the batteries again, the charger should be left
plugged in with the unit switched off for 14 hours. However, even with "BAT"
displayed, the unit will operate properly for about one hour before its accuracy will be
impaired.
3.6.4 Analog Output
The instrument provides an analog voltage output via the 25 pin output plug on the rear
panel. (See Figure 4). The analog output uses pins 1 (high) and 7 (low) for channel A
and 14 (high) and 7 (low) for channel B. The Laserstar is provided with an adapter plug
that connects to these pins and outputs to two BNC plugs. When the Laserstar only
has one channel, the first channel analog output will be active. The analog output is
useful for driving chart recorders and other analog devices. The voltage is proportional
to the reading on the display and scaled such that full scale equals 1.00 volts. The
output can drive up to 2mA into an external device.
LCD
OUTPUT
HEAD INPUT 12VDC
BACK
LIGHT
OFF/ON
Standard model rear panel
HEAD INPUT B
LCD
OUTPUT
HEAD INPUT A 12VDC
BACK
LIGHT
OFF/ON
Ratio/Multihead model rear panel
Figure 4
Laserstar Rear Panel View
3.6.5 LCD Contrast Adjustment
The LCD contrast can be adjusted with the blue contrast adjustment knob.
22
Chapter 4 Operation with Thermopile Absorber Heads
Warning:
Before using the head for power or energy measurement, check that your laser
power, energy and energy density do not exceed the head ratings. See tables 6
and 7 in section 11.2 Head Specifications.
If the head is a water-cooled type, ensure that the cooling water is flowing at an
adequate rate; see table below. Also, note that the reflectance from the absorber
could be as much as 10% and with CO2 lasers, the reflected beam can be quite
specular, so it is advisable to provide a beam stop for the reflected beam with the
highest power lasers.
HEAD TYPE
8000W
5000W
1500W
300W
LITERS
PER
MINUTE
7
4.5
2.5
1.0
MIN
PRESSURE
BAR
1.5
0.8
0.5
0.3
US GALLONS
PER MINUTE
2
1.2
0.7
0.25
Table 1.
Minimum Flow Rates For Water-Cooled Heads
4.1 Thermopile Absorber Heads
When a radiant heat source, such as a laser, is directed at the absorber head
aperture, a temperature gradient is created across the thermopile of the enclosed
detector disc. This generates a voltage proportional to the incident power. The
display unit amplifies this signal and indicates the power level received by the head.
At the same time, signal processing software causes the display unit to respond faster
than the thermal rise time of the detector disc, thus reducing the response time of the
Laserstar. Energy of a single pulse is measured on the Laserstar by digitally integrating
the pulse power over time.
23
4.2 Selecting Settings from the Laserstar Screen
The Laserstar can be set to various chosen settings while operating. In addition, it can
be set so that it will be in the desired configuration when turned on the next time.
4.2.1 To Set Type of Laser being Used
Thermopile heads have somewhat different absorption at different wavelengths. In
order to compensate for this, each head has been calibrated by laser at several
wavelengths. When you choose the correct laser wavelength, the correction factor for
that wavelength is automatically introduced. Note that the laser wavelength
correction in use is displayed in the upper left corner of the display.
4.2.2 To choose Manual or Automatic Ranging in Power Measurement
Autorange - The Laserstar allows you to choose autorange or manual ranging. In
autorange mode, you do not have to change scales. When the reading of the meter or
bar is more than 100% of full scale, the range goes to the next higher one. The ranges
are arranged in factors of 1, 10, 100, etc. When the reading falls below 9% of full scale,
the range changes to one range lower. This change only occurs after a few seconds
delay. This provides overlap (hysteresis) to keep the Laserstar from flipping back and
forth when reading close to the end of the scale.
Manual Range - There are certain disadvantages to autorange since it changes scale
even if you don't want it to do so. If you want to measure the same range all the time,
it is better to use manual range. To select manual range, press "range", select "auto"
then press "exit" to return to the measurement screen. The correct range to select is
the lowest one that is larger than the largest expected measurement. If you wish the
Laserstar to be in manual mode when switched on, save this configuration before
switching off (See section 4.3).
To choose auto or manual range, follow these steps:
1. From the main power measurement screen, press "range".
2. Select the appropriate manual range or autorange using the arrow buttons.
3. Press "exit" to return to the main power measurement screen.
24
4.2.3 To choose Power or Energy Measurement
The Laserstar thermopile heads can measure both power and single shot energy. See
sections 4.4 and 4.5 for details. To change from power to energy measurement or
vice versa do the following:
1. To go from the main power measurement screen power to energy measurement,
press "energy".
2. To go from the energy measurement screen to power measurement press the
power" soft key.
4.3 Startup and Configuration of Defaults
If you are planning to do measurements of the same type most of the time, you can set
up the Laserstar so that it automatically starts up in the measurement mode desired.
Since these settings are saved in the head "smart connector", you can save different
settings for different heads.
To set the Laserstar to start up in desired screen and to save the chosen
configuration:
1. With the head disconnected, switch on the Laserstar and press “value” to select
the desired startup screen. (Note that this selection is saved in the Laserstar and
not the head so will be operative for all heads). For more details on the screen
types see section 4.6.
2. Now switch the Laserstar off, connect the head and switch on again. From the
main power or energy measurement screen press the menu button located on the
right side.
3. Choose "config" with the arrow keys. Press "go".
4. Press "value" to choose "power" or "energy" for the desired startup screen. The
Laserstar will now start up in power or energy measurement mode, respectively,
when switched on.
5. Select “Laser:”. Now press "value" to select the laser type you want to be the
default. The Laserstar will now be correctly calibrated for the absorption of the
detector at the wavelength of the laser type selected and will startup with the
laser wavelength selected.
25
6. Select “Average over:” and select the period you wish to average power readings
over. This feature is especially useful for lasers with nonsteady output. See
section 4.4.2.4 for details.
7. Select “Power Range:” using the arrow keys. Now choose the manual power
range you wish to be the default or autorange. The Laserstar will now be in the
range selected when switched on with the head in question.
8. Select “Energy Range:” using the arrow keys. Now choose the energy range you
wish to be the default or autorange. The Laserstar will now be in the range
selected when switched on with the head in question. Note that there are only
manual ranges in energy.
9. Select “Energy Threshold” if you want to change the energy threshold. See
section 4.5.3 for details.
10. Now press “save” and “exit” and the defaults will be saved. If you only want the
changes saved for the present, exit without save and the changes will be saved
until the Laserstar is switched off only.
11. Switch the Laserstar off then on by means of the switch on the rear. (See Figure 4).
The Laserstar will enter the mode of operation last saved with the "configure"
operation.
4.4 Power Measurement
The next section describes the procedure for basic power measurement as well as
more advanced features with thermal measuring heads.
4.4.1 Power Measurement, Basic Operation
1. Switch the Laserstar on by means of the switch on the left side. (See Figure 4).
The Laserstar will enter the mode of operation last saved with the "configure"
operation. For basic operation, you need only set up the parameters for the type of
measurement you wish (Section 4.3 describes the procedure to store your
configuration.), and the Laserstar will be ready to perform that type of
measurement each time it is switched on. The normal default mode is the
bargraph autoranging power measurement screen.
2. If the Laserstar is in "energy" mode, pressing the "power" soft key will cause it to
enter the power measurement mode.
3. Center the laser beam carefully on the absorber surface and read the power.
26
4.4.2 Additional Power Measurement Features
The following section describes additional Laserstar functions in power mode in
addition to the basic power measurement mode described above.
4.4.2.1 Zoom
The Zoom function causes the scale to expand the present scale fivefold. Thus, if the
full scale of the bargraph is 20 watts, and your reading is 15 watts, pressing “zoom”
will make the bargraph scale range between approximately 13 and 17 watts.
Variations in power are more easily seen in this mode To access the zoom function,
simply press the “zoom” button. It will be highlighted to show that it is engaged. Note
that the fiducial marks of the bargraph are further apart, indicating that zoom is
engaged. Now press the “zoom” button again to return to the unexpanded bargraph
display.
4.4.2.2 Offset
The offset function subtracts background from the signal. If the ambient environment
has a thermal background, so that the Laserstar shows a nonzero power reading even
when there is no laser, you can subtract the background using the zero function. For
example, the Laserstar display reads 0.1 Watts when the laser is blocked, and 20.5
Watts with laser power applied. In this case, the true power is 20.5 - 0.1 = 20.4 Watts.
To subtract the background, press the “offset” button while the laser is blocked. The
Laserstar will now read zero, and the 0.1 Watt background will be subtracted from all
subsequent readings. The laser power reading will thus be 20.4 Watts.
When “offset” is engaged, the legend is highlighted. To cancel, press “offset” again.
If the “offset” is engaged, and you wish to subtract out a new value of the background,
press “offset” twice. The first press will cancel the old value, and the second will
activate a new value. If you suspect that the Laserstar has a permanent zero offset,
then disconnect the head while it is in the power measurement mode. If the Laserstar
still shows a similar offset even when the head is not connected, the instrument’s
internal zero should be reset. See Section 3.5.6.
27
4.4.2.3 Tune (see Figure 5)
The Tune function, an exclusive Ophir feature, makes adjusting your laser to its
maximum power easier than ever before. Unlike a bargraph or mechanical meter, this
display shows graphically what came before as well as the current reading and the
trend. This allows you to determine if you have reached maximum power. The tune
function also has an audio option so you can follow a rising or falling audio tone in
tuning your laser.
The screen is completely autoranging. Therefore, as soon as the cursor goes over the
top or under the bottom edge of the display, it re-scales to put the cursor back to the
middle of the screen. This allows you to devote all your attention to tuning the laser,
without having to worry about the Laserstar settings. You can also use the audio tone
feature so you do not have to look at the Laserstar at all while tuning the laser.
4.4.2.3.1 To use the Laserstar to fine tune laser power
1. From the bargraph power measurement screen press the menu button.
2. Press “-->“ until “tune” is highlighted then press “go”. Now press “setup”.
3. Set the power expansion scale to ±50% ,±25%, ±10%, ±100%or ±75% as desired,
using the “value” soft key.. The default value is 50%. If the laser power will
change a lot, use a large value; if a little, use a small value.
4. Set the horizontal sweep time to the rate desired. The default value is 1 minute.
5. Set the audio to on or off as you desire. (See below)
6. Now save these settings by pressing “save” and press “exit” to enter the tune
screen. If you want to save the settings only until the instrument is turned off,
press exit without save.
4.4.2.3.2 Measuring with the Tune Screen
You can now use the tune screen to adjust and maximize your laser power. (Figure 5).
Note that you can not only see the trend, but also see if you have already reached a
higher value before. The numbers on the left side show you the
present power reading as well as the highest one reached till now. Press “max” to
reset the maximum reading to the present time. Now measure the power of the laser
and adjust the laser until you determine that the power has reached a maximum.
28
YAG
NOW
23.45W
MAX
27.73W
1min
+50%
setup
max
esc
Figure 5
Power Tune Screen
4.4.2.3.3
Using the Audio Tune Function
The Laserstar has an exclusive audio tune facility. The instrument can generate a
rising or falling audio tone to indicate higher or lower power. To engage the audio
feature, simply choose “Audio: on” in the setup screen and save if you want this
feature to be the default.
4.4.2.4 Average
When a laser output is fluctuating or unstable, it is useful to measure the average
power over a certain period. The Laserstar gives you this exclusive feature, allowing
averaging over periods varying from 1 s to 1 hour.
The average mode works as follows:
As soon as the main power measurement screen (See Figure 6) is entered and the
instrument is set to average mode, the instrument displays the average of readings
over the period since the screen was entered up to the present. At the same time, the
small vertical bargraph on the right starts to fill up (See Figure 6). When the time period
of the average is reached, the bargraph is filled and from then on, the average is a
running average over the average period backward in time. For instance, if the
average period is 1 minute, at 30 seconds, the average is over 30 s., at 1 minute it is
over 1 min, at 5 minutes, it is over the period from 4 to 5 minutes (1 minute back from
the present etc.).
29
To use the Laserstar to display average:
1. From the main power screen, press the menu button and select “config”.
2. Press “go” and select “Average over”.. Use the value button to select the
average period you want or select “NONE" if you do not want to average.
3. If you want to permanently select this average period, press “save”. If you only
want to average at the present until the instrument is turned off, exit without
pressing “save”.
YAG
energy
30A-CAL
22.69W
zoom
offset
power
A
AVE:
10s
range
3W
menu
Figure 6
Thermopile Power Screen
4.4.2.5 Normalize
When you wish to show the readings as compared to some standard reading, the
normalize function allows you to do this. After setting “normalize”, all subsequent
readings will as a ratio to the reference reading. For instance, if you normalize the
reading at a power of 1.5W, then subsequent readings will be with ratio to that, i.e. if
the power is then 2W, the reading (dimensionless) on the screen will be 2/1.5 = 1.33.
The screen will also show in small digits the power at which the normalization was
done and the present power.
To use the Laserstar to normalize the power:
1. From the main power screen, press the menu button and select “normalize”.
2. Press “go” and when ready to normalize, press “apply”. From then on, the power
will be proportional to the normalized power value. (see Figure 7)
3. If you wish to return to the the regular display, press “exit”.
30
24.50W
24.00W
1.021
Normalization A
VIS
laser
reset
30W
range
exit
Figure 7
Thermopile Normalize Screen
4.4.2.6 Power vs. Time Graph and Data Logging
The Laserstar in datalog mode has the option of graphing the laser power against time
and storing the data in up to 10 permanent storage files with up to 5,400 data points in
each file. While measurements are being taken, the Laserstar will record data until the
screen is full or until the reset button is pressed. With the RS232 or IEEE adaptor, the
data can be read out to PC in real time or later after storage. Power logging has the
following characteristics:
To use the Laserstar to graph power vs. time:
1. From the bargraph power measurement screen, press the menu button and select
“data-log”. Press “go”.
2. Now press “setup” to access the setup screen. Now select the time scale,
maximum power and minimum power you wish and press “exit”. If you wish to
save these settings as defaults, press save before exiting.
3. Now press “log”.and you will be in the power graph screen (See Figure 2). Press
“go” and the measurement will begin immediately. The “go” button will now
change to “pause”. If you wish to pause the measurements without losing data
gathered, press “pause” . Press “pause” again to resume measurements. When
the data register is full, “FULL” will flash on the screen. If “zoom” is pressed at any
time, the screen display will expand fivefold around the present power value.
Press “zoom” again to cancel the expansion. If you want to start a new
measurement and not save the present data, press “reset”. If you want to save the
data before making a new graph, see the next section.
31
Note:
For data logging, the instrument has to be in a manual power range. If it is not, a
message will occur.
Warning:
Pressing “reset" will erase all previously stored data and start recording new
data.
4. If you press the “stats” button, the graphical display will be replaced by a
statistical summary of the data gathered till now. This summary is updated every
2 seconds.
CO2
POWER
2.875W
5min
go/pause
reset
zoom
stats
exit
Figure 8
Laser Power VS Time Graph
4.4.2.7 Power vs. Time Graph and Data Logging
4.4.2.7.1 Data Storage and Transmission
When using thermal and photodiode heads the data logging period can be set to
anywhere from 12 seconds to 600 hours. The number of points stored in the data
register is up to 5,400 points, where less will be stored for data logging periods of less
than 5 minutes. The data can be stored to file as described below. To store the data do
the following:
1. When you have gathered enough points press “pause” or wait until the data
register is full and “FULL” flashes. Press “exit ”and you sill be asked if you want to
enter the file control system. Press “yes”.
32
Temp: 5400
1:
0
2:
0
3:
0
FILE CONTROL
0
4:
5:
0
6:
0
7:
0
select
save
8:
9:
10:
Free Space:
delete
view
0
0
0
54000
esc
Figure 9
File Control Screen
2. When the screen is entered, the data in the latest power graph will be stored
temporarily in register “Temp”. Press “select” to select the permanent register
you wish to use for storing the data and press “save”. The data in the “Temp”
register will be transferred to the selected register. This data storage is permanent
and the data is not lost when the instrument is turned off. If you try to save into a
file which already has data, a warning will appear that the new save will erase
previous data in the file. If you want to delete the data from all the files, press
“delete”.
3. Pressing “view” will get you into a screen showing a summary of the data in the
selected file. If you press “data”, you will enter a screen showing all the data
points collected until now. Press “home” to get to the first page of data. Press
“end” to get to the last page and use the arrow keys to go through the data page
by page. Pressing “esc” will get you back to the previous screen.
Data Transmission to PC
The data stored in the Laserstar file system can be transmitted to PC using the
Starcom PC package supplied with the Laserstar. The data can be transmitted in real
time as well according to the following table:
Power Measurement
Power log period
Max points stored onboard (per file)
Max points in StarCom real time log
Max points direct to PC file in real time
RS232
12s to 600hr
5400
6000
unlimited
33
GPIB
12s to 600hr
5400
6000
unlimited
Energy measurement
(1)
Max real time data logging rate
(1)
Onboard data logging rate
Data transfer from instrument to PC
Max points stored onboard
RS232
>30Hz
GPIB
>1500Hz(2)
>200Hz
~500points/s
59,400
>200Hz
(2)
>1500points/s
59,400
(1): The above refers to the rate for logging every single point. Above that rate the
instrument will sample points but not log every single point.
(2): The rate shown is for GPIB with the instrument in turbo mode. In regular data
logging mode, the maximum rate for every single point is 180 points/sec
See the section 4.5.6.2 for further details.
4.5 Energy Measurement
4.5.1 Setup
Switch the Laserstar on. If it is in power mode, press the left soft key “energy” to put it
into energy mode (Figure 10).
The energy mode is manual ranging: press “range” and then use the arrow keys to get
to the proper range. The correct range is the lowest one which is larger than the pulse
energy measured. If you plan to use the same setting often, use the "configure"
function as described in Section 4.3. before switching the Laserstar off the first time.
When the Laserstar is switched on again, it will automatically go into the same range
until a different configuration is saved. Note that the present range is displayed on the
lower right of the energy measurement screen as shown in Figure 10.
YAG
30A-CAL
energy
22.69J
power
laser
READY
range
Figure 10
Thermopile Energy Screen
34
A
30J
menu
4.5.2 Measurement
To measure energy of a single pulse, set up as above and fire the laser. The display
will go blank while the energy is being integrated. After 2-4 seconds, the correct
energy will be displayed. When the Laserstar is ready to measure a new pulse, "ready"
will appear on the screen and flash on and off. (See Figure 10). The next pulse will
automatically blank the screen, and the new value will be displayed. If you fire
another pulse before "ready" appears, the reading may be inaccurate or may not be
displayed.
4.5.3 Minimum Energy Threshold
If the Laserstar is used in a noisy environment or where there is a high level of
background thermal radiation, the instrument may trigger spuriously on the noise or
background radiation. It would then fail to measure the intended pulse. Since there is
always some degree of noise or background radiation, the instrument is designed not
to respond to pulses below some preset minimum size. This "Minimum Energy
Threshold" is typically set to 0.3% of full scale of the selected range. If this level is
found to be too sensitive for the user's particular environment, it may be altered by the
user. The threshold should not, however, be raised higher than necessary. This will
cause a degradation in the accuracy of energy measurements of pulses below about 4
times the threshold level. The factory setting of energy threshold is "med" for medium.
If the unit triggers on noise, set the threshold to "high." If you are measuring small
energies and the unit does not trigger, set the threshold to "low."
To set the energy threshold:
1. From the power or energy measurement screen, press "menu ".
2. Select “config”. Press “go”. Select “energy threshold”. "Energy Threshold : “MED”
will be displayed.
3. Press “value” to select "high," "med," or "low" threshold. For the 3A-P head
"optical" is also available and is the default choice. (See below)
4. Press “exit” and “esc” to return to main measurement screen. If you wish to save
this value, press "save in the configure screen before exiting. (See also section
4.3).
35
Note (to users of 3A-P type heads):
The 3A-P type head has special circuitry enabling it to trigger on energy pulses of
very low energy. This is accomplished by a special photodiode trigger which
alerts the Laserstar that a pulse has been received and to start integration. This
allows the 3A-P to react to smaller pulses than would be measurable just by
triggering on the rising thermal signal as in other heads. When you select "optical"
this enables the optical trigger. However, in some cases, the optical trigger will
not work and you should select one of the thermal trigger settings, "low", "med" or
"high". You should use thermal triggering on the 3A-P in the following cases:
1. The wavelength is outside the range of the of the photodiode, i.e. outside of 0.19 1.064µm
2. You are measuring the energy of a shuttered pulse of a continuous laser. In this
case, the peak power is too low to trigger the photodiode.
3. For some other reason, the instrument does not trigger on the "optical" setting.
When using the optical trigger, the instrument should be able to measure down to 0.1 0.2 mJ, depending on wavelength. When using the thermal trigger (low, med or high),
you should not attempt to measure less than about 1mJ.
4.5.4 Measuring Pulses of Very Low Energy
When it is necessary to measure pulses of very low energy, i.e., less than 0.5% of the
maximum range of the instrument, the following two alternative methods allow greater
accuracy to be obtained.
1. A continuous train of pulses may be fired, and the average power measured using
“power” mode. The energy per pulse can be calculated by:
Energy per pulse = Average power / Pulse Repetition Rate
2. A train of a known number of pulses may be fired, and the total energy measured
in “energy” mode. This train should not exceed 5 seconds duration. The energy
per pulse can be calculated by:
36
Energy per pulse = Total Energy / Number of Pulses
In both of the above methods, the pulse repetition rate must exceed 3Hz. Higher rates
will generally give improved accuracy, but care should be taken not to exceed
maximum power ratings.
4.5.5 Measuring Energy of Rapidly Repeating Pulses
The standard Laserstar will only measure individual pulses every 5 seconds or so.
You can also calculate the average energy of rapidly repeating pulses by measuring
average power on the power setting and using the formula:
Average Energy per Pulse = Average Power / Pulse Repetition Rate
For rapidly repeating pulses, you can use one of the Ophir pyroelectric heads,as long
as the pulse energies do not exceed the ratings of the pyroelectric absorbers. The
pyroelectric heads are compatible with the Laserstar and just have to be plugged in to
be used.
For higher pulse energies, you can use the Ophir model RP to measure both average
power and exact individual pulse energy of the rapidly repeating pulses.
See your Ophir agent or sales representative for details.
37
4.5.6 Energy Log and Data Storage (See Figure 11)
The Laserstar has the option of displaying successive energy points in a scrolling
vertical bargraph form. While measurements are being taken, the Laserstar will
record data. Up to 59,400 points are stored See section 4.4.2.7.1 for more information
on data storage and handling.
Note:
For Thermopile heads logging energy, there are no setup options.
4.5.6.1 To use the Laserstar for graphical display of energy - regular mode
1. Make sure that the Laserstar is in the correct energy measurement range. If not,
press “range”, adjust and press “exit”.
2. From the energy measurement screen press “menu” and then select “data-log”.
Press “go”. Now press “log” and the energy log screen will appear. Press “go”.
Now fire a pulse when the "ready" legend flashes. The measurement will
immediately begin. When the screen is full, the display will scroll and the latest
points will continue to be displayed. When the data register is full, “FULL” will be
displayed. If you wish to see finer variations in the graph, press the “zoom” button.
3. When “reset” is pressed, the Laserstar is ready to begin a new measurement. If
you want to store the data before making a new measurement, see section
4.4.2.7.1 on data storage
Warning:
Pressing "reset" will erase all previously stored data.
4. When the “stats” button is pressed, a statistical summary of the data on the
screen is shown. If you wish to return to the graphical display, press “graph”. If
you wish to permanently store the data in a file, press exit and then choose “yes”
to enter the file system. See section 4.4.2.7.1 for further information.
Note:
Zoom can only be pressed after at least one pulse has been recorded.
38
4.5.6.2 Turbo mode
In regular data log mode above, you can only log every point at up to 180 points per
sec. You can also not transmit to PC at higher rates than 180 Hz in regular data log
mode.
In order to log data or transmit it to PC at rates >1500Hz, you must be in turbo mode.
This will put you into a special mode where the Laserstar can handle data at high
speed while curtailing other functions. To log in turbo mode, do as follows:
1. Make sure that the Laserstar is in the correct energy measurement range. If not,
press “range”, adjust and press “exit”.
2. From the energy measurement screen press “menu” and then select “data log”.
Press “go”. Now press “turbo”.
3. With the up/down buttons, indicate the laser frequency and then choose the log
size, i.e. how many points you want to log. Now press “go”. The measurement will
begin and the Laserstar will indicate when the file is full.
Note1:
The Laserstar does not measure frequency in turbo mode. Therefore you have to
indicate the frequency before starting the measurement. This means you cannot
measure pulses with frequencies which vary during the measurement run.
Note2:
The Laserstar will not respond to any buttons until the turbo logging session is
over. This applies either for data logging or data transmission in turbo mode.
CO2
ENERGY
2.875J
READY
go/pause
reset
zoom
Figure 11
Energy Log Screen
39
stats
exit
4.6 Advanced Display Screens
4.6.1 Beam Splitter/Attenuator Screen
If you have a measurement setup with a beam splitter or attenuator and wish to
display the laser power or energy before the splitter or attenuator and not the actual
value impinging on the measurement head the beam splitter function allows you to do
this. For example, if you are splitting off 4.5% of a laser beam into the meter and you
wish to display the full beam, do as follows:
1.
2.
From the main power screen, press the menu button and select “advanced”.
Press “go”. Select “attenuate” and press “go”.
Press “set” and then “value” to select first number. Press “set” again then
“value” again to select second number and so on. For example, in the screen
shown below, 4.5% has been selected.
If you press “exit, exit, esc” you will return to the standard measurement screen.
If you want the instrument to start up in the attenuation screen, follow the instructions
for instrument startup defaults in section 3.5.
VIS
2.354W
A
52.31 W
4.500%
set
30W
percent
exit
Figure 12
Attenuation Screen
Note 1:
The attenuator screen only affects the value displayed on that screen and nothing
else. The power and energy scales remain the same, the damage thresholds
remain the same etc. The attenuator screen is only an extra screen to show a
different calculated number introduced by the user.
40
Note 2:
The attenuation value is stored in the Laserstar and not the head so if it is set, any
head connected will come up with the value chosen.
Note 3:
If you have a dual channel Laserstar, the function will only work in single channel
mode and the value set will be applied irrespective of which channel you use.
4.6.2 Power and Energy Density Screens
The Laserstar gives you the option to measure in units of power and energy density
instead of power and energy. You input the beam diameter and the display then
calculates and displays the power or energy density in units of W/cm² or J/cm². In
order to activate this screen do as follows:
1. From the main power screen press “menu” then select “advanced” and press
“go”.
2. Select “density” and press go. The display will now be in units of W/cm² or J/cm²
depending if you were in the power or energy measurement screen.
3. Now press “change” and adjust the four values given to values of spot size that
you desire. Press “save” and “exit”.
4. Now select the beam diameter you want of the 4 given by repeatedly pressing
next.
5. Press “exit” to get back to the standard measurement screen. If you want the
instrument to start up in the density screen, follow the instructions on startup
defaults in section 5.3.
4.6.3 Limits Screen
The Laserstar gives you the option to set upper and lower limits of power and energy.
When these limits have been set in the limit screen, when the power or energy is
above the maximum limit set the message “OVER” will appear on the screen and when
under the minimum limet set, the message “UNDER” will appear on the screen.
41
To set up the limits screen do as follows:
1. From the main power or energy screen press “menu”, select “advanced”, press
“go”, select “limits” and press “go”. You are now in the limits screen.
2. Press “setup” and select the lower and upper limits as follows: With the up/down
buttons select the lower limit digits, then with the arrow go to the exponent
screen and with up/down select the exponent. For instance, if you want to select
a lower limit of 0.1W, set DIGITS to 1.000 and EXP to –1.
3. Now do the same for the upper limits on the right side of the screen and press
“save” to save the values.
4. If you want the limits screen to be the startup default of the Laserstar, follow the
instructions in section 5.3.
Now when the power or energy is over or under the limits chosen, the error message
will be shown as in Figure 13. Note that the lower limit is shown on the upper left and
the upper limit on the upper right.
VIS
OVER
A
8.49
8.00W
100.0mW
setup
W
30W
exit
Figure13
Limits Screen
4.7 Special Thermopile Heads
4.7.1 BC20 Power Meter for Scanned Beams
The BC20 scanned beam laser power meter has become the industry standard for
measuring scanned laser beams aswell as hard-to-reach static beams. The BC20 uses
a silicon detector and innovative circuitry to measure scanned as well as static beams
of up to 20 milliwatts with a noise level of microwatts. This instrument has patented
dynamic background subtraction that eliminates over 95% of background light and
allows measurement in normal room light.
42
The calibration of each measurement head is in the head plug so that heads and
displays can be interchanged without losing calibration. It also allows user
recalibration if desired.
The BC20 has advanced circuitry with excellent sensitivity, signal to noise ratio,
accuracy, and response time; its special circuitry rejects electromagnetic
interference. The measuring wand swivels 180° providing access to beams hidden in
complicated assemblies. The BC20 has a hold function, allowing user to hold highest
reading for 5s before updating.
43
Chapter 5 Operation with Photodiode Type Heads
Warning:
Before using the head for power measurement, check that your laser power or
energy and energy density does not exceed the head ratings. See table 6.
5.1 Photodiode Heads
When a photon source, such as laser, is directed at one of the PD300 or 3A-IS series
photodiode detectors, a current is created proportional to the light intensity and
dependent on the wavelength.
The PD300 and PD300-3W heads have a unique dual detector head (patented) in which
the two detectors are identical and connected back to back. When a uniform signal,
such as room light background, falls on the detector head the signal from the two
detectors cancels.
On the other hand, when a laser beam falls on the head, it illuminates only the first
detector and therefore is detected. Thus the PD300 subtracts most of the background
while detecting the desired signal. The subtraction is not perfect but usually 98% of
the background signal is eliminated so the detector can usually be used in ordinary
laboratory lighting conditions.
The Laserstar display unit amplifies this signal and indicates the power level received
by the head. Due to the superior circuitry of the Laserstar, the noise level is very low,
and the PD300 /3A-IS series heads with the Laserstar display have a large dynamic
range from nanowatts to hundreds of milliwatts.
Since many low power lasers have powers on the order of 5 to 30mW, and most
photodiode detectors saturate at about 2mw, most heads of the PD300 series have
been constructed with a built in filter so the basic head can measure to 30mW or more
without saturation. When the additional filter is installed, the maximum power is on
the order of 300mW (or 3W with model PD300-3W). The PD300 saturates when the
output current exceeds 1.3mA so the exact maximum power depends on the sensitivity
of the detector at the wavelength used. When saturated, the legend "SAT" will appear
on the screen. Table 2 gives the actual maximum power as a function of wavelength.
44
FILTER OUT
WAVELENGTH
250-350nm
400nm
633nm
670nm
800nm
900mm
1060nm
PD300
N.A.
30mW
20mW
13mW
10mW
10mW
25mW
PD3003W
N.A.
30mW
20mW
13mW
10mW
10mW
25mW
PD300-UV
3A-IS
1mW
3mW
3mW
3mW
2.5mW
2.5mW
3mW
N.A.
N.A.
1W
2W
3W
3W
3W
WAVELENGTH
800nm
1-1.3µm
1.4µm
1.5µm
1.6µm
1.8µm
PD300IR
20mW
30mW
25mW
15mW
10mW
25mW
WAVELENGTH
800nm
1-1.3µm
1.4µm
1.5µm
1.6µm
1.8µm
PD300IR
200mW
300mW
150mW
80mW
50mW
100mW
FILTER IN
WAVELENGTH
250-350nm
400nm
633nm
670nm
800nm
900mm
1060nm
PD300
PD300-3W
N.A.
300mW
300mW
200mW
100mW
150mW
250mW
N.A.
3W
3W
3W
1W
1.5W
2.5W
PD300UV
100mW
300mW
300mW
300mW
250mW
250mW
300mW
3A-IS
N.A.
N.A.
N.A.
N.A.
N.A.
N.A.
N.A.
Table 2.
Maximum Measurable Laser Power as a Function of Wavelength
5.2 Setting up the PD300 to display the user's chosen wavelengths
The PD300 series has built in wavelength correction curves for measurements either
with the removable filter installed (filter-in) or removed (filter-out). These curves are
stored in the head EEROM. The correction curves, with a resolution of 1nm, ensure
that the power reading is correct at all laser wavelengths.
In order to simplify changing from one laser wavelength to another, the user can
program up to 6 different wavelengths to be available from the screen menu. Please
use the following procedure to set the PD300 to your laser wavelengths.
45
1.
From the power measurement mode with the bargraph display, press the menu
button located on the right and select “wavelength”. Press “go”.
2. Press “select” to select the first wavelength desired. Press “go”.
3. Change to the wavelength desired using the up and down buttons. If you desire to
permanently save the new value press “save”. Press esc.
4. Repeat steps 2 and 3 for other wavelengths desired. When finished press exit.
Those values for which “save” was pressed will be default startup values, the
others will be saved until the instrument is turned off.
5.3 Startup Defaults
If you are planning to do similar measurements most of the time, you can set up the
Laserstar so that it automatically goes into the measurement mode you want upon
startup. Since these desired settings are saved in the head "smart connector", you
can save different settings for different heads. The following section describes how to
set up the Laserstar with the PD300 head so that it will start up in the desired
configuration.
Setting up the startup defaults: (See section 5.4 for further details)
1. With the head disconnected, turn on the Laserstar. Press “value” to select the
startup screen you wish to startup with as default and press “save”.
2. Now turn on the Laserstar with the head attached. From the power measurement
bargraph screen, press the menu button located on the right side and select
“configure”. Press “go”.
3. Press "value" to select filter in or out as the startup default. For details of filter
in/out See Section 5.4.3.
4. Now select “Power range” to choose the manual power range, autorange or dBm
you wish to be the default,. The Laserstar will now be in the mode selected when
switched on with this head connected.
5. Now select “Average over” to choose the averaging period for power
measurement. If you do not want averaging, choose the value “NONE” See
section 4.4.2.4 for details about averaging.
6. Now select “wavelength” and use the value button to select the default startup
wavelength. (See section 5.2 for changing to your desired wavelength values).
7. Press “save” when all selections have been made to save all current Laserstar
settings. If you only want to save the last changes made on the previous screen,
then exit without pressing save.
46
5.4 Selecting Settings from the Laserstar Screen
The Laserstar can conveniently be set to various chosen parameters from the screen.
In addition these settings can be saved as startup defaults so the head will be in the
desired configuration when turned on.
5.4.1 To Set to the Laser Wavelength Being Used
Photodiode heads have a different sensitivity at different wavelengths. Moreover, the
filters used in the head have a different transmission at different wavelengths. In
order to compensate for this, each head has a built in calibration curve (with 1nm
resolution) over the measurement range.
When you choose the correct laser wavelength, the correction factor for that
wavelength is automatically introduced. Note that the laser wavelength presently
corrected for is displayed in the upper left corner of the display. In order to define the
laser wavelengths to choose from, See section 5.2.
In order to choose the laser wavelength, simply press the “laser” button from the main
power screen until the correct wavelength is displayed. In order to set the default
startup wavelength, see section 5.2.
5.4.2 To choose Manual or Automatic Ranging or dBm
Autorange - The Laserstar allows you to choose autorange or manual ranging when
the reading is in watts. In autorange mode, you do not have to change scales. When
the reading of the meter or bar is more than 100% of full scale, the range goes to the
next higher one. When the reading falls below 9% of full scale, the range changes to
one range lower. This change occurs after a short delay. This provides overlap
(hysteresis) to keep the Laserstar from flipping back and forth when reading close to
the end of the scale.
Manual Range - There are certain disadvantages to autorange since it changes scale
even if you don't want it to do so. If you want to measure the same range all the time,
it is better to use manual range. The correct range to select is the lowest one that is
larger than the largest expected measurement. If you wish the Laserstar to be in
manual mode when switched on, save this configuration before switching off. See
Section 5.3.
47
dBm - The Laserstar allows the measurement to be made in units of dBm that is a
logarithmic scale. dBm units are defined as:
10 x log (reading in mW)
At 1mW the reading will be 0 dBm, at 100mW it will be 20 dBm etc.
To choose auto, manual or dBm range, follow these steps:
1. From the bargraph measurement screen, press “range”.
2. Now select the correct manual, auto or dBm range with the arrow keys. If you
want the selected range to be the startup value press “save”. Now press exit to
return to the measurement screen.
5.4.3 Operation with Filter In or Out
The PD300 head is equipped with a built in filter so that the photodiode can measure
up to 30mW without saturating the detector. In addition, the PD300 comes with an
additional removable filter for measuring up to 300mW. Other models of the PD300
series also have built-in and removable filters. The exact maximum power is reached
when the reading reaches full scale or the output current from the head reaches
1.3mA, whichever comes first. See Table 2 for the exact maximum as a function of
wavelength.
Depending on what powers you wish to measure, you should choose to work with the
removable filter installed or not. For this purpose, the Laserstar has a "filter" setting
and uses the proper correction curve depending on whether the filter is installed or
not.
Warning:
If the PD300 is used in the "filter in" setting and the filter is not installed or vice
versa the readings will be completely incorrect.
If the power of your laser exceeds the maximum for filter in, you can purchase a
thermal or integrating sphere head for that wavelength. Consult your Ophir agent
for details.
48
To choose the filter setting:
1. From the main measurement screen press the menu button and then “go”.
2. If you wish to work with filter installed, press "change" until display says "filter is
in". Be sure to install removable filter on detector head.
3. If you wish to work with the filter out, press "change" until display says "filter is out”
Be sure to remove the filter from the detector head.
4. When finished press exit and esc to return to the measurement screen.
5.4.4 Zoom
The Zoom function causes the scale to expand around the present reading ±20%.
Thus, if the full scale of the bargraph is 20mW and your reading is 15mW, pressing
"zoom" will make the bargraph scale range between approximately 12 and 18 mW.
Variations in power are more easily seen in this mode. When zoom is engaged, the
legend is highlighted. To cancel the zoom function, press "zoom" again. The zoom
function can be useful for laser power tuning and peaking.
To access the zoom function, press "zoom". When it is highlighted it is engaged. Note
that the fiducial marks of the bargraph are further apart, indicating that zoom is
engaged. Pressing "zoom" again will cancel the function.
5.4.5 Offset
The PD300 and PD300-3W heads have automatic background subtraction as described
in Section 5.1. In addition, the offset function can be used to subtract the residual
background signal that remains if desired. If the Laserstar shows a nonzero power
reading even when there is no laser, you can subtract the background using the zero
function. For example, the Laserstar display reads 0.1mW when the laser is blocked
and 20.5 mW with laser power applied. In this case, the true power is 20.5 - 0.1 = 20.4
mW. To subtract the background, press "offset" while the laser is blocked. The
Laserstar will now read zero (0.0), and the 0.1 mW background will be subtracted from
all subsequent readings. The laser power reading will thus be 20.4 mW.
49
When "offset" is engaged, the legend is highlighted. To cancel, press "offset" again. If
the "offset" is engaged, and you wish to subtract a new value of the background, press
"offset" twice. The first press will cancel the old value, and the second will activate a
new value. If you suspect that the Laserstar has a permanent zero offset, then
disconnect the head while it is in the power measurement mode.
5.4.6 Measuring loss using the dB offset function
Since dBm is a logarithmic measurement, the ratio between two measurements will be
the difference between the dBm measurements. For instance, if you want to measure
the loss in a fiber optic cable where the measurement before the cable is 1mW = 0dBm
and the measurement after the cable is 0.1mW = -10dBm. The ratio is then 1:10 = 0.1
and the dB loss is 0 – (-10) = 10dB.
The dB offset function allows you to easily measure this. To do so do as follows:
1. When measuring the reference value press “dB-O”. The value changes to 0 dB
(note that now the units are dB, a relative value instead of dBm, an absolute
value).
2. Now make your second measurement and the value of the difference in dB = ratio
in numerical units will be shown.
Note:
If there is a zero offset in the reference value, you cannot subtract this using the
dB offset function. Instead, before the start of the measurement, press “offset”
and subtract the zero offset. Then follow steps 1 and 2 above. The zero offset
subtracted when “offset” was pressed will be saved in the dBm scale and you can
now use the dB-O setting to measure true ratio without zero offset problems.
5.4.7 Average and Measuring Very Low Power Measurement
If the laser power is fluctuating, the Laserstar can display the average power readings
with averaging periods varying from 1s to 1 hour. When measuring very low powers,
such as picowatt measurements using the PD300-IRG or PD300-UV, there will be a
rather large zero offset coming from the detector as well as a considerable noise
fluctuation. Nevertheless, you can measure these low values by using the average
function and pressing offset to eliminate the detector zero offset.
50
In order to measure very low powers do as follows:
1. Press “menu” and select “configure”. Choose the appropriate value you want to
average over and save it and then exit.
2. Now block the power source you wish to measure, wait for a few measurement
periods and press “offset” to subtract the zero offset.
3. Now unblock the power source and measure.
For more about the average function See Section 4.4.2.4.
Note:
The average function does not work with autorange or dBm scales
5.4.8 Tune and Power log
The Tune function, an exclusive Ophir option, makes adjusting your laser to its
maximum power easier than ever before. Unlike a bargraph or mechanical meter, this
display shows graphically what came before as well as the current reading and the
trend. This allows you to see at a glance if you have reached maximum power.
The Laserstar also has the option of graphing the laser power vs. time, or successive
energy points as long as the Laserstar has not been turned off. While measurements
are being taken, the Laserstar will record data until the screen is full, or "reset" or "exit"
is pressed.
If the laser power is fluctuating, the Laserstar can also display the average power
readings with averaging periods varying from 1s to 1 hour.
These functions are the same for thermal type heads and for photodiode heads. See
Section 4.4.2.4 for details.
5.5 Special Photodiode Heads
5.5.1 PD300-BB Radiometer Head
In addition to photodiode heads for individual wavelengths, Ophir also supplies heads
for measuring the output of broadband light sources. The PD300-BB head has
spectrally flat response from 400 to 1000nm and therefore can give the true total power
of any broadband light source in that spectral region.
51
Note:
Because the BB heads are spectrally flat, wavelength selection is disabled. Other
than that, operation is the same as other PD300 type heads.
5.5.2 PD300-CIE Photometer Head
The PD300-CIE head has a spectral response similar to that of the human eye and can
therefore make measurements in eye response units of Lux. The PD300-CIE is
designed with a small detector where the source overfills the detector. It measures
the light intensity per unit area in units of Lux or Foot Candles.
Note:
Because the CIE heads have a spectral response similar to the human eye
wavelength selection is disabled. Other than that, operation is the same as other
PD300 type heads.
52
Chapter 6 Operation with Pyroelectric Heads
Warning:
Before using the head for power or energy measurement, check that your laser
power, energy or energy density do not exceed the head ratings as listed in tables
6 and 7 with the head specifications. Otherwise, there is a risk of damaging the
absorber.
With the pyroelectric head, you have been supplied a test slide with the same coating
as on your pyroelectric detector. You can also obtain this slide from your dealer. You
should use this slide to test the damage threshold with your laser pulses. If the slide
is damaged, then either enlarge your beam or lower the laser energy until damage is
no longer seen.
6.1 Pyroelectric Detector Heads
When a pulsed heat source, such as a laser, is directed at the detector head, a
temperature gradient is created across the pyroelectric crystal mounted in the head.
An electric charge is produced which is proportional to the energy absorbed. The
detector head has sophisticated circuitry unique to Ophir (patented) that determines
the baseline before the pulse is received, measures the voltage after a pre-determined
interval, amplifies it and holds it for a pre-determined time.
Due to this innovative circuitry, Ophir pyroelectric heads can measure very long pulses
as well as short ones. They can measure low energies as well as high. They can also
measure at higher repetition rates than was possible before.
The Laserstar display amplifies this signal and indicates the energy received by the
head as well as the frequency at which the laser is pulsing. Using the energy and
frequency information, the Laserstar is also able to display average power.
6.2 Selecting Settings from the Laserstar Screen
The Laserstar can conveniently be set to various chosen parameters from the screen.
In addition, it can be set to startup defaults so it will be in the desired configuration
when turned on.
53
NIR
10.00Hz
power
PE50-BB
energy
22.69mJ
Trig
ave
max: 50us
range
laser
A
AVE:
10s
2mJ
menu
Figure 14
Pyroelectric Energy Screen
6.2.1 Setting up the head to display the user's chosen wavelengths (Metallic
Type Only)
The absorption of the detector coating varies somewhat with wavelength. The
correction curve for the absorber is stored in the head EEROM. This correction curve
ensures that the power reading is correct at all laser wavelengths.
In order to simplify changing from one laser wavelength to another, the user can
program up to 6 different wavelengths to be available from the screen menu. Please
use the following procedure to set the pyroelectric head to your laser wavelengths.
1. From the main display, press the menu button located on the right and select
“wavelength”. Press “go”.
2. Press “select” to select the first wavelength desired. Press “go”.
3. Change to the wavelength desired using the up and down buttons. If you desire to
permanently save the new value press “save”. Press “exit”.
4. Repeat steps 2 and 3 for other wavelengths desired. When finished press exit.
Those values for which “save” was pressed will be default startup values, the
others will be saved until the instrument is turned off.
Note:
The broadband type heads (BB) have less variation with wavelength, and in those
heads, fixed wavelength ranges are selected similar to thermal heads. This section
is not relevant with those heads.
54
6.2.2 Setup of Laser Pulse Length and Pulses/Sample
6.2.2.1 Laser Pulse Length
As was mentioned before, the Ophir pyroelectric heads can measure long as well as
short pulses. In order to do this, the user must indicate to the Laserstar if the laser
pulses are going to be in the long or short pulse regime (BB models only have the long
pulse setting and measure all pulse lengths on this setting In that case “N/A” will
appear).
Warning:
If the pulse length is incorrectly set to the short setting for pulses longer than that
value, the reading will be erroneously low. If it is set to the longer setting for short
pulses the reading will be correct but noisier.
To set up for pulse length, please do the following:
1. From the main measurement screen, press the menu button and select
“configure”. Press “go”.
2. Now select “Max Pulse len:” and use “value” to select the setting for your laser
pulse length. If your laser pulses are longer than the short pulse length value, then
the long pulse value should be selected and vice-versa. Now press “save” if you
want this to be the startup default and press “exit”.
6.2.2.2 Setup for the Time Period to Average Over
The Laserstar has the ability to measure a number of pulses and display the average
value of the energy of the pulses. This function is useful if the laser energy is not
stable. Then the user can choose to measure a number of pulses and display only the
average.
55
To set up for averaging over a number of pulses:
1. From the main measurement screen, press the menu button and select
“configuration”. Press “go”.
2. Now select “Average over:” Now press "value" until the time period you wish to
average over is displayed. If you do not want to average, but collect individual
pulses then select "none".
3. Press "exit". If you wish to save the new setting as the default, press “save”
before exiting.
Note:
The Pyroelectric head is capable of measuring pulses up to very high repetition
rates on the order of kilohertz or above. The Laserstar actually captures each
pulse at over 180Hz and will sample pulses at up to 1000 to 5000 pulses depending
on the head. The pulses collected can be stored for later recovery and
transmission. (See section 4.4.7.2.1). However, the display can only display at rates
up to 15Hz. At higher rates, if the user has chosen “NONE”, the Laserstar will
display individual pulses sampled at a rate of 15Hz. If the user has chosen to
average over a time period, the instrument will display the average of readings
over the period from the time the screen was entered up to the present. At the
same time, the small vertical bargraph on the right starts to fill up.(See Figure 14)
When the time period of the average is reached, the bargraph is filled and from
then on, the average is a running average over the average period backward in
time. For instance, if the average period is 30 seconds, at 15 seconds, the average
is over 15 s., at 30 seconds it is over 30 seconds, at 5 minutes, it is over the period
from 4.5 to 5 minutes (30 seconds back from the present etc.).
6.3 Startup and Configuration of Defaults
If you are planning to do repetitive measurements most of the time, you can set up the
Laserstar so that it automatically goes into the measurement mode you want upon
startup. Since these desired settings are saved in the head "smart connector", you
can save different settings for different heads.
56
To set the Laserstar startup mode and to save the chosen Laserstar configuration:
1. With the head disconnected, turn on the Laserstar. Press “value” to select the
startup screen you wish to startup with as default and press “save”.
2. Connect the head and switch on the Laserstar. From the main measurement
screen, press the menu button located on the right side. Select “configuration”.
Press “go”.
3. Press "value" to choose "power" or "energy" for the desired startup screen. The
Laserstar will now start up in power or energy measurement mode, respectively,
when switched on.
4. Press the arrow key until the laser wavelength is highlighted. Now press
value to select the laser wavelength you want to be the default. The Laserstar will
now be correctly calibrated for the absorption of the detector at the wavelength
of the laser type selected. If you wish to choose another wavelength, See Section
6.2.1.
5. Select “Max Pulse Length:” to choose the default pulse length. See section 6.2.2
for details.
6. Select “Energy Range” to select the default energy range.
7. Select “Average Over:” to select the time period you wish to average over. See
section 6.2.2.2 for details.
8. Now press “save” when all selections have been made. and press exit. If you only
want to save the changes until the Laserstar is turned off, exit without saving.
1.1 Energy, Power or Exposure Measurement
Warning:
Before using the head for power or energy measurement, check that your laser
energy, energy density and average power do not exceed the head ratings as
listed in tables 6 and 7 with the head specifications at the end of the manual,
otherwise, there is a risk of damaging the absorber. With the pyroelectric head,
you have been supplied a test slide with the same coating as on your pyroelectric
detector. You can also obtain this slide from your dealer. You should use this slide
to test the damage threshold with your laser pulses. If the slide is damaged, then
either enlarge your beam or lower the laser energy until damage is no longer seen.
57
Note:
To measure pyroelectric energies properly, it is important that the head is not
grounded to the optical bench. Make sure that the head is isolated electrically
from the ground. The PE head has been supplied with an insulating mounting post
for this purpose.
6.4.1 Energy Average Power and Frequency Measurement
Unlike most pyroelectric energy meters, the Laserstar measures the pulse frequency
to a high degree of accuracy and is therefore able to display pulse frequency and
average power as well as pulse energy. The following paragraph will describe how to
set up and measure these functions.
6.4.1.1 Zeroing Head Against Laserstar Display
Unlike with the Nova display, there is a slight dependence of pyroelectric reading from
display to display. Therefore, for most accurate pyroelectric energy measurements it is
necessary to zero the pyroelectric head against the Laserstar display it will be used
with. After this is done, the head is “conditioned” to work with the particular Laserstar
the zeroing was done against. It is not necessary to do this procedure again unless the
head is used with a different Laserstar. If the procedure is not done, errors of 2% or so
can occur. To zero the head against the Laserstar, proceed as follows:
Make sure the head is in a quiet environment and not subject to pulsed radiation. Plug
the head into the Laserstar and turn on. Press “menu”, select “advanced”, press “go”
and “go” again. Press “start”. When “zeroing completed” appears, press “save”.
6.4.1.2 Energy Measurement
1. Ordinarily, when the instrument is switched on, it is in the main energy
measurement mode. This can be verified by the units of mJ, µJ etc. and the legend
“energy” in the upper right corner of the display (See Figure 10). If it is in power
measurement mode with units of mW, W etc., then press “energy”.
2. Press the range button then use the arrow keys to select the proper range. The
correct range is the lowest one that is larger than the pulse energy measured.
58
3. Press exit to return to the measurement screen and save before exit if you want
this to be the default range.
4. Press the menu button and select “configuration”. Press “go”. Select “Max Pulse
Length” and set to the correct value for your laser. (See section 6.2.2.1 for further
details).
5. If you wish to display the average of a number of pulses, press the menu button
and select “configuration”.. Press “go” and set “Average over:” to the value
desired. The default value is “none” which means that the pulses displayed are
individual pulses with no averaging. See section 6.2.2.2 for further information on
averaging.
The Laserstar is now ready to measure energy pulses. The energy reading will
operate in the following manner if "none" selected as the averaging period, following
every 1/5th of a second period, the Laserstar will display on the screen the next pulse
which arrives. The Laserstar will hold the display of the latest pulse until a new one
arrives. If an averaging period is selected, the Laserstar will collect pulses at up to
180Hz and will then display the average of those pulses. When a new pulse triggers
the Laserstar, “Trig” will appear on the screen. At over 5Hz, the "T" stops flashing and
appears all the time.
Note:
The Laserstar is able to record each pulse at up to 180Hz even though it is
displaying at a much lower rate. This data can be stored in a data file and
recovered and transmitted later.
The Laserstar also displays other information at the same time (see Figure 14). The
additional information displayed is as follows:
upper line: the laser wavelength in the left corner, the head type in the center and
whether the instrument is in power or energy mode in the right corner, A or B
signifying which head input is the main one (see the section on multihead inputs).
2nd and 3rd line: information about the average period and status.
4th line: the energy value and units.
5th line: The maximum pulse length and current energy scale.
6th line: the current soft keys.
59
6.4.1.3 Power Measurement
1. Make sure the instrument is in the power measurement mode indicated by the
legend “power” in the top right of the screen and the units of mW, W, etc. If it is
in energy measurement mode with units of mJ, µJ etc., then press the “power”
soft key or alternatively, press the menu button and then the left "power" soft key.
The Laserstar can be configured to start up in power measurement mode when
turned on. See section 6.3.
2. Press the range button then use the arrow keys to select the proper range. The
correct range is the lowest one that is larger than the pulse energy measured.
Note that the proper range is related to the pulse energy even though we are
measuring average power.
3. Press exit to return to the measurement screen.
6.4.2 Measuring Total Energy Exposure
The Laserstar has the ability to sum the total energy of a number of pulses over a given
time period or number of pulses. This gives the total energy "exposure" over that time
period. For example if the laser is pulsing at 30 times/s at 1mJ per pulse and you
measure the exposure over 20 seconds then the total exposure is 30 x 1 x 20 = 600mJ
In order to measure exposure, do the following:
1. Press the menu button and select “exposure”. Press “go”.
2. Setup the desired measurement parameters in the setup screen as follows:
Timeout:
Use this if you want to measure over a specific time period
independent of the number of pulses.
Pulses:
Use this if you want to measure over a specific number of
pulses.
Stop mode:
Choose “after time-out" if you want to measure over a specific
time period Choose “after pulses” if you wantto measure a
specified number of pulses. Choose manual only” if you want
to stop the measurement manually only. (Note that you can
also stop the measurement manually in the other modes as
well).
3. Now press “start” and you will be in the exposure measurement screen.
60
YAG
00: 00: 49.3
setup
PE50-BBH
exposure
224.7mJ
172P
reset
start
stop
A
2mJ
exit
Figure 15
Exposure Screen
4. Press “start” again. The Laserstar will start summing laser energy exposure.
When you wish to stop measuring, press "stop" or wait for the “time-out" selected
in the setup screen. The Laserstar will now display the total energy emitted during
that period, the time elapsed and the number of pulses during the period. If you
wish to reset reading to zero before another reading, press "reset".
5. To return to the measurement screen, press exit then esc.
Normalize
When you wish to show the readings as compared to some standard reading, the
normalize function allows you to do this. After setting “normalize”, all subsequent
readings will be shown as a ratio to the reference reading. For instance, if you
normalize the reading at an energy of 1.5mJ, then subsequent readings will be with
ratio to that, i.e. if the energy at that point is 2mJ, the reading (dimensionless) on the
screen will be 2/1.5 = 1.33. The screen will also show in small digits the energy at
which the normalization was done and the present energy.
To use the Laserstar to normalize the energy:
1. From the main energy screen, press the menu button and select “normalize”.
2. Press “go” and when ready to normalize, press “apply”. From then on, the energy
will be proportional to the normalized energy value (see Figure 16). If you wish to
return to the the regular display, press “exit”.
61
Normalization A
24.50mJ
24.00mJ
1.021
VIS
apply
30mJ
laser
range
exit
Figure 16
Pyroelectric Normalize Screen
6.5 Measuring Repeating Pulses of High Energy
Because of their construction, pyroelectric heads are restricted in the energy density
they can withstand, particularly for short pulses on the order of nanoseconds. If the
energy density of your laser exceeds the rating of the pyroelectric absorber, there are
several options available.
1. You can enlarge your laser beam using a negative lens until the energy density is
below damage threshold. You should test this using the test slide. See section
6.4.
2. You can use a beam splitter, splitting off typically 8 -10% of the light. If you use this
method, note that there may be polarization effects. You can calibrate the beam
splitter by running the laser at energies below damage threshold and measuring
the energy with and without the beam splitter.
3. Ophir has two instruments specifically designed for high energy density pulses.
They are the PE50-DIF model pyroelectric heads with a diffuser and the RP
thermal/photodiode heads . Both of these heads can measure energy densities up
to several Joules/cm².
Contact your Ophir dealer for details.
62
6.6 Energy Log
This is the same as for thermal heads, except you do not have to wait for "reset". See
sections 4.5.6. and 4.4.2.7.1.
Note:
For Pyroelectric heads logging energy the only setup option is ‘sample rate’. The
user can choose the number of pulses he wishes to log - from ‘every pulse’ to ‘1
out of 1000’ pulses - but not the time period.
6.7 Pyro Scope Adapter
A special adapter can be purchased which is plugged in between the head connector
and the Laserstar head socket. This adapter has a cable and BNC connector to attach
to an oscilloscope. It enables the user to see on the scope pulses proportional to
energy up to the maximum pulse rating of the head. Unlike the Laserstar display, which
samples at the maximum rate, the scope adapter shows every single pulse.
Activate the scope adapter as follows:
1.
Plug the adapter into the Laserstar display and then plug the head plug into the
adapter. Plug the BNC connector into a standard 1MΩ scope input.
2. Press “menu”, select “scope” and press “go”. The display will now say “in scope
mode”. Select the appropriate measurement range in the usual way.
3. You can return to the ordinary measurement mode by pressing “exit” from the
scope mode screen.
4. If you wish the instrument to start up in scope mode, press “menu”. Select
“config” and press “go”. Select “mode” and press “value”. It will change to
“scope”. Press “save” and “exit” to save the new configuration.
63
Chapter 7 Operation with RP heads
Note:
It is highly recommended to use the Customize function every time you work with a
new laser type or setup. See section 7.10 below
7.1 General Description
The exclusive Ophir RP type heads represents a unique way to accurately measure the
energy of high energy repetitively pulsed lasers, while at the same time measuring
average power, pulse shape, standard deviation, average energy, missing pulses and
jitter. As with other Ophir smart heads, you can log the laser energy and store it on
board or send it to PC. In addition to the above, the RP head is also a regular thermal
smart head and will measure power or single shot energy like any thermal head.
7.2 Principle of Operation
RP heads incorporate an innovation (patented) that allows measurement of the energy
of high energy repetitively pulsed lasers in a manner superior to previous methods.
The basic approach is to incorporate two sensors in one measurement head.
The RP measurement head has a standard thermopile type detector to measure
average laser power . It measures average power with a high degree of accuracy,
±3% in general. In addition, there is a fast photodiode detector, which measures the
energy of the laser pulses in real time. The photodiode detector is mounted so that a
fraction of the radiation falling on the thermopile absorber, 4% to 15% depending on
head type, is scattered form the absorber. A fraction of that falls on the photodiode
(see Figure 17) (There is also an additional, larger, fast photodiode that is connected
directly to an oscilloscope via the BNC connector and with this one can measure the
temporal pulse shape of the beam to a resolution of ns).
64
BNC connector to fast
oscilloscope for
temporal pulse shape
Si photodiode
Removable filter
Incoming laser beam
Scattered light
Volume absorber
Figure 17
Schematic Diagram of RP Head
The RP photodiode and its associated circuitry give a signal proportional to the energy
of arriving pulses. The photodiode signal also shows the time between adjacent
pulses. All of the above information is fed into the Laserstar microprocessor and is
averaged over two seconds. From the above information, the Laserstar can calculate
the average pulse rate, average energy and the energy per pulse, as given by the
formulae below.
Average pulse rate = (number of pulses in time period) / (time period)
Average energy = (average power) / (pulse rate)
energy of pulse (i) = (average energy) x (photodiode signal i )
average (2 sec) of photodiode detector signals
65
A removable filter is provided in front of the photodiode to increase the dynamic range
of energies measurable by the RP. If the energy per pulse of the laser is within the
highest range, the 10x reduction filter is inserted so as to prevent detector saturation.
The thermopile detector also has a built-in heater resistor that allows calibration to be
performed by the electrical substitution method. Since the calibration of the RP
depends only on the thermal head power calibration, the calibration procedure for an
RP head is the same as any Ophir thermal head. See section 10.1 - Calibration of
Thermal Heads for details of the calibration procedure.
Since the photodiode is extremely linear, it is possible to make a fast detector circuit
that will give an output proportional to pulse energy, within fractions of a percent. The
time between pulses is measured to great accuracy (±1µs), therefore the accuracy of
the pulse energy is limited only by the accuracy with which the thermopile measures
average power.
7.3 Advantages of the RP
Because the RP measures pulse energy with two different detectors, it has several
advantages over other types of repetitive detectors.
High Energy Density
The RP volume absorber can stand up to as much as 10 Joules/cm² for short pulses
and 60J/cm² for long pulses. This allows measurement of large energies and high
average powers.
High Repetition Rate
The fast photodiode and associated fast processor circuitry can handle up to 10,000
pulses per second (sampling pulses).
Accuracy
The RP accuracy is determined by the thermopile, which measures the average power
with ±3% accuracy or better. This is better than the accuracy typical for pyroelectric
detectors or the accuracy using beam splitters especially for measuring high energies
and average powers. In most cases, standard deviations of fractions of 1% can be
measured.
66
High Duty Cycle
Unlike pyroelectric heads, the RP is able to measure the pulse energy of lasers whose
pulse width is a large duty factor, i.e. the laser is on most of the time. This means that
you can measure for instance a diode laser pulsing at 3Hz with 100ms pulse width
where the duty cycle is over 30%.
7.4 Temporal Pulse Shape
The RP head also contains a second fast photodiode with nanosecond rise time. This
can be used to measure the laser pulse shape in addition to other parameters
mentioned above.
Connect the BNC output on the RP head (Figure 17) into a fast oscilloscope. The
oscilloscope must have a 50 Ω input impedance or be terminated with a 50 Ω
impedance, or the response time will be on the order of microseconds rather than
nanoseconds.
7.5 Measuring Repetitively Pulsed Lasers with the RP
When you switch on the Laserstar with an RP head, it immediately enters the
measurement screen and is ready for action. For first time use or when changing
measurement parameters, you must access the setup screen. Press “menu” then
select “RP configuration” and press “go” and you are ready to set the parameters for
your application. The following section describes the parameter option in detail.
67
<800
10.00Hz
power
30A-P-RP
filter: out
22.69mJ
laser
Trig 50us
>3Hz
range
A
100mJ
menu
Figure 18
RP Energy Screen
7.6 Setup for RP - Rapid Pulse measurement
Your RP is capable of measuring rapidly pulsing laser pulses of any energy, from
fractions of a millijoule to 10 Joules or higher. To ensure that the instrument gives you
the best possible results, you must first set up your instrument to match the type of
laser that you use. This is described below.
After you have chosen the desired values from the setup screen, press “save” before
exiting to save these as the default value. If you want these values saved only until the
instrument is turned off, exit without saving.
In order to choose the desired options from the main measurement screen, press
“menu”, select “RP config” and press “go”. Select the various options by pressing
“select” and “value”.
1. Energy or Power
With “energy” highlighted, press “value” to choose whether you want the startup
default mode of measurement will be “energy” or “power”. If you choose
“energy”, the RP will measure energy per pulse upon startup. If you choose
“power”, the RP will measure the average power.
2. Filter OUT or IN
Now select “Filter:” and choose filter “OUT or “IN” depending on whether you are
going to work in the highest range which requires the filter to be inserted in the
head.
Note:
With the filter out setting on the most sensitive energy range, you can sometimes
get triggering from room light. If you want to work on the lowest range and get
triggering from room light, you have to somewhat darken the room.
68
3. Absolute or Relative Mode
The next choice is the operation mode “op mode:”. This can be “absolute” or
“relative”. The absolute/relative function determines whether the energy
displayed will be absolute or relative. Ordinarily, “absolute” will be selected. In this
mode, the RP will calculate the actual pulse energy of each pulse based on the
average power, as explained in section 7.2, “Principle of Operation”.
If the average power is very low and you are interested in pulse-to-pulse variation
rather than absolute energy, then you should select “relative” mode. In this mode,
the RP ignores average power and displays a convenient value proportional to
pulse energy, but which is independent of average laser power. For low average
power values, this average could be highly inaccurate. Since the standard
deviation depends only on the pulse-to-pulse variation, the standard deviation
reading will still be valid in the relative mode, even though it will then be expressed
in relative units.
In this manner, you can use the RP to measure the pulse-to-pulse variation of
lasers whose average power is too small to measure thermally.
Another advantage of relative mode is that it allows you to directly gather
meaningful data from the first pulse collected. (See also the “stabilize” function
below). Since the absolute energy measurement I based on the power reading,
and since it takes several seconds for a stable power value to be determined, it is
not always possible to measure the absolute energy during the first few seconds
of operation.
4. Laser Wavelength
Since the calibration changes with wavelength, you must select the correct
wavelength band for your laser. Select “Laser:” and choose the laser wavelength
band you want to be the default startup.
5. RP Energy Range
With this function you choose the correct RP energy range. Choose the lowest
energy range value that is higher than the energy of your laser pulses. If the
highest scale available with filter “OUT” is not high enough, then set filter to “IN”,
slip the filter into its slot and go back to the RP energy selection to select a higher
range.
6. Power Range
With this function you choose the correct power range. Choose the lowest power
range value that is higher than the average power of your laser or choose “AUTO”
for autoranging.
69
7. Stabilize (This function is connected with energy logging. See section 0 for further
details).
As explained above in paragraph 4, the RP is unable to measure the absolute
energy of the laser pulses during the first few seconds of operation since the
average power measurement has not yet stabilized and the RP needs this value in
order to calculate the absolute energy. The “stabilize” function allows you to
obtain the absolute energy of the first few seconds of operation as well when
operating in the energy log mode (See section 0 on energy logging).
It operates as follows:
The user chooses a stabilization time in the RP configuration screen of up to 15
seconds during which the average power measurement value is assumed to reach
a stable value. When the user starts logging energy pulses, the RP then collects
the relative energy values during this initial period. (See para. 3 above for
explanation of relative vs. absolute). After the initial period, the RP uses the now
stabilized average power value to calculate the absolute energy of the pulses
during the first several seconds of operation.
Note:
Stabilize will only give correct readings for the absolute energy during the initial
period of operation if the laser average power is approximately constant from the
first pulse until the end of the stabilization period. If this is not the case, then use
relative mode as described in para 3 above.
8. Laser Frequency >3Hz or <3Hz
The RP is designed to measure pulses over a wide range of rates, from 0.5Hz to
several KHz. For most rates, the sample time for calculating averages and
standard deviations is two seconds. For rates less than 3 pulses per second, the
RP switches to a ten second sample time. This allows it to collect enough pulses
for a meaningful sample.
Choose the correct setting depending on whether your laser pulse rant is greater
than or less than 3Hz.
70
9. Laser Pulse Width
The RP is able to measure lasers with a wide range of pulse widths from
nanoseconds or below to hundreds of ms. In order to operate properly, the RP
must be set up for the laser pulse width. This sets up the integration time during
which the laser pulse energy is measured. The shorter the pulse width setting, the
higher the maximum repetition rate available and the less noise in the signal. The
factory default gives 6 choices for the laser pulse width setting that vary from head
to head. Choose the setting that is the smallest one which is larger than the
maximum pulse width of the laser. If the default values given are not appropriate
then you may choose other default values. See section 7.7 for this.
Warning:
If the pulse width of your laser is longer than the setting in the Laserstar, the
energy reading will be erroneous.
10. Scope Mode
As with pyroelectric heads, if you have the oscilloscope adapter, the RP is able to
operate in scope mode where you see every pulse up to high repetition rates on an
oscilloscope. (At high repetition rates, the ordinary RP mode only samples a
fraction of the pulses). If you want the RP to start up as default in scope mode
choose “scope: OFF”. For a description of how to operate in scope mode see
section 6.7.
7.7 Choosing Default Pulse Width Setting
As described in para. 9 below, the RP head has factory default settings of laser pulse
width. If you want to change these to more convenient values, please do as following:
1. From the main measurement screen press “menu” and choose “more”. Press “go”
and choose “pulse width”. Press “go”. With the arrow key, select a pulse width
you wish to change and press “go”. With the “up” and “down” keys choose the
value you desire and press “save” then “esc”, “exit”, “esc” to return to the
measurement screen. Note that in the pulse width setup screen, you are shown
the maximum laser pulse rate for each setting of the pulse width. These values are
given in the following chart.
71
Maximum Laser Repetition Rate for Given Pulse Width Setting
Maximum Pulse Width Setting (ms)
0.01
0.1
1
10
100
1000
10000
1000
100
10
Maximum Repetition Rate (Hz)
100000
1
Graph 1
Maximum Laser Repetition Rate for Given Pulse Width Setting
7.8 Configuration for Power and Single Shot Energy
As part of its equipment to measure the energy per pulse of repetitively pulsing lasers,
the RP contains a complete Ophir thermal power/energy head. As such, it is able to
measure power and single shot energy with the thermal head alone. (For further
information on power and single shot energy measurement see chapter Chapter 4).
To set up for these functions, do as follows:
From the main measurement screen press “menu” and choose “config”. Press “go”.
Press “select” to choose the function you want to set and “value” to choose the
desired option. When you are finished, press “save” and then “exit”. If you only want
to save the choices until the instrument is turned off, press “exit” without “save”.
72
In the following section, we explain the various functions:
1. Startup: Choose whether you want the start up default of the RP will be energy or
power measurement.
2. Laser: Choose the laser wavelength. (This can be chosen from other menus as
well).
3. Average Over: This function allows you to average the power readings over a
period from 1s to 1 hour. The average is a moving average, i.e. the average is from
the present backwards. For instance, if the user chooses average over 10s, The
average will be from the beginning till now for the first 10s and from 10s ago till the
present afterwards.
4. Power: This determines the power range that can be fixed or autorange. (This can
also be chosen from the RP config screen).
5. Energy Mode: As mentioned, the RP can measure single shot energy as well as
repetitive pulses. With this function you choose RAPID PULSE that is the RP mode
or SINGLE SHOT. If you choose, singe shot, there are additional menus to choose:
6. Energy Threshold: In the SINGLE SHOT mode, you can make the threshold 3X
more sensitive by choosing LOW and 3X less sensitive by choosing HIGH.
Choosing LOW will allow you to measure pulses of low energy more accurately but
may cause the measurement to false trigger from noise also.
7. Single Shot Energy: This determines the range for single shot energy that has to
be chosen independent of the RP energy ranges.
7.9 Zeroing
This function pertains to the thermal head of the RP and is described in the section on
thermal heads, chapter 3.5.
7.10 Customizing Gain
This function allows you to automatically tailor the gain of the RP to your measurement
situation.
The RP photodiode circuit has a factory default gain setting. This gain setting is a
compromise that allows the RP to operate under a wide variety of laser energies,
wavelengths, pulse widths and repetition rates. Since the RP must not go into
saturation under any of these circumstances, the gain is set lower than necessary in
many cases and therefore the system noise is higher than necessary.
73
The customize function allows you at the push of a button to set the gain to an
optimum value for the laser parameters you are measuring now. It is recommended to
use this function and the user can always return to the factory default if desired. To
customize the gain settings:
1. From the main measurement screen, press “menu”, “more”, “customize” and
“go”.
2. Wait for the power reading shown to be steady. Press “next”.
3. When the message “customization completed” appears, press “save” to save the
new gain value and exit.
4. If you want to restore the factory default values, from the main measurement
screen press “menu”, “more”, “go”, “customize”, “go” and “reset”.
7.11 Data Logging
7.11.1 Power Logging
As with other type heads, the RP allows you to log data and store it on board and send
it to PC. Data logging for average power is exactly the same as for Ophir thermal
heads. Follow the directions in section 4.4.2.7 for power data logging. For RP energy
data logging, do as follows:
7.11.2 RP Energy logging.
The RP Laserstar has the option of displaying successive energy points in a scrolling
vertical bargraph form. While measurements are being taken, the Laserstar will
record data. Up to 59,400 points are stored See section 4.4.2.7.1 for more information
on data storage and handling.
74
7.11.3 To use the RP for graphical display of energy:
1. Make sure that the RP is in the correct energy measurement range.
2. From the main measurement screen, press “menu” and select “data log”. Press
“go”. Press “setup” to set up measurement parameters for head and sample rate.
2.1 If you have more than one head attached, choose the head you wish for data
logging.
2.2 When set to “Sample Rate: every pulse”The RP will sample every pulse up to
400Hz in absolute mode and 600Hz in relative mode. Above that rate it will sample
at a rate from 400 to 800Hz depending on the laser pulse rate. If you choose “1 out
of n”, the RP will sample at a rate of 1/n of what it would in the every pulse mode.
3. Now press “log” and the energy log screen will appear. Press “go”. The
measurement will immediately begin. When the screen is full, the display will
scroll and the latest points will continue to be displayed. When the data register is
full, “FULL” will be displayed. If you wish to see finer variations in the graph, press
the “zoom” button.
4. When “reset” is pressed, the RP Laserstar is ready to begin a new measurement.
If you want to store the data before making a new measurement, see section
4.4.2.7.1 on data storage.
Warning:
Pressing "reset" will erase all previously stored data.
5. When the “stats” button is pressed, a statistical summary of the data on the
screen is shown. If you wish to return to the graphical display, press “graph”. If
you wish to permanently store the data in a file, press exit and then press “files”
to enter the file system. See section 4.4.2.7.1 for further information.
75
7.11.4 Stabilization and recording of initial pulses
As discussed in section 7.6 paragraph 7, The RP allows you to record the absolute
energy of the first pulses of a laser’s operation even though the average power is not
yet stabilized.
When logging energy pulses, the RP logs the photodiode output from the first pulse.
You do not see pulses on the bargraph display until after the power stabilization
period. After that period, the RP calculates the absolute energy of the initial pulses on
the assumption that the laser power was the same as after the stabilization period
chosen from the first pulse on. If this assumption is approximately true, then you have
the true pulse energies from the first pulse on recorded in the energy logging data.
These values can be seen in the data files recorded and sent to PC as well.
<800
ENERGY
2.875J
every
pulse
go/pause
reset
zoom
stats
exit
Figure 19
Energy Log Screen
7.11.5 Missing Pulses and Jitter
The RP has the ability to check for missing pulses and record them during data
logging. When this function is activated, the RP will also measure the time jitter
between pulse to pulse.
To set for missing pulses recording, from the main energy screen go into the setup
screen as follows:
76
menu/rp config/go and select “Missing Pulses Detection”. Using the “value” key,
choose <40Hz or >40Hz depending on your laser pulse rate. If you want to save this
setting as the startup default, press “save” before exiting this screen.
The RP will now record “missing” instead of the pulse value in the data log screen
when a pulse is missing.
Note 1:
The missing pulses function will only operate at up to 100Hz.
Note 2:
The missing pulses function will only operate correctly if the missing pulses are
less than 5% of the total.
Note 3:
Jitter will be measured only if the missing pulses function is turned on.
77
Chapter 8 Operation with the Dual Channel Laserstar
If you have the dual head version of the Laserstar, you can measure with two heads at
the same time, either independently or in combination, measuring the ratio or
difference between them.
8.1 Operation with One Head Plugged in Only
When only one head is plugged into the dual channel Laserstar, in either channel, it
operates the same as would a single channel Laserstar. Its operation is described in
the rest of this manual. An “A” or “B” in the upper right corner of the instrument
indicates if channel A or B is active.
8.2 Single Head Operation with Two heads Plugged In
1. Attach the two heads to the two input connectors. (See Figure 4).
2. Press the menu button. Press the arrow keys until “mode” is highlighted. Press
“go”.
3. Press “value” to select one of the choices for which heads are active, head A
(the head plugged into the left side), or head B.
4. Now press “select” to select “CHANNEL” and press value to select if you want
the head to be in power or energy mode. Now press “exit” and “esc” and the
Laserstar will operate in single head mode with the head selected. The Laserstar
will now operate the same as a single channel Laserstar and its operation is
described in the rest of this manual. If you want the default start up mode to be
the one you have selected, press “save” before pressing “exit”.
8.3 Dual Head Operation with Two heads Plugged In.
1. Attach the two heads to the two input connectors. (See Figure 4).
2. Press the menu button . Press the arrow keys until “mode” is highlighted. Press
“go”.
78
3. Press “value” to select “BOTH” so both heads are active.
4. Now press “select” to select “CHANNEL A” and press value to select if you
want the head to be in power or energy mode. Now press “select” again to
select “CHANNEL B” and press value to select if you want the second head to
be in power or energy mode Now press “select” again until “MODE” is
highlighted. Press “value” to select the mode of operation:
5. Now press “exit” and “esc” and the Laserstar will operate in dual head mode.. If
you want the default start up mode to be the one you have selected, press
“save” before pressing “exit”.
Note 1:
Description of modes.
a. Dual: The Laserstar will now operate with the two heads at the same time
independently, as if they are attached to two different Laserstars.
b. A/B: The Laserstar will display a screen showing the values of each head as
well as the ratio of head A divided by head B.
c. B/A : The same as above but the ratio is now head B divided by head A.
d. A-B: The Laserstar will now display the difference head A minus head B.
e. B-A: The same as above but now the difference is head B minus head A
f. A+B: The Laserstar will now display the sum head A plus head B.
Note 2:
Allowed combinations:
In dual head mode, any combination of Ophir smart heads can be combined. In
ratio or difference mode, the permitted combinations are [thermopile or
photodiode] vs. [themopile or photodiode] or else, [pyroelectric] vs. [pyroelectric].
In ratio or difference mode, power vs. power or energy vs. energy is permitted but
power vs. energy is not.
Note 3:
Data logging:
In dual head operation, data logging is only allowed in ratio or difference mode.
The data points for each channel are stored inside separately but are displayed by
the Laserstar only in the combined form. If the data is uploaded to PC using the
Ophir Starcom for Windows program, then the data can be displayed either in the
combination form or each channel individually.
79
Chapter 9 Circuit Description
The Laserstar has three circuit boards: an analog processor, a digital processor and a
power supply.
Analog Processor
The signal from the detector head enters the analog processor board and passes
through EMI protection components to a differential transimpedance preamplifier.
From there it is further amplified by a programmable gain voltage amplifier and passes
to a dual slope integrating analog to digital (A/D) converter. All calibration data for the
analog processor is stored in a memory chip on the analog processor board. There are
no adjustable components (trimmers etc.) in the Laserstar except for the display
contrast adjustment on the rear panel.
Fast Analog Processor
In addition to the above basic analog processor, the Laserstar contains a second fast
analog processor. This supports certain Ophir heads that read energy pulses at higher
rates than can be supported by the basic analog processor, but provides less overall
accuracy than the above processor. The fast processor consists of an EMI filtered
voltage input that is passed to a first stage of mild voltage attenuation. This is then
amplified and passed to an A/D converter. Calibration data is stored on the same
memory chip mentioned above.
Digital Processor
The digital processor is built around a Motorola MC68332 32-bit central processing unit
(CPU) with a 16-bit bus. On the digital processor board there is a pair of sockets
containing the upgradable FLASH chips which can be upgraded in situ by your Ophir
agent. In addition there are a pair of static RAM chips totaling 256Kbytes of RAM. The
large amount of RAM allows storage of relatively large amounts of data permanently
even when the instrument is turned off. (See section 4.4.2.7.1 on data storage). The
digital processor receives signals from the basic analog processor and converts them
into a measurement of current in amps. When used with thermopile heads the signal is
then processed by a sophisticated digital filter that speeds up the effective response
time of the head and rejects noise. In addition, it converts signals from the fast analog
processor and converts them into a voltage that can be processed as necessary.
80
The digital processor is also responsible for controlling the basic analog processor,
the fast analog processor, reading the keypad, driving the display and communicating
via RS232.
The CPU obtains calibration and capability data from a memory chip in the plug of the
detector head and configures itself accordingly. Recalibration data and saved settings
are also stored in this memory chip. In addition, the digital processor contains two
extra connectors : one is for connection to a second analog board if the user has
purchased the multihead/ratio version of the Laserstar. The other is for the external
IEEE-488 communications package. check with your Ophir representative about
availability of the IEEE option.
Power Supply
The power supply provides the internal DC supply voltages for the analog and digital
processors. It also contains the battery charging circuit and the AC supply for the
backlight. The power supplies for the charger and the main digital DC voltage operate
in switch mode.
EMI Protection
The digital processor and the whole Laserstar instrument is protected by EMI
protection component on all signals that pass in and out of the box. In addition, EMI
protection is added Internally to prevent disturbances to the normal functioning of the
instrument;. With the above mentioned components, the instrument meets the
requirements of the EEC with respect to electromagnetic compatibility and has the CE
mark.
81
Chapter 10 Calibration, Maintenance and Troubleshooting
10.1 Calibration of Thermopile or RP Heads
10.1.1 Absorber types and Method of Calibration of Ophir Power Meters
10.1.1.1 Types of Ophir Laser Absorbers
Two types of absorber surface are used in Ophir thermal measuring heads:
1. Surface Absorbers:
BB (broadband) absorber
On standard, high power density, broadband Ophir power monitor heads, a special
refractory coating is used to provide high absorptivity from the UV through the IR. This
coating can withstand very high power densities, up to 20 KW/cm², without changing
calibration. The absorption of this coating is above 90% for most of its range, as shown
in Graph 1 below.
EX (excimer) absorber
The EX absorber provides high absorption in the UV, and it can withstand both the
pulse energies and the average power of excimer lasers. These discs also have
excellent absorption for 10.6 µm and other wave-lengths. They can therefore be used
for other types of lasers as well. The absorption of the various Ophir absorbers as a
function of wavelength is shown in Graph 1 below.
LP (long pulse) absorber
This absorber has a particularly high damage threshold for long pulse (ms) or
continuous lasers and is therefore offered for use with high power heads. It is
calibrated for use with YAG laser at 1.064µm or CO2 laser at 10.6µm and absorbs about
90% at these wavelengths.
82
2. Volume absorbers:
P (pulse) type absorber
The models with the P suffix, for use with pulsed lasers, have a special absorbing
glass with an absorbance of 95 +2% over the operating range. Since the surface is a
glass, its reflectivity does not change even if damaged or melted locally.
HE/HE1 (high energy) absorber
The HE and HE1 types have a particularly high damage threshold for pulsed and
repetitively pulsed lasers of both the short and long pulse variety and are useful where
the highest pulse energies and average powers are used.
HL (high energy long pulse) absorber
The HL absorber is the absorber of choice for high energy repetitive pulses longer than
2ms. For these long pulses it has flatter spectral response than the HE/HE1 and
withstands higher pulse energy and average power.
83
Percent absorption
100
98
96
94
92
90
88
86
84
82
80
0.1
1
BB therm.
EX
10
P
Wavelength, µm
100
Percent absorption
100
95
90
85
80
75
70
65
60
55
50
0.1
1
HE
HE1
10
LP
HL
Graph 2.
Absorption of Ophir Absorbers vs. Wavelength
84
Wavelength, µm
10.1.1.2 Method of Calibration
The absorption of the various Ophir thermal absorbers can vary from disc to disc.
Therefore, all Ophir absorbers are individually calibrated against NIST traceable
standards.
Ophir power/energy meters with the broadband or P type absorbers are individually
calibrated by laser at several wavelengths against a NIST calibrated standard meter.
The meter can be switched to give the exact calibration at the various wavelengths
(Argon, YAG, and, where applicable, CO2) . For other wavelengths, the user should
consult the wavelength graph and use the closest of the above settings.
The EX type detector is calibrated by measuring the ratio of absorption in the UV to
that at 515nm. The total absorption is measured in both cases using an integrating
sphere. The detector is then calibrated with an argon laser and given a correction
factor from this ratio.
10.1.2 Linearity and Accuracy of Ophir Thermal Heads
10.1.2.1 Linearity
The linearity of most Ophir thermal detectors is specified to be 1% over the specified
power range of each particular instrument and is tested by Ophir from time to time. On
CAL models, the built in CAL resistor can be used to directly measure the linearity over
the range of powers of the CAL resistor. On non CAL models, a CAL resistor is
temporarily affixed to the sensor. For those models for which the linearity is not tested
over their entire range, randomly chosen sample models are tested periodically over
their entire range. The test is performed with a high power laser that can cover the
entire detector range using a rear leak detector for comparison. This rear leak
detector is a low power Ophir detector that has previously been tested for linearity.
Thus, in all cases, the linearity of the detectors is traceable to electrical standards.
85
10.1.2.2 Total Accuracy of Calibration
Since the instruments are calibrated against NIST standards, the accuracy is
generally 1% at the power level at which the calibration has been performed. This
accuracy has been verified by checking the scatter of the results when several
instruments are calibrated against the same standard. The maximum error in
measurement will be less than the sum of the specified accuracy and linearity. Since
the linearity is also 1%, the maximum error in measurement will generally be less than
2%.
10.1.3 Calibration Factor
For models equipped with the Ophir CAL resistor, the calibration factor is determined
at the factory by the following procedure. After calibration of the sensor as described
above in Section 10.1.1.2, electrical power is applied to the CAL resistor. The
calibration factor is given by the formula:
CAL factor = reading on meter / applied electrical power
If you wish to check and adjust the power reading, apply electrical power to the CAL
resistor, and measure the voltage and current to obtain the applied power. The
correct power reading for the meter is the applied electrical power multiplied by the
CAL factor given above.
10.1.4 Recalibration of Thermopile Heads Using the Laserstar
If your measuring head is equipped with the exclusive Ophir CAL resistor then
calibration is performed according to the instructions in Section 10.1.4.2.
If you do not have the CAL resistor, then you can recalibrate from a known source of
power or energy following the instructions in Section 10.1.4.3.
On the rear center of the sensor disc is the exclusive Ophir calibration heater. The
disc can be heated by electrical power instead of by radiation by applying electrical
power to the terminals at the rear of the sensor head.
86
By accurately measuring the voltage and current applied, the calibration can be
checked and if necessary, readjusted, taking into account the calibration factor. See
Section 10.13
10.1.4.1 Guidelines for using the CAL resistor for calibration
1. Do not exceed the maximum electrical power stated in the table.
MODEL
POWER
3A Series
10A Series
30A Series
150A Series
L250A Series
300W Series
1500W Series
and above
1 Watt
10 Watts
30 Watts
100 Watts
200 Watts
125 Watts
200 Watts
APROX. MAX
VOLTAGE
7 Volts
17 Volts
35 Volts
65 Volts
95 Volts
65 Volts
95 Volts
Table 3.
Maximum Power to apply to sensor CAL resistors
2. Use the resistor for calibration only.
3. Turn off the power as soon as calibration is done.
4. Do not operate the calibration resistor when the sensor disc is under radiation; the
excessive heat may burn out the calibration resistor.
5. To eliminate residual non-linear effects, it is advisable to perform electrical
calibration at about the same power level as that to be measured, so long as the
rating of the heating resistor is not exceeded.
87
10.1.4.2 Recalibration of Power using the Built in CAL Resistor
If your thermal head has the Ophir CAL resistor then you have a traceable absolute
calibration source available just by measuring the voltage and current into the CAL
resistor and multiplying by the calibration factor provided by Ophir.
Calibration instructions:
1. Set the instrument to power. If you want to recalibrate energy, this can be done
from a known energy source. See section 10.1.4.3.
2. From the bargraph power screen press the “menu” button and select “advanced”.
Select “calibrate” and press “go”, select “calibrate”,press “go” and press “power
with CAL”.
3. Using the “value” button select the proper laser wavelength. (See note 1 below).
4. Using a DC power supply, apply power to the CAL resistor (black and red terminals
at the back of the head). For highest accuracy, use the same power as you intend
to measure, but do not exceed values in Table 3, Section 10.1.4.1.
5. Maximum voltage applied should not exceed:
√ (resistance of CAL resistor) x (maximum power)
6. The voltage should be measured at the input to the head and the current in series
with the current loop.
7. Adjust the up and down buttons until the power reading on the screen reads the
(voltage in volts) x (current in amps) x (current calibration factor for your model
and laser or as shown on Laserstar).
8. When the correct power is shown on the screen, press “exit” and “permanent
save” to save the new calibration value. Note that in the save screen, the previous
value of the calibration is shown for your reference. As soon as you save, this
value is set to the newly saved value.
Note 1:
For units which have different calibration factors, e.g. CO2, YAG, or VISIBLE, press
"laser" to select correct type of laser before calibration. When recalibrating using
the CAL resistor, the other two settings will change proportionately. If you wish to
change the calibration of only one laser type, use the function "Power with laser".
88
Note 2:
The unit retains for your information the current sensitivity of the head in A/W in
engineering notation. The original value is retained at the factory. You should
record the original setting so you can return to it if you wish.
10.1.4.3 Recalibration from a Known Source of Laser Power / Energy
1. Set the instrument to power or energy depending which you wish to recalibrate.
2. From the bargraph power screen press the “menu” button and select “advanced”.
Select “calibrate” and press “go”, select “calibrate”, press “go” and press
“power with laser”.
3. Using the “value” button select the proper laser wavelength. (See note 1 below).
4. Press "power/energy with laser"
5. Use the “select” and “value” buttons to choose the appropriate laser wavelength
and averaging period. See note 1 below
6. Apply the known laser power/energy.
7. Adjust up/down until the power/energy reading on the screen equals the known
power/energy. The power/energy calibration factor will change accordingly. See
note 1.
8. Press exit and “permanent save”. The new value will be saved.
Note 1:
For units which have different calibration factors, e.g. CO2, YAG, or VISIBLE, press
"laser" to select correct type of laser before calibration. When recalibrating using
"power with laser:" function, only the calibration of the chosen laser wavelength
will change. If you wish to change the calibration of all wavelengths
proportionately, then use the function "power with CAL".
Note 2:
When changing power calibration, this will also change energy calibration
proportionately. However, changing energy calibration will not change power
calibration.
89
10.2 Calibration of Photodiode type Heads
Photodiode detectors are inherently very linear but also have a large variation in
sensitivity with wavelength. In addition, the Ophir model PD300 is equipped with both a
built in filter and removable filter to allow measurement of higher powers without
detector saturation. These filters also have a transmission that depends on
wavelength. Therefore, the PD300 Laserstar has a built in calibration adjustment for
wavelength which is described in the next paragraph.
10.2.1 Method of Factory Calibration
The sensitivity of various Ophir photodiode sensors can vary from one to another as
well as with wavelengths. Therefore, Ophir photodiode detectors are individually
calibrated against NIST traceable standards over the entire operating range of
wavelengths for both filter out and filter in.. The calibration curve is normalized to the
correct absolute calibration at 632.8 nm using a HeNe laser against a reference meter
traceable to NIST.
The spectral sensitivity curve of the detector as well as the spectral transmission
curve of the filters is fed into the head EEROM and this information is used to set the
gain to the proper value at wavelengths other than the wavelength the instrument was
calibrated. When the user selects his wavelength on the Laserstar, the correction
factor for that wavelength is applied.
10.2.2 Accuracy of Calibration
Since the instruments are calibrated against NIST standards, the accuracy is
generally ±2% at the wavelength the calibration has been performed. The maximum
error in measurement will be less than the sum of the calibration accuracy, linearity,
inaccuracy due to errors in the wavelength curve and variations in gain with
temperature. The linearity of the photodiode detector is extremely high and errors due
to this factor can be ignored. The maximum error due to the above factors is given in
Table 4 below.
90
WAVE
LENGTH
ERROR, FILTER OUT*
PD300
PD300-3W
200 - 250nm
250 - 360nm
360 - 400nm
400 - 950nm
950 - 1100nm
1100 - 1600nm
1600 -1800nm
±10%
±3%
±5%
-
±10%
±3%
±5%
-
PD300UV
±5%
±3%
±3%
±3%
±5%
-
PD300IR
±5%
±5%
±7%
3A-IS
5%
10%
Table 4.
Maximum Error as a Function of Wavelength and Filter
* Add ±2% to error for filter in (±5% for PD300-UV from 220 to 300nm).
10.2.3 Recalibration at a specific wavelength from a Known Sourceof Laser
Power
1.
2.
3.
4.
5.
6.
From the bargraph power screen press the “menu” button, select “advanced”
and press “go”. Select “calibrate” and press “go”.
Using the “value” button select the proper laser wavelength.
Use the “select” and “value” buttons to choose the appropriate laser
wavelength and averaging period.
Apply the known laser power.
Adjust up/down until the power reading on the screen equals the known power.
The power calibration factor will change accordingly.
Press exit and “permanent save”. The new value will be saved.
Note 1:
The relative readings at different wavelengths are fixed by the wavelength
calibration curve stored in the head EEROM. When changing the calibration at
one wavelength, the calibration at all other wavelengths will change
proportionately.
91
10.3 Calibration of Pyroelectric type Heads
Three types of absorber surface are used in Ophir pyroelectric measuring heads:
1. Metallic type: The type with no suffix in the name have a partially reflective
multilayer metallic coating which absorbs approximately 50% and whose
absorption graph is shown in graph 2 below. The metallic coating permits very
high repetition rates, up to 5000Hz as well as relatively high damage threshold.
2. Broadband type: The type with the BB suffix has a broadband black absorbing
coating to provide high absorptivity from the UV through the IR. This coating can
withstand energy densities, up to 0.3J/cm² for short pulses and 2J/m² for long
pulses without changing calibration. The absorption of this coating is above 90%
for most of its range, as shown in Graph 2 below. This coating is available for the
PE50 and PE25.
Absorption
100
90
BB - Broadband
80
70
60
50
40
Metallic Coating
30
0.1
1
10
Wavelength, nm
Graph 3
Absorption of Ophir Pyroelectric Absorbers
Absorption (%) vs. Wavelength (nm)
92
100
10.3.1 Calibration
The sensitivity of the various Ophir pyroelectric sensors can vary from one to another
as well as with wavelengths. Therefore, Ophir pyroelectric detectors are individually
calibrated against NIST traceable standards. In addition, the calibration is corrected
in the Laserstar for different wavelengths.
Ophir pyroelectric detectors are calibrated using a 1.06µm repetitively pulsed laser
referenced to a NIST traceable thermal power meter. The average energy is set to the
average power of the standard power meter divided by the laser frequency. The
metallic PE25 and PE50 heads are also calibrated with an excimer laser at 248nm to
correct the rather large absorption variations in that spectral region with those heads.
The spectral absorption of the detector coating is measured spectroscopically and the
absorption curve is used to correct the calibration for other wavelengths. When the
user selects his wavelength on the Laserstar, the correction factor for that wavelength
is applied.
10.3.2 Accuracy of Calibration
Since the instruments are calibrated against NIST standards, the accuracy is
generally 3% at the energy level and wavelength at which the calibration has been
performed. This accuracy has been verified by checking the scatter of the results
when several instruments are calibrated against the same standard. The maximum
error in measurement will be less than the sum of the specified accuracy, linearity and
inaccuracy due to errors in the wavelength curve.
The non linearity is approximately 2%, and the error due to wavelength is given in
Table 5 below.
In addition to the above errors, the reading of pyroelectric heads changes with
frequency. The Laserstar has a built in correction for this error. For frequencies
above 50% of maximum frequency, inaccuracies in this correction can increase the
total error by up to 3%.
93
The maximum error in measurement will be less than the sum of the above errors and
in general will be considerably less.
WAVELENGTH
190 - 350nm
400 - 800nm
1064nm
2 - 3µm
10.6µm
COATING TYPE
BROADBAND
(ERROR)
±1%
±1%
0
±2%
±5%
METALLIC
(ERROR)
±4%
±4%
0
±8%
±15%
Table 5
Maximum Measurement Error due to Wavelength
10.3.3 Recalibration from a Known Source of Laser Energy
1. Set the instrument to energy.
2. Set to the proper energy range.
3. From the main screen press the menu button and select “advanced”. Press “go”
and select “calibrate. Press “go “ again .
4. Select “Max pulse length and use the “value” button to set to the proper scale. Set
the laser wavelength to the correct value.
Using the "value" button, select the time period over which you wish to average.
Now press "select" and "value" to choose the correct laser wavelength. See Note
1 below. Now press "go".
5. Apply the known laser energy.
6. Adjust up/down until the energy reading on the screen equals the known energy.
The energy calibration factor will change accordingly.
7. Press exit. The new value will be saved.
Note 1:
For metallic type heads, when the calibration is changed at one laser wavelength,
the overall calibration of all other wavelengths changes proportionately. For BB
type, the calibration is only changed for the wavelength set.
94
10.4 Error Messages
The Laserstar displays various error messages when operated outside its normal
range:
Over range: When the power or energy being measured exceeds the range of the
measurement scale being used, the over range message is displayed, but the reading
still appears on the display. If the power or energy exceeds the maximum by more
than 10%, the reading on the display is blanked. If the user has chosen to activate the
audio warning in the screen that appears with not head attached, an audible warning
will appear when the highest range has been exceeded.
Low Battery: When the battery is almost discharged, the flashing message "BAT"
appears. When the low battery message appears, the Laserstar should be connected
to the charger. It will operate normally and charge slowly while connected to the
charger. If the user has chosen to activate the audio warning in the screen that
appears with not head attached, an audible beep will sound every minute when the
battery is low. Also, the Backlight will turn off when the battery is low.
Sat: When the photodiode current exceeds 1mA , and the detector starts to saturate,
or the pyroelectric voltage exceeds the maximum, the message "sat " (=saturated) is
displayed.
10.5 Troubleshooting
10.5.1 Laserstar Display
Problem
Instrument will not operate after
being completely discharged
and connected to charger.
Instrument operates with
charger but not with battery
alone.
Cause/Remedy
Check that charger provides 200mA
Battery is low. Recharge overnight with the
Laserstar turned off for 14-16 hours. If the
Laserstar still doesn't work with battery,
then the NiCd battery is probably dead.
Replace battery.
95
10.5.2 Thermal Heads, Energy Measurements
Problem
Instrument triggers on
background noise or sometimes
fails to catch large pulse.
Instrument does not show ready
for a long while after a reading
is made.
Non-reproducible results when
measuring very small energy
pulses; or no response to pulses
at low energy.
Cause/Remedy
Increase threshold level; See Section. 4.5.3.
Increase threshold level; See Section 4.5.3.
Decrease threshold level: See Section 4.5.3.
10.5.3 Thermal Heads, Power
Problem
Instrument shows zero reading
in both power and energy
modes.
Instrument responds while
head is cold, but suddenly fails
as it heats up.
Instrument does not return
completely to zero on power
measurement.
Cause/Remedy
Check connections between the head and
the instrument. See signal tracing (Section
10.5) Check that the sensor disc is
operative. Resistance between the pins 1
and 9 of the head connector should be
about 1.8K. If the sensor is defective, there
will be an open or short circuit.
Replace sensor disc. See Section-10.6.1.2.
If head is very hot, allow it to cool.
Disconnect the head from the instrument. If
readout unit does not zero, follow
instructions in section 3.5.4. If the offset
persists, try zeroing with the head
connected as well, as described in Section
3.4.2.
96
10.5.4 Pyroelectric Heads
Problem
Instrument reads incorrectly or
erratically,
especially
on
sensitive scale.
Instrument
triggers
even
without being exposed to laser
pulses.
Instrument shows frequency
which is too high
Cause/Remedy
Possible electromagnetic interference from
pulsing laser is causing misreading and/or
false triggering
Check the following:
1. Head is mounted to stand using insulated
plastic rod provided with instrument, and
not metal rod.
2. Try keeping cable away from bench.
3. Move head/display further away from
EMI.
10.6 Maintenance
10.6.1 Maintenance of Thermal Heads
10.6.1.1 Tracing the Signal from the Head to the Laserstar
1. With the instrument on, apply an approximately known amount of power to the
head. This test can be performed using either a laser or an electrical power
supply and the calibration resistor.
2. Estimate the approximate signal current that should be developed by the head by
multiplying the input power by the head-sensitivity shown in the head specification
tables 6 and 7.
3. Using a multimeter set to current, unplug the head from the Laserstar and check
that this current appears between pin 1 and 9 of the D type plug.
10.6.1.2 Disc Replacement
If you have ordered a replacement disc, it has been factory calibrated for the
wavelength region shown on the calibration sheet sent with the disc. It has been
calibrated at the wavelength requested, or for the 3 wavelengths listed. If it is a CAL
type disc, a CAL Factor is also included to use for electrical calibration checks on your
power/energy meter.
97
Please follow the following steps in disc replacement.
1. Remove the screws from the front and rear flanges of the absorber head.
2. Remove the front flange and raise the rear flange, taking care not to tear the wires
attached to the connectors.
3. Unsolder the wires from the faulty absorber disc attached to the small PC board in
the head, remembering which wire is connected to each terminal.
4. Pry the absorber disc free from its seat by using a screwdriver in the hole provided
at the edge of the seat.
5. Smear the absorber disc seat evenly with silicone heat sink compound.
6. Feed the wires through the hole and install the new disc. It is best to turn the disc
back and forth a few times while pressing on it, to ensure good contact between
the disc, grease and head.
7. Reassemble the front flange, making sure the screws are tight.
8. Resolder the two wires to their proper locations on the rear flange and reassemble
the rear flange.
10.6.1.3 Recalibrating the Head to a new Disc
1. From the main power measurement screen press the menu button, then select
"advanced" and press “go”.
2. Select "calibrate" and press "go" then "power with CAL". With the value button,
select the first laser wavelength sent with the disc. Now adjust up/down until the
sensitivity agrees with that sent with the disc. Now press save, exit and
“permanent save” to save the new value.
3. For heads with calibration at several laser wavelengths, you now have to adjust
the calibration for the other wavelengths. From the main power measurement
screen, press the menu button and select "advanced". Press "go” and select
"calibrate" Press "go". Now press "power with laser”. Select the next laser
wavelength sent with the disc. Adjust up/down until the CAL factor is the same as
that sent with the disc for the wavelength shown. Now press "exit" and
“permanent save” to save that value.
4. Now repeat step 3 for the other laser wavelengths. Each time, select a different
laser wavelength and enter the proper calibration factor sent with the disc for that
wavelength.
98
10.6.1.4 Battery Replacement
If the Laserstar battery is defective and does not hold a charge, a replacement can be
ordered from your agent. The new battery is installed as follows:
1. Turn the Laserstar display upside down and unscrew the 6 Phillips screws on the
bottom panel of the Laserstar.
2. Raise the bottom panel and disconnect the battery connector (red and black leads)
from the PC board.
3. Insert the new battery into the same location in place of the old battery. When the
upside down Laserstar is placed so the battery is near you, the black lead will be
on the left.
4. Reconnect the battery connector to the terminal BT1. Make sure the sloping side of
the connector is away from you. Reclose the panel and replace the 6 screws.
sloping
side
connector
black
battery
red/orange
Figure 20
Battery Connection
99
Chapter 11 Laserstar Specifications
11.1 Laserstar System/Display Specifications
Input Specifications
Thermal, Photodiode
Input Ranges
A to D Sampling rate
A to D resolution
Electrical accuracy
Electrical input noise level
Dynamic range
Input Specifications
Pyroelectric Heads
Input Ranges
A to D Sampling rate
A to D resolution
Electrical accuracy
Electrical input noise level
Dynamic range
General Specifications
Detector Compatibility
Analog output
Analog output accuracy
Dimensions
Mass
Display
Display digit height
Backlight
Bargraph segments
Battery
Charger input
Operation between charges
Data Logging and Com.
RS232 output
15nA - 1.5mA full scale in 16 ranges
15Hz
17 bits plus sign. (0.0009% resolution)
±0.25% ± 20pA new; ±0.5% ±50pA after 1 year
500nV or 1.5pA + 0.0015% of input range @3Hz.
9 decades (1:109)
23mV - 6V full scale in 9 ranges
40KHz maximum
12 bits no sign, 11 with sign (0.02-0.05%res.)
+/-2mV new, +/-4mV after 1 year
2mV
3.5 decades (1:4000)
Thermopile, photodiode and pyroelectric
0-1 Volt with 3mV (0.03%) resolution. 100 ohms impedance
±0.2% ±2mV relative to display
228W x 195D x 54H
1.45 Kg.
240 x 64 pixel super twist LCD
17mm
EL: Operates from charger or battery
240
3 x D size. 4.0A-h NiCd battery built in.
DC: 12 -25V, 5W; AC: 9 - 18V RMS, 5W
charge time 10 - 14Hr, 15 - 20Hr if operating
18 Hrs, thermal and photodiode, 14 Hrs, pyroelectric heads.
Max real time data logging rate*
Onboard data logging rate*
Data transfer from instrument to PC
Max points stored onboard
>30Hz
>200Hz
~500 points/s
59,400
* The above refers to the rate for logging every single point. Above that rate the
instrument will sample points but not log every single point.
IEEE 488.1 GPIB
General
Compliance: IEEE488.1
Max real time data logging rate*
>1500Hz
Onboard data logging rate*
1500Hz
Data transfer from instrument to PC
>1500 points/s
* The above refers to the rate for logging every single point. Above that rate
the instrument will sample points but not log every single point.
Maximum communication rate 38400 baud
Can store up to 10 files for a total of 54,000 points (Max points stored onboard
per power file is 5400). Data is not lost when instrument is turned off.
100
11.2 Head Specifications
EAD
PD300/UV/IR
PD300-3W
3A-IS
F100A-IS
2A
3A-P-CAL
10A-P
30A-P
30(150)A-HE
10A
30A
30(150)A
F150A
FL250A
F300A
1000W
1500W
5000W
8000W
L30A-EX
FL250A-EX
PD10
PE10
PE25
PE50
PE50-DIF
MAX POWER
(WATTS)
300mW
3W
3W
100w
2W
3W
10W
30W
30(150)W
10W
30W
30(100)W
150W
250W
300W
1000W
1500W
5000W
8000W
30W
250W
20mW
2W
10W
20W
40W
MAX AVG. POWER
DENSITY
50W/cm²
50W/cm²
200W/cm²
200W/cm²
200W/cm²
50W/cm²
50W/cm²
50W/cm²
1000W/cm²
20KW/cm²
20KW/cm²
20KW/cm²
20KW/cm²
20KW/cm²
20KW/cm²
6KW/cm²
6KW/cm²
5KW/cm²
5KW/cm²
1KW/cm²
1KW/cm²
50W/cm²
50W/cm²
10W/cm²
10W/cm²
500W/cm²
Table 6.
Max Power Specifications of Heads
PD - Photodiode
P - P type volume absorber for short pulse lasers
HE/HE1- volume absorber for high energy pulses.
EX - Excimer type, volume absorber
PE - Pyroelectric metallic or black absorber
BB - Broadband surface absorber, high power density
LP - Broadband surface absorber for highest power density
101
ABSORBER
TYPE
PD
PD
Int Sph PD
Int Sph Ther
BB
P
P
P
HE/HE1
BB
BB
BB
BB
BB
BB/LP
BB
BB/LP
BB/LP
BB/LP
EX
EX
PD
PE
PE
PE
PE
Absorber
Type
P
HE/HE1
BB
EX
PE, Metallic
PE, BB
PE-DIF
PE BB-DIF
Max Energy Density J/cm²
Pulse Length
10ns
1µs
10
10
5
10
0.3
0.5
0.5
0.6
0.1
0.2
0.3
0.3
1.5
3
3
3
300µs
10
100
5
4
4
1
40
10
Table 7.
Maximum Energy Densities for Various Absorbers (Single Pulse)
102
rev2.45-3/14.3.05/corrections
rev2.45-2/12.3.05/new graphics
rev2.45-1/1.12.04/be-new logo banner
rev2.45/15.11.04/be – corrected information regarding logging + headers that
disappeared +added BA20, PD300-BB and Pd300-CIE heads
revision record:
rev 2.21-1/19.11.01/eg added sections for attenuation screen and new offset
functions
rev2.21-2/21.1.02/eg fixed some graphics
rev2.29-1/23.7.02/eg
changed electrical and AN out accuracy specification. Next rev 2.36 rev
Laserstar
2.4/31.10.99/eg added information
aboutUser
turboManual
mode and corrected maximum data
Ophir
P/N 1J06020
log rate rev 2.5/11.1.00/eg added
normalize
function Rev 2.6/19.4.01/eg added
29 March
A+B
rev 2.61/21.5.01/eg updated
damage2005
tables in back rev 2.62/23.5.01/eg
updated absorption curves and TOCRev
rev2.45-3
2.63/xxxxx/eg added trigger note for RP
103