1
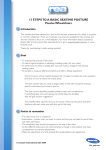
1 Install & Setup the Software If you purchased a Tablet from Vitacon US, the software is pre-installed and will automatically launch when turning on the system. Otherwise, install the VitaScan software using the USB Stick provided. Select Options 1. 2. 3. Launch the software Select Gender (Default Female) Select Scan Depth (Default 16cm) Connect the scanner to local Wi-Fi to print wirelessly to existing printers or if you wish to save Scans on a local area network. Launch the software and select Setup to add your facility name. 3 2 Position the Probe Proper probe position is key for a good measurement: 1. 2. 3. 4. 5. Place patient in the supine position (lying on the back, face upward). Find the midline position on the patient’s lower abdomen. Palpate the pubis bone. Apply ultrasound gel on the probe head or on the patient’s abdomen (walnut size amount recommended). Place the probe head one inch above the pubis bone on the midline with the red label facing upward. 1” Pubis Bone Bladder Pubis Bone 4 Locate and Scan the Bladder 1. 2. 3. Select Start or press and release the device button to find the bladder. Angle the probe so that the bladder takes up the largest area on the screen and the green line is in the middle of the bladder and around the bladder border. Keep this angle and select Scan or press and release the device button to make the measurement. Hold steady until two static images appear on screen (approximately 3 seconds). While scanning, avoid making any changes in the position, angle or pressure of the scan probe. (800) 757-8450 [email protected] www.vitacon.us Vitacon US, LLC 5557 Pioneer Creek Drive, Maple Plain, MN 55359 5 Verify the Scan When the test is complete, two static images are displayed on the screen (vertical and horizontal planes). For a good scan: 1. The bladder is entirely within the cone and has a defined border. The yellow object is circular and in the target crosshairs. 2. If you see a red arrow, re-scan and move the probe in the direction of the arrow. If no yellow object is visible, either the bladder is empty or could not be detected; rescan or measure manually. See User’s Manual for how to measure manually. 6 Print and/or Save Select Setup to add patient ID to the test. Select Print to print the test to a local or network printer. Select Save to store a JPEG image of the test locally or on the network. 7 Clear, Clean & Park Once you are done testing: 1. 2. 3. Select Clear/New Patient. Remove gel from the patient’s abdomen and from the probe. Use PDI Sani-cloth® AF3 Germicidal Disposable Wipes or other comparable disposable wipe designed for use on non-porous plastic surfaces. See User's Manual for complete instructions. Return the scanner to its storage location and plug it in to charge. Important, read before using: Only operate the scanner on battery power if you are using a non-medical grade computer or without an isolation transformer. Do not use when the patient has a catheter in his or her bladder. Tablet: Press Power On button for one second to wake up from Sleep. If that doesn't work, full Power On can be achieved by holding button down for 2 - 3 seconds. Use ultrasound gel, other lubricants should not be used. (800) 757-8450 [email protected] www.vitacon.us Vitacon US, LLC 5557 Pioneer Creek Drive, Maple Plain, MN 55359