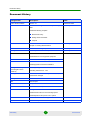
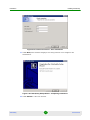
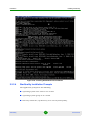
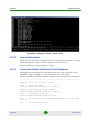
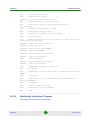
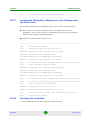
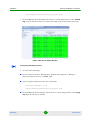
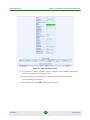
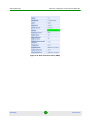
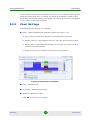
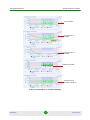
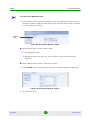
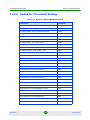
1
StarQuality User Manual Software Version: 3.0 June 2010 P/N 215720 Document History Document History Changed Item Description Date This is the first release Version 1.0 December 2008 General Version 1.5 - Changed to reflect multiple server group sites. February 2009 Added the following chapters: Network Discovery Setting Alarm Thresholds Reports Introduction Moved Counters for BreezeMAX from Introduction to Chapter 4 “Viewing Measurements” February 2009 Installation Added licence loading steps. February 2009 Settings Moved topics into relevant chapters. February 2009 General Added Solaris information Ver. 2.0 June 2009 Added 4Motion to the supported equipment Introduction Data Structure - Hierarchy changed Installation Added installation on Solaris Added upgrade for Windows installation Getting Started - Operations and Navigation in the Hierarchy Hierarchy changed Viewing Measurements Added 4Motion set of discovery measurements; screenshorts changed Setting Alarm Thresholds Added 4Motion information NBI New Chapter Reports Chapter modified Installation Added Linux as an optional OS Measurements Changed measurement definitions Activating SOAP server - new Added search feature for text including spaces Added Operations drop-down menu options General Added BreezeACCESS VL support information Ver.2.5 December 2009 Installation Added Oracle patch installation Ver.2.5 December 2009 StarQuality ii User Manual Document History Changed Item Description Date Introduction Added 4Motion ver.3.0 and BreezeMAX Extreme to the supported equipment list. Ver.3.0 June 2010 Deleted Deployment Scenarios Installation Revised structure Ver.3.0 June 2010 Getting Started “Operations and Navigation in the Hierarchy” on page 115 - Removed the Link Ver.3.0 June 2010 option (for Alarms and Measurements) Network Discovery Added 4Motion and BreezeMAX Extreme information. Ver.3.0 June 2010 Modified Prerequisites Generally revised Reports Added 4Motion and BreezeMAX Extreme information. Ver.3.0 June 2010 Setting Alarm Thresholds Moved all syntax tables to Chapter 11 Ver.3.0 June 2010 Chapter 11, Device Specific Information New Chapter, including information per device type Ver.3.0 June 2010 StarQuality iii User Manual Legal Rights Legal Rights © Copyright 2010 Alvarion Ltd. All rights reserved. The material contained herein is proprietary, privileged, and confidential and owned by Alvarion or its third party licensors. No disclosure thereof shall be made to third parties without the express written permission of Alvarion Ltd. Alvarion Ltd. reserves the right to alter the equipment specifications and descriptions in this publication without prior notice. No part of this publication shall be deemed to be part of any contract or warranty unless specifically incorporated by reference into such contract or warranty. Trade Names Alvarion®, BreezeCOM®, WALKair®, WALKnet®, BreezeNET®, BreezeACCESS®, BreezeLINK®, BreezeMAX®, BreezeLITE®, BreezePHONE®, 4Motion®, and/or other products and/or services referenced here in are either registered trademarks, trademarks or service marks of Alvarion Ltd. All other names are or may be the trademarks of their respective owners. “WiMAX Forum” is a registered trademark of the WiMAX Forum. “WiMAX,” the WiMAX Forum logo, “WiMAX Forum Certified,” and the WiMAX Forum Certified logo are trademarks of the WiMAX Forum. Statement of Conditions The information contained in this manual is subject to change without notice. Alvarion Ltd. shall not be liable for errors contained herein or for incidental or consequential damages in connection with the furnishing, performance, or use of this manual or equipment supplied with it. Warranties and Disclaimers All Alvarion Ltd. (“Alvarion”) products purchased from Alvarion or through any of Alvarion's authorized resellers are subject to the following warranty and product liability terms and conditions. Exclusive Warranty (a) Alvarion warrants that the Product hardware it supplies and the tangible media on which any software is installed, under normal use and conditions, will be free from significant defects in materials and workmanship for a period of fourteen (14) months from the date of shipment of a given Product to Purchaser (the “Warranty Period”). Alvarion will, at its sole option and as Purchaser's sole remedy, repair or replace any defective Product in accordance with Alvarion' standard R&R procedure. StarQuality iv User Manual Legal Rights (b) With respect to the Firmware, Alvarion warrants the correct functionality according to the attached documentation, for a period of fourteen (14) month from invoice date (the “Warranty Period”)”. During the Warranty Period, Alvarion may release to its Customers firmware updates, which include additional performance improvements and/or bug fixes, upon availability (the “Warranty”). Bug fixes, temporary patches and/or workarounds may be supplied as Firmware updates. Additional hardware, if required, to install or use Firmware updates must be purchased by the Customer. Alvarion will be obligated to support solely the two (2) most recent Software major releases. ALVARION SHALL NOT BE LIABLE UNDER THIS WARRANTY IF ITS TESTING AND EXAMINATION DISCLOSE THAT THE ALLEGED DEFECT IN THE PRODUCT DOES NOT EXIST OR WAS CAUSED BY PURCHASER'S OR ANY THIRD PERSON'S MISUSE, NEGLIGENCE, IMPROPER INSTALLATION OR IMPROPER TESTING, UNAUTHORIZED ATTEMPTS TO REPAIR, OR ANY OTHER CAUSE BEYOND THE RANGE OF THE INTENDED USE, OR BY ACCIDENT, FIRE, LIGHTNING OR OTHER HAZARD. Disclaimer (a) The Software is sold on an “AS IS” basis. Alvarion, its affiliates or its licensors MAKE NO WARRANTIES, WHATSOEVER, WHETHER EXPRESS OR IMPLIED, WITH RESPECT TO THE SOFTWARE AND THE ACCOMPANYING DOCUMENTATION. ALVARION SPECIFICALLY DISCLAIMS ALL IMPLIED WARRANTIES OF MERCHANTABILITY AND FITNESS FOR A PARTICULAR PURPOSE AND NON-INFRINGEMENT WITH RESPECT TO THE SOFTWARE. UNITS OF PRODUCT (INCLUDING ALL THE SOFTWARE) DELIVERED TO PURCHASER HEREUNDER ARE NOT FAULT-TOLERANT AND ARE NOT DESIGNED, MANUFACTURED OR INTENDED FOR USE OR RESALE IN APPLICATIONS WHERE THE FAILURE, MALFUNCTION OR INACCURACY OF PRODUCTS CARRIES A RISK OF DEATH OR BODILY INJURY OR SEVERE PHYSICAL OR ENVIRONMENTAL DAMAGE (“HIGH RISK ACTIVITIES”). HIGH RISK ACTIVITIES MAY INCLUDE, BUT ARE NOT LIMITED TO, USE AS PART OF ON-LINE CONTROL SYSTEMS IN HAZARDOUS ENVIRONMENTS REQUIRING FAIL-SAFE PERFORMANCE, SUCH AS IN THE OPERATION OF NUCLEAR FACILITIES, AIRCRAFT NAVIGATION OR COMMUNICATION SYSTEMS, AIR TRAFFIC CONTROL, LIFE SUPPORT MACHINES, WEAPONS SYSTEMS OR OTHER APPLICATIONS REPRESENTING A SIMILAR DEGREE OF POTENTIAL HAZARD. ALVARION SPECIFICALLY DISCLAIMS ANY EXPRESS OR IMPLIED WARRANTY OF FITNESS FOR HIGH RISK ACTIVITIES. (b) PURCHASER'S SOLE REMEDY FOR BREACH OF THE EXPRESS WARRANTIES ABOVE SHALL BE REPLACEMENT OR REFUND OF THE PURCHASE PRICE AS SPECIFIED ABOVE, AT ALVARION'S OPTION. TO THE StarQuality v User Manual Legal Rights FULLEST EXTENT ALLOWED BY LAW, THE WARRANTIES AND REMEDIES SET FORTH IN THIS AGREEMENT ARE EXCLUSIVE AND IN LIEU OF ALL OTHER WARRANTIES OR CONDITIONS, EXPRESS OR IMPLIED, EITHER IN FACT OR BY OPERATION OF LAW, STATUTORY OR OTHERWISE, INCLUDING BUT NOT LIMITED TO WARRANTIES, TERMS OR CONDITIONS OF MERCHANTABILITY, FITNESS FOR A PARTICULAR PURPOSE, SATISFACTORY QUALITY, CORRESPONDENCE WITH DESCRIPTION, NON-INFRINGEMENT, AND ACCURACY OF INFORMATION GENERATED. ALL OF WHICH ARE EXPRESSLY DISCLAIMED. ALVARION' WARRANTIES HEREIN RUN ONLY TO PURCHASER, AND ARE NOT EXTENDED TO ANY THIRD PARTIES. ALVARION NEITHER ASSUMES NOR AUTHORIZES ANY OTHER PERSON TO ASSUME FOR IT ANY OTHER LIABILITY IN CONNECTION WITH THE SALE, INSTALLATION, MAINTENANCE OR USE OF ITS PRODUCTS. Limitation of Liability (a) ALVARION SHALL NOT BE LIABLE TO THE PURCHASER OR TO ANY THIRD PARTY, FOR ANY LOSS OF PROFITS, LOSS OF USE, INTERRUPTION OF BUSINESS OR FOR ANY INDIRECT, SPECIAL, INCIDENTAL, PUNITIVE OR CONSEQUENTIAL DAMAGES OF ANY KIND, WHETHER ARISING UNDER BREACH OF CONTRACT, TORT (INCLUDING NEGLIGENCE), STRICT LIABILITY OR OTHERWISE AND WHETHER BASED ON THIS AGREEMENT OR OTHERWISE, EVEN IF ADVISED OF THE POSSIBILITY OF SUCH DAMAGES. (b) TO THE EXTENT PERMITTED BY APPLICABLE LAW, IN NO EVENT SHALL THE LIABILITY FOR DAMAGES HEREUNDER OF ALVARION OR ITS EMPLOYEES OR AGENTS EXCEED THE PURCHASE PRICE PAID FOR THE PRODUCT BY PURCHASER, NOR SHALL THE AGGREGATE LIABILITY FOR DAMAGES TO ALL PARTIES REGARDING ANY PRODUCT EXCEED THE PURCHASE PRICE PAID FOR THAT PRODUCT BY THAT PARTY (EXCEPT IN THE CASE OF A BREACH OF A PARTY'S CONFIDENTIALITY OBLIGATIONS). StarQuality vi User Manual Important Notice Important Notice This manual is delivered subject to the following conditions and restrictions: This manual contains proprietary information belonging to Alvarion Ltd. Such information is supplied solely for the purpose of assisting properly authorized users of the respective Alvarion products. No part of its contents may be used for any other purpose, disclosed to any person or firm or reproduced by any means, electronic and mechanical, without the express prior written permission of Alvarion Ltd. The text and graphics are for the purpose of illustration and reference only. The specifications on which they are based are subject to change without notice. The software described in this document is furnished under a license. The software may be used or copied only in accordance with the terms of that license. Information in this document is subject to change without notice. Corporate and individual names and data used in examples herein are fictitious unless otherwise noted. Alvarion Ltd. reserves the right to alter the equipment specifications and descriptions in this publication without prior notice. No part of this publication shall be deemed to be part of any contract or warranty unless specifically incorporated by reference into such contract or warranty. The information contained herein is merely descriptive in nature, and does not constitute an offer for the sale of the product described herein. Any changes or modifications of equipment, including opening of the equipment not expressly approved by Alvarion Ltd. will void equipment warranty and any repair thereafter shall be charged for. It could also void the user's authority to operate the equipment. StarQuality vii User Manual About this Manual About this Manual The StarQuality User Manual comprises the following chapters: Chapter 1- Introduction - provides an overview of the StarQuality system and its functionality. Chapter 2 - Installation - describes how to install and uninstall the StarQuality application and use commands to start and stop it. Chapter 3 - Getting Started - describes the structure of the interface windows, logging in, general display options, searching, the menu system, operations and navigation, and editing of objects, Chapter 4 - Network Discovery - describes the creation of a WiMAX network and all the BTSs under it. In addition, it describes the creation of a utility network. Chapter 5- Viewing Measurements - describes browsing options, display options, viewing measurement data, searching measurements and saving items as a submenu. Chapter 6 - Setting Alarm Thresholds - describes how to create threshold templates and assigning them to equipments. Chapter 7 - Threshold Crossing Alarms - describes the alarms and how to navigate, view and filter them. It also explains how to download data to Excel files. Chapter 8 - Reports - Setting and viewing reports. Chapter 9 - General Setting Options - describes how to set the site and equipment configuration, thresholds, customizing, server configuration and management, audit trail and user administration. Chapter 10 - Northbound Interface (NBI) - describes the StarQuality Northbound Interface (NBI) functionality Chapter 11 - Device Specific Information - contains details about software compatibility, traffic and performance counters, codes for thresholds and default built-in reports Glossary - Explanation of commonly used terms StarQuality viii User Manual Contents Contents Chapter 1 - Introduction ........................................................................... 1 1.1 System Overview ........................................................................................................3 1.1.1 General................................................................................................................ 3 1.1.2 STAR Management Suite Overview.................................................................... 3 1.1.3 Supported Equipment.......................................................................................... 4 1.2 System Data Structure................................................................................................5 1.3 User Types and Their Settings ..................................................................................6 Chapter 2 - Installation............................................................................. 8 2.1 Introduction ...............................................................................................................10 2.1.1 Installation Types .............................................................................................. 10 2.1.2 General Prerequisites........................................................................................ 11 2.2 Installing StarQuality on Windows Server with Internal Oracle Database ..........13 2.2.1 Pre-installation Tasks ........................................................................................ 13 2.2.2 Installing StarQuality.......................................................................................... 20 2.3 Installing StarQuality on Windows Server with External Oracle Database on the Same Machine ...............................................................................................30 2.3.1 Pre-installation Tasks ........................................................................................ 30 2.3.2 Installing StarQuality.......................................................................................... 38 Installing StarQuality on Windows Server with Oracle Database on 2.4 a Separate Machine ..................................................................................................46 2.4.1 Pre-installation Tasks ........................................................................................ 46 2.4.2 Installing StarQuality.......................................................................................... 54 2.5 StarQuality Installing StarQuality on Solaris Server with Internal Oracle Database ..............62 ix User Manual Contents 2.5.1 Pre-installation Tasks ........................................................................................ 62 2.5.2 Installing StarQuality.......................................................................................... 64 2.6 Installing StarQuality on Solaris Server with External Oracle Database on the Same Machine ...........................................................................................................71 2.6.1 Pre-installation Tasks ........................................................................................ 71 2.6.2 Installing StarQuality.......................................................................................... 74 2.7 Installing StarQuality on Solaris Server with Oracle Database on a Separate Machine......................................................................................................................81 2.7.1 Pre-installation Tasks ........................................................................................ 81 2.7.2 Installing StarQuality.......................................................................................... 83 2.8 Running StarQuality .................................................................................................90 2.8.1 Running StarQuality on Windows...................................................................... 90 2.8.2 Running StarQuality on Solaris ......................................................................... 92 2.8.3 Loading a StarQuality Licence........................................................................... 93 2.9 Additional Installation Information..........................................................................95 2.9.1 Firewall Settings ................................................................................................ 95 2.9.2 Mail Server Configuration .................................................................................. 95 2.9.3 Command Line Installer General Information.................................................... 96 2.9.4 Activating SOAP Server .................................................................................... 98 2.9.5 Configuration Parameters.................................................................................. 99 2.10 StarQuality Upgrade ...............................................................................................100 2.10.1 StarQuality Upgrade on Windows ................................................................... 100 2.10.2 StarQuality Upgrade on Solaris ....................................................................... 102 2.11 Uninstalling StarQuality .........................................................................................103 2.11.1 Uninstalling StarQuality from Windows ........................................................... 103 2.11.2 Uninstalling StarQuality from Solaris ............................................................... 104 StarQuality x User Manual Contents Chapter 3 - Getting Started .................................................................. 106 3.1 Login ........................................................................................................................108 3.2 The Structure of Interface Windows......................................................................110 3.3 The Menu System....................................................................................................111 3.3.1 Measurements................................................................................................. 111 3.3.2 Alarms ............................................................................................................. 112 3.3.3 Reports ............................................................................................................ 113 3.3.4 Settings ........................................................................................................... 114 3.4 Operations and Navigation in the Hierarchy ........................................................115 3.5 General Display Options ........................................................................................117 3.5.1 Scrolling or Hiding the Submenu Items ........................................................... 117 3.5.2 Using the Display Tabs.................................................................................... 117 3.6 Editing Objects........................................................................................................119 Chapter 4 - Network Discovery ............................................................ 120 4.1 Overview ..................................................................................................................122 4.2 Discovery of WiMAX Devices.................................................................................125 4.2.1 Activation/Deactivation of Data Collection....................................................... 128 4.3 Discovery of Equipment under a Server-Health Site ...........................................130 4.4 Scheduled Configuration .......................................................................................142 Chapter 5 - Viewing Measurements ..................................................... 145 5.1 Introduction .............................................................................................................147 5.2 WiMAX Equipment Measurements ........................................................................149 5.3 Measurements Browsing Options .........................................................................150 5.4 Measurements Display Options.............................................................................151 5.4.1 Display Types .................................................................................................. 151 5.4.2 Element Browsing Options .............................................................................. 152 StarQuality xi User Manual Contents 5.4.3 5.5 Operations Drop-Down Menu Options ............................................................ 152 Viewing Measurement Data....................................................................................155 5.5.1 Setting Time Span ........................................................................................... 155 5.5.2 View Options ................................................................................................... 155 5.5.3 Chart Settings.................................................................................................. 156 5.5.4 Elements ......................................................................................................... 157 5.6 Searching Measurements.......................................................................................158 5.6.1 On Searching in General ................................................................................. 158 5.7 Saving Items as A Submenu ..................................................................................161 5.8 Setting Trendlines to Graphs.................................................................................162 Chapter 6 - Setting Alarm Thresholds.................................................. 165 6.1 Overview ..................................................................................................................167 6.2 Creating and Editing Threshold Templates..........................................................168 6.2.1 Creating a New Threshold Template............................................................... 168 6.3 Assigning Threshold Templates to Equipments..................................................172 6.4 Editing Thresholds..................................................................................................175 6.4.1 Editing an Existing Threshold Template .......................................................... 175 6.4.2 Editing a Template-based Threshold (Local Change) ..................................... 177 6.5 Creating a Threshold (Not Based on Template ....................................................178 6.6 Generating the Expression Using Input Fields ....................................................179 Chapter 7 - Threshold-Crossing Alarms Monitoring............................. 182 7.1 Overview ..................................................................................................................184 7.2 Navigating, Viewing and Filtering Alarms ............................................................186 7.2.1 Viewing Alarms by Time Span......................................................................... 186 7.2.2 Alarm View Options ......................................................................................... 186 StarQuality xii User Manual Contents 7.2.3 7.3 Filtering Alarms................................................................................................ 190 Downloading Data to Excel Files...........................................................................191 Chapter 8 - Reports .............................................................................. 193 8.1 Overview ..................................................................................................................195 8.1.1 8.2 Built-in Reports ................................................................................................ 195 Report Configuration ..............................................................................................196 8.2.1 Regular Reports .............................................................................................. 196 8.2.2 On-Demand Reports ....................................................................................... 202 8.3 Viewing Reports ......................................................................................................207 8.3.1 Navigating Report Views ................................................................................. 207 8.3.2 Setting the Report Range and Display ............................................................ 207 8.4 Bulk Export Wizard - Exporting Data to XLS Files...............................................210 Chapter 9 - General Setting Options .................................................... 216 9.1 Overview ..................................................................................................................218 9.2 Search (Admin only) ...............................................................................................221 9.3 Site and Equipment Configuration ........................................................................222 9.3.1 Object Hierarchy Overview.............................................................................. 222 9.3.2 Site and Equipment Configuration................................................................... 224 9.3.3 Equipment Configuration ................................................................................. 226 9.3.4 Creating and Editing Virtual Equipment........................................................... 230 9.3.5 Linked Equipment............................................................................................ 232 9.4 Customization .........................................................................................................233 9.4.1 Customizing Display Preferences (Non-Administrator Users Only) ................ 233 9.4.2 Customizing Public (Admin only) and Private Menu Items.............................. 236 9.4.3 Configuring Public and Private Charts............................................................. 238 StarQuality xiii User Manual Contents 9.4.4 Setting E-mail Addresses (Admin only) ........................................................... 243 9.5 Templates (admin only) ..........................................................................................245 9.6 Server Configuration and Management (Admin only) .........................................246 9.6.1 Overview ......................................................................................................... 246 9.6.2 Licences .......................................................................................................... 247 9.6.3 Device and Measurement Summary ............................................................... 249 9.6.4 Server Configuration........................................................................................ 249 9.6.5 Start/Stop/Status of Servers ............................................................................ 253 9.6.6 Viewing Server Events .................................................................................... 254 9.6.7 Collector Load ................................................................................................. 255 9.7 Audit Trail ................................................................................................................258 9.8 User Administration (Admin only).........................................................................261 9.8.1 Registering/Modifying Users............................................................................ 261 9.8.2 User Permissions (Rights)............................................................................... 262 9.8.3 High Availability Performance.......................................................................... 265 Chapter 10 - Northbound Interface (NBI)............................................. 266 10.1 Introduction .............................................................................................................268 10.2 e-mail Notifications of StarQuality Server Events ...............................................269 10.3 e-mail Notifications and Traps of Threshold Crossing Events...........................270 10.3.1 e-Mail Notifications .......................................................................................... 270 10.3.2 SNMP Trap Notifications ................................................................................. 270 10.4 SOAP Interface ........................................................................................................271 Chapter 11 - Device Specific Information............................................ 272 11.1 Introduction .............................................................................................................274 11.2 BreezeMAX FDD and TDD Equipment...................................................................275 11.2.1 Overview ......................................................................................................... 275 StarQuality xiv User Manual Contents 11.2.2 Network Discovery Prerequisites..................................................................... 275 11.2.3 Key Performance Indicators (KPIs) ................................................................. 276 11.2.4 Codes for Threshold Setting............................................................................ 278 11.2.5 Default Built-in Reports.................................................................................... 279 11.3 BreezeACCESS VL..................................................................................................280 11.3.1 Overview ......................................................................................................... 280 11.3.2 Network Discovery Prerequisites..................................................................... 280 11.3.3 Key Performance Indicators (KPIs) ................................................................. 280 11.3.4 Codes for Threshold Setting............................................................................ 284 11.3.5 Default Built-in Reports.................................................................................... 286 11.4 4Motion Ver.2.5........................................................................................................287 11.4.1 Overview ......................................................................................................... 287 11.4.2 Network Discovery Prerequisites..................................................................... 287 11.4.3 Key Performance Indicators (KPIs) ................................................................. 287 11.4.4 Codes for Threshold Setting............................................................................ 290 11.4.5 Default Built-in Reports.................................................................................... 292 11.5 4Motion Ver.3.0........................................................................................................293 11.5.1 Overview ......................................................................................................... 293 11.5.2 Network Discovery Prerequisites..................................................................... 293 11.5.3 Key Performance Indicators (KPIs) ................................................................. 293 11.5.4 Codes for Threshold Setting............................................................................ 301 11.5.5 Default Built-in Reports.................................................................................... 306 11.6 BreezeMAX Extreme ...............................................................................................307 11.6.1 Overview ......................................................................................................... 307 11.6.2 Network Discovery Prerequisites..................................................................... 307 11.6.3 Key Performance Indicators (KPIs) ................................................................. 307 StarQuality xv User Manual Contents 11.6.4 Codes for Threshold Setting............................................................................ 311 11.6.5 Default Built-in Reports.................................................................................... 312 Glossary ............................................................................................... 313 StarQuality xvi User Manual Tables Tables Table 2-1: Selecting Installation Types ....................................................................................... 11 Table 2-2: Disk Partitioning ......................................................................................................... 13 Table 2-3: Network Ports............................................................................................................ 14 Table 2-4: Disk Partitioning ......................................................................................................... 30 Table 2-5: Network Ports............................................................................................................ 31 Table 2-6: Disk Partitioning ......................................................................................................... 46 Table 2-7: Network Ports............................................................................................................ 47 Table 2-8: Disk Partitioning ......................................................................................................... 62 Table 2-9: Disk Partitioning ......................................................................................................... 63 Table 2-10: Network Ports.......................................................................................................... 64 Table 2-11: Disk Partitioning ....................................................................................................... 71 Table 2-12: Disk Partitioning ....................................................................................................... 72 Table 2-13: Network Ports.......................................................................................................... 73 Table 2-14: Disk Partitioning ....................................................................................................... 81 Table 2-15: Network Ports.......................................................................................................... 82 Table 2-16: Firewall Settings....................................................................................................... 95 Table 3-1: Setting the Tab Display Options............................................................................... 118 Table 3-2: Editing Objects ......................................................................................................... 119 Table 4-1: Scheduled Configuration.......................................................................................... 143 Table 5-1: Time Span Options .................................................................................................. 155 Table 7-1: Using the Alarms List ............................................................................................... 185 Table 7-2: Time Span Options .................................................................................................. 186 Table 7-3: Alarms View Options................................................................................................ 187 StarQuality xvii User Manual Tables Table 7-4: Filtering Types.......................................................................................................... 190 Table 8-1: Navigating Reports................................................................................................... 207 Table 9-1: Admin Registering Options ...................................................................................... 262 Table 11-1: BTS Configuration Requirements .......................................................................... 275 Table 11-2: FDD and TDD Traffic BS KPIs ............................................................................... 276 Table 11-3: FDD/TDD Performance Counters (File Collection) ............................................... 278 Table 11-4: Syntax for TDD/FDD AU Measurements .............................................................. 278 Table 11-5: Syntax for TDD/FDD SU Measurements ............................................................... 279 Table 11-6: BreezeACCESS VL Traffic Counters ..................................................................... 280 Table 11-7: BreezeACCESS VL Performance Counters .......................................................... 282 Table 11-8: Syntax for BreezeACCESS VL AU Measurements................................................ 284 Table 11-9: Syntax for BreezeACCESS VL SU Measurements................................................ 285 Table 11-10: Traffic Counters 4Motion Ver.2.5 ......................................................................... 287 Table 11-11: Common Measurements for 4Motion BTS........................................................... 289 Table 11-12: Performance Counters Per MS ........................................................................... 289 Table 11-13: Syntax for 4Motion BS Measurements................................................................. 290 Table 11-14: Syntax for 4Motion Common Measurements....................................................... 292 Table 11-15: Syntax for 4Motion SU Measurements ................................................................ 292 Table 11-16: Traffic Counters 4Motion Ver.3.0 ......................................................................... 293 Table 11-17: NPU Counters ...................................................................................................... 297 Table 11-18: MS Counters ........................................................................................................ 300 Table 11-19: 4Motion BS Threshold Codes .............................................................................. 301 Table 11-20: NPU Threshold Codes ......................................................................................... 305 Table 11-21: SU Threshold Codes............................................................................................ 305 Table 11-22: Traffic Counters - BreezeMAX Extreme............................................................... 307 Table 11-23: BTS KPIs ............................................................................................................. 309 StarQuality xviii User Manual Tables Table 11-24: SU KPIs ............................................................................................................... 309 Table 11-25: BTS Codes........................................................................................................... 311 Table 11-26: SU Codes............................................................................................................. 311 StarQuality xix User Manual Figures Figures Figure 2-1: Cygwin Net Release Setup Program window .......................................................... 15 Figure 2-2: Choose a Download Source Window ...................................................................... 15 Figure 2-3: Select Root Install Directory..................................................................................... 16 Figure 2-4: Select Local Package Directory ............................................................................... 16 Figure 2-5: Select Packages Window - All Default (Initial State)................................................ 17 Figure 2-6: Select Packages Window - All “Install” .................................................................... 17 Figure 2-7: Select Packages Window - Perl Version.................................................................. 18 Figure 2-8: Cygwin Installation Process ..................................................................................... 19 Figure 2-9: Cygwin Installation Completion................................................................................ 19 Figure 2-10: StarQuality Setup Wizard Window......................................................................... 21 Figure 2-11: Licence Agreement ................................................................................................ 22 Figure 2-12: Choose Components ............................................................................................. 22 Figure 2-13: StarQuality Installing .............................................................................................. 23 Figure 2-14: StarQuality Basic Installation Complete................................................................. 23 Figure 2-15: Oracle Database Install.......................................................................................... 24 Figure 2-16: Oracle Directory ..................................................................................................... 25 Figure 2-17: Installation Progress .............................................................................................. 25 Figure 2-18: StarQuality Windows Service Registration ............................................................ 26 Figure 2-19: Oracle Connection Parameters.............................................................................. 26 Figure 2-20: Oracle Connection - Tablespace Parameters........................................................ 28 Figure 2-21: Oracle Connection - User Parameters................................................................... 28 Figure 2-22: StarQuality Setup Wizard - Completing Installation ............................................... 29 Figure 2-23: Cygwin Net Release Setup Program window ........................................................ 33 Figure 2-24: Choose a Download Source Window .................................................................... 33 Figure 2-25: Select Root Install Directory................................................................................... 34 Figure 2-26: Select Local Package Directory ............................................................................. 34 Figure 2-27: Select Packages Window - All Default (Initial State).............................................. 35 StarQuality xx User Manual Figures Figure 2-28: Select Packages Window - All “Install” .................................................................. 35 Figure 2-29: Select Packages Window - Perl Version................................................................ 36 Figure 2-30: Cygwin Installation Process ................................................................................... 37 Figure 2-31: Cygwin Installation Completion.............................................................................. 37 Figure 2-32: StarQuality Setup Wizard Window......................................................................... 39 Figure 2-33: Licence Agreement ................................................................................................ 40 Figure 2-34: Choose Components ............................................................................................. 40 Figure 2-35: StarQuality Installing .............................................................................................. 41 Figure 2-36: StarQuality Basic Installation Complete................................................................. 41 Figure 2-37: StarQuality Windows Service Registration ............................................................ 42 Figure 2-38: Oracle Connection Parameters.............................................................................. 42 Figure 2-39: Oracle Connection - Tablespace Parameters........................................................ 44 Figure 2-40: Oracle Connection - User Parameters................................................................... 44 Figure 2-41: StarQuality Setup Wizard - Completing Installation ............................................... 45 Figure 2-42: Cygwin Net Release Setup Program window ........................................................ 49 Figure 2-43: Choose a Download Source Window .................................................................... 49 Figure 2-44: Select Root Install Directory................................................................................... 50 Figure 2-45: Select Local Package Directory ............................................................................. 50 Figure 2-46: Select Packages Window - All Default (Initial State).............................................. 51 Figure 2-47: Select Packages Window - All “Install” .................................................................. 51 Figure 2-48: Select Packages Window - Perl Version................................................................ 52 Figure 2-49: Cygwin Installation Process ................................................................................... 53 Figure 2-50: Cygwin Installation Completion.............................................................................. 53 Figure 2-51: StarQuality Setup Wizard Window......................................................................... 55 Figure 2-52: Licence Agreement ................................................................................................ 56 Figure 2-53: Choose Components ............................................................................................. 56 Figure 2-54: StarQuality Installing .............................................................................................. 57 Figure 2-55: StarQuality Basic Installation Complete................................................................. 57 Figure 2-56: StarQuality Windows Service Registration ............................................................ 58 Figure 2-57: Oracle Connection Parameters.............................................................................. 58 StarQuality xxi User Manual Figures Figure 2-58: Oracle Connection - Tablespace Parameters........................................................ 59 Figure 2-59: Oracle Connection - User Parameters................................................................... 60 Figure 2-60: StarQuality Setup Wizard - Completing Installation ............................................... 60 Figure 2-61: Installation on Solaris - Basic Checks.................................................................... 65 Figure 2-62: Installing Embedded Oracle Database .................................................................. 66 Figure 2-63: Installation on Solaris - Basic Checks.................................................................... 75 Figure 2-64: Installation on Solaris - Basic Checks.................................................................... 84 Figure 2-65: Server Status Window ........................................................................................... 91 Figure 2-66: Licence Configuration Window .............................................................................. 94 Figure 2-67: Configuring SOAP Server ...................................................................................... 98 Figure 2-68: Server Start/Stop/Status - SOAP Entry.................................................................. 99 Figure 2-69: StarQuality Schema Update Window................................................................... 101 Figure 2-70: Setup Message .................................................................................................... 101 Figure 2-71: Uninstalling the Oracle User ................................................................................ 103 Figure 2-72: Uninstalling StarQuality from Solaris ................................................................... 105 Figure 3-1: Flash Player Message Window.............................................................................. 108 Figure 3-2: The StarQuality User Interface .............................................................................. 109 Figure 3-3: Example of Menus, Submenu Panel and Browser (in Measurements) ................. 111 Figure 3-4: Example of Operations pull down menu ................................................................ 115 Figure 3-5: Hierarchy Path ....................................................................................................... 115 Figure 3-6: Scrolling and Hiding the Submenu......................................................................... 117 Figure 3-7: Navigation Tabs ..................................................................................................... 117 Figure 4-1: Creating a New Site - Server Group Selection ...................................................... 123 Figure 4-2: Creating New Equipments from Template - WiMAX FDD ..................................... 126 Figure 4-3: Adding Sites manually ........................................................................................... 127 Figure 4-4: Activating Data Collection ...................................................................................... 128 Figure 4-5: Data Collection Status ........................................................................................... 129 Figure 4-6: Creating New Equipment - AlvariSTAR ................................................................. 131 Figure 4-7: Data Collection Active............................................................................................ 132 Figure 4-8: Default Oracle Template ........................................................................................ 134 StarQuality xxii User Manual Figures Figure 4-9: Network Discovery Results (Oracle) ...................................................................... 135 Figure 4-10: Activating Data Collection (Oracle) ...................................................................... 136 Figure 4-11: Data Collection Active (Oracle)............................................................................ 137 Figure 4-12: Default Unix/Linux Template................................................................................ 138 Figure 4-13: Network Discovery Results (Unix/Linux))............................................................. 139 Figure 4-14: Activating Data Collection (UNIX) ........................................................................ 140 Figure 4-15: Data Collection Active (UNIX).............................................................................. 141 Figure 4-16: Setting Discovery to a Schedule .......................................................................... 142 Figure 4-17: Scheduled Configuration...................................................................................... 144 Figure 5-1: The Measurements Main Menu Item with the Browser and the Icon View ............ 147 Figure 5-2: Hierarchy of Sites................................................................................................... 148 Figure 5-3: Navigation between Measurements: Detailed View.............................................. 151 Figure 5-4: Measurements Operation drop-down Menu .......................................................... 152 Figure 5-5: Show History.......................................................................................................... 153 Figure 5-6: Show Links ............................................................................................................ 153 Figure 5-7: Logical BS History Window.................................................................................... 154 Figure 5-8: Display with Flash Options..................................................................................... 156 Figure 5-9: Advanced Search .................................................................................................. 159 Figure 5-10: Measurements Search Results............................................................................ 160 Figure 5-11: Setting Trendlines Window .................................................................................. 162 Figure 5-12: Examples of Trendline Settings ........................................................................... 164 Figure 6-1: Threshold Template Configuration - Template List................................................ 168 Figure 6-2: Threshold Template Configuration - New .............................................................. 169 Figure 6-3: Using Threshold Template..................................................................................... 172 Figure 6-4: Relevant Equipments............................................................................................. 172 Figure 6-5: Threshold Template Details ................................................................................... 173 Figure 6-6: Items to Assign The Threshold .............................................................................. 174 Figure 6-7: Threshold Template Configuration - Template List................................................ 175 Figure 6-8: Threshold Template Configuration - Editing .......................................................... 176 Figure 6-9: Message on Template-based Threshold Modification ........................................... 176 StarQuality xxiii User Manual Figures Figure 6-10: Message on Template-based Threshold Modification ......................................... 177 Figure 6-11: Adding a New Threshold...................................................................................... 178 Figure 6-12: Threshold Configuration....................................................................................... 179 Figure 7-1: Alarms Summary at the Top Right Corner of the Window ..................................... 184 Figure 7-2: Table View of Alarms ............................................................................................. 184 Figure 7-3: Detailed Alarm Information .................................................................................... 185 Figure 7-4: Icon View of Alarms ............................................................................................... 188 Figure 7-5: List View of Alarms ................................................................................................ 188 Figure 7-6: Detailed View of Alarms......................................................................................... 189 Figure 7-7: The Equipment Level View of Alarms .................................................................... 189 Figure 7-8: Sample XLS of Alarm Table................................................................................... 191 Figure 7-9: Sample XLS File of Chart Data............................................................................. 192 Figure 8-1: Report Variables Window (Example) ..................................................................... 196 Figure 8-2: Adding a New Report Variable............................................................................... 197 Figure 8-3: Report View Configuration Window (example) ...................................................... 199 Figure 8-4: Creating a New Report View.................................................................................. 199 Figure 8-5: Configuration Page ................................................................................................ 200 Figure 8-6: Adding a New Variable .......................................................................................... 200 Figure 8-7: Creating a New Report View Using the Copy From Option ................................... 202 Figure 8-8: On-demand Reports - Types ................................................................................. 203 Figure 8-9: On-demand Reports - Search................................................................................ 203 Figure 8-10: On-demand Reports - Measurement Types ........................................................ 204 Figure 8-11: On-demand Reports - Measurement Types Settings .......................................... 205 Figure 8-12: On-demand Reports - Object Parameters ........................................................... 205 Figure 8-13: On-demand Reports - Save options .................................................................... 205 Figure 8-14: On-demand Reports - Show ................................................................................ 206 Figure 8-15: Calendar views (day, week, month and year) for selecting the time interval ....... 208 Figure 8-16: Bulk Export Wizard Window................................................................................. 210 Figure 8-17: Bulk Export Wizard - Filtering Devices................................................................. 211 Figure 8-18: Exported Entity Selection..................................................................................... 212 StarQuality xxiv User Manual Figures Figure 8-19: Export Message ................................................................................................... 212 Figure 8-20: File Download ...................................................................................................... 213 Figure 8-21: Sample xls File..................................................................................................... 213 Figure 8-22: SU Selection ........................................................................................................ 215 Figure 8-23: Export Message ................................................................................................... 215 Figure 9-1: Site and Equipment Configuration Window with Operations Drop-down Menu..... 225 Figure 9-2: Adding a New Site ................................................................................................. 226 Figure 9-3: Equipment Discovery Message ............................................................................. 227 Figure 9-4: Equipment Modification Window............................................................................ 227 Figure 9-5: Viewing Equipment with Additional Equipment Parameters .................................. 229 Figure 9-6: Virtual Equipment Modification I ............................................................................ 230 Figure 9-7: Virtual Equipment Modification II ........................................................................... 231 Figure 9-8: Virtual Equipment Modification - Site Search Results............................................ 232 Figure 9-9: User Preferences ................................................................................................... 234 Figure 9-10: Menu Item Configuration...................................................................................... 236 Figure 9-11: Menu Item Editing ................................................................................................ 237 Figure 9-12: Menu Item Configuration - Search Object............................................................ 237 Figure 9-13: Chart Configuration (accessed from the Equipment page).................................. 239 Figure 9-14: E-mail Address Configuration .............................................................................. 244 Figure 9-15: Example of Separate Threshold Violation Notification......................................... 244 Figure 9-16: Example of Bulk Threshold Violation Notification ................................................ 245 Figure 9-17: Device and Measurement Summary.................................................................... 249 Figure 9-18: Server Configuration Window .............................................................................. 250 Figure 9-19: Editing Server Configuration ................................................................................ 252 Figure 9-20: Server Configuration - Adding New ..................................................................... 253 Figure 9-21: Server Status ....................................................................................................... 254 Figure 9-22: Server Events Window......................................................................................... 255 Figure 9-23: Collector Load...................................................................................................... 256 Figure 9-24: Collector Load Statistics ...................................................................................... 257 Figure 9-25: Missing Measurements at a Given Time.............................................................. 257 StarQuality xxv User Manual Figures Figure 9-26: Audit Trail Query .................................................................................................. 258 Figure 9-27: Audit Trail Entries................................................................................................. 260 Figure 9-28: Viewing the Audit Trail ......................................................................................... 260 Figure 9-29: Users List ............................................................................................................. 261 Figure 9-30: User Administration.............................................................................................. 261 Figure 9-31: User Selection...................................................................................................... 264 Figure 9-32: User Rights Modification ...................................................................................... 264 StarQuality xxvi User Manual Chapter 1 Introduction Introduction In this chapter: “System Overview” on page 3 “System Data Structure” on page 5 “System Data Structure” on page 5 “User Types and Their Settings” on page 6 StarQuality 2 User Manual Introduction System Overview 1.1 System Overview 1.1.1 General Alvarion’s StarQuality is a carrier-class performance and traffic monitoring system designed for optimizing the WiMAX Network performance, identifying network problems, maximizing traffic capacity and optimizing resource allocation. StarQuality offers an end-to-end performance solution including collection, analyzing, storing and displaying of the performance data. The system provides a unified performance application for monitoring Alvarion’s WiMAX equipment as well as server health. StarQuality provides various sets of report types and lists through an intuitive and simple Web-GUI client. It also enables defining TCA (Threshold Crossing Alerts) mechanism: an alarm generation may be conditional to the occurrence of several rule violations. Alvarion’s StarQuality is an essential element for optimizing the WiMAX Network functionality, radio planning, ensuring service performance and problem identification. 1.1.2 STAR Management Suite Overview Alvarion’s STAR Management Suite offers complete and comprehensive management solution for ensuring the successful deployment of WiMAX services. The Alvarion STAR Management Suite offers a set of carrier class management tools, each tool designed to fulfill a certain management purpose. The STAR Management Suite includes: AlvariSTAR - Carrier-class Management System for managing Alvarion’s WiMAX Base Stations. StarACS - An Automatic Configuration Server (ACS) for managing end-user Fixed and Nomadic devices (CPE) based on TR-69 protocol. StarACS is relevant only for WiMAX 16e Networks. StarQuality - Performance monitoring system for optimizing the WiMAX network. StarReport - Powerful report generator for generating network inventory reports. StarQuality 3 User Manual Introduction Supported Equipment 1.1.3 Supported Equipment 1.1.3.1 WiMAX BreezeMAX FDD ver.3.5/3.6 (FDD SNMP) - Micro and Macro BTS BreezeMAX FDD ver.3.7 (FDD TFTP) - Micro and Macro BTS BreezeMAX TDD ver.4.5 and later (TDD TFTP) - Macro BTS only 4Motion ver.2.5M and 3.0 BreezeACCESS VL ver.6 BreezeMAX Extreme ver.1.5 1.1.3.2 Server Health AlvariSTAR ver4.0 and up Oracle database server UNIX OS StarQuality 4 User Manual Introduction 1.2 System Data Structure System Data Structure The basic entities comprising the StarQuality network are: Equipment - also referred to as the device: » BTS (Base Transceiver Station) and SU for WiMAX networks » AlvariSTAR, Oracle database server and UNIX machine for Server Health. Each piece of equipment belongs to a site. Basic sampled unit: » SU, Slot/BS (n times in each BTS) for WIMAX networks, BTS for common measurements » AlvariSTAR, Oracle database server and UNIX machine for Server Health. Site – collection of equipments and/or sites. Each site can contain arbitrary many sites and equipment. Each site can reside below another site. Root – a virtual site – collection of sites only A bare System contains only ROOT. StarQuality 5 User Manual Introduction 1.3 User Types and Their Settings User Types and Their Settings In the StarQuality, different users can have different access rights to various objects. There is always an administrator user (admin) with the highest permission level. The individual user groups are: admin user: The user named admin possesses all the rights, but cannot configure preferences, and cannot create a private virtual hierarchy and charts. The default password is admin123 at installation. This user cannot be deleted from the system. Administrator: has the same rights as the admin user, except: » Cannot create, modify and delete administrator users » Cannot create, modify and delete servers or server groups, cannot view the operating system level user password on some computers » Cannot change and view the actual licences used » Can set preferences, and create a private virtual hierarchy and charts Restricted administrators: similar to the normal users they can only view those objects that they have received privileges for. However the restricted administrators can modify these objects: » Only those site, equipment, measurement, threshold, threshold type and exclusion window objects for which they have received privileges » Can only modify a user if it was created by themselves » Can only view an entry in the audit log if the change was made by themselves » Can only modify a public virtual hierarchy object or a public chart if it was created by themselves » Cannot modify templates (except the exclusion windows), reports, servers, events and maps Normal users: cannot modify the base objects in the system, and can view only those objects that they have received privileges for. They can set StarQuality 6 User Manual Introduction User Types and Their Settings preferences, create private virtual hierarchies and charts, and can modify their own passwords Limited users: Similar to normal users, but they cannot change their passwords, cannot set preferences, and cannot create private virtual hierarchies and charts Any administrator has the right to modify normal users, while only the admin user can modify administrators. Restricted administrators cannot modify a user except if it was created by themselves. No user can delete the admin user. For further information, refer to the “User Administration (Admin only)” on page 261. StarQuality 7 User Manual Chapter 2 Installation Installation In this chapter: “Introduction” on page 10 “Installing StarQuality on Windows Server with Internal Oracle Database” on page 13 “Installing StarQuality on Windows Server with External Oracle Database on the Same Machine” on page 30 “Installing StarQuality on Windows Server with Oracle Database on a Separate Machine” on page 46 “Installing StarQuality on Solaris Server with Internal Oracle Database” on page 62 “Installing StarQuality on Solaris Server with External Oracle Database on the Same Machine” on page 71 “Installing StarQuality on Solaris Server with Oracle Database on a Separate Machine” on page 81 “Running StarQuality on Windows” on page 90 “Additional Installation Information” on page 95 “StarQuality Upgrade” on page 100 “Uninstalling StarQuality” on page 103 StarQuality 9 User Manual Installation Introduction 2.1 Introduction 2.1.1 Installation Types StarQuality can be installed on systems with internal or external databases and on systems running Windows and UNIX-like operating systems. This chapter is divided into sections according to the type of operating system and type of database installation. The following are possible installation types, depending on configuration: Installing StarQuality on Windows » with internal Oracle Database » with external Oracle Database on the same machine » with Oracle Database on a separate machine Installing StarQuality on Solaris » with internal Oracle Database » with external Oracle Database on the same machine » with Oracle Database on a separate machine Before starting installation, refer to Table 2-1 below to determine which type of installation to use: StarQuality 10 User Manual Installation General Prerequisites Table 2-1: Selecting Installation Types Operating System System Architecture Oracle database server version Windows 2008 Standard Internal database Oracle SW and patch supplied with StarQuality DVD External database on same machine External database on a separate machine Solaris 10 x86 Internal database Oracle client version (installed on StarQuality machine) No Oracle client required *Version supplied with StarQuality DVD (10203_vista_w2k8_ x86_production_db) Oracle SW and patch supplied with StarQuality DVD No Oracle client required External database on same machine External database on a separate machine 10203_vista_w2k8_x 86_production_client *Version supplied with StarQuality DVD (10201_database_s olx86_64) 10201_client_solx86_ 64 or 10202_client_solx86 Refer to “Installing StarQuality on Windows Server with Internal Oracle Database” on page 13 “Installing StarQuality on Windows Server with External Oracle Database on the Same Machine” on page 30 “Installing StarQuality on Windows Server with Oracle Database on a Separate Machine” on page 46 “Installing StarQuality on Solaris Server with Internal Oracle Database” on page 62 “Installing StarQuality on Solaris Server with External Oracle Database on the Same Machine” on page 71 “Installing StarQuality on Solaris Server with Oracle Database on a Separate Machine” on page 81 * The Oracle kit included in the DVD covers the Oracle license only if it is installed together with StarQuality (internal database installation). In case of installing an external DB, purchase licence separately. 2.1.2 General Prerequisites The following are general prerequisites for all installation types: The computer on which the server is installed must comply with hardware and software requirements as detailed in the Release Notes. StarQuality 11 User Manual Installation General Prerequisites The computer on which the StarQuality Server and/or Oracle database are installed must be dedicated to running these applications. The computers should have latest Operating System versions. The StarQuality application requires a minimum of 20 GB free disk space. Valid StarQuality license (required for initial activation after installation) StarQuality 12 User Manual Installation 2.2 Installing StarQuality on Windows Server with Internal Oracle Database Installing StarQuality on Windows Server with Internal Oracle Database Before beginning the StarQuality installation refer to Table 2-1 to ensure that this is the correct installation for your system, and perform all the tasks outlined in Section 2.2.1 below. This installation type involves the installation of the following components: cygwin StarQuality 2.2.1 Pre-installation Tasks 2.2.1.1 Disk Partitioning For medium network configurations, containing no more than 350 BTSs or 50,000 CPEs, disk partitioning is recommended, as described in the following table: Table 2-2: Disk Partitioning Physical Disk Volume Setup Physical disk 1 Volume 1 OS, StarQuality SW, Oracle SW Physical disk 2 Volume 2 - RAID 0 Oracle tablespaces, redo logs, etc. (entire SID) Physical disk 3 Physical disk 4 2.2.1.2 Configuring Network Ports The following ports must be open between the server machine, client machine, managed network equipment and other NMS/OSS elements: StarQuality 13 User Manual Installation Pre-installation Tasks Table 2-3: Network Ports Use Port Protocol Direction App. server and managed equipment 161 SNMP Outbound towards NE App. server, managed equipment and other NMS/OSS elements 162 SNMP Outbound towards NMS/OSS elements App. server and managed equipment 69 TFTP From Managed equipment to StarQuality App. server and client 8080 Sending requests to AlvariSTAR in order to reach KPI 16162 2.2.1.3 Inbound/Outbound between client and server SNMP Installing Cygwin Cygwin is a UNIX-like environment for Windows. StarQuality operation commands must always be executed from a cygwin window. The Cygwin Installation files can be downloaded from the internet (see “To download and install Cygwin from the Internet:” on page 20), or Alvarion FTP Server (see below). To download and install Cygwin from the Alvarion FTP server: 1 Download the CygwinFromWwwGoh4Com.zip file from ftp://downloads.alvarion.com/StarSuite/Star Quality/Installations/ (Username and password required when connecting as alvarioncustomer) 2 Extract the zip file into a folder with a path that does not include spaces. 3 From the extracted files run the setup.exe file; The Cygwin Net Release Setup Program window is displayed. StarQuality 14 User Manual Installation Pre-installation Tasks Figure 2-1: Cygwin Net Release Setup Program window 4 Click Next. The Choose a Download Source window is displayed. Figure 2-2: Choose a Download Source Window StarQuality 15 User Manual Installation Pre-installation Tasks 5 Select Install from Local directory. Click Next. Figure 2-3: Select Root Install Directory 6 Choose settings as recommended on screen. Verify that Root directory is a local drive. Click Next. Figure 2-4: Select Local Package Directory StarQuality 16 User Manual Installation Pre-installation Tasks 7 Verify that Local Package Directory is the correct path. Click Next; The Select Packages window is displayed. All - Default entry Figure 2-5: Select Packages Window - All Default (Initial State) 8 Click on the word “Default” in the main “All” entry (package) (see Figure 2-6) to change it to “Install”. Figure 2-6: Select Packages Window - All “Install” StarQuality 17 User Manual Installation Pre-installation Tasks 9 Verify that all the entries under the “All” main package have also been changed to “Install” (see Figure 2-7). 10 Scroll down to the Perl package and expand it using the + sign. 11 Check the sub-package under Perl. If it is other than 5.8.x.x (e.g. “skip”), click on it to change it to the required 5.8.x.x (see Figure 2-8). NOTE The Perl version must be 5.8.x.x, otherwise it does not meet the StarQuality requirements. In this case, use a different cygwin installation package. Perl Version Figure 2-7: Select Packages Window - Perl Version 12 Click Next; the installation proceeds until completed. StarQuality 18 User Manual Installation Pre-installation Tasks Figure 2-8: Cygwin Installation Process 13 Click Finish. Figure 2-9: Cygwin Installation Completion StarQuality 19 User Manual Installation Installing StarQuality To download and install Cygwin from the Internet: Make sure the Cygwin version you download and use includes the following packages: Sapache base-files base-passwd bash binutils bzip2 coreutils crypt cygrunsrv cygutils cygwin editrights expat findutils gawk gcc-core gcc-g++ gcc-mingw-core gcc-mingw-g++ grep gzip less libbz2_1 libdb4.5 libexpat1 libexpat1-devel libgdbm4 libiconv2 libintl3 libintl8 libncurses8 libpcre0 libpopt0 libreadline6 libwrap0 login make mingw-runtime minires openssh openssl perl - version 5.8.x.x ping sed tar termcap terminfo texinfo tzcode vim w32api which zlib 2.2.2 Installing StarQuality 2.2.2.1 Overview This Installation type is applicable when Installing StarQuality on Windows server with internal Oracle database (refer to Table 2-1). The installation has to be performed by a local administrator user. During the installation the installer writes information into two destinations: the Details view and the log file. To display the Details view, click Show Details in the installation wizard. The log file is located in the Temp directory of the user (by default C:\Documents and Settings\<USER>\Local Settings\Temp\). StarQuality 20 User Manual Installation 2.2.2.2 Installing StarQuality StarQuality Installation Procedure 1 Ensure that the pre-installation task are complete as required in Section 2.2.1 2 Do one of the following: » Insert the installation DVD into the DVD drive or » Copy/unzip the Installation folder directly onto one of the disk drives (for example: C:/). IMPORTANT Do not place the installation files into a folder with a long path. This is an Oracle installer limitation. 3 Run the installation program starquality.exe; The installation wizard is displayed. Figure 2-10: StarQuality Setup Wizard Window 4 Click Next; the wizard displays a license agreement. Please read the agreement carefully. StarQuality 21 User Manual Installation Installing StarQuality Figure 2-11: Licence Agreement 5 Click Next; the wizard displays components to install. Figure 2-12: Choose Components 6 Click Next; StarQuality installation starts. To view detailed information click Show Details. The content of the details view can be copied to the clipboard. StarQuality 22 User Manual Installation Installing StarQuality Figure 2-13: StarQuality Installing The last page indicates that the basic installation is done. Figure 2-14: StarQuality Basic Installation Complete 7 Click Next; the installer prompts for the Oracle installation and patch, located on the StarQuality DVD (Figure 2-15). Proceed as follows: StarQuality 23 User Manual Installation Installing StarQuality a Select the Oracle installer folder: If required, click Browse and select the location for the files. Figure 2-15: Oracle Database Install b Click Next. The StarQuality Installation window is displayed (Figure 2-16) Click Browse to change the default Oracle home directory. IMPORTANT The Oracle home directory must be on the same disk drive as the StarQuality (Cygwin) home directory. StarQuality 24 User Manual Installation Installing StarQuality Figure 2-16: Oracle Directory c Click Next. A command line window is displayed, showing the Oracle database installation progress (Figure 2-17). NOTE The Oracle database installation may take 30-60 minutes, depending on the machine characteristics. During the whole time, the installation progress is displayed in the console. If the console is idle for more than 10 minutes, check for errors. Figure 2-17: Installation Progress 8 Fill in and confirm the required password. It is recommended to use the Windows password for the same user. StarQuality 25 User Manual Installation Installing StarQuality Figure 2-18: StarQuality Windows Service Registration 9 Click Next; The Oracle Connection page is displayed (Figure 2-19). Figure 2-19: Oracle Connection Parameters 10 Verify that the correct values are filled in the following fields: Oracle Home: Path to the Oracle Home variable. StarQuality 26 User Manual Installation Installing StarQuality TNS: the TNS name to be used for the database connection as appears in the tnsnames.ora file on the StarQuality machine. For internal Oracle: SQ. Host and port: the host of the Oracle database server and port used for connecting to it. Port default is 1521(For internal Oracle: 1521). Host can be either: ◊ ”localhost” ◊ Host name ◊ IP ◊ 127.0.0.1 Service name and SID: only one of them needs to be filled in, preferably the Service name. For internal Oracle: SQ. System password and Confirm password: the password of the SYSTEM user in the database. For internal Oracle: oracle. The password is only used by the installer for the creation of the database user and table spaces, the installer does not save it. 11 Click Next; Oracle Connection continues with Oracle tablespace parameters. Point both CONF. and DATA tablespaces to the Oracle data computer partition cording to Table 2-2. 12 Approve the creation of CONF and DATA tablespaces. StarQuality 27 User Manual Installation Installing StarQuality Figure 2-20: Oracle Connection - Tablespace Parameters 13 Click Next; The Oracle user parameters are displayed. Figure 2-21: Oracle Connection - User Parameters 14 Click Next; The installer displays the Setup wizard and completes the installation. StarQuality 28 User Manual Installation Installing StarQuality Figure 2-22: StarQuality Setup Wizard - Completing Installation 15 Click Finish to close the wizard. 16 To load a licence and run StarQuality, refer to: StarQuality » “Loading a StarQuality Licence” on page 93 » “Running StarQuality on Windows” on page 90. 29 User Manual Installation 2.3 Installing StarQuality on Windows Server with External Oracle Database on the Same Machine Installing StarQuality on Windows Server with External Oracle Database on the Same Machine Before beginning the StarQuality installation refer to Table 2-1 to ensure that this is the correct installation for your system. Check that you have performed all the tasks outlined in Section 2.3.1 below. This installation type involves the installation of the following components: Oracle server (Oracle client is not required) cygwin StarQuality 2.3.1 Pre-installation Tasks 2.3.1.1 Disk Partitioning For medium network configurations, containing no more than 350 BTSs or 50,000 CPEs, disk partitioning is recommended, as described in the following table: Table 2-4: Disk Partitioning Physical Disk Volume Setup Physical disk 1 Volume 1 OS, StarQuality SW, Oracle SW Physical disk 2 Volume 2 - RAID 0 Oracle tablespaces, redo logs, etc. (entire SID) Physical disk 3 Physical disk 4 2.3.1.2 Configuring Network Ports The following ports must be open between the server machine, client machine, managed network equipment and other NMS/OSS elements: StarQuality 30 User Manual Installation Pre-installation Tasks Table 2-5: Network Ports Use Port Protocol Direction App. server and managed equipment 161 SNMP Outbound towards NE App. server, managed equipment and other NMS/OSS elements 162 SNMP Outbound towards NMS/OSS elements App. server and managed equipment 69 TFTP From Managed equipment to StarQuality App. server and client 8080 Inbound/Outbound between client and server Oracle communication client server As installed (Default: 1521) From StarQuality to Oracle and from Oracle to StarQuality Sending requests to AlvariSTAR in order to reach KPI 16162 2.3.1.3 SNMP Installing Oracle Server Follow these guidelines: Consult Table 2-1 for the correct Oracle Server version. Install Oracle Server according to instructions issued by Oracle corporation. Make sure that the database is set to a minimum of 170 processes. During StarQuality installation, the Oracle server must be running, and the database connection from the StarQuality should be available. To test connectivity to the database server from the StarQuality machine, use the sqlplus utility as follows: » Assuming that the database SID is testme, and system password is oracle, switch to the command prompt (on Windows) or use a console (on Solaris, logged in as the Oracle user) and enter the following command: sqlplus system/oracle@testme. If the SQL prompt is displayed, connectivity to the database server is confirmed. Any error message should be reported to and resolved by the DBA. » StarQuality Enter exit or quit to complete the procedure. 31 User Manual Installation Pre-installation Tasks The following Oracle database information should be available when installing StarQuality: 2.3.1.4 » Service name (SID) » TNS » Password for SYSTEM user Installing Cygwin Cygwin is a UNIX-like environment for Windows. StarQuality operation commands must always be executed from a cygwin window. The Cygwin Installation files can be downloaded from the internet (see “To download and install Cygwin from the Internet:” on page 20), or Alvarion FTP Server (see below). To download and install Cygwin from the Alvarion FTP server: 1 Download the CygwinFromWwwGoh4Com.zip file from ftp://downloads.alvarion.com/StarSuite/Star Quality/Installations/ (Username and password required when connecting as alvarioncustomer) 2 Extract the zip file into a folder with a path that does not include spaces. 3 From the extracted files run the setup.exe file; The Cygwin Net Release Setup Program window is displayed. StarQuality 32 User Manual Installation Pre-installation Tasks Figure 2-23: Cygwin Net Release Setup Program window 4 Click Next. The Choose a Download Source window is displayed. Figure 2-24: Choose a Download Source Window StarQuality 33 User Manual Installation Pre-installation Tasks 5 Select Install from Local directory. Click Next. Figure 2-25: Select Root Install Directory 6 Choose settings as recommended on screen. Verify that Root directory is a local drive. Click Next. Figure 2-26: Select Local Package Directory StarQuality 34 User Manual Installation Pre-installation Tasks 7 Verify that Local Package Directory is the correct path. Click Next; The Select Packages window is displayed. All - Default entry Figure 2-27: Select Packages Window - All Default (Initial State) 8 Click on the word “Default” in the main “All” entry (package) (see Figure 2-6) to change it to “Install”. Figure 2-28: Select Packages Window - All “Install” StarQuality 35 User Manual Installation Pre-installation Tasks 9 Verify that all the entries under the “All” main package have also been changed to “Install” (see Figure 2-7). 10 Scroll down to the Perl package and expand it using the + sign. 11 Check the sub-package under Perl. If it is other than 5.8.x.x (e.g. “skip”), click on it to change it to the required 5.8.x.x (see Figure 2-8). NOTE The Perl version must be 5.8.x.x, otherwise it does not meet the StarQuality requirements. In this case, use a different cygwin installation package. Perl Version Figure 2-29: Select Packages Window - Perl Version 12 Click Next; the installation proceeds until completed. StarQuality 36 User Manual Installation Pre-installation Tasks Figure 2-30: Cygwin Installation Process 13 Click Finish. Figure 2-31: Cygwin Installation Completion StarQuality 37 User Manual Installation Installing StarQuality To download and install Cygwin from the Internet: Make sure the Cygwin version you download and use includes the following packages: Sapache base-files base-passwd bash binutils bzip2 coreutils crypt cygrunsrv cygutils cygwin editrights expat findutils gawk gcc-core gcc-g++ gcc-mingw-core gcc-mingw-g++ grep gzip less libbz2_1 libdb4.5 libexpat1 libexpat1-devel libgdbm4 libiconv2 libintl3 libintl8 libncurses8 libpcre0 libpopt0 libreadline6 libwrap0 login make mingw-runtime minires openssh openssl perl - version 5.8.x.x ping sed tar termcap terminfo texinfo tzcode vim w32api which zlib 2.3.2 Installing StarQuality 2.3.2.1 Overview This Installation type is applicable when installing StarQuality on Windows server with external Oracle database on the same machine (refer to Table 2-1). The installation has to be performed by a local administrator user. During the installation the installer writes information into two destinations: the Details view and the log file. To display the Details view, click Show Details in the installation wizard. The log file is located in the Temp directory of the user (by default C:\Documents and Settings\<USER>\Local Settings\Temp\). StarQuality 38 User Manual Installation 2.3.2.2 Installing StarQuality StarQuality Installation Procedure 1 Ensure that the pre-installation task are complete as required in Section 2.3.1 2 Do one of the following: » Insert the installation DVD into the DVD drive or » Copy/unzip the Installation folder directly onto one of the disk drives (for example: C:/). IMPORTANT Do not place the installation files into a long path. This is an Oracle installer limitation. 3 Run the installation program starquality.exe; The installation wizard is displayed. Figure 2-32: StarQuality Setup Wizard Window 4 Click Next; the wizard displays a license agreement. Please read the agreement carefully. StarQuality 39 User Manual Installation Installing StarQuality Figure 2-33: Licence Agreement 5 Click Next; the wizard displays components to install. Figure 2-34: Choose Components 6 Click Next; StarQuality installation starts. To view detailed information click Show Details. The content of the details view can be copied to the clipboard. StarQuality 40 User Manual Installation Installing StarQuality Figure 2-35: StarQuality Installing The last page indicates that the basic installation is done. Figure 2-36: StarQuality Basic Installation Complete 7 Click Next; The StarQuality Windows Service Registration window is displayed (Figure 2-37). The service will be run with the given Windows user. Fill in and confirm the required password. It is recommended to use the Windows password for the same user. StarQuality 41 User Manual Installation Installing StarQuality Figure 2-37: StarQuality Windows Service Registration 8 Click Next; The Oracle Connection page is displayed (Figure 2-38). Figure 2-38: Oracle Connection Parameters 9 Verify that the correct values are filled in the following fields: Oracle Home: Path to the Oracle Home variable. StarQuality 42 User Manual Installation Installing StarQuality TNS: the TNS name to be used for the database connection determined during the Oracle database installation. This name appears in the tnsnames.ora file on the StarQuality machine. Host and port: the host of the Oracle database server and port used for connecting to it. Port default is 1521. Host can be either: ◊ ”localhost” ◊ Host name ◊ IP ◊ 127.0.0.1 Service name and SID: only one of them needs to be filled in, preferably the Service name. System password and Confirm password: the password of the SYSTEM user in the database. The password is only used by the installer for the creation of the database user and table spaces, the installer does not save it. 10 Click Next; Oracle Connection continues with Oracle tablespace parameters. Point both CONF. and DATA tablespaces to the Oracle data computer partition cording to Table 2-4. 11 Approve the creation of CONF and DATA tablespaces. StarQuality 43 User Manual Installation Installing StarQuality Figure 2-39: Oracle Connection - Tablespace Parameters 12 Click Next; Oracle user parameters window is displayed. Figure 2-40: Oracle Connection - User Parameters 13 Click Next; The installer displays the Setup wizard and completes the installation. StarQuality 44 User Manual Installation Installing StarQuality Figure 2-41: StarQuality Setup Wizard - Completing Installation 14 Click Finish to close the wizard. 15 To load a licence and run StarQuality, refer to: StarQuality » “Loading a StarQuality Licence” on page 93 » “Running StarQuality on Windows” on page 90. 45 User Manual Installation 2.4 Installing StarQuality on Windows Server with Oracle Database on a Separate Machine Installing StarQuality on Windows Server with Oracle Database on a Separate Machine Before beginning the StarQuality installation refer to Table 2-1 to ensure that this is the correct installation for your system. Check that you have performed all the tasks outlined in Section 2.4.1 below. This installation type involves the installation of the following components: Oracle server on a separate machine Oracle client on the StarQuality machine cygwin StarQuality 2.4.1 Pre-installation Tasks 2.4.1.1 Disk Partitioning For large network configurations using external Oracle setups, disk partitioning is recommended: Table 2-6: Disk Partitioning Physical Disk Volume Setup Physical disk 1 Volume 1- RAID 0 OS, Star Quality SW, Oracle client SW Physical disk 2 Physical disk 3 Physical disk 4 2.4.1.2 Configuring Network Ports The following ports must be open between the server machine, client machine, managed network equipment and other NMS/OSS elements: StarQuality 46 User Manual Installation Pre-installation Tasks Table 2-7: Network Ports Use Port Protocol Direction App. server and managed equipment 161 SNMP Outbound towards NE App. server, managed equipment and other NMS/OSS elements 162 SNMP Outbound towards NMS/OSS elements App. server and managed equipment 69 TFTP From Managed equipment to StarQuality App. server and client 8080 Inbound/Outbound between client and server Oracle communication client server As installed (Default: 1521) From StarQuality to Oracle and from Oracle to StarQuality Sending requests to AlvariSTAR in order to reach KPI 16162 2.4.1.3 SNMP Installing Oracle Follow these guidelines: Consult Table 2-1 for the correct Oracle Server/Client versions. Install Oracle Server on a standalone Oracle machine according to instructions issued by Oracle corporation. Make sure that the database is set to a minimum of 170 processes. Install Oracle client using the Administrator type installation. When completing the Oracle client installation, use the Oracle Net Configuration Assistant to create a connection to the Database server, and test it. During StarQuality installation, the Oracle server must be running, and the database connection from the StarQuality machine should be available. StarQuality 47 User Manual Installation Pre-installation Tasks To test connectivity to the database server from the StarQuality machine, use the sqlplus utility as follows: » Assuming that the database SID is testme, and system password is oracle, switch to the command prompt (on Windows) or use a console (on Solaris, logged in as the Oracle user) and enter the following command: sqlplus system/oracle@testme. » Enter exit or quit to complete the procedure. The following Oracle database information should be available when installing the StarQuality: 2.4.1.4 » Oracle Database server IP » Service name (SID) » TNS » Password for SYSTEM use Installing Cygwin Cygwin is a UNIX-like environment for Windows. StarQuality operation commands must always be executed from a cygwin window. The Cygwin Installation files can be downloaded from the internet (see “To download and install Cygwin from the Internet:” on page 20), or Alvarion FTP Server (see below). To download and install Cygwin from the Alvarion FTP server: 1 Download the CygwinFromWwwGoh4Com.zip file from ftp://downloads.alvarion.com/StarSuite/Star Quality/Installations/ (Username and password required when connecting as alvarioncustomer) 2 Extract the zip file into a folder with a path that does not include spaces. 3 From the extracted files run the setup.exe file; The Cygwin Net Release Setup Program window is displayed. StarQuality 48 User Manual Installation Pre-installation Tasks Figure 2-42: Cygwin Net Release Setup Program window 4 Click Next. The Choose a Download Source window is displayed. Figure 2-43: Choose a Download Source Window StarQuality 49 User Manual Installation Pre-installation Tasks 5 Select Install from Local directory. Click Next. Figure 2-44: Select Root Install Directory 6 Choose settings as recommended on screen. Verify that Root directory is a local drive. Click Next. Figure 2-45: Select Local Package Directory StarQuality 50 User Manual Installation Pre-installation Tasks 7 Verify that Local Package Directory is the correct path. Click Next; The Select Packages window is displayed. All - Default entry Figure 2-46: Select Packages Window - All Default (Initial State) 8 Click on the word “Default” in the main “All” entry (package) (see Figure 2-6) to change it to “Install”. Figure 2-47: Select Packages Window - All “Install” StarQuality 51 User Manual Installation Pre-installation Tasks 9 Verify that all the entries under the “All” main package have also been changed to “Install” (see Figure 2-7). 10 Scroll down to the Perl package and expand it using the + sign. 11 Check the sub-package under Perl. If it is other than 5.8.x.x (e.g. “skip”), click on it to change it to the required 5.8.x.x (see Figure 2-8). NOTE The Perl version must be 5.8.x.x, otherwise it does not meet the StarQuality requirements. In this case, use a different cygwin installation package. Perl Version Figure 2-48: Select Packages Window - Perl Version 12 Click Next; the installation proceeds until completed. StarQuality 52 User Manual Installation Pre-installation Tasks Figure 2-49: Cygwin Installation Process 13 Click Finish. Figure 2-50: Cygwin Installation Completion StarQuality 53 User Manual Installation Installing StarQuality To download and install Cygwin from the Internet: Make sure the Cygwin version you download and use includes the following packages: Sapache base-files base-passwd bash binutils bzip2 coreutils crypt cygrunsrv cygutils cygwin editrights expat findutils gawk gcc-core gcc-g++ gcc-mingw-core gcc-mingw-g++ grep gzip less libbz2_1 libdb4.5 libexpat1 libexpat1-devel libgdbm4 libiconv2 libintl3 libintl8 libncurses8 libpcre0 libpopt0 libreadline6 libwrap0 login make mingw-runtime minires openssh openssl perl - version 5.8.x.x ping sed tar termcap terminfo texinfo tzcode vim w32api which zlib 2.4.2 Installing StarQuality 2.4.2.1 Overview This Installation type is applicable when installing StarQuality on Windows server with Oracle database on a separate machine (refer to Table 2-1). The installation has to be performed by a local administrator user. During the installation the installer writes information into two destinations: the Details view and the log file. To display the Details view, click Show Details in the StarQuality 54 User Manual Installation Installing StarQuality installation wizard. The log file is located in the Temp directory of the user (by default C:\Documents and Settings\<USER>\Local Settings\Temp\). 2.4.2.2 StarQuality Installation Procedure 1 Do one of the following: » Insert the installation DVD into the DVD drive or » Copy/unzip the Installation folder directly onto one of the disk drives (for example: C:/). IMPORTANT Do not place the installation files into a long path. This is an Oracle installer limitation. 2 Run the installation program starquality.exe; The installation wizard is displayed. Figure 2-51: StarQuality Setup Wizard Window 3 Click Next; the wizard displays a license agreement. Please read the agreement carefully. StarQuality 55 User Manual Installation Installing StarQuality Figure 2-52: Licence Agreement 4 Click Next; the wizard displays components to install. Figure 2-53: Choose Components 5 Click Next; StarQuality installation starts. To view detailed information click Show Details. The content of the details view can be copied to the clipboard. StarQuality 56 User Manual Installation Installing StarQuality Figure 2-54: StarQuality Installing The last page indicates that the basic installation is done. Figure 2-55: StarQuality Basic Installation Complete 6 Click Next; The StarQuality Service Registration window is displayed. Fill in and confirm the required password. It is recommended to use the Windows password for the same user. StarQuality 57 User Manual Installation Installing StarQuality Figure 2-56: StarQuality Windows Service Registration 7 Click Next; The Oracle Connection page is displayed (Figure 2-19). Figure 2-57: Oracle Connection Parameters 8 StarQuality Verify that the correct values are filled in the following fields: 58 User Manual Installation Installing StarQuality Oracle Home: Path to the Oracle Client Home variable on the StarQuality machine. TNS: the TNS name to be used for the database connection as appears in the tnsnames.ora file on the StarQuality machine. Host and port: IP of the Oracle database server and port used for connecting to it. Port default is 1521 Service name and SID: only one of them needs to be filled in, preferably the Service name. System password and Confirm password: the password of the SYSTEM user in the database. The password is only used by the installer for the creation of the database user and table spaces, the installer does not store it. 9 Click Next; Oracle Connection continues with Oracle tablespace parameters. Figure 2-58: Oracle Connection - Tablespace Parameters 10 Click Next; The user parameters are displayed. StarQuality 59 User Manual Installation Installing StarQuality Figure 2-59: Oracle Connection - User Parameters 11 Click Next; The installer displays the Setup wizard and completes the installation. Figure 2-60: StarQuality Setup Wizard - Completing Installation 12 Click Finish to close the wizard. StarQuality 60 User Manual Installation Installing StarQuality 13 To load a licence and run StarQuality, refer to: StarQuality » “Loading a StarQuality Licence” on page 93 » “Running StarQuality on Windows” on page 90. 61 User Manual Installation 2.5 Installing StarQuality on Solaris Server with Internal Oracle Database Installing StarQuality on Solaris Server with Internal Oracle Database Before beginning the StarQuality installation refer to Table 2-1 to ensure that this is the correct installation for your system. Check that you have performed all the tasks outlined in Section 2.5.1 below. This installation type involves configuration of the Solaris kernel parameters and then installation of StarQuality. 2.5.1 Pre-installation Tasks 2.5.1.1 Disk Partitioning For medium network configurations, containing no more than 350 BTSs or 50,000 CPEs, disk partitioning is recommended, as described in the following table: Table 2-8: Disk Partitioning Physical Disk Volume Setup Physical disk 1 Volume 1 OS, StarQuality SW, Oracle SW Physical disk 2 Volume 2 - RAID 0 Oracle tablespaces, redo logs, etc. (entire SID) Physical disk 3 Physical disk 4 For large network configurations, containing no more than 1000 BTSs or 250,000 CPEs, disk partitioning is recommended, as described in the following table (Note that the HDDs have a capacity of 500 GB): StarQuality 62 User Manual Installation Pre-installation Tasks Table 2-9: Disk Partitioning Physical Disk Volume Setup Physical disk 1 Volume 1 OS, StarQuality SW, Oracle SW Physical disk 2 Volume 2 - RAID 0 Oracle tablespaces, redo logs, etc. (entire SID) Physical disk 3 Physical disk 4 Physical disk 5 Physical disk 6 Physical disk 7 Physical disk 8 Physical disk 9 Physical disk 10 2.5.1.2 Configuring Kernel Parameters for Solaris x86 1 Add the following entries to the /etc/system file and reboot the system: set shmsys:shminfo_shmmax=4294967295 set shmsys:shminfo_shmmni=100 set semsys:seminfo_semmni=100 set semsys:seminfo_semmsl=256 2 2.5.1.3 Verify a minimum of 10 GB swap space Configuring Network Ports The following ports must be open between the server machine, client machine, managed network equipment and other NMS/OSS elements: StarQuality 63 User Manual Installation Installing StarQuality Table 2-10: Network Ports Use Port Protocol Direction App. server and managed equipment 161 SNMP Outbound towards NE App. server, managed equipment and other NMS/OSS elements 162 SNMP Outbound towards NMS/OSS elements App. server and managed equipment 69 TFTP From Managed equipment to StarQuality App. server and client 8080 Sending requests to AlvariSTAR in order to reach KPI 16162 2.5.2 Inbound/Outbound between client and server SNMP Installing StarQuality StarQuality can be installed on a Solaris 10 x86 operating system using the command-line installer. For additional information on the installer commands and parameters, refer to “Command Line Installer General Information” on page 96 All operations should be done while logged in as root user. To install StarQuality: 1 Run the installer application, StarQuality.v3.0.en.bin, either directly from the installation DVD or from a directory to which the file was transferred (using FTP). 2 2.5.2.1 The following sections describe the installation process and details. Basic Checks The installer checks the following details: Version of the operating system Required packages StarQuality 64 User Manual Installation Installing StarQuality Version of Perl and the options used to build the Perl binary, If the application detects an error during these checks, then depending on the level of error, it either immediately terminates or asks whether it should continue or not. Always answer No and restart the installation. Figure 2-61: Installation on Solaris - Basic Checks 2.5.2.2 License Information When the basic checks are complete, the license agreement is displayed. To scroll down the agreement, press either the spacebar or the Enter key. Read the agreement carefully before accepting. 2.5.2.3 Installing Embedded Oracle Database The application prompts for the operating system user utilized during the Oracle installation. This part can take up to 30 minutes depending on the computer characteristics. After providing it, the application tries to find an Oracle user on the machine. Only if such a user does not exist, will the installer prompt for the installation of internal Oracle. StarQuality 65 User Manual Installation Installing StarQuality Figure 2-62: Installing Embedded Oracle Database 2.5.2.4 StarQuality Installation Prompts The application prompts for the following: Operating system user name to be created Operating system group to be created Directory below the /opt directory to be used by StarQuality, StarQuality 66 User Manual Installation Installing StarQuality Profile file to be used Type of StarQuality installation If the user and the directory already exist but the installer cannot find a valid StarQuality installation in the directory, then it asks whether it should continue or not. If it finds a StarQuality, it stops until all StarQuality modules are stopped. The installer prompts for the installation type, that is, if you are installing an additional server. Answer No to this prompt. ------------------------------------------------------------------------WARNING: !!! YOU SHOULD ONLY ANSWER YES TO THE FOLLOWING QUESTION!!! WARNING: !!! IF YOU ARE INSTALLING AN ADDITIONAL (COLLECTOR) SERVER !!! WARNING: !!! OR YOU ARE UPGRADING SUCH AN ADDITIONAL (COLLECTOR) SERVER !!! QUESTION : Are you installing a collector server (Y/N) [N]: ------------------------------------------------------------------------- 2.5.2.5 Apache Configuration If you are not installing a data collector, the installer asks whether it should configure the Apache WEB server or you will configure it later. This question is among the few yes-no questions for which the installer stores the given answer and sets the default to your previous answer when running a second time, and can accept this default answer in silent mode automatically. If you answer Yes, the installer asks for various Apache files and the port to be used, and then configures it. The default answers given to the user during the installation represent the answers for the default Apache installation according to the operating system. ------------------------------------------------------------------------QUESTION : Do you want to configure the Apache WEB server (Y/N) [Y]: y INFO : Configuring Apache QUESTION : On which port should Apache listen [80]: QUESTION : Where is the Apache apachectl file [/usr/apache/bin/apachectl]: QUESTION : Where is the Apache htpasswd file [/usr/apache/bin/htpasswd]: QUESTION : Where is the Apache pid file [/var/run/apache/httpd.pid]: QUESTION : Where is the Apache httpd.conf file [/etc/apache/httpd.conf]: INFO : Creating backup /etc/apache/httpd.conf.20090512-122852 from /etc/apache/httpd.conf StarQuality 67 User Manual Installation Installing StarQuality INFO : Stopping Apache INFO : Creating a new /etc/apache/httpd.conf INFO : Starting Apache ------------------------------------------------------------------------- 2.5.2.6 Automatic Starting and Stopping The installer application places scripts in the appropriate folder so that StarQuality can be automatically started and stopped. Automatic start/stop in this case does not include Oracle. If you are not installing a data collector server then the installer asks whether the Oracle has to be automatically started and stopped by the same script as well. You should only answer Yes if the Oracle server is running on the same machine and there is no other script to start and stop Oracle. If the Oracle server is running on the same machine but such a script already exists then you have to make sure that StarQuality starts after the Oracle server and stops before the Oracle server. This question is among the few yes-no questions for which the installer stores the given answer and sets the default to your previous answer when running a second time, and can accept this default answer in silent mode automatically. ------------------------------------------------------------------------INFO : Creating the service script, so the operating system can automatically INFO : start and stop StarQuality WARNING : !!! YOU SHOULD ONLY ANSWER YES TO THE FOLLOWING QUESTION IF !!! WARNING : !!! THE ORACLE DATABASE RUNS ON THIS SERVER AND YOU DO NOT !!! WARNING : !!! HAVE ALREADY A START/STOP SCRIPT FOR THE ORACLE !!! QUESTION : Should this script start/stop the Oracle server as well (Y/N) [Y]: n WARNING : !!! IF THE ORACLE RUNS ON THIS SERVER THEN MAKE SURE THAT !!! WARNING : !!! IT STARTS BEFORE THE APPLICATION AND STOPS AFTER THE !!! WARNING : !!! APPLICATION !!! INFO : Creating sym link /etc/rc0.d/K01starquality INFO : Creating sym link /etc/rc3.d/S99starquality ------------------------------------------------------------------------- StarQuality 68 User Manual Installation 2.5.2.7 Installing StarQuality Creating the StarQuality Tablespaces in the Database and the Oracle User The installer prompts for the following, and creates creates the tablespaces: Name, file name and size parameters for its configuration amd data tablespaces. Leave name and size as prompted but point to the partition as defined in the required Partitioning table. Name and password for its Oracle user. ------------------------------------------------------------------------INFO : Checking Oracle schema INFO : Getting the default tablespace directory QUESTION : StarQuality Conf tablespace name [SQ_CONF]: QUESTION : StarQuality Conf tablespace file [C:\ORACLE\PRODUCT\10.2.0\ORADATA\ORCL\SQ_CONF.dbf]: QUESTION : StarQuality Conf tablespace size [300M]: INFO : Creating the tablespace SQ_CONF, this could take several minutes INFO : Oracle tablespace SQ_CONF created QUESTION : StarQuality Data tablespace name [SQ_DATA]: QUESTION : StarQuality Data tablespace file [C:\ORACLE\PRODUCT\10.2.0\ORADATA\ORCL\SQ_DATA.dbf]: QUESTION : StarQuality Data tablespace size [10000M]: INFO : Creating the tablespace SQ_DATA, this could take several minutes INFO : Creating the tablespace SQ_DATA, this could take several minutes INFO : Oracle tablespace SQ_DATA created QUESTION : StarQuality Oracle user name [SQ]: QUESTION : StarQuality Oracle user password [******]: 2.5.2.8 INFO : Creating the Oracle schema, this could take several minutes INFO : Oracle user SQ created Finishing the Installation 1 The installer generates the schematic maps and exits. ------------------------------------------------------------------------INFO StarQuality : Redrawing schematic maps 69 User Manual Installation Installing StarQuality INFO : Installer ended -bash-3.00# ------------------------------------------------------------------------- 2 StarQuality To load a licence and run StarQuality, refer to: » “Loading a StarQuality Licence” on page 93 » “Running StarQuality on Solaris” on page 92. 70 User Manual Installation 2.6 Installing StarQuality on Solaris Server with External Oracle Database on the Same Machine Installing StarQuality on Solaris Server with External Oracle Database on the Same Machine Before beginning the StarQuality installation refer to Table 2-1 to ensure that this is the correct installation for your system. Check that you have performed all the tasks outlined in Section 2.6.1 below. This installation type involves configuration of the Solaris kernel parameters and the installation of the following components: Oracle server (Oracle client is not required) StarQuality 2.6.1 Pre-installation Tasks 2.6.1.1 Disk Partitioning For medium network configurations, containing no more than 350 BTSs or 50,000 CPEs, disk partitioning is recommended, as described in the following table: Table 2-11: Disk Partitioning Physical Disk Volume Setup Physical disk 1 Volume 1 OS, StarQuality SW, Oracle SW Physical disk 2 Volume 2 - RAID 0 Oracle tablespaces, redo logs, etc. (entire SID) Physical disk 3 Physical disk 4 For large network configurations, containing no more than 1000 BTSs or 250,000 CPEs, disk partitioning is recommended, as described in the following table (Note that the HDDs have a capacity of 500 GB): StarQuality 71 User Manual Installation Pre-installation Tasks Table 2-12: Disk Partitioning Physical Disk Volume Setup Physical disk 1 Volume 1 OS, StarQuality SW, Oracle SW Physical disk 2 Volume 2 - RAID 0 Oracle tablespaces, redo logs, etc. (entire SID) Physical disk 3 Physical disk 4 Physical disk 5 Physical disk 6 Physical disk 7 Physical disk 8 Physical disk 9 Physical disk 10 2.6.1.2 Configuring Kernel Parameters for Solaris x86 1 Add the following entries to the /etc/system file and reboot the system: set shmsys:shminfo_shmmax=4294967295 set shmsys:shminfo_shmmni=100 set semsys:seminfo_semmni=100 set semsys:seminfo_semmsl=256 2 2.6.1.3 Verify a minimum of 10 GB swap space Configuring Network Ports The following ports must be open between the server machine, client machine, managed network equipment and other NMS/OSS elements: StarQuality 72 User Manual Installation Pre-installation Tasks Table 2-13: Network Ports Use Port Protocol Direction App. server and managed equipment 161 SNMP Outbound towards NE App. server, managed equipment and other NMS/OSS elements 162 SNMP Outbound towards NMS/OSS elements App. server and managed equipment 69 TFTP From Managed equipment to StarQuality App. server and client 8080 Sending requests to AlvariSTAR in order to reach KPI 16162 2.6.1.4 Inbound/Outbound between client and server SNMP Installing Oracle Server Follow these guidelines: Consult Table 2-1 for the correct Oracle Server version. Install Oracle Server according to instructions issued by Oracle corporation. Make sure that the database is set to a minimum of 170 processes. During StarQuality installation, the Oracle server must be running, and the database connection from the StarQuality should be available. To test connectivity to the database server from the StarQuality machine, use the sqlplus utility as follows: » Assuming that the database SID is testme, and system password is oracle, switch to the command prompt (on Windows) or use a console (on Solaris, logged in as the Oracle user) and enter the following command: sqlplus system/oracle@testme. If the SQL prompt is displayed, connectivity to the database server is confirmed. Any error message should be reported to and resolved by the DBA. » StarQuality Enter exit or quit to complete the procedure. 73 User Manual Installation Installing StarQuality The following Oracle database information should be available when installing StarQuality: 2.6.2 » Service name (SID) » TNS » Password for SYSTEM user Installing StarQuality StarQuality can be installed on a Solaris 10 x86 operating system using the command-line installer. For additional information on the installer commands and parameters, refer to “Command Line Installer General Information” on page 96 All operations should be done while logged in as root user. To install StarQuality (Solaris): 1 Run the installer application, StarQuality.v3.0.en.bin, either directly from the installation DVD or from a directory to which the file was transferred (using FTP). 2 2.6.2.1 Follow the next sections for installation details. Basic Checks The installer checks the following details: Version of the operating system Required packages Version of Perl and the options used to build the Perl binary, If the application detects an error during these checks, then depending on the level of error, it either immediately terminates or asks whether it should continue or not. Always answer No and restart the installation. StarQuality 74 User Manual Installation Installing StarQuality Figure 2-63: Installation on Solaris - Basic Checks 2.6.2.2 License Information When the basic checks are complete, the license agreement is displayed. To scroll down the agreement, press either the spacebar or the Enter key. Read the agreement carefully before accepting. 2.6.2.3 Connection Details of External Oracle Database The application prompts for the operating system user used during the Oracle installation. After providing it, it tries to determine the value of the ORACLE_HOME environment variable using that user, and asks for confirmation. --------------------------------------------------------------------------------------------------QUESTION : The OS user of Oracle [oracle]: INFO : Found Oracle home: "/export/home/AlvariSTAR/db/product/10.2.0/db_1" QUESTION : ORACLE_HOME environment variable [/export/home/AlvariSTAR/db/product/10.2.0/db_1]: INFO : Checking the Oracle home /export/home/AlvariSTAR/db/product/10.2.0/db_1 INFO : Oracle home /export/home/AlvariSTAR/db/product/10.2.0/db_1 seems to be OK INFO StarQuality : Checking Oracle version 75 User Manual Installation Installing StarQuality INFO : Found Oracle version 10 INFO : Detected 64-bit Oracle QUESTION : StarQuality OS user name [starq]: INFO : Found StarQuality in /opt/starquality INFO : Select user starq and group starq with directory /opt/starquality INFO : Checking the environment of starq INFO : Environment checking is done INFO : Searching for running StarQuality modules INFO : Oracle checking INFO : Detected Solaris_x86 with 64 bit Oracle, so using full connect string instead of TNS names QUESTION : Oracle host name [localhost]: QUESTION : Oracle port [1721]: QUESTION : Oracle service name [BWANMS]: QUESTION : Oracle SID [BWANMS]: QUESTION : Oracle SYSTEM user password []: CONFIRM : Confirm the password: ERROR : Password mismatch QUESTION : Oracle SYSTEM user password []: CONFIRM : Confirm the password: INFO : Attempting to tnsping localhost:1721 INFO : Successful INFO BWANMS : Attempting to login to Oracle with the SYSTEM user and the SID INFO : Successful INFO : Attempting to login to Oracle with the SYSTEM user and the service name BWANMS INFO : Successful INFO : Oracle checking successful INFO : Configuring user SSH parameters INFO : Done ------------------------------------------------------------------------- 2.6.2.4 StarQuality Installation Prompts The application prompts for the following: StarQuality 76 User Manual Installation Installing StarQuality Operating system user name to be created Operating system group to be created Directory below the /opt directory to be used by StarQuality, Profile file to be used Type of StarQuality installation If the user and the directory already exist but the installer cannot find a valid StarQuality installation in the directory, then it asks whether it should continue or not. If it finds a StarQuality, it stops until all StarQuality modules are stopped. The installer prompts for the installation type, that is, if you are installing an additional server. Answer No to this prompt. ------------------------------------------------------------------------WARNING: !!! YOU SHOULD ONLY ANSWER YES TO THE FOLLOWING QUESTION!!! WARNING: !!! IF YOU ARE INSTALLING AN ADDITIONAL (COLLECTOR) SERVER !!! WARNING: !!! OR YOU ARE UPGRADING SUCH AN ADDITIONAL (COLLECTOR) SERVER !!! QUESTION : Are you installing a collector server (Y/N) [N]: ------------------------------------------------------------------------- 2.6.2.5 Apache Configuration If you are not installing a data collector, the installer asks whether it should configure the Apache WEB server or you will configure it later. This question is among the few yes-no questions for which the installer stores the given answer and sets the default to your previous answer when running a second time, and can accept this default answer in silent mode automatically. If you answer Yes, the installer asks for various Apache files and the port to be used, and then configures it. The default answers given to the user during the installation represent the answers for the default Apache installation according to the operating system. ------------------------------------------------------------------------QUESTION : Do you want to configure the Apache WEB server (Y/N) [Y]: y INFO : Configuring Apache QUESTION : On which port should Apache listen [80]: QUESTION : Where is the Apache apachectl file [/usr/apache/bin/apachectl]: StarQuality 77 User Manual Installation Installing StarQuality QUESTION : Where is the Apache htpasswd file [/usr/apache/bin/htpasswd]: QUESTION : Where is the Apache pid file [/var/run/apache/httpd.pid]: QUESTION : Where is the Apache httpd.conf file [/etc/apache/httpd.conf]: INFO : Creating backup /etc/apache/httpd.conf.20090512-122852 from /etc/apache/httpd.conf INFO : Stopping Apache INFO : Creating a new /etc/apache/httpd.conf INFO : Starting Apache ------------------------------------------------------------------------- 2.6.2.6 Automatic Starting and Stopping The installer application places scripts in the appropriate folder so that StarQuality can be automatically started and stopped. Automatic start/stop in this case does not include Oracle. If you are not installing a data collector server then the installer asks whether the Oracle has to be automatically started and stopped by the same script as well. You should only answer Yes if the Oracle server is running on the same machine and there is no other script to start and stop Oracle. If the Oracle server is running on the same machine but such a script already exists then you have to make sure that StarQuality starts after the Oracle server and stops before the Oracle server. This question is among the few yes-no questions for which the installer stores the given answer and sets the default to your previous answer when running a second time, and can accept this default answer in silent mode automatically. ------------------------------------------------------------------------INFO : Creating the service script, so the operating system can automatically INFO : start and stop StarQuality WARNING : !!! YOU SHOULD ONLY ANSWER YES TO THE FOLLOWING QUESTION IF !!! WARNING : !!! THE ORACLE DATABASE RUNS ON THIS SERVER AND YOU DO NOT !!! WARNING : !!! HAVE ALREADY A START/STOP SCRIPT FOR THE ORACLE !!! QUESTION : Should this script start/stop the Oracle server as well (Y/N) [Y]: n StarQuality WARNING : !!! IF THE ORACLE RUNS ON THIS SERVER THEN MAKE SURE THAT !!! WARNING : !!! IT STARTS BEFORE THE APPLICATION AND STOPS AFTER THE !!! WARNING : !!! APPLICATION !!! INFO : Creating sym link /etc/rc0.d/K01starquality 78 User Manual Installation Installing StarQuality INFO : Creating sym link /etc/rc3.d/S99starquality ------------------------------------------------------------------------- 2.6.2.7 Creating the StarQuality Tablespaces in the Database and the Oracle User The installer prompts for the following, and creates creates the tablespaces: Name, file name and size parameters for its configuration amd data tablespaces. Leave name and size as prompted but point to the partition as defined in the required Partitioning table. Name and password for its Oracle user. ------------------------------------------------------------------------INFO : Checking Oracle schema INFO : Getting the default tablespace directory QUESTION : StarQuality Conf tablespace name [SQ_CONF]: QUESTION : StarQuality Conf tablespace file [C:\ORACLE\PRODUCT\10.2.0\ORADATA\ORCL\SQ_CONF.dbf]: QUESTION : StarQuality Conf tablespace size [300M]: INFO : Creating the tablespace SQ_CONF, this could take several minutes INFO : Oracle tablespace SQ_CONF created QUESTION : StarQuality Data tablespace name [SQ_DATA]: QUESTION : StarQuality Data tablespace file [C:\ORACLE\PRODUCT\10.2.0\ORADATA\ORCL\SQ_DATA.dbf]: QUESTION : StarQuality Data tablespace size [10000M]: INFO : Creating the tablespace SQ_DATA, this could take several minutes INFO : Creating the tablespace SQ_DATA, this could take several minutes INFO : Oracle tablespace SQ_DATA created QUESTION : StarQuality Oracle user name [SQ]: QUESTION : StarQuality Oracle user password [******]: 2.6.2.8 INFO : Creating the Oracle schema, this could take several minutes INFO : Oracle user SQ created Finishing the Installation 1 StarQuality The installer generates the schematic maps and exits. 79 User Manual Installation Installing StarQuality ------------------------------------------------------------------------INFO : Redrawing schematic maps INFO : Installer ended -bash-3.00# ------------------------------------------------------------------------- 2 StarQuality To load a licence and run StarQuality, refer to: » “Loading a StarQuality Licence” on page 93 » “Running StarQuality on Solaris” on page 88. 80 User Manual Installation 2.7 Installing StarQuality on Solaris Server with Oracle Database on a Separate Machine Installing StarQuality on Solaris Server with Oracle Database on a Separate Machine Before beginning the StarQuality installation refer to Table 2-1 to ensure that this is the correct installation for your system. Check that you have performed all the tasks outlined in Section 2.7.1 below. This installation type involves configuration of the Solaris kernel parameters and the installation of the following components: Oracle server on a separate machine Oracle client on the StarQuality machine StarQuality 2.7.1 Pre-installation Tasks 2.7.1.1 Disk Partitioning For large network configurations using external Oracle setups, disk partitioning is recommended: Table 2-14: Disk Partitioning Physical Disk Volume Setup Physical disk 1 Volume 1- RAID 0 OS, Star Quality SW, Oracle client SW Physical disk 2 Physical disk 3 Physical disk 4 2.7.1.2 Configuring Network Ports The following ports must be open between the server machine, client machine, managed network equipment and other NMS/OSS elements: StarQuality 81 User Manual Installation Pre-installation Tasks Table 2-15: Network Ports Use Port Protocol Direction App. server and managed equipment 161 SNMP Outbound towards NE App. server, managed equipment and other NMS/OSS elements 162 SNMP Outbound towards NMS/OSS elements App. server and managed equipment 69 TFTP From Managed equipment to StarQuality App. server and client 8080 Inbound/Outbound between client and server Oracle communication client server As installed (Default: 1521) From StarQuality to Oracle and from Oracle to StarQuality Sending requests to AlvariSTAR in order to reach KPI 16162 2.7.1.3 SNMP Installing Oracle Follow these guidelines: Consult Table 2-1 for the correct Oracle Server/Client versions. Install Oracle Server on a standalone Oracle machine according to instructions issued by Oracle corporation. Make sure that the database is set to a minimum of 170 processes. Install Oracle client using the Administrator type installation. When completing the Oracle client installation, use the Oracle Net Configuration Assistant to create a connection to the Database server, and test it. During StarQuality installation, the Oracle server must be running, and the database connection from the StarQuality machine should be available. StarQuality 82 User Manual Installation Installing StarQuality To test connectivity to the database server from the StarQuality machine, use the sqlplus utility as follows: » Assuming that the database SID is testme, and system password is oracle, switch to the command prompt (on Windows) or use a console (on Solaris, logged in as the Oracle user) and enter the following command: sqlplus system/oracle@testme. » Enter exit or quit to complete the procedure. The following Oracle database information should be available when installing the StarQuality: 2.7.2 » Oracle Database server IP » Service name (SID) » TNS » Password for SYSTEM use Installing StarQuality StarQuality can be installed on a Solaris 10 x86 operating system using the command-line installer. For additional information on the installer commands and parameters, refer to “Command Line Installer General Information” on page 96 All operations should be done while logged in as root user. To install StarQuality (Solaris): 1 Run the installer application, StarQuality.v3.0.en.bin, either directly from the installation DVD or from a directory to which the file was transferred (using FTP). 2 2.7.2.1 Follow the next sections for installation details. Basic Checks The installer checks the following details: StarQuality 83 User Manual Installation Installing StarQuality Version of the operating system Required packages Version of Perl and the options used to build the Perl binary, If the application detects an error during these checks, then depending on the level of error, it either immediately terminates or asks whether it should continue or not. Always answer No and restart the installation. Figure 2-64: Installation on Solaris - Basic Checks 2.7.2.2 License Information When the basic checks are complete, the license agreement is displayed. To scroll down the agreement, press either the spacebar or the Enter key. Read the agreement carefully before accepting. 2.7.2.3 Connection Details of External Oracle Database The application prompts for the operating system user used during the Oracle installation. After providing it, it tries to determine the value of the ORACLE_HOME environment variable using that user, and asks for confirmation. --------------------------------------------------------------------------------------------------- StarQuality 84 User Manual Installation Installing StarQuality QUESTION : The OS user of Oracle [oracle]: INFO : Found Oracle home: "/export/home/AlvariSTAR/db/product/10.2.0/db_1" QUESTION : ORACLE_HOME environment variable [/export/home/AlvariSTAR/db/product/10.2.0/db_1]: INFO : Checking the Oracle home /export/home/AlvariSTAR/db/product/10.2.0/db_1 INFO : Oracle home /export/home/AlvariSTAR/db/product/10.2.0/db_1 seems to be OK INFO : Checking Oracle version INFO : Found Oracle version 10 INFO : Detected 64-bit Oracle QUESTION : StarQuality OS user name [starq]: INFO : Found StarQuality in /opt/starquality INFO : Select user starq and group starq with directory /opt/starquality INFO : Checking the environment of starq INFO : Environment checking is done INFO : Searching for running StarQuality modules INFO : Oracle checking INFO : Detected Solaris_x86 with 64 bit Oracle, so using full connect string instead of TNS names QUESTION : Oracle host name [localhost]: QUESTION : Oracle port [1721]: QUESTION : Oracle service name [BWANMS]: QUESTION : Oracle SID [BWANMS]: QUESTION : Oracle SYSTEM user password []: CONFIRM : Confirm the password: ERROR : Password mismatch QUESTION : Oracle SYSTEM user password []: CONFIRM : Confirm the password: INFO : Attempting to tnsping localhost:1721 INFO : Successful INFO BWANMS : Attempting to login to Oracle with the SYSTEM user and the SID INFO : Successful INFO : Attempting to login to Oracle with the SYSTEM user and the service name BWANMS StarQuality 85 User Manual Installation Installing StarQuality INFO : Successful INFO : Oracle checking successful INFO : Configuring user SSH parameters INFO : Done ------------------------------------------------------------------------- 2.7.2.4 StarQuality Installation Prompts The application prompts for the following: Operating system user name to be created Operating system group to be created Directory below the /opt directory to be used by StarQuality, Profile file to be used Type of StarQuality installation If the user and the directory already exist but the installer cannot find a valid StarQuality installation in the directory, then it asks whether it should continue or not. If it finds a StarQuality, it stops until all StarQuality modules are stopped. The installer prompts for the installation type, that is, if you are installing an additional server. Answer No to this prompt. ------------------------------------------------------------------------WARNING: !!! YOU SHOULD ONLY ANSWER YES TO THE FOLLOWING QUESTION!!! WARNING: !!! IF YOU ARE INSTALLING AN ADDITIONAL (COLLECTOR) SERVER !!! WARNING: !!! OR YOU ARE UPGRADING SUCH AN ADDITIONAL (COLLECTOR) SERVER !!! QUESTION : Are you installing a collector server (Y/N) [N]: ------------------------------------------------------------------------- 2.7.2.5 Apache Configuration If you are not installing a data collector, the installer asks whether it should configure the Apache WEB server or you will configure it later. This question is among the few yes-no questions for which the installer stores the given answer and sets the default to your previous answer when running a second time, and can accept this default answer in silent mode automatically. StarQuality 86 User Manual Installation Installing StarQuality If you answer Yes, the installer asks for various Apache files and the port to be used, and then configures it. The default answers given to the user during the installation represent the answers for the default Apache installation according to the operating system. ------------------------------------------------------------------------QUESTION : Do you want to configure the Apache WEB server (Y/N) [Y]: y INFO : Configuring Apache QUESTION : On which port should Apache listen [80]: QUESTION : Where is the Apache apachectl file [/usr/apache/bin/apachectl]: QUESTION : Where is the Apache htpasswd file [/usr/apache/bin/htpasswd]: QUESTION : Where is the Apache pid file [/var/run/apache/httpd.pid]: QUESTION : Where is the Apache httpd.conf file [/etc/apache/httpd.conf]: INFO : Creating backup /etc/apache/httpd.conf.20090512-122852 from /etc/apache/httpd.conf INFO : Stopping Apache INFO : Creating a new /etc/apache/httpd.conf INFO : Starting Apache ------------------------------------------------------------------------- 2.7.2.6 Automatic Starting and Stopping The installer application places scripts in the appropriate folder so that StarQuality can be automatically started and stopped. Automatic start/stop in this case does not include Oracle. If you are not installing a data collector server then the installer asks whether the Oracle has to be automatically started and stopped by the same script as well. You should only answer Yes if the Oracle server is running on the same machine and there is no other script to start and stop Oracle. If the Oracle server is running on the same machine but such a script already exists then you have to make sure that StarQuality starts after the Oracle server and stops before the Oracle server. This question is among the few yes-no questions for which the installer stores the given answer and sets the default to your previous answer when running a second time, and can accept this default answer in silent mode automatically. ------------------------------------------------------------------------INFO : Creating the service script, so the operating system can automatically StarQuality INFO : start and stop StarQuality WARNING : !!! YOU SHOULD ONLY ANSWER YES TO THE FOLLOWING QUESTION IF !!! 87 User Manual Installation Installing StarQuality WARNING : !!! THE ORACLE DATABASE RUNS ON THIS SERVER AND YOU DO NOT !!! WARNING : !!! HAVE ALREADY A START/STOP SCRIPT FOR THE ORACLE !!! QUESTION : Should this script start/stop the Oracle server as well (Y/N) [Y]: n WARNING : !!! IF THE ORACLE RUNS ON THIS SERVER THEN MAKE SURE THAT !!! WARNING : !!! IT STARTS BEFORE THE APPLICATION AND STOPS AFTER THE !!! WARNING : !!! APPLICATION !!! INFO : Creating sym link /etc/rc0.d/K01starquality INFO : Creating sym link /etc/rc3.d/S99starquality ------------------------------------------------------------------------- 2.7.2.7 Creating the StarQuality Tablespaces in the Database and the Oracle User The installer prompts for the following, and creates creates the tablespaces: Name, file name and size parameters for its configuration amd data tablespaces. Leave name and size as prompted but point to the partition as defined in the required Partitioning table. Name and password for its Oracle user. ------------------------------------------------------------------------INFO : Checking Oracle schema INFO : Getting the default tablespace directory QUESTION : StarQuality Conf tablespace name [SQ_CONF]: QUESTION : StarQuality Conf tablespace file [C:\ORACLE\PRODUCT\10.2.0\ORADATA\ORCL\SQ_CONF.dbf]: QUESTION : StarQuality Conf tablespace size [300M]: INFO : Creating the tablespace SQ_CONF, this could take several minutes INFO : Oracle tablespace SQ_CONF created QUESTION : StarQuality Data tablespace name [SQ_DATA]: QUESTION : StarQuality Data tablespace file [C:\ORACLE\PRODUCT\10.2.0\ORADATA\ORCL\SQ_DATA.dbf]: QUESTION : StarQuality Data tablespace size [10000M]: StarQuality INFO : Creating the tablespace SQ_DATA, this could take several minutes INFO : Creating the tablespace SQ_DATA, this could take several minutes 88 User Manual Installation Installing StarQuality INFO : Oracle tablespace SQ_DATA created QUESTION : StarQuality Oracle user name [SQ]: QUESTION : StarQuality Oracle user password [******]: 2.7.2.8 INFO : Creating the Oracle schema, this could take several minutes INFO : Oracle user SQ created Finishing the Installation 1 The installer generates the schematic maps and exits. ------------------------------------------------------------------------INFO : Redrawing schematic maps INFO : Installer ended -bash-3.00# ------------------------------------------------------------------------- 2 StarQuality To load a licence and run StarQuality, refer to: » “Loading a StarQuality Licence” on page 93 » “Running StarQuality on Solaris” on page 88. 89 User Manual Installation Running StarQuality 2.8 Running StarQuality 2.8.1 Running StarQuality on Windows To start the server following initial installation: 1 Open a Cygwin shell and enter the command (by default it is not required to start it manually): /usr/sbin/apachectl start NOTE If the Apache is started this way, the Cygwin shell should remain open. Closing it will cause the Apache service to shut down. 2 Open a web browser and go to http://<ip or hostname>/. 3 Enter User Name and Password. The default admin users credentials are: admin admin123 The StarQuality opening window is displayed for a few seconds and then the main interface window opens. 4 From Settings select Servers > Licenses. The Licences Configuration window is displayed. The entries marked red indicate missing or invalid licences that should be replaced. 5 If necessary, load a new license file using the WEB GUI (See “To load a licence:” on page 93.) 6 Do one of the following: In the computer service management window (myComputer > Manage > Services) start the services 'CYGWIN sshd' and 'StarQuality service'. In the WEB GUI, from Settings select Servers > Start/Stop/Status, click [start all]. Wait for the list to refresh. Return to the cygwin shell and enter the command: StarQuality 90 User Manual Installation Running StarQuality on Windows /opt/starquality/bin/start_stop_pvsr start 7 In the WEB GUI, from Settings select Server > Start/Stop/Status, click [check all], wait for all the entries to refresh and verify that all the entries are green. Figure 2-65: Server Status Window To stop the StarQuality server: 1 Do one of the following: In the computer Service Management window (myComputer > Manage > Services) stop the service 'CYGWIN sshd'. Open a Cygwin shell and enter the commands: /usr/sbin/apachectl stop /opt/starquality/bin/start_stop_pvsr stop In the WEB GUI, from Settings select Servers > Start/Stop/Status, click [stop all]. Wait for the list to refresh. StarQuality 91 User Manual Installation Running StarQuality on Solaris 2 In the WEB GUI, from Settings select Servers > Start/Stop/Status, click [check all], wait for all the entries to refresh and verify that all the entries are red. 2.8.2 Running StarQuality on Solaris To start the server following initial installation: 1 While logged in as root user enter the command (by default it is not required to start it manually): /usr/apache/bin/apachectl start Actual path may vary according to the Apache configuration. See “Apache Configuration” on page 67. 2 Open a web browser and go to http://<ip or hostname>/. 3 Enter User Name and Password. The default admin users credentials are: admin admin123 The StarQuality opening window is displayed for a few moments and then the main interface window opens. A message alerting a missing licence may appear, click OK and load a licence (see Step 5). 4 From Settings select Servers > Licenses. The Licences Configuration window is displayed. Check that all the entries are not marked red, which indicates invalid licences that should be replaced. 5 If necessary, load a new license file using the WEB GUI (see “Loading a StarQuality Licence” on page 93) 6 Do one of the following: Return to the StarQuality server machine console and enter the command: /etc/init.d/starquality start In the WEB GUI, from Settings select Servers > Start/Stop/Status, click [start all]. Wait for the list to refresh. StarQuality 92 User Manual Installation Loading a StarQuality Licence 7 In the WEB GUI, from Settings select Servers > Start/Stop/Status, click [Check all], wait for all the entries to refresh and verify that all the entries are green. To stop the server: 1 While logged in as root user enter the command: /usr/apache/bin/apachectl stop Actual path may vary according to the Apache configuration. See “Apache Configuration” on page 67. 2 Do one of the following: Return to the StarQuality server machine console and enter the command: /etc/init.d/starquality stop In the WEB GUI, from Settings select Servers > Start/Stop/Status, click [stop all]. Wait for the list to refresh. 3 In the WEB GUI, from Settings select Servers > Start/Stop/Status, click [check all], wait for all the entries to refresh and verify that all the entries are red. 2.8.3 Loading a StarQuality Licence To load a licence: 1 Place the licence file on the computer from which you activated the client. 2 From Settings select Servers > Licenses. The Licences Configuration window is displayed. StarQuality 3 Click [Add new] and browse for the file containing the license. 4 Click OK. A list detailing the licenses is displayed. 5 Verify that none of the entries in the license list are colored red. 93 User Manual Installation Loading a StarQuality Licence NOTE Depending on what license is present before the upgrade, the new license might deactivate the collection on certain collectors; Click Reactivate eqs to start the collection on all devices (see Figure 2-66). A message will appear showing how many devices were activated. Figure 2-66: Licence Configuration Window StarQuality 94 User Manual Installation Additional Installation Information 2.9 Additional Installation Information 2.9.1 Firewall Settings For proper operation of StarQuality, the following connections should be enabled on the firewall between the system components: Table 2-16: Firewall Settings From To Port StarQuality server (server running all modules, including the WEB interface and the data collector components too) StarQuality Oracle server Oracle SQL*Net (by default TCP 1521) User machines StarQuality WEB server HTTP and/or HTTPS (by default TCP 80 and 443) StarQuality WEB server StarQuality WEB server The port of the chart server, by default TCP 4444 The chart server module should always be located on a WEB server, so the connection need to be made only on the local machine StarQuality application manager and SQLLDR module server SMTP server StarQuality server Measured equipments SNMP port (UDP 161) StarQuality server External trap receiver SNMP trap port (UDP 162) StarQuality measurement server Measured Unix/Linux equipments SSH (TCP 22) StarQuality measurement server Measured Oracle equipments Oracle SQL*Net (by default TCP 1521) Machines using SOAP interface PVSR SOAP module server Port of the SOAP server, by default TCP 8082 2.9.2 SMTP port (TPC 25) Mail Server Configuration 1 Open the file CONFIG_INI.PM Windows: C:\cygwin\opt\starquality\etc Solaris: /opt/starquality/etc StarQuality 95 User Manual Installation Command Line Installer General Information 2 If required, edit the following fields: $SMTP_SERVER='localhost'; $PVSR_EMAIL_ADDRESS='StarQuality'; #$SMTP_AUTH='user/pwd'; » SMTP_SERVER: IP of the SMTP server through which the application sends the e-mails. If this is not entered, e-mails will not be sent. NOTE The SMTP server has to comply with the following: Connection between StarQuality and the server on Port 25. If the SMTP server requires username and password, fill them in the SMTP_AUTH clause, and delete the hash sign from its line beginning. » PVSR_EMAIL_ADDRESS: this address will be used as the sender for outgoing e-mail messages. If it is not specified, it is automatically set to StarQuality@<hostname>, while if the specified value does not contain the @ sign, then the <specified value>@<hostname> is used » SMTP_AUTH - in cases of SMTP server which requires username and password, delete the # sign and add the username and password in <'user/pwd'> format. 3 Configure the server to send e-mail notifications about admin events: $ADMIN_EMAIL_ADDRESSES=''; » ADMIN_EMAIL_ADDRESSES: a list of e-mail addresses separated by commas, to which the system sends e-mails regarding administrative information (for example: server up or down). 2.9.3 Command Line Installer General Information 2.9.3.1 Input Parameters The application has several input options: -h or -help: displays the different input options -c or -compatible: displays the different operating system/Oracle versions supported by the installer StarQuality 96 User Manual Installation Command Line Installer General Information -d or -debug: the installer application displays different log messages. The DEBUG level logging can be turned on using this option. The DEBUG messages appear in the log file /tmp/pvsr.install.log (even if the option is not on). -s or -silent: the installer prompts various questions during the installation. If the silent mode is turned on, and the installer prompts a question other than a yes-no question, for which it has a default answer, then it continues automatically, so the user does not have to accept the default answer manually. Regarding yes-no questions, however, the installer does not accept the default answer for a yes-no question even in silent mode. There are only a handful exceptions to this, but only when the yes-no question was answered during a previous installer running. This behavior will be noted at the particular yes-no questions later. -a=file_name: the installer takes the default answers from the specified file. The installer writes the answers to the /var/pvsr/answer file (except the passwords) and it reads them from that file by default. 2.9.3.2 Messages, Questions and Answers during the Installation The application saves the log messages in the /tmp/pvsr.install file during the installation. The DEBUG messages appear in this file even if the -d or -debug option wasn’t specified. The application uses the following log levels: ERROR, WARNING, INFO, DEBUG and QUESTION. In case of a question the application displays the default answer between square brackets - [and] - if such answer exists. If the installer asks for a password and such a default answer exists then it displays asterisks instead of the actual value. 2.9.3.3 Canceling or Stopping the Installation while Running If during the installation you do not want to, or cannot move forward, the installer offers the uninstallation of the components that have been installed during this last installer running. You may choose to retain those components, since the installer can be run more than once. Moreover, if a previous StarQuality is detected, then the installer takes the default values from that installation and switches to upgrade mode automatically. StarQuality 97 User Manual Installation Activating SOAP Server To cancel or stop the installation: 1 If the installer is waiting for an answer to a question, answer the original question. 2 2.9.4 Press Ctrl-C on the keyboard, followed by Enter. Activating SOAP Server A licence including the SOAP feature is a prerequisite to creating and activating the SOAP server. To check that a licence for SOAP is available, from Settings select Servers > Licences. Verify that there is a line including SOAP server, and it is not colored red. Refer to StarQuality SOAP Manual for more information on SOAP. To activate the SOAP server: 1 From Settings select Servers > Server Configuration. A list of available servers is displayed. 2 Click [Add new] at the top-left corner of the list. The Server Configuration window is displayed. Figure 2-67: Configuring SOAP Server 3 Fill-in the following fields: Name: free text StarQuality 98 User Manual Installation Configuration Parameters Type: Select: Other > SOAP Host, Login, Password and Directory: copy the values from the Scheduled Reports sever. 4 Go to Start/Stop/Status. The SOAP entry it is red. Click Start to activate the new server. Verify it turns green. Figure 2-68: Server Start/Stop/Status - SOAP Entry 2.9.5 Configuration Parameters The new 4Motion measurements which do not have values for the ver.2.5M devices can be hidden under the Measurement menu. There is an option to keep every XML file for one week in the /opt/starquality/tmp/xml_archive directory. Contact Alvarion’s customer service for more information. StarQuality 99 User Manual Installation 2.10 StarQuality Upgrade StarQuality Upgrade The upgrade has to be performed by an administrator user. Upgrade is available between immediate/adjacent versions only. Stop the StarQuality service and processes prior to upgrade. IMPORTANT If you are running an upgrade, the installer may not keep the StarQuality files or existing collected data. Therefore, prior to upgrade, make sure to check the Release Notes for version specific information. 2.10.1 StarQuality Upgrade on Windows To upgrade StarQuality (Windows): 1 2 Perform Stop Services as follows: a On the desktop right-click My Computer and select Manage . b Select Services and Applications > Services. c Right-click on StarQuality Service and select Stop Run the installation program starquality.exe; The installation wizard is displayed. 3 Follow the installtion instructions on the screen. The wizard runs as in the regular installation procedure until it reaches the StarQuality Schema Update window, which indicates that this is an upgrade. Click Next. StarQuality 100 User Manual Installation StarQuality Upgrade on Windows Figure 2-69: StarQuality Schema Update Window Figure 2-70: Setup Message 4 Click OK to the Setup message and wait for the installation to complete. Click Finish. 5 Proceed as in regular installation: Load a new licence that matches the new version (see “To load a licence:” on page 93) NOTE Depending on what license is present before the upgrade, the new license might deactivate the collection on certain collectors; Click Reactivate eqs in the Licence Configuration Window to start the collection on all devices (see Figure 2-66). A message will appear showing how many devices were activated. Start the servers (see “To start the server following initial installation:” on page 90) StarQuality 101 User Manual Installation StarQuality Upgrade on Solaris 2.10.2 StarQuality Upgrade on Solaris The upgrade has to be performed by an administrator user. Upgrade is available between immediate/adjacent versions only. Stop the StarQuality service and processes prior to upgrade. To upgrade StarQuality (Solaris): 1 Perform Stop Services as follows: a While logged in as root user enter the command: /usr/apache/bin/apachectl stop Actual path may vary according to the Apache configuration. See “Apache Configuration” on page 77. b Enter the command: /etc/init.d/starquality stop 2 Run the installer application, StarQuality.v3.0.en.bin 3 Follow the installation promps and enter: » OS user of Oracle » ORACLE_HOME environment variable » StarQuality OS user name » Oracle host name [localhost]: » Oracle port » Oracle service name » Oracle SID » Oracle SYSTEM user password The system runs DB update scripts. StarQuality 102 User Manual Installation 2.11 Uninstalling StarQuality Uninstalling StarQuality 2.11.1 Uninstalling StarQuality from Windows During the uninstallation the application asks whether it should delete the different components. If you want to keep a module which is dependent on another module, the application will not even ask to remove the other module. For example if you do not want to remove the bash symbolic link, it will not remove the Cygwin installation. The only exception to this rule is the Oracle user: you can choose to keep it, but nevertheless the application will be uninstalled. The uninstaller only drops the Oracle user and the tablespaces. To uninstall StarQuality from Windows: 1 Run the UninstallStarQuality.exe in the Cygwin root directory or select Start > Settings > Control Panel > Add or Remove Programs. 2 Fill in the SYSTEM password (oracle) and click Uninstall. Figure 2-71: Uninstalling the Oracle User StarQuality 103 User Manual Installation Uninstalling StarQuality from Solaris 2.11.2 Uninstalling StarQuality from Solaris To uninstall StarQuality from Solaris: 1 Log on to the StarQuality machine as root. 2 Stop any running StarQuality module: 3 a From Settings select Servers > Start/Stop/Status. b Click [stop all] and wait untill all the entries of the list are red. In a command window, run UninstallStarQuality from the StarQuality installation directory (default /opt/starquality). 4 The application prompts for various confirmations. Follow the instructions and questions on the screen. StarQuality 104 User Manual Installation Uninstalling StarQuality from Solaris Figure 2-72: Uninstalling StarQuality from Solaris StarQuality 105 User Manual Chapter 3 Getting Started Getting Started In this chapter: “Login” on page 108 “The Structure of Interface Windows” on page 110 “The Menu System” on page 111 “Operations and Navigation in the Hierarchy” on page 115 “General Display Options” on page 117 “Editing Objects” on page 119 StarQuality 107 User Manual Getting Started 3.1 Login Login 10 working clients may simultaneously use the system. Using the system is possible with the following web browsers: Microsoft Internet Explorer Mozilla Firefox To start a client session with StarQuality: 1 Open a web browser and go to http://<ip or hostname>/. 2 Enter User Name and Password. The default admin users credentials are: admin admin123 The StarQuality opening window is displayed for a few moments and then the main interface window opens (see Figure 3-2). If Flash Player is not installed on the machine from which the client is opened, the following message appears: Figure 3-1: Flash Player Message Window You can install Flash to display data with Flash functionality. If you do not install Flash, the data is displayed without Flash features. 3 You can proceed with discovering the network (see “Network Discovery” on page 120), modify settings or start monitoring the equipment. StarQuality 108 User Manual Getting Started Login Alarm Overview Main menu Submenu panel Browser Work Area Figure 3-2: The StarQuality User Interface StarQuality 109 User Manual Getting Started 3.2 The Structure of Interface Windows The Structure of Interface Windows The interface of the StarQuality application divides the browser window into several panels (see Figure 3-2): Alarm overview bar - displays current alarms, grouped by their severity level. This also acts as a shortcut to the alarm screens. The application displays only alarms that the user has permissions to view. If access to alarms is unavailable, the bar is completely missing. The main menu - contains the main operation tasks of the system: Alarms, Measurements, Reports, and Settings. Selecting each item on this menu opens various submenus and groups displayed in the submenu panel and in the browser. For detailed structure, refer to “The Menu System” on page 111. Submenu panel - the submenus under the selected menu item are displayed on the adjoining right hand side panel. This panel can be scrolled (up and down) using the arrows on its right edge. The submenu structure displayed here can be customized in order to accelerate the execution of frequently repeated navigation steps. The browser - located on the bottom left side of the user interface. The browser can contain further submenu items and special menu groups based on the chosen menu items in the upper menu system. Non-administrator users can only view those alarms/pieces of equipment/sites for which they have permissions. Refer to “User Types and Their Settings” on page 6. The user name and type appears in the title of the web browser window. StarQuality 110 User Manual Getting Started 3.3 The Menu System The Menu System The following sections describe the main menu, the submenus under it and the menu items and groups appearing in the browser. These items vary depending on the selected item in the main menu. For example: Time Span is displayed only when selecting Measurements or Alarms in the main menu (see Figure 3-3. 3.3.1 Measurements Main menu Sub-menus Tabs Items in Browser Figure 3-3: Example of Menus, Submenu Panel and Browser (in Measurements) Items in the submenu panel: » Search for sites, equipments, measurements and charts on the basis of sites/equipment names (see “Searching Measurements” on page 158) » Root - root directory navigation startpoint » If defined, public and private menu items for viewing the measurements under the chosen menu item StarQuality 111 User Manual Getting Started Alarms Items in the Browser: » View menu group: Selecting the mode of display for the measurements (see “Measurements Display Options” on page 151) » Time Span: Selecting the time range to display measurements: ◊ from time/date to time/date ◊ day/week/month/year ◊ real time view - auto refresh view » Chart Settings - displaying the measurement values » Elements menu group: This menu contains a list of the sites, equipments and measurement types. The root of the hierarchy is determined by the originally selected menu item (see “Viewing Measurement Data” on page 155). ◊ Element name, e.g. <FDD Network> - If the list contains too many elements, they are grouped by the system, using links pointing to the sub-lists. ◊ Measurement Types - for filtering the measurements by their types 3.3.2 Alarms Items in the submenu panel: » Root - root directory navigation startpoint » If defined, public and private menu items for viewing the alarms under the chosen menu item StarQuality 112 User Manual Getting Started Reports Items in the Browser: » Time Span: Selecting the time range to display alarms (see “Viewing Alarms by Time Span” on page 186): ◊ from time/date to time/date ◊ day/week/month/year ◊ real time view - auto refresh view » View menu group: Choosing the display mode for the alarms (see “Alarm View Options” on page 186) » Filters menu group: Filtering of the alarms to be displayed (see “Filtering Alarms” on page 190) 3.3.3 Reports Items in the submenu panel: » On-demand report - setting a new report (see “On-Demand Reports” on page 202) » Bulk export wizard - exporting reports to Excel (see “Bulk Export Wizard Exporting Data to XLS Files” on page 210) » Direct links to the built-in reports (see “Built-in Reports” on page 195) Items in the Browser: » Calendar: The reports are displayed with respect to the time interval selected in the calendar. » Settings: appear only when displaying reports, include: ◊ Type ◊ Show date column Refer to “Setting the Report Range and Display” on page 207 StarQuality 113 User Manual Getting Started 3.3.4 Settings Settings For each item in the submenu panel, different items appear in the Browser. For non-administrator users, the submenus used to make changes are not displayed, and the other submenus are displayed selectively based on the access rights of the user. Search: Searching the configured objects based on sites/equipment names [see “Search (Admin only)” on page 221). Site and equipment configuration: Configuring basic and virtual sites and equipment objects Thresholds (admin only): Setting alarm threshold parameters (see “Setting Alarm Thresholds” on page 165). Scheduled configurations (admin only): Automatically scheduled configurations that the Job queue module could not yet execute successfully (see “Scheduled Configuration” on page 142) Reports (admin only): Setting and viewing system reports (see “Reports” on page 193 Customization: editing of “public” objects refers to the administrator users, while editing of “private” objects refers to the rest of the users (“Customization” on page 233): Templates (admin only): Editing various system templates (see “Creating and Editing Threshold Templates” on page 168) Servers (admin only) (see “Server Configuration and Management (Admin only)” on page 246): Audit trail (admin only): Displaying the individual configuration modifications (see “Audit Trail” on page 258) User: Managing user settings (see “User Administration (Admin only)” on page 261) StarQuality 114 User Manual Getting Started 3.4 Operations and Navigation in the Hierarchy Operations and Navigation in the Hierarchy In Alarms, Measurements and Reports pages (and also under the Settings > Site and Equipment Configuration submenu) there are three elements at the top of the page. These fields are always visible (even if the page is scrolled): The Operations pull down menu (located at the top-right), contains different options depending on the current object and menu item (see Figure 3-4): » Fast navigation between the menu items while keeping the actual location within the hierarchy; for example, immediate opening of the measurement charts form the equipment configuration. » A Print option for Alarms, Measurements and Reports, because this is the only possible way to print the full content of the main display area (the basic print function of the browser is not suitable for this) » For Measurements, an option to save the current object as a menu item Figure 3-4: Example of Operations pull down menu A path (at the top-left) showing the current location within the hierarchy. It is always possible to click on the elements of this list, except for the last one, and return to a higher hierarchy level. Figure 3-5: Hierarchy Path StarQuality 115 User Manual Getting Started Operations and Navigation in the Hierarchy If during the navigation you access an equipment through one of its virtual sites then after any equipment modification you cannot get back to that point in the virtual hierarchy, because the application will modify the current location according to the normal hierarchy, i.e. it will show the equipment under its parent site. Notice that by using the fast navigation between the menu items (see the above bullet), the current location within the hierarchy might change: although the page will show the selected object, the path shown to the root object might be incorrect. StarQuality 116 User Manual Getting Started General Display Options 3.5 General Display Options 3.5.1 Scrolling or Hiding the Submenu Items If the name of a menu item is too long to display, it is abbreviated. To view the entire text as a tooltip, move the mouse pointer over it. To hide the entire menu system, click on the icon at the top-right corner of the panel (Figure 3-6). In this case the component can only be viewed if the mouse pointer is placed above it. To cancel the automatic hiding of the panel, click on the hiding icon again. Hiding submenu Scrolling submenu Figure 3-6: Scrolling and Hiding the Submenu 3.5.2 Using the Display Tabs You can work with several open pages at the same time. The current page or pages currently in use are displayed as tabs. You navigate the opened pages with the tabs on the top of the pages. The selected page always comes up in the front. The tabs can also be scrolled horizontally. Minimize/maximize tab area Tabs navigation Tabs Figure 3-7: Navigation Tabs StarQuality 117 User Manual Getting Started Using the Display Tabs When a page is put in the background, the browser window stores its content that is subsequently restored when the user chooses to display that page again. If you select a menu item, the requested page is displayed instead of the current page. However, it is also possible to load the new page in a new tab. This is the default option when using the Alarms fast menu, while in the configurable menus you can select whether the new page should be displayed in a new or in an already existing tab. t To set the tab display options: Use the following options to set the tabs display: Table 3-1: Setting the Tab Display Options StarQuality To Do this: Select the tab display mode Right-click on the menu items and select either “Open in a new tab” or “Open in tab: <already existing_tab_name>”. Rename the tab Click the tab title, type the name and press Enter. Maximize/minimize the page to entire window Use the icon at the top-right corner (see Figure 3-7) 118 User Manual Getting Started 3.6 Editing Objects Editing Objects This section explains the general editing principles of the system. The various possibilities of editing different kinds of objects are discussed in detail in the corresponding sections. The list of editable objects is displayed in a table that, with the exception of the Site-equipment-measurement Configuration page, contains the most important attributes of the objects. In the Settings menu you can edit the various objects of the system. To edit objects: Use one of the following options, when available: Table 3-2: Editing Objects StarQuality To Do this: Comments Delete an object (only if it has no sub-elements) Click [del] The system always prompts to confirm the action before it is executed. Modify an oblect Click [edit] and modify the parameters Click OK or Cancel Create a new simple object Click [add new] Create objects based on a template Click [from template] Create objects based on another object Click [copy from] Perform other editing operations Use the pull down menu available on the screen 119 Applicable in case of normal and virtual sites. User Manual Chapter 4 Network Discovery Network Discovery In this chapter: “Overview” on page 122 “Discovery of WiMAX Devices” on page 125 “Discovery of Equipment under a Server-Health Site” on page 130 “Scheduled Configuration” on page 142 StarQuality 121 User Manual Network Discovery 4.1 Overview Overview At first login, the system contains only a ROOT site. You build your new network (sites) under the ROOT to be able to start monitoring your equipment performance using the StarQuality. Mapping the network in StarQuality can be done using various structures, such as by geographical locations, by topics, etc. This section explains the creation of a a WiMAX network and all the BTSs under it, and creating a utility network. Following are available site types: WiMAX-equipment » WiMAX FDD SNMP - FDD versions 3.5/3.6, SNMP data collection. Up to 10 SUs per BTS can be measured » WiMAX FDD TFTP - FDD version 3.7, TFTP data collection » WiMAX TDD - TDD versions 4.5 and later, TFTP data collection » 4Motion - version 2.5M and 3.0 » BreezeACCESS VL - version 6.0. Up to 10 SUs per BTS can be measured » Extreme - version 1.5 Server Health » AlvariSTAR Version 4.0 and later » Oracle » UNIX The measurements can be viewed not less than 30 minutes following the initial collection for each device. For more information on configuration, refer to Chapter 9 - “General Setting Options” on page 216. StarQuality 122 User Manual Network Discovery Overview To create a WiMAX network site under ROOT: 1 From Settings select Site and Equipment Configuration. 2 From the Creation drop-down menu select Create New Site. Fill in the site name (free text), and its description (optional). 3 Select a corresponding icon. 4 Select a Server Group (see Figure 4-1): » For FDD 3.5/3.6 network - WiMAX FDD » For FDD 3.7 network - WiMAX FDD TFTP » For TDD network - WiMAX TDD » For 4Motion (ver.2.5) network - WiMAX 4Motion » For Extreme network - WiMAX Extreme » For VL network - WiMAX VL Figure 4-1: Creating a New Site - Server Group Selection 5 Click OK; The network site is created under the ROOT. 6 Proceed with discovery of devices according to the site type you created: refer to “Discovery of WiMAX Devices” on page 125. StarQuality 123 User Manual Network Discovery Overview To create a Server Health site under ROOT: 1 From Settings select Site and Equipment Configuration. 2 From the Creation drop-down menu select Create New Site. Fill in the site name (free text), and its description (optional). 3 Select a corresponding icon. 4 Select the SNMP Server Group (see Figure 4-1). 5 Click OK; The site is created under the ROOT. 6 Proceed with discovery of devices according to the site type you created: refer to “Discovery of Equipment under a Server-Health Site” on page 130 StarQuality 124 User Manual Network Discovery 4.2 Discovery of WiMAX Devices Discovery of WiMAX Devices This section describes how to add BTSs to the network. Data collection is automatically activated after discovery, except for equipments collected by SNMP, for which data collection has to be activated manually. To perform actual discovery: 1 2 From Settings select Site and Equipment Configuration. Enter the site matching the equipment type to be discovered, by clicking its icon. 3 From the Creation drop down menu select Add Equipments (plural) from Template. 4 Select the template upon which to base the equipment setup: » For FDD ver3.5/3.6 - WiMAX FDD SNMP » For FDD ver3.7 - WiMAX FDD TFTP » For TDD - TDD » For 4Motion - WiMAX 4Motion » For VL - WiMAX VL » For Extreme - WiMAX Extreme A basic setup template page is displayed. NOTE Each discovery can include a single equipment type. StarQuality 125 User Manual Network Discovery Discovery of WiMAX Devices Figure 4-2: Creating New Equipments from Template - WiMAX FDD 5 In the Creation section make sure the Equipment option is selected. 6 In the Discover Equipments field select either: » No - to add equipments manually (see Step 8) » Input File - to upload a text file (See Step 9) The Yes option is not applicable for WiMAX equipment. 7 In the Community section, override the Read community setting with the relevant one for your network. 8 If you selected No: a Click OK ; the system returns to the main network list. b Click [Add new] to add as many equipments as required. c In each line enter: BTS name (free text up to 46 characters), description and IP address. Name and IP address are mandatory. StarQuality 126 User Manual Network Discovery Discovery of WiMAX Devices Figure 4-3: Adding Sites manually NOTE Searching and displaying of devices in StarQuality is done by names only, therefore it is advised to keep a systematic naming convention, for example, it is recommended to name each device by its IP. 9 If you selected Input File: a Prepare a text file, in which each line signifies a BTS. Each line entry includes three columns in the following order: equipment name, equipment description (optional) and IP address. Allowed delimiters: semicolon (;) or tab. Save it as a .txt type file. b In the StarQuality application click Browse to select this file. c Click OK; the system returns to the main network list, loaded with device data from the uploaded file. You can edit this list as required. 10 Click OK; the system searches and discovers each existing and online BTS. For each discovered BTS a success message appears; For each unsuccessful discovery an error massage is displayed and the system continues to the next device. 11 When the discovery is complete, click Back to return to the network site. 12 Verify that all the equipments are not colored red, which means that their data is being collected. 13 Verify that for each BTS, a matching site has been created, named as the BTS with the postfix “SUs” (i.e, <btsname SUs>). 14 In case of BTS SNMP collection (FDD 3.5/3.6 or BreezeACCESS VL), this SU site is colored red, which means that no SU under it are being collected yet. In this case, activate Data Collection for up to 10 SUs as described in Section 4.2.1 below. StarQuality 127 User Manual Network Discovery 4.2.1 Activation/Deactivation of Data Collection Activation/Deactivation of Data Collection When you create a site, data collection is by default activated for all AUs and SUs (except for SNMP - FDD ver3.5/3.6 and BreezeACCESS VL SUs). To activate or deactivate data collection for any equipment type: 1 Click the site icon to enter the site. 2 For each equipment repeat the following: a Click [edit] next to the equipment you want to activate. The following window is displayed (measurement types themselves may vary according to the specific equipment: SU, BTS, Server Health element): Figure 4-4: Activating Data Collection b Select or deselect the Collect Data checkbox at the bottom of the upper table. c Select or deselect the measurements you want to activte/deactivate in the lower table . d Click OK. e Go back one level in the navigation path and verify that the equipment line line is no longer red (acivated) or is red if deactivated (Figure 4-5). StarQuality 128 User Manual Network Discovery Activation/Deactivation of Data Collection Navigation path Collection Not Activated Collection Activated Figure 4-5: Data Collection Status StarQuality 129 User Manual Network Discovery 4.3 Discovery of Equipment under a Server-Health Site Discovery of Equipment under a Server-Health Site This section describes how to add equipment related to server health to the StarQuality and initiate the data collection from them. For these equipment types, only a single device is discovered each time; that is, there is no multiple discovery. You can use a template or create new equipment from scratch. The procedures in this section describe the recommended way of creating equipment from templates. For more information refer to “Site and Equipment Configuration” on page 222, and “Discovery of WiMAX Devices” on page 125. To add AlvariSTAR server: 1 Make sure the following prerequisites are available: » Setup and configuration: ◊ Network connection between StarQuality and AlvariSTAR machines ◊ AlvariSTAR ver4.0 and later » Information: ◊ AlvariSTAR machine IP address ◊ Read community of AlvariSTAR SNMP server (if not changed, default is: “public”) StarQuality 2 From Settings select Site and Equipment Configuration. 3 Click the Server Health icon to enter its site. 4 From the Creation drop down menu select Add Equipment from Template. 5 Select the template upon which to base the equipment setup: AlvariSTAR. 6 Click OK. A basic setup template page is displayed. 130 User Manual Network Discovery Discovery of Equipment under a Server-Health Site Figure 4-6: Creating New Equipment - AlvariSTAR 7 Fill in the required information (for parameter information and description refer to “Discovery of WiMAX Devices” on page 125): 8 » Name and description - free text » IP address: <ip address>:<16162> » Community: public » Leave all other fields with their default values. Click OK; Discovery is running and can take up a few minutes. The following window is displayed. The green field means that collection is activated by default. StarQuality 131 User Manual Network Discovery Discovery of Equipment under a Server-Health Site Figure 4-7: Data Collection Active 9 If you wish to edit the specific counters collected, select Modify Equipment from the Operations drop-down menu. 10 choose specific measurements or all measurements by selecting the corresponding check-boxes. 11 Scroll down and click OK to implement changes. StarQuality 132 User Manual Network Discovery Discovery of Equipment under a Server-Health Site To add an Oracle database server: 1 Make sure the following prerequisites are available: » Setup and configuration: ◊ Network connection between StarQuality and Oracle machines » Information: ◊ Oracle TNS name - in case StarQuality and Oracle are on the same machine: Oracle server TNS; in case StarQuality and Oracle are on separate machines: Oracle client TNS (TNS name is defined in the file tnsnames.ora placed in the directory: ORACLE_HOME\NETWORK\ADMIN ◊ Password of Oracle SYSTEM user StarQuality 2 From Settings select Site and Equipment Configuration. 3 Click the Server Health icon to enter its site. 4 From the Creation drop-down menu select Add Equipment from Template. 5 Select the template upon which to base the equipment setup: Default Oracle. 6 Click OK. A basic setup template page is displayed. 133 User Manual Network Discovery Discovery of Equipment under a Server-Health Site Figure 4-8: Default Oracle Template 7 Fill in the required information (for parameter information and description refer to “Discovery of WiMAX Devices” on page 125): 8 » Name and description - free text » Connection: <TNS name> » User: system » Password: SYSTEM password » Right: SYSDBA/SYSOPER/Normal, according to security preferences » Leave all other fields with their default values Click OK; Discovery is running and can take up a few minutes. The following window is displayed. Red fields mean that collection is not activated by default. StarQuality 134 User Manual Network Discovery Discovery of Equipment under a Server-Health Site Figure 4-9: Network Discovery Results (Oracle) 9 To start collecting select from the Operations drop-down menu Modify Equipment. The following window is displayed. StarQuality 135 User Manual Network Discovery Discovery of Equipment under a Server-Health Site Figure 4-10: Activating Data Collection (Oracle) 10 Change Server Group to Oracle, and choose specific measurements or all measurements by selecting the corresponding check-boxes. 11 Scroll down and click OK to implement changes. The Server field turns green which indicates that collection is active. StarQuality 136 User Manual Network Discovery Discovery of Equipment under a Server-Health Site Figure 4-11: Data Collection Active (Oracle) To add equipment under the UNIX/Linux site: 1 Make sure the following prerequisites are available: » Setup and configuration: ◊ Network connection between StarQuality and UNIX machines » Information: ◊ IP address of UNIX machine ◊ UNIX user name and password. The prompt for the user used for discovery must have the following pattern: end with a space or have a >, #, %, or $ character followed by a space. StarQuality 2 From Settings select Site and Equipment Configuration. 3 Click the Server Health icon to enter its site. 137 User Manual Network Discovery Discovery of Equipment under a Server-Health Site 4 From the Creation drop down menu select Add Equipment from Template. 5 Select the template upon which to base the equipment setup: Default Unix/Linux. 6 Click OK. A basic setup template page is displayed. Figure 4-12: Default Unix/Linux Template 7 Fill in the required information (for parameter information and description refer to “Discovery of WiMAX Devices” on page 125): 8 » Name and description - free text » IP address: <ip address> » User: <root> » Password: <root password> » Leave all other fields with their default values Click OK; Discovery is running and can take up a few minutes. The following window is displayed. Red fields indicate that collection is not activated by default. StarQuality 138 User Manual Network Discovery Discovery of Equipment under a Server-Health Site Figure 4-13: Network Discovery Results (Unix/Linux)) 9 To start collecting select from the Operations drop-down menu Modify Equipment. The following window is displayed. StarQuality 139 User Manual Network Discovery Discovery of Equipment under a Server-Health Site Figure 4-14: Activating Data Collection (UNIX) 10 Change Server Group to Unix/Linux, and choose specific measurements or all measurements by selecting the corresponding check-boxes. 11 Scroll down and click OK to implement changes. The Server field turns green which implies that collection is active. StarQuality 140 User Manual Network Discovery Discovery of Equipment under a Server-Health Site Figure 4-15: Data Collection Active (UNIX) StarQuality 141 User Manual Network Discovery 4.4 Scheduled Configuration Scheduled Configuration In case the equipment is not available when you edit the configuration (discovery), you can display the configuration details using the Scheduled Configuration page from Settings. Restricted administrators can view or edit a scheduled configuration only if they have permission to its parent site. To set the equipment for scheduled discovery: 1 Follow the steps in “To perform actual discovery:” on page 125, with the following change: Figure 4-16: Setting Discovery to a Schedule 2 In the Creation section select either: » Job - the system creates scheduled jobs based on the parameters but does not run them » Job creation and run - the system creates scheduled jobs based on the parameters and runs them immediately. If the equipment creation for a job is not successful, it is not deleted, and therefore the Job queue server component can try it later. StarQuality 3 Define the Run Cycle. 4 In the Discover Equipments field select No - to add equipments manually. 142 User Manual Network Discovery Scheduled Configuration 5 Define the Community. 6 Click OK. To use the Scheduled Configuration: 1 From Settings select Scheduled Configuration; The Scheduled Configuration table is displayed, with the following columns: Table 4-1: Scheduled Configuration Item Description Links [edit] - the entry can be edited [del] - the entry can be deleted [now] - the system is trying to instantiate the configuration belonging to the entry immediately and does not wait for the next cycle StarQuality Site name The equipment will be placed to this site Template name The system will instantiate the equipment using this template Equipment name The same name as in the manual creation of the equipment Equipment description The same as in the manual creation of the equipment IP address equipment IP address Community Equipment read SNMP community Keep data for days The value of the appropriate equipment parameter Default interval The value of the appropriate equipment parameter Next run The next time the system will try to configure the the equipment Run cycle (minutes) In case of an unsuccessful attempt, the time period (in minutes) before retrying 143 User Manual Network Discovery Scheduled Configuration Figure 4-17: Scheduled Configuration 2 Do one if the following: » To modify the task parameters, click [edit]; The same parameters (except for the retrying time) can be modified as at template based creation. The IP address, SNMP Community and SNMP version fields are also displayed. » To delete a scheduled task, click [del] » To try and execute the entry immediately and not wait for the next run, click [now]. StarQuality 144 User Manual Chapter 5 Viewing Measurements Viewing Measurements In this chapter: “Introduction” on page 147 “WiMAX Equipment Measurements” on page 149 “Measurements Browsing Options” on page 150 “Measurements Display Options” on page 151 “Viewing Measurement Data” on page 155 “Searching Measurements” on page 158 “Saving Items as A Submenu” on page 161 “Setting Trendlines to Graphs” on page 162 StarQuality 146 User Manual Viewing Measurements 5.1 Introduction Introduction Viewing measurements is available using a configurable quick menu at the top panel for displaying and navigation. New elements can be added to the page using the Settings > Customization menu (see “Customization” on page 233). The Browser is also available for displaying, navigation and filtering in the site-equipment-measurement hierarchy, and it shows the measurements according to the measurement type. Only those objects (sites, equipments, or measurements) for which the user has permissions are accessible. The figure below shows the Browser and the Icon view of the selected hierarchy level (Root). Figure 5-1: The Measurements Main Menu Item with the Browser and the Icon View The structure of sites is illustrated in the following figure: StarQuality 147 User Manual Viewing Measurements Introduction Figure 5-2: Hierarchy of Sites StarQuality 148 User Manual Viewing Measurements 5.2 WiMAX Equipment Measurements WiMAX Equipment Measurements KPIs (Key Performance Indicators) exist for three types of entities: Slot (also referred to as AU, sector, BS) SU (also referred to as MS, CPE) NPU (also referred to as BTS, in “common measurements”) For specific device information refer to Chapter 11. StarQuality 149 User Manual Viewing Measurements 5.3 Measurements Browsing Options Measurements Browsing Options You can find a specific device data using three methods: Navigating the path from the Measurement menu - click ROOT or Network/Monitored SUs sites and then click the equipment icons. Searching for a specific equipment - see “Searching Measurements” on page 158 Creating a specific sub-menu as a shortcut - see “Saving Items as A Submenu” on page 161 StarQuality 150 User Manual Viewing Measurements Measurements Display Options 5.4 Measurements Display Options 5.4.1 Display Types Three display types are available in the View group: Icon: (as in Figure 5-1) the elements of the hierarchy level under the selected item are shown with a big icon and name, up to 5 items in a row. The navigation can be continued by clicking on the icons. List: the elements appear with a small icon and name, which makes it possible to view many objects on a small screen. Detailed: elements are listed under each other with a small icon, name and description. Navigation is also performed by clicking on the icon. Figure 5-3: Navigation between Measurements: Detailed View StarQuality 151 User Manual Viewing Measurements 5.4.2 Element Browsing Options Element Browsing Options The Elements group of the Browser also serves for the orderly display of the elements. The elements appear in a list, marked with a mini icon and a ► symbol. If there are too many pieces of equipment on the current level, the Browser automatically groups them. On the bottommost line of the Browser, you can browse all measurement types that are defined for the equipment under the current hierarchy level. To browse elements: Do one of the following: Click on the name of the object to continue the navigation on the left side. Click on the ► symbol to browse to the selected site or equipment; the elements under the selected equipment also appear in the currently active tab. In case of many equipments, click on a group to “unfold” it. The system stays at the same level, so clicking does not mean a hierarchy level has changed. Click Measurement Types to navigate the hierarchy and display only the elements that include the selected measurement type. 5.4.3 Operations Drop-Down Menu Options The following functions are available for viewing measurement data (see Figure 5-4): Figure 5-4: Measurements Operation drop-down Menu Print Page - sends the page to printer StarQuality 152 User Manual Viewing Measurements Operations Drop-Down Menu Options Show history - the application tracks the navigation of the user in the Measurements and in the Alarms menu and builds a history log from it. Each tab has its own log and each log entry contains the visited object, along with the used submenu and the selected date and time period. You can view this history log and either go back to a previous entry by clicking on the [view] link or open it in a new tab by right-clicking on the [view] link. Figure 5-5: Show History Show links - Displays three links, which jump directly to the currently viewed object when a new browser window is opened. The difference between the three links are the level of settings stored in them: ◊ Object only - stores only the location of the object itself ◊ Object with date and time - stores the selected date and time interval or the real-time display state ◊ Object with every setting - stores every setting made in the Browser area. Figure 5-6: Show Links StarQuality 153 User Manual Viewing Measurements Operations Drop-Down Menu Options Go to Alarms - jumps to the Alarms main menu items while keeping the selected hierarchy item. Logical BS History (for 4Motion only) - Displays the BSs to which the a CPE (SU) has been connected during mobility, within the measured time (see Figure 5-7). Figure 5-7: Logical BS History Window Go to Configuration - jumps to the Settings > Site and System Configuration page. Save as submenu - adds a submenu item at the top panel (see “Saving Items as A Submenu” on page 161). StarQuality 154 User Manual Viewing Measurements 5.5 Viewing Measurement Data Viewing Measurement Data After reaching the equipment level using one of the navigation methods described above, the measurement results can be reviewed in chart format by selecting the concrete equipment. You can export the measurement data to Excel by clicking the Export to XLS link at the top-right corner of each chart. 5.5.1 Setting Time Span You can define the time span of measurements to be displayed. The following view options are available: Table 5-1: Time Span Options Icon 5.5.2 Tooltip Description Realtime view the data is updated periodically Historical view by date A calendar is displayed. Select the desired day, week, month, and year to dispaly measurements for that time span Historical view by time Specify the time interval (hours, seconds, etc.) View Options Because of minimizing the required chart drawings, the StarQuality draws only the first 20 charts, and the others are visible only when scrolling down the page. You can set the chart display options in the View group: Large Charts: the charts appear in one column Medium Charts: the charts appear in two columns Small Charts: the charts are arranged in a three column table Display Deleted - Displays measurements of deleted equipments. StarQuality 155 User Manual Viewing Measurements Chart Settings A chart always uses the whole available area, that is, if you hide the menu system using the expand page icon, or change the shape of the Browser window, then StarQuality redraws the chart(s) accordingly. The values specified here are applied to every chart on the right-hand side. 5.5.3 Chart Settings The following chart settings are available: Flash - allows displaying the following options (see Figure 5-8): » View or hide specific measurements by clicking their check-box » Mouse-point on a spot displays the date, time and measurement values. » Mouse-point on [Show details] displays the average, last, min. and max. values of the measurement » Right-click and set a trendline calculation for any element. Figure 5-8: Display with Flash Options Peak - Default Yes No Resolution - Medium Small Large Minimum, Maximum values Click OK to activate your settings. StarQuality 156 User Manual Viewing Measurements 5.5.4 Elements Elements The Elements group contains the measurements listed for the selected equipment. To display one chart per an individual measurements, click on the specific measurement. Note that the elements in the main part of the display and in the Elements group of the Browser pane are not necessarily corresponding, that is, the StarQuality draws automatically only the fewest charts possible. StarQuality 157 User Manual Viewing Measurements Searching Measurements 5.6 Searching Measurements 5.6.1 On Searching in General Search strings are entered frequently in the StarQuality application in order to search by text or to filter the results. There are two types of searching methods: the complex search system, accessed from the Search menu item, and the simple filter system, used in other places. For the Search menu item, the StarQuality application performs character based, case insensitive “whole text” matching. Four special characters can be used in the search string: _ (underline) or ? (question mark): matches an arbitrary character % (percentage) or * (asterisk): matches zero or more arbitrary characters Therefore, for example, the “_apple%” search string results in all names whose second to sixth characters are “apple” (regardless of case), followed by an arbitrary string of characters, that is, for example “Xapple123”, “aApPle”, “1AppleTree”, etc. In other cases (filtering, charts editing, etc.), the StarQuality distinguishes small and capital letters, but the [?] and [*] characters do not have the special meaning mentioned above. In order to search for text that includes a space, include the space in the string for search. For example, “<space>SU” will result in all names including SU with a space proceeding it. For more information, refer to “Search (Admin only)” on page 221 (in Chapter 9) Search is relevant to names of sites, equipment, etc. but not to IPs. You can use the Measurements > Search menu item for displaying actual measurements. After searching, use the [view] link next to the equipment to view the measurement charts. To start searching for a measurement: Specify a searching string, using one of the following methods: StarQuality 158 User Manual Viewing Measurements On Searching in General 1 Simple search: type the string directly in the input field, and click OK. 2 Click Advanced Search; an advanced window is displayed, which facilitates the construction of the searching string and contains the following insert fields: a Search to parent name (Yes/No): If you select “yes” the search finds those objects whose parent name meets the conditions (e.g. the parent is the containing site for a piece of equipment). b Name: Name of the object to be searched. The _ and ? characters match an arbitrary single letter, while % and * match an arbitrary string. The expressions in separate lines will be in OR relation with each other. c Without: Characters to be ignored by the system (the format is the same as above) d Type: The type of the object to be searched. Subtype can also be given for equipment, equipment template and measurement type. e Display deleted: Display measurements of deleted equipments f Results count: Maximum number of results Figure 5-9: Advanced Search 3 Click OK; The results are displayed as well as the searching string as it could be given at simple search. StarQuality 159 User Manual Viewing Measurements On Searching in General Figure 5-10: Measurements Search Results To use the Search results in Measurements: 1 To display the found objects click [view]. 2 If the results contain only measurements or charts, to display them together, click on the [view all] link; A page containing the charts is displayed. 3 To create a virtual equipment containing the displayed list of measurements or charts, click [Save as Virtual Equipment]. NOTE This method can substitute the manual selection of measurements and charts under the Customization menu item. StarQuality 160 User Manual Viewing Measurements 5.7 Saving Items as A Submenu Saving Items as A Submenu You can create a submenu item under the Measurements menu in order to have a shortcut to a selected item. This may save navigation time and searching for data. See also “Customizing Public (Admin only) and Private Menu Items” on page 236 To create a submenu item: 1 Click the equipment icon you want to create a shortcut to. 2 From the Operations drop-down menu select Save As Submenu. 3 Specify if this menu item should appear in Measurement or Alarms or both menus. 4 StarQuality Click OK; the item appears in the Measurements/Alarms menu. 161 User Manual Viewing Measurements 5.8 Setting Trendlines to Graphs Setting Trendlines to Graphs When working in Flash mode, StarQuality enables defining trendlines for displayed measurements. You can also define thresholds using the trendline values. To set trendlines: 1 When viewing a result table in Flash mode, right-click on the table itself and select Set trendline. The Set Trendline page is displayed. The parameters in this page may vary depending on the equipment type and measurements Figure 5-11: Setting Trendlines Window StarQuality 162 User Manual Viewing Measurements 2 Setting Trendlines to Graphs For every entry, select one of the following trendline types from the drop-down list: » Linear » Polynomial (x^2) to (x^6) » Difference - The difference between the current value and the previous value are shown » Limits - Specify a condition value (e.g. > 10M) and a sample time (e.g the last hour). The following limit trendlines are available: ◊ Limit counter - The number of times the condition was true in the time sample is shown as a trendline. ◊ Limit indicator - A transparent red area is shown when at least one time the condition was true in the time sample ◊ Limit sum - The sum of the measurement values based on the same time interval » Average and deviation - three trend lines are displayed, showing the average of the element as well the plus and minus deviation. The following trendlines are available: ◊ Average and one deviation ◊ Average and two deviations ◊ Average and three deviations The following figure shows a few examples of setting trendlines. StarQuality 163 User Manual Viewing Measurements Setting Trendlines to Graphs Linear trendline Polynomial (x^2) trendline Polynomial (x^6) trendline Difference trendline Average and one Deviation trendlined Figure 5-12: Examples of Trendline Settings StarQuality 164 User Manual Chapter 6 Setting Alarm Thresholds Setting Alarm Thresholds In this chapter: “Overview” on page 167 “Creating and Editing Threshold Templates” on page 168 “Assigning Threshold Templates to Equipments” on page 172 “Editing Thresholds” on page 175 “Creating a Threshold (Not Based on Template” on page 178 “Generating the Expression Using Input Fields” on page 179 StarQuality 166 User Manual Setting Alarm Thresholds 6.1 Overview Overview Setting alarm thresholds is available for Admin users only. Thresholds are defined in the StarQuality system in order to trigger alarms when the values exceed the threshold. There are two main threshold types: Normal - triggers an alarm based on an expression containing one or more measurement values. Grouped - triggers an alarm depending on normal alarms rather than measurements: it will alarm when there are more alarms than the threshold limit specified in the expression on a normal or virtual site or a given device. The grouped alarms can summarize all possible types of alarms. The defined thresholds can be complex expressions using different measurements of different devices within different sites. You can also use templates to build thresholds. This manual describes creating normal measurement templates and assigning them to equipments. The process of adding, viewing and modifying thresholds depends on whether it is initiated from the menu (Settings > Thresholds > Configuration), or from the Equipment Configuration page. The difference between these options is the sets of displayed thresholds and selectable objects, and the displayed measurement names. This chapter focuses on creating threshold templates and assigning them to equipment. StarQuality 167 User Manual Setting Alarm Thresholds 6.2 Creating and Editing Threshold Templates Creating and Editing Threshold Templates Creating thresholds using a template enables the creation of more thresholds, even for the same measurement. First you create the template and then you assign it to a specific equipment. You can also configure the assigned threshold locally. 6.2.1 Creating a New Threshold Template This section describes how to create a new template (not based on an existing one) and how to configure it. To create a new threshold template: 1 From Settings select Templates > Threshold Templates; The Threshold Template Configuration list is displayed. Figure 6-1: Threshold Template Configuration - Template List 2 Click [add new]; The Threshold Configuration editor displays an empty template table. StarQuality 168 User Manual Setting Alarm Thresholds Creating a New Threshold Template Figure 6-2: Threshold Template Configuration - New 3 Fill in the fields with the following information: Name: Template name: For example: ”FDD SNMP OCCUPATION too low” Threshold name: A unique and meaningful name. For example: ”FDD SNMP OCCUPATION < 80%”. Expression: The threshold format. The application displays the expression in text format, while editing the expression is displayed in its original form in case of normal thresholds, and as different input fields for grouped alarms. See Step 4 below. Level: The possible threshold values in decreasing severity levels: StarQuality » Critical (red background) » Major (orange background) » Warning (yellow background) » Minor (cyan background) 169 User Manual Setting Alarm Thresholds Creating a New Threshold Template Type: Not applicable. E-mail: The e-mail address(es) to which the application should send a message if there is threshold violation. Select one or more e-mail addresses by highlighting (and using the CTRL and Shift keys) the required address(es) from the predefined list (refer to “Setting E-mail Addresses (Admin only)” on page 243). A prerequisite for the actual e-mail notifications is activating the SMTP server (see “Northbound Interface (NBI)” on page 266) SNMP Trap: Address(es) and port(s) to where the application should send an SNMP trap if there is a threshold violation. Zero or more e-mail addresses can be given, separated by commas. The format of the individual addresses: [community@]computer_name[:port]. If you do not set an explicit community, public is used by default. If you do not set an explicit port, it is 162 by default. The system also sends the variable causing the violation in the SNMP trap, but only if there is only one variable in the threshold definition and its current value can be stored in 32 bits. A prerequisite for the actual trap sending is network connection on the chosen port between the StarQuality server and the trap receiving application machine. Command: Not applicable Continuous alert: If selected, at each violation the appropriate e-mail and/or SNMP trap is sent. If not selected, this will be done only if there was no violation during the previous measurement. In both cases, the system will send an e-mail and/or SNMP trap when the threshold violation is ended. When: Which time period template is used for the threshold. The possible options are set in Settings > Templates > Exclusion Window Templates. 4 Specify the threshold attributes in the Expression section: The threshold syntax contains 4 parts, separated by a [#] key. That is: <value(VARx)> <comparators (=><)> <reference value> <frequency>. You can also have relations between expressions: Or/ And. Examples: ◊ Name: Subscription downlink>100% for FDD SNMP Syntax: #VAR1.O#WMP.IN > 100.0#1#1# StarQuality 170 User Manual Setting Alarm Thresholds Creating a New Threshold Template Meaning: Variable value 1.0, WMP (subscription) measurement downlink, should be greater than 100%, at least once per one measurement. ◊ Syntax: #VAR1.O#WOCC.OUT < 50.0#1#1# for FDD SNMP Validation: (Variable1[WiMAX FDD: Air Link Occupation (Table)].Downlink < 50.0) 1x in 1 sample ◊ Syntax: #VAR1.O#TOCC.IN < 70.0#2#3# for FDD and #VAR1.O#TOCC.OUT < 50.0#3#3# Validation: (Variable1[WiMAX TDD: Air Link Utilization (Table)].Uplink < 70.0) 2x in 3 samples and (Variable1[WiMAX TDD: Air Link Utilization (Table)].Downlink < 50.0) 3x in 3 samples For lists of syntax elements for thresholds, refer to Chapter 11. Usually only the following part of the Perl syntax is necessary: » and: and expression » or: or expression » +, -, *, /: mathematical operations » (,): punctuation » !: logical negation » <, <=, ==, >=, >: value comparators Alternatively you can create the template without expression and later edit the threshold locally using input field. See detailed information in “Generating the Expression Using Input Fields” on page 179. StarQuality 5 Click Validate. If the syntax is red, fix it according to the above. 6 Click OK; A new threshold template is added to the system. 171 User Manual Setting Alarm Thresholds 6.3 Assigning Threshold Templates to Equipments Assigning Threshold Templates to Equipments To assign a threshold template to multiple equipments: 1 From Settings select Threshold > Configuration. The threshold list is displayed. 2 Click [from template]. 3 Choose a threshold template from the drop-down list. The Threshold Configuration editor displays the attributes of the template. Figure 6-3: Using Threshold Template 4 If required, edit the values in the template. 5 Click OK to view the list of relevant equipments for this threshold template. All are checked by default, and you can select the equipment(s). Figure 6-4: Relevant Equipments StarQuality 172 User Manual Setting Alarm Thresholds 6 Assigning Threshold Templates to Equipments Click OK; The system creates the selected thresholds. To assign a threshold from template to a specific BTS: 1 Access the Site and Equipment Configuration in one of the following methods: » From Measurements, select the equipment and from the Operations pull-down menu select Go To Configuration. » 2 From Settings select Site and Equipment Configuration. Scroll down to the Threshold section and click [From Template], or choose New Threshold from Template from the operations drop down menu. 3 Select a template from the list to assign to the threshold and click OK; the system displays the threshold template details. You can modify the attributes as required. Figure 6-5: Threshold Template Details 4 Click OK; The system finds items (AUs or SUs) belonging to this BTS to which to assign the template. StarQuality 173 User Manual Setting Alarm Thresholds Assigning Threshold Templates to Equipments Figure 6-6: Items to Assign The Threshold 5 Select the AUs/SUs to assign the threshold to and click OK. The threshold is added to the list of thresholds for the equipment. StarQuality 174 User Manual Setting Alarm Thresholds Editing Thresholds 6.4 Editing Thresholds 6.4.1 Editing an Existing Threshold Template When you edit an existing template on which active thresholds are based, all these thresholds are automatically affected. The system identifies and lists these potentially affected thresholds for approval. To edit a threshold template: 1 Do one of the following: From Settings select Templates > Threshold Templates. The Threshold Template Configuration list is displayed. From Settings select Site and equipment configuration. Navigate to the equipment holding the threshold to be edited. Scroll down to the thresholds list. 2 Click [edit] next to the threshold template to be modified. Figure 6-7: Threshold Template Configuration - Template List StarQuality 175 User Manual Setting Alarm Thresholds Editing an Existing Threshold Template Figure 6-8: Threshold Template Configuration - Editing 3 Modify the required threshold attributes (see detailed information in “Creating a New Threshold Template” on page 168). 4 Click OK to save your modification to the template. If no thresholds are based on this template, the modifications are saved and the list of threshold templates reappears. If there are thresholds based on this template, the Threshold Configuration editor displays the modified attributes and lists these potentially affected thresholds for approval (Figure 6-9). Figure 6-9: Message on Template-based Threshold Modification StarQuality 176 User Manual Setting Alarm Thresholds Editing a Template-based Threshold (Local Change) The settings made here will override any local change in each of these thresholds. To avoid loosing such local changes, you may consider modifying the template and not the threshold itself. Clock OK to save the modification; the list of threshold templates reappears. 6.4.2 Editing a Template-based Threshold (Local Change) Editing the threshold template itself will override any local change in thresholds. To avoid loosing such local changes, you may consider modifying the template and not the threshold itself. To edit a template-based threshold: 1 From Settings select Threshold > Configuration. The Threshold list is displayed. 2 Select a specific threshold and click [edit]; the following message appears: Figure 6-10: Message on Template-based Threshold Modification 3 Click OK; the Template Configuration window is displayed. 4 Modify the required threshold attributes. You can use the input fields as described in “Generating the Expression Using Input Fields” on page 179. 5 StarQuality Click OK to save your modification to the threshold. 177 User Manual Setting Alarm Thresholds 6.5 Creating a Threshold (Not Based on Template Creating a Threshold (Not Based on Template To create a non-template-based threshold: 1 From Settings select Site and Equipment Configuration. 2 Navigate to the equipment for which you want to create a local threshold and scroll down to the Threshold section. 3 Click [add new]; the threshold configuration parameters are displayed. Figure 6-11: Adding a New Threshold 4 Fill in the required threshold attributes. You can use the input fields as described in “Generating the Expression Using Input Fields” on page 179. 5 StarQuality Click OK to save your modification to the threshold. 178 User Manual Setting Alarm Thresholds 6.6 Generating the Expression Using Input Fields Generating the Expression Using Input Fields This section provides basic rules for creating threshold expressions using input fields. Input files are not available when creating or editing threshold templates. You can use the input fields in the Threshold Configuration window (Figure 6-12) available in the following cases: Creating or editing a threshold that is not template-based Locally modifying a template-based threshold (see “Editing a Template-based Threshold (Local Change)” on page 177) To generate a threshold expression: 1 Access the Threshold Configuration window (Settings > Thresholds > Configuration. Input fields Figure 6-12: Threshold Configuration StarQuality 179 User Manual Setting Alarm Thresholds 2 Generating the Expression Using Input Fields In the Threshold Configuration page fill in or select the following fields as required: » The site and equipment of the measurement drop-down fields are displayed only when opening the threshold editor from the main page. If you edit the thresholds from the Equipment page, you can choose the measurements belonging only to that specific one. » The measurement to be selected » Operator » Compare value: ◊ Static value: interpreted with the same measurement unit as the one displayed on the measurement chart. If there is a single measurement in the sub-expression, the application draws a horizontal line on the measurement chart at the compare value. ◊ Vaseline value: the average of the measured values calculated with the specified cycle and resolution + or – a multiple of the standard deviation 3 » Frequency » In how many samples » Based on the last x cycles » Match in sample » Sample size Click the [Add to] link; The application inserts the required element at the current cursor position in the text, which can be of one of the following two types depending on the values of the fields: » If the compare value is filled, the application inserts a complete sub-expression element, namely: #selected_measurement_code operator compare_value#frequency#in how many# » If the compare value is not filled, the application inserts only the code of the selected measurement. StarQuality 180 User Manual Setting Alarm Thresholds 4 Generating the Expression Using Input Fields Anytime during the editing process you can click on the [Validate link] to check whether the expression has the required syntax. If the syntax is invalid, an error message is displayed, and if it is valid, the user readable format of the expression is displayed in the validate field. Usually only the following part of the Perl syntax is necessary: » and: and expression » or: or expression » +, -, *, /: mathematical operations » (,): punctuation » !: logical negation » <, <=, ==, >=, >: value comparators The list of Thresholds syntax elements is in Table 11-5. StarQuality 181 User Manual Chapter 7 Threshold-Crossing Alarms Monitoring Threshold-Crossing Alarms Monitoring In this chapter: “Overview” on page 184 “Navigating, Viewing and Filtering Alarms” on page 186 “Downloading Data to Excel Files” on page 191 StarQuality 183 User Manual Threshold-Crossing Alarms Monitoring 7.1 Overview Overview Viewing Alarms is performed similarly to viewing measurements: a configurable quick menu at the top panel is used for displaying and navigation, and also new elements can be added to it using the Settings > Customization menu. The alarms are displayed on the most prominent parts of the user interface to provide quick accessibility. The color-coded summary of the currently active alarms are displayed at the top-right corner of the window. The alarms can be navigated by selecting the Alarms item on the main menu. Figure 7-1: Alarms Summary at the Top Right Corner of the Window By default, only the “Root” highest level group is listed. The list view of alarms is displayed in the following figure: Figure 7-2: Table View of Alarms StarQuality 184 User Manual Threshold-Crossing Alarms Monitoring Overview To use the Alarms list: Use the following operations in the alarms list: Table 7-1: Using the Alarms List To Do this Comments Move to next page/entries on the list Use the arrows (< >) at the top of the list Sort the list by column entries Click on the column header Sort in ascending/descending order Click the up/down arrows under the column header Download the table Click the [view xls] link Obtain detailed information of an entry Click the [view] link the corresponding measurement values are displayed in a chart. Acknowledge an alarm Click the [ack] link if the alarm has already been acknowledged, the time and name of the user that acknowledged are displayed in the table. Delete (close) an alarm Click the [ack] link (if available) If the alarm is not a threshold violation but is from an event definition, and the event has not yet been closed, a [del] link appears. The numbers indicate the order Deleting an alarm is necessary, for example, if there is no closing event in the definition or a trap has been lost, or if the alarm is not relevant anymore. In this case, if the alarm has not been acknowledged yet, then it becomes acknowledged as well. Figure 7-3: Detailed Alarm Information StarQuality 185 User Manual Threshold-Crossing Alarms Monitoring 7.2 Navigating, Viewing and Filtering Alarms Navigating, Viewing and Filtering Alarms The browser, at the left-hand side of the user interface under the main menu, is used to filter and arrange the alarms. There are three groups in the Browser, each controls the display of alarms. The individual groups can be expanded or collapsed and by clicking on the button on the left edge next to them, which can be useful since this panel has no scroll bar. A tooltip is also displayed if the mouse pointer is moved above the group icon. Filtering of alarms can only be set with these groups if a set of alarms is already selected on the top part of the screen. The following sections explain in details the individual groups. 7.2.1 Viewing Alarms by Time Span You can define the time span of alarms to be displayed. The following view options are available in this group: Table 7-2: Time Span Options Icon 7.2.2 Tooltip Description Realtime view The currently active alarms are displayed Historical view by date A calendar is displayed. Select the desired day, week, month, and year to dispaly alarms during that time Historical view by time Specify the time interval (hours, seconds, etc.) Alarm View Options The way the alarms are displayed can be changed using the second group of controls. 7.2.2.1 Main View Options The following view options are available in this group: StarQuality 186 User Manual Threshold-Crossing Alarms Monitoring Alarm View Options Table 7-3: Alarms View Options Icon 7.2.2.2 Tooltip Description Table view The alarms are displayed in a list table. This is the default view. Refer to “Overview” on page 184, and Figure 7-2. Object view The current site hierarchy is displayed with icons instead of the table of alarms. The color of icon indicates the most severe alarm existing for this item. See detailed description of this view below (“Object View Options” on page 187). Chart view The number of active alarms are displayed in a graphical form (see “Chart View” on page 190). Object View Options By selecting the “Object view” icon, the current site/virtual site hierarchy is displayed with icons instead of the table of alarms. Only those sites for which there is an active alarm are visible. The icons are colored by the color code of the most severe alarm of the contained equipment: for example, if under a site there is an equipment with am active “Critical” alarm, the color of the site’s icon is red; if the most severe active alarm of the equipment under the given site is “Major”, then its color is orange, and so forth. During navigation the navigation path is displayed in the top line above the middle viewing area (under the name of the tab), which can be used to quickly navigate up to higher levels by clicking on its segments. In the “Object view”, three further icons are available, which are used to further simplify the object view: Icon view: The sites containing alarms are displayed with large, easy-to-see icons, up to five in a row. StarQuality 187 User Manual Threshold-Crossing Alarms Monitoring Alarm View Options Figure 7-4: Icon View of Alarms List view: The sites containing alarms are displayed with smaller icons (up to five in a row) allowing more icons to be displayed on a single screen. Icons with alarms can easily be identified based and their color codes. Figure 7-5: List View of Alarms Detailed view: The site/equipment icons are listed one under another (still colored) together with their names and descriptions StarQuality 188 User Manual Threshold-Crossing Alarms Monitoring Alarm View Options Figure 7-6: Detailed View of Alarms In each of these views, you can navigate to a site by clicking on its icon, in which case the contained sites and equipment are displayed in a similar view. Tracking the hierarchy downwards you can reach the equipment causing the alarm, and then by clicking on the icon of this equipment the name of the violated threshold and the chart of the referenced measurement values are displayed. On this lowest level you can also choose a threshold that is currently not violated in order to check the settings of the threshold value. If the alarm is not threshold but event based, then the StarQuality displays the time of alarm on the chart with superimposed transparent red rectangles. Figure 7-7: The Equipment Level View of Alarms StarQuality 189 User Manual Threshold-Crossing Alarms Monitoring 7.2.2.3 Filtering Alarms Chart View This view can only be selected if the current time interval is not the real-time/Auto refresh view (that is, for historical time intervals that do not contain the current time instant). 7.2.3 Filtering Alarms In the alarms browser, the third group “Filters” allows the specification of filter-conditions of alarms. Filtering is available using the following types: Table 7-4: Filtering Types StarQuality Type Description Name The name of the threshold (which typically contains the name of the corresponding equipment, such as “E1909 low availability”). The usual % and _ characters can be used here. Most useful in the List view. Level A dropdown list, used to filter on the severity level: Critical, Major, Warning, Minor). Type A dropdown list, used to filter on the threshold type. Grouped A dropdown list, used to set whether the normal and/or the grouped alarms should be displayed. Acknowledged Display acknowledged alarms - Yes/No 190 User Manual Threshold-Crossing Alarms Monitoring 7.3 Downloading Data to Excel Files Downloading Data to Excel Files You can download the displayed data in XLS format. The generated XLS file containing the measurement data also includes the name of the threshold, and the background color of the data cells that violate the threshold matches the color code of its severity level. If threshold violation occurred, but that value was not taken into account in the current alarm, then the background color of the cell is set to cyan. If a public or private (as opposed to normal) chart is exported to an XLS file, the generated file differs in the following aspects: » The number of columns and their names are the same as in the chart definition » Regardless of the chart definition the values are not aggregated » The resolution of rows follows the smallest time interval of the measurement data, thus infrequent measurement data are stored sparsely in the table To save data to Excel: To save the alarms table click [view xls]; open or save the file. Figure 7-8: Sample XLS of Alarm Table To save the chart data, click [Export to XLS] above the chart. The first few lines of a sample exported XLS file are: StarQuality 191 User Manual Threshold-Crossing Alarms Monitoring Downloading Data to Excel Files Figure 7-9: Sample XLS File of Chart Data StarQuality 192 User Manual Chapter 8 Reports Reports In this chapter: “Overview” on page 195 “Report Configuration” on page 196 “Viewing Reports” on page 207 “Bulk Export Wizard - Exporting Data to XLS Files” on page 210 StarQuality 194 User Manual Reports 8.1 Overview Overview StarQuality enables the following types of reports: Built-in and configurable reports Filtered data exported to .xls format 8.1.1 Built-in Reports These reports are variable evaluations on a chosen set of sampled objects (AUs, SUs, measurements) in the system. Administrator users can configure selected subsets, variables and reports views. Each report can be one of the following: Predefined reports - The system is installed containing the same set of four reports for most device types: » BottomN Uptime » TopN Air Link Utilization (not applicable to BreezeACCESS VL and Extreme) » TopN Sector Throughput » TopN Number of Connected SUs For details on device specific information, refer to Chapter 11. Regular reports - Each report-view is manually configured following the definitions of its variables, and begins collecting data from its creation time and on. Refer to “Regular Reports” on page 196 On-demand reports - Creation and generation of reports referring to data already existing in the database. Refer to “On-Demand Reports” on page 202 StarQuality 195 User Manual Reports 8.2 Report Configuration Report Configuration The configuration of reports (Settings > Reports), is available to admin users only. 8.2.1 Regular Reports Report creation consists of the following steps: Defining the variables which will be the building blocks of the reports. Only measurements performed after defining them as variables will be available for the reports. Refer to Section 8.2.1.1. Sorting the created variables in various combinations into report views. Refer to Section 8.2.1.2. 8.2.1.1 Defining Report Variables Reports are based on the system existing measurements. To start defining report variables: 1 From the Settings menu select Reports > Report Variables; The Report Variable Configuration starting page contains a table showing the active (currently monitored) and inactive report variables. In a new system, the table contains the variables used for the predefined reports. Figure 8-1: Report Variables Window (Example) StarQuality 196 User Manual Reports Regular Reports To create a report variable: 1 Click [add new]; the following window is displayed: Figure 8-2: Adding a New Report Variable 2 Enter a unique and meaningful name for the variable. The name should reflect the device type as well as the measurement. For example: “TDD Utilization”. 3 Select a Measurement Name from the drop-down list. The list is based on measurements per collector/equipment type. Make sure to select the measurement from the correct collector. 4 Leave Detailed summary at equipment level unchecked. 5 Verify that the Active check-box is selected. 6 Leave the interval of 15min. 7 When: Select the required timeframe for collection from the drop-down menu or leave the value as “non stop”. 8 StarQuality Click OK; the report variable is added to the list. 197 User Manual Reports Regular Reports To edit an existing report variable: 1 Click [edit] next to the variable to be changed; the Report Variable Configuration window is displayed (see Figure 8-2). 2 Edit the variable name as required. 3 Select if to activate the variable calculation using the Active check-box. 4 Click OK; the report variable is updated in the list. NOTE An active report variable consumes computer resources. Therefore, it is recommended to define only the required variables and deactivate redundant ones. The only way to disable a variable is to set it as inactive. You cannot delete a report variable. 8.2.1.2 Defining Report Views Report view is the display method of the report variables. Report views have three types: Table, TopN and Chart (not applicable). The first two are table-arranged report variables; The difference between TopN and Table reports is that for TopN reports it is impossible to navigate among the sites. To Start Report View Configuration: 1 From the Settings menu select Reports > Report Views; The Report View Configuration starting page contains a table showing the active report views. On a new system, this table contains the predefined reports. StarQuality 198 User Manual Reports Regular Reports Figure 8-3: Report View Configuration Window (example) To create a new report view: 1 Click [add new]; a setting page is displayed (see Figure 8-4). 2 Enter a meaningful name (free text). 3 Select a type: Tabular or TopN. 4 Leave the Top Level? check-box selected. 5 Set the First Hierarchy Level to: measurements. 6 Set the result window size. 7 Click OK; The new view is added to the list of views. Figure 8-4: Creating a New Report View StarQuality 199 User Manual Reports Regular Reports 8 In the Report View Configuration window (see Figure 8-3) click on the [tables] link. The configuration page is displayed (empty in a new report): Figure 8-5: Configuration Page 9 In the upper section, select the hierarchy level: Additional Measurements. 10 Click [add new] to add variables to the report view. Add as many variables as necessary. The following window is displayed per each variable: Figure 8-6: Adding a New Variable StarQuality 200 User Manual Reports Regular Reports 11 Repeat for each variable: a Set the order. Assign the same order to variables you want to group. Grouped variables share variable-.name and name; they differ by subname. b Select a variable name from the drop-down list of your pre-defined variables (See “To create a report variable:” on page 197.) c Enter a meaningful name for the order group. NOTE In cases it is applicable, the name should specify if the measurement is an uplink or downlink value. d Enter a meaningful subname for the subcolumn; it is only visible on the report, if there are at least two grouped columns. Example of grouping according to steps a - d: ◊ Common Measurement name: Utilization ◊ Common Name: Utilization Downlink ◊ Subname: Min. for one variable, Max. for the other e From the Field drop-down list select the required field value. Make sure that the field matches the names given above. NOTE In applicable cases, ‘First formula’ always represents uplink; ‘Second formula’ represents downlink. f Leave Div with ‘is null’. Leave the Precision value at 0. g Set Weekly-monthly aggregation according to the value selected in the Field. h Enter the Weekly-monthly-yearly summary postfix: The application appends this text to the name of the column if the field is specified and it is not a daily report. StarQuality i Leave all the next fields unedited. j Click OK. The Report View Configuration page is displayed. 201 User Manual Reports On-Demand Reports 12 In the upper right side of the page, select the report order using the Order by Column drop-down list. 13 Click Back in the upper right corner to save changes and return to the report view list. To edit an existing report view: 1 From Settings select Reports > Report Views. 2 Click [tables] next to the report view you want to edit. 3 In the upper section, select the hierarchy level: Additional Measurements. 4 Click [add new], [edit] or [delete]. To create a new report view based on an existing view: 1 Click [copy from]; a setting page is displayed. (see Figure 8-7). Figure 8-7: Creating a New Report View Using the Copy From Option 8.2.2 2 Enter a new name for the report view. 3 Select the report name to base the new report view from the drop-down list. 4 Click OK. 5 Edit the new report as described above. On-Demand Reports By using the On-demand reports the system creates and generates reports referring to data already existing in the database. It is recommended to specify limited amount of data for the report as processing large amounts of data causes system overload. StarQuality 202 User Manual Reports On-Demand Reports To create an On-Demand report: 1 From Reports select On Demand Reports; the On-demand selection path and settings window is displayed. The items in the selection path become available as you specify the settings: Selection path Figure 8-8: On-demand Reports - Types In the Report Type section, choose either: » By Equipment Level » By Measurement. In this case, select wether to group measurements together. When: Which time period is used for the report 2 Click Search in the selection path; the Search settings window is displayed: Figure 8-9: On-demand Reports - Search 3 StarQuality Specify the Search: 203 User Manual Reports On-Demand Reports parent attribute: » No - to search by equipment attribute » Yes - to search by parent attribute Field: Leave “Name” Search - enter strings to be searched. All rules are applied as in “On Searching in General” on page 158. Without - enter strings to exclude from the search. Type: Equipments, choose a specific equipment type Select the number of requested results in the report. NOTE The message Not all matching rows returned! may appear at the bottom of the table if there are more results than selected counts. 4 Click OK at the top-right of the window; The list of results is displayed (Figure 8-10). 5 To narrow or improve the filtering, edit the title line and click OK. Repeat until the requested results are returned. Title line Figure 8-10: On-demand Reports - Measurement Types StarQuality 204 User Manual Reports On-Demand Reports 6 Click Measurement Types in the selection path; a list of available measurement types and calculations is displayed: Figure 8-11: On-demand Reports - Measurement Types Settings 7 Select the measurement (s) at the left column, and the calculation (min., max. avg. etc) on the right column. 8 Click Object Parameters in the selection path; a list of parameters is displayed. These parameters will be the columns of the report. Some of the parameters are already selected. Figure 8-12: On-demand Reports - Object Parameters 9 Select the Measurement name check-box; the Show and Save options are enabled at the selection path. 10 Click Save to save the report settings (optional); the following window is displayed. Specify the report name and choose if to include the search settings Figure 8-13: On-demand Reports - Save options StarQuality 205 User Manual Reports On-Demand Reports 11 Click Show to display the report in a regular report format, including the option to specify time frame and export to *xls format. Figure 8-14: On-demand Reports - Show StarQuality 206 User Manual Reports Viewing Reports 8.3 Viewing Reports The reports are displayed in the Reports viewing menu about an hour after defining the variables. 8.3.1 Navigating Report Views Use the following buttons: Table 8-1: Navigating Reports Button/Link Description Go to the first and previous page, respectively Go to the next and last page, respectively Page x out of total number of pages. Jump directly to the required page by entering its number in the text field and pressing the enter key. Up and down arrows for ordering all results on the given level. The current ordering is indicated by a blue rectangle around the selected arrow Export current table to XLS Exports the currently displayed entries to an XLS file. Export all data to XLS Exports the all the entries to an XLS file, including entries which are not currently displayed. Filter Filters entries by equipment name or measurement name. The rules for special characters are the same as for search (see “Search (Admin only)” on page 221) Entries with underline, serve as links, and jump to the specific equipment measurement, with the properly selected date and time interval. 8.3.2 Setting the Report Range and Display While viewing the report results, the calendar at the Browser is used for setting the time interval of the report. The selected report view is displayed to the right of the calendar. You can also set what type of reports to view and whether to display the date in a column. StarQuality 207 User Manual Reports Setting the Report Range and Display To use the calendar: 1 Click on the arrow buttons in the two top corners of the calendar to change the month. Alternatively, select a month and year using the drop-down menus (see Figure 8-15). 2 To change the type of time interval, click on the Day/Week/Month/Year text links at the bottom. 3 Select the actual time interval by clicking on one of the displayed days, months or years. NOTE Time intervals starting in the future cannot be selected with the calendar. Figure 8-15: Calendar views (day, week, month and year) for selecting the time interval StarQuality 208 User Manual Reports Setting the Report Range and Display To set report display options: 1 In the Settings area at the bottom of the Browser, select the type of report from the Type drop-down list: 2 » Table only » Grouped » Separated » Sort by Select the Show Date in Column option to display (if the report includes dates) NOTE These settings do not affect the export of reports to xls files StarQuality 209 User Manual Reports 8.4 Bulk Export Wizard - Exporting Data to XLS Files Bulk Export Wizard - Exporting Data to XLS Files The Bulk Export is a wizard driven utility used for exporting data from the StarQuality database into xls files according to the following user defined cross sections: Timeframe: up to one week Network elements: » Type: SU, AU or common BTS data (number of exported lines is limited to 65,000) » Technology: FDD, FDD SNMP, TDD, 4Motion (Ver.2.5M and 3.0), VL, Extreme The system enables choosing specific elements from the list of NEs matching the above conditions. The xls file can be viewed or saved on the client machine at any location. To export AU or common BTS data: 1 From Reports select Bulk Export Wizard; The Bulk Export Wizard window is displayed. Selection Path Figure 8-16: Bulk Export Wizard Window 2 StarQuality Specify meaningful name and description (free text) to the report. 210 User Manual Reports Bulk Export Wizard - Exporting Data to XLS Files 3 Select a time frame, using the input fields or the calendar button: Specify maximum one week. Longer type results in an error message when trying to proceed to the next stage. NOTE Seconds are ignored; minutes are regarded as the closest quarter of an hour 4 Select NE Type: BTS and any technology required. 5 Click BTS Selection in the path at the top of the work area (see Figure 8-16); the filtering criteria screen is displayed. Figure 8-17: Bulk Export Wizard - Filtering Devices 6 Enter the following criteria. (All categories are optional; That is, if left empty, no filtering is performed. Also all input is according to the search rules described in “On Searching in General” on page 158): Site name BTS name BTS Address (IP) Site ID (as exists in the database) 7 Click OK; a list of network elements matching the filter criteria is displayed. You can repeat the filtering until getting the desired results. StarQuality 211 User Manual Reports Bulk Export Wizard - Exporting Data to XLS Files 8 Select the check-boxes of BTSs you wish to export data from, or use the topmost check box to select all the elements. NOTE The Select All check box refers only to the currently displayed page. For selecting all the results in all pages, select the checkbox separately on each page. 9 Click Type Selection in the selection path (Figure 8-16); the Exported Entity choice window is displayed. For AU/BS data select Logical BS measurements (default) For common BTS data select Common measurements Figure 8-18: Exported Entity Selection 10 Click Export in the selection path (Figure 8-16). The following message is displayed: Figure 8-19: Export Message 11 Click OK; In certain cases a second message is displayed informing that the data may exceed 66,000 lines. Click OK; A standard File Save/Download window is displayed. StarQuality 212 User Manual Reports Bulk Export Wizard - Exporting Data to XLS Files Figure 8-20: File Download The default file naming format is: StarQuality<Report Name><Date><Time>. Report name is defined in Step 2. Figure 8-21: Sample xls File StarQuality 213 User Manual Reports Bulk Export Wizard - Exporting Data to XLS Files To export SU data: 1 From Reports select Bulk Export Wizard; The Bulk Export Wizard window is displayed (see Figure 8-16). 2 Specify meaningful name and description (free text). 3 Select a time frame, using the input fields or the calendar button: Specify maximum one week. Longer type results in an error message when trying to proceed to the next stage. NOTE Seconds are ignored; minutes are regarded as the closest quarter of an hour. 4 5 Select NE Type: SU, and any technology required. Click BTS Selection in the path at the top of the work area (see Figure 8-16); the filtering criteria screen is displayed (see Figure 8-17). 6 Enter the following criteria. (All categories are optional, which means if left empty, no filtering is performed. Also all input is according to the search rules described in “On Searching in General” on page 158): 7 » Site name » BTS name » BTS Address (IP) » Site ID (as exists in the database) Click OK; a list of network elements matching the filter criteria is displayed (see Figure 8-17). You can repeat the filtering until getting the desired results. 8 Select the check-boxes of BTSs you wish to export data from, or use the topmost check-box to select all the BTSs. 9 Click Sector Selection in the selection path (see Figure 8-16); A list of all the sectors belonging to the BTSs chosen in Step 8 is displayed. 10 Click SU Selection in the selection path; A list of all the SUs belonging to the sectors chosen in Step 9 is displayed. StarQuality 214 User Manual Reports Bulk Export Wizard - Exporting Data to XLS Files Figure 8-22: SU Selection NOTE For Steps 8 through 10, the Select All check box refers only to the currently displayed page. For selecting all the results in all pages, select the checkbox separately on each page. 11 Click Export in the selection path. The following message is displayed. Figure 8-23: Export Message 12 Click OK; In certain cases a second message is displayed informing that the data may exceed 66,000 lines. Click OK; A standard File Save/Download window is displayed. The default file naming format is: StarQuality<Report Name><Date><Time>. Report name is defined in Step 2. StarQuality 215 User Manual Chapter 9 General Setting Options General Setting Options In this chapter: “Overview” on page 218 “Search (Admin only)” on page 221 “Site and Equipment Configuration” on page 222 “Customization” on page 233 “Templates (admin only)” on page 245 “Server Configuration and Management (Admin only)” on page 246 “Audit Trail” on page 258 “User Administration (Admin only)” on page 261 StarQuality 217 User Manual General Setting Options 9.1 Overview Overview The Settings item in the main menu contains many options for changing the StarQuality configuration. For each item in the submenu panel, different items appear in the Browser. For non-administrator users, the submenus used to make changes are not displayed, and the other submenus are displayed selectively based on the access rights of the user. This chapter describes some general setting options available in the StarQuality application. These settings are: Search - Setting the searching parameters Customization - editing of “public” objects refers to the administrator users, while editing of “private” objects refers to the rest of the users » Public/Private charts: Configuring charts » Public/Private menu items: Defining menu items for the submenu panel » External links (admin only): Setting the external links to display for basic or virtual site and equipment objects » Preferences (non-administrator users only): Configuring displaying preferences » StarQuality E-mail addresses: A list of the e-mail addresses of the users 218 User Manual General Setting Options Overview Servers » Licences: Displaying and configuring the currently used and available licences » Device and measurement summary: Viewing the list of all basic equipments, and the number of objects in the system for each measurement type » Server groups: Configuration of individual measuring groups » Server configuration: Modifying the measurement servers and other servers » Start/Stop/Status: Remote management of individual servers » Server events: Viewing the events that occurred during self-testing » Collector load: Viewing the load of the collectors and listing the unsuccessful measurements at a given date. Maps (admin only): Not applicable Audit Trail (admin only): Displaying the individual configuration modifications User » User admin (admin only): Adding, deleting and modifying users » User rights (admin only): Configuring which privileges/permissions the users should possess » Password: Changing password Other settings that are directly involved with the main system functionality are described in the relevant chapters. Such settings appear in the following list of menu items in the Settings section, with a reference to the exact location of their description: Site and equipment configuration - also in Chapter 3, “Getting Started” on page 106 StarQuality 219 User Manual General Setting Options Overview Scheduled configuration (admin only) - Automatically scheduled configurations - in Chapter 3, “Getting Started” on page 106 Thresholds - in Chapter 7, “Threshold-Crossing Alarms Monitoring” on page 182 Reports (admin only)- in Chapter 8, “Reports” on page 193 » Report variables: Defining the variables used for reports » Report views: Creating reports by selecting variables » Scheduled reports: Setting scheduled report delivering Templates - in Chapter 6, “Setting Alarm Thresholds” on page 165 StarQuality 220 User Manual General Setting Options 9.2 Search (Admin only) Search (Admin only) Searching is done only by names of sites and equipment. Under the Settings > Search menu item you can search the stored objects in the system. This menu is only accessible to the administrator and restricted administrator users. To start searching for an object: Specify a searching string, using one of the following methods: 1 Simple search: type the string directly in the input field, and click OK. 2 Click Advanced Search; an advanced window is displayed, which facilitates the construction of the searching string and contains the following insert fields: a Search to parent name (Yes/No): If you select “yes” the search finds those objects whose parent name meets the conditions (e.g. the parent is the containing site for a piece of equipment). b Name: name of the object to be searched. The _ and ? characters match an arbitrary single letter, while % and * match an arbitrary string. The expressions in separate lines will be in OR relation with each other. c Without: characters to be ignored by the system (the format is the same as above) d Type: the type of the object to be searched. Subtype can also be given for equipment, equipment template and measurement type. e 3 Results count: maximum number of results Click OK; The results are displayed as well as the searching string as it could be given at simple search. StarQuality 221 User Manual General Setting Options 9.3 Site and Equipment Configuration Site and Equipment Configuration The following topics are covered in this section: “Object Hierarchy Overview” on page 222 “Site and Equipment Configuration” on page 224 “Equipment Configuration” on page 226 “Creating and Editing Virtual Equipment” on page 230 “Linked Equipment” on page 232 9.3.1 Object Hierarchy Overview 9.3.1.1 Non-virtual Objects There are three non-virtual object types in the system obeying the following three rules: Sites: Each site has a name and an optional descriptive text. Each site can contain arbitrary many sites and equipments. Each site may reside below another site, and this relation can be modified during the existence of the site. The initial site (ROOT) is an exception to this rule and can only contain sites and cannot be modified or deleted. The name of the site has to be unique only inside the site containing it, although it is recommended to keep it globally unique. Equipment: Each piece of equipment belongs to a site. This relation can be modified during the existence of the equipment. The name of the equipment has to be unique in the whole system globally. Measurements: The equipments contain the measurements which cannot be moved to another piece of equipment. 9.3.1.2 Virtual Objects In the StarQuality system the administrator and the restricted administrator users can create sites, equipments and measurements. These items are immediately available for authorized users too: they appear under for example the Measurements menu item, where the individual elements are displayed in the StarQuality 222 User Manual General Setting Options Object Hierarchy Overview same division and in the same way as the administrators have specified during creation. This initial hierarchy and its objects are called basic or normal objects. Parallel to this structure both administrators and normal users can develop their own structures; moreover, administrators can create public structures as well. Each level of the basic hierarchy has its parallel equivalent: Virtual site: corresponds to a site object; can be placed under any basic or virtual site, and can contain virtual sites, virtual equipment and linked basic equipments Virtual equipment: corresponds to an equipment object; can be placed under any basic or virtual site, and can contain measurements and private/public charts Private/public charts: correspond to the measurement object; in contrast to that, however, it can contain not only one or two measurement values but also arbitrary measurements and report summaries of an arbitrary piece of equipment. It can be placed under virtual equipments manually. It can automatically appear under basic equipment too if it contains a measurement running on the given equipment or a report summary for that equipment This parallel structure is used, according to the settings under the Preferences menu item, for the display of both measurements and thresholds filtered by site or equipment. Contrary to this, for the Reports menu item one can move along only the basic hierarchy. Virtual sites and equipments can be private or public objects: » Administrator users can create both types » Admin users can only create public objects, » Other users can only create private objects » Restricted administrators can modify a public object if they created it. » The configuration follows the same principles and there is only one restriction: only public virtual sites, equipments and measurements can be placed under public virtual sites, while only the private ones under private virtual sites. StarQuality 223 User Manual General Setting Options 9.3.2 Site and Equipment Configuration Site and Equipment Configuration The administration of the (basic and virtual) sites, (basic and virtual) equipments and measurements is performed under the ‘Site and equipment’ menu item (Settings > Site and equipment configuration). You can also configure threshold settings (limited to measurement thresholds on a single equipment only, otherwise use the Settings > Threshold menu item, see “Customization” on page 233), and charts (of measurements from the same equipment in the hierarchy only, otherwise use the Settings > Customization > Public Charts (admin only) or Private Charts menu items). In the Site and Equipment Configuration the path showing the actual location within the hierarchy appears at the top of the page, and stay visible even if the page is scrolled (see Figure 9-1). To return to a higher hierarchy level, click on the elements of the list, except the last one. NOTE If you navigate to an equipment through one of its virtual sites, then after any equipment modification you cannot return to that point in the virtual hierarchy, since the application modifies the current location according to the normal hierarchy, i.e. it will show the equipment under its parent site. 9.3.2.1 Operations Drop-Down Menu Options The following functions are available for viewing site data (see Figure 9-1): » Go to measurements and Go to alarms - jump to these main menu items by keeping the selected hierarchy item. » Modify equipment, Modify equipment without discovery, Deactivate data collection - For non-virtual equipment, accessing different StarQuality 224 User Manual General Setting Options Site and Equipment Configuration equipment modification modes (see “Equipment Modification” on page 227). » New threshold, New group threshold, New threshold from template For non-virtual equipment, accessing the threshold configuration pages (refer to “Setting Alarm Thresholds” on page 165). » Edit public charts - For non-virtual equipment, accessing and private or public chart template configuration pages (see “Configuring Public and Private Charts” on page 238) » WiMAX inventory report - Displays a table of all the CPEs in the site, from a single BTS to the whole network. The information includes BTS no., BTS name (by StarQuality), Serving BS, and CPE MAC address. Operations Drop-down Menu Figure 9-1: Site and Equipment Configuration Window with Operations Drop-down Menu 9.3.2.2 Adding and Editing Sites You can create objects by selecting the kind of object from the scroll down menu in the table header under the basic or virtual site (see Figure 9-2). To add or edit a site: 1 Select Settings > Site and Equipment Configuration. 2 Select the site that should contain the new one, then from the Creating drop-down menu select New Site. StarQuality 225 User Manual General Setting Options 3 Equipment Configuration Fill in the site name, its description and choose the corresponding icon and server group. Click OK. 4 To modify a site, click either [edit] or [del]) next to the site. Only empty sites can be deleted. Figure 9-2: Adding a New Site 9.3.2.3 Creating and Editing Virtual Sites The creation and editing of virtual sites is performed similarly to non-virtual sites (See above). When adding a virtual site, select the New public or New private site item from the pull down menu. The main difference is that under virtual sites, basic sites or equipment cannot be created (the latter can be only linked), therefore no server groups can be specified. 9.3.3 Equipment Configuration 9.3.3.1 Creating New Equipment from Template The only templates available are either those not assigned to any site (general templates), or templates that are assigned to the current site (specific templates). If there is more than one available template, you choose the proper one. Then the system orders the templates so that the ones belonging to the data collector type of the current site are listed at the beginning. Refer to “Discovery of WiMAX Devices” on page 125. StarQuality 226 User Manual General Setting Options 9.3.3.2 Equipment Configuration Equipment Modification To modify a piece of equipment: Use one of the following methods for equipment modification: Equipment Modification in Settings: a Click [Edit] next to the equipment name, or click the equipment icon and select Modify Equuipment from the Operations pull down menu; the system rediscovers the list of measurements that can be carried out on the equipment. The following notice appears on the page: Figure 9-3: Equipment Discovery Message The following page is displayed: Figure 9-4: Equipment Modification Window StarQuality 227 User Manual General Setting Options b Equipment Configuration Modify each parameter and click OK; The equipment configuration page is displayed. Equipment modification from the site: when viewing sites, use the [edit] link in the equipment lines, or select Modify Equipment from the Operations pull down menu to display the same page as in the previous item with the only difference that after the modification the system returns to the site page. Equipment modification without discovery: During Equipment Modification, only the equipment parameters are modified, and not measurements. Accordingly, the StarQuality does not carry out the equipment discovery, and consequently the modifications can be performed faster, provided you modify equipment parameters only Activating/deactivating data collection: In the Operations pull down menu, either Activate or Deactivate data collection appears, depending on the equipment status. The turning on and off Data Collection operations corresponds to the setting and clearing of the “Collect data” check-box in Equipment Modification page (see Figure 9-4). After turning off the data collection, the StarQuality does not collect data from the equipment until the switch is turned back, but it does not delete the equipment either. Therefore, the equipment is displayed similarly to other equipment under the Measurements and Alarms menu items, and its threshold and charts definitions are also retained. 9.3.3.3 Viewing the Equipment Configuration To view the equipment configuration, click on the icon of the equipment in the list; a page with similar structure is displayed, with the following differences: Only the active measurements are displayed, and they cannot be modified On this page the threshold settings related to the equipment is displayed, which can also be modified from here. StarQuality 228 User Manual General Setting Options Equipment Configuration Figure 9-5: Viewing Equipment with Additional Equipment Parameters 9.3.3.4 Equipment Deletion You can delete equipments even if measurements belong to them. The deleted equipments, measurements and measurement results will be deleted from the active tables and placed into the archive tables. The deletion function differs from the equipment deactivation function: for the former one, the measurements can be restarted for the equipment only if they are recreated, and so the thresholds definitions and the public and private charts have to be recreated again. In equipment deactivation, however, the data collection is suspended for the equipment, but nothing is deleted. 9.3.3.5 Threshold Modification for Equipment Use the Operations pull-down menu to modify thresholds specifically for the selected equipment. Refer to “Customization” on page 233. 9.3.3.6 Editing Charts for Equipment Use the Operations pull down menu to modify charts specifically for the selected equipment, or scroll down to the threshold menu at the bottom of the page. Refer to “Configuring Public and Private Charts” on page 238. StarQuality 229 User Manual General Setting Options 9.3.4 Creating and Editing Virtual Equipment Creating and Editing Virtual Equipment When creating a virtual equipment, you specify only the name and an optional description. After the creation, the virtual equipment can also be modified. A newly created virtual equipment has a single parent object (with the current site), but later it can be placed under other sites as well. Accordingly, the parent site is a pull down menu suitable for choosing more elements, where the order in which the elements are displayed depends primarily on whether they have been selected to the equipment before. To create a new virtual equipment: 1 In Settings > Site and Equipment Configuration select the site to which to add a new virtual equipment by clicking on its icon (you can also add virtual equipment directly to the ROOT). 2 From the Creating pull-down menu select New Public (admin only) or Private Virtual Equipment. 3 Specify the name and an optional description. To modify a virtual equipment: Use the following methods to modify: Basic parameters: Click [edit] next to the virtual equipment entry and modify the name and description as required. You can also modify the parent basic and virtual sites, using the parent site pull down menu. Figure 9-6: Virtual Equipment Modification I StarQuality 230 User Manual General Setting Options Creating and Editing Virtual Equipment Assigning measurements and charts: a Click on the equipment icon. b Select either [add new] to add charts or measurements, or [del] to delete the equipment. c To choose a measurement to assign, specify reqired equipment parameters (see Figure 9-7). Use the symbols [%] and [_] to match an arbitrary substring or character, respectively. The search results are displayed in a list, where you can select parameters for the creation by setting or clearing the check-boxes in the lines, or changing the state of all check-boxes together with the check-box in the first line (see Figure 9-8). d To chose a chart to assign, specify its name. The searching method described above is similar for this step. Figure 9-7: Virtual Equipment Modification II StarQuality 231 User Manual General Setting Options Linked Equipment Figure 9-8: Virtual Equipment Modification - Site Search Results 9.3.5 Linked Equipment Under the virtual sites you cannot insert or delete equipment, but you can link the already inserted equipment or remove an existing connection. To create a link to equipment: 1 From the Creating pull down menu select Link Equipment. 2 Specify equipment parameters to search. 3 From the search results, select the equipment to be placed under the virtual site. StarQuality 232 User Manual General Setting Options 9.4 Customization Customization In this menu item (Settings > Customization) you can make user-specific settings (non-administrator users) and system level settings (admin users). The following topics are covered in this section: “Customizing Display Preferences (Non-Administrator Users Only)” on page 233 “Customizing Public (Admin only) and Private Menu Items” on page 236 “Configuring Public and Private Charts” on page 238 “Setting E-mail Addresses (Admin only)” on page 243 9.4.1 Customizing Display Preferences (Non-Administrator Users Only) NOTE This section is applicable to Non-administrator users only You can select and modify the display preferences per your needs. To customize display preferences: 1 From the main menu select Settings. 2 From the Settings panel select Customization > Preferences. The submenu has a single page only. StarQuality 233 User Manual General Setting Options Customizing Display Preferences (Non-Administrator Users Only) Figure 9-9: User Preferences 3 Modify the preferences as required: Measurement view: select the default view for the site and equipment configurations. For every page the view can be changed temporarily with the small icons located at the top of the page. » Icons: Large icons representing the sites and equipment, up to five in a row. » List: Small icons representing the sites and equipment, up to five in a row. » Detailed: a single element per row with the following columns: ◊ First column: The element icon, this differentiates the equipment from the sites ◊ Name: The name of the element ◊ Description: The description of the element ◊ Equipment data: Used only for equipment, contains all measurement server specific data of the equipment (e.g. community for SNMP). StarQuality 234 User Manual General Setting Options Customizing Display Preferences (Non-Administrator Users Only) Virtual site-equipment hierarchy: This controls whether the private and public virtual, or the default hierarchy should be displayed below the Measurements > Current measurements submenu. The possible settings are: » Private and original » Public and original » Private, public and original (default) » Only private » Only public » Private and public Single select entry: If this option is set, then: » Under the “Equipment Search” menu item, the equipment will be immediately displayed if the search has a single result only » Below the “Current measurements” menu item the page for a given piece of equipment will be displayed immediately if the user has the rights for a single piece of equipment only, furthermore the elements of a site will also be displayed if only a single site could be accessed. Starting page: Choose the value from the scroll down list: » Empty: the initial page is displayed for the user after login » Menu items: the page below the given menu item is displayed for the user after login, its value can be one of the menu items below Alarms and Measurements Measurement page info: The amount of equipment information displayed on the page containing the measurements. Chart order on actual result page: Whether the public and/or private charts should be displayed on the base measurement page accessed through the Current measurements menu item. Moreover, if they are displayed, then in what order (this setting does not influence the display of virtual equipment, there only created charts are displayed in the order they were configured) StarQuality 235 User Manual General Setting Options Customizing Public (Admin only) and Private Menu Items Equipment actual results chart time span: On the equipment measurement page the chart resolution cannot be specified, instead the user can set the value here. By default this is the suggested 5-minute resolution daily chart. The smallest chart on the page displaying the details of individual measurements is set based on the time interval of the measurement, but in case of public and private charts the value given here is used. 4 Click OK; The modifications is saved and the page is refreshed with the modified data. 9.4.2 Customizing Public (Admin only) and Private Menu Items You can create shortcut menu items under the Alarms and Measurements main menus. To edit a menu item: 1 From the Settings > Customization select Public/Private Menu Items; The Menu Item Configuration page is displayed. NOTE The menu item configuration can also be performed from the Alarms and Measurements main menu items: after selecting the object, select the Save as Submenu action the Operation pull down menu on the right-hand side (see also “Saving Items as A Submenu” on page 161. Figure 9-10: Menu Item Configuration 2 StarQuality Click [edit]; The following page is displayed: 236 User Manual General Setting Options Customizing Public (Admin only) and Private Menu Items Figure 9-11: Menu Item Editing 3 Set the menu in which the edited menu item will be displayed. For charts, only the “for the Measurements menu” option can be selected. 4 Click OK; The Alarms or Measurement pages will be updated according to your selections. To add a new menu item: 1 Select a schematic map (created by the administrators). 2 Select the virtual or real site or equipment to which the menu item points. 3 In Settings > Customization select Public/Private Menu Item; the Menu Item Configuration window is displayed (see Figure 9-10). 4 Click [add new]; A search window appears where a search string has to be specified (the % and _ characters can be used, * and ? characters are no applicable) to obtain the list of matching elements. Figure 9-12: Menu Item Configuration - Search Object 5 StarQuality Select the item to add to the Alarms or Measurement submenus and Click OK. 237 User Manual General Setting Options 9.4.3 Configuring Public and Private Charts Configuring Public and Private Charts Administrators and restricted administrators can edit private and public charts, while admin users can edit only public charts, and every other user - only private charts. The editing of both types takes place on pages structured almost identically; therefore, both are discussed herein, while indicating the differences between them. 9.4.3.1 Editing and Creating Charts When modifying already existing elements in the chart, the same fields are displayed with the only difference that the name of the previously selected object in the object field cannot be changed. To initiate chart editing: 1 Access the Chart Configuration page (Figure 9-13) using one of the following methods: » Select Settings > Customization > Public charts or Private charts submenu items. » Select Settings > Site and Equipment Configuration (when a non-virtual site or equipment is selected in the hierarchy). This case differs from a menu based direct access in the following points: ◊ It is not necessary to specify the site and equipment name filter conditions when creating a new chart because the results are filtered automatically for the object at which the user started editing the chart. ◊ There is a [back] link on the starting page, which leads back to the appropriate site or equipment. ◊ Similarly to the Site and equipment configuration, both the location in the site equipment hierarchy as well as a pull down menu with the usual operations appear on the top of the page. ◊ If the chart template configuration is opened from the equipment page, then for the template based creation of new charts the system automatically offers the names of the equipment and template together for chart name. However in the other case only the template name will StarQuality 238 User Manual General Setting Options Configuring Public and Private Charts be offered, which in general will not be unique in the system without modification (see below) ◊ If the chart template configuration is opened from the equipment page, it is possible to use all chart templates at the same time, which means that you can create all charts for the equipment templates in one step. Figure 9-13: Chart Configuration (accessed from the Equipment page) To modify chart elements: 1 Edit the information in the charts page as required. The page contains the list of private or public charts together with the following attributes: Editing links: » [add new]: creates a new chart » [copy from]: creates a chart based on an existing one. Both in the private and the public charts, you can choose from the list of your private charts and the public charts that you have access to. » [from template]: creates a new chart based on a template (see “Viewing Charts” on page 243) » [from each templates]: creating new charts from templates appears only if the chart creation is initiated from the equipment page. This list allows connecting of each chart to an existing template. StarQuality » [edit]: edits the chart attributes that are displayed here » [del]: deletes chart » [members]: edits the members of the chart 239 User Manual General Setting Options Configuring Public and Private Charts Name: The name of the chart. For public charts, it should be unique among the public charts, and for private charts it should be unique among the public and private charts. Accordingly, a public chart can be created with a name that already exists under the private charts of the user, or the same chart name can appear in the set of private charts belonging to many different users Created by: The name of the chart designer, naturally it is used for public charts only Unit: Description of the value axis of the chart Minimum: The chart minimum as a percentage or a concrete value. If it is not set, the minimum value is at 0. A percentage value is interpreted with respect to the average of the values displayed on the current chart Maximum: The chart maximum as a percentage or a concrete value. If it is not set, the maximum value is the current maximum value displayed in the chart. A percentage value is interpreted with respect to the average of the values displayed on the current chart Summary: determines if aggregate measurement values should be calculated in the table that corresponds to the chart. It can be turned on only if the chart has no element for which the Zero value (see below) is set to the previous zero value. Moreover, if it is turned on and such an element is created during chart modification or creation, it is turned off automatically. Short description (URL): This field is displayed only for administrator users. In this field a URL can be specified. If it is set, for each chart a Help sign appears for the users when the chart is viewed, and when clicking this link, the page pointed by the given URL is displayed in a new window. NOTE The editing and creating of these pages are not part of the StarQuality system 2 If you have administrator and restricted administrator user permissions, in addition to the above fields, you can change whether the chart is public or private. 3 Under the [members] link is the list of chart elements of the current chart. The items of this table are the following in order: StarQuality 240 User Manual General Setting Options Configuring Public and Private Charts Editing links: » [add new]: creating a new element » [edit]: modifying an element » [del]: deleting an element Order: The order of the element within the chart. The order not only determines the drawing order of the elements on the chart but it also influences the reference point of the chart base. The order can be modified on this starting page with the green down and up arrows. Name: The name of the element, which appears in the table of values on the chart Object: The object for which the element contain data. For chart elements the object can be a basic site or basic equipment report. For measurement chart elements it can be an interface or other measurement. Threshold or report variable: Depending on the type of the element (report or measurement) it contains the name of the threshold violation or the report variable to be displayed Field: Which measured value belonging to the object, and optionally to the report variable, should be displayed by the chart element: » For measurement chart elements this can be an uplink or downlink. » For report charts this can be minimum, maximum, average, etc. Type: The representation of a chart element should be a line, an area or a bar Chart base: Selects the chart base of the chart element. With the exception of the first element (where naturally the 0 value necessarily corresponds to the zero) it is possible to choose, whether the chart base of the chart element should agree with the current chart base of the previous chart element (chart elements “drawn onto each other”) or with the current value of the previous chart element (chart elements “drawn over each other”). The following example shows the two different diagrams for the same value pair. Color: Element color StarQuality 241 User Manual General Setting Options Configuring Public and Private Charts Peak color: If the chart resolution (e.g. 15 minutes, 2 hours, etc.) is smaller than the value resolution (e.g. 15 minutes, 3 minutes, etc.), the application shows the calculated average on the chart (both on the chart defined here and on the default one). If a color is set here, the average values are displayed in addition to the maximum values of the data. Transparent: Determines whether the other possible chart elements behind the element should be visible. Its use is recommended if the type of the element is area or bar, and the value of the zero point parameters is not “previous value” but “previous zero” Assume zero when value is missing: If there is no measurement value at a given time, the application can draw the chart according to the last value, or assume the missing value to be zero. To create a new element: 1 Select the type of the measurement or the report variable; The following configurable elements appear from the list mentioned above: name, object, and threshold (if a measurement is selected currently, see below), field, type, chart base, color, peak color, and zero value. 2 Edit the elements as required. Note that the order does not appear since the new element receives the last sequence number automatically. Depending on the object, maximum three pull down menus are displayed: » In case of site level report variable: site pull down menu » In case of equipment level report variable: site and equipment pull down menus » In case of measurement element: site, equipment and measurement pull down menus The equipment pull down menu always displays the list of equipment directly under the currently chosen element in the site menu, while the measurement menu always shows the measurements under the currently selected equipment. When the selection of the pull down menus is changed, the page reloads automatically to reflect the current status. 3 StarQuality Click OK to select the desired element 242 User Manual General Setting Options Setting E-mail Addresses (Admin only) NOTE The OK button appears only if all the necessary object pull down menus have been displayed according to the report variable or measurement selected in the first step. For example, when measuring communication traffic, this button appears only if a piece of equipment on a site and a measurement under that have been selected. 9.4.3.2 Deleting Chart Elements Users can delete a chart element using the [del] link. However note the following limitations: If the user is not administrator and the user rights to an object are revoked, then the corresponding private chart elements are deleted too. When deleting an object, it is automatically removed from all chart definitions. If a chart becomes empty after such an operation, then the chart is deleted automatically as well. 9.4.3.3 Viewing Charts By navigating the site-equipment hierarchy starting from the “Measurements” menu item, all private charts can be accessed and also public charts for which the user has access rights. 9.4.4 Setting E-mail Addresses (Admin only) All users (except limited ones) may set up one or more e-mail address to which the system can send notifications on threshold violations. A prerequisite to the actual e-mail sending is that the StarQuality server has been configure with an active SMTP server as described in “Mail Server Configuration” on page 95, Step 2. To set an e-mail address: 1 From Settings > Customization select E-mail Addresses; A list of addresses appears. 2 StarQuality Click [add new]; The E-mail Address Configuration window is displayed. 243 User Manual General Setting Options Setting E-mail Addresses (Admin only) Figure 9-14: E-mail Address Configuration 3 Specify the following: » Name: It must be unique for each user. This name will appear in the selection list for in the Thresholds Configuration window. » E-mail: The e-mail address to where the messages should be sent. » Multiple threshold violations in one mail: In case of a single sampling interval in which multiple threshold violations occurred, it is possible to send the notification in a single e-mail (bulk) instead of sending them separately. The bulk mail is less detailed than the separate e-mail. Figure 9-15: Example of Separate Threshold Violation Notification StarQuality 244 User Manual General Setting Options 9.5 Templates (admin only) Templates (admin only) Figure 9-16: Example of Bulk Threshold Violation Notification MIB upload: Not applicable. Measurement type definitions: Not applicable. Equipment templates: Not applicable. Threshold templates: Editing threshold templates (see “Setting Alarm Thresholds” on page 165) Chart templates: Not applicable. Editing chart templates (see “Viewing Charts” on page 243) Exclusion window template: Defining time frames in which thresholds can be activated/deactivated StarQuality 245 User Manual General Setting Options 9.6 Server Configuration and Management (Admin only) Server Configuration and Management (Admin only) The following topics are covered in this section: “Overview” on page 246 “Licences” on page 247 “Device and Measurement Summary” on page 249 “Server Configuration” on page 249 “Start/Stop/Status of Servers” on page 253 “Viewing Server Events” on page 254 “Collector Load” on page 255 9.6.1 Overview Server configuration and management refers to two server types: Default server: e.g. the application manager or the report counting server. The number of servers cannot be extended or limited. Measurement servers: arbitrary number of these can exist and each must belong to a measurement server group. There are three types of measurement servers matching the types given for the measurement server groups: » Active and discoverable: the measurements are actively made by the StarQuality application through the available API. The measurements supported by discoverable equipment can be discovered or queried through a suitable management protocol: e.g. the list of interfaces on network equipment or the list of disk partitions on a UNIX server. These are discovered and automatically monitored by the StarQuality (e.g. it automatically deletes them if the measurement has ended or the measurement name has changed). Even though the StarQuality automatically searches the measurements in such a case, they can also be manually recorded. If such a measurement is created, subsequent StarQuality 246 User Manual General Setting Options Licences automatic discovery will not occur. Accordingly, if the measured object is deleted from the active equipment, it will not disappear from the StarQuality. This type of measurement will again be monitored automatically only if a new manual discovery is performed on the equipment through the web interface and it is saved afterwards. For certain discoverable servers there are measurement types (e.g. servers measuring IPSec) where no discovery is performed. » Active but non-discoverable: the measurements are actively made by the StarQuality application through the available API, but it is impossible to discover and monitor the measurements of the equipment. This is typical when parameters need to be set for the measuring system in order to start the measurements (e.g. one or more WEB server addresses should be given to measure HTTP services). » Passive and optionally capable of auto-discovery: the StarQuality only collects files containing measurement values in certain defined formats, and optionally records and deletes the pieces of equipment and measurements based on the collected data. The Servers menu includes five submenus, described herein. 9.6.2 Licences 9.6.2.1 Overview The licence for StarQuality is an encrypted file which defines: Validity period - either unlimited or temporary. Number of collector Network Elements (NEs) of any type - BTSs only (disregarding the number of AUs under each BTS. No. of SUs is unlimited, except for FDD 3.5/3.6: 10 SUs per BTS). The installation CD includes a temporary licence file for a limited period of time and limited number of NEs. To receive acquire the permanent licence, access the Alvarion on-line feature licence application (refer to Getting Feature Licenses Guide) 9.6.2.2 Managing Licences The Licences submenu is available only for admin users. You can edit the license table and compare the number of available and required licences. If there are fewer licences available than required for operating the system, or any of the StarQuality 247 User Manual General Setting Options Licences licenses has expired, then users receive a warning message during the login process. Licence data can only uploaded and deleted but not edited. The individual columns are: Editing links: » [add new]: adding a new licence file » [del]: deleting a licence entry Name: Name of the licence End date: Expiration date of the given licence. If it is unlimited, then use “never” Quantity: Quantity of licences in the system. Can be unlimited. Needed: Quantity required to operate the system Error type: In those rows where the licence is invalid an error message is shown and the row is displayed in red. Possible error messages: » Wrong checksum: invalid line since someone directly modified the licence entry » Expired: licence was valid for a limited period only which has expired » No licence found: the given licence entry is required but not found » Low licence quantity: the quantity of the given licence is not enough for the system A licence can be added by providing a licence file. During this process the application keeps the already existing licence entries or modifies them if they exist in the file. To add a new licence: StarQuality 1 Place the licence file on the computer from which you activated the client. 2 From Settings select Servers; the Servers tab is displayed. 248 User Manual General Setting Options 9.6.3 Device and Measurement Summary 3 Select Licences. The Licences Configuration window is displayed. 4 Click [add new] and browse for the file containing the license. 5 Click OK. A list detailing the licenses is displayed. 6 Verify that the entry in the license list is not colored red. Device and Measurement Summary You can display a list of all basic equipments, and for each measurement type the number of objects in the system. To use the summary list: From Settings select Servers > Device and Measurement Summary; A table of all devices is displayed, indicating the site and equipment name, IP address, F H C A and total number of measurements. Figure 9-17: Device and Measurement Summary 9.6.4 Server Configuration Server configuration is available for the admin users only. You can add new servers, or delete and modify existing servers. To access the Server Configuration: 1 StarQuality From the main menu select Settings. 249 User Manual General Setting Options 2 Server Configuration From the Settings panel select Servers > Server Configuration; A list of all configured servers is displayed. Figure 9-18: Server Configuration Window The following information is displayed in the table: ID: unique identifier of the server. It is used when starting and halting the server from the command line, or when displaying the summary of the collected data for the measurement servers. Name: the name of the server Status: status of the server: running, not running, or unknown; Refer to “Editing Server Configuration” on page 252 Type: the type of the server; or the type of the server group for collector servers: SOAP, Manager, Event Server group: for a measurement server the name of its group Host: the host computer of the server Login: the user name used to login to the machine StarQuality 250 User Manual General Setting Options Server Configuration Pwd: user password. If it is not set, the application can still log in if SSH key-based authentication is configured Directory: the directory of the StarQuality application. The name of the directory should be an absolute path (i.e. it should started with /) Param1 and Param2: Further parameters depending on the type of the server, displayed with the appropriate name. » Measurement server: ◊ Persistent SSH and SFTP connection (Param1): Whether the SQLLDR and the MANAGER server can keep a persistent SSH and SFTP connection with the measurement server or not. Persistent connection is strongly recommended since nonessential logins and logouts can be avoided. There is only one case when non-persistent connection is necessary: in the case of certain former SSH implementations the established SFTP connection has fully utilized the CPU of the target machine, even when no operation was executed ◊ How many seconds should the system wait for collector result if it is not running (Param2). » Application manager: ◊ Cycle (in sec): The number of seconds waited between server monitoring ◊ Number of files: During self-testing the system checks the number of files in the tmp/done directory that executes the data loading component. If this is higher than the value specified here, the system generates a server event and notifies the operator. » Data compression and moving and partition creation: the time of running (HH:MM): These servers execute operations once a day (though they are continuously running). Partition creation is an exception since the daily operation is executed immediately at startup. » Threshold procession and report creation: the maximum time period (in hours) of former data to be processed at startup. At startup both of these servers determine the time up to which the individual thresholds as well as report variables were processed, and if the hour of the last processing is smaller than the current hour minus the specified time period, then they consider the processing to be done up to the current hour minus the specified time period. For example: if the five-minute thresholds were StarQuality 251 User Manual General Setting Options Server Configuration processed by the server up to 8:55, and it is restarted at 18:05 (same day), and the set value is 6, then processing will only be continued from 12:00 9.6.4.1 Editing Server Configuration During the configuration of the servers the following fields can be modified: name, host, login, password and the optional parameters. The host, login and directory parameters can only be modified if the given server is not running. To edit a server configuration: 1 Click [edit] next to one of the entries; the Server Configuration editing window is displayed. Figure 9-19: Editing Server Configuration 2 Specify the required information: name, host, login, password and the optional Param1 and Param2. 3 9.6.4.2 Click OK. Adding a New Server Adding and deleting a server is possible for measurement, SOAP, secondary application manager and secondary event receiver servers. When a measurement server is added, a server group is also added to the table in the Server Configuration window. StarQuality 252 User Manual General Setting Options Start/Stop/Status of Servers To add a new server: 1 In the Server Configuration window, click [add new]; The server Configuration editing window is displayed. Figure 9-20: Server Configuration - Adding New 2 Specify the required information: Name, type, host, login, password and directory. 3 9.6.5 Click OK. Start/Stop/Status of Servers This feature is available for the admin and administrator users only. The page displays the current status of servers by color coding. The columns of the table are identical to the table in “Server Configuration” on page 249 (except for password). You can start and stop the servers and check for their status manually, in addition to the automatic server check of the application manager. The page is continuously refreshed. After starting and stopping server(s) the subsequent refreshing also checks their status. The servers can be in three different statuses: Running, Not running and Unknown. Unknown status means that it cannot be determined whether the server is running or not: for example it is impossible to login with the specified data to the computer running the server. Only measurement servers with “running” status will be assigned to measure equipments. A server may be configured to the equipment, and another server is modified to be a secondary measurement server. Each measurement server measures all those pieces of equipment where it is a primary or secondary server, and after a certain period it deletes secondary server registrations where it is the StarQuality 253 User Manual General Setting Options Viewing Server Events primary server. Due to this algorithm no measurement would be omitted even if, for example in a measurement server group, one of the servers is started when another server has already been run: even though load balancing transfers a certain part of the equipment, both of them will measure the transferred pieces of equipment temporarily. To use the Server Start/Stop/Status window 1 From Settings select Servers > Start/Stop/Status. A list of all servers is displayed. Running servers are colored green, Not running servers are colored red. Figure 9-21: Server Status 2 Click either Start or Stop to change the status, or Check to manually check and refresh the status. 9.6.6 Viewing Server Events The application manager module (or modules if the secondary application manager is also installed) periodically performs different verifications in connection with the database and the machines running StarQuality. You can view the results of these verifications and the log entries created when modules are started or stopped. StarQuality 254 User Manual General Setting Options Collector Load To access the Event Server list: From Settings select Servers > Server Event; The server events list is displayed. Figure 9-22: Server Events Window 9.6.7 Collector Load This feature is available for the admin and administrator users only. You can view results for all possible measurement times, and the list of measurements that were unsuccessful at a given time. To use the Collector Load Information: 1 From Settings select Servers > Collector Load; The list of measurement servers is displayed, with the following information: StarQuality » General information: name, type, status and group » Size of the data files created by the server » Total number of equipments connected 255 User Manual General Setting Options Collector Load » Total number of measurements performed » F H C A - identifies the type of the measurement: F for traffic, H for error, C Deprecated and A for Alvarion measurements. Figure 9-23: Collector Load 2 You can use the scroll down menu in the Import Statistics column to display results for all possible measurement times, independently from the fact whether a measurement of that interval currently belongs to the given measurement server or not (since the query examines data collected earlier, too). As a hint the current time interval is indicated in green, with the number of measurements running with that interval. If you select a different interval, the Statistics page is automatically displayed. 3 Click the [view] link in the first column; A page identical to the one displayed from Settings > Measurements > Summary is displayed, filtered by the selected measurement server. StarQuality 256 User Manual General Setting Options Collector Load Figure 9-24: Collector Load Statistics 4 You can view the list of measurements that were unsuccessful at a given time by clicking on the [view] link: The list of devices and measurements are displayed together with another link that opens to the configuration panel of the device. Figure 9-25: Missing Measurements at a Given Time StarQuality 257 User Manual General Setting Options 9.7 Audit Trail Audit Trail The application records each configuration modification – equipment, site, measurement creation, modification, deletion, modification of reports and thresholds, etc. – that can be displayed under the Audit Trail menu item. The administrators are allowed to view every change, the restricted administrators are allowed to view only those changes which were made by themselves. The other users do not have access to this functionality. It also saves the name of the user who made the modification. It either equals to the user name at the WEB interface or it is a system value, if it was an automatic modification (e.g. an interface was cancelled in the equipment). To start an audit trail query: 1 From Settings select Audit trail; The Audit Trail query page is displayed (Figure 9-26). Figure 9-26: Audit Trail Query StarQuality 258 User Manual General Setting Options 2 Audit Trail Enter the filter conditions: » Object type: Select a type from a scroll down menu. Possible values: ◊ All: no type based filtering ◊ Other: only the operations for the object types adequate for the selection appear » Parent name: The name of the parent object; it can contain values only for equipments, measurement reports and chart elements » Name: Object name » Modified by: Name of the modifier. It is displayed only for the administrator users since the restricted administrators cannot view a change if it wasn’t made by themselves. 3 » From and To: When it was modified (from-till) » All results: Maximum number of displayed results. Mandatory to fill in Click OK; The query produces a table with columns similar to the search results with the following additional items: StarQuality » Operation: Insert, Modification or Delete » Object type » Name » Parent name » Modified by » Modification time 259 User Manual General Setting Options Audit Trail Figure 9-27: Audit Trail Entries 4 For “update” type changes, the first column also contains a [view] link; Click it to display the exact description that contains, the modified value in addition to the above elements. Figure 9-28: Viewing the Audit Trail StarQuality 260 User Manual General Setting Options 9.8 User Administration (Admin only) User Administration (Admin only) The administrator user can manage the list of users and their permissions, and add new users to the system. Every administrator has the right to modify normal users, while only the admin user can modify administrators. Restricted administrators cannot modify a user except if it was created by themselves. No user can delete the admin user. 9.8.1 Registering/Modifying Users To add or modify users: 1 From the Settings menu select User. The browser displays a list of user administration tasks. The Users tab displays a list of existing users. Figure 9-29: Users List 2 Select either [add new] or [edit] to modify a user (select [delete] to delete a user from the list); the following user definition fields are displayed. Figure 9-30: User Administration StarQuality 261 User Manual General Setting Options 3 User Permissions (Rights) Specify the following parameters for the added or modified user: » Name: The name of the user, e.g. First-name Family-name » Login: The user will be able to login with this name. It is suggested to use the small case letters of the English alphabet. The given value must be unique » Password: An initial password. If you do not specify a new password, then only the name and the admin fields are modified. » Admin: This option is only available if you are logged in with the admin user. The options are: ) Table 9-1: Admin Registering Optionsa Option Description Yes Provide the registered user with administrator rights Restricted Provide the registered user with restricted administrator rights No Provide the registered user with normal or restricted rights based on the value of the next parameter a. Refer to “User Types and Their Settings” on page 6 for more information » Can modify own settings: The user can only modify their password, preferences, own virtual hierarchy and charts if this field is checked. For administrator and restricted administrator users this is always set automatically. 9.8.2 User Permissions (Rights) 9.8.2.1 Overview For normal users, the access rights can be changed in four different levels: Site, equipment, measurement: These three objects are in a tree hierarchy, in which you can choose the items that the user can view. If you appoint one of these objects, then all objects below it can also be accessed by the user. For example, if the user has the access rights to the ROOT item (zero level site), all the objects in the system are accessible. If the user has access rights to one site, then all sites, equipment and measurements below it are accessible; however if access rights are provided only for the equipment, then StarQuality 262 User Manual General Setting Options User Permissions (Rights) only that equipment and its measurements are accessible; access right to the measurement only makes only that measurement accessible. Note that the rights are given only for the base hierarchy, and not for a virtual site, equipment or public chart, since the system calculates the permissions for these from the corresponding base objects. Chart: For each individual chart it can be specified whether the user can view it or not. Report: For each individual report, the user access can be set independently, which will be later combined with the access rights specified for the related site-equipment, so for example in a chart containing sites, only those rows for which the user has the rights are displayed. Threshold: Specifies if the user may view the threshold violations or not. If yes, then the system calculates also the domain of the viewable thresholds automatically based on the privileges of the base object. This entry is missing for the restricted administrators because they have always the right to see (and edit) thresholds. 9.8.2.2 Modifying User Rights If you modify a user as a restricted administrator then you can grant rights only for those objects for which you have right as well. Later on an administrator can grant more right to the user. However, if the right setting for a restricted administrator is edited (even if there was no change), then the system automatically checks all users created by that restricted administrator and revokes the rights for all objects for which that restricted administrator does not have right. The user can view certain measurements without any special settings, those that belong to some of the agents. This is true only if the user can view the equipment, and the measurement of the agent is the same as the name of the equipment, or starts with that name and is followed by a space. The set of visible public virtual sites, pieces of equipment and charts are determined automatically based on the measurement objects accessible by the user. For example: The users can only view a public virtual site if they have the right to view its real or virtual parent site StarQuality 263 User Manual General Setting Options User Permissions (Rights) The user scan view a virtual piece of equipment if they have the right to see all charts of that equipment. The user can view a public chart if they can view all measurements displayed on the chart. To modify user rights: 1 From Settings > User select User Rights; The User Rights window is displayed. Figure 9-31: User Selection 2 Select the user type and select whether the equipments and the measurements should also be included in the list of displayed objects. 3 Click OK; The User Rights modification window is displayed. The elements that cannot be accessed by the user are displayed on the left-hand side, while those that can be viewed on the right-hand side. Figure 9-32: User Rights Modification StarQuality 264 User Manual General Setting Options 4 High Availability Performance Select one or more items from either of these lists and move them to the other side by clicking on the appropriate arrow. The program automatically filters out the elements whose parent – already available in the hierarchy above – is present. For example if you mark all basic equipment and sites and move them to the right hand side of the window, after saving the modification only the ROOT object (the topmost) will remain in the right list. 9.8.3 High Availability Performance StarQuality is able to provide high availability as a result of using measurement server groups. Different strategies must be applied depending on the number of machines serving StarQuality and its Oracle database. However, for all strategies except the non-measuring server components, it is recommended to install all components on the same machine with Oracle. The report and threshold modules can be relocated to another machine if there is enough capacity. StarQuality 265 User Manual Chapter 10 Northbound Interface (NBI) Northbound Interface (NBI) In this chapter “Introduction” on page 268 “e-mail Notifications of StarQuality Server Events” on page 269 “e-mail Notifications and Traps of Threshold Crossing Events” on page 270 “SOAP Interface” on page 271 StarQuality 267 User Manual Northbound Interface (NBI) 10.1 Introduction Introduction The StarQuality Northbound Interface (NBI) functionality provides the following capabilities: Sending e-mail notifications to any number of recipients regarding server management events Sending e-mail notifications to any number of mail recipients and/or SNMP traps to any number of upper level management system (OSS) regarding threshold crossing events. Performing operations using the SOAP interface. StarQuality 268 User Manual Northbound Interface (NBI) 10.2 e-mail Notifications of StarQuality Server Events e-mail Notifications of StarQuality Server Events The StarQuality server can be configured to send e-mail notifications to a list of recipients about various events occurring within the system. For example: server up/down, collection failure. A prerequisite for the actual e-mail sending is the configuration of the StarQuality server with an active SMTP server as described in “Mail Server Configuration” on page 95, steps 2- 3. StarQuality 269 User Manual Northbound Interface (NBI) 10.3 e-mail Notifications and Traps of Threshold Crossing Events e-mail Notifications and Traps of Threshold Crossing Events 10.3.1 e-Mail Notifications A prerequisite to the actual e-mail sending is that the StarQuality server has been configure with an active SMTP server as described in “Mail Server Configuration” on page 95, Step 2 (PVSR_EMAIL_ADDRESS is not mandatory). To set e-mail notifications: 1 In order to receive e-mail notifications, define the address list as described in “Setting E-mail Addresses (Admin only)” on page 243. 2 From the list, select the specific recipients for each threshold or threshold template as described in “Setting Alarm Thresholds” on page 165. 10.3.2 SNMP Trap Notifications StarQuality Threshold Crossing Alerts (TCA) mechanism provides an interface From which SNMP traps can be sent to other management systems, in cases of actual threshold crossing events. The traps are constructed according to the designated StarQuality MIB supplied with the installation CD, ready for uploading to any trap receiving management system. Trap can be sent to one or more recipients and with different timetables. Refer to “Setting Alarm Thresholds” on page 165. StarQuality 270 User Manual Northbound Interface (NBI) 10.4 SOAP Interface SOAP Interface StarQuality SOAP interface enables various NBI operations via third party applications. A prerequisite for enabling SOAP operations is activation of the StarQuality SOAP server, as described in “Activating SOAP Server” on page 98. For description and instructions on available operations, refer to the StarQuality SOAP Manual. StarQuality 271 User Manual Chapter 11 Device Specific Information Device Specific Information In this chapter: “Introduction” on page 274 “BreezeMAX FDD and TDD Equipment” on page 275 “BreezeACCESS VL” on page 280 “4Motion Ver.2.5” on page 287 “4Motion Ver.3.0” on page 293 “BreezeMAX Extreme” on page 307 StarQuality 273 User Manual Device Specific Information 11.1 Introduction Introduction This chapter provides device specific information regarding software compatibility and limitations, traffic and performance counters, codes for thresholds and default built-in reports. This information may help you focus on the details required for each equipment type when using StarQuality. KPIs (Key Performance Indicators) exist for three types of entities: Slot (also referred to as AU, sector, BS) SU (also referred to as MS, CPE) NPU (also referred to as BTS, in “common measurements”) StarQuality 274 User Manual Device Specific Information 11.2 BreezeMAX FDD and TDD Equipment BreezeMAX FDD and TDD Equipment 11.2.1 Overview The information in this section is common to the following equipment types: » BreezeMAX FDD SNMP » BreezeMAX FDD » BreezeMAX TDD SW Compatibility: » FDD - 3.5/3.6 (SNMP based collection) » FDD 3.7 » TDD - 4.5/4.6 Refer to the Release Notes for specific Firmware versions. Collector type » FDD 3.5/3.6 - WiMAX FDD SNMP » FDD 3.7 - WiMAX FDD TFTP » TDD - WiMAX TDD 11.2.2 Network Discovery Prerequisites Table 11-1: BTS Configuration Requirements Requirement FDD SNMP Collection Interval Setting (rbCollectionStatisticsInterval) 900 sec. StarQuality registered as Authorised Manager (Traps disabled) + PM/TM Collection Activated StarQuality 275 FDD TFTP TDD + + + + (Mode: Basic User Manual Device Specific Information Key Performance Indicators (KPIs) Table 11-1: BTS Configuration Requirements (Continued) Requirement FDD SNMP FDD TFTP TDD PM/TM Collection Contents 11.2.3 Key Performance Indicators (KPIs) 11.2.3.1 BS KPIs Each of the following is available for both Downlink (DL) and Uplink (UL): Table 11-2: FDD and TDD Traffic BS KPIs Counter Description Air Link Utilization (%) The utilization of available wireless link resources: Total used symbols during the collection period as a percentage of total symbols available. Total symbols Qty used Air Link Utilization% = 100 --------------------------------------------------------Total symbols available Subscription (%) Subscription (%) = If Constant throughput >0 then The throughput (based on the total traffic rate taking into account the unusable gap period in each frame) as a percentage of total provisioned MIR. The higher this value, the higher is the actual utilization by users of the provisioned MIR. Throughput – Const throughput 100 --------------------------------------------------------------------------- CIR&MIR Otherwise Throughput 100 -------------------------------- CIR&MIR Constant throuput = Throuput – CIR&MIR MIR+CIR Allocated (bits per second) MIRCIR = Stop_time_quarter Provisioned MIR for BE and nRT registered + Provisioned CIR for RT & CG registered 1000 -------------------------------------------------------------------------------------------------------------------------------------------------------------------------------------------------------------------- Stop_time – Start_time----------------------------------------------------- bps Start_time_quarter 15min CIR Allocated (bits per second) StarQuality The total Maximum Information Rate (MIR for all BE and NRT services and CIR for RT and CG services) provisioned to connected SUs. The Committed Information Rate (CIR for NRT, RT and CG services) provisioned to SUs connected to the AU/FDD Micro Base Station. 276 User Manual Device Specific Information Key Performance Indicators (KPIs) Table 11-2: FDD and TDD Traffic BS KPIs Counter Description Stop_time_quarter Provisioned CIR for nRT and CG registered CIR = 1000 --------------------------------------------------------------------------------------------------------- Stop_time – Start_time----------------------------------------------------- bps Start_time_quarter 15min Throughput (bits per second) Total symbols used. Total symbols used in bytes considering rate 8 Rate = Throughput = ---------------------------------------------------------------------------------------------------------------------------------------------------------------------Stop_time – Start_time----------------------------------------------------- Total symbols available T_symbol bps 15min Total Used Capacity Rate (bps) Throughput of each MCS for the uplink and downlink directions Calculation formula per each rate: Stop_time_quarter Symbols[Ra] b 8 --------------------------------------------------------------------------------------------------- Total symbols available T_symbol [bps] Start_time_quarter When: a - modulation rate b - bytes per symbol for this modulation rate Number of connected SUs 11.2.3.2 SUs with active services SU KPIs Performance KPIs include the uplink/downlink RSSI (Received Signal Strength Indicator), SNR (Signal to Noise Ration) and modulation rate (from rate 1 (BPSK 1/2] to rate 8 [64QAM 3/4]) measurements for all SUs. Note the following regarding FDD ver3.5/3.6 SUs (SNMP based data collection): The number of SUs is limited to 10 per BTS Only a single value per each counter is displayed according to its value at the time of sampling. StarQuality 277 User Manual Device Specific Information Codes for Threshold Setting Table 11-3: FDD/TDD Performance Counters (File Collection) Counter Description Uplink RSSI Average/Max/Min (dBm) The average/maximum/minimum RSSI value of the signal from the SU measured at the AU/FDD Micro Base Station for the past 15 minutes. In TDD there is only Average. Downlink RSSI Average/Max/Min (dBm) The average/maximum/minimum RSSI value of the signal from the AU measured at the SU (and reported over the air to the Base Station equipment) for the past 15 minutes. In TDD there is only Average.. Uplink SNR Average/Max/Min (dB) The average/maximum/minimum SNR value of the signal from the SU measured at the AU/FDD Micro Base Station for the past 15 minutes. Downlink SNR Average/Max/Min (dB) The Average/maximum/minimum SNR value of the signal from the AU measured at the SU (and reported over the air to the Base Station equipment) for the past 15 minutes. Uplink Rate Average/Max/Min From rate 1 (BPSK 1/2) to rate 8 (64QAM 3/4) Downlink Rate Average/Max/Min From rate 1 (BPSK 1/2) to rate 8 (64QAM 3/4) Uptime BTS uptime in seconds 11.2.3.3 Common/BTS KPIs Uptime 11.2.4 Codes for Threshold Setting Table 11-4: Syntax for TDD/FDD AU Measurements Description StarQuality Parameter FDD 35 (SNMP) FDD TFTP TDD Total Used Capacity Rate 1 WCR1 FCR1 TCR1 Total Used Capacity Rate 2 WCR2 FCR2 N/A Total Used Capacity Rate 3 WCR3 FCR3 TCR3 Total Used Capacity Rate 4 WCR4 FCR4 TCR4 Total Used Capacity Rate 5 WCR5 FCR5 TCR5 Total Used Capacity Rate 6 WCR6 FCR6 TCR6 Total Used Capacity Rate 7 WCR7 FCR7 TCR7 Total Used Capacity Rate 8 WCR8 FCR8 TCR8 Subscription WMP FMP TMP 278 User Manual Device Specific Information Default Built-in Reports Table 11-4: Syntax for TDD/FDD AU Measurements (Continued) Description Parameter FDD 35 (SNMP) FDD TFTP TDD Air Link Occupation WOCC FOCC TOCC CIR Allocated WPC FPC TPC MIR+CIR Allocated WPM FPM TPM Throughput WT FT TT Number Of Connected SUs WCS FCS TCS Table 11-5: Syntax for TDD/FDD SU Measurements Description Parameter FDD 35 (SNMP) FDD TFTP TDD WSU3 FSU8 TSU6 Rate average FSU9 TSU7 Rate min FSU7 TSU5 FSU5 TSU2 SNR average FSU6 TSU3 SNR min FSU4 TSU1 FSU2 TSU4 Rate max SNR max RSSI max WSU1 WSU2 RSSI average FSU3 RSSI min FSU1 11.2.5 Default Built-in Reports BottomN Uptime TopN Air Link Utilization TopN Throughput TopN Number of Connected SUs StarQuality 279 User Manual Device Specific Information 11.3 BreezeACCESS VL BreezeACCESS VL 11.3.1 Overview SW Compatibility: Version 6.0. (Up to 10 SUs per BTS can be measured) Collector type - WiMAX VL 11.3.2 Network Discovery Prerequisites » StarQuality registered as Authorised Manager (Traps disabled) » PM/TM Collection Activated 11.3.3 Key Performance Indicators (KPIs) 11.3.3.1 BS KPIs Table 11-6: BreezeACCESS VL Traffic Counters Counter Description Concatenated Frames Received (frames per second) The total number of concatenated frames received from the wireless medium, including duplicate frames. There are also separate counts for concatenated frames that include one frame (Single), two frames (Double) or more than two frames (More). Concatenated Frames Transmitted (frames per second) The total number of concatenated frames transmitted successfully to the wireless medium, excluding retransmissions. There are also separate counts for concatenated frames that include one frame (Single), two frames (Double) or more than two frames (More). StarQuality 280 User Manual Device Specific Information Key Performance Indicators (KPIs) Table 11-6: BreezeACCESS VL Traffic Counters (Continued) Counter Description Errors Received (frames per second) Phy - The number of Physical errors (unidentified signals). CRC - The number of frames received from the wireless medium containing CRC errors. Overrun - The number of frames that were discarded because the receive rate exceeded the processing capability or the capacity of the Ethernet port. Decrypt - The number of frames that were not received properly due to a problem in the data decryption mechanism. Other - Errors other than previous counters. Duplicate Frames Discarded - The number of data frames discarded because multiple copies were received. If an acknowledgement message is not received by the originating unit, the same data frame can be received more than once. Although duplicate frames are included in all counters that include data frames, only the first copy is forwarded to the Ethernet port. Errors Transmitted (frames per second) Frames dropped (too many retries) - The number of dropped frames, which are unsuccessfully retransmitted without being acknowledged until the maximum permitted number of retransmissions. Underrun Events - The number of times that transmission of a frame was aborted because the rate of submitting frames for transmission exceeds the available transmission capability. Other TX Events - The number of frames whose transmission was not completed or delayed due to a problem other than those represented by the other counters. Internally discarded MIR/CIR - The number of data frames received from the Ethernet port that were discarded by the MIR/CIR mechanism to avoid exceeding the maximum permitted information rate. Frames Received (frames per second) The total number of data frames received from the wireless medium, including duplicate frames. Frames Transmitted (frames per second) The total number of data frames submitted to the internal bridge for transmission to the wireless medium. The count does not include control and wireless management frames, or retransmissions. There are also separate counts for each priority queue through which the frames were routed (High, Mid and Low). StarQuality 281 User Manual Device Specific Information Key Performance Indicators (KPIs) Table 11-6: BreezeACCESS VL Traffic Counters (Continued) Counter Description Wireless Frames Received (frames per second) The total number of frames received from the wireless medium. The count includes data frames as well as control and wireless management frames. The count does not include bad frames and duplicate frames. Wireless Frames Transmitted (frames per second) The number of frames transmitted to the wireless medium. The total includes one count for each successfully transmitted unicast frame (excluding retransmissions), and the number of transmitted multicast and broadcast frames, including control and wireless management frames. CIR Allocated (Bits per second) The sum of allocated CIR (Committed Information Rate) Downlink/Uplink values for all the SUs in the sector. Ethernet Throughput (bits per second) The average throughput per second on the Ethernet port on Downlink/Uplink direction. MIR Allocated (bits per second) The sum of allocated MIR (Maximum Information Rate) Downlink/Uplink values for all the SUs in the sector. Noise Floor (dBm) The average Noise Floor recorded by the unit. Number of Connected SUs SUs with active services Retransmission (%) The percentage of total number of retransmissions, including all unsuccessful transmissions and retransmissions, out of the total number of unicast frames transmitted over the wireless port. Throughput (bits per second) The average throughput per second on the Radio port on Downlink/Uplink direction. Uptime (hours) BS uptime in hours 11.3.3.2 SU KPIs Table 11-7: BreezeACCESS VL Performance Counters Counter Description Concatenated Frames, Receive (frames per second) The total number of concatenated frames received from the wireless medium, including duplicate frames. There are also separate counts for concatenated frames that include one frame (Single), two frames (Double) or more than two frames (More). Concatenated Frames ,Transmit (frames per second) The total number of concatenated frames transmitted successfully to the wireless medium, excluding retransmissions. There are also separate counts for concatenated frames that include one frame (Single), two frames (Double) or more than two frames (More). StarQuality 282 User Manual Device Specific Information Key Performance Indicators (KPIs) Table 11-7: BreezeACCESS VL Performance Counters (Continued) Counter Description Errors Received (frames per second) Phy - The number of Physical errors (unidentified signals). CRC - The number of frames received from the wireless medium containing CRC errors. Overrun - The number of frames that were discarded because the receive rate exceeded the processing capability or the capacity of the Ethernet port. Decrypt - The number of frames that were not received properly due to a problem in the data decryption mechanism. Other - Receive errors other than previous counters. Duplicate frames discarded -The number of data frames discarded because multiple copies were received. If an acknowledgement message is not received by the originating unit, the same data frame can be received more than once. Although duplicate frames are included in all counters that include data frames, only the first copy is forwarded to the Ethernet port. Errors Transmitted (frames per second) Frames dropped (too many retries) - The number of dropped frames, which are unsuccessfully retransmitted without being acknowledged until the maximum permitted number of retransmissions. Underrun Events - The number of times that transmission of a frame was aborted because the rate of submitting frames for transmission exceeds the available transmission capability. Other TX Events - The number of frames whose transmission was not completed or delayed due to a problem other than those represented by the other counters. Internally discarded MIR/CIR - The number of data frames received from the Ethernet port that were discarded by the MIR/CIR mechanism to avoid exceeding the maximum permitted information rate. Ethernet Throughput (bits per second) The average throughput per second on the Ethernet port on Downlink/Uplink direction. Frames Received (frames per second) The total number of data frames received from the wireless medium, including duplicate frames. Frames Submitted (frames per second) The total number of data frames submitted to the internal bridge for transmission to the wireless medium. The count does not include control and wireless management frames, or retransmissions. There are also separate counts for each priority queue through which the frames were routed (High, Mid and Low). StarQuality 283 User Manual Device Specific Information Codes for Threshold Setting Table 11-7: BreezeACCESS VL Performance Counters (Continued) Counter Description Noise Floor (dBm) The average Noise Floor recorded by the unit. Retransmission (%) The percentage of total number of retransmissions, including all unsuccessful transmissions and retransmissions, out of the total number of unicast frames transmitted over the wireless port. Downlink RSSI (dBm) Downlink RSSI value as measured in the time of sampling Downlink SNR (dB) Downlink SNR value as measured at the time of sampling Throughput (bits per second) Sector throughput as measured at the time of sampling Uptime (hours) CPE uptime in hours Wireless Frames (frames per second) The number of frames transmitted to the wireless medium. The total includes one count for each successfully transmitted unicast frame (excluding retransmissions), and the number of transmitted multicast and broadcast frames, including control and wireless management frames. 11.3.4 Codes for Threshold Setting Table 11-8: Syntax for BreezeACCESS VL AU Measurements StarQuality Description Parameter Concatenated Frames Single VCFS Concatenated Frames Double VCFD Concatenated Frames More VCFM Concatenated Frames Total VCFT Errors Receive CRC VERC Errors Receive Decrypt VERD Errors Receive Duplicate frames discarded VERd Errors Receive Other VERo Errors Receive Overrun VERO Errors Receive Phy VERP Errors Transmit Frames dropped (too many retries) VETD Errors Transmit Internally discarded MIR/CIR VETI Errors Transmit Other TX Events VETO Errors Transmit Underrun Events VETU Frames Received - Total VFRT 284 User Manual Device Specific Information Codes for Threshold Setting Table 11-8: Syntax for BreezeACCESS VL AU Measurements (Continued) Description Parameter Frames Submitted High VFSH Frames Submitted Low VFSL Frames Submitted Mid VFSM Frames Submitted Total VFST Wireless Frames Received VWFR Wireless Frames Submitted Beacons VWFB Wireless Frames Submitted OtherMng and Data VWFO Wireless Frames Submitted Total VWFT CIR Allocated VCA Ethernet Throughput VETH MIR Allocated VMA Noise Floor VNF Number Of Connected SUs VCS Retransmission VR Throughput VTHR Uptime VUPT RSSI VRSS Table 11-9: Syntax for BreezeACCESS VL SU Measurements StarQuality Description Parameter Concatenated Frames Single VCFS Concatenated Frames Double VCFD Concatenated Frames More VCFM Concatenated Frames Total VCFT Errors Receive CRC VERC Errors Receive Decrypt VERD Errors Receive Duplicate frames discarded VERd Errors Receive Other VERo Errors Receive Overrun VERO Errors Receive Phy VERP Errors Transmit Frames dropped (too many retries) VETD 285 User Manual Device Specific Information Default Built-in Reports Table 11-9: Syntax for BreezeACCESS VL SU Measurements (Continued) Description Parameter Errors Transmit Internally discarded MIR/CIR VETI Errors Transmit Other TX Events VETO Errors Transmit Underrun Events VETU Frames Received - Total VFRT Frames Submitted High VFSH Frames Submitted Low VFSL Frames Submitted Mid VFSM Frames Submitted Total VFST Ethernet Throughput VETH Noise Floor VNF Retransmission VRSU RSSI VRSS SNR VSNR Throughput VTHR Uptime VUPT Wireless Frames VWF 11.3.5 Default Built-in Reports BottomN Uptime TopN Throughput TopN Number of Connected SUs StarQuality 286 User Manual Device Specific Information 11.4 4Motion Ver.2.5 4Motion Ver.2.5 11.4.1 Overview SW Compatibility - Versions 2.5M1 and 2.5M1 Refer to the release notes for details. Collector type - WiMAX 4Motion 11.4.2 Network Discovery Prerequisites PM/TM Collection Contents - All Management > Performance Categories checked For MS data - check “All MS Basic Data” (it is not checked by default) 11.4.3 Key Performance Indicators (KPIs) 11.4.3.1 BS KPIs Table 11-10: Traffic Counters 4Motion Ver.2.5 Counter Members Description Air Link Utilization (%) All The utilization of available wireless link resources: Data utilization from all slots (including MAP, not including preamble and TTG/RTG) per BS as a percentage of total slots available for the uplink and downlink directions. UL Data Zone DL Data Zone DL Map Zone MAP Size Distribution (Frames) 2 Symbols 4 Symbols Number of frames per number of symbols per BS for the downlink direction. 6 Symbols 8 Symbols 10 Symbols > 10 Symbols MCS Distribution Downlink (Bits per Second) MCS Distribution Uplink (Bits per Second) StarQuality 19 MCS values from QPSK 1/2 rep 6 Throughput of each MCS for the uplink and downlink directions To 64 QAM 1/2 MIMO B 287 User Manual Device Specific Information Key Performance Indicators (KPIs) Table 11-10: Traffic Counters 4Motion Ver.2.5 (Continued) Counter Members Description Retransmission Downlink (HARQ Sub Bursts) Total Number of transactions with a certain number of retransmissions per BS for the downlink direction. 0 Retransmissions 1 Retransmission 2 Retransmissions 3 Retransmissions 4 Retransmissions > 4 Retransmissions SINR Distribution Downlink (%) < 3 dB Percentages of CPEs per SINR range for downlink per bs. 3 – 9 dB 9 – 13 dB 13 – 17 dB 17 – 21 dB > 21 dB SINR Distribution Uplink (%) < 3 dB Percentages of CPEs per SINR range for Uplink per bs. 3 – 7 dB 7 – 11 dB 11 – 15 dB 15 – 19 dB > 19 dB Spectral Efficiency of all MS (Bits/Bin) Average UL Average DL Peak and average spectral efficiency values for all MSs in a BS for both downlink and uplink directions. Max UL Max DL Throughput (Bits per Second) UL Throughput DL Total Average sector throughput per BS (each measurement represents the average throughput of the passed sampling interval of 15 minutes). DL MIMO A/BF DL MIMO B StarQuality 288 User Manual Device Specific Information Key Performance Indicators (KPIs) Table 11-10: Traffic Counters 4Motion Ver.2.5 (Continued) Counter Members Description Uplink HARQ Packet Error Rate (Dropped HARQ Sub Bursts) 11 MCS values from Error rate of dropped packets after HARQ of each MCS per BS for the uplink direction. QPSK 1/2 Rep 6 To 64 QAM 5/6 And Total Number Of Connected SUs (Count) Value Number of SUs that have been connected to the BS, for the whole 15 minute interval proceeding the PMTM file generation. UL Noise (Median) (dBm) Uplink The median extracted from the actual noise flow histogram 11.4.3.2 4Motion 2.5M BTS KPIs Table 11-11: Common Measurements for 4Motion BTS Counter Description Uptime BTS uptime in seconds Average Backhaul Traffic (bits per second) Average data throughput (user IP packets) in both the downlink or uplink direction including: backhaul, bearer, external management, internal management and cascading 11.4.3.3 MS KPIs Table 11-12: Performance Counters Per MS Counter Description Average Spectral Efficiency (bits/bin) Average spectral efficiency values for both the downlink and uplink directions. CINR (db) Min, max and average values for the downlink and uplink directions MCS (bits/slot) (slot efficiency) Min, max and average Number of bits per slot for uplink and downlink directions RSSI Uplink (dBm) Min, max and average values StarQuality 289 User Manual Device Specific Information Codes for Threshold Setting 11.4.4 Codes for Threshold Setting Table 11-13: Syntax for 4Motion BS Measurements StarQuality Description Parameter Throughput 4AST Average Spectral Efficiency all MSs 4SEA DL Retransmission, Above Four Retransmissions 4DR6 DL Retransmission, Four Retransmissions 4DR5 DL Retransmission, One Retransmission 4DR2 DL Retransmission, Three Retransmissions 4DR4 DL Retransmission, Two Retransmissions 4DR3 DL Retransmission, Zero Retransmission 4DR1 DL SINR Distribution, 11dB < SINR < 13dB 4SD3 DL SINR Distribution, 15dB < SINR < 17dB 4SD4 DL SINR Distribution, 19dB < SINR < 21dB 4SD5 DL SINR Distribution, 23dB < SINR < 25dB 4SD6 DL SINR Distribution, 5dB < SINR < 9dB 4SD2 DL SINR Distribution, SINR < 5dB 4SD1 DL Slot Utilization, Data Zone 4UD1 DL Slot Utilization, Map Zone 4UD2 HARQ Packet Error Rate PER 16QAM 1/2 4E06 HARQ Packet Error Rate PER 16QAM 3/4 4E07 HARQ Packet Error Rate PER 64QAM 1/2 4E08 HARQ Packet Error Rate PER 64QAM 2/3 4E09 HARQ Packet Error Rate PER 64QAM 3/4 4E10 HARQ Packet Error Rate PER 64QAM 5/6 4E11 HARQ Packet Error Rate PER QPSK 1/2 4E04 HARQ Packet Error Rate PER QPSK 1/2 Rep 2 4E03 HARQ Packet Error Rate PER QPSK 1/2 Rep 4 4E02 HARQ Packet Error Rate PER QPSK 1/2 Rep 6 4E01 HARQ Packet Error Rate PER QPSK 3/4 4E05 HARQ Packet Error Rate Percent 4E00 MAP Length Eight Symbols 4MS4 290 User Manual Device Specific Information Codes for Threshold Setting Table 11-13: Syntax for 4Motion BS Measurements (Continued) StarQuality Description Parameter MAP Length Four Symbols 4MS2 MAP Length More Than Ten Symbols 4MS6 MAP Length Six Symbols 4MS3 MAP Length Ten Symbols 4MS5 MAP Length Two Symbols 4MS1 MCS Distribution 16QAM 1/2 4D06 MCS Distribution 16QAM 3/4 4D07 MCS Distribution 64QAM 1/2 4D08 MCS Distribution 64QAM 2/3 4D09 MCS Distribution 64QAM 3/4 4D10 MCS Distribution 64QAM 5/6 4D11 MCS Distribution QPSK 1/2 4D04 MCS Distribution QPSK 1/2 Rep 2 4D03 MCS Distribution QPSK 1/2 Rep 4 4D02 MCS Distribution QPSK 1/2 Rep 6 4D01 MCS Distribution QPSK 3/4 4D05 Max Spectral Efficiency all MSs 4SEM Number Of Connected SUs 4CS Slot Utilization ALL 4UA UL Noise (99th Percentile) 4UN1 UL Noise (Median) 4UN2 UL SINR Distribution, 17dB < SINR < 21dB 4SU4 UL SINR Distribution, 5dB < SINR < 9dB 4SU2 UL SINR Distribution, 9dB < SINR < 13dB 4SU3 UL SINR Distribution, SINR < 5dB 4SU1 UL SINR Distribution, SINR > 21dB SU6 UL Slot Utilization, Data Zone 4UU1 UL Slot Utilization, Feedback Zone 4UU2 291 User Manual Device Specific Information Default Built-in Reports Table 11-14: Syntax for 4Motion Common Measurements Description Parameter Uptime 4UPT cntNpuBckhlPort 4NT5 cntNpuBearer 4NT1 cntNpuCascPort 4NT4 cntNpuExtMgmt 4NT2 cntNpuIntMgmt 4NT3 Table 11-15: Syntax for 4Motion SU Measurements Description Parameter CINR Average 4SU3 CINR Max 4SU2 CINR Min 4SU1 MCS Average 4SU6 MCS Max 4SU5 MCS Min 4SU4 Uplink RSSI Average 4SU9 Uplink RSSI Max 4SU8 Uplink RSSI Min 4SU7 Average Spectral Efficiency 4SU0 11.4.5 Default Built-in Reports BottomN Uptime TopN Air Link Utilization TopN Average Sector Throughput TopN Number of Connected SUs StarQuality 292 User Manual Device Specific Information 11.5 4Motion Ver.3.0 4Motion Ver.3.0 11.5.1 Overview SW Compatibility - Versions 3.0 Refer to the release notes for details. Collector type - WiMAX 4Motion 11.5.2 Network Discovery Prerequisites PM/TM Collection Contents - All Management > Performance Categories checked For MS data - check “All MS Basic Data” (it is not checked by default) 11.5.3 Key Performance Indicators (KPIs) 11.5.3.1 BS KPIs Table 11-16: Traffic Counters 4Motion Ver.3.0 Counter Members Description Active MS / Idle MS / Registered MS (count) Registered MSs Qty The MSs are sampled at the end of the 15 Min sample period Idle MSs Qty Active MSs Qty Active MS / Idle MS Ratio (%) Idle MSs Ratio Air Link Utilization (%) All Active MSs Ratio UL Data Zone DL Data Zone DL Map Zone StarQuality Ratio of gauges mentioned above The utilization of available wireless link resources: Data utilization from all slots (including MAP, not including preamble and TTG/RTG) per BS as a percentage of total slots available for the uplink and downlink directions. 293 User Manual Device Specific Information Key Performance Indicators (KPIs) Table 11-16: Traffic Counters 4Motion Ver.3.0 (Continued) Counter Members Description Average Provisioned Downlink (bits per second) RT CIR Counts the provisioned DL based on registered MSs per second. The graphs are per QoS. The calculation divides the accumulated value with 900 seconds. RT MIR UGS CIR eRT CIR eRT MIR nRT CIR nRT MIR BE MIR Average Provisioned Uplink (bits per second) BE MIR RT CIR RT MIR Counts the provisioned UL based on registered MSs per second. The graphs are per QoS. The calculation divides the accumulated value with 900 seconds. UGS CIR eRT CIR eRT MIR nRT CIR nRT MIR BS Traffic Type (%) DL MIMO A Ratio DL MIMO B Ratio Ratio is based on number of bursts counted in the sampled period DL MIMO CDD Ratio DL MIMO BF Ratio Burst Error Rate Downlink (count) Succeeded transfer Qty Dropped Qty Counts the actual numbers of bursts in the sampled period Repetitions Burst Error Rate Ratio Downlink (%) Succeeded Transfer Ratio Ratio is based on number of bursts counted in the sampled period Drop Ratio Repetition Ratio StarQuality 294 User Manual Device Specific Information Key Performance Indicators (KPIs) Table 11-16: Traffic Counters 4Motion Ver.3.0 (Continued) Counter Members Description Burst Error Rate Ratio Uplink (%) Succeeded Transfer Ratio Ratio is based on number of bursts counted in the sampled period Drop Ratio Repetition Ratio Burst Error Rate Uplink (count) Succeeded transfer Qty Dropped Qty Counts the actual numbers of bursts in the sampled period Repetitions MAP Size Distribution (Frames) 2 Symbols 4 Symbols Number of frames per number of symbols per BS for the downlink direction. 6 Symbols 8 Symbols 10 Symbols > 10 Symbols MCS Distribution Downlink (Bits per Second) MCS Distribution Uplink (Bits per Second) MS Hand Over (Count) 19 MCS values from QPSK 1/2 rep 6 Throughput of each MCS for the uplink and downlink directions To 64 QAM 1/2 MIMO B Succeeded HO Attempts Counts number handover attempts both in and out Failed HO Attempts Hand Over Ratio (%) Succeeded Attempts Ratio Ratio calculation of counters mentioned above HO Attempts Ratio Failed Attempts Ratio MS Registration (Count) Created Service Flow Qty Number of initial network entry attempts sampled Failed Initial NE Succeeded initial NE Registration Ratio (%) Succeeded Service Flow Ratio Ratio of counters mentioned above Failed Initial NE Ratio Succeeded initial NE Ratio StarQuality 295 User Manual Device Specific Information Key Performance Indicators (KPIs) Table 11-16: Traffic Counters 4Motion Ver.3.0 (Continued) Counter Members Description Retransmission Downlink (HARQ Sub Bursts) Total Number of transactions with a certain number of retransmissions per BS for the downlink direction. 0 Retransmissions 1 Retransmission 2 Retransmissions 3 Retransmissions 4 Retransmissions > 4 Retransmissions SINR Distribution Downlink (%) < 3 dB 3 – 9 dB Percentages of CPEs per SINR range for downlink per bs. 9 – 13 dB 13 – 17 dB 17 – 21 dB > 21 dB SINR Distribution Uplink (%) < 3 dB 3 – 7 dB Percentages of CPEs per SINR range for Uplink per bs. 7 – 11 dB 11 – 15 dB 15 – 19 dB > 19 dB Spectral Efficiency of all MS (Bits/Bin) Average UL Average DL Peak and average spectral efficiency values for all MSs in a BS for both downlink and uplink directions. Max UL Max DL Throughput (Bits per Second) UL Throughput DL Total Average sector throughput per BS (each measurement represents the average throughput of the passed sampling interval of 15 minutes). DL MIMO A/BF DL MIMO B StarQuality 296 User Manual Device Specific Information Key Performance Indicators (KPIs) Table 11-16: Traffic Counters 4Motion Ver.3.0 (Continued) Counter Members Description Uplink HARQ Packet Error Rate (Dropped HARQ Sub Bursts) 11 MCS values from Error rate of dropped packets after HARQ of each MCS per BS for the uplink direction. QPSK 1/2 Rep 6 To 64 QAM 5/6 And Total MIR + CIR Provisioned (Bits per Second) Uplink Number Of Connected SUs (Count) Value Number of SUs that have been connected to the BS, for the whole 15 minute interval proceeding the PMTM file generation. UL Noise (Median) (dBm) Uplink The median extracted from the actual noise flow histogram 11.5.3.2 This KPI shows aggregation of maximum provisioned traffic during the 15 minutes period. Value is calculated based on aggregation of Downlink NPU KPIs There are KPIs that are relevant only for NPUs working in non-transparent mode. You can find the items relevant for non-transparent mode in the release notes. Table 11-17: NPU Counters Counter Members Description Comments ASN GW - MS Registration (Count) Authentication Rejections Sample of MSs in ASNGW in 15 min ASNGW KPI Created Service Flows Qty Min and Max shows the tide mark in 15 min duration Failed Initial NE Max Registered MSs Min Registered MSs Registered MSs Qty Succeeded Initial NE StarQuality 297 User Manual Device Specific Information Key Performance Indicators (KPIs) Table 11-17: NPU Counters (Continued) Counter Members Description Comments Average Backhaul Traffic (Bits per Second) cntNpuBckhlPort in Average data throughput (user IP packets) in both the downlink or uplink direction including: backhaul, bearer, external management, internal management and cascading ASNGW KPI cntNpuBckhlPort out cntNpuBearer in cntNpuBearer out cntNpuCascPort in cntNpuCascPort out cntNpuExtMgmt in cntNpuExtMgmt out cntNpuIntMgmt in cntNpuIntMgmt out Authentication Reject Ratio (%) Value Ratio of auth. Rejection in respect of successful INE ASNGW KPI NE failure Ratio (%) Value Ratio of failed INE in respect to successful INE ASNGW KPI R3 CIR Throughput Oversubscription (%) Uplink Ratio is a calculation of average actual traffic rate over R3 in respect to total provisioned CIR in % ASNGW KPI R3 MIR Throughput Oversubscription (%) Uplink Ratio is a calculation of average actual traffic rate over R3 in respect to total provisioned MIR in % ASNGW KPI R3 Throughput (Bits per Second) Uplink Average total bytes transferred over R3 with the active period to show average rate over R3 ASNGW KPI R3 Total CIR (Bits per Second) Uplink Average over 15 min period based on aggregation of CIR from all served BSs ASNGW KPI StarQuality Downlink Downlink Downlink Downlink 298 User Manual Device Specific Information Key Performance Indicators (KPIs) Table 11-17: NPU Counters (Continued) Counter Members Description Comments R3 Total MIR (Bits Per Second) Uplink Average over 15 min period based on aggregation of MIR from all served BSs ASNGW KPI R6 CIR Throughput Oversubscription (%) Uplink Average over 15 min period based on aggregation of CIR from all served BSs ASNGW KPI R6 MIR Throughput Oversubscription (%) Uplink Average over 15 min period based on aggregation of MIR from all served BSs ASNGW KPI R6 CIR Throughput Oversubscription (%) Uplink Ratio is a calculation of average actual traffic rate over R6 in respect to total provisioned CIR in % ASNGW KPI R6 MIR Throughput Oversubscription (%) Uplink Ratio is a calculation of average actual traffic rate over R6 in respect to total provisioned MIR in % ASNGW KPI R6 Throughput (Bits per Second) Uplink Average total bytes transferred over R3 with the active period to show average rate over R6 ASNGW KPI R6 Total CIR (Bits per Second) Uplink Average over 15 min period based on aggregation of CIR from all served BSs ASNGW KPI R6 Total MIR (Bits per Second) Uplink Average over 15 min period based on aggregation of MIR from all served BSs ASNGW KPI Service Flow usage Ratio (%) Value Ratio shows number of service flows in respect to maximum allowed of 36000 service flows ASNGW KPI Uptime (hours) NPU uptime Time of system up StarQuality Downlink Downlink Downlink Downlink Downlink Downlink Downlink Downlink 299 User Manual Device Specific Information 11.5.3.3 Key Performance Indicators (KPIs) MS KPIs Table 11-18: MS Counters Counter Members Description MCS Downlink (Bit/Bin) Min/Max/Average Counts bit/bin for each MS transaction. Min and max are calculated by BS. Average is calculated by dividing by number of samples MCS Uplink (Bit/Bin) Min/Max/Average Counts bit/bin for each MS transaction. Min and max are calculated by BS. Average is calculated by dividing by number of samples MS Burst Error Rate Downlink (Count) Succeeded transferred Qty Counts HARQ bursts of ACK, dropped and total Dropped Bursts Qty Repetitions MS Burst Error Rate Ratio Downlink (%) Succeeded Transfer Ratio Ratio based on above counters Drop Ratio Repetition Ratio Burst Error Rate Ratio Uplink (%) Succeeded Transfer Ratio Drop Ratio Counts HARQ bursts of ACK, dropped and total Repetition Ratio MS Burst Error Rate Uplink (Count) Succeeded transferred Qty Ratio based on above counters Dropped Bursts Qty Repetitions RSSI Uplink (dBm) Min/Max/Average RSSI is sampled from each burst Min and max are calculated by BS. Average is calculated by dividing by number of samples Aggregated Throughput (Bits per Second) Uplink Counts the bytes transferred and calculates the transferred rate normalized to the active frames MS transferred data. SINR Avg (dB) Uplink Downlink CINR in db average to the number of sampled bursts Downlink Total Transferred Bursts (Bits per Second) StarQuality Downlink Total burst transmitted including MIMO B and MIMO AB 300 User Manual Device Specific Information Codes for Threshold Setting 11.5.4 Codes for Threshold Setting 11.5.4.1 BS Codes Table 11-19: 4Motion BS Threshold Codes StarQuality Code Parameter Active MS Qty #4021 Active MS Ratio #4033 Additional Provisionable Bit Rate #4AP Air Link Utilization ALL #4UA Authentication Reject Ratio #4NTh Authentication Rejections #4NTo Average Provisioned BE MIR #4041 Average Provisioned RT CIR #4037 Average Provisioned RT MIR #4038 Average Provisioned UGS CIR #4034 Average Provisioned eRT CIR #4035 Average Provisioned eRT MIR #4036 Average Provisioned nRT CIR #4039 Average Provisioned nRT MIR #4040 Average Sector Throughput #4AST Average Sector Throughput MIMO A/BF #4AS1 Average Sector Throughput MIMO-B #4AS2 Average Spectral Efficiency all MSs #4SEA CQI channels #4017 CQI channels utilization Ratio #4001 Created Service Flows Qty #4NTp Created Service Flows Qty #4025 Created Service Flows Qty Ratio #4005 DL Air Link Utilization, Data Zone #4UD1 DL Air Link Utilization, Map Zone #4UD2 DL MIMO A Ratio #4006 DL MIMO B Ratio #4007 DL MIMO BF Ratio #4009 301 User Manual Device Specific Information Codes for Threshold Setting Table 11-19: 4Motion BS Threshold Codes (Continued) StarQuality Code Parameter DL MIMO CDD Ratio #4008 DL Retransmission, Above Four Retransmissions #4DR6 DL Retransmission, Four Retransmissions #4DR5 DL Retransmission, One Retransmission #4DR2 DL Retransmission, Three Retransmissions #4DR0 DL Retransmission, Two Retransmissions #4DR3 DL Retransmission, Zero Retransmission #4DR1 DL SINR Distribution, SINR 13dB till 17dB #4SD4 DL SINR Distribution, SINR 17dB till 21dB #4SD5 DL SINR Distribution, SINR 3dB till 9dB #4SD2 DL SINR Distribution, SINR 9dB till 13dB #4SD3 DL SINR Distribution, SINR > 21dB #4SD6 DL SINR Distribution, SINR Below 3dB #4SD1 Drop Ratio #4012 Dropped Bursts Qty #4027 Failed Ho Attempts #4030 Failed Ho Attempts Ratio #4016 Failed Initial NE #4NTn Failed Initial NE #4023 Failed Initial NE Ratio #4003 Gross Idle Entries #4031 Ho Attempts Ratio #4015 Idle MSs Qty #4020 Idle MSs Ratio #4032 MAP Length Eight Symbols #4MS4 MAP Length Four Symbols #4MS2 MAP Length More Than Ten Symbols #4MS6 MAP Length Six Symbols #4MS3 MAP Length Ten Symbols #4MS5 MAP Length Two Symbols #4MS1 MCS Distribution 16QAM 1/2 #4D06 302 User Manual Device Specific Information Codes for Threshold Setting Table 11-19: 4Motion BS Threshold Codes (Continued) StarQuality Code Parameter MCS Distribution 16QAM 1/2 MIMO B #4D14 MCS Distribution 16QAM 3/4 #4D07 MCS Distribution 16QAM 3/4 MIMO B #4D15 MCS Distribution 64QAM 1/2 #4D08 MCS Distribution 64QAM 1/2 MIMO B #4D16 MCS Distribution 64QAM 2/3 #4D09 MCS Distribution 64QAM 2/3 MIMO B #4D17 MCS Distribution 64QAM 3/4 #4D10 MCS Distribution 64QAM 3/4 MIMO B #4D18 MCS Distribution 64QAM 5/6 #4D11 MCS Distribution 64QAM 5/6 MIMO B #4D19 MCS Distribution QPSK 1/2 #4D04 MCS Distribution QPSK 1/2 MIMO B #4D12 MCS Distribution QPSK 1/2 Rep 2 #4D03 MCS Distribution QPSK 1/2 Rep 4 #4D02 MCS Distribution QPSK 1/2 Rep 6 #4D01 MCS Distribution QPSK 3/4 #4D05 MCS Distribution QPSK 3/4 MIMO B #4D13 MIR + CIR Provisioned #4MC Max Registered MSs #4NTk Max Spectral Efficiency all MSs #4SEM Min Registered MSs #4NTj NE failure Ratio #4NTg Number Of Connected SUs #4CS Registered MSs Qty #4019 Repetition Ratio #4013 Repetitions #4028 Sounding Resources #4018 Sounding Resources utilization Ratio #4010 Subscription Ratio #4SR Succeed Ho Attempts #4029 303 User Manual Device Specific Information Codes for Threshold Setting Table 11-19: 4Motion BS Threshold Codes (Continued) StarQuality Code Parameter Succeed Ho Attempts Ratio #4014 Succeed Initial NE #4022 Succeed Initial NE Ratio #4002 Succeed Transfer Ratio #4011 Succeed Transferred Bursts Qty #4026 UL Air Link Utilization, Data Zone #4UU1 UL HARQ Packet Error Rate PER 16QAM 1/2 #4E06 UL HARQ Packet Error Rate PER 16QAM 3/4 #4E07 UL HARQ Packet Error Rate PER 64QAM 1/2 #4E08 UL HARQ Packet Error Rate PER 64QAM 2/3 #4E09 UL HARQ Packet Error Rate PER 64QAM 3/4 #4E10 UL HARQ Packet Error Rate PER 64QAM 5/6 #4E11 UL HARQ Packet Error Rate PER QPSK 1/2 #4E04 UL HARQ Packet Error Rate PER QPSK 1/2 Rep 2 #4E03 UL HARQ Packet Error Rate PER QPSK 1/2 Rep 4 #4E02 UL HARQ Packet Error Rate PER QPSK 1/2 Rep 6 #4E01 UL HARQ Packet Error Rate PER QPSK 3/4 #4E05 UL HARQ Packet Error Rate Total #4E00 UL Noise (Median) #4UN2 UL SINR Distribution, SINR 11dB till 15dB #4SI4 UL SINR Distribution, SINR 15dB till 19dB #4SI5 UL SINR Distribution, SINR 3dB till 7dB #4SI2 UL SINR Distribution, SINR 7dB till 11dB #4SI3 UL SINR Distribution, SINR > 19dB #4SI6 UL SINR Distribution, SINR Below 3dB #4SI1 304 User Manual Device Specific Information 11.5.4.2 Codes for Threshold Setting NPU Codes Table 11-20: NPU Threshold Codes 11.5.4.3 Code Parameter R3 CIR Throughput Oversubscription #4NT8 R3 MIR Throughput Oversubscription #4NT7 R3 Throughput #4NT6 R3 Total CIR #4NTa R3 Total MIR #4NT9 R6 CIR Throughput Oversubscription #4NTd R6 MIR Throughput Oversubscription #4NTc R6 Throughput #4NTb R6 Total CIR #4NTf R6 Total MIR #4NTe Registered MSs Qty #4NTl Service Flow usage Ratio #4NTi Succeed Initial NE #4NTm Uptime #4UPT cntNpuBckhlPort #4NT5 cntNpuBearer #4NT1 cntNpuCascPort #4NT4 cntNpuExtMgmt #4NT2 cntNpuIntMgmt #4NT3 SU Codes Table 11-21: SU Threshold Codes StarQuality Code Parameter Aggregated Throughput #4SUa MCS Avg #4SU6 MCS Max #4SU5 MCS Min #4SU4 MS BF Ratio #4SUe MS Drop Ratio #4SUg 305 User Manual Device Specific Information Default Built-in Reports Table 11-21: SU Threshold Codes Code Parameter MS Dropped Bursts Qty #4SUj MS MIMO A Ratio #4SUc MS MIMO B Ratio #4SUd MS Repetition Ratio #4SUh MS Repetitions #4SUk MS Succeed Transfer Ratio #4SUf MS Succeed Transferred Bursts Qty #4SUi SINR Avg #4SU3 Total Transferred Bursts #4SUb Uplink RSSI Avg #4SU9 Uplink RSSI Max #4SU8 Uplink RSSI Min #4SU7 11.5.5 Default Built-in Reports BottomN Uptime TopN Air Link Utilization TopN Average Sector Throughput TopN Number of Connected SUs StarQuality 306 User Manual Device Specific Information 11.6 BreezeMAX Extreme BreezeMAX Extreme 11.6.1 Overview SW Compatibility - version 1.5 Collector type - WiMAX Extreme 11.6.2 Network Discovery Prerequisites Optional - registered as Authorized manager with traps disabled - according to BreezeMAX Extreme specifications. 11.6.3 Key Performance Indicators (KPIs) 11.6.3.1 BS KPIs Table 11-22: Traffic Counters - BreezeMAX Extreme Counter/Formula Members Description CIR Allocated (Bits per Second) Downlink Aggregation of maximum provisioned traffic of CIR services during the sampled 15 minutes period. Uplink * BS_TOTAL_DL_CIR * 1000 * BS_TOTAL_UL_CIR * 1000 CIR Related Over-Subscription Ratio (%) Uplink Downlink calculation of average actual traffic in respect to total provisioned CIR in % * (BS_TOTAL_DL_CIR/ ((BS_DL_BYTES / BS_DL_USED_SEC * 8 ) )) *100 * (BS_TOTAL_UL_CIR/ ((BS_UL_BYTES / BS_UL_USED_SEC * 8 ) )) *100 Drop Ratio (%) Uplink Downlink * SUM(CPE_DL_DROP_BURSTS) / SUM(CPE_DL_TOTAL_BURSTS + CPE_DL_DROP_BURSTS) * 100 * SUM(CPE_UL_DROP_BURSTS) / SUM(CPE_UL_TOTAL_BURSTS + CPE_UL_DROP_BURSTS) * 100 StarQuality 307 Ratio between number of dropped bursts and total bursts (dropped and succeeded) counted in the sampled period User Manual Device Specific Information Key Performance Indicators (KPIs) Table 11-22: Traffic Counters - BreezeMAX Extreme (Continued) Counter/Formula Members Description MIR Allocated (Bits per Second) Uplink Aggregation of maximum provisioned traffic of MIR services during the 15 minutes period. Downlink * BS_TOTAL_DL_MIR * 1000 * BS_TOTAL_UL_MIR * 1000 MIR Related Over-Subscription Ratio (%) Uplink Downlink calculation of average actual traffic in respect to total provisioned MIR in % * (BS_TOTAL_DL_MIR/ ((BS_DL_BYTES / BS_DL_USED_SEC * 8 ) )) *100 * (BS_TOTAL_UL_MIR/ ((BS_UL_BYTES / BS_UL_USED_SEC * 8 ) )) *100 Number of Connected SU (Count) Value Number of SUs that have been connected to the BS, for the whole 15 minute interval proceeding the PMTM file generation. Repetition Ratio (%) Downlink Ratio between aggregated CPE HARQ repetitions to aggregated Total Bursts Uplink * ( SUM( CPE_DL_HARQ_REPETITION ) / SUM( CPE_DL_TOTAL_BURSTS) )* 100 * ( SUM( CPE_UL_HARQ_REPETITION ) / SUM( CPE_UL_TOTAL_BURSTS) )* 100 Throughput (Bits per Second) Downlink Uplink * (BS_DL_BYTES * 8 ) / BS_DL_USED_SEC * (BS_UL_BYTES * 8 ) / BS_UL_USED_SEC Transfer Overhead (%) Downlink Uplink Average sector throughput per BS (each measurement represents the average throughput of the passed sampling interval of 15 minutes). Ratio between aggregated CPE HARQ NACKs to aggregated CPE HARQ ACKs * SUM ( CPE_DL_HARQ_NACK ) / SUM (CPE_DL_HARQ_ACK) * 100 * SUM ( CPE_UL_HARQ_NACK ) / SUM (CPE_UL_HARQ_ACK) * 100 StarQuality 308 User Manual Device Specific Information Key Performance Indicators (KPIs) Table 11-22: Traffic Counters - BreezeMAX Extreme (Continued) Counter/Formula Members Description Transfer Ratio (%) Downlink Ratio between aggregated CPE Total Bursts to aggregated CPE Total and Dropped Bursts. Uplink * SUM( CPE_DL_TOTAL_BURSTS) / SUM(CPE_DL_TOTAL_BURSTS + CPE_DL_DROP_BURSTS) * 100 * SUM( CPE_UL_TOTAL_BURSTS) / SUM(CPE_UL_TOTAL_BURSTS + CPE_UL_DROP_BURSTS) * 100 11.6.3.2 BTS KPIs Table 11-23: BTS KPIs Counter Members Description Uptime Uptime Time since last system boot in hours 11.6.3.3 SU KPIs Table 11-24: SU KPIs Counter Members Description Rate Downlink/Uplink (Rate) Min/Average/Max Modulation Rate for each MS. The Min and max Rate sampled in the integration period of 15min. Average is calculated by dividing by number of samples RSSI Downlink/Uplink (dBm) Min/Average/Max RSSI is sampled from each burst. Min and max RSSI value sampled in the integration period of 15min.. Average is calculated by dividing by number of samples SNR Downlink/Uplink (dB) Min/Average/Max SNR Min and max SNR value sampled in the integration period of 15min. Average is calculated by dividing by number of samples SU CIR Allocated (Bits per Second) Downlink Aggregation of maximum provisioned traffic of CIR services for each CPE during the 15 minutes period. Uplink * CPE_TOTAL_DL_CIR * 1000 * CPE_TOTAL_UL_CIR * 1000 StarQuality 309 User Manual Device Specific Information Key Performance Indicators (KPIs) Table 11-24: SU KPIs (Continued) Counter Members Description Su Drop Ratio (%) Downlink Ratio between number of dropped bursts and total bursts (dropped and succeeded) for each CPE, counted in the sampled period Uplink * CPE_DL_DROP_BURSTS) / (CPE_DL_TOTAL_BURSTS + CPE_DL_DROP_BURSTS) * 100 * (CPE_UL_DROP_BURSTS) / (CPE_UL_TOTAL_BURSTS + CPE_UL_DROP_BURSTS) * 100 SU MIR Allocated (Bits per Second) Downlink Aggregation of maximum provisioned traffic of MIR services for each CPE during the 15 minutes period. Uplink * CPE_TOTAL_DL_MIR * 1000 * CPE_TOTAL_UL_MIR * 1000 SU Repetition Ratio (%) Downlink Ratio between CPE HARQ repetitions to Total Bursts Uplink * ( ( CPE_DL_HARQ_REPETITION ) /( CPE_DL_TOTAL_BURSTS) )* 100 * ( ( CPE_UL_HARQ_REPETITION ) / ( CPE_UL_TOTAL_BURSTS) )* 100 SU Throughput (Bits per Second) Downlink Counts the bytes transferred and calculates the transferred rate normalized to the active frames MS transferred the counted bytes. Uplink * CPE_TOTAL_DL_BYTES_TRANSF ERRED * 8 / 900 * CPE_TOTAL_UL_BYTES_TRANSF ERRED * 8 / 900 SU Transfer Overhead (%) Downlink Ratio between CPE HARQ NACKs and CPE HARQ ACKs Uplink * ( CPE_DL_HARQ_NACK ) / (CPE_DL_HARQ_ACK) * 100 * ( CPE_UL_HARQ_NACK ) / (CPE_UL_HARQ_ACK) * 100 StarQuality 310 User Manual Device Specific Information Codes for Threshold Setting Table 11-24: SU KPIs (Continued) Counter Members Description SU Transfer Ratio (%) Downlink Ratio between CPE Total BURSTS to CPE Total BURSTS and CPE Dropped Bursts Uplink * ( CPE_DL_TOTAL_BURSTS) / (CPE_DL_TOTAL_BURSTS + CPE_DL_DROP_BURSTS) * 100 * ( CPE_UL_TOTAL_BURSTS) / (CPE_UL_TOTAL_BURSTS + CPE_UL_DROP_BURSTS) * 100 11.6.4 Codes for Threshold Setting 11.6.4.1 BTS Codes Table 11-25: BTS Codes 11.6.4.2 Code Parameter CIR Allocated #eBSe CIR related Over Subscription Ratio #eBSg Drop Ratio #eBSb MIR Allocated #eBSf MIR related Over Subscription Ratio #eBSh Number Of Connected SUs #eCS Repetition Ratio #eBSc Throughput #eT Transfer Ratio #eBSa Transfer overhead #eBSd Uptime #eUPT SU Codes Table 11-26: SU Codes StarQuality Code Parameter SU CIR Allocated #eSUe SU Drop Ratio #eSUb SU MIR Allocated #eSUf 311 User Manual Device Specific Information Default Built-in Reports Table 11-26: SU Codes (Continued) Code Parameter SU RATE AVERAGE #eSU9 SU RATE MAX #eSU8 SU RATE MIN #eSU7 SU RSSI AVERAGE #eSU6 SU RSSI MAX #eSU5 SU RSSI MIN #eSU4 SU Repetition Ratio #eSUc SU SNR AVERAGE #eSU3 SU SNR MAX #eSU2 SU SNR MIN #eSU1 SU Throughput #eSUg SU Transfer Ratio #eSUa SU Transfer overhead #eSUd 11.6.5 Default Built-in Reports BottomN Uptime TopN Number of Connected SUs TopN throughput StarQuality 312 User Manual Chapter Glossary Glossary The following terms are frequently used in this manual: AU - Access Unit BS - Base Station BTS - Base Transceiver Station CIR - Committed Information Rate CINR - Carrier to Interference-plus-Noise Ratio CPE - Customer Premises Equipment Equipment - the basic sampled unit. Two types of equipment are used in the StarQuality system: » AU /Slot/ BS/Sector (in TDD or FDD only) » SU/CPE/MS HARQ - Hybrid Automatic Repeated Request MCS - Modulation Coding Scheme MIR - Maximum Information Rate MS - Mobile Subscriber NBI - Northbound Interface Public/Private objects - Public objects (sites, etc.) are created by the admin user for the whole system. Private object are created by the local user for the local system only. ROOT Site - the basic system network site, under which you can create sites and virtual sites RSSI - Received Signal Strength Indication. SINR - Signal Interference Noise Ratio StarQuality 314 User Manual Glossary SNR - Signal to Noise Ratio SOAP (Simple Object Access Protocol) - interface to enable various NBI operations via third party applications Site - » Non-virtual - A base station, containing up to 7 AUs, on which measurements are collected » Virtual Site - any collection of equipments, grouped by various subjects, such as areas SU - Subscriber Unit XLS - Excel file format StarQuality 315 User Manual