1
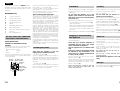
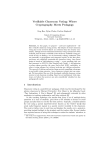
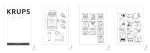
www.krups.com
1
6
I
II
7
2
5
8
3
4
9
Art. Gaufrier Expert / Expert Waffle Maker
English
4
6
5
USA
IMPORTANT SAFEGUARDS
When using electrical appliances, basic safety precautions should
always be followed including the following :
• Read all instructions.
• Do not touch hot surfaces. Use handles or knobs.
• To protect against electrical shock, do not immerse cord, plug, or
complete appliance in water or other liquids.
• Close supervision is necessary when any appliance is used by or
near children.
• Unplug from outlet when not in use and before cleaning. Allow to
cool before putting on or taking off parts.
• Do not operate any appliance with a damaged cord or plug or
after the appliance malfunctions, or has been damaged in any
manner. Return appliance to the nearest authorized KRUPS Service
Center for examination, repair or adjustment (see enclosed list).
• The use of accessory attachments not recommended or sold by
KRUPS may cause injuries.
• Do not use outdoors.
• Do not let the cord hang over the edge of the table or counter, or
touch hot surfaces.
• Do not place on or near a hot gas or electric burner or in a heated
oven.
• Extreme caution must be used when moving an appliance
containing hot oil or other hot liquids.
• To disconnect remove plug from wall outlet.
• Do not use the appliance for other than intended household use.
• Do not use metallic fasteners to hold the waffles in place. Sharp
utensils should not be used.
• Always check that the voltage indicated on the identification
panel matches that of your electrical installation.
• For household use only. Using the appliance for other than its
intended use will void the warranty.
6
• Position the appliance on a flat, heat resistant surface.
• Do not leave or use the appliance in a damp area.
• Do not touch the non-stick plates when in use.
• When the appliance is on, do not leave it unatteded.
• A fire may occur if the appliance is covered with flammable material
including curtains, draperies, walls, etc, when in operation.
SAVE THESE INSTRUCTIONS
CAUTION
This appliance is for household use. Any servicing other than
cleaning and user maintenance should be performed by the nearest
authorized KRUPS Service Center (see enclosed list).
• Do not immerse appliance in water.
• To reduce the risk of fire or electric shock, do not dismantle the
appliance. No user serviceable parts inside. Repair should be done
by an authorized KRUPS Service Center only.
SPECIAL CORD INSTRUCTIONS
A. A short power-supply cord is provided to reduce the risk of
becoming entangled in or tripping over a longer cord.
B. Extension cords are available and may be used if care is exercised
in their use.
C. If an extension cord is used, (1) the marked electrical rating of the
extension cord should be at least as great as the electrical rating
of the appliance, (2) the cord should be arranged so that it will
not drape over the counter top or table top where it can be pulled
on by children or tripped over unintentionally.
D. This appliance has a polarized plug (one blade is wider than the
other). To reduce the risk of electric shock, this plug is intended to
fit into a polarized outlet only one way. If the plug does not fit
fully into the outlet, reverse the plug. If it still does not fit,
contact a qualified electrician. Do not attempt to modify the plug
in any way.
7
English
Thank you for purchasing this KRUPS appliance.
Whatever model you have, please read these
instructions carefully and keep them for future
reference.
Description (1)
a
b
c
d
e
f
g
h
i
j
“On/off” light (red)
“Ready” light (green)
Adjustable thermostat
Handle release button
Handle
Removable waffle plates
Plate retaining pins
Notches for easier handling of plates
Spill tray
Non-removable cord
For U.K. users only : additional
information and instructions
WIRING INSTRUCTIONS
WARNING: ALL APPLIANCES MUST BE
EARTHED.
IMPORTANT: the wires in this lead are coloured
in accordance with the following codes.
Green and Yellow : Earth
Blue
: Neutral
Brown
: Live
Connect the Green/Yellow wire to the terminal
in the plug marked “E” (or by the earth symbol)
or coloured Green.
N: Blue
E: Green and
or black yellow or green
L: Brown
or red
Fit correct
fuse(13 amp)
Connect the Brown wire to the terminal in the
plug marked “L” or coloured Red.
Connect the Blue wire to the terminal in the
plug marked “N” or coloured Black.
Seek professional advice if you are unsure of
the correct procedure for the above.
ABOUT YOUR FACTORY FITTED PLUG
The cord is already fitted with a plug
incorporating an appropriate fuse. If the plug
does not fit your socket outlet, see paragraph
below. Should you need to replace the fuse in
the plug supplied, an appropriately rated
approved BS 1362 fuse must be used (refer to
electrical specification for fuse rating).
If the plug supplied does not fit your socket
outlet, it should be removed from the mains
lead and disposed of safely. The flexible cord
insulation should be stripped back as
appropriate and a suitable alternative plug
fitted. The replacement plug must be equipped
with an appropriate fuse. If the plug has
external access to the fuse (non-rewirable type
plug) please note that the fuse cover is an
important part of the plug. Please ensure that it
is always refitted correctly. If you lose this cover,
please do not use the plug. You may contact
our helpline for a replacement.
For any problems or queries, please contact our
Customer Relations Team first for expert help
and advice:
0845 602 1454 – UK (calls charged at local rate)
(01) 47 51947 – Ireland
Handling the plates
Check that the appliance is cold and
unplugged before handling the plates.
• To remove the plates (7):
Open the appliance and hold the handle (e)
with one hand. With the other hand, grasp the
plate (f) at the notches (h), pull it sideways and
disengage it from the retaining pins (g) to
remove it.
• To insert the plates (8):
Insert the plate (f) at an angle into the retaining
pins (g) and press on the opposite side to
secure it correctly in the appliance.
Installation
Place the appliance on a stable, heat resistant
surface: do not use it on a soft surface such as
a table pad.
Do not place the appliance on or near
slippery or hot surfaces. Do not let the cord
hang down over a source of heat (hot plates,
gas cookers, etc.).
Before using the appliance for the first time:
• Put the handle in a horizontal position (2).
• Open the appliance.
• Remove any packaging, stickers and accessories
from both inside and outside the appliance.
• Pour a little oil onto the plates. Wipe with a
soft cloth.
Place the spill tray (i) underneath the appliance (1).
Plugging in and preheating
the appliance
Close the appliance.
Check that your electrical installation is
compatible with the power and voltage
shown underneath the appliance.
Plug the appliance into an earthed socket
only.
If the power supply cord is damaged, it must
be replaced by the manufacturer or its
service agent or a similarly qualified person
in order to avoid a hazard.
Plug the cord into a socket: the red “on/off”
light (a) comes on (3).
Set the thermostat (c) to 6 and let the appliance
preheat for approximately 5 minutes: when it
has finished preheating, the green “ready”
light (b) comes on (4).
When the appliance is used for the first
time, it may give off a slight odour and
smoke, this is normal.
Cooking
Set the thermostat (c) to the position of your
choice or as required for the recipe.
Open the appliance.
Do not touch the hot surfaces of the
appliance: use the handle (e).
Use a ladle to pour waffle batter onto the
bottom plate (f) of the appliance (5).
Close the appliance and press down firmly.
Wait 10 seconds then turn the appliance over,
turning the handle (e) to the right (6-I).
Cook the waffles for the time indicated in the
recipe.
When they are cooked, turn the appliance over
again, turning the handle (e) to the left (6-II).
Open the appliance and remove the waffles.
After use
Set the thermostat to the minimum setting.
Unplug the cord.
Let the appliance cool down completely in the
open position.
Clean the plates (f), the spill tray (i) and the
body of the appliance with a sponge and
washing up liquid.
The plates (f) and the spill tray (i) are
dishwasher-safe.
Do not use a metal scouring pad or
scouring powder.
Never immerse the appliance or the cord in
water.
Storage
To save space, press the handle release button (d)
and fold the handle down (9).
Use cable
gripper
8
9
CRUNCHY WAFFLES WITH HOT CHOCOLATE
AND ICE CREAM
Recipes
Thermostat setting: 6
Cooking time: approximately 4 to 4 1/2 min
For 8 waffles: 300 g plain flour, 10 g baking
powder, salt, 75 g sugar, 100 g butter, 2 eggs,
1/2 litre milk
• Combine the flour and baking powder in a
bowl. Make a well in the centre and add the
salt, sugar, melted butter and eggs.
• Gradually add the milk.
• Let the batter stand for 1 hour.
Thermostat setting: 6
Cooking time: approximately 4 1/2 to 5 1/2 min
For 6 waffles: 250 g plain flour, 10 g traditional
active dried yeast (granular type), pinch salt,
2 cubes sugar or 2 tsp sugar, 75 g butter, 2 eggs,
1/4 litre milk, 1 liqueur glass of Cognac, vanilla
ice cream, chocolate
• Leave the yeast for 15 minutes to become
frothy in a glass of hand-hot water with the
sugar.
• Combine the yeast mixture, eggs and melted
butter.
• Add the milk, flour, Cognac and salt and mix
to a fluid consistency.
• Leave the mixture to stand for 3 hours in a
warm place.
• Before serving, garnish with 2 scoops of
vanilla ice cream and top with melted
chocolate (also delicious served with sugar or
jam).
CRISP
BELGIAN
For all of these recipes, you can adjust the
thermostat settings to vary the texture of
your waffles. For crisp waffles, leave the
thermostat on 6; for softer waffles, set the
thermostat to between 4 and 5 (for slower
cooking). The other thermostat settings
can be used to keep cooked waffles warm.
TRADITIONAL
WAFFLES
WAFFLES
Thermostat setting: 6
Cooking time: approximately 4 to 4 1/2 min
For 6 waffles: 300 g plain flour, 1 tbsp baking
powder, pinch salt, 1 tbsp sugar, 2 eggs, 400 ml
milk
• Beat the eggs until frothy.
• Add the other ingredients and beat the
mixture until smooth.
BEER
WAFFLES
Thermostat setting: 6
Cooking time: approximately 4 to 4 1/2 min
For 8 waffles: 330 ml beer, 250 g plain flour,
1 tbsp baking powder, 1 tsp salt, 75 g sugar,
50 g melted butter, 4 eggs, 1 tsp lemon juice
• Pour the beer into a jug and let it stand for
5 minutes until the froth disappears.
• Combine the flour, baking powder and salt.
• In a large bowl, beat together the eggs, beer,
butter, sugar and lemon juice for approximately
2 minutes.
• Gradually add the flour mixture, one spoonful
at a time.
• Beat until smooth.
10
WAFFLES
Thermostat setting: 6
Cooking time: approximately 4 1/2 to 5 1/2 min
For 6 waffles: 5 eggs, 1 tbsp baking powder,
plain flour, sugar and butter (same weight as
the eggs)
• Soften the butter.
• Combine the flour, sugar and baking powder.
• Add the softened butter and the eggs.
• Mix well.
SOFT
BELGIAN GALETTES
Thermostat setting: 6
Cooking time: approximately 5 to 5 1/2 min
For 16 galettes: 1 kg plain flour, 1 tbsp baking
powder, 800 g melted butter, 800 g sugar, 400 ml
milk, 1 packet vanilla sugar or 1 tsp vanilla essence,
10 eggs
• Beat the egg yolks.
• Gradually add the remaining ingredients,
finishing with the stiffly beaten egg whites.
• This batter is best made the day before and
kept in the refrigerator.
TUNA
AND SALMON WAFFLES
Thermostat setting: 6
Cooking time: approximately 5 to 5 1/2 min
For 6 waffles: 200 g plain flour, 200 g grated
gruyere, 300 ml milk, 100 ml oil, 2 eggs, 400 g
tinned tuna, 140 g vacuum-packed salmon
slices (smoked or unsmoked), 1 tbsp baking
powder, salt, pepper
• Combine the flour and baking powder in a
bowl and mix well.
• Add the grated gruyere, roughly-mashed
tuna and salmon cut into small pieces. Mix
well.
• Add the milk, oil, eggs, salt and pepper. Mix
well with a whisk or a wooden spoon.
• Serve the waffles hot or cold, with a green
salad or mayonnaise.
SPONGE
CHEESE
WAFFLES
Thermostat setting: 6
Cooking time: approximately 4 to 4 1/2 min
For 12 waffles: 100 g butter, 8 egg yolks,
1/2 tsp salt, 500 g plain flour, 1/2 tsp baking
powder, 50 g grated Parmesan, 1/2 litre water,
8 egg whites
• Cream the butter.
• Combine the flour and baking powder.
• Add in order the egg yolks, salt, flour, cheese
and water.
• Fold in the stiffly beaten egg whites.
WAFFLES
Thermostat setting: 6
Cooking time: approximately 4 to 4 1/2 min
For 6 waffles: 5 egg yolks, 5 tbsp hot water,
100 g sugar, grated zest of one lemon, 150 g
plain flour, 1/2 tsp baking powder, 5 egg whites
• Beat together the egg yolks, water, sugar and
lemon zest.
• Combine the flour and baking powder and
add them to the mixture.
• Beat the egg whites to form stiff peaks and
fold them into the mixture.
VANILLA
WAFFLES
Thermostat setting: 6
Cooking time: approximately 4 to 4 1/2 min
For 10 waffles: 200 g butter, 50 g sugar,
vanilla pod or 2 packets traditonal style vanilla
or 1 tsp vanilla essence, pinch salt, 6 eggs,
300 g flour, 2 tsp baking powder, 1/4 litre milk,
1 tbsp rum
• Cream the butter with the sugar, vanilla and
salt.
• Combine the flour and baking powder and
add to the mixture. Gradually add the milk
and eggs, then the rum.
11
Gaufrier Expert / Expert Waffle Maker
2016204.581 - 09/03