1
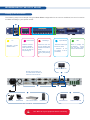
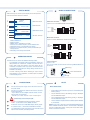
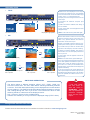
QUICK START GUIDE
Octo Value - Ref. OXE831
Thank you for choosing Analog Way and the Octo Value. By following these simple steps, you will be able to setup and
use your powerfull scaler/switcher within minutes. Discover the Octo Value extensive capabilities and intuitive interface
while configuring your first show, and unleash your creativity for a new experience in show and event management by
Analog Way.
What’s in the box
1 x Octo Value (OXE831)
1 x AC Power supply cord
1 x HD15 male / 5 x BNC female cable adaptor
1 x HD15 female / DVI-I male adaptor
1 x Set of 5 MCO (5-pin) female connectors
1 x RCS - Remote Control Software *
1 x User Manual (PDF version) *
* Download on our website: www.analogway.com
Octo Value settings
• We recommend resetting the device to all of its default
values, with the front panel LCD menu (CONTROL >
default value > yes) before proceeding.
• Select the fast or seamless switching mode with
the LCD menu (SWITCHING > fast switching or
seamless).
• Select the Auto settings function with the LCD menu
(INPUT > Auto settings). This function will detect
automatically the source type connected to the inputs
of the device. Sometimes, the auto setting may not
detect the source type : in this case select manually
the source type with the LCD menu (INPUT > Input
type).
• If you have selected the fast switching mode: select
one of the output formats with the LCD menu
(OUTPUT > output format). Then select the output
rate with the LCD menu (OUTPUT > output rate).
• Display device adjustment :
- IN SEAMLESS MODE: Select the reference
computer source. The reference computer image
is displayed onto the output. Adjust directly the
display device itself, using its position and size
controls, to fill the computer image in full screen.
- IN FAST SWITCHING MODE: Display
the centering pattern with the LCD menu
(OUTPUT > test pattern > centering). Display
a black output. Adjust directly the display device
itself, using its position and size controls, to fill the
centering pattern in full screen.
• For each input source connected to the device, make
the following adjustments:
- Select the source you want to adjust (with the
front panel “INPUT SELECTION” buttons).
- Select the aspect ratio of your input source with
the LCD menu (IMAGE > aspect ratio).
- Use the Centering function (IMAGE >
centering) to automatically position the image in
the Centering pattern.
- As required, make the other adjustments,
available in the LCD IMAGE menu (color,
brightness…).
WORKING WITH THE OCTO VALUE
Setting up the Octo Value
The following setup is an example of a typical Octo Value configuration for an event or roadshow, but can of course be
modified according to your specific needs :
❷
Fn
Effect Preset
Secondary function
selection button.
Input selection
Freeze/logo
Selection of the six
EFFECT PRESET.
Effect preset #4, #5,
#6 can be used by
first pressing Fn.
Freeze the main output (the blinking LED
indicates the Freeze is
active).
LOGO display can be
used by first pressing
Fn.
- Selection of the 8 input
sources: #1 to #8.
- Selection of the
four frames: F1 to F4
(see NOTE).
Take
Allows to display the
pre-selected
source
onto the Main output
with the selected effect.
PREVIEW DISPLAY
RS-232 communication port
on a DB9 female connector or
TCP/IP on RJ45 connector
❷
❶
❹
❹
❸
❷
CAMERA
NOTEBOOK
❸
VCR / DVD PLAYER
COMPUTER
MAIN DISPLAY
INPUT SOURCES
!
Turn OFF all of your equipment before connecting.
MAIN PROJECTOR
AUDIO CONNECTIONS
STATUS MODE
When switching ON, the front panel display shows the product’s
name and firmware versions as follows:
1/
2/
OXE831
Version _._
3/
4/
XGA
MAIN : 1
60.1K / 75Hz
5/
6/
YUV
7/
8/
Output : 1024x768
Seamless #1
75Hz
PREVIEW : 2
15.7K / 50Hz
DEVICE STATUS
MCO male connector
Inputs # 3,4,5 & 6: UNBALANCED connection only
MAIN STATUS
PREVIEW STATUS
Input #3
LEFT
RIGHT
3
L
R
Input #4
GROUND(S)
LEFT
RIGHT
4
L
R
UNBALANCED
OUTPUT STATUS
MCO male connector
Inputs # 7 & AUX: Balanced & unbalanced connection
1/ Device Reference
2/ Device version
3/ MAIN output : selected input number
4/ Format, line & frame frequency of the selected input
5/ PREVIEW output : pre-selected input number
6/ Format, line & frame frequency of the pre-selected input
7/ Output format
8/ Switching mode & output frame rate
OPERATING MODE
7
L+
L-
LEFT
GROUND
RIGHT
R+
RUNBALANCED
L+
L-
3
L+
L-
GROUND(S)
R+
R-
4
R+
R-
BALANCED
The devices can be used in two different switching modes:
•
•
The seamless mode allows switching seamlessly, fading and
titling between the «reference» computer input and the other
inputs. Other inputs are scaled to the same format as the
«reference» computer format. Only Input #1 or #8 can be used
as the reference Computer input. Titling, fading, and PIP are not
available in this setting.
Jack connectors
Inputs # 1; #2
This 3,5 mm JACK connector allows connecting UNBALANCED audio source.
RIGHT (ring)
3.5 mm JACK connector
The fast switching mode allows selecting an output format
corresponding to your application. All video inputs are scaled
to the selecting format.
GROUND
LEFT (tip)
CONNECTIONS
NOTE
❶
Connect the AC power supply cord to the device and to an
AC power outlet.
❷
Connect your computer & video sources to the 8 universal
inputs of the device.
• If you need to connect a digital computer source, use the
input #1 (DVI-I IN connector).
• Connect your other sources to the unused inputs.
•
Frame selection can be used only when Fn is activated (LED
blinking quickly).
•
The pre-selected source (LED blinking slowly) is displayed
onto the PREVIEW output.
!
•
The pre-selected frame (LED blinking quickly) is displayed
onto the PREVIEW output.
The source/frame displayed onto the MAIN output is indicated
by a solid LED.
Connect only one source per input.
INPUT SELECTION:
❸
Connect your MAIN display device (projector, plasma
screen...) to the HD15 or DVI-I MAIN connector.
•
❹
If required, connect your PREVIEW display device (projector, plasma screen...) to the HD15 PREVIEW connector.
❺
Turn ON the device (rear panel switch), then turn ON all your
input sources and then your display device.
NOTE: a long push (1 second) on the selected/preselected input
button activates the BLACK function. A black screen is displayed
onto the corresponding output. A short push on the same button
allows to inactive this function.
Operating mode
•
TITLE
Create the text to be displayed on the computer used as the reference input, using software
such as PowerPoint® : the text should be bright
(yellow, white...) on a black background.
a) Display the main background source on the
main output.
a)
c)
b)
b) Pre-select the reference computer input
(input #1).
c) Select an EFFECT PRESET, then assign it
the TITLE effect.
TITLE
TITLE
Main source (Input #3)
Title source (Input #1)
•
Displayed image (MAIN)
PIP
d) Then, press TAKE. The text appears onto the
displayed image.
NOTE: To turn OFF the text, press TAKE again.
The PIP effect allows to insert a source onto the
reference computer input or onto a frame. This
effect is only possible between the reference
input/frame and the other inputs.
Display on the MAIN output the reference computer input or a frame (input #1 in this example).
b)
c)
a)
b) Select an EFFECT PRESET, then assign it
the PIP effect. You can then adjust position and
size of your PIP.
TAKE
Reference input #1 (MAIN)
Displayed image (MAIN)
Input #3 (PREVIEW)
d)
e)
Frame #1 selection
Background = reference input #1
PIP = Input #3
Input #4 selection
Background = frame #1
PIP = Input #3
a) Pre-select the input used for the PIP effect
(input #3 in this example). The LED is blinking.
Background = frame #1
PIP = Input #4
c) Press TAKE. The PIP appears onto the displayed image.
NOTE: To turn OFF the PIP, press TAKE again.
d) You can change the background image during
a PIP effect (between the reference input & the
frames store). Press the reference input selection button or Fn button plus the desired frame
selection button. The transition of the background
operates seamlessly.
e) You can change the PIP source (between the
other inputs except for the reference input). Press
the desired input selection button. The transition
of the PIP operates with a fade to black or a customized color.
SWITCHING OPERATIONS
• The device allows 4 different switching effects: CUT*, FADE*, FADE COLOR and CLEAN CUT. The CUT effect allows switching seamlessly between
2 sources. The FADE effect allows fading out the displayed source while another
source is fading in. The FADE COLOR effect allows switching between 2 sources
with a fading through the color of you choice. The CLEAN CUT allows a clean
switching thanks to a fast freeze of the displayed source.
• PIP* = Picture in Picture is also available effect.
• OXE831 also enables you to key text onto the displayed image (TITLE* effect).
!
* The CUT, FADE,
PIP and TITLE effects are active in
SEAMLESS mode
and only between the
reference computer
input and the other
inputs.
Going further with the Octo Value
Please check the User Manual and our website for further information: www.analogway.com
Version: 2.45 - 20/12/2011
Code: 140115