1
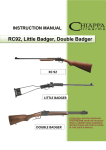
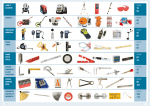
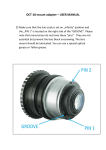
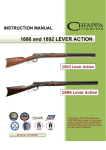
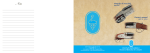
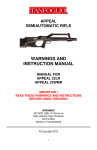
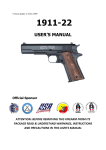
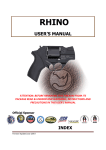
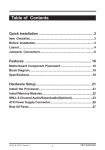
AUGUST 2011 INSTRUCTION MANUAL Little Badger, Little Squirrel, Double Badger LITTLE BADGER LITTLE SQUIRREL DOUBLE BADGER ATTENTION: BEFORE REMOVING THIS FIREARM FROM ITS PACKAGE READ & UNDERSTAND WARNINGS, INSTRUCTIONS AND PRECAUTIONS IN THIS USER’S MANUAL INDEX MODEL “LITTLE BADGER” - SPECIAL ACCESSORIES ......................................................................................... 3 WARNINGS ...................................................................................................................................................... 4 SAFETY RULES .................................................................................................................................................. 5 IDENTIFYING MARKINGS .................................................................................................................................. 6 MODEL RANGE ................................................................................................................................................ 6 AMMUNITION ................................................................................................................................................. 7 SAFETY FEATURES ............................................................................................................................................ 8 SIGHT ADJUSTMENT ........................................................................................................................................ 8 LITTLE BADGER : STOCK ADJUSTMENT AND SPECIAL FEATURES....................................................................... 9 LOADING ....................................................................................................................................................... 10 SHOOTING/FIRING ......................................................................................................................................... 10 UNLOADING................................................................................................................................................... 11 CLEANING ...................................................................................................................................................... 11 LITTLE BADGER / LITTLE SQUIRREL PARTS LIST ............................................................................................... 12 LITTLE BADGER / LITTLE SQUIRREL EXPLODED VIEW ...................................................................................... 13 DOUBLE BADGER PARTS LIST ......................................................................................................................... 14 DOUBLE BADGER EXPLODED VIEW ................................................................................................................ 15 WARRANTY CONDITIONS............................................................................................................................... 16 FOR UPDATES OF THIS MANUAL PLEASE REFER TO OUR WEBSITE www.chiappafirearms.com (Download section) Instruction Manual Little & Double Badger, rev. September 2013 Pag. 2 MODEL “LITTLE BADGER” - SPECIAL ACCESSORIES PISTOL GRIP with integrated CLEANING KIT Can be mounted in two positions Item code: 970.372 HAMMER EXTENSION Item code: 730.769 Instruction Manual Little & Double Badger, rev. September 2013 Pag. 3 WARNINGS The manufacturer is not responsible for damage to objects caused by misuse of the gun or for injuries to persons or animals, or in case of death, caused voluntarily or involuntarily by the gun user. The manufacturer is not responsible for injuries caused by poor maintenance, misuse of the gun, unauthorized or improper modifications. The manufacturer declines responsibility for the indirect consequences of any injuries and / or death of persons or animals, damage to objects caused by use of the gun or by primer explosion, by bullet’s ricochet, or unsafe loading practices and / or procedure. Read the entire manual and learn the proper use of the gun without live ammunition. It is important that you understand the proper use of this product. The life of the people close to you may depend on your safe behaviour. If the manual is not clear, please contact the dealer where you bought the gun or call the distributor or the manufacturer by using the contact information provided within this manual. The manufacturer declines any responsibility for misuse of the firearm. In case of alteration of the firearm, The manufacturer declines any civil and penal responsibility and will not refund any damage. QUALITY INSPECTION: Every firearm is thoroughly inspected by the manufacturer, for function and cosmetic blemish, prior to shipment. To guarantee the gun is safe, all guns produced in the Italian facility are sent to the National Proof House of Gardone Val Trompia – BRESCIA – ITALY for proof testing, in compliance with Italian law. The Proof House tests the firearm with heavy loads then checks the barrel, chamber and headspace to make certain the firearm is safe for use with standard factory ammunition. The National Proof House will put their markings on the gun, certifying the gun is qualified and can be sold. Guns produced in our US facility are scrupulously tested in our premises. Warning! Discharging firearms in poorly ventilated areas, cleaning firearms, or handling ammunition may result in exposure to lead or other substances known to the State of California to cause birth defects, reproductive harm, and other serious physical injury. Have adequate ventilation at all times. Wash hands thoroughly after exposure. ANY LEGAL DISPUTE WILL BE UNDER THE JURISDICTION OF A COURT IN THE STATE OF OHIO – USA, OR IN THE COURT OF BRESCIA – ITALY, AT OUR DISCRETION. Instruction Manual Little & Double Badger, rev. September 2013 Pag. 4 SAFETY RULES 1. 2. 3. 4. 5. 6. 7. 8. 9. 10. 11. 12. 13. 14. 15. 16. 17. 18. 19. 20. 21. 22. 23. 24. Read the instructions carefully before use. Reading the manual and careful examination of the gun are fundamental to avoid any kind of problem. Be aware that you are handling a firearm; therefore your knowledge and behaviour may affect your life and those of the people close to you. Guns and ammunitions must be kept in separate places. ALWAYS keep guns and ammunitions out of reach of children. Store the gun in a clean, dry and airy place after use to avoid rust in mechanical parts that may cause serious problems in functioning after a period of inactivity. The gun must ALWAYS be stored unloaded, ALWAYS check that the chamber is empty. Keep away from open flame or heating sources. Never leave a loaded gun unattended. Never leave the weapon loaded, it could fall and cause injury and death. Always point the gun in a safe direction, and handle it as though it were loaded. This is especially important when loading and unloading the gun, and when handing it to someone else. Never take someone’s word that it is unloaded. Always make sure the gun is unloaded before laying it down or handing it to someone else. After use, clean and lubricate the inside of the barrel with appropriate oil. Grease or oil build up can cause excessive pressure and result in serious personal injuries. Before using the gun again, inspect the barrel and chamber to make certain that there are no obstructions in the bore. Remove any oil residue with rod and dry patch before shooting. Accumulation of rust in the barrel can cause excessive pressures resulting in serious injury and may cause the explosion of the barrel. A rusted, pitted or eroded barrel should be replaced. Before shooting ALWAYS check to ensure that the barrel is free of obstructions. Never force a jammed action, this act could cause explosion of the round and consequent injury. Use exclusively factory loaded ammunition of the caliber specified on the firearm barrel. Use of different calibers may cause serious personal injuries to you and to people close to you. In case of misfire, manually extract the cartridge from the chamber. If firearm fails to fire when trigger is pulled, as a result of slow primer ignition (hangfire), keep muzzle pointed downrange for a minimum of 30 seconds. If the round does not fire, remove the magazine, clear the weapon and examine the ejected, unfired cartridge. If the indent from the firing pin is off center, light or absent, take the gun to a competent gunsmith. If the indent appears normal compared to other rounds, assume a faulty round, separate from other cartridges, reload and continue shooting. Do not attempt to re-use unexploded ammunitions. NEVER modify any parts of your gun. Any alteration may cause serious personal injury and voids the warranty. Only a qualified gunsmith may service the gun for repair or serious maintenance. Pay great attention during transportation and use. Mechanical safety devices can fail. Developing intelligent, good safety habits is the best way to prevent accidents. Never rest your finger on the trigger until the very moment you wish to shoot. Always keep the safety on until you are ready to safely shoot at an intended target (see safety features). Note: Safety devices on guns are extras and are not a substitute for your proper and safe handling practices. ALWAYS keep the gun unloaded when transporting it from home to the shooting areas. Carefully check that cartridge chamber is empty. When you walk around with the gun in a shooting area, ALWAYS keep the muzzle pointed in a safe direction. NEVER run with a loaded gun, don’t cross any obstacle (fences or water courses, etc.) or walk where there is any possibility of slipping or falling without having your firearm unloaded and in safety position. When selecting a place to shoot, always be absolutely sure of your target and the area behind it before you touch the trigger, making sure there is an adequate backstop which Instruction Manual Little & Double Badger, rev. September 2013 Pag. 5 will stop and contain bullets. A bullet can travel through or past your target with a range up to 1 1/2 miles. If you have any doubt, do not shoot. 25. Never shoot against a solid surface or in a pool of water, the projectiles could ricochet and shoot toward any direction. Don’t shoot up into the sky. 26. Keep all bystanders behind you, standing beside a shooter is not a safe position. Make sure all other shooters and bystanders are well away from the ejection port. 27. Do not smoke while handling, loading or shooting any ammunition, especially black powder. Keep black powder in a closed container at all times, reclosing the container after each and every use. 28. Never drink alcoholic beverages or take any drugs before or during shooting, as this not only constitutes criminal disregard for your safety and that of others, but will seriously impair your judgment and vision. Never use a gun while you are taking medication unless you have checked with your doctor to ensure your fitness to handle the gun safely. 29. Always wear and encourage others near you to wear proper ear protection when shooting, especially on a range since the noise from your gun, and other guns close to you, could result in permanent hearing loss. 30. Always wear protective shooting glasses to protect your eyes from injury by gun powder, gas, lubricant, dirt or metallic particles, carbon residue, sparks or other debris. 31. Wash hands thoroughly after shooting and handling firearms to remove any unwanted residues. 32. NEVER leave the loaded firearm or the loaded magazine in the sun 33. By replica firearms there is no modern safety. In this case you must pay even more attention to safety rules. REMEMBER: No mechanical safety device is infallible. The user is responsible for injuries or damages caused to him or to other persons. COMPLETE KNOWLEDGE OF YOUR FIREARM CAN MAKE THE DIFFERENCE. IDENTIFYING MARKINGS Every gun we produce has a serial number that is marked on the receiver/frame. Close to the serial number you will also find the manufacturers information with the model name and caliber marked either on the frame or the slide as required by law. These markings must not be removed from the firearm for any reason. MODEL RANGE CODE 500.092 500.110 500.140 500.133 500.146 500.147 500.145 500.097 500.111 Barrel length DESCRIPTION CALIBER in cm 22LR 16,5 41,9 LITTLE BADGER rifle .22LR, 16,5" MB 22 Magnum 16,5 41,9 LITTLE BADGER rifle .22MAG, 16,5" MB 22LR 18,5 47 LITTLE BADGER rifle .22LR, 18,5" MB 18.5” 47 LITTLE BADGER rifle .9 mm Flobert, 16,5" MB 9 Flobert 9 Flobert 24” 61 LITTLE SQUIRREL cal. 9mm Flobert 22LR/.410 18.5 47 LITTLE SQUIRREL .22LR, 18.5", 1/2"20UNF 17HMR 16.5 41.9 LITTLE BADGER.17HMR folding rifle 22LR/.410 19 48,3 DOUBLE BADGER COMBINED RIFLE 22Mag/.410 19 48,3 DOUBLE BADGER COMBINED RIFLE Instruction Manual Little & Double Badger, rev. September 2013 Total length in cm 32 81 32 81 34 86 42 107 42 107 36 91 32 91 36 91 36 91 Weight Kg lbs 1,58 3,5 1,58 3,5 1,7 3,6 1,7 3,75 1,8 3,75 1.7 3.6 1,58 3,5 2,5 5,5 2,5 5,5 Pag. 6 AMMUNITION NOTICE WE SPECIFICALLY DISCLAIM RESPONSIBILITY FOR ANY DAMAGE OR INJURY WHATSOEVER OCCURRING IN CONNECTION WITH, OR AS THE RESULT OF, THE USE OF FAULTY, OR NONSTANDARD, OR “REMANUFACTURED” OR HANDLOADED (RELOADED) AMMUNITION, OR OF CARTRIDGES OTHER THAN THOSE FOR WHICH THE FIREARM WAS ORIGINALLY CHAMBERED. Death, serious injury, and damage can result from the use of wrong ammunition, bore obstructions, powder overloads, or incorrect cartridge components. Use only ammunition specifically recommended for your firearm (the caliber is specified on the barrel/cylinder/frame). Always use cartridges whose length is equal or inferior to that indicated on the barrel. Use only high quality, original factory manufactured ammunition whose pressure cannot be higher than the one stated by S.A.A.M.l. or C.I.P. Your gun has been designed for ammunition of a specific caliber – do not alter the barrel, chamber, caliber for which your gun was designed. Be sure you never mix ammunition. Firearms may be severely damaged, and serious injury to the shooter or others may result from any condition causing excessive pressure inside the chamber or barrel during firing. Excessive pressure can be caused by obstruction in the barrel, propellant powder overloads, or by the use of incorrect or defectively assembled cartridges. In addition, the use of a dirty, corroded or damaged cartridge can lead to a burst cartridge case and consequent damage to the firearm and personal injury from the sudden escape of high-pressure propellant gas within the firearm's mechanism. Immediately stop shooting and check the barrel for a possible obstruction whenever: You have difficulty in, or feel unusual resistance in chambering a cartridge A cartridge misfires (does not go off) The mechanism fails to extract a fired cartridge case Unburned grains of propellant powder are discovered spilled in the mechanism A shot sounds weak or abnormal In such cases it is possible that a bullet is lodged part way down the barrel. Firing a subsequent bullet into the obstructed barrel can damage the firearm and cause serious injury to the shooter or bystanders. Bullets can become lodged in the barrel: If the cartridge has been improperly loaded without propellant powder, or if the powder fails to ignite. Ignition of the cartridge primer alone will push the bullet out of the cartridge case, but usually does not generate sufficient energy to expel the bullet completely from the barrel. If the bullet is not properly seated tightly in the cartridge case. When such a cartridge is extracted from the chamber without being fired, the bullet may be left behind in the bore at the point where the rifling begins. Subsequent chambering of another cartridge may push the first bullet further into the bore. If there is any reason to suspect that a bullet is obstructing the barrel, immediately unload the firearm and look through the bore. It is not sufficient to merely look in the chamber. A bullet may be lodged some distance down the barrel where it cannot easily be seen. If a bullet is in the bore, do not attempt to shoot it out by using another cartridge, or by blowing it out with a blank or one from which the bullet has been removed. Such techniques can generate excessive pressure, damage the firearm and cause serious personal injury. If the bullet can be easily removed with a wood or brass dowel, (using hand pressure only, never "hammer" a bullet lodged in the bore) clean any unburned powder grains from the bore, Instruction Manual Little & Double Badger, rev. September 2013 Pag. 7 chamber and mechanism before resuming shooting. If the bullet cannot be dislodged by tapping it with a cleaning rod, take the firearm to a gunsmith. Dirt, corrosion, or other foreign matter on a cartridge can impede complete chambering and may cause the cartridge case to burst upon firing. The same is true of cartridges which are damaged or deformed. Don't oil cartridges, and be sure to wipe the chamber clean of any oil preservative before commencing to shoot. Oil interferes with the friction between cartridge case and chamber wall that is necessary for safe functioning, and subjects the firearm to stress similar to that imposed by excessive pressure. Use lubricants liberally on the moving parts of your firearm. Avoid excessive spraying of any aerosol gun care product, especially where it may get on ammunition. All lubricants, and aerosol spray lubricants in particular, can penetrate cartridge primers and cause misfires. Some highly penetrative lubricants can also migrate inside cartridge cases and cause deterioration of the propellant powder; on firing, the powder may not ignite. If only the primer ignites, there is a danger that the bullet may become lodged in the barrel. The use of reloaded or improper ammunition voids the warranty. SAFETY FEATURES NEVER ASSUME THE GUN IS UNLOADED. You can never be sure a gun is unloaded unless you check that the charger is not in place/ the cartridge chamber / magazine tube / cylinder is completely empty. Never rely solely on mechanical features alone - always be extremely careful, use safe gun handling practices, and avoid situations which could lead to an accident. This firearm is equipped with several safety features which, if properly employed, can minimize the danger of accidental discharge. Little Badger: AUTOMATIC TRIGGER SAFETY When the hammer is not cocked, the trigger is automatically blocked. AUTOMATIC SAFETY When you open the breech block, the hammer is automatically engaging the safety and blocking the trigger. Double Badger: TRIGGER SAFETY The safety(ref. B21) is positioned on top of the receiver. MANUAL SAFETY Moving the manual safety button in safe position, the safety will block the trigger. SIGHT ADJUSTMENT Little Badger: The front sight is fixed. The rear sight is adjustable in height and windage. Instruction Manual Little & Double Badger, rev. September 2013 Pag. 8 Setting of the rear sight The elevation is adjusted by moving the leaf up and down. There are 4 possible positions, each defined by a click. The windage is adjusted by turning the windage knob (part #29 from exploded view). Mounting an optical sight To mount an optical sight, the standard sight can be removed by loosening the nuts on the base of the sight. This will provide a standard rail for mounting of optics. STANDARD SIGHT windage knob Double Badger: The front sight is a fixed fiber optic sight. The rear sight is adjustable in height and windage (see Little Badger instructions). LITTLE BADGER : STOCK ADJUSTMENT AND SPECIAL FEATURES By model Little badger it is possible to adjust the stock length. 1. Loosen the screw on the left side of the stock, item 101.008 (ref. 4 in the exploded view), about 2 turns (picture 1) using a Torx screwdriver size T20 2. Unscrew the screw on the right side of the stock, item 110.010, about 3 turns (picture 2) using a Torx screwdriver size T20 101.008 PICTURE 1 101.010 PICTURE 2 1. Move the stock sideways (right and left) so that it is released and adjust length as desired. 2. Once you have found the ideal position, tighten first screw item 110.010 and then 110.008 CAUTION: For safety reasons do not pull the stock beyond 1-2 rings of the thread Instruction Manual Little & Double Badger, rev. September 2013 Pag. 9 The stock of Little Badger integrates a cartridge holder for 12 cartridges and the rifle is supplied with a convenient two-straps rucksack holster. The mouth of the barrel is threaded. LOADING Warning: Keep muzzle pointed in safe direction and follow all safety procedures at all times. Practice these steps with an unloaded gun or dummy ammo until you are completely familiar and comfortable with the procedures. Use live ammo only when you are prepared to shoot. Always use clean, dry, high quality ammunition (of the proper caliber) that meets industry performance standards. Little Badger: Open the lever positioned in front of the trigger and bend the two parts of the rifle to almost 90°; insert the cartridge inside the cartridge chamber paying attention that it is the correct caliber. Close the breech block. Double Badger: Push the trigger guard completely, and bend the two parts of the rifle to almost 90°. Push the safety lever back, so that the letter “S” is completely visible. Insert the cartridges inside the cartridge chambers paying attention that they are the correct calibers. SHOOTING/FIRING Always wear eye and hearing protection when shooting. 1. Point muzzle in a safe direction. 2. Load gun as previously directed. 3. Grip the frame firmly. 4. (Disengage the safety). 5. Place index finger on trigger, take aim and fully pull the trigger rearward. Instruction Manual Little & Double Badger, rev. September 2013 Pag. 10 UNLOADING Open the opening lever and bend the rifle as by the loading operation; the extractor is automatically jutting out, allowing you to retrieve the cartridges. CLEANING Attention: Careful and detailed cleaning of this firearm is essential to guarantee its safety and proper function. This product should be cleaned and lubricated after every use and when exposed to dirt, sand, etc. When not in use, clean at least twice per year. A careful and scrupulous ordinary maintenance of the firearms is essential to guarantee its safety and long life. Warning: Always use a cleaning rod from the chamber end of the barrel. DOUBLE BADGER INFORMATION: the front trigger is for caliber .410 and the rear trigger is for caliber .22LR or .22Mag THE CARTIDGE CHAMBER BY CALIBER .410 IS 3”. THE CHOKE IS 1 STAR/NOTCH (FULL) Instruction Manual Little & Double Badger, rev. September 2013 Pag. 11 LITTLE BADGER / LITTLE SQUIRREL PARTS LIST REF. 1 2 3 CODE 740.449 740.450 130.010 4 5 6 7 8 9 10 11 12 13 14 15 16 17 18 19 20 21 22 23 24 25 26 27 28 29 30 31 32 33 34 35 36 37 38 39 40 41 101.008 770.587 770.588 770.589 760.162 720.023 720.134 720.011 101.010 731.007 731.008 750.046 731.033 720.025 130.062 750.205 740.448 770.590 130.023 710.345 750.158 750.204 104.024 750.203 730.942 750.162 750.161 750.160 720.032 130.021 720.003 130.100 750.147 101.006 101.005 731.009 731.034 140.021 DESCRIZIONE Guancetta sx little badger Guancetta dx little badger Rullino d. 4x15,8 DIN 5402 VITE AUTOFORMANTE TSP IMPRONTATORX M4x16 Cane little badger Grilletto little badger Leva Apertura little badger Spintone little badger Molla spir. 5,2x17x0,8 Molla cane Little Badger Molla spir. 4x16.5x0.6 VITE AUTOF. TCB IMPRONTA TORX M 4X16 Asta superiore calcio little badger Asta inferiore calcio little badger Calciolo in plastica RO77-Little Badger Percussore Little badger Molla spir. 3,8x9,7x0,3 Rullino d.2x11,8 Portacartucce Little badger Manicotto little badger Estrattore little badger Rullino d.3x11.8 Tubo rigato little badger 22LR Mirino M1 Cuffia canna little badger Grano M3x6 brugola p. piana Base tacca di mira little badger Vite regolazione tacca di mira M1 Ghiera regolazione tacca di mira M1 Foglia tacca di mira M1 Corsoio tacca di mira M1 Molla spir. 2x2x0,3 Sfera d.2 Molla spir. 2x6x0.4 Rullino d.2x3.8 Picatinny mfour-22 pistol Vite autoform. TSP TORX M3X8 Vite autoform. TSP TORX M3X6 Bussola basc. manicotto little badger Vite buss.fuc. Little badger Rondella Dentellata RDA est. DEV X M 5 DESCRIPTION Left grip, Little Badger Right grip, Little Badger Roller 4x15,8 Self-threading TSP torx screw M4x16 Hammer, Little Badger Trigger, Little Badger Opening lever, Little Badger Hammer spring guide rod, Little Badger Spiral spring 5,2x17x0,8 Main spring, Little Badger Spiral spring 4x16.5x0.6 Self-threading TCB torx screw M4x16 Stock upper forend, Little Badger Stock lower forend, Little Badger Rubber stock for RO77 Firing pin Little Badger Spiral spring 3,8x9,7x0,3 Roller 2x11,8 Cartridge holder, Little Badger Barrel shroud, Little Badger Extractor, Little Badger Roller 3x11,8 Barrel liner Little Badger .22LR M1 - Front sight Barrel threaded cap. Little Badger Grub nut M3x6 Rear sight base, Little Badger M1 - Rear sight adjusting screw M1 Rear sight windage knob M1 - Rear sight leaf M1 - Rear sight ladder Spiral spring 2x2x0,3 Sphere dia.2 Spiral spring 2x6x0.4 Roller 2x3,8 dia Picatinny Self-threading TSP torx screw M3x8 Self-threading TSP torx screw M3x6 Barrel shroud bushing, Little Badger Bushing screw, Little Badger Notched washer DEV X M 5 Instruction Manual Little & Double Badger, rev. September 2013 Pag. 12 LITTLE BADGER / LITTLE SQUIRREL EXPLODED VIEW Instruction Manual Little & Double Badger, rev. September 2013 Pag. 13 DOUBLE BADGER PARTS LIST REF. A1 A2 A3 A4 A5 B 01 B 02 B 04 B 05 B 06 B 07 B 08 B 10 B 12 B 13 B 14 B 15 B 16 B 18 B 19 B 20 B 21 B 22 B 23 B 24 B 26 B 27 B 28 B 29 B 31 B 32 B 33 B 34 B 65 B 66 B 67 L 01 L 02 L 03 L 04 L 09 L 11 L 12 L 13 DESCRIZIONE BASCULA CANNA SOTTOGUARDIA ZOCCHETTO VITE SOTTOGUARDIA GRILLETTO DESTRO GRILLETTO SINISTRO MOLLA GRILLETTO VITE MOLLA GRILLETTO SPINA GRILLETTO MARTELLETTO DESTRO MARTELLETTO SINISTRO MOLLA MARTELLETTO GUARDAMANO SPINA GUARDAMANO MOLLA GUARDAMANO SPINA MOLLA GUARDAMANO SPINA BASCULA-GUARDAMANO TASSELLO MOLLA TASSELLO SPINA TASSELLO SICURA SPINA SICURA MOLLA SICURA VITE MOLLA SICURA PERCUSSORE MOLLA PERCUSSORE SPINA PERCUSSORE ESTRATTORE NASETTO GRANO BLOCCA NASETTO PERNO VITE PERNO MIRINO PERCUSSORE CAL. 22 TACCA DI MIRA CALCIO PISTOLA ASTA PORTACINGHIA CALCIO PORTACINGHIA ASTA CALCIOLO VITE CALCIOLO TIRANTE CALCIO RONDELLA TIRANTE DESCRIPTION FRAME BARREL GUARD PLATE BLOCK GUARD PLATE LOCK SCREW RIGHT TRIGGER LEFT TRIGGER TRIGGER SPRING TRIGGER SCREW TRIGGER PIN RIGHT BLOCK LEFT BLOCK BLOCK SPRING TRIGGER GUARD TRIGGER GUARD PIN TRIGGER GUARD SPRING TRIGGER GUARD SPRING PIN FRAME-TRIGGER GUARD PIN LOCKING PLATE LOCKING PLATE SPRING LOCKING PLATE PIN SAFETY SAFETY PIN SAFETY SPRING SAFETY SPRING SCRW FIRING PIN FIRING PIN SPRING FIRING PIN STOP PIN EXTRACTOR EXTRACTOR LEVER EXTRACTOR LEVER REATAINING SECREW PIN PIN SCREW FRONT SIGHT FIRING PIN CAL. 22 REAR SIGHT PISTOL GRIP STOCK FORE-END REAR SWIVEL FOR STOCK REAR SWIVEL FOR FORE-END BUTT PLATE BUTT PLATE SCREW STOCK SCREW STOCK SCREW WASHER Instruction Manual Little & Double Badger, rev. September 2013 Pag. 14 DOUBLE BADGER EXPLODED VIEW Instruction Manual Little & Double Badger, rev. September 2013 Pag. 15 WARRANTY CONDITIONS The manufacturer guarantees that our products are scrupulously checked against defects in materials, workmanship and aesthetical and functioning problems. In case you find a defect in one of our products, you should immediately contact the DEALER/SHOP/GUNSMITH where you have bought your gun. The seller will indicate the conditions for the repair, which will be either made directly by them or through our assistance. ATTENTION: end users are not allowed to ship any gun directly to the manufacturer for repair, either under guarantee or against payment. Transportation of weapons is strictly regulated and the documents which are required can solely be issued by companies with specific authorization. 1. The manufacturer guarantees, for a year after the purchase date, the free substitution of parts for defects which have been found out during use: wear of parts which shouldn’t be subject to wear, or excessive wear of parts subject to wear. The customer will have to give evidence of the purchase date with a bill or other valid proof. 2. In case the defect under cover of guarantee is not repairable, The manufacturer will provide for a free substitution of the weapon. THE MANUFACTURER RESERVES THE RIGHT OF DEFINING THE TYPE OF DEFECT OF THE FIREARM, AND THEREFORE TO STATE WHETHER THE DEFECT IS COVERED BY GUARANTEE The manufacturer’s decision will be fair but final. The manufacturer will be allowed a timing of 60 days for repair under guarantee, and 90 days for free substitution. We strongly recommend that you keep the receipt or proof of purchase for any Chiappa Firearms product Should the manufacturer become aware of a defect of a product during the guarantee period, the defective part will be replaced free of charge. The guarantee does not cover parts subject to wear and corrosion ATTENTION: delivery expenses to and from the service center are not covered by the guarantee and will be charged to the customer. Instruction Manual Little & Double Badger, rev. September 2013 Pag. 16 THE GUARANTEE IS VOID IN CASE: Inadequate ammunition has been used (any ammunition but those commonly on sale, reloaded ammunition, different from caliber and specification indicated on the firearm barrel) The firearm failed to be provided proper maintenance and cleaning The firearm has been modified without our prior consent Unauthorized, inadequate or incorrect repairs have been carried out Non original spare parts were used Parts subject to wear and corrosion Damage (improper use of the gun by the user) Expired guarantee In the above cases the repair, if carried out, will be charged to the customer In case, for any valid reason, you do not have the possibility to obtain repair under guarantee at the shop where you bought the firearm, you may contact us directly; we will indicate a local dealer to support you with the repair file: USA - Phone: +1-937-835-5000 CANADA (Murray Charlton) – Phone +1-778.426.3884 e-mail: [email protected] REST OF THE WORLD - Phone: +39/030/9749065 e-mail: [email protected] This instruction manual must always follow the firearm, also in case of change of ownership Procedure for the use of warranty REGISTER your firearm in the proper section of our website: http://www.chiappafirearms.com/registration CONTACT the gunshop where the product was bought, or the Chiappa Firearms facility for USA, Canada or Rest of the World as indicated above. You will receive an NDR number and the instructions to return the gun. FILL IN the attached form, which will accompany the return firearm. Don’t forget to include the NDR number, a description of the defect and a copy of the proof of the purchase indicating the purchase date. SHIP the weapon to the gun shop (or to the service center) in its original packing, according to the instructions you have received. ATTENTION: the returned firearm must be protected with adequate packaging; any damages occurred during transportation and handling will be the customer’s responsibility Instruction Manual Little & Double Badger, rev. September 2013 Pag. 17 Request form REPAIR UNDER GUARANTEE NdR NDR : _____________________ Please write in the above box the Repair Authorization Number 1. Customer data: Name: ______________________________________ Address : ____________________________________ Town : ______________________________________ ZIP Code : ___________________________________ Phone : _______________Available from ____ to ____ Fax : _____________________ Email address: ________________________________ 2. Product information: Model : ___________________________________ Serial number : _____________________________ 3. Gun Shop - dealer: Purchase date : ______________________________ Dealer name : ______________________________ Dealer address: ______________________________ 4. Description of defect: Documents to attach: Proof of purchase with date Instruction Manual Little & Double Badger, rev. September 2013 Pag. 18 NOTES: Instruction Manual Little & Double Badger, rev. September 2013 Pag. 19 Via Milano 2 25010 Azzano Mella (BS) Italy www.chiappafirearms.com email: [email protected] OFFICIAL SPONSOR Instruction Manual Little & Double Badger, rev. September 2013 Pag. 20