1
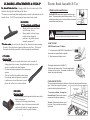
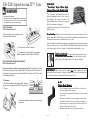
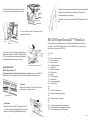
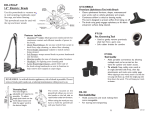
EB-210
12” Electric Brush
Use this powerbrush to
vacuum wall to wall carpeting,
handmade carpets, fine rugs,
and other flooring.
UT-530BL
Upholster y Tool with Slide-On Br ush
• Cleans upholstered furniture, drapes,
Belt
Replacement:EB21010
Pile Height
Adjustment Knob
Light Bulb:
Replacement: EB21016
This powerbrush must be used
with the top and lower wands.
•
Light Cover
Edge Cleaner
(not shown)
The overload protector protects the motor from brush
Overload Protector
(reset button)
jamming and belt breakage.
If the brush stops or is stalled,
ver
load
eset the o
ov
erload
the overload protector will shut the brush off. To rreset
pr
otector
protector
otector,, turn the vacuum off, press the reset button on the brush.
Now, you may turn your vacuum back on and continue cleaning.
WPH-219
2-Blac
k Str
aight Wands
2-Black
Straight
•
•
Fea
tur
es inc
lude:
eatur
tures
include:
• 3-level height adjustment--adjusts to match
surface being cleaned.
• Soft Bumper--wraps around brush to
protect baseboards and furniture.
• Reset Button--A flat belt drive with a belt
protector reset button means years of
trouble-free service.
Can use one or both--depending on the
length of wand that you need.
Attach any of your standard suction tools such
as the upholstery tool or dusting brush for whatever
cleaning needs you may have.
(Not intended for use with EB210 or other electric powerheads)
CT-3BL
Tool Cad
dy
Cadd
•
REMEMBER: As with all electric appliances, risk of shock is possible. Do not
remove brush, pull wands out, or attempt maintenance while power is on.
•
1
Wands
2
wer Wand
1. (EB368793) Lo
Low
•
Connects to top wand when operating the floor brush. Curled end
connects to top wand, other end is inserted into electric brush.
-540) Top Wand
2. (W
(W-540)
•
•
mattresses,and even works well on
vehicle upholstery and carpets.
The directional slide brush assures
consistent fit and is detachable for
aggressive cleaning.
Connects to lower wand when operating the floor brush
Cord management--keeps cords out of the way and allows you to
disengage the hose handle from the electric brush
3
Adds portable convenience by allowing
multiple tools to be carried on the wand for
quicker and easier access.
To aattac
ttac
h: Snap caddy onto wand at an
ttach:
angle (beveled side first), then slip attachments
and tools onto caddy pegs. When clipping it
onto wand, attach it so that the two-peg side
faces up, while the single-peg side faces down
the wand. This will keep your tools on better.
CB-180
Mesh Tool Cad
d y Ba
g
Cadd
Bag
•
•
Holds accessories and tools making them
more manageable.
For storing and transporting tools & accessories
Accessories shown may not be to scale.
12
L6178
CLEANING ATT
ACHMENTS & TOOLS*
TTA
To Attac
h Tools ffor
or Use: Simply slide the tool onto end of the
Attach
wand or directly onto stub tube of the hose.
*Tools are to be used with plastic straight wands or attach to the stub tube on the
handle of hose. Do NOT use with top or lower electric brush wands.
FB-215BLK
12” Floor Brush with Wheels
• Works well to clean bare floors,
•
wood flooring, tile, etc.
Shorter bristles in front, longer
in back--allows larger dirt
particles to be picked up with
forward movement.**
**F
or best rresults
esults
**For
esults,, do not force the front of the brush down when moving
forward. Allow the brush to gently glide across the floor. The front of
the brush should allow particles to enter through the raised bristles.
CT-530BL
Cr
Cree vice Tool
• 13” tool to reach into cracks and crevices such as tracks of
•
•
sliding glass doors, corners, along baseboards, and even in the
cracks of couches and other furniture.
Notched end helps maintain air flow and proper
suction.
This tool has flat sides which makes it great
for reaching under refrigerators, around air
conditioner coils, and other hard to reach
places that collect a lot of dust and dirt.
DB-530BL
Dusting Brush
• Use for dusting furnishings such as bookcases, tables,
desks, and mantles.
• Also great for dusting picture frames,
collectibles, tops of televisions, window sills,
and even the backs of computer monitors.
• Full, natural bristles for gentle cleaning.
11
Electric Brush Assembly & Use
Wand Insertion and Release
For the EB-210--insert wand, snap wand button into
place. Turn wand button past the stop position. This
slotted area allows you to turn the handle to the side to
reach farther under furniture.
!
Button
Slotted Area
Stop Position
WARNING
DO NOT attach or remove handle or wands while cleaner is ON. This
could cause sparking and damage the electrical contacts.
HOW TO START
EB-210 SuperGroom II™ Model:
1. To lower wands hold EB-210 SuperGroom II™
down with foot and pull back on wands.
2. Start vacuum and electric brush.
Pile height adjustment for the EB-210:
Rotate the pile height control. The pile height setting
is shown on the control. The deeper the pile of the
carpet, the higher the setting.
OVERLOAD PROTECTOR
The overload protector protects the motor from brush jamming and belt breakage. If the brush stops, the overload
protector will stop the electric brush.
Overload Protector
(reset button)
To correct problem: Unplug the
electrical cord. Check brush area for
excessive lint buildup or jamming.
To reset: Press reset button on top of
the brush. Plug in and turn on vacuum
and brush.
4
EB-210 SuperGroom II™ Care
Electric Shock Hazard
Disconnect electrical supply before servicing or
cleaning the unit. Failure to do so could result
in electrical shock or personal injury.
LIGHT CHANGING
EB-210 SuperGroom II™:
1. Remove light cover by pressing in and
lifting both sides as shown.
2. Push in and turn bulb to remove.
GSH-430C
“T
ear
-Dr
op” Style 2-W
ir
“Tear
ear-Dr
-Drop”
2-Wir
iree High
Volta
g e Hose with Pigtail Cor
d
oltag
Cord
The “tear-drop” style handle has 360° rotation to minimize kinks, effort, and inhand weight. Its unique “tear-drop” designed handle allows the hose to drape to
the floor reducing the weight
supported in your hand. For use with the
electric brush.
Hose Handling: Hold the hose and handle in any way you find to be the
most comfortable. With this new style handle, numerous hand positions are
offered and reduce strain and increase ease of use.
Also, for added ease while vacuuming, try keeping the hose behind you rather
than out in front of you. Use one hand to hold the handle and the other hand
to hold and guide the hose. Again, do what feels comfortable to you.
3. Replace bulb and snap light cover in place.
Note: replacement bulb number is EB21016.
Pigtail cor
d w
all-end
-cord
wall-end
all-end---Use with standard pin-jack valve.
To inser
alv
insertt hose cuf
cufff into vvalv
alvee : Lift valve door, insert
cuff into hole, & plug cord into 110 electrical outlet.
BELT CHANGING AND BRUSH CLEANING
EB-210 SuperGroom II™:
Disconnect hose and brush from electrical outlet. Frequently check and
remove hair, string and lint buildup in the EB-210 SuperGroom II™ brush area. If
buildup becomes excessive, disconnect EB-210 SuperGroom II™ from wand
and follow steps below.
IMPOR
TANT
IMPORT
ANT:: Make sure power is turned off before removing the hose
and handle from the wand. Arcing or damage to the electrical contacts can
occur if the wand is removed while brush power is on.
To Remove:
1. Raise the pile height adjustment rollers. Remove
the two cover screws from the EB-210 SuperGroom
II™ base.
H-431
Plastic Hose Hanger
•
•
•
2. Insert and twist flat screwdriver under both back
cover tabs.
•
5
L6178
Use of hanger can increase the life of your hose
and save space while storing.
Coil your hose around this hanger to store it when
not in use.
Mount on a wall in a closet, garage, or any other
convenient location for hose storage, and place it
high enough so you can loop your hose only four
times and still clear the floor.
Mounts using only one stud and two screws.
10
10
27
16
12
17
3. Turn EB-210 SuperGroom II™ right side up.
Tilt cover forward from back until front snaps free.
26
Base
13
4. Carefully insert and lift screwdriver at
each brush support to free brush from
base.
18
14
Brush Support
19
15
20
22
Belt
5. Remove belt from motor shaft.
23
Belt
21
6. Remove broken or worn belt.
7. Slide brush supports off to check and clean
brush support areas. See Brush Assembly-EB210 SuperGroom II™ for picture of complete
brush.
BRUSH ASSEMBLY
EB-210 SuperGroom II™:
To Replace:
1. Slide on washers and brush supports.
Brush
Brush
Support
Brush
Support
Washer
Belt
Motor
Belt Groove
Belt
Washer
9
2. Install new belt in belt groove on the brush
assembly, then over motor shaft as show.
Note: Replacement belt number is EB21010.
6
3. Insert both front support tabes into base
slots. Then snap brush supports into place.
1. Remove brush support and washers from brush assembly.
2. Remove brush assembly and replace with new brush.
3. Reassemble brush assembly.
4. Replace belt, brush assembly, EB-210 SuperGroom II™
cover.
Front
Support Tab
4. Line up tabs on front of base with slots
inside the cover front.
Cover
Slots
EB-210 SuperGroom II™ Parts List
Front
Base Tabs
Please note when ordering that you must include the identification number for
the brush. For the EB-210 SuperGroom II™ this is EB210 (i.e. to order a light
bulb you would order an EB21016).
5. Tilt cover to back. Press cover firmly until rear
tabs snap into place. Turn EB-210 SuperGroom
II™ over, replace the cover screws and lower the
pile height adjustment rollers into place.
Rear
Base
Tabs
BRUSH SERVICING
EB-210 SuperGroom II™:
Disconnect hose and brush from electrical outlet and disconnect EB-210
SuperGroom II™ from wand so brush will not operate while being serviced.
To Check:
When brush is worn to the level of the base
support bars, replace the brush.
Base Support Bar
To Replace:
Remove light cover, EB-210 SuperGroom II™
cover, belt and brush assembly (follow to remove
section in Belt Changing and Brush Cleaning”.
7
-10
-11
-12
-13
-14
-15
-16
-17
-18
-19
-20
-21
-22
-23
-24
-25
-26
-27
-28
-29
-30
-31
-32
-33
-34
Belt
Floor nozzle lower unit
Motor assembly
Motor bracket
Overload protector
Light bulb
Light bulb socket
Swivel catch
Swivel
Furniture guard
Roller shaft
Swivel bearing seal
Nozzle roller
Front axle assembly
Brush and bearing assembly
Window cover (not shown)
Cord and plug assembly (not shown)
Power head cover assembly (not shown)
Floor nozzle upper unit (not shown)
8
L6178
10
27
16
12
17
3. Turn EB-210 SuperGroom II™ right side up.
Tilt cover forward from back until front snaps free.
26
Base
13
4. Carefully insert and lift screwdriver at
each brush support to free brush from
base.
18
14
Brush Support
19
15
20
22
Belt
5. Remove belt from motor shaft.
23
Belt
21
6. Remove broken or worn belt.
7. Slide brush supports off to check and clean
brush support areas. See Brush Assembly-EB210 SuperGroom II™ for picture of complete
brush.
BRUSH ASSEMBLY
EB-210 SuperGroom II™:
To Replace:
1. Slide on washers and brush supports.
Brush
Brush
Support
Brush
Support
Washer
Belt
Motor
Belt Groove
Belt
Washer
9
2. Install new belt in belt groove on the brush
assembly, then over motor shaft as show.
Note: Replacement belt number is EB21010.
6