1
2011
Adra Match Accounts
User manual AMA version 13
This manual contains a user guide with descriptions of features.
Adra Match
2011
Contents
Guide Adra Match Accounts................................................................................................................4
Preparations ...................................................................................................................................4
Daily routines..................................................................................................................................4
Login ...............................................................................................................................................4
Welcome Page ................................................................................................................................5
Edit accounts and account groups ...................................................................................................5
Set starting balance .....................................................................................................................8
Imports ...........................................................................................................................................9
Add import................................................................................................................................ 10
XLM import ............................................................................................................................... 10
User defined import (Wizard) .................................................................................................... 11
Settings ..................................................................................................................................... 11
Columns .................................................................................................................................... 12
Optional fields........................................................................................................................... 12
Extra field.................................................................................................................................. 12
Files and folders ............................................................................................................................ 13
Import .......................................................................................................................................... 14
Balance post – import ............................................................................................................... 15
Automated (reconciliation) ........................................................................................................... 16
Scheduled Automated Reconciliation ............................................................................................ 18
Exceptions .................................................................................................................................... 19
Useful tips ................................................................................................................................. 21
Reconcile transactions with deviation ....................................................................................... 25
Reconciled transactions ............................................................................................................ 26
Search and Replace Reconciled Transactions ........................................................................ 27
Reports ......................................................................................................................................... 29
View historical date ................................................................................................................... 30
Reports and content.................................................................................................................. 30
Custom Reports ............................................................................................................................ 31
Add a Custom Report ................................................................................................................ 31
License settings ............................................................................................................................. 33
Add or edit a client .................................................................................................................... 33
Add or edit users ....................................................................................................................... 34
User manual Adra Match Accounts
Page 2
User Privileges and Roles .............................................................................................................. 34
Single sign-on ............................................................................................................................ 36
Add or change Company information ........................................................................................ 36
Add or change product key or update licence ............................................................................ 36
Backup and restore ....................................................................................................................... 38
Create backup ........................................................................................................................... 38
Restore backup ......................................................................................................................... 38
Settings for exceptions .................................................................................................................. 39
Undo import and reconciliation..................................................................................................... 40
Manual registration ...................................................................................................................... 42
Settings for automatic reconciliation ............................................................................................. 43
“Reconcile general” Reconciliation rules.................................................................................... 43
Examples................................................................................................................................... 45
Automatic reconciliation with Variance or Split ......................................................................... 50
Actions to perform after import .................................................................................................... 53
Data enrichment with regular expressions (Find Expression and add new) ................................ 53
User manual Adra Match Accounts
Page 3
Guide Adra Match Accounts
Preparations
-
Export an account statement as a text file from your Financial Ledger (referred to
herein as “ERP”) containing the accounts you wish to reconcile. Usually this is done
via a Report or Export – function in your ERP system.
o Create a folder on a network drive where you can save the files.
e.g. G:\AccountMatch\(name_of_ERP)
o Create a backup folder where Adra Match Accounts will move the imported
files.
e.g. G:\AMAccounts\(name_of_ERP)\Backup
o The file must be a text file. Excel files can be used if it is saved as a TABdelimited text file.
-
Obtain your bank statement as a text file from your bank.
o
Contact your bank for further instructions on how to do this. Most banks
provide this service via their web-site or through online banking software.
o Create a folder on a network drive where you can save the files.
e.g. G:\ AMAccounts\(name_of_bank)
o Create a backup folder where Adra Match Accounts will move the imported
files.
e.g. G:\AMAccounts\(name_of_bank)\Backup
Daily routines
-
Download the text file (account statement) from your ERP system
Download the text file (account statement) from your bank
Log in to Adra Match accounts
Import the file from your ERP system and bank into Adra Match Accounts
Verify that the post-import balance is the same as the balance on your bank- and
ledger account(s)
Run the automatic reconciliation routine(s)
Reconcile exceptions manually where not auto-matched or investigate and resolve
Produce and Print reports
Login
Log in with the username and password you have been assigned.
User manual Adra Match Accounts
Page 4
Welcome Page
Once logged in, Adra Match Accounts will show a welcome page displaying the account
groups of the clients the user has access to.
The Welcome Page works like a dashboard showing all clients that are available to the user
logged on. Select Client in the box in the right upper corner. The welcome page will then
display all the Account groups belonging to the client you chose.
Edit accounts and account groups
Before you start using the program, you have to register some basic information about the
accounts you want to reconcile in Adra Match Accounts.
In the tab Edit accounts and account groups you can add, modify and delete accounts
and account groups. Set the starting balance of account groups, delete all transactions or
delete all reconciled transactions up to a specified date.
Select Maintenance → Edit accounts and account groups.
User manual Adra Match Accounts
Page 5
Click New and select a name for the account group. Click Save.
Select Account settings, click New and enter the account number. Set it to Interim to enable
reconciliation between debit to credit within the account. Set it to Unique if the account
number is unique for the entire engagement. This enables the possibility to import at
engagement level (Import to all clients). Click Save to save the added/edited account(s). This
procedure has to be done for all accounts you want to reconcile in the application.
User manual Adra Match Accounts
Page 6
Click Account group. Make sure that the right account group is selected. Select one or more
of the Available accounts. Then click the up arrow to add account to Ledger (Left) or Bank
(Right). It is also possible to change account type (Ledger or Bank). When you have finished,
click Save.
User manual Adra Match Accounts
Page 7
Set starting balance
Click Set starting balance under Account group. Set the balance of the month/period you
want to start your reconciliation, and remember to reverse the +/- signs of the bank
transactions. Then manually enter the open transactions from ledger and bank. Remember
to reverse the +/- signs of the bank transactions. Do not forget to select the correct account
number. When Difference is zero, click Insert to save the starting balance and the open
transactions.
User manual Adra Match Accounts
Page 8
Imports
Select Import from the Maintenance menu to select predefined import, add an XML import or
create a user defined import. If you have received a standard import for your company, it will
be available here.
Select Maintenance → Imports.
Click Add to add new import, or select one of the existing imports to Edit or Delete. It is only
possible to edit or delete imports with the type “XML import” or “User defined import”. Imports
with the type “File” cannot be changed or deleted. Administrators can import to all clients by
checking Engagement mode. Click Get XML to view the code of an existing “XML import” or
“User defined import”.
User manual Adra Match Accounts
Page 9
Add import
Click Add to add XML code, or create your own user defined import.
Select a name for the new import. Then select Wizard to create a user defined import, or
XML to add XML code.
XLM import
Select XML. Type or paste the XML code in to the window. Click Save.
User manual Adra Match Accounts
Page 10
User defined import (Wizard)
Settings
File type – Select Position if the field columns in the text file have “Fixed width”.
Select Delimited if the field columns in the text file are delimited e.g. tab or comma.
Remove character – This is used to remove „Wrappers‟, for instance if you have a CSV file
that has a quotation mark (“) on both sides of a text column. E.g. „,2010-08-15,400.00,”Bank
Acc.”,‟.
Encoding – Set the encoding to the encoding of your text file. If you do not know the
encoding of your text file, use the standard “Western European (Windows)(1252)(Windows1252)”.
Static account – Use this static field if your text file does not contain any account number or
account name. Enter the appropriate account number.
Debit/Credit columns – To be selected if debit and credit transaction amounts are divided in
to two separate columns in the data file.
Invert amount – Inverts the amount. Plus(+) to minus(-) and minus to plus.
Multiplier – Multiplies the amount in the text file, with the value in multiplier. E.g. “1000”
multiplied with “0.01” equals “10.00”.
Start at line – Use this if the transaction data in the text file does not start at the first line.
E.g. if you have a header in the text file, set the value to “2”.
Decimal symbol – If the amount look like this “100,000.00”, the value will be “.”.
Digit grouping symbol – If the amount look like this “100,000.00”, the value will be “,”.
User manual Adra Match Accounts
Page 11
Columns
Column index (Delimited file) – Insert the number of the corresponding columns in the text
file.
From-Length (Position) – Insert the start position and length of the corresponding columns
in the text file.
Mandatory fields
Account no. – The account number in the data file.
Amount (Debit/Credit) – The transaction amount in the data file. If you selected the setting
Debit/Credit columns, amount will be separated into one Debit column and one Credit
column.
Date (Transaction Date) – The transaction date (Value date) in the data file. Do not forget to
change the date format to the one used in your data file.
Reference – The reference in your data file
Optional fields
Client no. – The unique number or name in the text file used to import to more than one
client at the time.
Sign – Only used if (+/-) or (d/k) symbols are in a separate column in the data file.
BDate (Booking Date) – The booking date in the data file. Do not forget to change the date
format to the one used in your data file.
Text – The transaction text in the data file.
Free text – Free text in the data file.
Extra field
Select extra field if you want to display any additional information in a separate column.
Select Extra field and type the name of the new field. Enter the column number or from
position and length.
User manual Adra Match Accounts
Page 12
Files and folders
This is where you define the path to the import folder (the folder to which you save your text
files), and the backup folder. This is set once per selected import and client. Paths for file
import in engagement mode can also be set up.
Select Maintenance → Files and folders
Select the import you want to set a folder path for. Select a path to the folder where the files
are located. You can also setup a path to a Backup folder. Select a Filter e.g. to show only
text files (*.txt). Click Save.
To select a path for an import in engagement mode (imports data to all clients). Select
Engagement mode before you select your import and paths. It is also possible to run action
after import. See Actions to perform after import for more info.
User manual Adra Match Accounts
Page 13
Import
This is where you import the files from your Bank, ERP, or other Source/System.
Click on Import. Click it again, and you are presented with three options (see below). What
you select here is saved for the current user and PC.
-
Import to all clients – It is possible to import to two or more clients simultaneously, if
the accounts you are importing to are set to unique under Maintenance – Accounts
and account groups, or if they aren‟t unique, have a client number set under
Maintenance – License settings, that also needs to be in the file you are importing
-
Exclude duplicate transactions – Excludes already imported transactions from your
data file. If you add transactions to an already imported booking period, you can
export a new data file from your ERP on the same booking period and import it to
Adra Match Accounts, and only import the new transactions in the data file to Adra
Match Accounts.
-
Show advanced settings – Gives you the option to limit the import based on date.
Select import. If you successfully set up the correct paths under Files and folders you can
select the file(s) you want to import and click Import, as the files will appear in this window
automatically. It is possible to import one or multiple files of the same type, at the same time.
Select one data file by selecting one row with the mouse. Select multiple data files by clicking
and dragging the mouse over the data files. Add files manually by clicking Add.
User manual Adra Match Accounts
Page 14
Balance post – import
When the files are imported, you will be prompted with the number of transactions imported
and the balance post-import. By clicking the magnifier glass next to the balance, you can see
the transactions that have been imported. Click Back to return to the balance window. Make
sure that the balance is correct, and then click Accept. If it is incorrect, click Cancel and
redo the import. You can also click Print, to print the balance for all the imported accounts.
The information window also shows if something went wrong during the import.
Do this once per ERP, Bank or Source you want to import files from.
User manual Adra Match Accounts
Page 15
Automated (reconciliation)
This is where you run your settings/rules for automatic reconciliation. You need to set up
settings/rules for automatic reconciliation for this to work. See ”Settings for automatic
reconciliation” for more information.
Select Automatic. Click on Automatic once more and select ”Show all clients”. It is possible to
run automatic reconciliation for all clients and account groups simultaneously. You can also
show only the account groups, and hide the reconciliation rules, by selecting “Show only
account groups”.
Make sure that the clients you want to reconcile are selected. You can also choose not to run
a particular setting/rule by removing the check in the checkbox. Click Reconcile. You can
stop the reconciliation by clicking Stop.
User manual Adra Match Accounts
Page 16
When the reconciliation is complete, the number off open and reconciled transactions is
shown in the lower-right corner of the screen. You can also see the number of items and the
percentage each setting/rule has reconciled, and the total percentage for the account group.
User manual Adra Match Accounts
Page 17
Scheduled Automated Reconciliation
You can schedule the automated reconciliation to do the reconciliation at the time that is
most convenient for you. The reconciliation can be scheduled to run daily, weekly, monthly,
on certain days or times on specific clients and account groups.
Scheduled automated reconciliation presupposes that files have been imported into the
Account Groups you want to schedule and that balances are verified.
Engagement Level
You can choose whether you want to run scheduler on all reconciliation routines on an
engagement, or just some of them.
Client Level
You can choose whether you want to run scheduler on all reconciliation routines on a Client,
or just some of them.
To run the scheduler the file AMAScheduler.dll and ScheduleJob.xml need to be located in
the Adra Match Account application folder.
Note! If you change the name of an Account Group or a Client that is referred in the
ScheduleJob, the ScheduleJob must also be changed.
To start the file ScheduleJob.xml, a Task Scheduler needs to be created. Open Windows
Task Scheduler, and select Create Task.
Password needs to be a Windows User. Password never expires.
User manual Adra Match Accounts
Page 18
Exceptions
This is where you reconcile your outstanding transactions interactively. Search, sort,
summarize and filter to find transactions that match but were outside of the specified rules
set up in the system.
Select Exceptions. Click on Exceptions once more, and you have several options.
-
Reconcile – Reconciles the checked transactions if the sum is 0 (or if the deviation is
within the allowed limit for the account group)
Search – Search for a transaction among the open/reconciled transactions
Reconcile when sum is 0 – Reconciles the transactions, without prompting the user,
when you have checked two or more transactions that summarize to zero.
Show reconciled transactions – Shows the reconciled transactions of the selected
account group
Use high contrast – Shows the transactions from the Ledger (Left side) and Bank
(Right side) in higher contrast colours
Fit row to text – Will adjust the row height to the content of the text column
Reset column order – Will reset column order and width to the preset values
User manual Adra Match Accounts
Page 19
Start by clicking on the Amount-column to sort the transactions by the absolute amount. The
transactions will be sorted independently of whether it is a debit or credit. Look through the
open transactions to find two equal amounts, one debit and one credit from each side
(Ledger left-side, blue rows, Bank right side, yellow rows). It is also possible to reconcile two
blue or two yellow transactions. Select these transactions in the checkbox-column, and click
Reconcile or press ALT+A to reconcile the transactions. The reconciled transactions are
now moved to the tab Reconciled.
When you cannot find any more transactions with equal amounts, sort the transactions on
date by clicking the Date or BDate column. For example: Try to find one or more
transactions from the ledger that match the amount of one or more transactions in the bank.
You are helped by the “calculator” in the upper right corner, which summarizes the number
and amount of the selected items and highlights the net difference. When net difference is
zero or within the allowed deviation (Sum remaining), the Reconcile button will be active.
Click on Reconcile to reconcile the selected transactions. Keep doing this until you are out
of reconcilable transactions.
User manual Adra Match Accounts
Page 20
Useful tips
In the Comment column you can type whatever you want, for example why a transaction
hasn‟t been reconciled.
You can select several transactions by dragging your mouse pointer over several rows. If the
Amount column is selected the sum of the selected rows is shown on the information bar on
the lower right of the application. Then right-click and click Select or Remove selection.
Select a word or a number string, or a part of a word or number string from one of the text
columns. Right click and select Contains from menu to set filter to what you have selected, or
right click on a single cell in a column and select Equals to. Date and amount can also be
filtered on Greater than or equal to, Less than or equal to or Equal to. It is also possible to
apply filters to several columns at the same time.
User manual Adra Match Accounts
Page 21
To remove a filter from a single column, click the „funnel‟ indicator in the column header.
Right click and select Remove all filters to remove all filters from all columns.
Click the checkbox in the column header of the V – column, to select all open or filtered
transactions. Unselect clear all selected transactions
Ctrl+Z to undo the last manually reconciled transaction
Ctrl+U to jump up to the next checked transaction
Ctrl+D to jump down to the next checked transaction
Right click in the grid and select “Send transactions by E-mail (Outlook)”, to copy checked
transactions to Outlook E-mail.
Right click in the grid and select “Copy transactions to Excel”, to copy checked transactions
to Excel.
User manual Adra Match Accounts
Page 22
Search for Open Transactions
Another way of searching for open transactions is to use the functionality in the Search tab
under Exceptions →Search.
This feature allows you to do extended search among the open transactions. You can search
for a specific values, or search within to and from values.
Amount:
You can choose whether you want to search for exact amount, or from and to amount.
To search for an exact amount, type in the amount you are looking for in the Amount field.
Adra Match Accounts will then search for this specific amount, and list up all open
transaction lines on that account group, regardless of what sign the amounts have.
When searching for exact amount only, the name of the field is Amount. As soon as you type
in both From and To date, the label of the field will change.
Example:
If you search for From Amount 120,- and To Amount 245,-, Adra Match Accounts will display
all amounts between these two amounts.
To Amount field can only be used when (From) Amount field is filled.
User manual Adra Match Accounts
Page 23
Date:
You can choose whether you want to search for exact date, or a space of time (From Date To Date).
When only Date is filled in Adra Match Accounts will search for the exact date. When both
From Date and To Date are filled in, the Adra match Accounts will search for all dates
between the two dates that were typed.
When searching for exact amount only, the name of the field is Amount. As soon as you type
in both From and To date, the label of the field will change.
To Date field can only be used when From Date field is filled.
Comment:
To search for text or numbers, type in the full string or parts of it.
Text:
The text should contain the search string anywhere in the text.
Reference:
The reference should contain the search string anywhere in the reference text.
User manual Adra Match Accounts
Page 24
Reconcile transactions with deviation
It is possible to reconcile transactions with deviation (Split or Variance) interactively. To
reconcile a transaction with deviation you first have to set up “Allowed deviation”, see
Settings for Exceptions.
Select transactions with deviation. If the deviation/difference is within the “Allowed deviation”,
you will be able to click Reconcile.
You will now be prompted to select if the deviation is Split or Variance.
Split should be used if you want to save the deviation/difference to be reconciled later.
Saves the text fields and dates from the oldest transaction with the largest amount
from the Ledger side. If you reconcile Bank against Bank or Ledger against Ledger,
all the text fields, BDate and Date from the oldest transaction with the largest amount
will be saved. A reconciliation ID is added on a new row in the text column.
Variance should be used if you want an item to correct in your ledger.
Saves the text fields and date from the oldest transaction with the largest amount
from the Ledger side. If you reconcile Bank against Bank or Ledger against Ledger,
all the text fields, BDate and Date from the oldest transaction with the largest amount
will be saved. The Reference will be copied text column and replaces Reference will
be replaced with “Diff: 1296 (The number is the unique variance number)” and adds a
Reconciliation ID on a new row in the text column. Variance transactions can be
printed separately.
User manual Adra Match Accounts
Page 25
Reconciled transactions
Click the tab Reconciled. Here you can undo reconciled transactions, search for a
reconciled transaction, see when it was reconciled, by whom and if it is manually reconciled
or not. Select a date from the dropdown menu Reconciled after to see reconciled
transactions after a specified date, this will also include the transactions reconciled on the
selected date. If you want to undo a reconciled transaction, select the check-box on the
transaction you want to undo and Adra Match Accounts will automatically check the
transaction it is reconciled against. Then click Undo - button to return the transactions to the
Open tab.
User manual Adra Match Accounts
Page 26
Search and Replace Reconciled Transactions
It is possible to search for reconciled transactions on Amount, Comment, Date, Text and
Reference.
Amount:
You can choose whether you want to search for exact amount, or from and to amount.
To search for an exact amount, type in the amount you are looking for in the Amount field.
Adra Match Accounts will then search for this specific amount, and list up all reconciled
transaction lines on that account group, regardless of what sign the amounts have.
When searching for exact amount only, the name of the field is Amount. As soon as you type
in both From and To date, the label of the field will change. Example:
If you search for From Amount 120,- and To Amount 250,-, Adra Match Accounts will display
all amounts between these two amounts.
To Amount field can only be used when (From) Amount field is filled.
User manual Adra Match Accounts
Page 27
Date: You can choose whether you want to search for exact date, or a space of time (From
Date - To Date).
When only Date is filled in Adra Match Accounts will search for the exact date. When both
From Date and To Date is filled in, the Adra match Accounts will search for all dates between
the two dates that were typed.
When searching for exact amount only, the name of the field is Amount. As soon as you type
in both From and To date, the label of the field will change.
To Date field can only be used when From Date field is filled.
Reconciled date:
The fields Reconciled Date, From Reconciled Date and To Reconciled Date work in the
same way as the Date fields.
Comment:
To search for text or numbers, type in the full string or parts of it.
Text:
The text should contain the search string anywhere in the text.
Reference:
The reference should contain the search string anywhere in the reference text.
For all fields press Clear to remove contents.
If you want to undo reconciled transactions, click on the actual transaction you want to undo.
Adra match Account will then display in a new window the transactions that were reconciled
and that were given the same reconcile id. Click on Undo.
User manual Adra Match Accounts
Page 28
Reports
This is where you produce and print reports for one or more account groups and clients.
Click on the tab Reports.
Select report type, sorting and the account group(s) or client you wish to print. Select “Active
client” to show all accounts on active client or “All available clients” to show all account
groups on all clients you have access to. Select more than one account group by holding
down the left mouse button and drag the mouse over the account groups, or hold down Ctrl
and select the desired account groups with the mouse, or select the first account group and
scroll down to the last and hold down Shift and select the last too select all. You can also
select a date to be printed on the report. If you check the View historical date check box, to
produce a report on „Per date‟, „Date‟ or „BDate‟. Select type of preview on the dropdown
„Select report format‟. Then click Preview.
The report can be previewed in three fromats PDF, RTF, TXT, XLS and Report Viewer.
Note that the application is delivered with a set of standard reports. In addition, Adra Match
provides tailor-made reports according to your specifications. If you need a specific report,
please contact Adra Match.
User manual Adra Match Accounts
Page 29
View historical date
A historical report can only be created as an „Open items‟, „Open items Bank‟ or „Balance‟
report. The balance is also shown in the „Open items‟ and „Open items Bank‟ reports.
-
Per date – Produces a report with all the transactions that were imported, and not
reconciled up till the selected „Per date‟ – date
-
Date – Produces a report with all the transactions not reconciled on the selected Date
– date
-
BDate – Produces a report with all the transactions not reconciled on the selected
BDate – date
Reports and content
- Open items – Gives you the open transactions list within an account group or client
or for all clients, together with the balance of each account and the number of open
transactions. This list can be sorted on several different columns including date,
amount and text and reference. Username, timestamp and date are also included
-
Open items bank – This report is only accessible if the right account type is ledger
and the left is bank, or vice versa. The report is split on debit and credit bank/ledger
and gives you the sum of these
-
Reconciled Transactions – Reconciled transactions after your chosen date. The
number of transactions, timestamp, creation date and username are also displayed
-
Balance – The balance and the sum of the open transactions for all available account
groups. A timestamp and username are also displayed
-
Corrected Transactions – A report of all the transactions reconciled with a deviation,
giving you the deviations, the total amount, and the number of transactions reconciled
with a deviation. A timestamp and username are also displayed.
User manual Adra Match Accounts
Page 30
Custom Reports
Reports can be customized to suit your needs. A custom report made according to your
spescifications can be ordered from Adra Match.
Add a Custom Report
A custom report made by Adra Match is normally sent to you via email. Save the custom
report to your desktop. You will also get screen dump with the settings your report is
customized for. Start Adra Match Accounts and login.
Select Maintenance → Reports.
Click Add
User manual Adra Match Accounts
Page 31
1.
2.
3.
4.
Enter a report name
Select a report file (RPT)
Select the settings the report is designed for
Select the output type (CRV is the Crystal Reports Viewer)
Click Save
Only select “Use standard AMA data” if you want to use datasets from AMA engine. This can
be used if you e.g. want to change an existing standard rapport.
1
2
3
4
Select if you want the report to be viewable on the active client or on all clients and select
“Admin only” if you only want the report to be restricted to administrators. Close
maintenance and you are ready to use your new report.
User manual Adra Match Accounts
Page 32
License settings
This is where you manage your users and clients.
Select Maintenance → License settings.
Add or edit a client
Click Add. Client name is mandatory. Address and Zip/Post-Code is optional. Add client
number if you have one. The client number is used to find the right client when importing to
more than one client. Select users. Users can be added later. Click Save.
Select a client to edit. Edit client and click Save.
User manual Adra Match Accounts
Page 33
Add or edit users
User Privileges and Roles
Adra Match Accounts contains five levels of roles and user privileges. Grouped from highest
to lowest order, these are:
Admin
Super User
User
Restricted User
Viewer
Admin is the superior user level and has full user rights at all levels in the program. Super
User has full control on all available clients. This role can do anything except from change
licenses, users or clients and taking backup.
Holding the User role you can do any typical user task in the program, such as:
o
o
o
Set Available Clients
Set available Account Groups
Import – Reconcile - Report
Import data
Auto reconcile
Exceptions (Manual reconciliation)
Undo Reconcile
o Older than
o Can undo Auto reconciled
Reconcile with variance
o Max amount
Print Reports
Available on Maintenance Menu
Undo Import
Registration of new starting basis
A Restricted User has the same rights as a User, except from on Maintenance where only
Undo Import is available.
The Viewer role is typically meant for auditors. A Viewer would normally be interested in
performing IT audit and accounting audit of work that has already been done, how it has
been done and by whom. A Viewer has access to:
o
o
Exceptions
View Exceptions
Write Comments to Exceptions
Send copy of Exceptions to e-mail (Outlook) of Excel
Report
View and print Reports
User manual Adra Match Accounts
Page 34
Select the tab Users from the License settings window. Click Add. Enter a User name,
Password and Language. Other optional fields are First name, Last name and E-mail. Under
Role you select whether the user should have the role Admin, Super User, User, Viewer or
Restricted User. If you do not select Admin you need to select the Clients the user should
have access to. Click Save.
If you uncheck In use, the user will no longer be able to log in and the user will be returned to
Available users.
Edit user by selecting user to edit. Change values and click Save.
The Roles feature is meant to be a dynamic feature. Should there be a need for tailor-made
roles other than the five roles listed above, Adra can help create and add roles with different
combinations.
User manual Adra Match Accounts
Page 35
Single sign-on
The user can be set up to be automatically logged in to Adra Match Accounts. If you register
the windows user name “DOMAIN\USERNAME” as the username in Adra Match Accounts,
and then select Windows authentication, the users will be automatically logged in next time
they start Adra Match Accounts. If you only have one administrator (Admin), do not set the
administrator Windows authentication.
Add or change Company information
Select the tab License from the License settings window. Add the company address in
Company information, and click Save.
Add or change product key or update licence
Select the tab License from the License settings window.
Click Change product key. Enter or paste the Adra Match Accounts product key and click
Add.
User manual Adra Match Accounts
Page 36
Click Check for license update. Verify that the license is right, and then click Confirm.
If you have any problems with your license, please contact Adra Match Support.
User manual Adra Match Accounts
Page 37
Backup and restore
If your SQL-server is not set up to do backups automatically, you can do a backup manually.
If you encounter problems with the program, Adra Match support can ask you to do a backup
and send it to them.
Select Maintenance → Backup / Restore.
Create backup
Select path to backup folder. Click Create backup.
Restore backup
Select path to backup folder, if not all ready selected. Select file to restore, click Restore
backup.
Backups will always be saved with the name “AmBackup YYYY-MM-DD HH-MM-SS.xml”. If
Adra Match support asks you to send them a backup, go to the backup folder, right click on
the backup file and select Send To → Compressed (zipped) Folder. Send the ZIP – file
you created to Adra Match support.
User manual Adra Match Accounts
Page 38
Settings for exceptions
Set the allowed deviation for interactive/manual reconciling. When reconciling with a
deviation, a balancing transaction with the deviation amount will be saved as an open
transaction in Adra Match Accounts. Correct this transaction in your ledger and when a file
containing the adjustment is imported into Adra Match Accounts it will clear the open
deviation amount thus returning to a reconciled position.
Select Maintenance → Settings for exceptions
Select the Account group that you want to change the values to. Enter the deviation you want
to allow in the Allowed deviation field. If you have large amounts of open transactions, you
can enter the Maximum number of transactions shown to display per page in Exceptions and
the sort order of them. Click Save and Close maintenance.
User manual Adra Match Accounts
Page 39
Undo import and reconciliation
Imported files with reconciled transactions will not appear in the list. To undo the import of a
file with reconciled transactions, you first have to undo the reconciliation of those
transactions, and then undo the import of the file.
Select Maintenance → Undo import.
Select the file or files you wish to undo. If you logged in as admin, select Engagement mode
to see the files imported to all clients. You can click on the button Details to see the impact
on balance the Undo import will have on the selected file or files. Click Undo import. Click
Yes to confirm. If the file or files you want to undo do not appear in the list, select
Reconciled imports.
User manual Adra Match Accounts
Page 40
Before you undo the reconciliation for a selected file or files, you can click on the button
Details to see the impact on balance the Undo import will have. If you still want undo the
reconciliation on the selected file or files, close the Undo Import Details window and click
Undo reconciliation. When you unreconciled the selected file or files, select Unreconciled
transactions to undo the import.
User manual Adra Match Accounts
Page 41
Manual registration
Manual registration is used to add transactions manually to an account.
Select Maintenance → Registration
Select Account group. Register the transactions in the top window. In the window below all
the registered transactions are shown. Do not forget to select the correct account. When all
transactions are registered, click Insert to add the transactions to the reconciliation.
User manual Adra Match Accounts
Page 42
Settings for automatic reconciliation
This is where you manage your settings/rules for automatic reconciliation. You can add
settings to reconcile one to one, many to one, many to many, or within an account. You can
reconcile on parameters texts, amounts and dates.
Click Automatic. Click Settings → Settings for automatic reconciliation
“Reconcile general” Reconciliation rules
Settings
Reconcile using the same text string for Ledger and Bank – Only reconciles if the
information in the bank and ledgers text string are the same. For example if the text “OCR” is
in both sides‟ text strings.
Reconciliation within an account (debit/credit) – Reconciles one debit transaction against
one credit transaction within one account. The transactions must be within the allowed Date
deviation. The account must be set to Interim.
Reconcile a suspense account (sum) – Reconciles one or more transactions within the
same account with the same text string. The setting indexes on one column and tries to find
a match within the same account with the same text string, which it then sums up to test to
see if the sum is zero. The transactions that are summed up must be within the set date
deviation. Remember to set the account to Interim to use this reconciliation rule.
Reconcile when only one alternative exists –Reconciles provided that only one alternative
exists within the allowed date deviation, you just need to create a new setting, give it a
Name, select ”Reconcile when only one alternative exists”, set a date deviation and click
Save.
Date deviation – This is the deviation between transactions on the left and right side (often
the bank and ledger accounts.). The deviation can be set to reconcile transactions booked
before or after the transaction you are reconciling.
User manual Adra Match Accounts
Page 43
Many items from...
Select if you want to reconcile One to Many, Many to One or Many to Many. If the
transactions in the bundle you want to reconcile are booked on different days, you have to
set a Date deviation within the bundle.
If you know that just a known number of the transactions found on the “Many”-side in a One
to Many, Many to One or Many to Many reconciliation rule matches the other side. For
example 3 out of 5 transactions on the same day on the Ledger-side, match a single
transaction on the Bank-side. Select Bundle combinations on the Ledger-side and set the
value to 3 in Items returned. Adra Match Accounts will now try to find all unique combinations
of 3 out of the 5 transactions in the bundle and try to match the single transaction on the
Bank-side.
Indexing
You can select two different index types. Default creates the index by splitting the text on
space or on other. You can also select which Field you want to create an index from, and if
the “word/string” is only numbers, and length of the “word/string”. “0” as Length will Index
“words/strings” of all lengths. RegEx creates an index item from the Value of a Named Value
that is defined in the regular expression. You can find more information on Regular
Expressions on the internet.
User manual Adra Match Accounts
Page 44
Examples
Default indexing
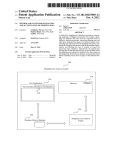
On the image below you can see four transactions, three from ACCOUNTPAY and one from
ACCOUNTREC. The three transactions on ACCOUNTPAY have the same amount as the
single transaction on ACCOUNTREC. The smallest +/- date devition between ACCONTPAY
and ACCOUNTREC is +23 days (5,215.00 and -431.00), and the largest deviation within the
ACCOUNTPAY bundle is +88 days (5,215.00 and -4,665.00).
Below you can see the reconciliation rules with Indexing Default to the left, and Indexing
RegEx to the right.
User manual Adra Match Accounts
Page 45
Create a One to One reconciliation
It is easy to create a reconciliation rule that reconciles one transaction from the left side,
often the ledger account, against one transaction from the right side, often the bank account,
within a date deviation.
Start by selecting Settings for automatic reconciliation from Maintenance. Select the
Account group you want to add the reconciliation rule to. Click Add.
User manual Adra Match Accounts
Page 46
Give the reconciliation rule a clearly descriptive name. Then select the date deviation. In this
case we want to reconcile transactions against one another, with the same amount, that
deviates +/- 5 days. Set the Date deviation to -5 and 5. Click Save.
User manual Adra Match Accounts
Page 47
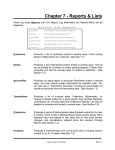
You can also create a One to One reconciliation rule that checks if a text string, or a part of
text string is alike on the two transactions. In the example below the transactions we are
about to match if from the same account, one debit and one credit. The date and reference
number is the same.
Below you see how the rule should set up. You can of curs RegEx Indexing here to. The
Regular Expression could look like this “(\d{6}\w{2})”.
User manual Adra Match Accounts
Page 48
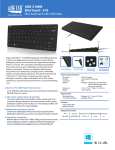
Create a ‘One to Many’ or ‘Many to One’ reconciliation rule
On the picture below you can see two payments on the bank account, which combine to the
same amount as the single ledger booking on account 2331. The payments on the bank are
booked on the same date and 3 and 4 days later than the ledger booking. The text is the
same on the payments from the bank.
Now we are going to set up a reconciliation rule for the example above. Create a new
reconciliation rule. Give the reconciliation rule a descriptive name. We know from the
example above that it is 3 days between the ledger booking and the two payments from the
bank. Set Date deviation to 3 in the right-side box. We also know that we have more than
one transaction from the bank and that they are booked on the same date. Select Many
items from bank. Because the bank transactions are on the same day, you do not have to
set any Date deviation within group. In Indexing you just select Text Field. Click Save.
User manual Adra Match Accounts
Page 49
Automatic reconciliation with Variance or Split
Select the Reconcile with Variance and Split checkbox on the reconciliation rule to enable
automatic reconciliation with variance or split. The automatic reconciliation with variance or
split can be added to all reconciliation rules, accept when you selected the option Reconcile
a suspense account (sum).
Select if you want to reconcile with Variance or Split. To learn more, read about it in the
section “Reconcile transactions with deviation”.
Insert deviation transaction on – To be selected if you want to insert deviation on the
ledger side or Bank side (Left or Right).
Use info from latest or oldest on deviation transaction – If you reconcile many to one or
many to many, you can select from which of the “many” transaction, oldest or newest, to
save the info from.
Reconcile with an exact deviation (+ or -) – Select this option if you only want to reconcile
transactions with an exact deviation. To only reconcile transactions that are 20£ less on the
bank side then on the ledger side, you need to select this option and set Allowed + or amount deviation to -20.
Reconcile with deviation in percent (%) – Select this option if you want to reconcile
transactions with a percentage difference.
Allowed +/- amount deviation – Enter the (+/-) amount deviation you want to allow. If you
enter 5.00, the rule will reconcile all transactions where the amount of the right-side
transaction(s) is between 5.00 amount units less to 5.00 amount units larger than the amount
of the left-side transaction(s).
Allowed + or - amount deviation – Enter the (+ or -) amount deviation you want to allow. If
you enter 25.00, the rule will reconcile all transactions where the amount of the right-side
transaction(s) is 25.00 amount units less than the amount of the left-side transaction(s).
Enter a negative amount deviation like this -25.00.
Allowed +/- percent deviation – Enter the (+/-) percent deviation you want to allow. If you
enter 1.50, the rule will reconcile all transactions where the amount of the right-side
transaction(s) is between 1.50 % less to 1.50 % larger than the amount of the left-side
transaction(s).
User manual Adra Match Accounts
Page 50
Allowed + or - percent deviation – Enter the (+ or -) percent deviation you want to allow. If
you enter 0.10, the rule will reconcile all transactions where the amount of the right-side
transaction(s) is 0.10 amount units less than the amount of the left-side transaction(s). Enter
a negative percent deviation like this -0.10
Allowed +/- amount tolerance on deviation – This option is only active if you have the
option “Reconcile with an exact deviation (+ or -)” selected. Enter the (+/-) tolerance you
want to allow on the exact deviation. If you enter a 0.10 on this value, and have an exact
deviation of 1.00, the rule will reconcile transactions where the amount on the right-side is
0.90 to 1.10 amount units larger the amount on the left-side.
Intervals to reconciliation. Amount Larger then/Less then – This value selects which
transactions to reconcile. If you enter 0.00 in the first box and 1.00 in the second box, only
transactions with the amount -1.00 to 0.00 on the left-side, and transactions with the amount
0.00 to 1.00 on the right-side will be reconciled.
Intervals for allowed deviation. Deviation Larger then/Less then – This option is only
active if you have the option “Reconcile with deviation in percent (%)” selected. If you
enter 1.00 in the first box and 10 000.00 in the second box, the rule will only reconcile
transactions with the amount from -10 000.00 to -1.00 and 1.00 to 10 000.00.
User manual Adra Match Accounts
Page 51
Set the order of automatic reconciliation rules
Click on the dropdown in the Order column to select the priority order of the reconciliation
rules. It is good practice to start with the tightest rules e.g. One to One match with a short
date deviation before One to Many or many to one rules are processed.
User manual Adra Match Accounts
Page 52
Actions to perform after import
This feature can be used to run actions or tasks after import.
Data enrichment with regular expressions (Find Expression and add new)
This feature can find an expression, by using Regular Expressions, in a text column that
exists in the selected import and database, and insert a new value into an existing or new
column. This will only be performed on the imported file.
Select import. Select Find Expression and add new and click on the button to the left of the
option to open the settings window.
Enter your Regular Expression on the column Find expression. If you if you enter a number
or text in the Find expression column, the function will search for it in the select In column.
Select your In column from the dropdown. Enter the text and/or number you want to insert
into the new or existing, the insert will only happen if the imported text column (In column)
contains the Find expression value. Enter the name of the new or existing column in the Into
column and select a account. Click Save.
Regular Expressions can be used with numbered groups. Example if you would like to
extract a number from a column containing the text “Check nr. 4358”. Enter the Regular
Expression “Check nr. (\d{4})” into the Find expression column and “$1” in the Insert text
column, the number “4358” will be inserted in to the new or excising column.
User manual Adra Match Accounts
Page 53