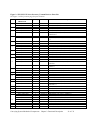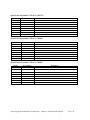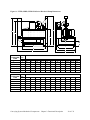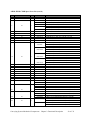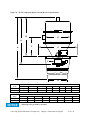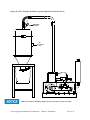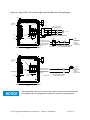
1
Conveying System Mechanical Components Part Number: 882.99774.00 Bulletin Number: CNV5-600 Effective: August 1, 2012 Write Down Your Serial Numbers Here For Future Reference: _________________________ _________________________ _________________________ _________________________ _________________________ _________________________ We are committed to a continuing program of product improvement. Specifications, appearance, and dimensions described in this manual are subject to change without notice. DCN No. ____________ Conveying System Mechanical Components © Copyright 2013 All rights reserved. ii Shipping Info Unpacking and Inspection You should inspect the mechanical components of your conveying system for possible shipping damage. Thoroughly check the equipment for any damage that might have occurred in transit, such as broken or loose wiring and components, loose hardware and mounting screws, etc. In the Event of Shipping Damage According to the contract terms and conditions of the Carrier, the responsibility of the Shipper ends at the time and place of shipment. Notify the transportation company’s local agent if you discover damage. Hold the damaged goods and packing material for the examining agent’s inspection. Do not return any goods before the transportation company’s inspection and authorization. File a claim with the transportation company. Substantiate the claim by referring to the agent’s report. A certified copy of our invoice is available upon request. The original Bill of Lading is attached to our original invoice. If the shipment was prepaid, write us for a receipted transportation bill. Advise customer service regarding your wish for assistance and to obtain an RMA (return material authorization) number. If the Shipment is Not Complete Check the packing list as back-ordered items are noted on the packing list. You should have: þ Mechanical Components of Conveying System þ Bill of lading þ Packing list þ Operating and Installation packet þ Electrical schematic and panel layout drawings þ Component instruction manuals Re-inspect the container and packing material to see if you missed any smaller items during unpacking. If the Shipment is Not Correct If the shipment is not what you ordered, contact the shipping department immediately. For immediate assistance, please contact the correct facility located in the technical assistance section of this manual. Have the order number and item number available. Hold the items until you receive shipping instructions. Conveying System Mechanical Components iii Returned Material Policy Do not return any damaged or incorrect items until you receive shipping instructions from the shipping department. Credit Returns Prior to the return of any material authorization must be given by the manufacturer. A RMA number will be assigned for the equipment to be returned. Reason for requesting the return must be given. ALL returned material purchased from the manufacturer returned is subject to 15% ($75.00 minimum) restocking charge. ALL returns are to be shipped prepaid. The invoice number and date or purchase order number and date must be supplied. No credit will be issued for material that is not within the manufacturer’s warranty period and/or in new and unused condition, suitable for resale. Warranty Returns Prior to the return of any material, authorization must be given by the manufacturer. A RMA number will be assigned for the equipment to be returned. Reason for requesting the return must be given. All returns are to be shipped prepaid. The invoice number and date or purchase order number and date must be supplied. After inspecting the material, a replacement or credit will be given, at the manufacturer’s discretion. If the item is found to be defective in materials or workmanship, and it was manufactured by our company, purchased components are covered under their specific warranty terms. Conveying System Mechanical Components iv Table of Contents CHARTS AND FIGURES .......................................................... VIII CHAPTER 1: SAFETY.............................................................. 10 1-1 How to Use This Manual............................................................................................. 10 Safety Symbols Used in this Manual ................................................................... 10 1-2 Warnings and Precautions.......................................................................................... 13 1-3 Responsibility.............................................................................................................. 14 General Responsibility ........................................................................................ 14 Operator Responsibility ....................................................................................... 15 Maintenance Responsibility................................................................................. 16 Reporting a Safety Defect ................................................................................... 16 CHAPTER 2: FUNCTIONAL DESCRIPTION ........................... 17 2-1 Models Covered in This Manual ................................................................................. 17 2-2 General Description .................................................................................................... 17 Basic System Components ................................................................................. 17 Basic System Types ............................................................................................ 18 Conveying Distance ............................................................................................ 18 Equipment Cycle ................................................................................................. 18 2-3 Standard Features & Options ..................................................................................... 19 SRI/, SSI, CSI Series Inventory Vacuum Receivers ........................................... 19 Pumps ................................................................................................................. 24 Pumps ................................................................................................................. 28 Blowback Pumps ................................................................................................. 35 Blowback Pumps ................................................................................................. 39 VTTV TurboVac Series Pumps ........................................................................... 48 SRH/SRC, SSR, CSR Vacuum Receivers .......................................................... 57 Vacuum Receivers .............................................................................................. 73 Atmospheric Valves............................................................................................. 78 Sequence T-Valves ............................................................................................. 80 Cartridge-Style Vortex Filter Chamber ................................................................ 82 FC Series Bag-Style Filters ................................................................................. 86 ACA Series Filter Chambers ............................................................................... 89 AFC-S, SFC-S, CFC-S Series Filters .................................................................. 92 Take-Off Compartments and Pickup Tubes ........................................................ 95 2-4 Safety Devices and Interlocks .................................................................................... 98 CHAPTER 3: INSTALLATION ............................................... 100 3-1 Uncrating the Equipment .......................................................................................... 100 3-2 Rigging and Placing Mechanical Components ......................................................... 100 Installing the Pump Package ............................................................................. 100 Installing the Control Panel ............................................................................... 103 Installing Material/Vacuum Tubing .................................................................... 103 Installing VFC, SFC, CFC or FC Filter Chambers ............................................. 108 Installing ACA Series Filter Chambers .............................................................. 109 Conveying System Mechanical Components v 3-3 3-4 3-5 3-6 3-7 Installing Vacuum Receivers and Inventory/Vacuum Receivers ....................... 110 Installing the Safety Filter .................................................................................. 110 Retrofit Kit for XFC Filter Chambers.................................................................. 112 Compressed Air Blowback Connection .................................................................... 113 Implosion Blowback Connection ............................................................................... 113 Adjusting the Vacuum Receiver Counterbalance .............................................. 116 Installing the Pickup Probe ................................................................................ 116 Installing the Grinder Take-off Attachment ........................................................ 117 Installing and Adjusting the Take-off Compartment .......................................... 117 Adjusting Fast Take-off (FCO) Compartments .................................................. 118 Installing the Powder Check Adapter (Box Style; EVTO; FEVTO only) ............ 118 Compressed Air Connections ................................................................................... 120 Running Remote Proportioning Valve or Proportioning Vacuum Receiver Compressed Air Lines ....................................................................................... 122 Electrical Connections .............................................................................................. 123 Making ACA Series Filter Chamber Electrical Connections .............................. 123 Making Pump Power Drop Wiring Connections ................................................ 123 Making Control Panel Power Drop Wiring Connections .................................... 123 Connecting the Control Panel to Vacuum Receivers ........................................ 124 Installing Station Bypass Switches .................................................................... 127 Connecting the Control Panel to the Pump Package ........................................ 127 Initial Start-up ........................................................................................................... 137 Making Startup Checks ..................................................................................... 137 Adjusting Sight Glass Proximity Sensor Sensitivity ........................................... 137 Adjusting Air Pulse Duration: All Models ........................................................... 138 ACA Series Filter Chamber Pre-Operation Checklist ........................................ 138 Adjusting Time Between Air Pulses on ACA Filters .......................................... 138 Adjusting the Number of Air Pulses................................................................... 138 Starting ACA Series Filter Chamber Units ........................................................ 139 Adjusting Proximity Sensor Sensitivity .............................................................. 139 CHAPTER 4: OPERATION .................................................... 140 4-1 Start-up ..................................................................................................................... 140 Starting ACA Series Filter Chamber Units ........................................................ 140 4-2 Operation Procedures............................................................................................... 140 Vacuum Switch (VS) Operation......................................................................... 140 High Vacuum Relief Regulator Operation ......................................................... 141 4-3 Shut-down ................................................................................................................ 141 CHAPTER 5: MAINTENANCE ............................................... 142 5-1 Preventative Maintenance Schedule ........................................................................ 142 5-2 Preventative Maintenance ........................................................................................ 143 Maintaining Pump Packages ............................................................................. 143 Maintaining Filter Chambers ............................................................................. 145 Inspecting ACA Series Filter Chamber Filter Bags ........................................... 145 Maintaining Vacuum Power Unit Non-Reversing Valves .................................. 146 Servicing and Reassembling Lower Valves ...................................................... 151 Maintaining Vacuum Receivers and Filter/ Receiver Combinations.................. 151 5-3 Cleaning the Collection Bin ..................................................................................... 152 5-4 Cleaning the Filter Shroud) ....................................................................................... 152 Conveying System Mechanical Components vi 5-5 Corrective Maintenance ............................................................................................ 153 Dealing with Shortened ACA Series Filter Bag Life .......................................... 153 CHAPTER 6: TROUBLESHOOTING ..................................... 154 6-1 Introduction ............................................................................................................... 154 CHAPTER 7: APPENDIX ....................................................... 162 7-1 7-2 7-3 7-4 Technical Specifications ........................................................................................... 162 Drawings and Diagrams ........................................................................................... 164 Spare Parts List ........................................................................................................ 166 Technical Assistance ................................................................................................ 170 Conveying System Mechanical Components vii Charts and Figures 1 2 3 4 5 6 7 8 9 10 11 12 13 14 15 16 17 18 19 20 21 22 23 24 25 26 27 28 29 30 31 32 33 34 35 36 37 38 39 40 41 42 43 Typical SRI Series Inventory Vacuum Receiver Exploded View SRI Series Inventory Vacuum Receiver Parts List SRI Stainless Steel Inventory Vacuum Receiver Dimensions VTP, SPD, CPD Series Pump Spare Parts List VTP, SPD, CPD 5-30 Series Specifications and Dimensions VTP, SPD, CPD 5-30 Series Spare Parts List Reversing Valve Assembly Spare Parts Drawing Reversing Valve Assembly Spare Parts list APD, SPD, CPD Positive Displacement Pump Dimensions APDB, SPDB, CPDB Spare Parts List VTPD, SPDB, CPDB 5-30 Series Blowback Pump Dimensions APDB, SPDB, CPDB Spare Parts Drawing APDB, SPDB, CPDB Spare Parts List APDB, SPDB, CPDB 5-15 Series Blowback Pump Dimensions VTTV TuboVac Series Pump Spare Parts List VTTV TurboVac Series Pump Dimensions VTP, SPB, CPB, VTPB, SPDB, CPDB & VTTV Pump Specifications APC, SPC, CPC Centrifugal Spare Parts Drawing APC, SPC, CPC Centrifugal Pump Dimensions APC, SPC, CPC Centrifugal Spare Parts List APD, SPD, CPD, APDB, SPDB, CPDB & APC, SPC, CPC Pump Specifications (Positive Displacement and Centrifugal) Typical SRC, SSR, CSR Series Vacuum Receiver Exploded View (Pre-May 2003) SRC,SSR,CSR Series Vacuum Receiver Parts List (Pre-May 2003) Typical SRC02-16, SSR/CSR06-45 Vacuum Receiver Exploded View (Post May 2003) Typical SRC02-16, SSR/CSR06-45 Spare Parts List (Post May 2003) Typical SRC30/60, SSR/CSR85/170 Vacuum Receiver Exploded View (Post May 2003) SRC30/60, SSR/CSR85/170 Spare Parts List SRH01, SSR/CSR03 Series Vacuum Receiver Exploded View SRH01, SSR/CSR03 Series Vacuum Receiver Spare Parts List SHR01, SSR/CSR03 Series Dimensions SRC02-16, SSR/CSR06-45 Series Dimensions SRC30-60, SSR/CSR85-170 Dimensions SRC/SSR/CSR AV-5 and AV-10 Spare Parts Drawing SRC/SSR/CSR AV-5 and AV-10 Spare Parts List TV/VF Flange-Mount Vacuum Receiver Specifications TF/VF Suspension-Mount Vacuum Receiver Specifications TF/VF Silo-Mount Vacuum Receiver Specifications TF/VF Vacuum Receiver Spare Parts List, Models TF/VF30X to TF/VF60X Typical Atmospheric Valve Atmospheric AV Series Valves Spare Parts List Typical Sequence T-Valve SV Sequence Series Sequence Valve Spare Parts List VFC, SFC, CFC Series Filter Chamber Spare Parts List Conveying System Mechanical Components viii 18 19 21 24-26 27 29-31 32 33 34 36-37 38 40 41-46 47 48-49 50 51-52 53 54 55 56 58 59-60 61 62 63 64-65 66 67 68 69 70 71 72 74 75 76 77 78 78-79 80 80-81 83-84 44 45 46 47 48 49 50 51 52 53 54 55 56 57 58 59 60 61 62 63 64 65 66 67 68 69 70 71 72 73 74 75 76 77 78 79 80 81 82 83 84 85 86 87 88 89 VFC, SFC, CFC Vortex Filter Chamber Specifications & Dimensions FC Series Filter Chambers Dimensions FC Series Filter Chamber Spare Parts List ACA Series Filter Chamber Spare Parts List Typical ACA251 Series Filter Chamber Drawing AFC-S, SFC-S, CFC-S Series Filter Chambers Compressed Air Blowback AFC-S, SFC-S, CFC-S Series Filter Compressed Air Blowback Specifications & Dimensions AFC-S, SFC-S, CFC-S Series Filter Chamber Spare Parts Drawing AFC-S, SFC-S, CFC-S Series Spare Parts List ACA Series Model 51 and 53 Low Boy Filter Assembly Typical Grinder Take-off Attachment Typical Take-off Compartment Typical Fast Take-off Compartment Drawing Typical Pickup Probe Filter Chamber Installation, Optional Blowback Controller Shown Typical Multiple Line System Installation Recommended Single-Line Y-Tube Installation Modified Single-Line Y-Tube Installation Manifold Y-Tube Installation Typical Single Line Y-Tube System Installation Typical Material Check Valve AFC-S, CFC-S, SFC-S Filter Installation Clearing Valve Compressed Air Connections Typical Powder Check Adaptor Solenoid Valve Location on Atmospheric Valve & Compressed Air Connection Solenoid Valve Location on Sequence T-Valve & Compressed Air Connection Volume-Fill, Time-Fill, Vacuum Receiver Wiring Connections, 115 VAC Control Circuit Volume-Fill, Time-Fill, Vacuum Receiver Wiring Connections, 24 VDC Control Circuit Recommended Filed-Installed Optional Station Bypass Switch Typical VTP, SPD, CPD Series Junction Box Wiring Diagram Typical VTP, SPD, CPD Series Junction Box with Fused Disconnect Wiring Diagram Typical VTPB, SPDB, CPDB Series Junction Box Wiring Diagram Typical VTPB, SPDB, CPDB Series Junction Box with Fused Disconnect Wiring Diagram Typical APDB, SPDB, CPDB 5-15 Series Junction Box Wiring Diagram—24VDC Distributed I/O Typical APDB, SPDB, CPDB 5-15 Series Junction Box Wiring Diagram –24 VDC Typical APDB, SPDB, CPDB 5-15 Series Junction Box Wiring Diagram –120VAC Typical VTTV Series Junction Box Wiring Diagram Typical VTTV Series Junction Box with Fused Disconnect Wiring Diagram ACA Series Model 50 Blowback DIP Switch Settings Oil Capacities, APD, SPD, CPD Only No-reversing Valve Cycle of Operation (VTP, APD, SPD, CPD Pumps) Equipment Cycles Vacuum Power Units 5-15hp Models Exploded View Spare Parts Drawing Vacuum Power Units 5-15hp Models Spare Parts List Vacuum Power Units 25-30 hp Models Exploded View Spare Parts Drawing Vacuum Power Units 25-30hp Models Spare Parts List Conveying System Mechanical Components ix 85 87 88 89-90 91 92 92 93 94 95 96 96 97 98 102 104 105 106 106 107 108 111 114 119 121 122 125 126 127 128 129 130 131 132 133 134 135 136 138 144 164 165 166 167 168 169 Chapter 1: Safety 1-1 How to Use This Manual Use this manual as a guide and reference for installing, operating, and maintaining the mechanical components of your conveying system. The purpose is to assist you in applying efficient, proven techniques that enhance equipment productivity. This manual covers only light corrective maintenance. No other maintenance should be undertaken without first contacting a service engineer. The Functional Description section outlines models covered, standard features, and safety features. Additional sections within the manual provide instructions for installation, preoperational procedures, operation, preventive maintenance, and corrective maintenance. The Installation chapter includes required data for receiving, unpacking, inspecting, and setup of the mechanical components of your conveying system. We can also provide the assistance of a factory-trained technician to help train your operator(s) for a nominal charge. This section includes instructions, checks, and adjustments that should be followed before commencing with operation of the conveying system. These instructions are intended to supplement standard shop procedures performed at shift, daily, and weekly intervals. The Operation chapter includes a description of electrical and mechanical controls, in addition to information for operating the conveying system safely and efficiently. The Maintenance chapter is intended to serve as a source of detailed assembly and disassembly instructions for those areas of the equipment requiring service. Preventive maintenance sections are included to ensure that the mechanical components of your conveying system provide excellent, long service. The Troubleshooting chapter serves as a guide for identification of most common problems. Potential problems are listed, along with possible causes and related solutions. The Appendix contains technical specifications, drawings, schematics, parts lists, and available options. A spare parts list with part numbers specific to your machine is provided with your shipping paperwork package. Refer to this section for a listing of spare parts for purchase. Have your serial number and model number ready when ordering. Safety Symbols Used in this Manual The following safety alert symbols are used to alert you to potential personal injury hazards. Obey all safety messages that follow these symbols to avoid possible injury or death. DANGER indicates an imminently hazardous situation that, if not avoided, will result in death or serious injury. WARNING indicates a potentially hazardous situation or practice that, if not avoided, could result in death or serious injury. CAUTION indicates a potentially hazardous situation or practice that, if not avoided, may result in minor or moderate injury or in property damage. Conveying System Mechanical Components Chapter 1: Safety 10 of 170 Safety Tags and Warning Labels Hazard Alert Symbol Description/Explanation Preventative Maintenance Hand crush hazard. Hands could be exposed to a crushing movement. Every month inspect the for any type of wear. For further information see the Maintenance Chapter in this manual. Electrical Shock hazard. High voltage inside enclosure. The electrical enclosure is supplied with 3-phase electrical power. Use caution when using or maintaining this product. Every six months inspect all electrical connections for secure attachment. For further information see the Maintenance Chapter in this manual. High Voltage Hazard. The electrical enclosure is supplied with 3-phase electrical power. Use caution when using or maintaining this product. Every six months inspect all electrical connections for secure attachment. For further information see the Maintenance Chapter in this manual. Auto start Hazard. Equipment may start at any time. Lock out/tag out before servicing the machine Every month inspect all electrical connections for secure attachment and that all warning labels are in place. For further information see the Maintenance Chapter in this manual When equipped with belts and sheaves, hands could become entangled. Every month inspect the belt(s) for any type of wear. For further information see the Maintenance Chapter in this manual. Conveying System Mechanical Components Chapter 1: Safety 11 of 170 Mandatory Symbol Description/Explanation Read Operators Manual. This equipment must be operated and maintained by properly trained personnel. The information contained within this manual must be read and understood prior to operating this equipment. Disconnect before opening. Before servicing or maintaining the machine be sure to disconnect the power and/or compressed air source to avoid electrical shock and/or serious injury. Lock Out. This equipment is operated with 3-phase electrical power. Therefore, when performing any maintenance operations we recommend following the local standards for performing a lock-out/tag-out procedure. Wear ear and eye protection. This unit may produce loud and continuous noise and may produce projectiles. Pneumatic or hydraulic equipment. Pneumatic or hydraulic equipment must be kept at a safe pressure. Conveying System Mechanical Components Chapter 1: Safety 12 of 170 1-2 Warnings and Precautions Our equipment is designed to provide safe and reliable operation when installed and operated within design specifications, following national and local safety codes. This may include, but is not limited to OSHA, NEC, CSA, SPI, and any other local, national and international regulations. To avoid possible personal injury or equipment damage when installing, operating, or maintaining this equipment, use good judgment and follow these safe practices: þ Read and follow these operation and installation instructions when installing, operating, and maintaining this equipment. If these instructions become damaged or unreadable, additional copies are available from the manufacturer. þ Follow all SAFETY CODES. þ Wear SAFETY GLASSES and WORK GLOVES. þ Work only with approved tools and devices. þ Disconnect and/or lock out power before servicing or maintaining the equipment. þ Use care when LOADING, UNLOADING, RIGGING, or MOVING this equipment. þ Operate this equipment within design specifications. þ OPEN, TAG, and LOCK ALL DISCONNECTS before working on equipment. You should remove the fuses and carry them with you. þ Make sure the equipment and components are properly GROUNDED before you switch on power. þ Use extreme caution when working with your conveying system. HIGH VACUUM can be dangerous. Keep body parts, tools, clothing, and debris away from vacuum inlets. þ When welding or brazing in or around this equipment, make sure VENTILATION is ADEQUATE. PROTECT adjacent materials from flame or sparks by shielding with sheet metal. An approved FIRE EXTINGUISHER should be nearby and ready for use if needed. þ Do not restore power until you remove all tools, test equipment, etc., and the equipment and related components are fully reassembled. þ Only PROPERLY TRAINED personnel familiar with the information in this manual should work on this equipment. We have long recognized the importance of safety and have designed and manufactured our equipment with operator safety as a prime consideration. We expect you, as a user, to abide by the foregoing recommendations in order to make operator safety a reality. Conveying System Mechanical Components Chapter 1: Safety 13 of 170 1-3 Responsibility These machines are constructed for maximum operator safety when used under standard operating conditions and when recommended instructions are followed in the maintenance and operation of the machine. All personnel engaged in the use of the machines should become familiar with their operation as described in this manual. Proper operation of the machine promotes safety for the operator and all workers in its vicinity. Each individual must take responsibility for observing the prescribed safety rules as outlined. All warning and danger signs must be observed and obeyed. All actual or potential danger areas must be reported to your immediate supervisor. General Responsibility No matter who you are, safety is important. Owners, operators and maintenance personnel must realize that every day, safety is a vital part of their jobs. If your main concern is loss of productivity, remember that production is always affected in a negative way following an accident. The following are some of the ways that accidents can affect your production: • Loss of a skilled operator (temporarily or permanently) • Breakdown of shop morale • Costly damage to equipment • Downtime An effective safety program is responsible and economically sound. Organize a safety committee or group, and hold regular meetings. Promote this group from the management level. Through this group, the safety program can be continually reviewed, maintained, and improved. Keep minutes or a record of the meetings. Hold daily equipment inspections in addition to regular maintenance checks. You will keep your equipment safe for production and exhibit your commitment to safety. Please read and use this manual as a guide to equipment safety. This manual contains safety warnings throughout, specific to each function and point of operation. Conveying System Mechanical Components Chapter 1: Safety 14 of 170 Operator Responsibility The operator’s responsibility does not end with efficient production. The operator usually has the most daily contact with the equipment and intimately knows its capabilities and limitations. Plant and personnel safety is sometimes forgotten in the desire to meet incentive rates, or through a casual attitude toward machinery formed over a period of months or years. Your employer probably has established a set of safety rules in your workplace. Those rules, this manual, or any other safety information will not keep you from being injured while operating your equipment. Learn and always use safe operation. Cooperate with co-workers to promote safe practices. Immediately report any potentially dangerous situation to your supervisor or appropriate person. REMEMBER: • NEVER place your hands or any part of your body in any dangerous location. • NEVER operate, service, or adjust the conveying system without appropriate training and first reading and understanding this manual. • NEVER try to pull material out of the conveying system with your hands while it is running! • Before you start the conveying system, check the following: • Remove all tools from the conveying system. • Be sure no objects (tools, nuts, bolts, clamps, bars) are lying in the area. • If your conveying system has been inoperative or unattended, check all settings before starting the unit. • At the beginning of your shift and after breaks, verify that the controls and other auxiliary equipment are functioning properly. • Keep all safety guards in place and in good repair. NEVER attempt to bypass, modify, or remove safety guards. Such alteration is not only unsafe, but will void the warranty on your equipment. • When changing control settings to perform a different mode of operation, be sure selector switches are correctly positioned. Locking selector switches should only be adjusted by authorized personnel and the keys removed after setting. • Report the following occurrences IMMEDIATELY: • unsafe operation or condition • unusual conveying system action • leakage • improper maintenance • NEVER stand or sit where you could slip or stumble into the conveying system while working on it. Conveying System Mechanical Components Chapter 1: Safety 15 of 170 • DO NOT wear loose clothing or jewelry, which can be caught while working on the conveying system. In addition, cover or tie back long hair. • Clean the conveying system and surrounding area DAILY, and inspect the machine for loose, missing or broken parts. • Shut off power to the conveying system when it is not in use. Turn the switch to the OFF position, or unplug it from the power source. Maintenance Responsibility Proper maintenance is essential to safety. If you are a maintenance worker, you must make safety a priority to effectively repair and maintain equipment. Before removing, adjusting, or replacing parts on a machine, remember to turn off all electric supplies and all accessory equipment at the machine, and disconnect and lockout electrical and pneumatic power. Attach warning tags to the disconnect switch and air shutoff valve. When you need to perform maintenance or repair work on a conveying system above floor level, use a solid platform or a hydraulic elevator. If there is a permanently installed catwalk on your conveying system, use it. The work platform should have secure footing and a place for tools and parts. DO NOT climb on the conveying system, machines, or work from ladders. If you need to repair a large component, use appropriate handling equipment. Before you use handling equipment (portable “A” frames, electric boom trucks, fork trucks, overhead cranes) be sure the load does not exceed the capacity of the handling equipment or cause it to become unstable. Carefully test the condition of lifting cables, chains, ropes, slings, and hooks before using them to lift a load. Be sure that all non-current carrying parts are correctly connected to earth ground with an electrical conductor that complies with current codes. Install in accordance with national and local codes. When you have completed the repair or maintenance procedure, check your work and remove your tools, rigging, and handling equipment. Do not restore power to the conveying system until all persons are clear of the area. DO NOT start and run the conveying system until you are sure all parts are functioning correctly. BEFORE you turn the conveying system over to the operator for production, verify all enclosure panels, guards and safety devices are in place and functioning properly. Reporting a Safety Defect If you believe that your equipment has a defect that could cause injury, you should immediately discontinue its use and inform the manufacturer. The principle factors that can result in injury are failure to follow proper operating procedures (i.e. lockout/tagout), or failure to maintain a clean and safe working environment. Conveying System Mechanical Components Chapter 1: Safety 16 of 170 Chapter 2: Functional Description 2-1 Models Covered in This Manual This manual provides operation, installation, and maintenance instructions for the mechanical components of the conveying system. Model numbers are listed on the serial tag. Make sure you know the model and serial number of your equipment before contacting the manufacturer for parts or service. Our mechanical components are designed to create vacuum for conveying pelletized, granular, or powder material in a central material handling system. A typical use is as an inplant distribution system for plastic processing plants. Conveying system mechanical components are sized to meet the specific requirements stated by the Customer at the time of purchase. 2-2 General Description Our central vacuum systems are as varied as the applications that they service. Tubing and equipment furnished in a specially designed system is intended to convey the material(s) specified at the time of purchase at specific rates and distances. We can advise you on your system capabilities based on system makeup, distance, material, and desired conveying rates. Pressure drops in the overall system directly affect system capacity, such as number of material line bends, footage of pipe, Y-tubes, T-tubes, etc. The less distance, flexible hose, and bends you use on material lines, the better. Keep material lines as straight as possible. Vacuum leaks occurring anywhere in your system reduce capacity. Basic System Components A typical conveying system contains the following components: • Vacuum receiver(s) • Vacuum pump • Filter chamber • Sequence or atmospheric valves • Controller • Take-off compartments • Pickup tubes/wands • Vacuum and material tubing Combinations of these components will help you build your system for the application you need. Conveying System Mechanical Components Chapter 2: Functional Description 17 of 170 Basic System Types Time-Fill Systems A time-fill system conveys material to an on-line vacuum receiver for a pre-set time period. When this interval elapses, the controller conveys material to the next on-line vacuum receiver. Volume-Fill Systems A volume-fill system conveys material to an on-line vacuum receiver until the material level activates the proximity switch in the vacuum receiver, or a preset time elapses. When either of these conditions occur, the controller conveys material to the next on-line vacuum receiver. Conveying Distance Vacuum hoppers and Low Head Separators are installed over the material delivery point. The Vacuum Power Unit and material pick-up device, however, can be installed some distance from the delivery point. This distance is dependent upon the power unit chosen and the total equivalent feet required to convey the material. The manufacturer’s Engineering Department can advise you on your system’s capabilities given the system make-up, distance, material and desired conveying rates. Equipment Cycle Our bulk material conveying systems are used for automatic pneumatic handling of most free-flowing, dry, pelletized, powder granular materials. Add a Low Head Separator, and fine powders can be conveyed. Most systems are custom designed using standard components. A positive displacement blower draws air through the non-reversing valves on the Vacuum Power Unit. (See Figure 9 on page 34). The vacuum is drawn through a filter chamber to prevent material from reaching the blower. Signals from the programmable controller shift Sequence-“T” Valves to direct the vacuum through the station being filled to a material pick-up device. Material is sucked into a pick-up device and through the material tubing to the vacuum hopper or Low Head Separator, mounted or suspended over a storage bin or processing equipment. When the vacuum hopper is filled or the convey cycle times out, the convey cycle ends. The Vacuum Power Unit immediately shifts into blowback, dumping the material in the vacuum hopper. The blowback cycle back flushes air through the vacuum tubing to clean the filter chamber. The blowback feature cleans the filter chamber after each loading cycle and speeds emptying of the vacuum hopper. This operation is continuous and automatic. (See Figure 11 and Figure 14 on page 38 and 47). The programmable controller automatically shifts the appropriate sequence “T”-valves and starts the loading cycle at the next station in the cycle. The cycle continues until the programmable controller senses, through level sensors at each station that all stations are filled. Conveying System Mechanical Components Chapter 2: Functional Description 18 of 170 Material characteristics determine the type of equipment needed to properly convey the material. See Figures 59 and 63 on pages 104 and 107 for typical system configurations. 2-3 Standard Features & Options SRI/, SSI, CSI Series Inventory Vacuum Receivers Models: SRI01, SSI03, CSI03 SRI02, SSI06, CSI06 SRI04, SSI11, CSI11 • Brushed stainless steel construction, with stainless steel product contact surfaces. • Pyrex™ sight glass. • Receiver capacities of 0.1, 0.2, and 0.4 cu. ft. (2.8, 5.6, and 11.3 liters). • Ten (10) -mesh stainless steel pellet deflector screen. • Designed for minimum inventory on molding machine. • Four-inch (101.6 mm) -sq. flange on 0.1 cu. ft. (2.8 liter) model. • Seven-inch (177.8 mm) -sq. flange on 0.2 and 0.4 cu. ft. (5.6 and 11.3 liter) models. • Side inlet/outlet design. • Removable inlets and outlets, up to 2” O.D. on 0.2 and 0.4 cu. ft (5.6 and 11.3 liter) models; material inlet is check valve-ready. • Check valve for single-line Y applications. • Adjustable proximity-type material level sensor (mounted on sight glass): 24 VDC or 115 VAC. Conveying System Mechanical Components Chapter 2: Functional Description 19 of 170 Figure 1: Typical Inventory Vacuum Receiver Exploded View 8 11 27 7 12 28 13 5 25 10 4 1 20 22 17 15 21 3 16 2 18 1 19 9 14 A0559206 Conveying System Mechanical Components Chapter 2: Functional Description 20 of 170 Figure 2: SRI, SSI, CSI Series Inventory Vacuum Receiver Parts List See Figure 1 on the previous page for parts location. Item Model No. SRI/SSI/CSI SRI01, SSI/CSI03 SRI02-04, SSI/CSI06-11 SRI01, SSI/CSI03 SRI02-04, SSI/CSI06-11 SRI01, SSI/CSI03 SRI02-04, SSI/CSI06-11 Quantity Part No. Description 2 2 1 1 4 4 A0553714 A0553722 A0553727 A0553726 A0553715 A0553723 4 SRI01, SSI/CSI03 SRI02-04, SSI/CSI06-11 1 1 A0553717 A0553725 5 ALL SRI01, SSI/CSI03 SRI01, SSI/CSI03 SRI01, SSI/CSI03 SRI01, SSI/CSI03 SRI01, SSI/CSI03 SRI02-04, SSI/CSI06-11 SRI01, SSI/CSI03 SRI02-04, SSI/CSI06-11 SRI01, SSI/CSI03 SRI01, SSI/CSI03 SRI01, SSI/CSI03 8 2 1 1 1 1 1 1 1 1 2 1 A0553718 A0556529 A0553741 A0553742 A0553743 A0556531 A0556532 A0556506 A0556507 A0553712 A0553728 A0553710 SRI02-04, SSI/CSI06-11 1 A0553720 SRI01, SSI/CSI03 SRI02-04, SSI/CSI06-11 SRI02-04, SSI/CSI06-11 SRI02-04, SSI/CSI06-11 SRI02-04, SSI/CSI06-11 SRI02-04, SSI/CSI06-11 ALL SRI01, SSI/CSI03 SRI02-04, SSI/CSI06-11 1 1 2 2 2 2 2 1 1 A0556503 A0553731 A0553728 A0556504 A0556505 A0555796 A0556822 A0553713 A0553721 ALL ALL ALL ALL SRI01, SSI/CSI03 SRI01, SSI/CSI03 SRI02, SSI/CSI06 SRI02, SSI/CSI06 SRIL04, SSI/CSI11 ALL ALL ALL 1 1 1 3 1 1 1 1 1 1 1 1 A0541036 A0541037 A0541039 A0541038 A0542138 A0556548 A0548191 A0548190 A0556537 A0003217 A0003254 A0548359 GKST,BODY,SIL,SRI/IL01, SSI/IL03, CSI/IL03 GSKT,BODY,SIL,SRI/IL02-08, SSI/ILCSI/IL06-23 SGLS,PYREX,SRI/IL01, SSI/IL03, CSI/IL03 SGLS,PYREX,SRI/IL02-04, SSI/IL06-11, CSI/IL06-11 ROD,SUPT,BODY,ALU,SRI/IL01, SSR/IL03, CSR/IL03 ROD,SUPT,BODY,ALU,SRI/IL02-04, SSR/IL06-11, CSR/IL06-11 PL,MACH,TOP,ALU,SRI/IL01, SSR/IL03, CSR/IL03 PL,MACH,TOP,ALU,SRI/IL02-04, SSI/IL06-11, CSI/IL0611 SCR,SHC,SS,1/4-20 X 3/4 SCR,RTRCT,1/4-20,SCO #471162210 CONE,WELD,6”ID,SSTL,SRX01, SSI03, CSI03 CONE,WELD,9”ID,SSTL,SRX02, SSI06, CSI06 CONE,WELD,9”ID,SSTL,SRX04, SSI11, CSI11 FLTR,FLAT,WIRE,6”OD,SRH/I01, SSI03, CSI03 FLTR,FLAT,WIRE,9”OD,SRH/I02-04, SSI06-11, CSI06-11 CVR,WELD,6”ID,SSTL,SRI/H01, SSI06-11, CSI06-11 CVR,WELD,9”ID,SSTL,SRI/H02-04, SSI06-11, CSI06-11 BASE,MACH,BODY,ALU,SRI/IL01, SSI/IL03, CSI/IL03 ORNG,SILC,2.234ID X 0.139,CS BASE,MACH MOUNT,THRT,SRI/IL01, SSI/IL03, CSI/IL03 BASE,MACH,BODY,ALU,SRI/IL02-04, SSI06-11, CSI06-11 FLAP,DISCHARGE,SS,SRX01, SSI03, CSI03 FLAP,DISCHARGE,SS,SRX02-04, SSI06-11,CSI06-11 ORNG,SIL,2.234ID X 0.139 THK IN/OUT,SRX02-04,AL,1.50 IN/OUT,SRX02-04,AL,2.00 IN/OUT,SRX02-04,AL,2.50 SCR,CAP,HEX,SOC,HD,10-32 X 1/2 BRKT,JBOX/PROX,ALU,SRI/IL01, SSI/IL03, CSI/IL03 BRKT,JBOX/PROX,ALU,SRI/IL02-04, SSI/IL06-11, CSI/IL06-11 BOX,GANG,SNGLE,4X2X2,UL WETLOC BOX,GANG,SNGLE,COVER,BLNK,GSKT CORD,GRIP,1/2”,.270-.480 #3231 BOX,GANG,PLUG,1/2” NPT,UL SW,PROX,CAP,110VAC,30MM,N.C. SW,PROX,CAP,DC,30MM,NO/NC,NPN,3-WIRE SW,PROX,AC/DC,18MM,NC,2 WIRE SW,PROX,DC,18MM,NC,NPN,3 WIRE SW,PROX,E0MM,DC,#ED3025NPAPL CDUT,NIPPLE,1/2”,#CN 50 RDUC,WSHR,.75”X.50” STEEL PLUG,HEYCO,BLK,5/8”,#2663 1 2 3 6 7 8 9 10 11 12 13 14 15 16 17 18 19 20 21 22 Conveying System Mechanical Components Chapter 2: Functional Description 21 of 170 Item 25 26 27 28 29 30 31 32 33 34 35 36 37 38 39 40 41 42 43 44 45 46 47 Model No. SRI/SSI/CSI SRI02-04, SSI/CSI06-11 SRI02-04, SSI/CSI06-11 SRI01, SSI/CSI03 SRI02-04, SSI/CSI06-11 SRI02-04, SSI/CSI06-11 ALL SRI02-04, SSI/CSI06-11 SRI01, SSI/CSI03 SRI01, SSI/CSI03 SRI01, SSI/CSI03 SRI01, SSI/CSI03 SRI01, SSI/CSI03 SRI01, SSI/CSI03 SRI01, SSI/CSI03 SRI02, SSI/CSI06 SRI02, SSI/CSI06 SRI02, SSI/CSI06 SRI02, SSI/CSI06 SRI02, SSI/CSI06 SRI02, SSI/CSI06 SRI02, SSI/CSI06 SRI02, SSI/CSI06 SRI04, SSI/CSI11 SRI04, SSI/CSI11 Quantity Part No. 8 1 1 1 1 2 2 1 1 1 1 1 1 1 1 1 1 1 1 1 1 1 1 1 W00002373 A0556529 A0556820 W00000990 A0559420 A0536966 W00532685 A0565924 A0556538 64062 A0559419 A0559425 A0559421 A0559422 A0565925 A0540240 64062 A0556538 A0559419 A0559425 A0559421 A0559422 A0559430 A0555796 Conveying System Mechanical Components Description WASH,FLAT,WI,3/16”,100PCS/# SCR,RTRCT,1/4-20,SCO #471162210 GSKT,U-CHNL,NPRN,.38X.20X.06W VLV,CHECK,INT,1.5”TUBE,POLY CV,URETHANE,2.00ID CONN,WIRE NUT,IDEAL #A0/A1 GSKT,O-RING,PARKER #2-017 FLTR,FLAT,1.52OD,WIRE10,MESH SW,PROX,CAP,AC,30MM,NO/NC 2-WIRE SW,PRX,CAP,DC,30MM,NO/NC,PNP,3-WIRE CV,URETHANE,1.50ID CV,URETHANE,2.25ID CV,URETHANE,2.50ID CV,URETHANE,3.00ID FLTR,FLAT,10.25OD,WIRE,10MESH GSKT,U-CHNL,NPRN,.56X.19X.06W SW,PROX,CAP,DC,30MM,NO/NC,PNP,3-WIRE SW,PROX,CAP,AC,30MM,NO/NC 2-WIRE CV,URETHANE,1.50ID CV,URETHANE,2.25ID CV,URETHANE,2.50ID CV,URETHANE,3.00ID IN/OUT,SRX02-04,AL,2.25 IN/OUT,SRX02-04,AL,2.50 Chapter 2: Functional Description 22 of 170 Figure 3: SRI, SSI, CSI Series Stainless Steel Inventory Vacuum Receiver Dimensions SRI01/SSI/CSI03 Vacuum Receiver D A B E C SRI01.DWG J I H G F F Model SRI/SSI/CSI 01, 03 02, 06 04, 11 HOPSRI.DWG Unit size cu. ft. A B C D 0.1 0.2 0.4 211/4” 255/8” 311/2” 20” 233/4” 295/8” 165/8” 191/2” 251/2” 6 3 /8 ” 9 1 /8 ” 9 1 /8 ” Dimensions in inches E F -sq. 1 3 /4 ” 3” 3” 4” 7” 7” Unit size Dimensions in cm Model liters A B C D E F -sq. SRI/SSI/CSI 01, 03 2.8 54.0 cm 50.8 cm 42.2 cm 16.2 cm 4.4 cm 10.2 cm 02, 06 5.6 65.1 cm 60.3 cm 49.5 cm 23.2 cm 7.6 cm 17.8 cm 04, 11 11.3 80.0 cm 75.2 cm 64.8 cm 23.2 cm 7.6 cm 17.8 cm 99/32”/0.28125” (7.14 mm) -diameter holes in four (4) places, equally spaced. Conveying System Mechanical Components G -sq. H -sq. I -sq. J 2” 3 1 /2 ” 3 1 /2 ” 1 1 /4 ” 2 3 /4 ” 2 3 /4 ” 2 1 /2 ” 5 1 /2 ” 5 1 /2 ” 2” 3” 3” G -sq. H -sq. I -sq. J 5.1 cm 8.9 cm 8.9 cm 3.2 cm 6.9 cm 6.9 cm 6.4 cm 13.9 cm 13.9 cm 5.1 cm 7.6 cm 7.6 cm Chapter 2: Functional Description 23 of 170 Pumps VTP, SPD, CPD Series Models: 5, 7.5, 10, 15, 20, 30 • Support base. • Positive displacement blower. • 3-phase high efficiency TEFC electric motor. • 5, 7.5, 10, 15, 20, or 30 horsepower (3.75, 5.63, 7.5, 11.25, 15 or 22.5 kW). • Standard voltage is 230-460/3/60. 380-415/3/50 and 575/3/60 are optional. • Adjustable motor base. • Compressed air-operated mechanical high-vacuum relief valve. • Vacuum gauge. • Vacuum switch for high vacuum protection. • Junction box with motor starter, including overload protection. • Discharge silencer. Options • Fused disconnect in the junction box. • Distributed I/O capability. • Sound enclosure. • Premium-efficiency motors. • Re-sheave for elevation. • 24VDC or 120 AC controls. Figure 4: Spare Parts List model VTP, SPD, CPD 5: Model 5 5 Part Number W00052043 W00018378 Description BLOW,ROOTS,33RAI,5HP VAC UNIT VLV,ATMOS,ASSY,2” 5 5 5 5 A0547953 W00017812 A0556722 A0556723 SW,VAC,SET @ 14HG GSKT,AV/SV2.50-3.00,VELMOID SOLV,3WAY,24VDC,1/8NPT,CV=.15,CND CONN SOLV,3WAY,120VAC,1/8NPT,CV=017,1/25NPT,CND CONN 5 W00017529 CYL,AIR,S1288,(2)1/4-20 HOLES,CYL,AIR,13818A 5 W00001958 PLGR,2.86OD,EPT,BLK,3/8-16,CS Conveying System Mechanical Components Chapter 2: Functional Description 24 of 170 Spare Parts List model VTP, SPC, CPD 7.5: Model 7.5 7.5 7.5 7.5 7.5 7.5 7.5 7.5 Part Number W00052044 W00050866 W00017812 A0547953 A0556722 A0556723 W00017529 W00001958 Description BLOW,ROOTS,45RAI,7.5-10HP VLV,ATMOS,ASSY,2.5” GSKT,AV/SV2.50-3.00,VELOMOID SW,VAC,SET @ 14HG SOLV,3WAY,24VDC,1/8NPT,CV=015,NPT,CND CONN SOLV,3WAY,120VAC,1/8NPT,CV=017,1/2NPT,CND CONN CYL,AIR,S1288,(2)1/4-20HOLES,CYL,AIR,13818A PLGR,2.86OD,EPT,BLK,3/8-16,CS Spare Parts List model VTP, SPC, CPD10: Model 10 10 10 10 10 10 10 10 Part Number W00052044 W00050867 W00017812 A0547953 A0556722 A0556723 W00017529 W00001958 Description BLOW,ROOTS,45RAI,7.5-10HP VLV,ATMOS,ASSY,3.0” GSKT,AV/SV2.50-3.00,VELOMOID SW,VAC,SET @ 14HG SOLV,3WAY,24VDC,1/8NPT,CV=.15,NPT,CND CONN SOLV,3WAY,120VAC,1/8NPT,CV=.17,1/2NPT,CND CONN CYL,AIR,S1288,(2)1/4-20 HOLES,CYL,AIR,13818A PLGR,2.86OD,EPT,BLK,3/8-16,CS Spare Parts List model VTP, SPC, CPD15: Model 15 15 15 15 15 15 15 15 Part Number W00052045 W00050867 W00017812 A0547953 A0556723 A0556722 W00017529 W00001958 Description BLOW,ROOTS,56RAI,15HP,VAC UNIT VLV,ATMOS,ASSY,3”,10-15HP GSKT,AV/SV2.50-3.00,VELOMOID SW,VAC,SET @ 14HG SOLV,3WAY,120VAC,1/8NPT,CV=.17,1/2NPT,CND CONN SOLV,3WAY,24VDC,1/8NPT,CV=.15,NPT,CND CONN CYL,AIR,S1288,(2)1/4-20 HOLES,CYL,AIR,13818A PLGR,2.86OD,EPT,BLK,3/8-16,CS Conveying System Mechanical Components Chapter 2: Functional Description 25 of 170 Spare Parts List model VTP, SPC, CPD20: Model 20 20 20 20 20 20 20 20 20 Part Number W00052046 A0538211 W00018017 W00017812 A0547953 A0556722 A0556723 W00017529 W00001958 Description BLOW,ROOTS,68RAI,20HP,VAC UNIT VLV,ATMOS,ASSY,4.5” GSKT,VELOMOID,25-30HP NON –R VL GSKT,AV/SV2.50-3.00,VELOMOID SW,VAC,SET @ 14HG SOLV,3WAY,24VDC,1/8NPT,CV=.15,NPT CND CONN SOLV,3WAY,120VAC,1/8NPT,CV=.17,1/2NPT CND CONN CYL,AIR,S1288,(2)1/4-20 HOLES,CYL,AIR,13818A PLGR,2.86OD,EPT,BLK,3/8-16,CS Spare Parts List model VTP, SPC, CPD30: Model 30 30 30 30 30 30 30 30 30 Part Number W00052046 A0538211 W00018017 W00017812 A0547953 A0556722 A0556723 W00017529 W00001958 Description BLOW,ROOTS,88RAI,30 HP VAC UNIT VLV,ATMOS,ASSY,4.5” GSKT,VELOMOID,25-30HP NON –R VL GSKT,AV/SV2.50-3.00,VELOMOID SW,VAC,SET @ 14HG SOLV,3WAY,24VDC,1/8NPT,CV=.15,CND CONN SOLV,3WAY,120VAC,1/8NPT,CV=.17,1/2NPT,CND CONN CYL,AIR,S1288,(2)1/4-20 HOLES,CYL,AIR,13818A PLGR,2.86OD,EPT,BLK,3/8-16,CS Conveying System Mechanical Components Chapter 2: Functional Description 26 of 170 Figure 5: Model 5-30 Series Pump Dimensions C A E B F D G Model: Unit size VTP/SPD/CPD hp 5 5 7.5 7.5 10 10 15 15 20 20 30 30 A 20 21 21 25 32 38 B 42.5 42.5 56 56 56 50 C 47 50 50 62 65 85 Dimensions (inches) D 25.75 25.75 25.75 32.5 32.5 37.25 Model: Unit size VTP/SPD/CPD KW 5 3.75 7.5 5.63 10 7.50 15 11.25 20 15.00 30 22.38 A 51 53 53 63 81 97 B 108 108 142 142 142 127 C 109 127 127 162 178 216 Dimensions (cm) D 64 64 82 82 82 95 Conveying System Mechanical Components E 39.5 39.5 53 53 53 48.25 E 100 100 134 134 134 123 Chapter 2: Functional Description F 23.5 23.5 31 31 31 35.75 G 47.5 48 48 57 60 69.3 F 60 60 79 79 79 91 G 117 122 155 162 167 176 27 of 170 Pumps APD,SPD,CPD Series Models: 5, 7.5, 10, 15 • Support base. • Positive displacement blower. • 3-phase high efficiency TEFC electric motor. • 5, 7.5, 10, or 15 horsepower (3.75, 5.63, 7.5, or 11.25 kW). • Standard voltage is 230-460/3/60. 380-415/3/50 and 575/3/60 are optional. • Adjustable motor base. • Compressed air-operated mechanical high-vacuum relief valve. • Vacuum gauge. • Vacuum switch for high vacuum protection. • Junction box with motor starter, including overload protection. • Discharge silencer. Options • Fused disconnect in the junction box. • Distributed I/O capability. • Sound enclosure. • Premium-efficiency motors. • Re-sheave for elevation. • 24VDC or 120 AC controls. Conveying System Mechanical Components Chapter 2: Functional Description 28 of 170 Figure 6: Spare Parts List APD, SPD, CPD List No. 1 2 3 4 Qty. 1 2 1 1 Model No. APD/SPD/CPD 5 5 5 5 Part No. A0571182 W00000145 W00013524 W00017811 BLOWER O-RING VALVE PLUNGER GSKT,AV/SV2.00-2.25,VELOMOID 5 1 5 W00052176 6 7 8 9 10 11 7 8 9 10 11 12 13 14 15 16 17 1 1 1 1 1 2 1 1 1 1 2 1 1 1 1 1 1 5 5 5 5 5 5 5 5 5 5 5 5 5 5 5 5 5 W00052800 A0538247 A0547083 A0538259 A0573828 W00011500 A0573834 A0547083 A0538252 W00052174 A0573868 W00017812 A0547953 W00018378 A0571183 W00001958 W00017529 MTR,5HP,TEFC,1800RPM,230/460,184T FRAME,50/60HZ MOTOR, 5 HP 575 V MOTOR SHEAVE (60 HZ) MOTOR BUSHING (60 HZ) BLOWER SHEAVE (60 HZ) BLOWER BUSHING (60 HZ) PUMP BELT (60 HZ) MOTOR SHEAVE (50 HZ) MOTOR BUSHING (50 HZ) BLOWER SHEAVE (50 HZ) BLOWER BUSHING (50 HZ) PUMP BELT (50 HZ) GSKT,AV/SV2.50-3.00,VELOMOID SW,VAC,SET @ 14HG SUBASSY,AV2.00 BLO,PD,45URAIJ,HORT,2.5NPT,LHD PLGR,2.86OD,EPT,BLK,3/8-16,CS CYL,AIR,S1288,(2)1/4-20 HOLES,CYL,AIR,13818A 1 2 3 4 5 6 7 8 9 10 11 7 8 9 10 11 12 13 14 1 1 1 2 1 2 1 1 1 1 2 1 1 1 1 2 1 1 1 7.5 7.5 7.5 7.5 7.5 7.5 7.5 7.5 7.5 7.5 7.5 7.5 7.5 7.5 7.5 7.5 7.5 7.5 7.5 A0571183 W00017812 W00001958 W00001045 W00052179 W00052801 A0573829 W00011491 A0534549 W00052178 W00011500 A0538247 W00054462 A0573945 A0538249 W00011770 A0547953 W00050866 W00017529 BLO,PD,45URAIJ,HORT,2.5NPT,LHD GSKT,AV/SV2.50-3.00,VELOMOID PLGR,2.86OD,EPT,BLK,3/8-16 CS O-RING MOTOR,7.5HP 208/230/460 V MOTOR,7.5 HP 575 V MOTOR SHEAVE (60 HZ) MOTOR BUSHING (60 HZ) BLOWER SHEAVE (60 HZ) BLOWER BUSHING (60 HZ) PUMP BELT (60 HZ) MOTOR SHEAVE (50 HZ) MOTOR BUSHING (50 HZ) BLOWER SHEAVE (50 HZ) BLOWER BUSHING (50 HZ) PUMP BELT (50 HZ) SW,VAC,SET @ 14HG SUBASSY,AV2.50 CYL,AIR,S1288,(2)1/4-20 HOLES,CYL,AIR,13818A 15 1 7.5 W00052176 MTR,5HP,TEFC,1800RPM,230/460,184T FRAME,50/60 HZ Conveying System Mechanical Components Description Chapter 2: Functional Description 29 of 170 Spare Parts List APD, SPD, CPD (Cont’d.) List No. 1 Qty. 1 Model No. APD/SPD/CPD 10 2 3 4 5 6 7 8 9 10 11 7 8 9 10 11 7 8 9 10 11 7 8 9 10 11 12 13 14 Part No. A0571183 1 1 2 1 1 1 1 1 1 2 1 1 1 1 2 1 1 1 1 2 1 1 1 1 2 1 1 1 10 10 10 10 10 10 - 2.5 LINES 10 - 2.5 LINES 10 - 2.5 LINES 10 - 2.5 LINES 10 - 2.5 LINES 10 - 2.5 LINES 10 - 2.5 LINES 10 -2 .5 LINES 10 - 2.5 LINES 10 - 2.5 LINES 10 - 3.0 LINES 10 - 3.0 LINES 10 - 3.0 LINES 10 - 3.0 LINES 10 - 3.0 LINES 10 - 3.0 LINES 10 - 3.0 LINES 10 - 3.0 LINES 10 - 3.0 LINES 10 - 3.0 LINES 10 10 10 W00017812 W00001958 W00001045 W00016464 W00052802 A0534550 W00011491 A0538248 A0538249 W00011500 A0573834 W00054462 A0538247 A0547933 A0547043 A0538247 W00054462 A0538248 A0538249 W00011500 A0538258 W00054462 A0538259 W00052178 A0547043 A0547953 W00050866 W00017529 Conveying System Mechanical Components Description BLO,PD,45URAIJ,HORT,2.5NPT,LHD GSKT,AV/SV2.50-3.00,VELOMOID PLGR,2.86OD,EPT,BLK,3/8-16,CS O-RING MTR,10HP,TEFC,1800RPM,230/460,215T FRAME MOTOR 10 HP 575 V MOTOR SHEAVE (60 HZ) MOTOR BUSHING (60 HZ) BLOWER SHEAVE (60 HZ) BLOWER BUSHING (60 HZ) PUMP BELT (60 HZ) MOTOR SHEAVE (50 HZ) MOTOR BUSHING (50 HZ) BLOWER SHEAVE (50 HZ) BLOWER BUSHING (50 HZ) PUMP BELT (50 HZ) MOTOR SHEAVE (60 HZ) MOTOR BUSHING (60 HZ) BLOWER SHEAVE (60 HZ) BLOWER BUSHING (60 HZ) PUMP BELT (60 HZ) MOTOR SHEAVE (50 HZ) MOTOR BUSHING (50 HZ) BLOWER SHEAVE (50 HZ) BLOWER BUSHING (50 HZ) PUMP BELT (50 HZ) SW,VAC,SET @ 14HG SUBASSY,AV2.50 CYL,AIR,S1288,(2)1/4-20 HOLES,CYL,AIR,13818A Chapter 2: Functional Description 30 of 170 Spare Parts List APD, SPD, CPD (Cont’d.) List No. Qty. Model No. APD/SPD/CPD Part No. 1 2 3 4 5 6 7 8 9 10 11 7 8 9 10 11 5 6 7 8 9 10 11 7 8 9 10 11 5 6 7 8 9 12 13 14 15 1 2 1 1 1 1 1 1 1 1 2 1 1 1 1 2 1 1 1 1 1 1 2 1 1 1 1 2 1 1 1 1 1 1 1 1 1 15 15 15 15 15 15 15 - 3.0 LINES 15 - 3.0 LINES 15 - 3.0 LINES 15 - 3.0 LINES 15 - 3.0 LINES 15 - 3.0 LINES 15 - 3.0 LINES 15 - 3.0 LINES 15 - 3.0 LINES 15 - 3.0 LINES 15 - 3.0 LINES 15 - 3.0 LINES 15 - 3.5 LINES 15 - 3.5 LINES 15 - 3.5 LINES 15 - 3.5 LINES 15 - 3.5 LINES 15 - 3.5 LINES 15 - 3.5 LINES 15 - 3.5 LINES 15 - 3.5 LINES 15 - 3.5 LINES 15 - 3.5 LINES 15 - 3.5 LINES 15 15 15 5/7.5/10/15 5/7.5/10/15 5/7.5/10/15 5/7.5/10/15 A0571183 W00001738 W00001958 W00017812 W00016466 W00052803 A0573834 W00016479 A0534550 W00052178 A0547043 A0573829 W00011495 A0534549 W00052178 A0547043 A0555870 A0555875 A0573834 W00016479 A0573829 W00052178 A0547043 A0534550 W00011495 A0534549 W00052178 A0547043 A0555870 A0555875 A0547953 W00050867 W00017529 A0069307 A0547079 35085K 35086K BLO,PD,45URAIJ,HORT,2.5NPT,LHD O-RING PLGR,2.86OD,EPT,BLK,3/8-16,CS GSKT,AV/SV2.50-3.00,VELOMOID MTR,15HP,TEFC,1800RPM,230/460,254T FRAME MOTOR 15 HP 575 V MOTOR SHEAVE (60 HZ) MOTOR BUSHING (60 HZ) BLOWER SHEAVE (60 HZ) BLOWER BUSHING (60 HZ) PUMP BELT (60 HZ) MOTOR SHEAVE (60 HZ) MOTOR BUSHING (60 HZ) BLOWER SHEAVE (60 HZ) BLOWER BUSHING (60 HZ) PUMP BELT (60 HZ) MOTOR 5 HP 208/230/460 V (50 HZ ONLY) MOTOR 15HP 575 V (50 HZ ONLY) MOTOR SHEAVE (60 HZ) MOTOR BUSHING (60 HZ) BLOWER SHEAVE (60 HZ) BLOWER BUSHING (60 HZ) PUMP BELT (60 HZ) MOTOR SHEAVE (60 HZ) MOTOR BUSHING (60 HZ) BLOWER SHEAVE (60 HZ) BLOWER BUSHING (60 HZ) PUMP BELT (60 HZ) MOTOR 15 HP 208/230/460 V (50 HZ ONLY) MOTOR 15 HP 575 V (50 HZ ONLY) SW, VAC, SET @ 14HG SUBASSY,AV3.00 CYL,AIR,S1288,(2)1/4-20 HOLES,CYL,AIR,13818A POLY TUBING VACUUM GAUGE STRAIGHT FITTING ELBOW FITTING 16 17 18 19 20 20 21 21 22 22 22 23 24 25 26 1 1 1 1 1 1 1 1 1 1 1 1 1 1 3 FT. 5/7.5/10/15 5/7.5/10/15 5/7.5/10/15 5/7.5/10/15 5/7.5/10/15 5/7.5/10/15 5/7.5/10/15 5/7.5/10/15 5/7.5/10/15 5/7.5/10/15 5/7.5/10/15 5/7.5/10/15 5/7.5/10/15 5/7.5/10/15 5/7.5/10/15 A0543268 A0543269 A0532231 W00013961 W00017552 W00017688 A0571250 A0571252 A0573982 214.00002.00 214.00004.00 A0015492 A0562421 A0562419 A0562430 FTG,BR,BU,0.25 NPT X 1/8 NPT FTG,BR,TE,0.25 NPT NIP,BR,0.25NPT X 0.88 LG,CL AIR REGULATOR CYLINDER GASKET SEAL KIT AIR CYLINDER SOLENOID VALVE ,3 WAY, 115 VAC, 1/8 NPT SOLENOID VALVE,3 WAY,24 VDC,1/8 NPT SYNTHETIC OIL GALLON ISO-V-320 SYNTHETIC OIL QUART ISO-VG-320 SYNTHETIC OIL CASE ISO-VG-320 NIPPLE FITTING CONDUIT FITTING STRAIGHT CONDUIT FITTING ELBOW CONDUIT FLEXIBLE Conveying System Mechanical Components Description Chapter 2: Functional Description 31 of 170 Figure 7: Reversing Valve Assembly Spare Parts Drawing Conveying System Mechanical Components Chapter 2: Functional Description 32 of 170 Figure 8: APD, SPD, CPD Reversing Valve Option Spare Parts List Item No. Qty. Part No. 1 5 7.5-10 15 1 A0573974 A0573975 A0573976 ADPTR,CS,2.00 OD,XPD 5 W/BB ADPTR,CS,2.50OD,XPD 7.5-10 W/BB ADPTR,CS,3.00OD,XPD 15 W/BB 2 3 5-15 5-15 1 1 A0573980 A0573981 PIPE,DSCH,UPR,XPD 5-15 W/BB EL,AL,3”OD X 2.5NPT,XPD 5-15 W/BB 4 5-15 1 A0573987 BRKT,SUPT,DSCH,XPD 5-15HP W/BB 5 6 7 8 5-15 5-15 5-15 5-15 10 6 10 1 W00013527 A0069206 A0101190 A0573983 SCR,HHC,PS,1/4-20 X 0.63LG NUT,HEX,PS,1/4-20 WSHR,LOCK,1/4 VLV,ASSY,REV,XPD 5-15,3”CONN 9 10 11 12 5-15 5-15 5-15 5 7.5-15 3 4 2 1 35086K A0553322 W00017812 892.00305.00 892.00373.00 FTG,TBG,90,1/8NPT X 1/4TBG NUT,RVT,PS,1/4-20 GASKET PIPE,DSCH,LWR,XPD 5W/BB PIPE,DSCH,LWR,XPD 7.5-15 W/BB 13 Model No. APD/SPD/CPD 5 7.5-10 1 5 Conveying System Mechanical Components Description A0573977 A0573987 INL,VAC,2.0OD,XPD 5W/BB INL,VAC,2.0OD,XPD 5W/BB A0573979 INC,VAC,3.00OD,XPD 10-3”/15 W/BB Chapter 2: Functional Description 33 of 170 Figure 9: Positive Displacement Pump Dimensions Model Unit size APD/SPD/CPD hp 5 5 7.5 7.5 10 10 15 15 Model Unit size APD/SPD/CPD kW 5 3.75 7.5 5.6 10 7.5 15 11.25 Dimensions (inches) D E A B C 33 27.5 85.82 29 A B C 84 70 218 Conveying System Mechanical Components F G 22 21.75 31.75 Dimensions (cm) D E F G 74 56 55 81 Chapter 2: Functional Description 34 of 170 Blowback Pumps VTPB, SPDB, CPDB Series Models: 5, 7.5, 10, 15, 25, 30 • Compressed air-operated blowback and vacuum valves with highvacuum relief. • Mechanical high-vacuum relief valve. • Support base. • Positive displacement blower. • Three (3) -phase high efficiency TEFC electric motor. • 5, 7.5, 10, 15, 25, or 30 horsepower (3.75, 5.63, 7.5, 11.25, 18.75, or 22.5 kW) • Standard 230-460/3/60. 380-415/3/50. 575/3/60 is optional. • Adjustable motor base. • Vacuum gauge. • Vacuum switch for high vacuum protection. • Junction box with motor starter, including overload protection. • Discharge silencer. Options • Fused disconnect in the junction box. • Distributed I/O capability. • Sound enclosure. • Efficiency motors available. • Re-sheave for elevation. • 24VDC or 120VAC controls. Conveying System Mechanical Components Chapter 2: Functional Description 35 of 170 Figure 10: Spare Parts List model APDB, SPDB, CPDB Spare Parts List model APDB, SPDB, CPDB5: Model 5 5 5 5 5 5 5 5 5 Part Number A0547953 W00017812 W00052176 W00001958 W00017529 A0573983 W00052043 732.00224.00 732.00225.00 Description SW,VAC,SET @ 14HG GSKT,AV/SV2.50-3.00,VELOMOID MTR,5HP,TEFC,1800RPM,230/460,185T FRAME,50/60HZ PLGR,2.86OD,EPT,BLK,3/8-16,CS CYL,AIR,S1288,(2)1/4-20 HOLES,CYL,AIR,13818A VLV,ASSY,REV,XPD5-15HP,3.00” CONN BLO,PD,33URAI,VERT,2.0NPT,BHD VLV,SOL,DUAL3WAY,1/4,115VAC VLV,SOL,DUAL3WAY,1/4,24VDC,NC Spare Parts List model APDB, SPDB, CPDB7.5: Model 7.5 7.5 7.5 7.5 7.5 7.5 7.5 7.5 7.5 Part Number W00017812 W00052179 A0547953 W00001958 W00017529 A0573983 W00052044 732.00225.00 732.00224.00 Description GSKT,AV/SV2.50-3.00,VELOMOID MTR,7.5,TEFC,1800RPM,230/460,213T FRAME SW,VAC,SET @ 14HG PLGR,2.86OD,EPT,BLK,3/8-16,CS CYL,AIR,S1288,(2)1/4-20 HOLES,CYL,AIR,13818A VLV,ASSY,REV,XPD5-15,3.00”,CONN BLO,PD,45URAI,VERT,2.5NPT,BHD VLV,SOL,DUAL 3WAY,1/4,24VDC,NC VLV,SOL,DUAL 3WAY,1/4.115VAC Spare Parts List model APDB, SPDB, CPDB10: Model 10 10 10 10 10 10 10 10 10 10 Part Number W00017812 W00015710 W00016464 A0547953 W00001958 W00017529 A0573893 732.00224.00 732.00225.00 W00052044 Description GSKT,AV/SV2.50-3.00,VELOMOID GSKT,CPRSN,CPLG,3.00T,3BLT,BLK MTR,10HP,TEFC,1800RPM,230/460,215T FRAME SW,VAC,SET @ 14HG PLGR,2.86OD,EPT,BLK,3/8-16,CS CYL,AIR,S1288,(2)1/4-20 HOLES,CYL,AIR,13818A VLV,ASSY,REV,XPD5-15,3.00” CONN VLV,SOL,DUAL 3WAY,1/4,115VAC VLV,SOL,DUAL 3WAY,1/4,24VDC,NC BLO,PD,45URAI,VERT,2.5NPT,BHD Conveying System Mechanical Components Chapter 2: Functional Description 36 of 170 Spare Parts List model APDB, SPDB, CPDB15: Model 15 15 15 15 15 15 15 15 15 Part Number A0547953 W00017812 W00016466 W00001958 W00017529 A0573983 732.00225.00 732.00224.00 W00052045 Description SW,VAC,SET @ 14HG GSKT,AV/SV2.50-3.00,VELOMOID MTR,15HP,TEFC,1800RPM,230/460,254T FRAME PLGR,2.86OD,EPT,BLK,3/8-16,CS CYL,AIR,S1288,(2)1/4-20 HOLES,CYL,AIR,13818A VLV,ASSY,REV,XPD5-15,3.00” CONN VLV,SOL,DUAL 3WAY,1/4,24VDC,NC VLV,SOL,DUAL 3WAY,1/4,115VAC BLO,PD,56URAI,4.0NPT,BHD Spare Parts List model APDB, SPDB, CPDB25: Model 25 25 Part Number A0547953 W000033002 25 25 25 25 25 25 25 25 25 W00018080 W00018081 W00018017 W00017812 W00018152 W00001958 W00017529 732.00224.00 732.00224.00 Description SW,VAC,SET @ 14HG MTR,25HP,TEFC,1800RPM,230/460 284T FRAME,HOSTILE DUTY VLV,VTPB20-30,LOWR VLV,VTPB20-30,UPR GSKT,VELOMOID,25-30HP,NON-R VL GSKT,AV/SV2.50-3.00,VELOMOID FLTR,VTPB20-30,INL PLGR,2.86OD,EPT,BLK,3/8-16,CS CYL,AIR,S1288,(2)1/4-20 HOLES,CYL,AIR,13818A VLV,SOL,DUAL 3WAY,1/4,115VAC VLV,SOL,DUAL 3WAY,1/4,24VDC,NC Spare Parts List model APDB, SPDB, CPDB30: Model 30 30 30 30 30 30 30 30 30 30 30 Part Number A0547953 W00018017 W00017812 W00018080 W00018081 W00018152 W00001958 W00017529 732.00224.00 732.00225.00 W00052047 Description SW,VAC,SET @ 14HG GSKT,VELOMOID,25-30HP NON-R VL GSKT,AV/SV2.50-3.00,VELOMOID VLV,VTPB20-30,LOWR VLV,VTPB20-30,UPR FLTR,VTPB20-30,INL PLGR,2.86OD,EPT,BLK,3/8-16,CS CYL,AIR,S1288,(2)1/4-20 HOLES,CYL,AIR,13818A VLV,SOL,DUAL 3WAY,1/4,115VAC VLV,SOL,DUAL 3WAY,1/4,24VDC,NC BLO,PD,412RAM,HORT,6.0FLG,LHD Conveying System Mechanical Components Chapter 2: Functional Description 37 of 170 Figure 11: VTPB, SPDB, CPDB 5-30 Series Blowback Pump Dimensions D A B C H E I F J G K Model VTPB/SPDB/ CPDB 5 7.5 10 15 25 30 Unit size hp 5 7.5 10 15 25 30 Model VTPB/SPDB/ CPDB 5 7.5 10 15 25 30 Unit size kW 3.75 5.63 7.50 11.25 18.75 22.50 Dimensions (inches) A 40 40 40 40 80 80 B 35 35 35 35 60 60 C 24 24 24 24 39 39 D 42.5 42.5 42.5 42.5 74 74 E 29 29 29 29 42.5 42.5 F 34 34 34 34 46 46 G 44 44 44 44 65 65 H 7 7 7 7 9 9 I 22.5 22.5 22.5 22.5 31.5 31.5 J 27.5 27.5 27.5 27.5 35 35 K 29 29 29 29 32 32 H 18 18 18 18 23 23 I 57 57 57 57 80 80 J 70 70 70 70 89 89 K 73 73 73 73 81 81 Dimensions (cm) A 101 101 101 101 203 203 B 89 89 89 89 152 152 C 61 61 61 61 101 101 Conveying System Mechanical Components D 108 108 108 108 188 188 E 73 73 73 73 108 108 F 86 86 86 86 117 117 G 111 111 111 111 166 166 Chapter 2: Functional Description 38 of 170 Blowback Pumps APDB, SPDB, CPDB Series Models: 5, 7.5, 10, 15 • Compressed air-operated blowback and vacuum valves with highvacuum relief. • Mechanical high-vacuum relief valve. • Support base. • Positive displacement blower. • Three (3) -phase high efficiency TEFC electric motor. • 5, 7.5, 10, or 15 horsepower (3.75, 5.63, 7.5, or 11.25 kW) • Standard 230-460/3/60. 380-415/3/50. 575/3/60 is optional. • Adjustable motor base. • Vacuum gauge. • Vacuum switch for high vacuum protection. • Junction box with motor starter, including overload protection. • Discharge silencer. Options • Fused disconnect in the junction box. • Distributed I/O capability. • Sound enclosure. • Efficiency motors available. • Re-sheave for elevation. • 24VDC or 120VAC controls. Conveying System Mechanical Components Chapter 2: Functional Description 39 of 170 Figure 12: APDB, SPDB, CPDB Spare Parts Drawing Conveying System Mechanical Components Chapter 2: Functional Description 40 of 170 Figure 13: APDB, SPDB, CPDB Spare Parts List: (See previous page for spare parts drawing) Item No. 1 2 Model No. APDB/SPDB/CPDB 5 5 Qty. Part NO. 1 1 3 5 1 228.00019.00 A0571182 51119 W00052176 4 5 6 7 8 9 5 5 5 5 5 5 1 1 2 1 1 1 W00052800 A0573874 A0573944 W00000239 A0573316 W00018378 W00013961 A0573824 A0573825 10 5 1 11 12 13 14 15 16 17 18 19 20 5 5 5 5 5 5 5 5 5 5 2 1 2 1 1 4 1 1 1 1 21 5 1 22 5 1 23 5 1 24 5 1 25 5 2 A0534550 A0538259 W00011494 A0547083 A0538252 A0538247 W00011500 26 27 28 29 30 5 5 5 5 5 1 1 1 1 1 W00017811 W00017812 W00001958 W00017529 A0547953 A0571619 A0571662 A0544752 A0538306 A0543268 A0543269 A0547079 35086K A0015081 A0573984 35157 A0571252 A0571250 A0573828 Conveying System Mechanical Components Description KIT,WELD,FRM,XPD,5HP,W/HDWR BLO,PD,33URAU,HORT,2.0NPT,LHD MOTOR,5HP,208-460 V (50HZ) MTR,5HP,TEFC,1800RPM,230/460 184T FRAME,50/60HZ MOTOR,5HP,575V NIP,TOE,2.0 NPT X 2.5 HOSE,FLEX,2.5” ID X 3” LG #44 HOSE CLAMP ADPTR,CS,2.0 NPT X 2.0 OD W/ 1/8 TAP SUBASSY,AV2.00 REG. AIR MINT 127111000 HPR LDR J BOX,5HP,115VAC,208/3/60 V JBOX,5HP,115VAC,220/3/50 V JBOX,5HP,115VAC,230/3/60 V JBOX,5HP,115VAC,400/3/50 V JBOX,5HP,115VAC,460/3/60 V JBOX,5HP,115VAC,575/3/60 V JBOX,5HP,24VDC or DIST I/O,208/3/60 V JBOX,5HP,24VDC or DIST I/O,220/6/50 V JBOX,5HP,24VDC or DIST I/O,230/3/60 V JBOX,5HP,24VDC or DIST I/O,400/3/50 V JBOX,5HP,24VDC or DIST I/O,460/3/60 V JBOX,5HP,24VDC or DIST I/O,575/3/60 V PLUG,HOLE,DOME,BLK,0.875 DIA NIP,BR,0.13 NPT X 0.75 LG,CLOSE FTG,BR,BU,1/4M X 1/8F FTG,BR,TE,1/4 X ¼ X 1/4 GAUG,VAC,2.5D,0-30”,1/4LM,GF,LWR,MNT SS FTG,TBG,90,1/8NPT X ¼ TBG NIP,CS,2.50 NPT X 5.0 OAL GRP,XPD 5,BB VLV MECH PTS MUFFLER,1/8” NPT SOLENOID VALVE- 24VDC SOLENOID VALVE- 120VDC 5HP,BLOWER BUSHING (50HZ) 5HP,BLOWER BUSHING (60HZ) 5HP,BLOWER SHEAVE (50HZ) 5HP,BLOWER SHEAVE (60HZ) 5HP,MOTOR BUSHING (50HZ) 5HP,MOTOR BUSHING (60HZ) 5HP,MOTOR SHEAVE (50 HZ) 5HP,MOTOR SHEAVE (60HZ) 5HP,PUMP BELT,(50HZ) 5HP,PUMP BELT (60 HZ) GSKT,AV/SV2.00-2.25,VELOMOID GSKT,AV/SV2.50-3.00,VELOMOID PLGR,2.86PD,EPT,BLK,3/8-16,CS CYL,AIR,S1288,(2)1/4-20 HOLES.CYL,AIR,13818A SW,VAC,SET @ 14HG Chapter 2: Functional Description 41 of 170 APDB, SPDB, CPDB Spare Parts List (Cont’d) 1 2 7.5 7.5 1 1 228.00018.00 A0571183 3 7.5 1 4 5 6 7 8 9 7.5 7.5 7.5 7.5 7.5 7.5 1 1 2 1 1 1 W00052179 W000525801 A0573315 A0573944 W00000239 A0573316 W00050866 W00013961 A0573826 A0573824 10 7.5 1 11 12 13 14 15 16 17 18 19 20 7.5 7.5 7.5 7.5 7.5 7.5 7.5 7.5 7.5 7.5 2 1 2 1 1 4 1 1 1 1 21 7.5 1 22 7.5 1 23 7.5 1 24 7.5 1 25 7.5 2 26 27 28 29 30 31 7.5 7.5 7.5 7.5 7.5 7.5 1 1 1 1 1 1 A0571620 A0571619 A0544752 A0538306 A0543268 A0543269 A0547079 35086K A0015081 A0573985 35157 A0571252 A0571250 W00052178 A0573829 A0534549 W00054462 W00011491 A0538247 A0573829 W00011770 W00011500 W00017812 892.03243.00 A0547953 W00050866 W00001958 W00017529 Conveying System Mechanical Components KIT,WELD,FRM,XPD,7.5-15HP BLO,PD,45URAIJ,HORT,2.5NPT,LHD MTR,7.5,TEFC,1800RPM,230/460 213T FRAME MOTOR,7.5HP,208-460V (60HZ) MOTOR,7.5HP,575V NIP,TOE,2.5NPT X 3.0 HOSE,FLEX,3.0” ID X 3 LG #44 HOSE CLAMP ADPTR, CS, 2.5 NPT X 2.5 OD. W/ 1/8 TAP SUBASSY,AV 2.50 REG,AIR MINT 127111000 HPR LD J BOX,7.5HP,115VAC,208/3/60 V JBOX,7.5HP,115VAC,220/3/50 V JBOX,7.5HP,115VAC,230/3/60 V JBOX,7.5HP,115VAC,400/3/50 V JBOX,7.5HP,115VAC,460/3/60 V JBOX,7.5HP,115VAC,575/3/60 V JBOX,7.5HP,24VDC or DIST I/O,208/3/60 V JBOX,7.5HP,24VDC or DIST I/O,220/3/50 V JBOX,7.5HP,24VDC or DIST I/O,230/3/60 V JBOX,7.5HP,24VDC or DIST I/O,400/3/50 V JBOX,7.5HP,24VDC or DIST I/O,460/3/60 V JBOX,7.5HP,24VDC or DIST I/O,575/3/60 V PLUG,HOLE,DOME,BLK,0.875 DIA NIP,BR,0.13 NPT X 0.75 LG,CLOSE FIG,BR,BU,1/4M X 1/8F FTG,BR,TE,1/4 X ¼ X ¼ GAUG,VAC,2.5D,0-30”,1/4LM,GF,LWR,MNT,SS FTG,TBG,90,1/8 NPT X 1/4 TBG NIP,CS,2.50 NPT X 5.0 OAL GRP,XPD,7.5-10,BB,VLV,MECH PTS MUFFLER,1/8” NPT SOLENOID VALVE -24VDC SOLENOID VALVE-120 VDC 7.5HP,BLOWER BUSHING (50 HZ) 7.5HP,BLOWER BUSHING (60 HZ) 7.5HP,BLOWER SHEAVE (50 HZ) 7.5HP,BLOWER SHEAVE (60 HZ) 7.5HP,MOTOR BUSHING (50 HZ) 7.5HP,MOTOR BUSHING (60 HZ) 7.5HP,MOTOR SHEAVE (50 HZ) 7.5HP,MOTOR SHEAVE (60 HZ) 7.5HP,PUMP BELT (50 HZ) 7.5HP,PUMP BELT (60 HZ) GSKT,AV/SV2.50-3.00,VELOMOID SUBASSY,BASE,BLO,XPD7.5-15 SW,VAC,SET @ 14HG SUBASSY.AV2.50 PLGR,2.86OD,EPT,BLK,3/8-16,CS CYL,AIR,S1288,(2)1/4-20 HOLES,CYL,AIR,13818A Chapter 2: Functional Description 42 of 170 APDB, SPDB, CPDB Spare Parts List (cont’d) 1 2 10 10 1 1 3 10 1 228.000018.00 A0571183 A0504633 W00016464 W00052802 W00016464 4 5 6 7 8 9 10 10 10 10 10 10 1 1 2 1 1 1 W00052802 A0573315 A0573944 W00000239 A0573316 W00050866 W00013961 A057826 A0573824 10 10 1 11 12 13 14 15 16 17 18 19 20 10 10 10 10 10 10 10 10 10 10 2 1 2 1 1 4 1 1 1 1 21 10 1 22 10 1 23 10 1 A0571620 A0571619 A0544752 A0538306 A0543268 A0543269 A0547079 35086K A0015081 A0573985 35157 A0571252 A0571250 A0547933 A0538249 W00052178 A0538294 A0538247 A0538248 A0538259 A0538248 W00011491 W00054462 Conveying System Mechanical Components KIT,WELD,FRM,XPD,7.5-15HP BLO,PD,45URAJ,HORT,2.5NPT,LHD MOTOR,10HP-2.5”,208-460 V (50HZ) MTR,10HP,TEFC,1800RPM,230/460 215T FRAME MOTOR,10HP-2.5”,575 V MOTOR,10HP-3.0”,208-460 MOTOR,10HP-3.0”,208-460 V (60 HZ) MOTOR,10HP-3.0”,575V NIP,TOE,2.5 NPT X 3.0 HOSE,FLEX,3.0” ID X 3 LG #44 HOSE CLAMP ADPTR,CS,2.5 NPT X 2.5 OD W/ 1/8 TAP SUBASSY,AV 2.50 REG,AIR MINT 12711000 HPR LDR JBOX,10HP,115VAC,208/3/60 V JBOX,10HP,115VAC,220/3/50 V JBOX,10HP,115VAC,230/3/60 V JBOX,10HP,115VAC,400/3/50 V JBOX,10HP,115VAC,460/3/60 V JBOX,10HP,115VAC,575/3/60 V JBOX,10HP,24VDC or DIST I/O,208/3/60 V JBOX,10HP,24VDC or DIST I/O,220/3/50 V JBOX,10HP,24VDC or DIST I/O,230/3/60 V JBOX,10HP,24VDC or DIST I/O,400/3/50 V JBOX,10HP,24VDC or DIST I/O,460/3/60 V JBOX,10HP,24VDC or DIST I/O,575/3/60 V PLUG,HOLE,DOME,BLK,0.875 DIA NIP,BR,0.13 NPT X 0.75 LG,CLOSE FIG,BR,BU,1/4M X 1/8F FTG,BR,TE,1/4 X ¼ X 1/4 GAUG,VAC,2.5D,0-30”,1/4LM,GF,LWR,MNT,SS FTG,TBG,90,1/8 NPT X ¼ TBG NIP,CS,2.50 NPT X 5.0 OAL GPG,XPD,7.5-10,BB,VLV,MECH PTS MUFFLER,1/8” NPT SOLENOID VALVE-24 VDC SOLENOID VALVE-120 VAC 10HP-2.5”LINE,BLOWER BUSHING (50 HZ) 10HP-2.5”LINE,BLOWER BUSHING (60 HZ) 10HP-3.0”LINE,BLOWER BUSHING (50 HZ) 10HP-3.0”LINE,BLOWER BUSHING (60 HZ) 10HP-2.5”LINE,BLOWER SHEAVE (50 HZ) 10HP-2.5”LINE,BLOWER SHEAVE (60 HZ) 10HP-3.0”LINE,BLOWER SHEAVE (50 HZ) 10HP-3.0”LINE,BLOWER SHEAVE (60 HZ) 10HP-2.5”,MOTOR BUSHING (50HZ) 10HP-2.5”,MOTOR BUSHING (60HZ) 10HP-3.0”,MOTOR BUSHING (50HZ) 10HP-3.0”,MOTOR BUSHING (60HZ) Chapter 2: Functional Description 43 of 170 APDB, SPDB, CPDB Spare Parts List (cont’d) 24 10 1 25 10 1 26 27 28 29 30 31 10 10 10 10 10 10 1 1 1 1 1 1 A0573829 A0534550 A0538258 A0538247 W00011770 W00011500 A0547043 W00011500 W00017812 A0547953 W00050867 892.03243.00 W00001958 W00017529 Conveying System Mechanical Components 10HP-2.5”,MOTOR SHEAVE (50 HZ) 10HP-2.5”,MOTOR SHEAVE (60 HZ) 10HP-3.0”,MOTOR SHEAVE (50 HZ) 10HP-3.0”,MOTOR SHEAVE (60 HZ) 10HP-2.5”LINE,PUMP BELT (50 HZ) 10HP-2.5”LINE,PUMP BELT (60 HZ) 10HP-3.0”LINE,PUMP BELT (50 HZ) 10HP-3.0”LINE,PUMP BELT (60 HZ) GSKT,AV/SV2.50-3.00,VELOMOID SW,VAC,SET @ 14HG SUBASSY,AV3.00 SUBASSY.BASE,BLO,XPD7.5-15 PLGR,2.86OD,EPT,BLK,3/8-16,CS CYL,AIR,S1288,(2)1/4-20 HOLES,CYL,AIR,13818A Chapter 2: Functional Description 44 of 170 APDB, SPDB, CPDB Spare Parts List (cont’d) 1 2 15 15 1 1 3 15 1 4 5 6 7 8 9 15 15 15 15 15 15 1 1 2 1 1 1 228.00018.00 A0571183 A0555870 W00016466 W00052803 A0555870 W00016466 W00052803 A0573315 A0573944 W00000239 A0573317 W00050867 W00013961 A0573827 A0573826 10 15 1 A0571621 11 12 13 14 15 16 17 18 19 20 15 15 15 15 15 15 15 15 15 15 2 1 2 1 1 4 1 1 1 1 A0571620 A0544752 A0538306 A0543268 A0543269 A0547079 35086K A0015081 A0573986 35157 A0571252 A0571250 Conveying System Mechanical Components KIT,WELD,FRM,XPD,7.5-15HP BLO,PD,45URAIJ,HORT,2.5NPT,LHD MOTOR,15HP-3.0”208-460V (50 HZ) MTR,15HP,TEFC,1800RPM,230/460,254T FRAME MOTOR,15HP-3.0”,575V MOTOR,15HP-3.5”,208-460V (50 HZ) MOTOR,15HP-3.5”,208-460V (60HZ) MOTOR,15HP-3.5”,575V NIP,TOE,2.5NPT X 3.0 HOSE,FLEX,3.0”ID X 3 LG #44 HOSE CLAMP ADPTR,CS,2.5NPT X 3.0OD,W/1/8 TAP SUBASSY,AV3.00 REG,AIR MINT 127111000 HPR LDR JBOX,15HP,115VAC,208/3/60V JBOX,15HP,115VAC,220/3/50V JBOX,15HP,115VAC,230/3/60V JBOX,15HP,115VAC,400/3/50V JBOX,15HP,115VAC,460/3/60V JBOX,15HP,115VAC,575/3/60V JBOX,15HP,24VDC or DIST I/O,208/3/60V JBOX,15HP,24VDC or DIST I/O,220/3/50V JBOX,15HP,24VDC or DIST I/O,230/3/60V JBOX,15HP,24VDC or DIST I/O,400/3/50V JBOX,15HP,24VDC or DIST I/O,460/3/60V JBOX,15HP,24VDC or DIST I/O,575/3/60V PLUG,HOLE,DOME,BLK,0.875 DIA NIP,BR,0.13 NPT X 0.75 LG,CLOSE FIG,BR,BU,1/4M X 1/8F FTG,BR,TE,1/4 X ¼ X 1/4 GAUG,VAC,2.5D,0-30”,1/4LM,GF,LWR,MNT SS FTG,TBG,90,1/8 NPT X ¼ TBG NIP,CS,2.50 NPT X 5.0 OAL GRP,XPD 15,BB,VLV,MECH PITS MUFF;ER,1/8”NPT SOLENOID VALVE-24 VDC SOLENOID VALVE-120 VAC Chapter 2: Functional Description 45 of 170 APDB, SPDB, CPDB Spare Parts List (cont’d) 21 15 1 W00052175 A0534549 A0534550 22 15 1 23 15 1 24 15 1 25 15 2 A0547043 26 27 28 29 30 15 15 15 15 15 1 1 1 1 1 W00017812 A0547953 892.03243.00 W00001958 W00017529 A0573829 W0011495 22012M W011495 22012M A0573829 23012M A0534549 23012M Conveying System Mechanical Components 15HP-3.0”LINE,BLOWER BUSHING (50HZ) 15HP-3.0”LINE,BLOWER BUSHING (60HZ) 15HP-3.5”LINE,BLOWER BUSHING (50HZ) 15HP-3.5”LINE,BLOWER BUSHING (60HZ) 15HP-3.0”LINE,BLOWER SHEAVE (50 HZ) 15HP-3.0”LINE,BLOWER SHEAVE (60HZ) 15HP-3.5”LINE,BLOWER SHEAVE (50HZ) 15HP-3.5LINE,BLOWER SHEAVE (60HZ) 15HP-3.0”,MOTOR BUSHING (50HZ) 15HP-3.0”,MOTOR BUSHING (60HZ) 15HP-3.5”,MOTOR BUSHING (50HZ) 15HP-3.5”,MOTOR BUSHING (60HZ) 15HP-3.0”,MOTOR SHEAVE (50HZ) 15HP-3.0”,MOTOR SHEAVE (60HZ) 15HP-3.5”,MOTOR SHEAVE (50HZ) 15HP-3.5”,MOTOR SHEAVE (60HZ) 15HP-3.0”LINE,PUMP BELT (50HZ) 15HP-3.0”LINE,PUMP BELT (60HZ) 15HP-3.5”LINE,PUMP BELT (50HZ) 15HP-3.5”LINE,PUMP BELT (60HZ) GSKT,AV/SV2.50-3.00,VELOMOID SW,VAC,SET @ 14HG SUBASSY,BASE,BLO,XPD7.5-15 PLGR,2.86OD,EPT,BLK,3/8-16,CS CYL,AIR,S1288,(2)1/4-20 HOLES,CYL,AIR,13818A Chapter 2: Functional Description 46 of 170 Figure 14: APDB, SPDB, CPDB 5-15 Series Blowback Pump Dimensions Model APDB/SPDB/ CPDB 5 7.5 10 15 Unit size hp Model APDB/SPDB/ CPDB Unit size kW 5 7.5 10 15 5 7.5 10 15 3.75 5.6 7.5 11.25 Conveying System Mechanical Components A 64.71 28.22 31.10 27.84 Dimensions (inches) B C 64.84 29.34 31.10 30.93 64.84 29.34 31.10 30.93 D 64.84 29.34 31.75 30.93 Dimensions (cm) A 164.36 71.68 78.99 70.71 B 164.69 74.52 78.99 78.56 C 164.69 74.52 78.99 78.56 Chapter 2: Functional Description D 164.69 74.52 80.65 78.56 47 of 170 VTTV TurboVac Series Pumps Models: VTTV-1.0, VTTV-2.0, VTTV-3.5, VTTV-8.5 • Centrifugal blower. • Cartridge filter. • Vent valve (optional on VTTV-1.0 1-hp [0.75 kW] unit). • Junction box with starter mounted on unit. Options • Freestanding central filter. • Distributed I/O. • Fused disconnect. • 24VDC or 120VAC controls. Figure 15: Spare Parts List VTTV Pumps Spare Parts List model VTTV-1.0: Model VTTV 1.0 VTTV 1.0 Part Number W00017811 W00017812 Description GSKT,AV/SV2.00-2.25,VELOMOID GSKT,AV/SV2.50-3.00,VELOMOID VTTV 1.0 VTTV 1.0 A0556722 A0556723 VTTV 1.0 VTTV 1.0 W00018378 A0546402 SUBASSY,AV2.00 FLTR,VTTV1.0 VTTV 1.0 W00001958 PLGR,2.86OD,EPT,BLK,3/8-16,CS VTTV 1.0 W00017529 CYL,AIR,S1288,(2)1/4-20 HOLES,CYL,AIR,13818A SOLV,3WAY,24VDC,1/8NPT,CV=.15,NPT,CND,CONN SOLV,3WAY,120VAC,1/8NPT,CV=0.17,1/2NPT,CND,CONN Spare Parts List model VTTV-2.0: Model VTTV 2.0 VTTV 2.0 VTTV 2.0 VTTV 2.0 VTTV 2.0 VTTV 2.0 VTTV 2.0 VTTV 2.0 Part Number W00017811 W00017812 A0556722 A0556723 W00018378 A0547482 W00001958 W00017529 Description GSKT,AV/SV2.00-2.25,VELOMOID GSKT,AV/SV2.50-3.00,VELOMOID SOLV,3WAY,24VDC,1/8NPT,CV=015,NPT,CND,CONN SOLV,3WAY,120VAC,1/8NPT,CV=0.17,1/2NPT,CND,CONN SUBASSY,AV2.00 FLTR,VTTV2.0 PLGR,2.86OD,EPT,BLK,3/8-16,CS CYL,AIR,S1288,(2)1/4-20 HOLES,CYL,AIR,13818A Conveying System Mechanical Components Chapter 2: Functional Description 48 of 170 Spare Parts List model VTTV-3.5: Model VTTV 3.5 VTTV 3.5 VTTV 3.5 VTTV 3.5 VTTV 3.5 VTTV 3.5 VTTV 3.5 VTTV 3.5 Part Number W00017811 W00017812 A0544603 A0554722 A0554723 W00018378 W00001958 W00017529 Description GSKT,AV/SV2.00-2.25,VELOMOID GSKT,AV/SV2.50-3.00,VELOMOID FLTR,VTTV3.5,2.0OD SOLV,3WAY,24VDC,1/8NPT,CV=.15,NPT,CND,CONN SOLV,3WAY,120VAC,1/8NPT,CV=0.17,1/2NPT,CND,CONN SUBASSY,AV2.00 PLGR,2.86OD,EPT,BLK,3/8-16,CS CYL,AIR,S1288,(2)1/4-20 HOLES,CYL,AIR,13818A Spare Parts List model VTTV-8.5: Model VTTV 8.5 VTTV 8.5 VTTV 8.5 Part Number W00017812 W00001958 W00017529 Description GSKT,AV/SV2.50-3.00,VELOMOID PLGR,2.86OD,EPT,BLK,3/8-16,CS CYL,AIR,S1288,(2)1/4-20 HOLES,CYL,AIR,13818A Conveying System Mechanical Components Chapter 2: Functional Description 49 of 170 Figure 16: VTTV TurboVac Series Pump Dimensions A B I F D E C C G H Model VTTV 1.0 2.0 3.5 8.5 Unit size hp 1 2 3.5 8.5 A 9 18 18 18 B 123/8 — — 21 C Model VTTV 1.0 2.0 3.5 8.5 Unit size kW 0.75 1.50 2.63 6.38 A 23 46 46 46 B 31 — — 53 C 23 46 46 46 9 18 18 18 Dimensions (inches) D E F — 181/4 — 205/8 253/8 2913/16 1 3 22 /2 25 /8 2913/16 1 3 22 /2 25 /8 313/8 D — 52 57 57 Dimensions (cm) E F 46 — 64 76 64 76 64 79 G 163/4 227/8 227/8 23 H 261/4 322/3 355/16 3713/16 G 109 58 58 58 H 66 83 89 96 Does not include D and F dimensions. Dimension I is overall height for 1-hp (0.75 kW) unit only. Note: Atmospheric valve (shown) for TV 2.0 – 8.5 units only. Conveying System Mechanical Components Chapter 2: Functional Description 50 of 170 I 23 325/16 325/16 337/8 I 58 82 82 86 Figure 17: Pump Specifications (VTP, SPD, CPD, VTPB, SPDB, CPDB and VTTV Pumps) Model Amp draw, full-load amps hp 230 V 460 V 575 V Pump — VTP, SPD 5 13.6 6.8 5.4 7.5 20.6 10.3 8.2 10 27.2 13.6 10.9 15 39.2 19.6 15.7 20 49.6 24.8 19.8 30 76.3 38.1 30.4 Pumps with Blowback — VTPB, SPDB, CPDB 5 13.6 6.8 5.4 7.5 20.6 10.3 8.2 10 27.2 13.6 10.9 15 39.2 19.6 15.7 25 49.6 24.8 19.8 30 76.3 38.1 30.4 TurboVac Pumps — VTTV 1.0 3.4 1.7 1.4 2.0 6.2 3.1 2.5 3.5 11.3 5.7 4.4 8.5 23.8 11.9 9.2 Air flow cfm Line size inches Ship weight lbs. 110 150 225 350 475 665 2” tube 2½” tube 3” tube 3” Sch. 5 pipe 4” tube 5” tube 385 470 830 870 1,600 1,700 103 150 225 300 545 765 2” tube 2½” tube 3” tube 3” Sch. 5 pipe 4.5” tube 5” Sch. 10 pipe 385 470 830 870 1,600 1,700 50 85 100 225 1½” tube 1½” tube 2” tube 3” tube 50 75 175 350 Air flow measured in cubic feet per minute (cfm) and cubic meters per hour (cmh). Rated performance is at standard atmosphere and sea level conditions. High elevation affects system performance Conveying System Mechanical Components Chapter 2: Functional Description 51 of 170 Pump Specifications (VTP/SPD/SPD, VTPB/SPDB/CPDB, and VTTV Pumps ) (Cont’d.) Model Amp draw, full-load amps Air flow kW 230 V 460 V 575 V cmh Pumps — VTP, SPD, CPD Models 3.75 13.6 6.8 5.4 186 5.63 20.6 10.3 8.2 254 7.50 27.2 13.6 10.9 382 11.25 39.2 19.6 15.7 594 14.9 49.6 24.8 19.8 805 22.4 76.3 38.1 30.4 1,127 Pumps with Blowback — VTPB, SPDB, CPDB/ Models 3.75 13.6 6.8 5.4 175 5.63 20.6 10.3 8.2 254 7.50 27.2 13.6 10.9 382 11.25 39.2 19.6 15.7 507 18.7 49.6 24.8 19.8 968 22.4 76.3 38.1 30.4 1,208 TurboVac Pumps — VTTV Models 0.75 3.4 1.7 1.4 84 1.50 6.2 3.1 2.5 144 2.63 11.3 5.7 4.4 169 6.38 23.8 11.9 9.2 382 Line size mm 50 mm tube 63 mm tube 76 mm tube 3” Sch. 5 pipe 101.6 mm tube 127 mm tube 50 mm tube 63 mm tube 76 mm tube 3” Sch. 5 pipe 4” Sch. 10 pipe 5” Sch. 10 pipe 38 mm tube 50 mm tube 50 mm tube 76 mm tube Ship weight Kg 175 214 377 395 727 789 175 214 377 395 727 789 23 35 80 159 Air flow measured in cubic feet per minute (cfm) and cubic meters per hour (cmh). Rated performance is at standard atmosphere and sea level conditions. High elevation affects system performance. Conveying System Mechanical Components Chapter 2: Functional Description 52 of 170 Figure 18: APC, SPD, CPD Spare Parts Drawing APC, SPC, CPC Centrifugal Pumps Models: 3.5, 6.5 & 11 Hp • Centrifugal blower. • Cartridge filter. • Vent valve • Junction box with starter mounted on unit. Conveying System Mechanical Components Chapter 2: Functional Description 53 of 170 Figure 19: Centrifugal Pump Dimensions Model APC/SPC/CPC 3.5 6.5 11.5 Unit size Hp* 3.5 5 11.5 Model APC/SPC/CPC 3.5 6.5 11.0 Unit size kW 2.63 4.84 8.58 A 15 A 38 B 26.25 24.5 31.5 B 67 62 80 Dimensions (inches) D E F 13 8.75 13 12 7.5 14.8 8.6 C 17.4 C 44 D 33 33 37 Dimensions (cm) E F 22 30 19 21 G H 35 31 35.5 17.75 G 45 H 89 79 90 *At 460/3/60 Conveying System Mechanical Components Chapter 2: Functional Description 54 of 170 I 18 17.75 19 I 46 45 48 Figure 20: APC, SPC, CPC Centrifugal Vacuum Pump Spare Parts List List # 1 2 3 4 5 6 7 8 9 10 11 1 1 1 1 1 1 1 1 1 1 1 1 Model No. APC/SPC/CPC 3.5, 6.5 3.5, 6.5 3.5, 6.5 3.5, 6.5, 11 3.5, 6.5, 11 3.5, 6.5, 11 3.5, 6.5, 11 3.5, 6.5, 11 3.5, 6.5, 11 3.5, 6.5, 11 3.5, 6.5, 11 3.5, 6.5, 11 W00000145 W00013524 W00017811 A0069307 A0547079 35086K W00013961 W00017552 W00017688 A0535380 A0571250 A0571252 O-RING VALVE PLUNGER GSKT,AV/SV2.00-2.25,VELOMOID AIR TUBING VACUUM GAUGE TUBING ELBOW AIR REGULATOR CYLINDER SEAL KIT CYL,AIR,S1311,1.515HP,2HOLE,CYL,AIR,2HLE,OPCYL,ROD END BRASS NIPPLE,.25 NPT X 1.5LG SOLENOID VALVE,3 WAY,115 VAC,1/8 NPT SOLV,3WAY,24VDC,1/8NPT,CV=.18,1/2NPT,CND,CONN,W/JBOX 12 1 3.5, 6.5, 11 W00000334 HOSE CLAMP 13 1 3.5, 6.5, 11 A0015492 NIPPLE FITTING 14 1 3.5, 6.5, 11 A0562421 CONDUIT FITTING STRAIGHT 15 1 3.5, 6.5, 11 A0562419 CONDUIT FITTING ELBOW 16 3.5, 6.5, 11 A0562430 CONDUIT FLEXIBLE 17 3 FT. 1 3.5, 6.5, 11 35193 18 1 3.5, 6.5, 11 A0570035 FILTER MOUNTING ADAPTER 1 3.5 A0570037 BLOWER,3.5 HP 208-460 V 1 3.5 A0570030 BLOWER, 3.5 HP 575 V 1 6.5 A0570038 BLOWER, 5 HP 208-460 V 1 6.5 A0570033 BLOWER 5 HP 575 V 1 11 A0570039 BLOWER 11.5 HP 208/406 V 1 11 A0570040 BLOWER 11.5 HP 575 V 1 1 11 W00001045 O-RING 20 21 22 23 24 25 26 1 1 1 1 1 1 1 3.5, 6.5, 11 3.5, 6.5 11 3.5, 6.5 11 3.5, 6.5, 11 3.5, 6.5, 11 W00017812 A0547953 A0547953 W00018378 W00050866 W00001958 W00017529 GSKT,AV/SV2.50-3.00,VELOMOID SW,VAC,SET @ 14HG SW,VAC,SET @ 14HG SUBASSY,AV2.00 SUBASSY,AV2.50 PLGR,2.86OD,EPT,BLK,3/8-16,CS CYL,AIR,S1288,(2)1/4-20 HOLES,CYL,AIR,13818A 19 Qty Part No. Description BRASS ELBOW ¼ NPT Conveying System Mechanical Components Chapter 2: Functional Description 55 of 170 Figure 21: APD, SPD, CPD, APDB, SPDB, CPDB, and APC, SPC, CPC Pump Specifications (Positive Displacement and Centrifugal pump) Model hp Amp draw, full-load amps 230 V 460 V 575 V Pumps — Positive Displacement Models (APD/B, SPD/B, CPD/B) XPD 5 5 13.4 6.7 5.4 XPD 7.5 7.5 20.6 10.3 8.2 XPD 10 10 28.4 14.2 11.4 XPD 10 10 29.2 14.6 11.7 XPD 15 15 38.4 19.2 15.3 XPD 15 15 39.2 19.6 15.7 XPDB 5 5 13.4 6.7 5.4 XPDB 7.5 7.5 20.6 10.3 8.2 XPDB 10 10 28.4 14.2 11.4 XPDB 10 10 29.2 14.6 11.7 XPDB 15 15 38.4 19.2 15.3 XPDB 15 15 39.2 19.6 15.7 Pumps — Centrifugal Models (APC, SPC, CPC) XPC 3.5 3.5 9.1 4.6 3.0 XPC 6.5 5 12.9 6.5 4.3 XPC 11.5 11.5 32.5 16.2 10.6 Air flow Line size inches cfm Vacuum 120 155 200 300 300 360 120 155 200 300 300 360 Vacuum 2.0” 2.5” 2.5” 3.0” 3.0” 3.5” 2.0” 2.5” 2.5” 3.0” 3.0” 3.5” kW 385 400 400 400 420 420 385 400 400 400 420 420 Material 2.0” 2.0” 2.5” Amp draw, full-load amps Air flow 230 V 460 V 575 V cmh Pumps — Positive Displacement Models (APD, SPD, CPD) XPD 5 3.7 13.4 6.7 5.4 203 XPD 7.5 5.6 20.6 10.3 8.2 263 XPD 10 7.5 28.4 14.2 11.4 339 XPD 10 7.5 29.2 14.6 11.7 381 XPD 15 11.2 38.4 19.2 15.3 508 XPD 15 11.2 39.2 19.6 15.7 610 XPDB 5 3.7 13.4 6.7 5.4 203 XPDB 7.5 5.6 20.6 10.3 8.2 263 XPDB 10 7.5 28.4 14.2 11.4 339 XPDB 10 7.5 29.2 14.6 11.7 381 XPDB 15 11.2 38.4 19.2 15.3 508 XPDB 15 11.2 39.2 19.6 15.7 610 Pumps — Centrifugal Models (APC, SPC, CPC) XPC 3.5 2.63 9.1 4.6 3.0 180 XPC 6.5 4.84 12.9 6.5 4.3 258 XPC 11.5 8.58 32.5 16.2 10.6 302 Air flow measured in cubic feet per minute (cfm) and cubic meters per hour (cmh). Model Material 2.0” 2.5” 2.5” 3.0” 3.0” 3.5” 2.0” 2.5” 2.5” 3.0” 3.0” 3.5” 106 152 225 Ship weight lbs. 1.5” 2.0” 2.5” Line size mm 175 300 350 Ship weight Kg 51 mm 63.5 mm 63.5 mm 76 mm 76 mm 89 mm 51 mm 63.5 mm 63.5 mm 76 mm 76 mm 89 mm 175 181 181 181 190 190 175 181 181 181 190 190 38 mm 50 mm 63 mm 80 136 159 Rated performance is at standard atmosphere and sea level conditions. High elevation affects system performance Conveying System Mechanical Components Chapter 2: Functional Description 56 of 170 SRH/SRC, SSR, CSR Vacuum Receivers Models: SRH01, SRC02, SRC04, SRC08, SRC16, SRC30, SRC60 SSR02, SSR06, SSR11, SSR23, SSR45, SSR85, SSR170 CSR02, CSR06, CSR11, CSR23, CSR45, CSR85, CSR170 • Receiver capacities of 0.1, 0.2, 0.4. 0.8, 1.6, 3.0, and 6.0 cu. ft. (2.8, 5.6, 11.3, 22.6, 45.3, 84.9, and 169.9 liters). • Brushed stainless steel construction, with stainless steel product contact surfaces. • Material demand/level sensor with Normally Open (std.) or Normally Closed (version available) contacts. • Perforated stainless steel pellet deflectors (SRC30/60 and SSR/CSR 85/170 Models). • Ten (10) -mesh stainless steel pellet deflector screen (SRC02–16 and SSR/CSR06-45 models only). • Removable side inlets and outlets – up to 3” O.D.(except on 0.1 cu. ft. [2.8 liter] models). • Internal check valve on material inlets (up to 3” line size) – Not on SRC02 and SSR/CSR06 models. Options • Volume fill sensor. • Optiview sensor. • Spun aluminum riser. • Filters (polyester, nylon, mesh & perforated screen). • Throat gaskets – high temp & food grade. • Consult assembly drawings for optional materials. SRC 30/60 and SSR/CSR 85/170 models can be vented or non-vented or equipped with a silo mount riser with an access door Conveying System Mechanical Components Chapter 2: Functional Description 57 of 170 Figure 22: Typical SRC Series Vacuum Receiver Exploded View (SRC02-16 shown, Pre-May 2003 Conveying System Mechanical Components Chapter 2: Functional Description 58 of 170 Figure 23: SRC, SSR, CSR Series Vacuum Receiver Parts List (Pre-May 2003) Model No. SRC02, SSR/CSR06 SRC02, SSR/CSR06 SRC08, SSR/CSR23 SRC08, SSR/CSR23 SRC02-04, SSR/CSR06-11 SRC08, SSR/CSR23 SRC02-04, SSR/CSR06-11 SRC08-16, SSR/CSR23-45 SRC02-16, SSR/CSR06-45 SRC02-04, SSR/CSR06-11 SRC08, SSR/CSR23 SRC02-16, SSR/CSR06-45 SRC02-04, SSR/CSR06-11 SRC08, SSR/CSR23 ALL ALL SRC02-04, SSR/CSR06-11 SRC08, SSR/CSR23 SRC02-16, SSR/CSR06-45 ALL SRC02-16, SSR/CSR06-45 ALL ALL SRC02-16, SSR/CSR06-45 SRC02-16, SSR/CSR06-45 SRC02-16, SSR/CSR06-45 SRC/SLC02-16, SSR/SLC0645, CSR/CSL06-45 SRC/SLC02-16, SSR/SLC0645, CSR/CSL06-45 SRC02-16 SRC/SLC02-16, SSR/SLC0645, CSR/CSL06-45 ALL ALL ALL ALL ALL SRC/SLC, SSR/SLC, CSR/CSL SRC/SSR/CSR OPT. OPT. OPT. OPT. ALL SRC/SSR/CSR SRC02-04, SSR/CSR06-11 SRC08-16, SSR/CSR23-45 SRC08-16, SSR/CSR23-45 SRC08-16, SSR/CSR23-45 Quantity 1 1 1 1 1 1 2 2 1 2 2 1 1 1 1 1 1 1 1 3 1 1 1 1 1 1 1 Part No. A0563504 A0563505 A0563507 A0563508 A0556507 A0556508 A0556504 A0556520 A0563510 A0553728 A0556546 A0563516 A0559419 A0559422 A0541036 A0541037 A0556532 A0556533 A0541039 A0541038 A0003254 W00002373 W00016426 A0003217 A0548359 A0567620 A0563543 1 A0563536 ASSY,FLAP/SPRT 1 1 A0563517 A0563512 THRT,SILC,4.0 DIA CTWT,FLAP 2 1 2 FT. 1 1 1 1 1 2 OPT. OPT. 1 3 2 2 2 2 A0567628 A0567627 W00000890 A0533924 A0563514 A0563515 A0563533 A0559420 A0559421 A0548190 A0548191 A0533925 W00017692 A0556505 A0556518 A0556519 A0559438 Conveying System Mechanical Components Description CONE,WELD,9”DIA CONE,WELD,9”DIA CONE,WELD,14”DIA CONE,WELD,14”DIA COVER,WELD,9”DIA COVER,WELD,14”DIA IN/OUT,SRX02-04,AL,1.50 IN/OUT,SRX08-16,AL,3.00 FLANGE,MTG,MLD THRT,12”DIA ORING,SILICONE,AS568-228 ORING,SILICONE,3.234ID X 0.139THK BRACKET,J BOX CV,URETHANE,1.50ID CV,URETHANE,3.00ID BOX,SINGLE GANG,4X2X2 COVER,BOX,SINGLE GANG,4X2 SCREEN,SSTL,10 MESH SCREEN,SSTL,10 MESH CORD,GRIP,1/2”,0.270-0.480 PLUG,BOX,GANG,1/2”NPT WASHER,REDUCER,0.75” X 0.5” WSHR,FLAT,PS,#10 NUT,STOP,PS,1/4-20 NIPPLE,CONDUIT,1/2”NPT PLUG,NYLON,5/8” ASSEMBLY,4”ANGLED THROAT,SS INSR,THRT,4”SS SCREW,BTNHD,PHILLIPS,#6-32 X 1/2LG,SS SCREW,FLTHD,PHILLIPS,#6-32 X 1/2LG,SS HOSE,RUBBER,BLK,1/4” X 1/16” MAGNET CERAMIC SW,REED,MAG,SPDT MAG,ACTUATOR,REED,SW VENT,LOUVER,1”DIA,ALUM NATURAL CV,URETHANE,2.00ID CV,URETHANE,2.50ID SWITCH,PROX,DC,NC,NPN SWITCH,PROX,AC,NC SWITCH,PROX SRC,SHC,SSR, CSR, 1/4-20 X 5/8,W/PATCH IN/OUT,SRC02-04. SSR/CSR06-11,AL,2.00 IN/OUT,SRC08-16, SSR/CSR23-45,AL,2.00 IN/OUT,SRC08-16, SSR/CSR23-45,AL,2.50 IN/OUT,SRC08-16, SSR/CSR23-45,AL,3.50 Chapter 2: Functional Description 59 of 170 Model No. SRC02-16, SSR/CSR06-45 SRC02-16, SSR/CSR06-45 SRC02-16, SSR/CSR06-45 SRC02-04, SSR/CSR06-11 SRC08-16, SSR/CSR23-45 ALL SRC02-16, SSR/CSR06-45 ALL ALL ALL ALL Quantity 1 1 1 1 1 2 1 1 1 1 1 Part No. W00012559 W00018024 W00016136 A0556821 A0555790 A0563513 A0563520 A0559430 A0555796 A0559425 A0565925 ALL 1 A0565929 ALL ALL ALL 1 1 1 161.00214.00 161.01676.00 A0565932 Conveying System Mechanical Components Description GSKT,THRT,4”,EPT,BLK,SRC 02-16, SSR/CSR06-45 GSKT,THRT,4”,SILC,ORG,SRC 02-16, SSR/CSR06-45 GSKT,THRT,4”,NPRN,WHT,SRC 02-16, SSR/CSR06-45 GASKET,U CHANNEL,10”DIA GASKT,U CHANNEL, 13”DIA GASKET,THROAT,SEAL RING,THROAT,4”SS IN/OUT,SRX02-04,AL,2.25 IN/OUT,SRX02-04,AL,2.50 CV,URETHANE,2.25ID FLTR,FLAT,10.25OD,WIRE,10 MESH,SRC/H/I02-04, SSR/CSR06-11 FLTR,FLAT,10.25OD,POLYEST,GLZD,SLC/RL/IL0204, SLC//RL/IL06-11, CSL/RL/IL06-11 FLTR,FLAT,10.25OD,WIRE,20 MESH,SRC/H/I02-04 FLTR,FLAT,10.25OD,PERF,SS FLTR,FLAT,10.25OD,NYL,150 MESH,SLC/RL/IL02-04, SLC//RL/IL06-11, CSL/RL/IL06-11 Chapter 2: Functional Description 60 of 170 Figure 24: Typical SRC02-16, SSR/CSR06-45 Series Vacuum Receiver Exploded View (Post May 2003) 1 2 1 1 6 2 1 3 1 5 3 1 7 8 1 6 1 9 6 1 0 3 4 5 4 2 3 2 9 2 2 2 2 1 1 0 9 Conveying System Mechanical Components 2 4 3 0 1 8 Chapter 2: Functional Description 1 4 7 61 of 170 Figure 25: SRC02-16 Series Vacuum Receiver Parts List (Post-May 2003) See Figure 24 on the previous page for parts location. Item 1. 2. 3. 4. 5. 6. 7. 8. 9. 10. 11. 12. 13. 14. 15. 16. 17. 18. 19. 20. 21. 22. 23. 24. 25. 26. 27. 28. 29. 30A. 30B. 30C. Model no. SRC02, SSR/CSR06 SRC02-04, SSR/CSR06-11 SRC02-04, SSR/CSR06-11 ALL SRC02-16 SRC02-04, SSR/CSR06-11 SRC02-16, SSR/CSR06-45 SRC02-04, SSR/CSR06-11 ALL ALL SRC02-04, SSR/CSR06-11 SRC02-04, SSR/CSR06-11 SRC02-16, SSR/CSR06-45 ALL SRC02-16, SSR/CSR06-45 SRC02-16, SSR/CSR06-45 SRC02-16, SSR/CSR06-45 SRC02-16, SSR/CSR06-45 SRC30, SSR/CSR85 ALL ALL ALL ALL SRC OPT. SRC02-04, SSR/CSR06-11 OPT. OPT. SRC SRC02-16, SSR/CSR06-45 SRC02-16, SSR/CSR06-45 SRC02-16, SSR/CSR06-45 Quantity 1 1 2 2 1 2 1 1 1 1 1 1 1 3 1 1 1 1 1 2 2 FT. 1 1 1 1 2 OPT. OPT. 3 1 1 1 Conveying System Mechanical Components Part no. A0563504 A0556507 A0556504 A0563513 A0567621 A0553728 A0563516 A0559419 A0541036 A0541037 A0556532 A0556821 A0541039 A0541038 A0003254 A0003217 A0548359 A0567620 A0533925 A0567628 W00000890 A0533924 A0567627 A0563533 A0559420 A0556505 A0548190 A0548191 W00017692 W00012559 W00018024 W00016136 Description CONE, WELD, 9” DIA. COVER, WELD, 9” DIA. TUBE, INLET/OUTLET, 1-1/2” GASKET, THROAT, SEAL FLANGE, MTG., 12” DIA. ORING, SILICONE, AS568-228 BRACKET, J BOX CHECK VALVE, 1.5” URETHANE BOX, SINGLE GANG, 4 X 2 X 2 COVER, BOX, SINGLE GANG, 4 X2 SCREEN, SSTL, 10 MESH GASKET, U CHANNEL, 10” DIA. CORD GRIP, ½”, 0.270 – 0.480 PLUG, BOX, GANG, ½” NPT WASHER, REDUCER, 0.75” X 0.5” NIPPLE, CONDUIT, ½” NPT PLUG, NYLON, 5/8” ASSEMBLY, 4” ANGLED THROAT S.S SWITCH, REED, SPST, NO SCREW, BTNHD PHILLIPS, #6-32 X ½ LG. SS HOSE, RUBBER, BLK, ¼” X 1/16” MAGNET CERAMIC SCREW, FLTHD, PHILLIPS, #6-32 X ½” LG. SS VENT, LOUVER, 1” DIA. CHECK VALVE, 2.0”, URETHANE TUBE, INLET/OUTLET, 2” OPT. SWITCH, PROX, DC, NC, NPN SWITCH, PROX, AC, NC SRC, SHC, ¼ - 20 X 5/8, W/PATCH GSKT, THRT, EPT, BLACK, 4” STD TEMP GSKT, THRT, SILICONE, ORANGE, 4” HI-TEMP GSKT, THRT, NEOPRENE, WHITE, 4”, STD TEMP. (FDA) Chapter 2: Functional Description 62 of 170 Figure 26: Typical SRC Series Vacuum Receiver Exploded View SRC30, SSR/CSR85 (Left) & SRC60, SSR/CSR170 (Right) shown, Post-May 2003) Conveying System Mechanical Components Chapter 2: Functional Description 63 of 170 Figure 27: SRC30-60, SSR/CSR85-170 Series Vacuum Receiver Parts List See Figure 26 on the previous page for parts location. Item 10 20 30 40 50 60 70 80 90 100 Model No. SRC30-60, SSR/CSR85-170 SRC30-60, SSR/CSR85-170 SRC30, SSR/CSR85 SRC30, SSR/CSR85 SRC30-60, SSR/CSR85-170 SRC30-60, SSR/CSR85-170 SRC30, SSR/CSR85 SRC30, SSR/CSR85 SRC30-60, SSR/CSR85-170 SRC30-60, SSR/CSR85-170 Quantity 1 2 3 3 1 1 6 FT. 1 1 1 110 SRC30-60, SSR/CSR85-170 120 SRC30, SSR/CSR85 130 SRC30-60, SSR/CSR85-170 140 150 160 170 180 SRC30-60, SSR/CSR85-170 SRC30-60, SSR/CSR85-170 SRC30-60, SSR/CSR85-170 SRC30-60, SSR/CSR85-170 SRC30-60, SSR/CSR85-170 1 1 3 1 1 190 SRC30-60, SSR/CSR85-170 1 200 210 220 230 240 250 260 SRC30-60, SSR/CSR85-170 SRC30-60, SSR/CSR85-170 SRC30-60, SSR/CSR85-170 SRC30, SSR/CSR85 SRC30-60, SSR/CSR85-170 OPT. OPT. 1 2 1 1 2 FT. OPT. OPT 2 Conveying System Mechanical Components Part No. A0567619 A0566923 A0069227 A00069203 A0566910 A0566925 A0540240 A0566912 A0566971 A0566906 A0566927 A0566928 A0566929 A0566930 A0566931 A0566932 A0566933 A0566934 A0566935 A0566936 A0566926 A0566927 A0566928 A0566929 A0566930 A0566931 A0566932 A0566933 A0566934 A0566935 Description ASSEMBLY,6” SLANTED THROAT,SS GASKET,SEAL,6” THROAT BOLT,HEX,3/8-16,SS,W/PATCH WASHER,3/8” LOCK,SS WELDMENT,CONE,20”DIAMETER,SS CLAMP,BAND,T-BOLT,20” SS GASKET,U-CHANNEL,NPRN,0.56 X 0.19 X 0.6W WELDMENT,CYLINDER,20” DIAMETER,SS FLTR,FLAT,21.25OD,POLYEST GLZD COVER,20”DIAMETER,SS INLET/OUTLET,2IN,OD INLET/OUTLET,2.5IN,OD INLET/OUTLET,3IN,OD INLET/OUTLET,3.5IN,OD INLET/OUTLET,4IN,OD TUBE,ELBOW OUTLET,2”OD TUBE,ELBOW OUTLET,2.50”OD TUBE,ELBOW OUTLET 3”OD TUBE,ELBOW OUTLET,3.50”OD TUBE,ELBOW OUTLET 4” OD ORING,INLET/OUTLET SEAL TUBE,STRAIGHT INLET, 2”OD TUBE,STRAIGHT INLET,2.50”OD TUBE,STRAIGHT INLET,3”OD TUBE,STRAIGHT INLET,3.50”OD TUBE,STRAIGHT INLET,4”OD TUBE,ELBOW INLET,2”OD TUBE,ELBOW INLET,2.50”OD TUBE,ELBOW INLET,3”OD TUBE,ELBOW INLET,3.50”OD A0566936 TUBE,ELBOW INLET,4”OD A0541036 A0536516 A0541038 A0566915 A0541037 W00016928 A0540363 W00018281 A0567627 A0567628 A0533924 A0533925 W00000890 A0548190 A0548191 BOX,SINGLE GANG,4X2X2 BRACKET,J BOX PLUG,BOX,GANG,1/2”NPT FLANGE,MOUNTING,16”SS COVER,BOX,SINGLE GANG, 4 X2 GSKT,THRT,6”,EPT,BLK GSKT,THRT,6”,SILC,ORG GSKT,THRT,6”,NPRN,WHT SCREW,FLTHD,PHILLIPS,#6-32 X ½”LG SS SCREW,BTNHD PHILLIPS,#6-32 X 1/2LG SS MAGNET CERAMIC SWITCH,REED,SPST,NO HOSE,RUBBER,BLK,1/4” X 1/16” SWITCH,PROX,DC,NC,NPN SWITCH,PROX,AC,NC Chapter 2: Functional Description 64 of 170 Item 270 280 290 300 Model No. SRC30-60, SSR/CSR85-170 SRC30-60, SSR/CSR85-170 SRC30-60, SSR/CSR85-170 SRC30-60, SSR/CSR85-170 Quantity 1 1 1 1 Part No. A0559419 A0559420 A0559421 A0559425 310 320 330 SRC30-60, SSR/CSR85-170 SRC30-60, SSR/CSR85-170 SRC30-60, SSR/CSR85-170 1 1 1 A0559422 A0566907 161.00254.00 Conveying System Mechanical Components Description CV,URETHANE,1.50ID CV,URETHANE,2.00ID CV,URETHANE,2.50ID CV,URETHANE,2.25ID CV,URETHANE,3.00ID FLTR,FLAT,21.25OD,PERF,SS FLTR,FLAT,21.25OD,NYL,MESH, SRC30-60, SSR/CSR85-170 Chapter 2: Functional Description 65 of 170 Figure 28: Typical SRH01, SSR/CSR03 Series Vacuum Receiver Exploded View 17 19 18 16 26 22 18 19 15 12 10 13 11 21 2 3 20 7 9 8 5 13 1 4 14 Conveying System Mechanical Components Chapter 2: Functional Description 66 of 170 Figure 29: SRH01, SSR/CSR03 Series Vacuum Receiver Parts List See Figure 28 for parts location. Item 1 2 3 4 5 7 8 9 10 11 12 13 14 15 16 17 Model No. ALL ALL ALL ALL ALL ALL ALL ALL ALL ALL ALL ALL ALL SRH01, SSR/CSR03 SRH02, SSR/CSR06 SRH04, SSR/CSR11 SRH08, SSR/CSR23 SRH16, SSR/CSR45 SRH01, SSR/CSR03 SRH02,04. SSR/CSR06-11 Quantity 1 1 1 3 1 1 1 1 1 1 4 8 4 1 1 1 1 1 1 1 Part No. A0556521 A0541036 A0541037 A0541038 A0541039 A0003254 A0003217 A0548359 A0558402 A0556805 A0553718 W00002373 W00016426 A0553741 A0553742 A0553743 A0553744 A0553745 A0556531 A0556532 SRH08,16, SSR/CSR23-45 1 A0556533 SRH01, SSR/CSR03 SRH02,04. SSR/CSR06-11 1 1 A0556506 A0556507 SRH08,16, SSR/CSR23-45 1 A0556508 SRH02,04. SSR/CSR06-11 2 SRH08,16, SSR/CSR23-45 2 SRH02,04. SSR/CSR06-11 SRH08,16, SSR/CSR23-45 SRH01, SSR/CSR03 SRH02,04. SSR/CSR06-11 SRH08,16, SSR/CSR23-45 2 1 1 1 A0556504 A0556505 A0555796 A0556518 A0556519 A0556520 A0553728 A0553728 A0556503 A0553731 A0553730 ALL SRH02,04. SSR/CSR06-11 SRH02,16, SSR/CSR06-45 SRH08,16, SSR/CSR23-45 SRH08,16, SSR/CSR23-45 ALL SRH02,16, SSR/CSR06-45 SRH02,16, SSR/CSR06-45 SRH02,16, SSR/CSR06-45 SRH01, SSR/CSR03 SRH02,04. SSR/CSR06-11 SRH08,16, SSR/CSR23-45 ALL 2 1 1 1 1 2 2 1 1 1 1 1 1 A0556822 W00000990 A0559420 A0559421 W00000995 A0536966 W00532685 A0548190 A0548191 A0556820 A0556621 A0559790 A0505648 18 19 20 21 22 23 24 25 26 27 Conveying System Mechanical Components Description FLNG,MOUNT,ADAPT,SRH/L01-16 BOX,GANG,SNGLE,4X2X2,UL,WETLOC BOX,GANG,SNGLE,COVER,BLNK,GSKT BOX,GANG,PLUG,1/2”NPT,UL CORD,GRIP,1/2”,.270-.480 #3231 RDUC,WSHR,.75”X.50”,STEEL CDUT,NIPPLE,1/2” #CN 50 PLUG,HEYCO,BLK,5/8”, #2663 SCR,FLAT,CSUNK,10-32X3/8,NYLOC SW,ASSY,NC,LEVEL SENSOR,SRH/L SCR,SHC,SS,1/4-20X3/4 WASHER,FLAT,1/4” NUTM1/4-20,ZINC PLATED,NYLOC CONE,WELD,6”ID,SSTL,SRX01, SSR/CSR03 CONE,WELD,9”ID,SSTL,SRX02, SSR/CSR06 CONE,WELDMENT,0.4CU FT CONE,WELD,14”ID,SSTL,SRX08, SSR/CSR23 CONE,WELD,14”ID,SSTL,SRX16, SSR/CSR45 FLTR,FLAT,WIRE,6”OD,SRH/I01, SSR/SSI03, CSR/CSI03 FLTR,FLAT,WIRE,9”OD,SRH/I02/04, SSR/SSI06-11, CSR/CSI06-11 FLTR,FLAT,WIRE,14”OD,SRH/I08/16, SSR/SSI23-45, CSR/CSI23-45 CVR,WELD,6”ID,SSTL,SRI/H01, SSR/CSR03 CVR,WELD,9”ID,SSTL,SRI/H02/04, SSR/SSI06-11, CSR/CSI06-11 CVR,WELD,14”ID,SSTL,SRI/H08/16, SSR/SSI23-45, CSR/CSI23-45 TUBE,IN/OUT,1.5”,SRX02-04, SSR/CSR06-11 TUBE,IN/OUT,2.0”SRX02-04, SSR/CSR06-11 TUBE,IN/OUT,2.5”,SRX02-04, SSR/CSR06-11 TUBE,IN/OUT,2.0”,SRX08-16, SSR/SSI23-45, CSR/CSI23-45 TUBE,IN/OUT,2.5”,SRX08-16, SSR/SSI23-45, CSR/CSI23-45 TUBE,IN/OUT,3.0”,SRX08-16, SSR/SSI23-45, CSR/CSI23-45 ORNG,SIL,2,2 ¾ ID X 0.139 THK ORNG,SIL,3.234 ID X 0.139 THK FLAP,DISCHARGE,SS,SRXX01, SSR/CSR03 FLAP,DISCHARGE,SS,SRXX02-04, SSR/CSR23-45 FLAP,DISCHARGE,SS,SRXX08-16, SSR/SSI23-45, CSR/CSI23-45 SCR,CAP,HEX,SOC,HD,10-32X1/2 VLV,CHECK,INT,1.5” TUBE,POLY VLV,CHECK,URETHANE,2.0” VLV,CHECK,URETHANE,2.5” VLV,CHECK,INT,3.0” TUBE,POLY CONN,WIRE NT,IDEAL,#A0/A1 GSKT,O-RING,PARKER,#2-017 SW,PROX,DC,18MM,NC,NPN,3 WIRE SW,PROX,AC/DC,18MM,NC,2 WIRE GSKT,U-CHNL,NPRN,.38X.20X.06W GSKT,U-CHNL,NPRN,50X,20X,06W GSKT,U-CHNL,NPRN,50X,20X,06W GROM,BLK,0.5625X0.25X Chapter 2: Functional Description 67 of 170 Figure 30: SRH01, SSR/CSR03 Series Stainless Steel Vacuum Receiver H Vacuum Receiver Dimensions Model SRH, SSR/CSR Cu. ft. SRH01, 03 0.1 A B 14.88” 10.63” C 9.38” Dimensions (inches) E F D 6.38” 12” 1.75” G H J K 6.38” 5.50” 11” 6.75” G H J K Dimensions (cm) Model SRH, SSR/CSR Liters A B C D E F 01, 03 2.8 27 24 16 31 4.4 16.2 14 38 28 5/16”/0.3125” (8.00 mm) -diameter holes, two (2) places equally spaced. 1/4”/0.2500” (6.35 mm) -diameter holes, six (6) places equally spaced; H is standard mounting hole location. Conveying System Mechanical Components Chapter 2: Functional Description 17 68 of 170 Figure 31: SRC 02-16, SSR/CSR06-45 Stainless Steel Vacuum Receiver Dimensions SRC16, SSR/CSR45 Vacuum Receiver (shown) 14.14” (14.14) 27.95” (23.63) K J SEE NOTE 5 (5.75) (Mounting Flange -10” Diameter Cut-Out) Model # SRC, SSR/CSR 02, 06 04, 11 08, 23 16, 45 Cu. ft. A B C 0.2 0.4 0.8 1.6 16.75” 22.38” 26” 32.25” 11.5” 17.5” 20.13” 26.38” 12.11” 18.46” 20.97” 27.95” D 5.5” 11.5” 11.6” 18.1” Dimensions (inches) E F G H I J K N/A 11” 10” 4.5” 9.23” 12” 4” 14.17” Metric Standards • Dimensions in cm Model # SRC, Liters A B C D E SSR/CSR 02, 06 5.6 42.5 29.2 30.76 14.0 04, 11 11.3 56.8 44.4 46.89 29.2 30.5 08, 23 22.6 66.1 51.1 53.26 29.5 16, 45 45.3 81.9 67.0 71.00 46.1 5/16”/0.3125” (8.00 mm) -diameter holes, two (2) places equally spaced. F G H I J K 10.2 36.00 N/A 27.9 25.4 11.4 1/4”/0.2500” (6.35 mm) -diameter holes, six (6) places equally spaced; I is standard mounting hole location. Conveying System Mechanical Components Chapter 2: Functional Description 69 of 170 Figure 32: SRC 30-60, SSR/CSR85-170 Stainless Steel Vacuum Receiver Dimensions SRC60, SSR/CSR80 Vacuum Receiver (shown) K J 16” OD (Mounting Flange -14” Diameter Cut-Out) Model # SRC, SSR/CSR 30, 85 60, 170 Cu. ft. A B C D 3.0 6.0 47 63 39 55 NA 26 42 Dimensions (inches) E F G 16 6 20 H J K NA 15 7 Metric Standards • Dimensions in cm Model # Liters A B C D E F G H J K SRC, SSR/CSR 30, 85 85 119 100 66 N/A 41 15 51 N/A 38 19 60, 170 170 159 140 106 5/16”/0.3125” (8.00 mm) -diameter holes, two (2) places equally spaced.1/4”/0.2500” (6.35 mm) -diameter holes, six (6) places equally spaced; I is standard mounting hole location. Conveying System Mechanical Components Chapter 2: Functional Description 70 of 170 Figure 33: SRC/SSR/CSR AV Drawing SRC16, SSR/CSR45 AV-5 Conveying System Mechanical Components SRC16, SSR/CSR45 AV-10 Chapter 2: Functional Description 71 of 170 Figure 34 Spare Parts List SRC/AV-5, SSR/AV-5, CSR/AV-5: Part Number 872.00955.00 A0565693 Description RACK,FLTR,SRC/AV CLP,BAND,T-BLT,SSTL,14”,PHL 161.00245.00 A0556813 A0555773 842.00020.00 FLTR,BAG,SNAP,4.625OD X 12.5LG,POLY,FELT,ACRYLIC COATED (QTY 4) FLTR,BAG,SNAP,4.62OD X 12.5LG,POLY FELT,TEFLON COATED (QTY 4) CYL,AIR,1.06BORE,2”ST PLGR,3.25OD,URE,WHT,5/16-24CS (QTY 2) PLGR,3.25”OD,HI-TEMP,5/16ORG (QTY 2) 732.00225.00 892.02081.00 732.00224.00 VLV,SOL,DUAL 3WAY,1/4,24VDC,NC ASSY,CNTL,FLTR CLN,24VDC VLV,SOL,DUAL 3WAY,1/4,115VAC 161.00256.00 Spare Parts List SRC/AV-10, SSR/AV-10, CSR/AV-10: Part Number 872.00955.00 A0565693 161.01770.00 161.01822.00 732.00224.00 732.00225.00 892.02081.00 A0555773 842.00020.00 A0556813 Description RACK,FLTR,SRC/AV CLP,BAND,T-BLT,SSTL,14”,PHL FLTR,BAG,SNAP,4.625OD X 24.5LG POLY FELT,ACRYLIC COATED (QTY 4) FLTR,BAG,SNAP,4.62OD X 24.5LG POLY FELT,TEFLON COATED (QTY 4) VLV,SOL,DUAL 3WAY,1/4,115VAC VLV,SOL,DUAL 3WAY,1/4,24VDC,NC ASSY,CNTL,FLTR CLN,24VDC PLGR,3.25OD,URE,WHT,5/16-24,CS (QTY 2) PLGR,3.25”OD,HI-TEMP,5/16ORG (QTY 2) CYL,AIR,1.06BORE,2”ST Conveying System Mechanical Components Chapter 2: Functional Description 72 of 170 Vacuum Receivers Models: TF301G, TF301U, TF301S, TF601G, TF601U, TF601S, TF302G, TF302U, TF302S, TF602G, TF602U, TF602S, VF301G, VF301U, VF301S, VF601G, VF601U, VF601S, VF302G, VF302U, VF302S, VF602G, VF602U, VF602S • Bin-Full sensor on flapper dump valve. • TF receivers are used with time-fill conveying systems. • VF receivers with proximity sensor are used with volume-fill conveying systems. • Available in 3.0 (30) and 6.0 (60) cubic foot sizes (85- and 170-liter sizes). • Available in mild steel (1) or stainless steel (2). • Most models available with flange (G), suspension (U), or silo (S) mounting systems. • Individually addressed network-capable distributed I/O control optional. • Sixteen (16) -mesh stainless steel pellet deflector standard. • 2” (50 mm) to 3” (76 mm) check valves and material inlets for use with single-line Y systems. • Adjustable proximity-type material-level sensor: 24 VDC or 115 VAC available. Options • Paddle-style level indicator. • Compressed air filter cleaning controls for individual vacuum hoppers available. • Glazed polyester, acrylic, and Gore-Tex® filters. Conveying System Mechanical Components Chapter 2: Functional Description 73 of 170 Figure 35: TF/VF Flange-Mount Vacuum Receiver Specifications I G B D H A E C F cu. ft. 3.0 6.0 A 40 475/8 B 3311/16 417/16 C 229/16 309/32 Dimensions (inches) D E F 20 217/8 6 22 217/8 6 G 16 16 H I Dimensions (cm) D E F 51 55 15 56 55 15 G 40 40 H I liters A B C 85 101 85 57 170 120 105 77 13/64” (5 mm) -diameter holes — 8 places, equally spaced. 13/64” (5 mm) -diameter holes — 6 places, equally spaced. Mounting holes provided by customer. Conveying System Mechanical Components Chapter 2: Functional Description 74 of 170 Figure 36: TF/VF Suspension-Mount Vacuum Receiver Specifications B D H C A E F G cu. ft. 3.0 6.0 liters 85 170 A 6911/16 7711/32 A 177 196 B 3311/16 417/16 B 85 105 C 229/16 309/32 C 57 77 Dimensions (inches) D E 20 30 22 30 Dimensions (cm) D E 51 76 56 76 F 6 6 F 15 15 G 17 17 H 40 477/8 G 43 43 Mounting holes provided by customer. Conveying System Mechanical Components Chapter 2: Functional Description 75 of 170 H 101 121 Figure 37: TF/VF Silo-Mount Vacuum Receiver Specifications B D J K C A E L M F H G M cu. ft. 3.0 6.0 A 50 575/8 liters 85 170 A 127 146 B 3311/16 417/16 B 85 105 C 229/16 309/32 C 57 77 D 20 22 D 51 56 Dimensions (inches) E F G H 217/8 6 20 13/4 217/8 6 20 13/4 E 55 55 Dimensions (cm) F G 15 51 15 51 J 40 475/8 H 4 4 J 101 121 K 227/32 227/32 K 56 56 L 22 22 L 56 56 Mounting holes provided by customer. 9 /16” (14 mm) -diameter holes; 7 places, equally spaced. Conveying System Mechanical Components Chapter 2: Functional Description 76 of 170 M 231/2 231/2 M 60 60 Figure 38: TF/VF Vacuum Receiver Spare Parts List, Models TF/VF30X to TF/VF60X Part number A0539992 A0540240 W00016928 A0540277 A0533925 A0536225 A0533934 Part description Flapper disk, 30X-60X Gasket, U-channel neoprene, 30X-60X Gasket, throat, 30X-60X Filter, cart, mesh, 30X-60X Switch, reed, HPR discharge Switch, prox, volume fill, 115 VAC Switch, prox, volume fill, 24 VDC Refer to the Bill of Materials report included in the Customer Information Packet for a complete listing of parts. Conveying System Mechanical Components Chapter 2: Functional Description 77 of 170 Atmospheric Valves Models: AV1.5, AV2, AV2.25, AV2.5, AV3 • Mount on cover of vacuum hopper to direct vacuum into hoppers. • Relieves vacuum by allowing an in-rush of atmospheric air into the system. • Compressed air-operated. • Selection of black or white neoprene plungers or available high temperature plungers. • 24 VDC or 115 VAC control voltage solenoid. • Adds only six inches (15 cm) to the height of vacuum hoppers and filter chambers. Figure 39: Typical Atmospheric Valve Figure 40: Spare Parts List AV Valves Spare Parts List AV 1.5: Model AV1.5 AV1.5 AV1.5 AV1.5 Part Number W00000146 W00017807 W00001959 W00017688 SOLENOID VALVE SOLENOID VALVE A0556722 A0556723 Conveying System Mechanical Components Description ORNG,BUNA70,1.484ID X 0.139CS GSKT,AV/SV1.50.VELOMOID PLGR,1.61OD,EPT,BLK,3/8-16CS CYL,AIR,S1311,1.5-15HP,2 HOLE,CYL AIR,2HLE,OP CYL,ROD END SOLV,3WAY,24VDC,1/8NPT,CV=.15,CV=.15,NPT CND CONN SOLV,3WAY,120VAC,1/8NPT,CV=0.17,1/2NPT CND CONN Chapter 2: Functional Description 78 of 170 Spare Parts List AV2: Model AV2 AV2 AV2 Part Number W00000145 W00017811 W00017688 AV2 SOLENOID VALVES SOLENOID VALVES W00013524 A0556722 A0556723 Description ORNG,BUNA70,1.984ID X 0.139CS GSKT,AV/SV2.00-2.25,VELOMOID CYL,AIR,S1311,1.5-15HP,2 HOLE,CYL AIR,2HLE,OP CYL,ROD END PLGR,2.38OD,EPT,BLK,3/8-16,CS SOLV,3WAY,24VDC,1/8NPT,CV=.15,CV=.15,NPT CND CONN SOLV,3WAY,120VAC,1/8NPT,CV=0.17,1/2NPT CND CONN Spare Parts List AV2.25: Model AV2.25 AV2.25 AV2.25 Part Number W00001470 W00017811 W00017688 AV2.25 SOLENOID VALVE SOLENOID VALVE W00013524 A0556722 A0556723 Description ORNG,2-1/2OD X 2-1/4OD GSKT,AV/SV2.00-2.25,VELOMOID CYL,AIR,S1311,1.5-15HP,2 HOLE,CYL AIR,2HLE,OP CYL,ROD END PLGR,2.38OD,EPT,BLK,3/8-16,CS SOLV,3WAY,24VDC,1/8NPT,CV=.15,CV=.15,NPT CND CONN SOLV,3WAY,120VAC,1/8NPT,CV=0.17,1/2NPT CND CONN Spare Parts List AV2.5: Model AV2.5 AV2.5 AV2.5 Part Number W00001045 W00017812 W00017688 AV2.5 SOLENOID VALVE SOLENOID VALVE W00001958 A0556722 A0556723 Description ORNG,BUNA70,2.484ID X 0.139CS GSKT,AV/SV2.50-3.00,VELOMOID CYL,AIR,S1311,1.5-15HP,2 HOLE,CYL AIR,2HLE,OP CYL,ROD END PLGR,2.86OD,EPT,3/8-16,CS SOLV,3WAY,24VDC,1/8NPT,CV=.15,CV=.15,NPT CND CONN SOLV,3WAY,120VAC,1/8NPT,CV=0.17,1/2NPT CND CONN Spare Parts List AV3: Model AV3 AV3 AV3 Part Number W00001738 W00017812 W00017688 AV3 SOLENOID VALVE SOLENOID VALVE W00001958 A0556722 A0556723 Conveying System Mechanical Components Description ORNG,BUNA70,2.984ID X 0.139CS GSKT,AV/SV2.50-3.00,VELOMOID CYL,AIR,S1311,1.5-15HP,2 HOLE,CYL AIR,2HLE,OP CYL, ROD END PLGR,2.86OD,EPT,BLK,3/8-16,CS SOLV,3WAY,24VDC,1/8NPT,CV=.15,CV=.15,NPT CND CONN SOLV,3WAY,120VAC,1/8NPT,CV=0.17,1/2NPT CND CONN Chapter 2: Functional Description 79 of 170 Sequence T-Valves Models: SV1.5, SV2, SV2.25, SV2.5, SV3, SV4, SV4.5, SV5 • Mount in vacuum header piping above vacuum hoppers to direct vacuum into hoppers. • Used with pumps that have blowback feature and critical dried resins because no atmospheric air is introduced when vacuum is relieved. • Compressed air operation. • Selection of black or white neoprene plungers, or high temperature silicone plungers. • 24 VDC or 115 VAC control voltage solenoid. • Distributed I/O capability. Figure 41: Typical Sequence T-Valve Figure 42: Spare Parts List SV Valves Spare Parts List SV1.5: Model Part Number SV1.5 W00000146 ORNG,BUNA70,1.484ID X 0.139CS SV1.5 SV1.5 SV1.5 SOLENOID VALVE W00017807 W00051670 W00001959 A0556722 SOLENOID VALVE A0556723 GSKT,AV/SV1.50,VELOMOID CYL,AIR,S1626,1.125 BORE,1.5ST PLGR,1.61OD EPT,BLK,3/8-16,CS SOLV,3WAY,24VDC,1/8NPT,CV=.15,CV=.15,NPT CND CONN SOLV,3WAY,120VAC,1/8NPT,CV=0.17,1/2NPT,CND CONN Conveying System Mechanical Components Description Chapter 2: Functional Description 80 of 170 Spare Parts List SV2: Model SV2 SV2 SV2 SV2 SOLENOID VALVE Part Number W00000145 W00017811 W00051670 W00013524 A0556722 SOLENOID VALVE A0556723 Description ORNG,BUNA70,1.984ID X 0.139CS GSKT,AV/SV2.00-2.25,VELOMOID CYL,AIR,S1626,1.125 BORE,1.5ST PLGR,2.38OD,EPT,BLK,3/8-16,CS SOLV,3WAY,24VDC,1/8NPT,CV=.15,CV=.15,NPT CND CONN SOLV,3WAY,120VAC,1/8NPT,CV=0.17,1/2NPT CND CONN Spare Parts List SV2.25: Model SV2.25 SV2.25 SV2.25 SV2.25 SOLENOID VALVE Part Number W00001470 W00017811 W00051670 W00013524 A0556722 SOLENOID VALVE A0556723 Description ORNG,2-1/2OD X 2-1/4OD GSKT,AV/SV2.00-2.25,VELOMOID CYL,AIR,S1626,1.125 BORE,1.5ST PLGR,2.38OD,EPT,BLK,3/8-16,CS SOLV,3WAY,24VDC,1/8NPT,CV=.15,CV=.15,NPT CND CONN SOLV,3WAY,120VAC,1/8NPT,CV=0.17,1/2NPT CND CONN Spare Parts List SV2.5: SV2.5 SV2.5 SV2.5 SV2.5 SOLENOID VALVE W00001045 W00017812 W00051670 W00001958 A0556722 SOLENOIDVALVE A0556723 ORNG,BUNA70,2.848ID X 0.139CS GSKT,AV/SV2.50-3.00,VELOMOID CYL,AIR,S1626,1.125 BORE,1.5ST PLGR,2.86OD,EPT,BLK,3/8-16,CS SOLV,3WAY,24VDC.1/8NPT,CV=.15,CV=.15,NPT CND CONN SOLV,3WAY,120VAC,1/8NPT,CV=0.17,1/2NPT CND CONN Spare Parts List SV3: Model SV3 SV3 SV3 SV3 SOLENOID VALVE Part Number W00001045 W00017812 W00051670 W00001958 A0556722 SOLENOID VALVE A0556723 Description ORNG,BUNA70,2.484ID X 0.139CS GSKT,AV/SV2.50-3.00,VELOMOID CYL,AIR,S1626,1.125 BORE,1.5ST PLGR,2.86OD,EPT,BLK,3/8-16,CS SOLV,3WAY,24VDC,1/8NPT,CV=.15,CV=.15,NPT CND CONN SOLV,3WAY,120VAC,1/8NPT,CV=0.17,1/2NPT CND CONN Spare Parts List SV4/SV4.5/SV5: Model SV4,SV4.5,SV5 SV4,SV4.5,SV5 SV4,SV4.5,SV5 SV4,SV4.5,SV5 SOLENOID VALVE SOLENOID VALVE Part Number W00003231 W00018017 W00017918 W00018112 A0556722 A0556723 Description ORNG,BUNA70,4.484ID X 0.139CS GSKT,VELOMOID,25-30HP NON-R CYL,AIR,S1313,25-30HP,UPR VLV PLGR,ASSY,5”,DISC SUPT DISC,SUPT,PLGR,NON-REV,VLV SOLV,3WAY,24VDC,1/8NPT,CV=.15,CV=.15,NPT CND CONN SOLV,3WAY,120VAC,1/8NPT,CV=0.17,1/2NPT CND CONN Conveying System Mechanical Components Chapter 2: Functional Description 81 of 170 Cartridge-Style Vortex Filter Chamber Models: VFC225, VFC1000, SFC225, SFC1000, CFC225, CFC100 • For use with standard pumps. • Two stage cyclone/cartridge filter design. • Twenty-nine inch (29”/74 cm) -high floor stand for drum discharge. • Reverse pulse filter element. • Flapper dump valve and filter shroud. • Available in mild (51) or stainless steel (52) construction. • Compressed air filter cleaning 24VDC or 120VAC. Options • 45” (114 cm) floor stand with 38” (97 cm) clearance for 55-gallon (208liter) drum. • Removable dust can on 29” (74 cm) floor stand. • Compressed air blowback with 115VAC/24VDC solenoid; controller available separately. Conveying System Mechanical Components Chapter 2: Functional Description 82 of 170 Figure 43: Filter Chamber Spare Parts List VFC, SFC, CFC Models Models VFC225, SFC225, CFC225 Model 225 225 225 225 225 225 225 225 225 225 225 225 225 225 225 225 225 225 225 Part Number W00012559 W00016136 W00018024 A0540240 A0540241 A0540242 A0565399 A0003336 732.00012.02 A0566360 A0566361 A0542155 A0541611 A0542165 A0539361 A0542143 A0542153 A0541611 A0542165 A0539361 A0542143 A0542154 A0542211 A0542165 A0539361 A0542143 A0547008 A0539933 W00533542 W00001868 A0539993 Description GASKET,THRT,NPRN GASKET,THRT,FDA GASKET,THRT,HI-TEMP GASKET,U-CHNL,NPRN GASKET,U-CHNL,FDA GASKET,U-CHNL,HI-TEMP VLV,SOL,DIN CONN,1/2”CONDUIT CORD,16/3C,TYPE SO VLV,SOL,1/2”,5/8,GP,300,115V VLV,SOL,1/2”,5/8,GP,300,230/60 VLV,SOL,1/2”,5/8,GP,300,24VDC ASSY,CNTL,BLOWBACK,24VDC FUSE,MDL-3/4 (QTY 1) CNTL,PCB,BLOWBACK CNTL CNTL,SERIES 1,VER-II,AC/DC EPRM,BLWBK,SERIES 1,BLOWBACK CONTROL ASSY,CNTL,BLOWBACK,115VAC FUSE,MDL-3/4 (QTY 1) CNTL,PCB,BLOWBACK CNTL CNTL,SERIES 1,VER-II,AC/DC EPRM,BLWBK,SERIES 1,BLOWBACK CONTROL ASSY,CNTL,BLOWBACK,230VAC FUSE,250V,GL,TD,6.00A,1/4 X 1-1/4 (QTY 2) CNTL,PCB,BLOWBACK CNTL CNTL,SERIES 1,VER-II,AC/DC EPRM,BLWBK,SERIES 1,BLOWBACK CONTROL FILTER,CART,WIRE,MESH,10X6X15 GASKET,FLTR,10”OD,ELE,MVH/VFC SHROUD,DRAWSTRING,16” ID X 13” LNG SHROUD,FLTR,50#,HPR DISC,FLAPPER,HPR,6”,TEFLON COAT Conveying System Mechanical Components Chapter 2: Functional Description 83 of 170 Models VFC1000, SFC1000, CFC1000 (Cont’d) Model 1000 1000 1000 1000 1000 1000 1000 1000 1000 1000 1000 1000 Part Number A0561801 161.01722.00 A0540240 W00001868 W00533542 A0539992 A0547961 A0547960 A0547995 A0542155 A0541611 A0542165 A0539361 A0542143 A0542153 A0541611 A0542165 A0539361 A0542143 A0542154 A0542211 A0542165 A0539361 A0542143 Description GASKET,FLTR,13.88”OD,ELE,VFC/SFC/CFC1000 FLTR,CART,TFLN,13.84 X 9.5 X 23.88 GASKET,U-CHNL,NPRN SHROUD,FLTR,50#,HPR SHROUD,DRAWSTRING,16”ID X 13”LNG DISC,FLAPPER,HPR,6”,ALUM VALVE,SOL,1”,24VDC VALVE,SOL,1”,115VAC VALVE,SOL,1”,230VAC ASSY,CNTL,BLOWBACK,24VDC FUSE,MDL-3/4 (QTY 1) CNTL,PCB,BLOWBACK CNTL CNTL,SERIES 1,VER-II,AC/DC EPRM,BLWBK,SERIES 1,BLOWBACK CONTROL ASSY,CNTL,BLOWBACK,115VAC FUSE,MDL-3/4 (QTY 1) CNTL,PCB,BLOWBACK CNTL CNTL,SERIES 1,VER-II,AC/DC EPRM,BLWBK,SERIES 1,BLOWBACK CONTROL ASSY,CNTL,BLOWBACK,230VAC FUSE,250V,GL,TD,6.00A,1/4 X 1-1/4 (QTY 2) CNTL,PCB,BLOWBACK CNTL CNTL,SERIES 1,VER-II,AC/DC EPRM,BLWBK,SERIES1,BLOWBACK CONTROL Conveying System Mechanical Components Chapter 2: Functional Description 84 of 170 Figure 44: VFC, SFC, CFC Series Vortex Filter Chamber Specifications and Dimensions VFC, SFC, CFC -225 VFC, SFC, CFC -1000 Floor stand 29” (74 cm) stand Optional 45” (114 cm) stand with drum Floor stand 29” (74 cm) stand Optional 45” (114 cm) stand with drum A B C D E inches 20.50” cm 52 inches 67.50” cm 171 inches 45.38” cm 115 inches 16.50” cm 42 inches 29” 28.50” 72 83.50” 212 61.38” 156 24.50” 62 45” Inches 26.50” cm 67 inches 82.38” cm 209 inches 50.38” cm 128 inches 22.50” cm 57 inches 29” 34.50” 88 98.38” 250 66.38” 169 30.50” 77 45” A B C D Chapter 2: Functional Description 114 E Dimensions are approximate and subject to change without notice. Conveying System Mechanical Components cm 74 85 of 170 cm 74 114 FC Series Bag-Style Filters Models: FC15, FC30, FC55 • For use with power units equipped with blowback feature. • Polyester felt bags are standard. • Forty-five inch (45”/114 cm) floor stand with 38” (97 cm) clearance for 55-gallon (208-liter) drum. • Available in floor-mount, floor stand with manual dump, or floor stand with flapper dump configurations. • Spare filter bag rack with bags available. Options • Filter media available. • Enclosed floor stand. Conveying System Mechanical Components Chapter 2: Functional Description 86 of 170 Figure 45: FC Drawing and Dimensions Model A, in. (mm) B, in. (mm) C, in. (mm) FC-15 56 5/16 (1430) 15 1/2 (394) 42 (1067) 45 (1143) 20 (508) 28 (711) FC-30 80 5/16 (2040) 15 1/2 (394) 66 (1676) 45 (1143 20 (508) 28 (711) FC-55 83 (2108) 20 (508) 76 (1930) 50 (1270) 26 (660) 35 (889) Conveying System Mechanical Components D, in. (mm) Chapter 2: Functional Description E, in. (mm) 87 of 170 Figure 46: Spare Parts List FC Filter Chambers: Models FC15 Model FC15 FC15 FC15 FC15 FC15 FC15 FC15 FC15 FC15 FC15 Part Number W00013550 W00015675 A0542139 W00532536 W00015044 15239 W00012559 W00013983 W00533541 W00001465 Description TNK,FC15,CS,1.5-3.0 FLTR,BAG,POLY,4.25ID, X 25.5LG (QTY 7) FLTR,BAG,ACYL,4.25ID X 25.5LG (QTY 7) FLTR,BAG,GRTX,4.25ID X 25.5LG (QTY 7) FLAP,DISC,4”THRT,AL GASKET,RUBBER,FILTER CHAMBER GSKT,THRT,4”,EPT,BLK,SRC02-16 GSKT,HI-TEMP,3/16”X1”X40”W/1 CLP,VEE-RTNR,VOSS CLP,HOSE,DIX#064,2.5-4.5” (QTY 7) Part Number W00012290 W00532545 W00013552 A0542140 W00015140 W00015044 W00012559 W00013983 W00533541 Description RACK,BAG,FC-30 TNK,FC30,CS,3.0SCH5 TNK,FC30,CS,1.5-3.0 FLTR,BAG,ACYL,4.25”ID X 50.875 (QTY 7) FLTR,BAG,POLY,4.25ID X 48.5LG (QTY 7) FLAP,DISC,4”THRT,AL GSKT,THRT,4”,EPT,BLK,SRC02-16 GSKT,HI-TEMP,3/16”X1”X40”W/1 CLP,VEE-RTNR,VOSS Part Number W00015883 W00015140 A0542140 W00533301 W00015939 W00013983 W00015160 W00018920 W00016928 W00001465 A0534113 Description FLAP,DISC,6”THRT,AL FLTR,BAG,POLY,4.25”ID X 50.875 (QTY 13) FLTR,BAG,ACYL,4.25”ID X 50.875 (QTY 13) FLTR,BAG,GRTX,4.25ID X 48.5LG (QTY 13) RACK,FC55,BAG GSKT,HI-TEMP,3/16”X1”X40”W/1 TNK,FC55,CS,STYLE C,4.0SCH10 TNK,FC55,CS,STYLE C,5.0SCH10 GSKT,THRT,6”,EPT,BLK,SRC30-60 CLP,HOSE,DIX#064,2.5-4.5” (QTY 13) CLP,VEE RETR Models FC30 Model FC30 FC30 FC30 FC30 FC30 FC30 FC30 FC30 FC30 Models FC35 Model FC55 FC55 FC55 FC55 FC55 FC55 FC55 FC55 FC55 FC55 FC55 Conveying System Mechanical Components Chapter 2: Functional Description 88 of 170 ACA Series Filter Chambers Models: ACA51 Low Boy, ACA53 Low Boy, ACA09, ACA93, ACA131, ACA133, ACA251, ACA253 • Self-cleaning design. • Available construction in mild steel (-1 models) or mild steel with epoxycoated interior (-3 models). • Filter chamber section shipped completely assembled separate from the hopper section; mounting on hopper section required. Figure 47: Spare Parts List ACA Series Spare Parts List ACA09: Model ACA09 ACA09 Part Number W00017799 W00017892 Description RACK,ACA10,CS,18”BAG FLTR,BAG,POLY,4.25ID X 18.5LG, (QTY 6) ACA09 ACA09 W00012986 732.00392.00 FLTR,BAG,SATN,4.25ID X 18.0LG (QTY 6) ASSY,VLV,SOL ACA09 W00533541 CLP,VEE-RTNR,VOSS (QTY 3) ACA09 ACA09 W00001465 A0534532 CLP,HOSE,DIX#064,2.5-4.5” (QTY 6) CNTL,ACA10-25,PCB ACA09 700.00365.00 CABLE,5 METER Spare Parts List ACA131: Model ACA131 ACA131 ACA131 ACA131 ACA131 ACA131 ACA131 ACA131 ACA131 Part Number W00017770 W00532536 W00015675 A0542139 732.00392.00 W00533541 W00001465 700.00365.00 A0534532 Description RACK,ACA15,CS,25”BAG FLTR,BAG,GRTX,4.25ID X 25.5LG (QTY 6) FLTR,BAG,POLY,4.25ID X 25.2LG (QTY 6) FLTR,BAG,ACYL,4.25ID X 25.5LG (QTY 6) ASSY,VLV,SOL CLP,VEE-RTNR,VOSS (QTY 3) CLP,HOSE,DIX#064,2.5-4.5” (QTY 6) CABLE,5 METER CNTL,ACA10-25,PCB Conveying System Mechanical Components Chapter 2: Functional Description 89 of 170 Spare Parts List ACA251: Model ACA251 ACA251 ACA251 ACA251 ACA251 ACA251 ACA251 ACA251 ACA251 Part Number 732.00392.00 W00017715 W00015140 A0542140 W00533301 W00533541 W00001465 700.00365.00 A0534532 Description ASSY,VLV,SOL RACK,ACA25,CS,48”BAG FLTR,BAG,POLY,4.25”ID X 50.875 (QTY 6) FLTR,BAG,ACYL,4.25”ID X 50.875 (QTY 6) FLTR,BAG,GRTX,4.25ID X 48.5LG (QTY 6) CLP,VEE-RTNE,VOSS (QTY 3) CLP,HOSE,DIX#064,2.5-4.5” (QTY 6) CABLE,5 METER CNTL,ACA10-25,PCB Spare Parts List ACA051-053: Model ACA051-053 ACA051-053 ACA051-053 ACA051-053 ACA051-053 ACA051-053 ACA051-053 ACA051-053 ACA051-053 Part Number W00052714 A0566366 A0542141 W00013983 A0542153 A0541611 A0542165 A0539361 A0542143 W00533541 W00001465 Description FLTR,RAK,WELD,LB50,AL FLTR,BAG,POLY,4.75ID X 8.0LG (QTY 6) FLTR,BAG,ACYL,4.75ID X 8.0LG (QTY 6) GSKT,HI-TEMP,3/16”X40”W/1 CNTL,BLOWBACK,115V FUSE,MDL-3/4 (QTY 1) CNTL,PCB,BLOWBACK CNTL (Contains below 2 items) CNTL,SERIES 1,VER-II,AC/DC EPRM,BLWBK,SERIES1,BLOWBACK CONTROL CLP,VEE-RTNR,VOSS (QTY 2) CLP,HOSE,DIX#064,2.5-4.5” (QTY 6) Conveying System Mechanical Components Chapter 2: Functional Description 90 of 170 Figure 48: Typical ACA Series Filter Chamber The 2.5” OD upper air inlet can be sized to vacuum system requirements using available transitions. Filter Tank, Overall Dimensions ACA91, 93 A in. 19.5” ACA131, 133 B cm 49.5 in. 39.0” A cm 99.1 in. 26.5” Conveying System Mechanical Components ACA251, 253 B cm 67.3 in. 46.0” A cm 116.8 in. 49.5” Chapter 2: Functional Description B cm 125.7 in. 69.0” 91 of 170 cm 175.3 AFC-S, SFC-S, CFC-S Series Filters Figure 49: Filter Compressed Air Blowback WALL MOUNT FLOOR MOUNT APC, SPC, CPC PUMP MOUNT Model: AFC-S, SFC-S, CFC-S Filter • Voltage: 24V DC (also available in 115V AC) • Compressed air supply, 60-80 PSI (4.1-5.5 Bar) • APC, SPC, CPC pump mount, Wall mount or Floor mount • See-through Plexiglas collection bin with quick disconnects Figure 50: Filter Compressed Air Blowback Specifications and Dimensions: Filter surface, sq. ft. (m²) 50 (4.64) Filter cleaning method Compressed air or implosion blowback Approx. weight, lbs. (kg) 70 (26) Line sizes available 1.5, 2.0, 2.5, 3.0, 3.5 (2 Sch. 5), 4.0 1. Implosion style filter cleaning option may be available but requires a special control system. Consult factory. 2. The AFC-SC, SFC-SC, CFC-SC cyclonic pre-filter is also available. Consult factory for more information. Conveying System Mechanical Components Chapter 2: Functional Description 92 of 170 Figure 51: AFC-S, SFC-S, CFC-S Filter Replacement filter element part number: A057125 Conveying System Mechanical Components Chapter 2: Functional Description 93 of 170 Figure 52: AFC-S, SFC-S, CFC-S Filter Spare Parts List Implosion blowback and compressed air blowback assemblies shown together. Actual configuration depends on blowback method. List No. 1 2 3 4 5 6 7 8 9 10 11 12 13 14 15 16 17 18 19 20 21 22 23 24 Qty. 1 1 1 1 1 1 2 4 4 2 8 4 4 4 2 1 1 1 1 1 1 1 1 1 Part Number 882.00697.00 832.00178.00 852.00001.00 872.01280.00 832.00176.00 164.01063.00 A0556519 A0069203 A0069236 A0570013 003.00303.00 A0069230 A0069203 W00001491 A0556546 SEE CHART 2 A0535382 SEE CHART 3 A0555194 A0563817 A0541039 A0571348 A0570035 A0571262 25 26 1 1 003.02145.00 001.00008.00 16 18 2 1 Description CYL, EXT, XFC-S, FLTR, 1225X34.01X14GA EX, CYL,XFCS, 11.40ODX10.01DX1.00”, MACH BUCKET,POLYCARBONATE,XFC-S SPRT,RING,SUB-ASSY CSTG,FLTR,CMBR GSKT,RBR IN/OUT,SRC08-16, SSR/CSR23-45 WASH,SPLIT,LOCK,3/8 SCR,HHC,PS,1/2-13X 1.00 STND,FLTR,BASE,WELDMT WASH,WRT,STL,3/8, ZN,USS SCR,HHC,PLD,3/8-16 X 2-1/2, FT WSHR,LOCK, PS,3/8, SPLT NUT,HEX, PS,3/8-16 ORNG,SILC,3.234ID X O.139CS IN/OUT,SRC08-16, SSR/CSR23-45, AL NIP,BR,0.5NPTX 2.00” LG VLV,SOL.,1/2”, 5/8, GP,300 PATCHCD, DC,RCPT,M,12IN LEAD CBL,DC MICRO,4CND, 2M, RTANG M12 CORD, GRIP, 1/2” BLACK CBL,18-3C,300V,SJEOW, BLK BRKT, FLTR, MTG, SPC, PMP, WELDMNT FLTR, ELEM,50 SQ.FT. PAPER, XFCS REPLACEMENT WSHR,NPRN,BLK SCR,THMB,3/8-16X2”,XFC,FLTR CHART #2 IN/OUT, SRX08-16, SSR/CSR23-45 A0559449 IN/OUT,SRX08-16, SSR/CSR23-45, AL,1.50 A0556518 IN/OUT,SRX08-16, SSR/CSR23-45, AL,2.00 A0556519 IN/OUT,SRX08-16, SSR/CSR23-45, AL,2.50 A0556520 IN/OUT,SRX08-16, SSR/CSR23-45, AL,3.00 CHART #3 IN/OUT, SOLENOID VALVE 732.00012.02 VLV,SOL, ½’, 5/8, GP, 300 120V A0566361 VLV,SOL, 1/2", 5/8, GP, 300, 24VDC Conveying System Mechanical Components Chapter 2: Functional Description 94 of 170 Figure 53: ACA Series Model 51 and 53 Low Boy Filter Assembly 17.62" approx. Ø 2.00" OD 22.58" 10.95" 7.84" 15.50" ID The air inlet can be sized to vacuum system requirements using available transitions. Take-Off Compartments and Pickup Tubes Take-Off Compartment Models: • Grinder Takeoff Attachment style, • Filtered Expandable Vacuum Takeoff (FEVTO) style, • Expandable Vacuum Takeoff (EVTO) style, • Cleanout style • Box style • Fast Cleanout Vacuum style • MTO • MDT • FCO Conveying System Mechanical Components Chapter 2: Functional Description 95 of 170 Figure 54: Typical Grinder Take-Off Attachment 5" 13 cm 6 7/8" 17 cm 1/4" 6 mm 2" 5 cm 1/4" dia. holes (6 mm) (4 places) 45° 2" 51 mm 7" 6" 15 cm18 cm 2" 5 cm 2" OD 51 mm B-3934 1/4" 6 mm 2 1/2" 6 cm 4 3/8" 11 cm 9" 23 cm 1/2" 13 mm 1/2" 13 mm 4" 10 cm Figure 55: Typical Take-Off Compartment Conveying System Mechanical Components Chapter 2: Functional Description 96 of 170 Figure 56: Typical Fast Take-Off Compartments (not to scale) FCO-1.5M 10" sq. 25 cm sq. 3 3/4" 9 cm 5 1/4" 13 cm 6 1/2" 16 cm A0546365 FCO-1.5MD 10" sq. 25 cm sq. TOP VIEW 2 7/8" 7 cm 5 7/8" 15 cm A0546368 3 3/4" 9 cm SIDE VIEW FRONT VIEW Conveying System Mechanical Components 3.5" Sch. 10 pipe (89 mm) Chapter 2: Functional Description 97 of 170 Pickup Tube Models: Single and dual tube pickup tubes available. Figure 57: Typical Pickup Probe A0 53 69 03 45º Vent holes 2-4 Safety Devices and Interlocks This section includes information on safety devices and procedures that are inherent to the mechanical components of the conveying system. This manual is not intended to supersede or alter safety standards established by the user of this equipment. Instead, the material contained in this section is recommended to supplement these procedures in order to provide a safer working environment. At the completion of this section, the operator and maintenance personnel will be able to do the following: • Identify and locate specific safety devices. • Understand the proper use of the safety devices provided. • Describe the function of the safety device. Safety Circuit Standards Safety circuits used in industrial systems protect the operator and maintenance personnel from dangerous energy. They also provide a means of locking out or isolating the energy for servicing equipment. Various agencies have contributed to the establishment of safety standards that apply to the design and manufacture of automated equipment. The Occupational Safety and Health Administration (OSHA) and the Joint Industrial council (JIC) are just a few of the organizations that have joined with the plastics industry to develop safety standards. Every effort has been made to incorporate these standards into the design of the mechanical components of the conveying system; however, it is the responsibility of the personnel operating and maintaining the equipment to familiarize themselves with the safety procedures and the proper use of any safety devices. Fail Safe Operation If a safety device or circuit should fail, the design must be such that the failure causes a “Safe” condition. As an example, a safety switch must be a normally open switch. The switch must be held closed with the device it is to protect. If the switch fails, it will go to the open condition, tripping out the safety circuit. Conveying System Mechanical Components Chapter 2: Functional Description 98 of 170 At no time should the safety device fail and allow the operation to continue. For example, if a safety switch is guarding a motor, and the safety switch fails, the motor should not be able to run. Safety Device Lock-Outs Some safety devices disconnect electrical energy from a circuit. The safety devices that are used on the mechanical components of the conveying system are primarily concerned with electrical power disconnection and the disabling of moving parts that may need to be accessed during the normal operation of the machines. Some of the safety devices utilize a manual activator. This is the method of initiating the safety lock out. This may be in the form of a plug, lever or a handle. Within this lockable handle, there may be a location for a padlock. Personnel servicing the equipment should place a padlock in the lockout handle. In addition to the safety devices listed above, these mechanical components are equipped with a line cord plug. This allows the operator or maintenance personnel to unplug the system from its power source and tag it out. The plug can then be tagged with any number of approved electrical lockout tags available at most electrical supply stores. Always disconnect and lockout all electrical power and pneumatic (i.e. compressed air) sources prior to servicing or cleaning the conveying system. Failure to do so may result in serious injury. No one but the person who installed the lockout may remove it. Conveying System Mechanical Components Chapter 2: Functional Description 99 of 170 Chapter 3: Installation 3-1 Uncrating the Equipment The mechanical components of the conveying system are shipped mounted on a skid, enclosed in a plastic wrapper, and contained in a cardboard box. 3. Pry the crating away from the skid. Remove the nails holding the box to the skid and lift the box off carefully; avoiding staples in the 1’ x 4’ wood supports. Cut the steel banding. 4. Use a pry bar to remove the blocks securing the unit to the skid. 5. Lift unit from sides, inserting forklift under the base. The forks must be equidistant from the centerline of the unit and the unit must be balanced on the forks. Lift slowly and only high enough to clear the skid. Use a pry bar if necessary to carefully remove the skid from the unit. 6. Lower slowly. 7. Temporary hardware has been installed to prevent side panels from shifting in transit. Remove hardware. 8. Retain the crating material for reshipping the components in case hidden shipping damage is found. 3-2 Rigging and Placing Mechanical Components Conveying system installations vary depending on the application: in-plant distribution or rail car unloading, single or multiple material line systems, pellets, or powders. The sections on the following pages are general installation guidelines. Installing the Pump Package Place the vacuum pump where you can have easy access to the mechanical components. Choose a clean, dry place where debris won’t be drawn into the vent valve on top of the blower. If you install the unit outside, you must provide a weather shed to shelter the unit. 1. Level the vacuum pump package. Use shims as needed. 2. Secure the vacuum pump package with appropriately-sized bolts to the floor or mounting platform. 3. Do not twist or warp the pump package base. This can misalign the blower housing and damage the blower. Vacuum Pump Vent Piping Considerations Most vacuum pumps are installed with no exhaust venting of the vacuum pump discharge. If your installation requires vacuum pump exhaust venting, follow these guidelines: • Venting exhaust air from vacuum pumps requires the installation of metal pipe or ducting. Make sure that no more than two inches water column (2” WC or about 0.5 kPa) backpressure is present at the discharge of the vacuum pump silencer. Improper sizing or ducting of exhaust air voids your warranty! Conveying System Mechanical Components Chapter 3: Installation 100 of 170 • Use piping or ducting at least two (2) diameter sizes larger than the vacuum connection. Overall vent pipe length—horizontal plus vertical—should not exceed 100 feet (about 30 m) and should not include more than three (3) elbows. If you use pipe for venting, make sure that you use Sch. 5 or Sch. 10 pipe with long radius elbows to provide minimum airflow resistance. If you use ducting, make sure you use high-pressure ducting with mitered bends—with a minimum of three (3) breaks—for minimum airflow resistance. Make sure all piping connections are properly supported. • If you are venting pump discharge outdoors, make sure you properly terminate vent piping to prevent pump damage. You can either: a. Install a rain cap, or b. Install the piping so the exhaust faces down and terminates with a screened opening. If the pump becomes contaminated from rain or airborne particulates, or is damaged by birds, insects, or small animals, your warranty becomes void! Any variance from these guidelines can cause excessive pump backpressure. Such a condition can drastically affect equipment performance, possibly leading to equipment damage. Conveying System Mechanical Components Chapter 3: Installation 101 of 170 Figure 58: Filter Chamber Installation, Optional Blowback Controller Shown Blowback solenoid To vacuum line Make sure you have all tubing supported at ten (10) foot (3 meter) intervals. Conveying System Mechanical Components Chapter 3: Installation 102 of 170 Installing the Control Panel Select a flat, vertical area for mounting the panel. It should be in an area that gives your operator access to the control. Consider how you are running wiring to the vacuum hoppers, the filter chamber, and pump motor starter(s), vacuum switch(es), and vent valve(s). The panel requires a low voltage grounded power drop as listed on the serial tag. Avoid mounting control panel near material lines. Installing Material/Vacuum Tubing Well-designed material/vacuum piping systems provide the best conveying rates. Vacuum/material piping may be a single material line Y system or a multiple material line or a combination of the two systems, depending on the processing floor layout. All systems utilize a common vacuum header line for all stations connected to a pump package; material flow is controlled by sequence T or atmospheric valves operated by the control panel. When installing material/vacuum tubing, take the following into consideration: • Vacuum leaks anywhere in the system reduce system capacity. • Keep the number of material tube bends, elbows, Y-tubes, and vacuum T-tubes to a minimum for maximum system capacity. • Use long radius tube bends on material lines. • Keep the total length of material conveying flex hose to a minimum. Long flex hose material runs reduce system capacity. • Vertical material tubing runs should be straight up. Inclined runs can reduce capacity. • Support tubing about every ten feet with straps, pipe hangers, or brackets. • Tube joints must be rigid to prevent vacuum or material leaks. • Cut tube ends square and chamfer edges smooth. Use a fixed band saw or power miter saw when making cuts. You can use a tubing cutter on aluminum tubing, but you need to use a saw with a carbide or diamond-impregnated saw blade when cutting stainless steel. Chamfer outer and inner edge cuts with a die grinder or a hardened rasp file. • Clean all tubing after cutting and before assembly. Dampen a rag in a non-volatile cleaning solvent, and run it through all tubing and couplers to remove sediment from shipping or cutting. Run a quantity of low-grade material through new lines to remove any remaining sediment, then discard the material immediately. • Tube ends must butt together inside couplers. • Tighten tube coupler nuts from the center outward to ensure a tight seal and allow proper contact of the internal grounding strip. • Each material tubing run must maintain an electrical continuity through the tubing and couplers, from pickup point to vacuum hopper. Grounded flexible hose is recommended. • If you must cut bends, cut the straight section, leaving enough straight length for complete insertion into a coupler. Conveying System Mechanical Components Chapter 3: Installation 103 of 170 • You can attach a quick-change or standard tube coupler to vinyl flex hose by inserting a stub of hard tube into the hose and securing it with a hose clamp. Be sure enough tube extends from the hose to properly install the quick-change or coupler. Make sure that you put clear silicone caulk around adjoining tube seams for exterior bolted couplers. • If you use stainless flexible material hose, the material flow must be in the direction as indicated by the arrows on the hose. Material direction is not critical with vinyl flex hose. • Bring all truck fill lines to a central location, such as a silo, unless otherwise specified. • All rail car manifold Y-tubes must be installed with a ten-degree (10º) downward slant from horizontal on the leg section. Make sure that space between rail car manifold Y-tubes are fifteen feet (15’/4.5 meters) on center to allow proper alignment between rail car discharge ports and the manifold Y-tubes. • A plug must be put in the last sequence T valve on the vacuum header to prevent vacuum loss. If atmospheric valves are used, you must terminate the vacuum line at the last atmospheric valve. Multiple Line System Piping Considerations • Multiple line systems have separate material lines for each material to allow different types of materials to be conveyed. • Multiple line systems have separate pickup devices for each vacuum hopper. • Materials are often loaded from beside the processing machine from gaylords, grinder takeoffs, and storage bin takeoffs. Figure 59: Typical Multiple Line System Installation Conveying System Mechanical Components Chapter 3: Installation 104 of 170 Single Line Y-Tube System Considerations • Single line Y piping systems use a common material line for all vacuum receivers connected to a pump and are typically used to convey material from a central supply to several stations. • If you are installing a single line Y system, use Y tubes on the material lines. A Y tube is installed with the branch arm leading to the next station on top and the straight portion that supplies material to the station underneath. • Connect a short-radius bend to the straight portion as close to the Y as possible. • You must connect a minimum 2-foot (61 cm) straight length of tube to this short radius bend on the horizontal before the material tubing drops to the receiving point. If possible, incline this tube approximately 1/8” per foot (1 cm per meter). • On single line Y systems, you must install check valves on material inlet tubes inside vacuum receivers. Do not use SRH01, SSR03, CSR03 or SRC02, SSR06, CSR06 vacuum receivers on single line Y systems. • You can install a long- or short-radius bend on the last station, where a Y-tube is not needed. Figure 60: Recommended Single-Line Y-Tube Installation Conveying System Mechanical Components Chapter 3: Installation 105 of 170 Figure 61: Modified Single-Line Y-Tube Installation Figure 62: Manifold Y-Tube Installation Conveying System Mechanical Components Chapter 3: Installation 106 of 170 Figure 63: Typical Single Line Y-Tube System Installation Material Check Valves in Single Line Y-Tube Systems • Check valves are a critical feature on single line Y systems. You must have a check valve installed on the material inlet inside the receiver on all vacuum hoppers in single line Y installations. • Check valves must open when the receiver is being loaded and seal to prevent a vacuum leak when other hoppers are being loaded. • Vacuum receivers for these systems have a special factory-installed extended material inlet tube to hold the check valve. • The check valve must not be pressed too far onto the inlet stub to prevent proper sealing. • The hinge of the check valve should be up to prevent material from being deflected up into the vacuum hopper filter. • Do not allow vacuum receivers with check valves to be over-filled to a point above the bottom of the check valve. Over-filling prevents the check valve from sealing and creates a vacuum loss. Adjust the conveying time on Time-Fill systems to prevent this from happening. • Inspect periodically for erosion or wear. Replace as required. Conveying System Mechanical Components Chapter 3: Installation 107 of 170 Figure 64: Typical Material Check Valve Installing VFC, SFC, CFC or FC Filter Chambers The filter chamber protects the vacuum pump from damage caused by material carry-over. Primary system filtration occurs in the filter chamber, not in the vacuum receivers. This reduces maintenance of vacuum receiver filters atop processing machines. A vortex created in the filter chamber separates carry-over from the air stream and a cartridgetype filter catches any dust and fines drawn into the upper chamber. At the end of the conveying cycle to all on-line vacuum receivers, the dump delay cycle occurs. Atmospheric air from the vacuum line is introduced to the filter chamber, equalizing the pressure inside the filter chamber. The material discharge flapper valve falls open and dumps the fines and dust collected during the conveying cycle. A compressed air filter cleaning blow back option is available for systems conveying very dusty materials. Consult the Sales Department for more information. To install the unit, perform the steps listed below: 1. Level and secure the filter chamber near the pump package. Use 3/8” (9 mm) bolts to anchor the filter chamber. 2. Connect the piping between the vacuum inlet valve on the pump package and the tube stub on the filter chamber lid. For easy filter maintenance, install at least three feet (3’ / 1 m) of vinyl flex hose at the end of the run to the filter chamber. The rest may be hard piping as long as it is properly supported. 3. Run vacuum tubing from the tangential inlet tube to the vacuum header line servicing the vacuum hoppers. Turn the inlet tube toward the header. Support the tubing properly and make it vacuum-tight. Conveying System Mechanical Components Chapter 3: Installation 108 of 170 Use of a system without an approved filter system installed on the vacuum air inlet voids the blower warranty! Installing the Filter Chamber Shroud The cloth filter shroud is mounted to a ring on the underside of the filter chamber stand. It reduces housekeeping duties around the filter chamber by preventing dust from becoming airborne when the dust and fines are discharged from the VFC filter chamber. The dust container below the shroud is customer-supplied—the standard 24” (61 cm) clearance stand is designed for use with a 5-gallon (19-liter) pail, and the optional 38” (96 cm) clearance stand is designed for use with a 55-gallon (208-liter) drum. 1. Insert the filter shroud support wire into the slotted hole in the middle of the cloth filter shroud. Use supplied hardware to secure. 2. Slip the filter shroud over the retaining ring located on the bottom side of the filter stand mounting plate. Secure it with the worm clamp provided. 3. Place the dust container you’ve supplied below the filter chamber stand and insert the filter shroud. 4. On standard 5-gallon (19-liter) pails, the filter shroud should be trimmed and fastened to the top lip of the can with a band clamp. Don’t trim the filter shroud on 55-gallon (208liter) drums. Secure the drawstring on the shroud around the drum, making sure the open end of the shroud hangs freely inside the drum. 5. Make sure the operation of the counterweighted flapper dump valve is not obstructed in any way by the filter shroud. See Figure 26 on page 55 for a typical example of a filter chamber shroud. Do not obstruct the filter shroud in any way. Empty the dust container before the dust level obstructs the end of the filter shroud. Failure to observe these directives may result in reduced filtering efficiency and contaminants entering the conveying system. Installing ACA Series Filter Chambers Powders or granular materials with fines can cling to filters and contaminate operating components. The ACA Series filter chamber is a self-cleaning filtration unit that enables such materials to be conveyed. During material conveying, fines accumulate on the outside of the filter media as the air passes through a filter bag. These fines must be periodically removed to prevent performance losses in the conveying system. The ACA Series filter utilizes a plant-based compressed air supply to clean filter bags with intermittent air pulses. At preset time intervals, a solenoid valve activates, interrupting continuous compressed air flow to the unit. This interruption causes an exhaust valve to open, allowing stored compressed air from an accumulator to be released down inside the filter bag. This momentary burst of air stops the flow of dust-laden air through the filter bag and flexes the filter fabric. This, along with the reverse flow of air, causes the accumulated dust to fall off the bag and back into the hopper for discharge. This instantaneous cleaning action of air pulses are directed to each individual filter bag in sequence and at a specified duration. You can adjust the time between air pulses; different conveying rates and materials require different air pulse times. Air pulses must occur more Conveying System Mechanical Components Chapter 3: Installation 109 of 170 frequently with increased dusting conditions. Since filter cleaning action is directed to an individual filter bag, remaining filter bags are on-stream, continually filtering conveying air. ACA Series filter chambers are shipped completely assembled to reduce customer installation time. Several mounting arrangements are available, depending on the mounting adapter supplied with the unit. ACA filter chambers are used with several different sizes of vacuum hoppers, depending on the mounting adapter supplied with the unit. Typical hopper sizes range from 0.8 cu. ft. to 6.0 cu. ft. (22.7 liters to 169.9 liters); smaller hopper installations are also possible. You must install a bottom flange adapter when mounting the filter chamber to the vacuum hopper. The adapter increases overall height of the filter chamber unit; this may affect where you install the unit. Installing Vacuum Receivers and Inventory/Vacuum Receivers Vacuum uses one of three mounting systems: flange, suspension, or silo mounting. Vacuum receivers and inventory vacuum receivers use flange mountings only. • Remove all rubber banding and any other packaging materials from around the flapper dump valve before installation for proper operation. Complete the vacuum and material tubing to the vacuum receivers. Final connections are usually made with flexible hose. On single line Y systems, you must install a check valve on the material inlet of each hopper. Installing the Safety Filter Use the following procedure to install the safety filter: 1. Place the safety filter in the conveying system directly before the vacuum pump. 2. Using 7/16”, Grade 5 or better hardware, secure the filter in place: Wall Mount. Use the mounting flange to secure the filter to the wall. Floor Mount. Bolt the floor stand to the ground. Pump Mount. Bolt the pump and stand to the ground. Pump-mount is only available with XPC pumps. Make sure all screws are strong enough to hold the weight of the filter. • Connect the vacuum line to the filter chamber’s inlet tube (A). Use a hose clamp to secure the flexible hose. • Connect the vacuum pump line to the outlet tube (B). Use a hose clamp to secure the flexible hose. Conveying System Mechanical Components Chapter 3: Installation 110 of 170 Figure 65: AFC-S, CFC-S, SFC-S Filter Installation Conveying System Mechanical Components Chapter 3: Installation 111 of 170 Retrofit Kit for XFC Filter Chambers Kit P/N 228.00250.00 Instructions for installation of new filter chamber sealing gasket Disconnect filter chamber from production system, orient as shown and remove bucket. Remove existing gasket from ring’s groove. Clean groove to remove dust and dirt. Groove needs to be clean for next step. Apply a thin two inch long bead of silicone sealant in the groove every 45°. A 734 RTV or equivalent sealant is recommended due to ease of use. (Adhesive is not included with this kit) Place the new red gasket into the groove. Allow gasket to seat. Use fingers and thumbs to ensure proper and uniform seating of gasket in groove. Replace bucket on to filter chamber. Filter Chamber is ready to be reinstalled and put back into service. Conveying System Mechanical Components Chapter 3: Installation 112 of 170 3-3 Compressed Air Blowback Connection To provide proper filter element cleaning, the compressed air supply must be regulated to 80 PSI (5.5 bars). Low air pressure will cause poor filter element cleaning. Air consumption depends on the frequency and length of cleaning air pulses into the filter element. Connect a minimum of 3/8” (9 mm) air line to the top of the solenoid valve air block. Compressed air must be clean, dry, and free of oil. A filter regulator and shut-off are recommended components of your in-plant air supply. In-line filters can handle small amounts of moisture; in-line desiccant filters or packed beds of granular absorbing polymer can remove oil mist and condensed oil. You may need to install an accumulator in your air supply system to enhance blowback effectiveness if your system cannot consistently meet these requirements. Make sure you use full-sized 3/8” or larger diameter pipe or tubing when making the connection. 3-4 Implosion Blowback Connection The clearing valve (implosion blowback valve) is located on the outlet of the vacuum filter. Connect the clearing valve to a 60-80 PSI (4.1-5.5 Bar) compressed air supply. Compressed air must be clean, dry and free of oil. Run a 3/8” (9 mm) branch line to supply the vacuum hoppers in your system. Install a 3/8” (9 mm) x 1/8” (3 mm) tee valve in the up position near the filter chamber. Connect shop compressed air to port number 3 on the clearing valve solenoid with 1/4” (approx. 6 mm) poly tubing. Connect port number 2 to the clearing valve. Port 1 is to be exhausted to the atmosphere. (See Figure 66 on next page). The 3/8” (9 mm) branch supply line should include a shut-off valve for on/off control, an air filter/pressure regulator with a gauge for pressure control, and mini-lubricators located at each vacuum receiver. Install a quick-disconnect fitting or a shut-off valve in the compressed air Conveying System Mechanical Components Chapter 3: Installation 113 of 170 piping leading to the vacuum receiver’s clearing valve to speed receiver cover removal for cleanout or service. Port 3: Shop Air In Port 2: (common) Attach to Clearing Valve Port 1: Exhaust Figure 66: Clearing Valve Compressed Air Connections Conveying System Mechanical Components Chapter 3: Installation 114 of 170 Flange Mount Vacuum Receiver Mounting These units are designed to fit in existing equipment with standard 10” mounting holes that will accept our vacuum receivers. þ For new installations, the recommended cut-out is a 10” (25.4 mm) –diameter round hole with six (6) mounting holes equally spaced on an 11.0” (279.4 mm) OD bolt circle. The factory provides 5/16” holes on the mounting flange to allow proper bolt clearance. Orienting the Unit The factory provides (12) mounting holes locations on the 11.0” (279.4 mm) OD mounting bolt circle. Under most conditions, using six (6) of the mounting holes with the proper hardware is sufficient to secure the unit to other equipment. þ Make sure that mounting hardware is equally spaced along the bolt circle. The twelve holes on the mounting bolt circle let you rotate the unit in 30 degree increments to match the orientation of piping and wiring of the equipment. If you need a finer orientation or if you need to adjust the mounting position, locate the six holes on the inside of the mounting flange ring. To allow for better orientation of equipment installations, the junction box bracket (located on the mounting flange) has been designed to mount during installation by utilizing two of the mounting locations along the bolt circle. To mount the junction box assembly: 1. Mount the vacuum receiver using four (4) of the six (6) bolts. 2. Cut the temporary straps securing the junction box assembly to the mounting flange. 3. Orient the junction box assembly along the mounting bolt circle location. Stop when the location most closely matches the preferred installation orientation. The mounting holes for the junction box bracket must line up with two of the holes on the mounting bolt circle flange. Be careful of wiring on or around the unit. 4. Secure the junction box assembly with hardware through the remaining two (2) mounting flange holes. Properly tighten to secure the assembly to the flange. Positioning and Spacing on the Demand Switch The factory has pre-set the demand switch position for proper operation and, under most operating conditions, does not require adjustment. The demand switch has two wires to provide for a normally open signal to the central controller (close to the load): • A common (black) contact, and • A closed (white) contact The demand switch sends a signal to the central controller when the material discharge flapper is closed and the unit calls for material. Most controllers utilize a closed contact to signal the conveying system controller that a material demand condition exists (using the black and white wires). Conveying System Mechanical Components Chapter 3: Installation 115 of 170 The Demand/Level sensor is not designed to be connected to a load. Do not connect external devices to the sensor wires. This switch is designed for signal load only. Connecting the sensor to a load VOIDS YOUR WARRANTY! If the switch is not providing a signal to the controller, check the following: 1. Check that the proper wire connections are made. • Secure the connections. 2. Make sure that the switch is not connected to any external load device. • Disconnect the load device, connect wiring to the system controller only. 3. Consult with ACS Service Engineers for proper switch/magnet spacing. Once the vacuum receiver and Demand Switch is properly oriented, complete the installation by performing the following: 1. Run a bead of silicone sealant around the mounting flange before seating the vacuum receiver. This makes a better seal. 2. Use nuts and screws to mount the hopper. Nuts and bolts can loosen, fall off, and damage process equipment. 3. Check across the mounting flange with a bubble level. A level installation is important for proper operation. 4. Properly ground all vacuum receivers. Adjusting the Vacuum Receiver Counterbalance TF and VF Models Only The counterbalance is factory-adjusted, but may have moved during shipment. To adjust the vacuum receiver counterbalance: 1. Loosen the set screw on the counterbalance. Move the counterbalance so the flapper opens from 3/16” (4 mm) to 1/4” (6 mm) on the end opposite the pivot. Re-tighten the set screw. 2. Apply removable thread locking compound to the set screw and re-tighten. Installing the Pickup Probe Pickup probes (See Figure 25 on page 51 for an example) are used to empty gaylords or bulk material containers located beside the processing machine. A conveying system can use horizontal take-offs or vertical pickup probes (or a combination of the two) to supply material to the vacuum receivers. To ensure maximum conveying rates by your system, take the following into consideration: • Locate the supply container near the vacuum receiver. • Connect the pickup probe to a vacuum hopper material inlet tube with a minimum amount of tubing, bends, and flex hose. • Secure the flex hose at the probe and the material inlet with hose clamps. Be sure to avoid loops and kinks, and install grounding wire around the outside of flex hose to prevent static built-up. Make sure you ground both ends of the grounding wire. Conveying System Mechanical Components Chapter 3: Installation 116 of 170 • Put the pickup probe in the material supply. The burrowing action of the probe provides a steady flow of material. • To vary the convey rate, cover or open the vent holes on the pickup probe as needed with the inlet tube. • If your material bridges frequently and triggers No-Convey alarm conditions, you should consider using a gaylord tilter or tilter/jogger to supply a steady stream of material to your conveying system. • Container tilters are recommended for complete cleanout of gaylords. Installing the Grinder Take-off Attachment A grinder take-off attachment (See Figure 22 on page 49 for an example) is typically mounted horizontally through the side of a grinder or granulator bin or any other straight sided supply bin. 1. The take-off attachment is mounted through a hole cut close to the bottom of the bin to allow emptying as much material as possible. 2. Cut a hole smaller than the mounting plate. 3. Mount the take-off attachment with the mitered air inlet tube on top, and the straight material outlet on the bottom. 4. Mark and drill holes to match the mounting plate holes. Fasten tightly with sheet metal screws, bolts, or rivets. 5. Secure the mounting hardware with a removable thread locking adhesive, cotter pins, aircraft fasteners, etc. to prevent the hardware from vibrating loose and being conveyed into the processing machine. 6. You should attach grounded flex hose to the material outlet and the vacuum receiver with hose clamps. The other tube is the air inlet to supply make-up air to the bin. Avoid loops or kinks in the flex hose. Installing and Adjusting the Take-off Compartment Take-off compartments (TOCs) are installed under surge bins, silos, or other storage devices. TOCs are available in a single position complete cleanout style with a V-shaped bottom or a box type with one or more material takeoff positions (See Figure 23 on page 49 for an example.). You can have several different size tubes for several different sized pump packages conveying a material from a central supply to several destinations. Take-off compartments are typically pre-drilled for mounting and their outlets are sized to fit the pump package, material, and distance specified at the time of purchase. To optimize the use of your take-off compartment, provide for the following: • Make sure that a three-foot (1 m) horizontal run is present prior to installing elbows. • Install the TOC so the outlet tubes can head out unobstructed in the direction of the material destination. • Use long radius bends on TOC outlets. • Provide access for removing and cleaning TOC inlet air filters. • Provide access for cleanout doors on TOCs. Conveying System Mechanical Components Chapter 3: Installation 117 of 170 Most TOCs have adjustable material inlet tubes to fine-tune the material to air ratio for optimal conveying rates. To adjust: 1. Loosen the set screw on the adjusting dial and turn the tube clockwise one third of the way from the 0 (zero) mark. 2. Turn ON the conveying system and start loading from the takeoff. 3. Rotate the dial until the material flows at a steady rate, then throttle it back a bit when surging or flooding occurs. System vacuum should be between 8” Hg (271 millibars) to 12” Hg (339 millibars) for best rates. 4. Lock the dial in place with the set screw when you have determined the best setting for a particular material. Make note of the setting and vacuum level for future reference. Adjusting Fast Take-off (FCO) Compartments When adjusting fast clean-out take-off compartments, make adjustments in small increments (especially in systems with long runs) to allow air flow to equalize throughout the system. FCO-1.5M In some applications, material flow characteristics may require a more defined air-to-material ratio. You can do this easily by covering one or more of the aeration holes located at the top of the inlet tube in FCO-1.5M fast clean-out take-off compartment models. FCO-1.5MD The FCO-1.5MD model fast take-off compartment has adjustable inner tubes fitted to the fixed outer tube. These adjustable inner tubes are locked down by a hold-down screw on the outer tube. Loosen this screw to adjust the inner tube. When the adjustable inner tube is completely inside the material compartment and the indicator knob is in a vertical position, no material can be conveyed in the system. Adjust the tube by pulling it away and keeping the indicator knob vertical. The maximum amount of material can convey when the reference hole on the adjustable inner tube is outside the edge of the outer tube. Vary the amount of material conveyed by rotating the inner adjustable tube. To clean out material in the FCO-1.5MD model fast take-off compartment, unscrew the plug at the bottom. Installing the Powder Check Adapter (Box Style; EVTO; FEVTO only) The powder check adapter is usually factory-installed. When installing the powder check adapter, make sure you install it on the tube stub as shown below. Remove the filter on the takeoff compartment and install the adapter using the four screws provided, then replace the filter. No other adjustments are required. Conveying System Mechanical Components Chapter 3: Installation 118 of 170 Figure 67: Typical Powder Check Adapter Customer horizontal take-off compartment 1/2" X 3/16" (13 mm x 4 mm) gasket Internal check valve Filter Conveying System Mechanical Components Chapter 3: Installation 119 of 170 3-5 Compressed Air Connections Making ACA Series Filter Chamber Compressed Air Connections To provide proper filter bag cleaning, make sure that you regulate the compressed air supply to 80 psig (551.6 kPa/ 5.52 bars). Air consumption depends on frequency and length of cleaning air pulses into the filter bags. Higher pressures can shorten the life of filter bags; lower pressures cause poor filter bag cleaning. Connect a ¼” (approx. 6.3 mm) air line to the bottom of the solenoid valve air block. Make sure that the compressed air you use is clean, dry, and free of oil. In-line filters can handle small amounts of moisture; in-line desiccant filters or packed beds of granular absorbing polymer can remove oil mist and condensed oil. Making Pump Compressed Air Connections Connect the vacuum pump to a minimum of 60 psi to 80 psi (414 kPa to 552 kPa) source of clean, dry, lightly lubricated compressed air. Make the 1/8” NPT (3 mm) connection at the solenoid valve on the pump package. Your compressed air supply piping should include: 1. A shutoff valve for ON/OFF control. 2. A pressure regulator with gauge. 3. An air filter/lubricator. Connecting Vacuum Receivers with Atmospheric Valve Compressed Air Lines See Figure 36 on the following page for an illustration of a typical atmospheric valve. Most conveying systems use atmospheric valves to direct system vacuum into the vacuum hoppers. You should be able to locate the atmospheric valve in one of three places: • Installed on top of TF or VF Series vacuum receivers • Installed in the vacuum header on SR Series vacuum receivers Connect the atmospheric valve to 60 psi to 80 psi (414 kPa to 552 kPa) source of clean, dry, lightly lubricated compressed air. Run a 3/8” (9 mm) branch line off the plant air main to supply the vacuum hoppers in your system. Install a 3/8” (9 mm) x 1/8” (3 mm) tee in the UP position near each hopper. Connect compressed air to the normally closed port on the atmospheric valve solenoid valve with a 1/8” (approx. 3 mm) pipe nipple. Connect the common port to the atmospheric valve using 1 /4” (6 mm) poly tube and connectors. Conveying System Mechanical Components Chapter 3: Installation 120 of 170 Figure 68: Solenoid Valve Location on Atmospheric Valve & Compressed Air Connections Solenoid Valve (1) Normally Closed Port = Connect to Air Supply (2) Common = Connect to Valve (3) Normally Open = Exhaust Port Your 3/8” (9 mm) branch supply line should include: 1. A shutoff valve for ON/OFF control. 2. An air filter/pressure regulator with a gauge for pressure control. 3. Mini-lubricators located at each vacuum receiver. Install a quick-disconnect fitting or a shutoff valve in the compressed air piping leading to the vacuum receiver atmospheric valve to speed receiver cover removal for cleanout or service. Connecting Vacuum Receivers with Sequence-T Valve Compressed Air Lines See Figure 37 on the following page for an illustration of a typical sequence-T valve. Critical dried resin systems sometimes require sequence-T valves to prevent drawing humid atmospheric air into the material supply. Sequence-T valves are usually installed in the vacuum header above the vacuum hoppers. The sequencing valve is located in the cover on SR Series vacuum receivers if you selected the internal sequencing valve option. If mounted in the vacuum line, connect the sequence-T valve to a 60 psi to 80 psi (414 kPa to 552 kPa) source of clean, dry, lubricated compressed air. Run a 3/8” (9 mm) branch line off the plant air main to the sequence T valves in your system. Install a 3/8” (9 mm) x 1/8” (3 mm) tee in the up position near each receiver. Connect compressed air to the normally open port on top of the sequence-T valve solenoid valve with a 1/8” (approx. 3 mm) pipe nipple. Connect the common port to the sequence-T valve using 1 /4” (6 mm) poly tube and connectors. See the following for more information. Conveying System Mechanical Components Chapter 3: Installation 121 of 170 Figure 69: Solenoid Valve Location on Sequence-T Valve & Compressed Air Connections Solenoid Valve (1) (2) (3) Normally Closed Port = Exhaust Port Common = Connect to Valve Normally Open = Connect to Air Supply Your 3/8” (9 mm) branch supply line should include: 1. A shutoff valve for ON/OFF control. 2. An air filter/pressure regulator with a gauge for pressure control. 3. Mini-lubricators located at each vacuum receiver. Running Remote Proportioning Valve or Proportioning Vacuum Receiver Compressed Air Lines You must run compressed air to any proportioning valves in the system. Refer to the Proportioning Valve operating manual for detailed installation and operation information. Conveying System Mechanical Components Chapter 3: Installation 122 of 170 3-6 Electrical Connections Refer to local electrical codes, the schematic, and connection diagrams supplied with this unit and the serial tag for wiring considerations. Run all wiring in conduit if codes require it. Label all wiring to make any future troubleshooting easier. Make all electrical connections tight. Making ACA Series Filter Chamber Electrical Connections Be safety conscious! High or low voltage can cause serious or fatal injury. Installation must be performed by qualified personnel only!! Always disconnect power source before attempting installation or repair. Mount the control box in any convenient location free from excessive vibration where the temperature does not exceed 120ºF (49ºC). Power supply and solenoids are 115/1/60 for Models 91/93, 131/133, and 251/253 ACA filter chambers; choice of 115 VAC, 230 VAC or 24 VDC on 51/53 models. Locate the power supply terminal inside the control enclosure. Provide a hole as needed for the power supply cord and connect to L1, L2, and ground. See the electrical schematic wiring diagram supplied in your Customer Information Packet for more information. Provide another hole in the control enclosure for wiring the solenoid valves on the filter chamber. Locate the terminal strip inside the control enclosure and connect the solenoid valve wiring in the order shown in the electrical schematic wiring diagram supplied in your Customer Information Packet. The order of wiring determines the sequence of the filter bag cleaning air pulses. Making Pump Power Drop Wiring Connections Pump packages are connected to a three-phase power supply. Bring properly sized power leads in conduit to the contacts in the junction box of each pump package in the system. Complete the pump wiring connections by performing the following: • Install a properly-sized fused disconnect switch with lockout on the main lines to each vacuum pump package. This is recommended even for pumps with optional fused disconnects. • Check the serial tag for voltage and amperage requirements. On 60 Hz units, voltage supplied to the unit must be within plus or minus ten percent (±10%) of the serial tag value; on 50 Hz units, within plus or minus five percent (±5%) of the serial tag value. Phase imbalance must be less than 2% in accordance with NEMA MG1-14.32. • Ground the unit for operator safety and equipment protection. Making Control Panel Power Drop Wiring Connections Plug the controllers’ power cord into a properly grounded, 3-slot, 115/1/60 VAC or 230/1/60 VAC receptacle as specified on the control panel serial tag and the enclosed controller Operation and Instruction manual. The control enclosure draws less than 5 amps during normal operation at 115/1/60 VAC. Conveying System Mechanical Components Chapter 3: Installation 123 of 170 The manufacturer recommends that you protect PLC memory by providing the control panel with a dedicated circuit, a true earth ground, and a spike/surge protector. Connecting the Control Panel to Vacuum Receivers Refer to the wiring connection drawings shown on the next page and to your conveying control panel’s diagrams for general connections. Each control panel is supplied with specific control schematics and a separate Operation and Instruction manual. To ensure proper conveying system operation, install the equipment according to the enclosed instructions. • Wire the Atmospheric/Sequence-T solenoid (SOL) valve to the terminal provided in the conveying system control panel enclosure. • Wire the Bin Full/Hopper Full switch (LS/PRS) to the terminal provided in the conveying system control panel enclosure. • On 115 VAC control voltage systems, run a common hot (115 VAC) wire and a common neutral wire from the controller to each vacuum receiver in the conveying system. • On 24 VDC control voltage systems, run a common +24 VDC wire and a common 0 (zero) VDC wire from the controller to each vacuum receiver in the conveying system. • On all systems, run two wires to each vacuum hopper: one each from the controller to the Bin-Full switch (LS) and to the Atmospheric/Sequence-T solenoid (SOL) valve. The conveying system control panel is supplied with a terminal strip at the upper right corner for + positive and – negative wire connections. • Be sure the solenoid and proximity switch(es) (if supplied) on vacuum receivers are the same voltage (24 VDC or 115 VAC) as the conveying system control panel control voltage. Consult the control panel serial tag and the solenoid valve nameplates. • Wire size depends on control voltage, distance, number of vacuum receivers, and the number of wires in each raceway. Consult a qualified electrician. • Properly ground each receiver to reduce static build-up generated by material conveying. Conveying System Mechanical Components Chapter 3: Installation 124 of 170 Figure 70: Volume-Fill, Time-Fill, Vacuum Receiver Wiring Connections 115 VAC Control Circuit Conveying System Mechanical Components Chapter 3: Installation 125 of 170 Figure 71: Volume-Fill, Time-Fill, Vacuum Receiver Wiring Connections 24 VDC Control Circuit Conveying System Mechanical Components Chapter 3: Installation 126 of 170 Installing Station Bypass Switches The manufacturer recommends field-installing a station bypass switch (shown below) in a convenient location at each vacuum hopper in series with the flapper dump Bin Full (LS) switch. Check local codes. Turning off this bypass switch simulates a full machine bin, cancels a No-Convey alarm, and takes the receiver out of the loading sequence until the switch is closed. This allows on-the-fly processing changes and cancels No-Convey alarms. If the bypass switch is turned off while a hopper is filling, the switch simulates a full vacuum hopper and stops the conveying of material to that hopper immediately. Figure 72: Recommended Field-Installed Optional Station Bypass Switch Wiring without Station Bypass Switch A Bin-Full switch (LS) B Wiring with Station Bypass Switch Station Bypass switch (TS) A Off On A1 Bin-Full switch (LS) B N. O. (normally open, held closed) Connecting the Control Panel to the Pump Package Consult the specific schematics and Operation & Instruction manual supplied with your controller for your specific application. • Wire the pump package motor starter coil (M) to the terminal provided in the conveying system control panel enclosure. • Wire the pump package vacuum relief valve solenoid (SOL A) to the terminal provided in the conveying system control panel enclosure. • Wire the pump package high vacuum switch (VS) to the terminal located in the conveying system control panel enclosure. • On VTPB pumps, wire the pump package blowback solenoid (SOL B) to the terminal located in the conveying system control panel enclosure. • On 115 VAC control voltage systems, run a common hot 115 VAC wire and a common neutral wire from the controller to the pump package in the conveying system. • On 24 VDC control voltage systems, run a common +24 VDC wire and a common 0 (zero) VDC wire from the controller to the pump package in the conveying system. Conveying System Mechanical Components Chapter 3: Installation 127 of 170 Make sure that the pump motor starter, the vacuum relief valve solenoid, and the blowback solenoid (if supplied) are the same voltage (24 VDC or 115 VAC) as the conveying system control panel control voltage. Consult the control panel serial tag and the pump package serial tag. Wire size depends on control voltage, distance, number of vacuum hoppers, and the number of wires in each raceway. Consult a qualified electrician. Figure 73: Typical VTP, SPD, CPD Series Junction Box Wiring Diagram 3 PHA SE / 4 WI RE SERVI CE A ND FUSE D D ISCONN ECT S WITC H TO BE PROVID ED BY C USTOMER DI SC GRD L1 FU L2 FU L3 FU M L1 L1 L2 L3 OL T1 L2 T2 L3 T3 MTR 5 H. P. P UMP POWER WIRING GRD TO CONTROLLER INPU T FOR PU MP HI GH VA CUU M VS 115VAC N. O. NE UTRA L 0L FROM CONTR OLLER OUTPUT FOR PU MP MOTOR STARTER TES T J1 95 J1 95 A2 OL VA CUU M/VENT SOLENOID ON PU MP SOL B FROM CONTR OLLER OUTPUT FOR FILTER CH AMBER BLOWB ACK SOLENOID T2 VA CUU M PUMP MOTOR STARTER A1 FROM CONTR OLLER OUTPUT FOR PU MP VA CUU M/VENT SOLENOID VS T1 M SOL A R ESET TR IPPE D 96 97 98 96 BLOWB ACK SOLENOID ON FI LTER CH AMBE R 115V AC CONTROL VOLTAGE T3 TO MOTOR (MTR ) TO CONTROLLER INPU T FOR PU MP HI GH VA CUU M VS 0 VDC N. O. +24 VD C LEGEND 0L FROM CONTR OLLER OUTPUT FOR PU MP MOTOR STARTER 96 WIRE LUG 95 A2 M VA CUU M PUMP MOTOR STARTER A1 SOL A FIE LD WIRING INTERNAL WIRI NG J1 VA CUU M/VENT SOLENOID ON PU MP FROM CONTR OLLER OUTPUT FOR PU MP VA CUU M/VENT SOLENOID SOL B FROM CONTR OLLER OUTPUT FOR FILTER CH AMBER BLOWB ACK SOLENOID BLOWB ACK SOLENOID ON FI LTER CH AMBE R 24 VDC CONTROL VOLTAGE This information is shown for reference only. Refer to the electrical Schematics that were supplied with your equipment and controls for specific wiring information. Conveying System Mechanical Components Chapter 3: Installation 128 of 170 Figure 74: Typical VTP, SPD, CPD Series Junction Box with Fused Disconnect Wiring Diagram DISC T OT ERMIN AL A1 (N EUT RAL ) ON MOTOR S TART ER (M) GRD F ROM L 1, L2 AND L 3 AT BOT TOM OF DISCONNE CT SWITCH (DI SC) (FROM DI S C-3 ) F ROM CONT ROLL ER OUT PUT F OR BL OWBACK S OLENOI D F ROM CONT ROLL ER OUT PUT F OR MOT OR ST ARTER F ROM CONT ROLL ER OUTPUT F OR VACUUM/ (11 5VA C) V ENT SOL ENOID (NEUTRAL) L1 L2 L3 L1 L2 3 PHASE / 4 WIRE SERVICE TO BE PROVIDED BY CUSTO MER L1 FU L2 FU L3 FU M L1 OL T1 L2 T2 L3 T3 MTR 5 H.P . PUMP POWER WIRING WITH DISCONNECT SW IT CH L3 A1 1 L1 3 L2 5 L3 T2 4 T3 6 13 M DISC T1 2 14 T OS OL A DISC-1 T OS OL B A2 RESET T EST T RIPPED 96 97 98 95 OL F ROM DIS C-2 2 T 1 T 2 4 T1 T2 T3 T OM OTOR (MT R) N.O. T OT ERMIN AL #96 ON OVE RL OAD (OL ) TO V ACUUM S WI T CH (VS) T 3 6 TO CONTROLL ER INPUT FOR PUMP HIGH VACUUM VS (1 15V AC) A2 J1 (NEUTRAL) DISC L1 L2 DISC-2 L3 0L FROM CONTROL LE R OUTPUT FO R PUMP M OTOR START ER T OL 1, L2 AND L 3 ON MOTOR S TART ER (M) 96 J1 95 A2 DISC-3 F ROM DIS C-1 VACUUM /VENT SOLENOID ON PUMP SOL C T OCONT ROLL ER I NPUT F OR HI GH VACUUM DISC-4 SUB PANEL LAYOUT AND CONNECT IO N DIAGRAM VACUUM PUM P MOT OR STARTER A1 SOL A FROM CONTROL LE R OUTPUT FO R PUMP VACUUM /VENT SOLENOID VS M OP TIO NAL ATMO SPHERI C VALVE ON FIL TER CHAM BER SOL B FROM CONTROL LE R OUTPUT FO R FIL TER CHAM BER BLOWBACK SOLENOID (1 15 V AC) BLOWBACK SOLENOID ON F ILT ER CHAMBER JUNCTION BOX O N VACUUM PUMP 115V AC CONT ROL VOLT AGE CONTROL WIRING T OT ERMIN AL A1 (+ 24 V DC) ON MOTOR S TART ER (M) GRD F ROM CONT ROLL ER OUT PUT F OR V ACUUM/ V ENT S OLENOI D (FROM DISC -1) F ROM L 1, L2 AND L 3 AT BOT TOM OF DISCONNE CT SWITCH (DI SC) (+2 4VD C) L1 L2 L3 L1 L2 L3 A1 1 L1 3 L2 5 L3 T2 4 T3 6 T OT ERMIN AL A1 (+2 4VDC) ON MOT OR ST ART E R(M) A2 T RIPPED 96 97 98 95 F ROM CONT ROLL ER OUT PUT F OR PUMP MOTOR START ER 96 RESET T EST J1 (+ 24V DC) 0L 14 A2 DISC-1 N.O. M T1 2 TO CONTROLL ER INPUT FOR PUMP HIGH VACUUM VS (0 V DC) 13 J1 95 A2 M VACUUM PUM P MOT OR STARTER A1 SOL A OL VACUUM /VENT SOLENOID ON PUMP DISC 2 T1 T 1 4 T 2 T2 6 T 3 T3 L1 L2 L3 T OL 1, L2 AND L 3 ON MOTOR S TART ER (M) SOL C OP TIO NAL ATMO SPHERI C VALVE ON FIL TER CHAM BER T OM OTOR (MT R) SOL B (0VDC) BLOWBACK SOLENOID ON F ILT ER CHAMBER VS T OCONT ROLL ER I NPUT FOR HIGHV ACUUM CONTROL WIRING SUB PANEL LAYOUT AND CONNECT IO N DIAGRAM (2 4V D C) JUNCTION BOX O N VACUUM PUMP 24V DC CONT ROL VOLT AGE This information is shown for reference only. Refer to the electrical Schematics that were supplied with your equipment and controls for specific wiring information. Conveying System Mechanical Components Chapter 3: Installation 129 of 170 Figure 75: Typical VTPB, SPDB, CPDB Series Junction Box Wiring Diagram KA Y VA LVE LOCATED ON PU MP GRD FRO M CO NTRO LLER O UTP UT FO R VAC UU M SO LEN OID (NEUTRAL) /(+2 4VDC) VACUUM TO TERMINA LA 1 (NEU TRAL) /( +24VD C) COM MON ON MOTO R STA RTER ( M) L1 L2 L3 TO JUNC TION BOX FRO M CO NTRO LLER O UTP UT FO R BLO WBA CK S OLEN OID BLOWB ACK A1 1 L1 3 L2 5 L3 T2 4 T3 6 13 M DI SC A 09 T1 2 14 TO UPPER VAL VE PROCESS AI R CONNECTION A2 A2 J1 R ESET TES T TR IPPE D 96 97 98 95 FRO M CO NTRO LLER O UTP UT L1 FU L2 FU L3 FU L1 M OL 3 PHA SE / 4 WI RE SERVI CE A ND FUSE D D ISCONN ECT S WITC H TO BE PROVID ED BY C USTOMER T1 L2 T2 L3 T3 MTR 5 H. P. P UMP OL FO R PUMP MO TOR STARTE R 2 T1 T 1 4 T 2 T2 6 T 3 T3 TO MO TOR (MTR) (1 15 VAC)/ (0VDC ) VS ( 115V AC ) VS TO CONTROLLER INPU T FOR PU MP HI GH VAC UUM N. O. TO CO NTR OLLER I NPUT FO R PUMP HIGH -VACUUM ( NEUTR AL) 0L FROM CONTR OLLER OUTPUT FOR MOTOR STAR TER 96 J1 95 A2 M A1 SOL A FROM CONTR OLLER OUTPUT FOR VA CUU M PU MP SOLE NOID SUB PANEL LAYO UT AND CONNECTION DIAGRAM SOL B FROM CONTR OLLER OUTPUT FOR PU MP BLOWB ACK SOLENOID (115V A C AN D 24V DC ) VA CUU M PUMP MOTOR STARTER VA CUU M SOLENOID ON PU MP BLOWB ACK SOLENOID ON PU MP CONT ROL WIRING JUNCTION BOX ON VACUUM PUMP 115V AC CONT ROL VOLT AGE LEGEND FIE LD WIR IN G IN TER NA L WIRI NG VS ( 0V DC) TO CONTROLLER INPU T FOR PU MP HI GH VAC UUM N. O. WIRE LU G ( +24 V DC ) 0L FROM CONTR OLLER OUTPUT FOR MOTOR STAR TER 96 J1 95 A2 1M A1 SOL A FROM CONTR OLLER OUTPUT FOR VA CUU M PU MP SOLE NOID SOL B FROM CONTR OLLER OUTPUT FOR PU MP BLOWB ACK SOLENOID VA CUU M PUMP MOTOR STARTER VA CUU M SOLENOID ON PU MP BLOWB ACK SOLENOID ON PU MP CONT ROL WIRING JUNCTION BOX ON VACUUM PUMP 24V DC CONT ROL VOLT AGE This information is shown for reference only. Refer to the electrical Schematics that were supplied with your equipment and controls for specific wiring information. Conveying System Mechanical Components Chapter 3: Installation 130 of 170 Figure 76: Typical VTPB, SPDB, CPDB Series Junction Box with Fused Disconnect Wiring Diagram S OL A/ B KAY VALV E L OCAT ED ON P UMP (FROM DI S C-3 ) V AC UU M TO TERM IN ALA 1( NEUTR AL) GRD ON M OTOR STA RTER (M ) (NEUTRAL) F ROM L I, L 2 AND L 3 AT BOT TOM OF DISCONNE CT SWITCH (DI SC) L1 TO JU NC TI ON B LO WB AC K B OX F ROM CONT ROLL ER OUT PUT F OR PUMP MOTOR START ER F ROM CONT ROLL ER OUTPUT F OR VACUUM S OLENOI D L2 L3 C OMMO N (FROM DI S C-4 ) F ROM CONT ROLL ER OUTPUT F OR BLOW BACKS OLENOI D (11 5VA C) L1 L2 1 L1 3 L2 1C 5 L3 T2 4 T3 6 L1 FU L2 FU 14 T OS OL A L3 FU T OS OL B A2 M L1 13 M T1 2 3 P HASE / 4 WIRE SERVI CE TO BE PROVIDED BY CUSTOME R DISC L3 A1 OL T1 L2 T2 L3 T3 MTR 5 H.P . PUMP A2 T RIPPED 96 97 98 95 OL F ROM DIS C-2 2 T 1 T 2 4 T1 POWER WIRING WITH DISCONNECT SW IT CH RESET T EST J1 DISC TO V ACUUM S WI T CH (VS) T 3 6 T2 T OT ERMIN AL #96 ON OVE RL OAD (OL ) T3 L1 L2 DISC L3 DISC-1 T OL 1, L2 AND L 3 ON MOTOR S TART ER (M) T OM OTOR (MT R) TO CONTROLL ER INPUT FO R PUMP HIGH VACUUM VS (1 15V AC) N.O. F ROM DIS C-1 (NEUTRAL) VS DISC-2 T OCONT ROLL ER I NPUT F OR HI GH VACUUM 0L FROM CONTROL LE R OUTPUT FO R PUMP M OTOR START ER 96 J1 95 A2 DISC-3 FROM CONTROL LE R OUTPUT FO R PUMP VACUUM SOLENOID FROM CONTROL LE R OUTPUT FO R PUMP BL OWBACK SOLENOID (1 15 V AC) VACUUM PUM P MOT OR STARTER A1 SOL A DISC-4 SUB PANEL LA YOUT A ND CONNEC TION DIAGRA M M VACUUM SOLENOID ON PUMP SOL B BLOWBACK SOLENOID ON P UMP CONTROL WIRING JUNCTIO N B OX O N VA CUUM PU MP 115V AC CON TR OL VO LTAG E S OL A/ B KAY VALV E L OCAT ED ON P UMP (FROM DISC -1) F ROM L 1, L2 AND L 3 AT BOT TOM OF DISCONNE CT SWITCH (DI SC) V AC UU M F ROM CONT ROLL ER OUT PUT F OR VACUUM SOL ENOI D T OT ERMIN AL A1 (+ 24 V DC) ON MOTOR S TART ER (M) F ROM CONT ROLL ER OUT PUT F OR BL OWBACK SOL ENOI D GRD C OMMO N L2 L3 L1 (+ 24V DC) 0L L2 FROM CONTROL LE R OUTPUT FO R PUMP M OTOR START ER L3 96 J1 95 A1 1 L1 3 L2 5 L3 T2 4 T3 6 14 RESET T EST T RIPPED 96 97 98 95 FROM CONTROL LE R OUTPUT FO R PUMP BL OWBACK SOLENOID T OT ERMIN AL A1 (+2 4VDC) ON MOT OR ST ART E R(M) A2 A2 J1 A2 M A1 SOL A FROM CONTROL LE R OUTPUT FO R PUMP VACUUM SOLENOID 13 M T1 2 DISC-1 N.O. TO JU NC TI ON B LO WB AC K B OX (+2 4VD C) L1 TO CONTROLL ER INPUT FO R PUMP HIGH VACUUM VS (0 V DC) F ROM CONT ROLL ER OUT PUT F OR PUMP MOTOR START ER SOL B VACUUM PUM P MOT OR STARTER VACUUM SOLENOID ON PUMP BLOWBACK SOLENOID ON P UMP CONTROL WIRING OL DISC 2 T1 T 1 4 T 2 T2 6 T 3 L1 T3 L2 L3 T OL 1, L2 AND L 3 ON MOTOR S TART ER (M) JUNCTIO N B OX O N VA CUUM PU MP 24V D C CO NTRO L VOLTAGE T OM OTOR (MT R) (0VDC) VS T OCONT ROLL ER I NPUT F OR HI GH VACUUM SUB PANEL LA YOUT A ND CONNEC TION DIAGRA M (2 4V D C) This information is shown for reference only. Refer to the electrical Schematics that were supplied with your equipment and controls for specific wiring information. Conveying System Mechanical Components Chapter 3: Installation 131 of 170 Figure 77: Typical APDB, SPDB, CPDB 5-15 Series Junction Box Wiring Diagram 24VDC, Distributed I/O Conveying System Mechanical isComponents Chapter 3: Installation This information shown for reference only. Refer to the electrical Schematics that were supplied with your equipment and controls for specific wiring information. 132 of 170 Figure 78: Typical APDB, SPDB, CPDB 5-15 Series Junction Box Wiring Diagram 24 VDC Conveying System Mechanical Chapteronly. 3: Installation This informationComponents is shown for reference Refer to the electrical Schematics that were supplied with your equipment and controls for specific wiring information. 133 of 170 Figure 79: Typical APDB, SPDB, CPDB 5-15 Series Junction Box Wiring Diagram 120 VAC This information is shown for reference only. Refer to the electrical Conveying System Mechanical Components 3: Installation Schematics that were supplied withChapter your equipment and controls for specific wiring information. 134 of 170 Figure 80: Typical VTTV Series Junction Box Wiring Diagram GRD (NEUTRAL) /(+2 4V DC) TO TERMINA LA 1 (NEU TRAL) / L2 L1 L3 (+24V DC ) ON MO TOR STAR TER (M) FRO M CO NTRO LLER O UTP UT FOR VA CUU M/V ENT SO LENO ID A1 1 L1 3 L2 5 L3 13 M 3 PHA SE / 4 WI RE SERVI CE A ND FUSE D D ISCONN ECT S WITC H TO BE PROVID ED BY C USTOMER DI SC A 09 T1 2 T2 4 T3 6 14 L1 FU L2 FU L3 FU A2 A2 R ESET TES T J1 TR IPPE D 96 97 98 95 OL M L1 FR OM C ON TRO LLE R OUTP UT FOR OL T1 L2 T2 L3 T3 MTR 2 H. P. P UMP POWER WIRING PU MP MOTOR STA RTE R 2 T1 T 1 4 T 2 T2 6 T 3 ( NEUTR AL) T3 0L TO MOTOR (MTR) 96 J1 95 A2 M VA CUU M PUMP MOTOR STARTER A1 SOL CONTR OL W IR ING (115V AC AND 24V DC) 0L 96 J1 95 A2 M A1 SOL FIE LD WIRING INTERNAL WIRI NG CONTR OL W IR ING WIRE LUG JUNCTION BOX O N VACUUM PUMP 115V AC CONT ROL VOLT AGE ( +24 V DC ) SUB PANEL LAYOUT AND CONNECTIO N DIAGRAM LEGEND OPTIONAL VACU UM/VE NT SOLENOID ON PU MP VA CUU M PUMP MOTOR STARTER OPTIONAL VACU UM/VE NT SOLENOID ON PU MP JUNCTION BOX O N VACUUM PUMP 24V DC CONT ROL VOLT AGE This information is shown for reference only. Refer to the electrical Schematics that were supplied with your equipment and controls for specific wiring information. Conveying System Mechanical Components Chapter 3: Installation 135 of 170 Figure 81: Typical VTTV Series Junction Box with Fused Disconnect Wiring Diagram GRD T OT ERMIN AL A1 (N EUT RAL ) ON MOTOR S TART ER (M) F ROM L 1, L2 AND L 3 AT BOT TOM OF DISCONNE CT SWITCH (DI SC) (NEUTRAL) L1 (FROM DI S C-2 ) F ROM CONT ROLL ER OUT PUT F OR VACUUM /V E NT S OLENOI D F ROM CONT ROLL ER OUT PUT F OR MOT OR ST ARTER L2 L3 L1 L2 DISC L3 3 P HASE / 4 WIRE SERVI CE BE PROV IDED BY CUSTOM ER A1 1 L1 3 L2 5 L3 13 L1 FU L2 FU T1 2 T2 4 T3 6 L3 FU T RIPPED 96 97 98 T 1 T 2 4 T1 T2 L3 T3 2 H.P . PUMP MTR T2 DISC T OT ERMIN AL #96 ON OVE RL OAD (OL ) T 3 6 T OS OL OL F ROM DIS C-1 2 T1 L2 RESET T EST 95 OL 14 A2 A2 J1 M L1 M L1 T3 L2 POWER WIRING WITH DISCONNECT SW IT CH L3 T OL 1, L2 AND L 3 ON MOTOR S TART ER (M) T OM OTOR (MT R) DISC (NEUTRAL) DISC-1 FROM CONTROL LE R OUTPUT FO R PUMP M OTOR START ER 0L 96 J1 95 A2 DISC-2 FROM CONTROL LE R OUTPUT FO R PUMP VACUUM /VENT SOLENOID CONTROL WIRING SUB PANEL LA YOUT A ND CONNEC TION DIAGRA M M VACUUM PUM P MOT OR STARTER A1 SOL OP TIO NAL VACUUM /VENT SOLENOID ON PUMP JUNCTION BOX O N VACUUM PUMP 115V AC CONT ROL VOLT AGE (1 15 V AC) GRD T OT ERMIN AL A1 (+ 24 V DC) ON MOTOR S TART ER (M) F ROM L 1, L2 AND L 3 AT BOT TOM OF DISCONNE CT SWITCH (DI SC) (FROM DISC -1) F ROM CONT ROLL ER OUT PUT F OR V ACUUM/ V ENT S OLENOI D (+2 4VD C) L1 L2 L3 L1 L2 L3 A1 1 L1 3 L2 5 L3 DISC-1 13 (+ 24V DC) M T1 2 T2 4 T3 6 0L 14 A2 RESET T EST T RIPPED 96 97 98 95 F ROM CONT ROLL ER OUT PUT F OR PUMP MOTOR START ER T1 T 1 4 T 2 T2 6 OL T 3 T3 96 95 A2 M A1 SOL DISC 2 T OM OTOR (MT R) FROM CONTROL LE R OUTPUT FO R PUMP M OTOR START ER T OT ERMIN AL A1 (+2 4V DC) ON MOT OR ST ART E R(M) A2 J1 J1 L1 L2 L3 FROM CONTROL LE R OUTPUT FO R PUMP VACUUM /VENT SOLENOID T OL 1, L2 AND L 3 ON MOTOR S TART ER ON MOTOR S TART ER (M) CONTROL WIRING VACUUM PUM P MOT OR STARTER OP TIO NAL VACUUM /VENT SOLENOID ON PUMP JUNCTIO N B OX O N VA CUUM PU MP 24V D C CO NTRO L VOLTAGE SUB PANEL LA YOUT A ND CONNEC TION DIAGRA M (2 4V D C) This information is shown for reference only. Refer to the electrical Schematics that were supplied with your equipment and controls for specific wiring information. Conveying System Mechanical Components Chapter 3: Installation 136 of 170 3-7 Initial Start-up Making Startup Checks Before operating the conveying system, check these details: 1. All components in the system must be installed securely and prepared for operation. Refer to the instructions supplied with auxiliary equipment for specific checks. 2. Couplers, fittings, attachments, and flexible lines must be attached securely and be vacuum-tight. 3. Electrical and compressed air connections to the pump package, vacuum hoppers, and filter chambers must be complete, safe, and conform to code. 4. The pump package blower gearbox must be filled with oil as specified in the manufacturer’s instructions included in the customer information package. Do not overfill the blower gearbox with oil; too much oil damages the blower. 5. If not done already, remove the plastic plug from the silencer air outlet. Keep hands away from the open air inlet to avoid injury! 6. Do not allow any loose parts, tools, or foreign materials in or near the unit and other system components. 7. Check for proper motor rotation, as indicated by an arrow on the pump package motor. Bump-start the pump package with the compressed air disconnected just long enough to verify proper rotation direction. To change motor rotation: a. Disconnect power at the external disconnect. b. Switch any two incoming power leads on the main power supply. 8. Make sure that filter chamber housings have no leaks; check stretcher clamps for tightness. Adjusting Sight Glass Proximity Sensor Sensitivity You can adjust the sensitivity of the material level proximity sensor in the sight glass. The factory setting usually is correct for most applications. The sensor is factory-installed to the frame; however, you should install the sensor at the material level height you want. When adjusting, fill the glass and verify that the sensor detects your material. The LED on the switch goes out when it detects material. • For increased sensitivity, turn the potentiometer clockwise. • For decreased sensitivity, turn the potentiometer counterclockwise. • Consult proximity switch instructions if necessary or call Service Department. Conveying System Mechanical Components Chapter 3: Installation 137 of 170 Adjusting Air Pulse Duration: All Models Locate the on-time potentiometer inside the control enclosure on the circuit board. With the unit operating, turn the potentiometer counterclockwise to shorten the air pulse duration; turn clockwise to lengthen the air pulse. ACA Series Filter Chamber Pre-Operation Checklist Check the following before you operate ACA Series filter chambers: 1. Make sure all mechanical installations are complete. 2. Make sure all electrical and compressed air connections are complete and correct. 3. Make sure that no leaks are present in the filter chamber housing. Check stretcher clamps for tightness. Adjusting Time Between Air Pulses on ACA Filters Models 91/93, 151/153, and 251/253 The time between cleaning air pulses requires adjusting to match up with dusting characteristics of the material being conveyed. If more dusting occurs, then more frequent compressed air pulses are required to clean filter bags. Locate the off-time control potentiometer inside the control enclosure and adjust from 0- to 30second intervals between air pulses to match material conveying characteristics. Adjusting the Number of Air Pulses Model 51/53 Low Boy Locate the DIP switch inside the blowback control box. Set the DIP switch to the number of pulses you want from 1 to 16, using the DIP switch settings shown in the following figure. The diagram is also shown on the blowback control box electrical schematic located in your Customer Service Packet. Figure 82: ACA Series Model 50 Blowback DIP Switch Settings 16 PULSES 15 PULSES 14 PULSES 13 PULSES 1 1 1 1 2 3 4 OFFOFF OFFOFF 2 ON 3 4 OFFOFFOFF OPEN 2 OFF 3 ON OPEN 4 OFFOFF OPEN 12 PULSES 11 PULSES 10 PULSES 1 1 3 OFFOFF ON 4 OFF 2 ON OFF OPEN 2 3 OFFOFFOFF 1 ON ON 3 OFFOFF 2 OFF 2 3 OFF OFF ON ON 1 ON 2 ON 1 2 2 OFF 1 OFF OFF 2 3 4 OFF OPEN 5 PULSES 4 ON 1 2 3 ON ON OFF 4 ON OPEN 2 PULSES 4 ON ON OPEN OFF 3 ON OFFOFF ON ON ON 6 PULSES 4 4 9 PULSES 1 OPEN 3 OFF OPEN 4 OPEN 3 PULSES 4 3 ON ON OPEN 4 PULSES 2 OFF 7 PULSES 4 OPEN 1 ON 4 OPEN 8 PULSES 1 3 3 OPEN 1 2 2 ON ON 3 1 PULSE 4 ON ON ON OPEN 1 2 3 4 ON ON ON ON OPEN A0542161 Conveying System Mechanical Components Chapter 3: Installation 138 of 170 Starting ACA Series Filter Chamber Units With all adjustments complete, turn on clean, dry, oil-free compressed air and regulate to 60 psi to 80 psi (414 kPa to 552 kPa). Turn the power on/off switch to ON; the unit then automatically self-cleans the filter bags. An indicator light on the control box for Model 91/93, 151/153, and 251/253 ACA filter chambers illuminates each time a compressed air pulse is directed into a filter bag. If for any reason the power is turned off, wait at least three (3) seconds to reset. During initial startup, you’ll note some dusting occurring at the clean air exhaust. This condition is normal with new filter bags until the exterior surfaces of the bags become evenly coated with dust particles, which prevents fine material from passing through the filter bag pores. This dusting condition should stop after the first several hours of operation. Adjusting Proximity Sensor Sensitivity Models Equipped with Volume-Fill Switch Only A proximity switch mounted in VF, SRH and SRC vacuum receivers detects when the vacuum receiver has been filled during a conveying sequence, telling the conveying system control to move on to the next on-line vacuum receiver in the sequence. This speeds the conveying cycle and shuts the pump down promptly to conserve electricity if all the bins being loaded are full. The sensitivity of the vacuum receiver material level sensor can be adjusted. The factory setting is correct for most applications. The sensor is mounted through the wall of the vacuum receiver. The adjusting potentiometer is located beneath a plastic cover screw near the sensor LED indicator. Remove the protective cover screw before making adjustments and replace it when finished. Before adjusting the Receiver-Full sensor, make sure that the Bin Full sensor is in the closed position. When adjusting, fill a vacuum hopper to see if the switch detects your material. The LED on the switch goes out when it detects material. • For increased sensitivity, turn the potentiometer clockwise. • For decreased sensitivity, turn the potentiometer counterclockwise. • Consult proximity switch instructions if necessary or call Service Department. Conveying System Mechanical Components Chapter 3: Installation 139 of 170 Chapter 4: Operation 4-1 Start-up Starting ACA Series Filter Chamber Units Turn on clean, dry, oil-free compressed air and regulate to 60 psi to 80 psi (414 kPa to 552 kPa). Turn the power on/off switch to ON; the unit then automatically self-cleans the filter bags. An indicator light on the control box for Model 91/93, 151/153, and 251/253 ACA filter chambers illuminates each time a compressed air pulse is directed into a filter bag. If for any reason the power is turned off, wait at least three (3) seconds to reset. 4-2 Operation Procedures When you activate the controller, the system energizes and initiates the conveying cycle. The following components energize: • The vacuum pump motor starter. • The vacuum pump vent valve. • The sequencing valve above the first on-line vacuum receiver that requires material. The vacuum pump draws vacuum to that receiver. When the receiver is full or the time interval elapses, the controller then signals the atmospheric valve above the next on-line receiver requiring material to energize, allowing material to convey to that receiver. The conveying sequence continues to the last on-line vacuum receiver requiring material. When the time interval for the last receiver elapses or the receiver is full, a new conveying cycle begins at the first on-line vacuum receiver requiring material. The sequence of events listed above is a generalized description of what occurs when a controller is activated. Consult your specific controller manual for an accurate depiction of these events. Vacuum Switch (VS) Operation A high vacuum switch is mounted inside a pump package junction box. It is preset to close at 14” Hg (475 millibars) and is not adjustable. The vacuum switch protects the pump package from motor damage caused by high amperage draw and strain on the blower. Pumps typically draw a vacuum of less than 5” Hg (170 millibars) only when air is pulled into the system and 8” to 12” Hg (271 to 339 millibars) while conveying. If system vacuum should reach 14” Hg (475 millibars), the high vacuum switch closes. The pump package tries to clear the line for three seconds, then moves to the next on-line vacuum receiver. The normal conveying cycle continues. If high vacuum keeps occurring, the pump continues with attempts to clear the line. See your specific controller manual for additional operation information. Conveying System Mechanical Components Chapter 4: Operation 140 of 170 High Vacuum Relief Regulator Operation A factory-set pressure regulator is installed on the pump package vent valve as a mechanical back-up safety feature. It protects the pump motor from damage during high vacuum conditions if an undetected failure of the vacuum switch should occur. The regulator is set to limit system vacuum to 15” Hg (475 millibars) by allowing the vent valve plunger to shift and vent the pump. APC, SPC, CPC vacuum relief is set at lower levels based on vacuum pump performance curves. Do not adjust the pressure regulator. Adjusting the pressure regulator voids your warranty. See Figure 41 on page 79 for additional operation information. 4-3 Shut-down To deactivate the conveying system: 1. Turn the disconnect switch at each pump or component to OFF. This will take each pump or component offline. 2. Turn off the compressed air supply to the system. Consult your specific controller operation and instruction manual for specific shutdown information for your conveying system. Conveying System Mechanical Components Chapter 4: Operation 141 of 170 Chapter 5: Maintenance 5-1 Preventative Maintenance Schedule The checklist below contains a list of items, which should be inspected and/or replaced to keep the mechanical components of your conveying system operating at peak efficiency. Perform each inspection at the regular intervals listed below. System model # Every week Serial # Date/ By Date/ By Date/ By Date/ By Date/ By Date/ By Date/ By Date/ By Date/ By Date/ By Date/ By Date/ By Date/ By Inspect all filters for wear, replace/ clean if dirty or worn. Check to make sure that all hose connections are air tight. Every month Jan Feb Mar Apr May Jun Jul Aug Sep Oct Nov Lock out electrical power and inspect electrical wiring for integrity. Check demand sensor. Inspect gaskets at hoppers. Inspect belt(s). Oil & grease (lubricate) components - Photocopy this page for your maintenance records - Conveying System Mechanical Components Chapter 5: Maintenance 142 of 170 Dec 5-2 Preventative Maintenance Maintaining Pump Packages Pump packages need periodic maintenance to provide long dependable service. Check these elements regularly: • Maintain a proper oil level in the blower gearbox. The manufacturer’s brochure (packed with the pump package) recommends oils, and lists instructions for checking the oil level. See Oil Capacities chart on following page. • Pack blower bearings with high temperature ball bearing grease and change the oil to the manufacturer’s recommendations. • V-belts are sized for maximum life with the pump package blower/motor combination. Inspect periodically for proper tension, and replace when worn. V-belts stretch when new. Check belt tension after you have run them in. At proper belt tension, the belt should deflect downward 1/64” for every one inch span (1 mm every 6.4 cm) from sheave to sheave. • Keep the pump package area clear of any debris that could be drawn through the vent valve and into the blower while the pump package is idling. • Torque the motor and blower sheave bolts to 72 ft.-lbs. (98 Nm). • Check the moisture traps in the compressed air lines. Drain as needed. • Check the compressed air lubricator(s) for flow rate and level. Use only 1 or 2 drops of oil per day when lubricating. Adjust and fill as necessary. • Inspect the silencer periodically for contamination. Silencer fouling indicates poor filter maintenance at the vacuum hopper or filter chamber. Fines may also be drawn into the silencer through the pump package vent valve during the dump cycle from poor housekeeping near the pump package. Make sure you replace a contaminated silencer immediately to avoid blower damage and possible fire hazard. • Standard pump package TEFC motors do not require lubrication or oiling. Optional motors may have different requirements. Refer to the motor manufacturer’s specification sheet in your Customer Information Packet. • Keep the control panel and pump package junction boxes securely closed to prevent component contamination. • Inspect air cylinders and plugs for proper operation. • Verify that all safety components/circuits are in full operational conditions. Conveying System Mechanical Components Chapter 5: Maintenance 143 of 170 Figure 83: Oil Capacities-APD, SPD, CPD Only* Vertical¹ Model Part No. Horizontal¹ Frame GE (OZ) DE (OZ) GE (OZ) DE (OZ) URAI-J 33 A0571182 3” DSL 8.5 4 16 6.5 URAI-J 45 A0571183 4” DSL 12.7 5.5 22.8 10.8 ¹GE= GEAR END, DE = DRIVE END Suggested Lubricants: Synthetic Oil Size of container Quart Gallon Case Part # 214.00002.00 A0573982 214.00004.00 *APD, SPD, CPD style vacuum blowers require a synthetic blend of lubricant for proper operation. Using other types of lubricant may void all warranties. For more information, refer to the blower manufacturers instruction manual. Conveying System Mechanical Components Chapter 5: Maintenance 144 of 170 Maintaining Filter Chambers VFC, SFC, CFC Filter Chambers VFC, SFC, CFC filter chamber maintenance is much easier if you use vinyl flex hose for making the final connection to the cover. See Figure 62 on page 126 for a complete parts list. To check the filter element: 1. Unlatch the clamp that secures the cover assembly. 2. Lift off the cover and look for element fouling or wear: • If the filter is worn, replace with P/N A0547008 (VFC225) or P/N A0547007 (VFC1000). • If the filter is lightly soiled, remove the filter and clean with compressed air. Blow it out from the inside. 3. To remove the filter: a. Note the orientation of the components. b. Unscrew the retaining cover. 4. Wipe down the gasket and filter retainer/VFC cover mating surfaces to ensure a good seal. 5. Blow out the cartridge filter with compressed air. Blow from the inside out. 6. Re-install the filter and filter retainer. Do not over tighten the retainer. A snug fit is required for a proper seal. 7. Secure the cover assembly with the clamp. • Periodically inspect the flapper assembly gasket and disk for signs of wear. A good vacuum seal is important for proper operation. • Periodically inspect the flapper dump assembly for proper operation. The flapper should swing freely. The counterbalance should be adjusted so the flapper remains open from 3/16” (4 mm) to 1/4” (6 mm) when not under vacuum. Inspecting ACA Series Filter Chamber Filter Bags Schedule regular filter bag inspections to maintain the operational efficiency of the filter chamber. Make sure that schedules coincide with materials that are being conveyed. Dusty materials require more frequent filter bag examinations. 1. Turn off compressed air and disconnect the electrical power supply. 2. Remove the stretcher clamp just below the externally mounted solenoid valves. Be careful to avoid damaging the gasket between tank sections. 3. Lift off the upper tank section with accumulator, blowpipes, and filter bag rack. 4. Inspect the filter bags for dust caking, dampness, or oil deposits. Any or all of these symptoms are indications of moisture or condensed oil in the compressed air supply. Conveying System Mechanical Components Chapter 5: Maintenance 145 of 170 5. Check compressed air supply in-line filters and clean or replace as needed. If moisture is condensing inside the filter chamber, you may need to insulate the chamber and the piping leading to the filter. This action should keep the surface moisture above the dew point and prevent condensation on filter bags. 6. Do not attempt to wash or reuse soiled ACA filter bags. If they are clogged, replace them with new filter bags. Contact the Parts Department for more information on replacement filter bags. 7. Inspect the filter bags for wear. Thinning bags may not stop fine dust when flexed with compressed air, or dust can escape into the clean air tank section and contaminate conveying air. Replace with new filter bags as needed. When re-installing ACA Series filter bags, make sure that the bag is turned inside out, with the glazed surface facing outward. 8. Carefully slip the bag over the bag cage. Position the filter bag all the way onto the bag cage, and place a clamp around the bag near the top of the bag rack plate. Tighten the clamp. Improperly installed clamps cause a poor dust seal. Dusting in the clean air exhaust is a normal condition after installing new filter bags, and should stop after the first several hours of operation. 9. Replace the upper tank section, with the gasket properly seated between upper and lower sections. Make sure the filter bags are hanging straight down and that the bags do not touch each other or the inside walls of the filter chamber. This action prevents excessive bag wear when compressed air pulses enter the bags. 10. Replace and tighten the stretch clamp. Maintaining VTPB, SPDB, CPDB Series Vacuum Power Unit Non-Reversing Valves Upper and lower non-reversing valves require periodic service to keep VTPB, SPDB, CPDB Series vacuum power units operating at peak efficiency. Contact the Parts Department for information on valve service kits and customer-recommended parts. Maintaining Upper Valves -5 to 15 HP (3.73-11.19 kW) VTPB Units (See Valve Assembly Drawings and Spare Parts Lists in Figures 86-89 on pages 166-169) Removing Upper Valves 1. Turn off and lock out the power switch for the vacuum power unit. Disconnect and lock out the power main to the unit; make sure to follow applicable safety regulations. 2. Turn off compressed air. Disconnect the compressed air line running to the pressure relief regulator. 3. Loosen the hose clamps that connect the upper valve to the incoming vacuum line and lower valve, and slide the hose back. 4. Loosen the set screws that secure the valve to the blower inlet. 5. Remove the valve from the power unit. Conveying System Mechanical Components Chapter 5: Maintenance 146 of 170 Disassembling Upper Valves 1. Remove the two (2) socket cap screws from the upper cap, and remove the upper cap. 2. Remove the six (6) socket cap screws from the end plate. Separate the end plate and air cylinder from the machined body. 3. Remove the cotter pin from the plunger. Unscrew the plunger from the air cylinder shaft. 4. Remove the four (4) socket cap screws holding the air cylinder to the end plate. Separate the cylinder and the end plate. Servicing and Reassembling Upper Valves 1. Clamp the air cylinder in a vise and unscrew the end cap. Using parts from the valve service kit, replace the seals in the air cylinder. Screw the end cap back on. 2. Secure the air cylinder to the end plate using the four (4) socket cap screws. 3. Screw a new plunger on the air cylinder shaft; secure it with the cotter pin. 4. Place a new gasket on the end plate; secure the end plate. 5. Reattach the upper cap to the air cylinder using two (2) socket cap screws. Reinstalling Upper Valves 1. Replace the O-rings in the machined body. 2. Position the valve on the blower inlet, making sure the valve seats properly. Tighten the set screws that secure the valve to the blower inlet. 3. Reconnect the valve inlet to the incoming vacuum line and the lower valve with the hose. Tighten the clamps. 4. Reconnect the compressed air line to the vacuum relief regulator. Maintaining Lower Valves - 5 to 15 HP (3.73-11.19 kW) VTPB Units Removing Lower Valves 1. Turn off and lock out the power switch for the vacuum power unit. Disconnect and lock out the power main to the unit; make sure to follow applicable safety regulations. 2. Turn off compressed air. Disconnect the copper compressed air line to the lower valve at the lower valve body. 3. Loosen the hose clamps that connect the valve to the T-Y tube, and slide the hose back. On units with optional sound enclosures, loosen the hose clamps between the discharge silencer and the U-bend. 4. Remove the screws holding the discharge silencer to the base of the vacuum power unit, and take off the discharge silencer. On units with optional sound enclosures, remove the screws securing the U-bend to the base, and pull the silencer out of the body of the lower valve. 5. Loosen the set screws holding the lower valve to the blower outlet, and remove the valve from the power unit. Conveying System Mechanical Components Chapter 5: Maintenance 147 of 170 Disassembling Lower Valves 1. Remove the pipe nipple and pipe coupler from the lower cap. 2. Remove the two (2) socket cap screws from the lower cap. 3. Remove the lower cap from the machined body. 4. Remove the six (6) socket cap screws from the end plate. Separate the end plate from the machined body. 5. Remove the cotter pin from the plunger. Unscrew the plunger from the air cylinder shaft. 6. Remove the four (4) socket cap screws holding the air cylinder to the end plate. Servicing and Reassembling Lower Valves 1. Clamp the air cylinder in a vise and unscrew the end cap. Using parts from the valve service kit, replace the seals in the air cylinder. Screw the end cap back on. 2. Secure the air cylinder to the end plate using the four (4) socket cap screws. 3. Screw a new plunger on the air cylinder shaft; secure it with the cotter pin. 4. Place a new gasket on the end plate; secure the end plate to the machined body using six (6) socket cap screws. 5. Fasten the lower cap to the air cylinder using two (2) socket cap screws, a new gasket, and a new O-ring. 6. Screw the pipe nipple and coupler back into place. Reinstalling Lower Valves 1. Replace the O-rings in the machined body. 2. Position the valve on the vacuum power unit. Tighten the set screws that secure the valve to the blower outlet. 3. Reconnect the valve to the T-Y tube by sliding the radiator hose back into place. Tighten the hose clamps. 4. Reconnect the copper compressed air tube to the fitting on the lower valve. 5. Push the discharge silencer into the valve body, and secure it with the screws. On units with optional sound enclosures, push the short silencer into the valve body, reinstall the U-bend, and secure both ends with the radiator hose and hose clamps. Conveying System Mechanical Components Chapter 5: Maintenance 148 of 170 Maintaining Upper Valves- 25 and 30 HP (18.65-22.38 kW) VTPB, SPDB, CPDB Units (See Valve Assembly Drawings and Spare Parts Lists in Figures 56-57 on Pages 121-122) Removing Upper Valves 1. Turn off and lock out the power switch for the vacuum power unit. Disconnect and lock out the power main to the unit; make sure to follow applicable safety regulations. 2. Turn off compressed air. Disconnect the compressed air line running to the pressure relief regulator on the upper valve. 3. Loosen the set screws securing the inlet filter, and remove the filter. 4. Loosen the hose clamps that connect the upper valve to the T-Y tube, and slide the hose back. 5. Loosen the set screws that secure the valve to the blower inlet. 6. Remove the valve from the power unit. Disassembling Upper Valves 1. Remove the pipe coupler and the pipe nipple from the valve. 2. Remove the two (2) socket cap screws from the upper cap, and remove the upper cap from the valve body. 3. Remove the six (6) socket cap screws from the end plate. Separate the end plate from the valve body. 4. Remove the locknut from the air cylinder shaft. 5. Remove the two (2) plunger support discs and the plunger from the air cylinder shaft. 6. Remove the four (4) socket cap screws holding the air cylinder to the end plate. Separate the cylinder and the end plate. Servicing and Reassembling Upper Valves 1. Clamp the air cylinder in a vise and unscrew the end cap. Using parts from the valve service kit, replace the seals in the air cylinder, and screw the end cap back on. 2. Fasten the air cylinder to the end plate using the four (4) socket cap screws. 3. Place the plunger support discs and a new plunger on the air cylinder shaft. 4. Thread the locknut back on the air cylinder shaft. 5. Reconnect the end plate to the valve body using six (6) socket cap screws and a new gasket. 6. Reconnect the upper cap to the air cylinder using two (2) socket cap screws. 7. Reconnect the pipe coupler and pipe nipple to the valve. Conveying System Mechanical Components Chapter 5: Maintenance 149 of 170 Reinstalling Upper Valves 1. Replace the O-ring in the valve body. 2. Position the valve on the power unit, making sure the valve seats properly. Tighten the set screws that secure the valve to the blower inlet. 3. Reconnect the valve inlet to the incoming vacuum line using the radiator hose. Tighten the clamps. 4. Reconnect the compressed air line to the vacuum relief regulator. 5. Secure the inlet filter to the valve, and tighten the set screws. Maintaining Lower Valves-25 and 30 HP (18.65-22.38 kW) VTPB, SPDB, CPDB Units Removing Lower Valves 1. Turn off and lock out the power switch for the vacuum power unit. Disconnect and lock out the power main to the unit; make sure to follow applicable safety regulations. 2. Turn off compressed air. Disconnect the copper compressed air line to the lower valve at the lower valve body. 3. Loosen the hose clamps that connect the valve to the T-Y tube, and slide the hose back. 4. Remove discharge silencers. Unscrew the vertical silencer and unbolt the bracket holding the silencer under the unit. Pull the silencer out of the valve body. 5. Loosen the set screws holding the lower valve to the blower outlet, and remove the valve from the power unit. Disassembling Lower Valves 1. Remove the pipe nipple and pipe coupler from the lower cap. 2. Remove the two (2) socket cap screws from the lower cap. 3. Remove the lower cap from the machined body. 4. Remove the six (6) socket cap screws from the end plate. Separate the end plate from the machined body. 5. Remove the cotter pin from the plunger. Unscrew the plunger from the air cylinder shaft. 6. Remove the four (4) socket cap screws holding the air cylinder to the end plate. Conveying System Mechanical Components Chapter 5: Maintenance 150 of 170 Servicing and Reassembling Lower Valves 1. Clamp the air cylinder in a vise and unscrew the end cap. Using parts from the valve service kit, replace the seals in the air cylinder. Screw the end cap back on. 2. Secure the air cylinder to the end plate using the four (4) socket cap screws. 3. Screw the two (2) plunger support disks and a new plunger on the air cylinder shaft. 4. Thread the locknut back on the air cylinder shaft. 5. Place a new gasket on the end plate; secure the end plate and valve body using six (6) socket cap screws. 6. Reconnect the lower cap to the air cylinder using two (2) socket cap screws and a new O-ring. Reinstalling Lower Valves 1. Replace the O-ring in the valve body. 2. Position the valve back on the vacuum power unit. Tighten the set screws that secure the valve to the blower outlet. 3. Insert the silencer into the valve body, and bolt it to the base at the bracket. Screw the vertical silencer back on. 4. Reconnect the compressed air line to the valve. 5. Reconnect the valve to the T-Y tube using the radiator hose and hose clamps. Tighten the hose clamps. Maintaining Vacuum Receivers and Filter/ Receiver Combinations • Clean the vacuum receiver filter cartridges as needed. Blow clean with compressed air. Blow out from the inside for best results. If the screen becomes bent or warped, or the gasket becomes worn, replace it to prevent material carry-over to the VFC filter chamber. • Clean and inspect the gasket. Replace it if it is worn. • Invert SR Series vacuum hoppers onto their flat covers for easier maintenance. • If the optional SR Series vented internal sequencing valve is installed, make sure you remove compressed air prior to servicing. • If optional supplemental cloth filter bags are being used, periodically inspect for wear and fouling. Clean or replace as necessary. Conveying System Mechanical Components Chapter 5: Maintenance 151 of 170 5-3 Cleaning the Collection Bin (All Models Except VFC, SFC, CFC 225 and VFC, SFC, CFC 1000) Use the following procedure to clean the collection bin: 1. Open the toggle fasteners on the bottom of the filter 2. Remove the collection bin. 3. Empty contents of the collection bin and completely clean it. 4. AFC-A/AFC-K Only: Adjust the counterbalance so that the dump valve remains open from 3/16” to 1/4” (4 mm to 6 mm) when not under vacuum. 5. Wipe down the gasket and collection bin mating surfaces to ensure a good seal. A good vacuum seal is important for proper operation. Replace gasket if necessary. 6. Check the filter element for excessive wear or damage. If the filter element is damaged, replace it immediately. (See Figure 62 for replacement parts). 7. Return the collection bin to the bottom of the filter. 8. Close the toggle fasteners. 5-4 Cleaning the Filter Shroud (VFC, SFC, CFC 225 and VFC, SFC, CFC 1000 Only) Use the following procedure to clean the filter shroud: 1. Remove the dust container from the filter shroud by unclamping the band clamp or loosening the drawstring. (Filters that have been trimmed for 5-gallon pails do not have a drawstring.) 2. Empty the contents of the collection bin and completely clean it. 3. Remove the worm clamp from the bottom of the filter stand mounting plate, and remove the filter shroud. 4. Clean the filter shroud by blowing compressed air through it. 5. Slip the filter shroud over the retaining ring located on the bottom side of the filter stand mounting plate. Secure it with the worm clamp provided. 6. Place the dust container below the filter chamber stand and insert the filter shroud. 7. Fasten the filter shroud to the dust container using either a band clamp or the drawstring. (Filters that have been trimmed for 5-gallon pails do not have a drawstring.) Conveying System Mechanical Components Chapter 5: Maintenance 152 of 170 5-5 Corrective Maintenance Dealing with Shortened ACA Series Filter Bag Life If ACA filter bags wear our rapidly, refer to the following list to diagnose certain difficulties: Chemical Attack Filter bag material may degrade from certain chemicals in the dust of the air stream. Moisture Filter bag material may shrink or degrade from excessive moisture in the filter chamber. Abrasion If filter bags are improperly installed, bags can rub together or against filter chamber walls, resulting in excessive wear. Abrasion on the filter bags near the air inlet area indicates that a dust-impingement baffle may be required. High Temperature If operating temperatures are above the recommended limit for filter bag material, damage may result. Consult the Service Department for assistance if difficulties occur. Conveying System Mechanical Components Chapter 5: Maintenance 153 of 170 Chapter 6: Troubleshooting 6-1 Introduction The utmost in safety precautions should be observed at all times when working on or around the machine and the electrical components. All normal trouble-shooting must be accomplished with the power off, line fuses removed, and with the machine tagged as out of service. The use of good quality test equipment cannot be over-emphasized when troubleshooting is indicated. Use a good ammeter that can measure at least twice the AC and DC current that can be encountered for the machine. Be sure that the voltmeter has at least minimum impedance of 5,000 OHMS-per-volt on AC and 20,000 OHMS-per-volt on DC scales. Popular combination meters, VOM and VTVM can be selected to provide the necessary functions. Before making haphazard substitutions and repairs when defective electrical components are malfunctioning, we recommend that you check the associated circuitry and assemblies for other defective devices. It is common to replace the obviously damaged component without actually locating the real cause of the trouble. Such hasty substitutions will only destroy the new component. Refer to wiring diagrams and schematics. Locating mechanical problems, should they occur, is relatively straightforward. When necessary, refer to the parts catalog section. Refer to specific control panel operation and instruction manual for additional details and Troubleshooting information. Problem The pump doesn’t run even though it is on line. (Refer to enclosed Control Panel Manual) Possible Cause Possible Remedy The motor overload tripped. Reset the overload and check the motor for the proper amp draw as listed on the serial tag. No demand signal/stations offline. Check control panel. Control panel problem. Verify wire connections. Inspect output cards. Main fuse in power drop or optional fused disconnect has blown. Motor contactor is faulty. Conveying System Mechanical Components Chapter 6: Troubleshooting Replace the fuse. Check for 3-phase voltage. Repair or replace as required. 154 of 170 Problem Possible Cause Possible Remedy The bin below the vacuum receiver is full if the amber receiver indicator light is off. The receiver is off line. Static convey time was set to zero. Normal operation. When hopper level drops, material begins conveying to it. Put it on line via menus. Put in a reasonable convey time via menus. Normal operation. Throw field-installed switch to put hopper back in the loading sequence. Field installed station bypass switch is simulating a bin-full condition. A vacuum receiver bypasses in the Loading cycle. (Refer to enclosed Control Panel Manual) The field-installed station bypass switch is bad or miswired. Insufficient compressed air to shift valves. The Bin-Full switch sensor fails to close. The Receiver-Full proximity sensor is fouled, creating a false reading (Volume Fill systems only). The Receiver-Full proximity sensor has failed closed (Volume Fill systems only). Pressure is present at the vacuum inlet. No-Convey alarm. (Part of vacuum control panel. Refer to enclosed Control Panel Manual) Supply 80 psi (552 kPa) compressed air to all compressed air- operated valves. Standard switch is normally open, held closed by the magnet. Check for the presence of the magnet and for proper switch operation. Wipe off the proximity sensor. Re-adjust if needed; see Page 86. Replace. Blowback solenoid failed open. Material supply empty. Switch any two wires at the incoming power. Check filter chamber or pump. Refill the supply. Material supply bridging. Agitate material supply. Pick up device not in supply. Flapper stuck in open position. Power to vacuum pump off. Bad level sensor. Re-insert the probe. Plugged material line. Find and remove obstruction. Vacuum line leak. Find and repair leak. Check for signal, sufficient compressed air, proper wiring and operation. Improper pump rotation. Sequence-T valve problem (where used). Conveying System Mechanical Components Repair, replace, or rewire. Chapter 6: Troubleshooting Clear flapper of obstructions. Inspect power. Replace level sensor. 155 of 170 Problem Possible Cause Material or vacuum line plugged. Filter chamber filter dirty. Vacuum hopper filter dirty. Improper piping. Convey time set too long. Reduce convey time. Collapsing hoses. Inspect hoses. Faulty vacuum switch. Take off compartment closed. Test – ON – replace switch. Vent valve on pump package not operating correctly. Conveying times are too long (Time Fill only). Vacuum receivers are being overfilled. (Refer to enclosed Control Panel Manual) Special convey enabled. Maximum conveying times are too long (Volume Fill only) and the Receiver Full proximity switch(es) are not being recognized by the PLC. Poor take-off adjustment. Vacuum receivers are being under-filled. Conveying times are too short (Time Fill only). (See control panel’s O & I.) Vacuum line leak. No material to convey. Vacuum filter is plugged. Conveying System Mechanical Components Find and remove the obstruction, such as a coupling gasket and gaylord bags. Clean filter. Clean filter. Check for signal, sufficient compressed air, proper wiring and operation. Check for signal, sufficient compressed air, proper wiring and operation. Locate and correct. Bad atmospheric/sequence-T valve. High-Vacuum alarm. Possible Remedy Chapter 6: Troubleshooting Adjust take-off box. Observe and time the hopper(s) when loading. Note the time needed to fill a hopper. Set the conveying time to a few seconds less. Check proximity sensors for proper operation and proper wiring to PLC. Repair. Reset the conveying times to reasonable times. Re-adjust if needed; see Page 86. Observe and time the hopper(s) when loading. Note the time needed to fill a hopper. Set the conveying time to a few seconds more. Find and repair leak. Make sure pickup probe is buried in material source. Clean and/or replace filter. 156 of 170 Problem Filter chamber filter cartridge is becoming obstructed too frequently by fines and dust. Pumps and receivers are online, but the pumps are not conveying material. (Refer to enclosed Control Panel Manual for specific instructions.) Possible Cause Possible Remedy Dump Delay time set to zero, or insufficient dump delay time. Set dump delay time to the time it takes the largest vacuum hopper in the system to dump. Dusty material. Optional cyclone separator or lowhead separator may be needed – Consult sales rep. Dusty material — Optional compressed air filter cleaning may be needed on filter chamber. No material demand at receivers if none of the amber lights on the optional light board are lit. The on-line receivers are not assigned to the pumps that are on-line. Consult sales representative. Consult sales representative. Normal operation. Pump packages shut off thirty (30) seconds after no demand is detected for the time programmed. Reconfigure the control panel, assigning the pumps to the desired hopper. In cases where numerous alarm conditions occur, alarm messages build up in the display buffer. Each time one is released from the buffer, the alarm sounds. The operator may: Optional audible/visual alarm continues to signal after the Press-To-Silence button is pressed. (Refer to enclosed Control Panel Manual for specific instructions.) The alarm is triggered every time an alarm message displays. • Press the silence button after each message • Disable the alarm using the control panel keypad • Cancel No-Convey alarm(s) . Correct the problem causing the alarm. Alarm will not trigger again until another high vacuum condition occurs. If multiple alarm messages are in the buffer, the button may need to be pressed a few times. To cancel No Convey alarm(s): • Take the problem receiver(s) off line with field-installed station bypass switches. • Take the problem receiver(s) off line with the control panel. • Remove the material demand by filling the bin below the vacuum receiver. Conveying System Mechanical Components Chapter 6: Troubleshooting 157 of 170 Problem Possible Cause Possible Remedy Optional audible alarm is not functioning. The alarm package is wired incorrectly. Correct wiring. Consult wiring diagram. (Refer to enclosed Control Panel Manual for specific instructions.) Alarm package component failure. Troubleshoot and repair/replace problem. • Blower is dead-headed. Check for obstruction. • Vent valve is not operating. Check for proper signal, voltage, and 80 to 90 psi (552 to 621 kPa) compressed air. Vacuum conveying rate is declining due to a vacuum loss in the system. Conveying System Mechanical Components Pump package blower problem. Use a cfm/cfh monitoring device to ensure that blower cfm/cfh is to the manufacturer’s specifications. Consult Service Engineer if problem persists. Chapter 6: Troubleshooting • Worn seals in blower. Rebuild/replace blower. • Worn bearings in blower. Rebuild or replace. • Loose drive belt(s). Tighten or replace if worn. Follow the vacuum path from the blower through the filter, piping, valves and material receivers to isolate where the loss occurs. Filter chamber problem. The vacuum at the filter chamber should be the same as the blower generates. If the vacuum at the filter chamber is adequate, the problem is down line. 158 of 170 Problem Possible Cause Possible Remedy • Dirty filter. Clean or replace filter. • Loose clamps, gaskets or couplers. Tighten or replace. • Filter chamber discharge flapper not sealing under vacuum. Check for proper operation; clean or repair as needed. Vacuum conveying rate is declining due to a vacuum loss in the system. (Cont’d.) Pump package blower problem. Use a cfm/cfh monitoring device to ensure that blower cfm/cfh is to the manufacturer’s specifications. (Cont’d.) Consult Service Engineer if problem persists. • Check for faulty compressed air blowback solenoid. Check for voltage signal during cleaning cycle, proper solenoid operation, incorrect wiring, proper compressed air connection, and for worn plunger in valve. Vacuum line problem. Disconnect the vacuum line at the first vacuum hopper and block it off. The vacuum here should equal the vacuum at the blower. Allow a few seconds for vacuum to build. If the vacuum here is low, disconnect the piping halfway to the first vacuum hopper and check the vacuum there. If proper vacuum exists, the problem is upstream. If not, work backward to isolate the vacuum loss. • Tighten loose pipe couplers; replace worn gaskets as needed. • Replace any damaged piping found. Leaks in vacuum lines between valves. Conveying System Mechanical Components Chapter 6: Troubleshooting Check for leaks as described in previous steps. 159 of 170 Problem Possible Cause Possible Remedy • Replace or re-install worn or misaligned gaskets. • Hopper discharge flapper not sealing under vacuum. 1) Replace worn or missing gasket. 2) Clean fouled flapper. 3) Check counterweight for proper operation. Repair or adjust as needed. Vacuum leak(s) in vacuum hoppers. Vacuum conveying rate is declining due to a vacuum loss in the system. (Cont’d.) Vacuum leaks in material lines. Material take-offs not properly adjusted. The blower is dead-headed. Conveying System Mechanical Components Chapter 6: Troubleshooting • Internal check valves missing or damaged. On single line Y systems, internal check valves must be installed in the vacuum hoppers to seal all hoppers not being conveyed to. If the check valves are present and undamaged, they may be pushed too far onto the tube stub to permit a proper seal. Also, if the hopper is over-filled, the check valve may not seal properly. Check for leaks as described in previous steps. Too much air and not enough material or too much material and not enough air. Close takeoff compartment material inlet, slowly open until you hear material surging and slugging. Close material inlet until surging disappears. On most systems, a proper adjustment generates a 6” to 10” Hg (203 to 339 millibars) vacuum. Check the blower inlet for obstruction. 160 of 170 Problem Material is sucked from the filter chamber and through the blower. Possible Cause Possible Remedy Filters in the filter chamber are dislodged, worn, or not seated properly on the gasket. Replace or repair immediately. If the exhaust silencer has material in it, replace it to prevent fire hazard. The material conveyed is not what the system was designed to convey. Very dusty materials have different conveying needs. Consult manufacturer for advice on hardware requirements. Other service problems or questions can be answered by contacting the Service Department. Conveying System Mechanical Components Chapter 6: Troubleshooting 161 of 170 Chapter 7: Appendix 7-1 Technical Specifications The following design information is provided for your reference: 1. No modifications are allowed to this equipment that could alter the CE compliance 2. Ambient temperature: 40 degrees Celsius – Maximum (104 degrees Fahrenheit) 3. Humidity range: 50% relative humidity 4. Altitude: Sea level 5. Environment: Clean, dust-free and non-explosive 6. Radiation: None 7. Vibration: Minimal, i.e. machine mounting 8. Allowable voltage fluctuation: +/- 10% 9. Allowable frequency fluctuation: Continuous +/- 1% Intermittent +/- 2% 10. Nominal supply voltage: 460/3/60 (Verify on serial number tag) 11. Earth ground type: protective conductor) TN (system has one point directly earthed through a 12. Power supply should include a ground connection. 13. Over-current protection is supplied in the conveying system, but additional protection should be supplied by the user. 14. The door-mounted disconnect serves as the electrical disconnect device. 15. Conveying system is not equipped with local lighting. 16. Functional identification 17. Conveying system is equipped with a CE mark 18. Conveying system is supplied with an operating manual in the language of the destination country. 19. Cable support may be required for power cord, depending on final installation. 20. No one is required to be in the interior of the electrical enclosure during the normal operation of the unit. Only skilled electricians should be inside the enclosure for maintenance. 21. Doors can be opened with a screwdriver, but no keys are required. 22. Two-hand control is not required or provided. 23. All components should be moved around and set in a place with a lift truck or equivalent. 24. There are no frequent repetitive cycles that require manual control⎯repetitive functions are automatic while the conveying system is operating. Conveying System Mechanical Components Chapter 7: Appendix 162 of 170 25. An inspection report detailing the functional test is included with the conveying system. 26. The machine is not equipped with cableless controls. 27. Color-coded (harmonized) power cord is sufficient for proper installation. Conveying System Mechanical Components 0 163 of 170 7-2 Drawings and Diagrams Figure 84: Non-Reversing Valve Cycle of Operation (VTP, APD, SPD, CPD Pumps) VTP XPD A0535302 Conveying System Mechanical Components 0 164 of 170 Figure 85: Equipment Cycles Conveying System Mechanical Components 0 165 of 170 7-3 Spare Parts List Figure 86: Vacuum Power Units; 5 to 15 hp (3.73-11.19 kW) Models Exploded View Conveying System Mechanical Components 0 166 of 170 Figure 87: Vacuum Power Units; 5 to 15 hp (3.73-11.19 kW) Models Spare Parts List Part number W00017529 W00017688 W00017552 W00052175 W00011770 W00052546 W00052181 W00052178 W00011490 W00011494 W00011491 W00011495 W00001596 W00000334 W00001142 W00013971 W00001135 W00001781 Part description Air cylinder assembly, upper valve, includes: (1) #17688 air cylinder, (1) #1958 plunger, (1) #17812 gasket, (1) #3237 cotter pin, (1) #17957 end plate with seat, (4) #2337 socket head screws, (1) #13749 pipe nipple Air cylinder assembly, lower valve, includes: (1) #17529 air cylinder, (1) #1958 plunger, (1) #17812 gasket, (1) #3237 cotter pin, (1) #17639 end plate with seat, (4) #2337 socket head screws, (1) #13749 pipe nipple, and (1) 17650 O-ring Air cylinder, lower valve Air cylinder, upper valve Air cylinder seal replacement kit Belt, drive, 3VX400, 5 hp unit Belt, drive, 3VX475, 7½ hp unit Belt, drive, BX42, 10 hp unit Belt, drive, BX44, 15 hp unit Bushing, blower sheave, 7½ hp and 10 hp units Bushing, blower sheave, 15 hp unit Bushing, motor sheave, 5 hp unit Bushing, motor sheave, 7½ hp and 10 hp units Bushing, motor sheave, 15 hp unit Cap, end, for non-sound enclosure units Clamp, hose, for P/N 3816, 2½” (approx. 63.5 mm) ID hose Connector, 90 deg., for ¼” OD poly tube Connector, 90 deg., for ¼” OD copper tube Connector, straight, for ¼” OD poly tube Gasket, 1/32” W00001043 W00003816 W00052089 W00052014 W00017733 Gauge, vacuum Hose, rubber, 2½” ID x 3½” long Silencer, discharge, horizontal Silencer, discharge, vertical Silencer, discharge, used with W00052089 on S/E units W00018087 W00018088 Part number Part description Part number Part description W00011484 Sheave, blower, less bushing, 7½ hp unit W00011483 Sheave, motor, less bushing, 7½ hp unit W00052545 Sheave, blower, less bushing, 10 hp unit W00052544 Sheave, motor, less bushing, 7½ hp unit W00052183 Sheave, blower, less bushing, 15 hp unit W00052184 Sheave, motor, less bushing, 15 hp unit Part number W00001045 W00001738 W00017650 W00003237 W00001958 W00013961 W00016288 W00014988 W00014987 Part description O-ring, 2½” ID O-ring, 3” ID O-ring, 4¾” ID Pin, cotter, 1/16” Plunger, 3” Regulator, air pressure Seal, air entrance fitting Solenoid valve, 115 VAC, vacuum-vent Solenoid valve, 24 VDC, vacuum-vent Part number W00014659 W00014658 W00018089 W00001174 W00005592 A0547953 W00052055 W00017802 Part description Solenoid valve, 115 VAC, kay valve Solenoid valve, 24 VDC, kay valve Spring, air cylinder Tubing, polyethylene, ¼” OD Tubing, copper, ¼” OD Vacuum switch, 14” Hg Valve assembly, lower Valve assembly, upper Refer to the Bill of Materials report included in the Customer Information Packet for a complete listing of parts. Conveying System Mechanical Components 0 167 of 170 Figure 88: Vacuum Power Units; 25 to 30 hp (18.65-22.38 kW) Models Exploded View Conveying System Mechanical Components 0 168 of 170 Figure 89: Vacuum Power Units; 25 to 30 hp (18.65-22.38 kW) Spare Parts List Part number W00018616 W00018617 W00017919 W00017918 W00018625 W00018626 W00016022 W00533012 W00054462 W00052238 W00016019 W00001466 W00001142 W00001135 W00013971 W00012767 W00012218 W00001043 W00018017 W00018018 W00003246 W00051283 W00002353 W00003231 W00018016 W00018112 W00013961 W00016288 W00002929 W00014988 W00014987 W00014659 W00014658 W00054463 W00533127 W00054461 W00533128 W00001174 W00005592 A0547953 W00018080 W00018081 Part description Air cylinder assembly and valve repair kit; for W00018080 upper valve Air cylinder assembly and valve repair kit; for W00018081 upper valve Air cylinder, lower valve Air cylinder, upper valve Air cylinder seal replacement kit; for W00017919 lower valve air cylinder Air cylinder seal replacement kit; for W00017918 upper valve air cylinder Belt, drive, 25 hp; 2 required Belt, drive, 30 hp; 2 required Bushing, blower; 25 hp units Bushing, blower; 30 hp units Bushing, motor; 25 hp and 30 hp units Clamp, hose; for 4½” ID hose Connector, 90 deg. elbow; for ¼” OD poly tube Connector, straight; for ¼” OD copper tube Connector, 90 deg.; for ¼” OD copper tube Connector, straight; for ¼” OD copper tube Elements, filter, inlet silencer Gauge, vacuum Gasket, valve; end cap mounting Gasket, air cylinder mounting Hose, rubber, 4½” ID x 4” long Silencer, horizontal Silencer, UH-4, vertical O-ring, 4½” ID x 4¾” OD x 1/8” thick O-ring, 8¼” ID x 8½” OD x 1/8” thick Plunger, upper and lower valves Regulator, air pressure Seal, valve air entrance fitting; Stat-O-Seal Screen, exhaust muffler Solenoid valve, 115 VAC, vacuum/vent Solenoid valve, 24 VDC, vacuum/vent Solenoid valve, 115 VAC, kay valve Solenoid valve, 24 VDC, kay valve Sheave, blower, less bushing; 25 hp Sheave, blower, less bushing; 30 hp Sheave, motor, less bushing; 25 hp Sheave, motor, less bushing; 30 hp Tubing, polyethylene, ¼” OD; per foot Tubing, copper, ¼” OD; per foot Vacuum switch, 14” Hg Valve assembly, lower Valve assembly, upper Refer to the Bill of Materials report included in the Customer Information Packet for a complete listing of parts. Conveying System Mechanical Components 0 169 of 170 7-4 Technical Assistance Parts and Service Department The ACS Customer Service Group will provide your company with genuine OEM quality parts manufactured to engineering design specifications, which will maximize your equipment’s performance and efficiency. To assist in expediting your phone or fax order, please have the model and serial number of your unit when you contact us. A customer replacement parts list is included in this manual for your convenience. ACS welcomes inquiries on all your parts needs and is dedicated to providing excellent customer service. For immediate assistance, please contact: • North, Central and South America, 8am – 5pm CST +1 (800) 483-3919 for drying, conveying, heating and cooling and automation. For size reduction: +1 (800) 229-2919. North America, emergencies after 5pm CST (847) 439-5855 North America email: [email protected] • Mexico, Central & South America Email: [email protected] • Europe, Middle East & Africa +48 22 390 9720 Email: [email protected] • India +91 21 35329112 Email: [email protected] • Asia/Australia +86 512 8717 1919 Email: [email protected] Sales and Contracting Department Our products are sold by a worldwide network of independent sales representatives. Contact our Sales Department for the name of the sales representative nearest you. Let us install your system. The Contract Department offers any or all of these services: project planning; system packages including drawings; equipment, labor, and construction materials; and union or non-union installations. For assistance with your sales or system contracting needs please Call: North, Central and South America +1 (262) 641-8600 or +1 (847) 273-7700 Monday–Friday, 8am–5pm CST • Europe/Middle East/Africa +48 22 390 9720 • India +91 21 35329112 • Asia/Australia +86 512 8717 1919 Facilities: ACS offers facilities around the world to service you no matter where you are located. For more information, please visit us at www.acscorporate.com Asia/Australia: United States: India ACS Suzhou ACS Schaumburg – Corporate Offices ACS India 109 Xingpu Road SIP 1100 E. Woodfield Road Gat No. 191/1, Sandbhor Suzhou, China 215126 Suite 588 Complex Phone: + 86 8717 1919 Schaumburg, IL 60173 Mhalunge, Chakan, Tal Khed, Fax: +86 512 8717 1916 Phone: + 1 847 273 7700 Dist. Pune 410501, India Fax: + 1 847 273 7804 Phone: +91 21 35329112 Europe/Middle East/Africa: Fax: + 91 20 40147576 ACS New Berlin – Manufacturing Facility ACS Warsaw th 2900 S. 160 Street Ul. Działkowa 115 New Berlin, WI 53151 02-234 Warszawa Phone : +1 262 641 8600 Phone: + 48 22 390 9720 Fax: + 1 262 641 8653 Fax: +48 22 390 9724 Conveying System Mechanical Components 0 170 of 170