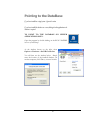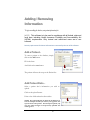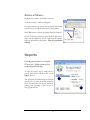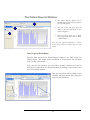
1
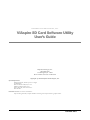
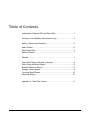
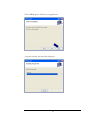
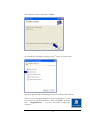
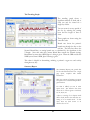
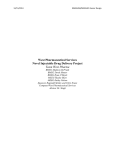
INSPIRED TECHNOLOGIES, INC.
VIAspire SD Card Data Utility User’s Manual
VIAspireSDCard
SoftwareUtility
LT00-0020 REV 0
INSPIRED TECHNOLOGIES, INC
VIAspire SD Card Software Utility
User’s Guide
Inspired Technologies, Inc.
1061 Main Street
N. Huntingdon, PA 15642
Phone 724.861.5510 • Fax 724.861.5530
copyright © 2009 Inspired Technologies, Inc.
System Requirements:
IBM Compatible PC, Pentium processor or higher
128 MB of Ram
Microsoft Windows 2000, XP, or Vista
10MB of available hard disc space
SVGA (800 x 600) 16-bit color monitor
SD Card reader
Functional overview: The software is intended to:
Input data files generated by VIAspire SmartDose O2 dosing units and present data in graphical format.
LT00-0020 REV 0
Table of Contents
Installing the VIAspire SD Card Data Utility .................................... 1
Pointing to the DataBase (client/server only) .................................. 5
Adding / Removing Information....................................................... 6
Add a Patient .................................................................................. 6
Add Patient Data............................................................................. 6
Delete a Patient .............................................................................. 7
Reports ........................................................................................... 7
The Patient Reports Window (overview) ......................................... 8
Daily Usage by Month Report ......................................................... 8
Breath Distribution Report............................................................... 9
Dosage Volume Report................................................................... 9
Trending Graph Report ................................................................. 10
Summary Report ........................................................................... 10
Appendix A: Raw Files Format..................................................... 11
Installing the VIAspire SD
Data Utility
The VIAspire SD Card Data Utility is a client-server solution, but can also
be installed on a single computer.
When the CD Rom is inserted, you will see a menu as shown below. Install the server
side first by clicking on the first button.
You will then see the following windows:
1
Click Next -
At the window below, you can choose a new location for the database by clicking on
the “Browse” button, or accept the default location. Click Next.
2
Click on Next again to load the server applications.
A progress window with status bar will appear.
3
When finished with the install, click on Close.
Now install the Client Side by clicking on the 2nd button as shown below:
Repeat the process used for installing the server to install the client software.
When you have completely installed the server and the client, you will
have an icon on your desktop labeled – “RUN VIASPIRE” as shown
here. Congratulations – you have successfully installed the
software!!
4
Pointing to the DataBase
If you have installed on a single system – Ignore this section
If you have installed the database on a server, linking the client application to the
database is required.
TO POINT TO THE DATABASE ON SERVER
APPLICATIONS ONLY:
Open the program by double clicking on the RUN VIASPIRE
icon on your desktop.
At the window shown on the right, select
Options > Database > Set DB Connection
You will then see the window below. Simply
enter the location of the installed database (on
another computer, LAN Drive, or server location.
5
Adding / Removing
Information
To begin assembling the database, enter patient information first.
NOTE: This software is to be used in compliance with all federal, state and
local laws, including Health Insurance Portability and Accountability Act
(HIPAA) requirements. Only trained and authorized users are to use
software. Security requirements for Patient information are assumed by the user of this software. Add a Patient To enter a patient to the database, simply
click on the add button.
Fill in the form
And click on the save button
The patient will now show up on the Patient List
Add Patient Data –
Select a patient who’s information you wish to
upload.
Click on the upload button.
Point to the folder where the data resides.
NOTE: The upload will bring in all data in the folder that is
from the VIAspire Portable (csv format). Keep patient data
separated from other patients. On subsequent uploads, only
new data will be brought in and previously uploaded data
will be ignored.
6
Delete a Patient –
Highlight the patient to be deleted on the list
A “Delete Patient?” window will appear.
Pay special attention to ensure that the patient listed is the
patient that you would like deleted from the database.
Select Yes button to delete this patient from the database.
NOTE: Deleting a patient from the database will remove
them from the patient list as well as removing all data that
had been uploaded for this patient. This is a permanent
deletion.
Reports
Generating reports for patients is easy and quick.
When you select / highlight a patient on the list,
statistics will populate on the right.
To open the report viewer, simply select a
patient from the list and then click on the
reports button.
This will open the Patient Reports window
and allow you to select from various reports,
select the timeframe for reports, and allow
printing and exporting of data in easy to
read, graphical form.
7
1
2
The Patient Reports Window:
1. The Patient Reports window has 5
standard reports accessed by the tabs at
the top of the graphs.
1
2. The area on the left gives users the
ability to select the time frame for the
charts and graphs.
3
2
3. The tool buttons allow you to print,
format pages and export data to Excel
or PDF formats.
Note that the patient information is always
shown along with the creation date for the
report.
Daily Usage by Month Report
The first chart shown in the Patient Reports window is the Daily Usage (by
Month) report. This simply shows the number of hours that the unit has been
used each day of the month.
Note that the date selection area only allows monthly selections and can be
advanced or decreased in one month increments by clicking on the arrows at the
top of the monthly calendar.
Days that show data will be bolded on the
calendar, while days without data (usage) are
shown in non-bolded text.
8
Breath Distribution Report:
By clicking on the Breath Distribution tab, you will see a report showing the percentage
of breaths taken at each breath rate during the time frame selected.
Because the SD Card in the VIAspire
records a record at each and every breath,
this can a compilation of a significant
number of breaths. For example, if we were
to look at a one month period where a
patient used the unit for only 4 hours each
day, and assuming an average breath rate of
only 20 BPM, this would be:
20 BPM * 60 min/hour * 4 hours * 30 days
= 144,000 breaths.
Note: This chart rounds the breath rates into 0.5 BPM increments to give a general
overview of the distribution of the patient’s breath rate over time.
Dosage Volume Report
By clicking on the Dosage Volume tab a report showing both the patient setting and
modes for the time period selected. Select the desired time period to view on the left
and the graph will update to reflect data for that time period.
The x-axis of the graph is patient settings.
On this chart, the patient had the settings
knob on 2 most of the time, but also had
used the 1 & 3 settings as well.
The stacking in each bar shows the doses at
each mode of the VIAspire unit; normal
mode, Sport 1 dose, and Sport 2 dose.
Normal mode provides 16 ml /setting of
oxygen on each breath, so a patient on a 2
setting in normal mode will receive 32 ml of
O2 on each breath.
Sport 1 dose provides an additional 16 ml over the normal mode, and Sport 2 dose
gives an extra 32 ml over normal mode. In this example, when the user had the
settings knob on the 2 setting for just over 60% of the time. They were in setting 2
normal mode more than half of that time, but got sport doses 1 & 2 for periods as
well.
9
The Trending Graph
The trending graph shows a
significant amount of detail and as
such, can only be viewed for a
single day of data.
You can zoom in on any period of
the day by selecting the starting
hour and the length of data to
show.
Three graphs are shown using the
same time scale.
Breath rate shows the patient’s
breath rate through the day on the
red line. The blue line shows the
Normal Breath Rate, or resting breath rate, as calculated by the algorithms in the
VIAspire. Note that when the Current Breath Rate exceeds the Normal (resting)
Breath Rate by more than 4 BPM, Sport 1 dosing is given. When the CBR exceeds the
NBR by more than 8 BPM, Sport 2 dosing is given.
This chart is helpful in determining outlining a patient’s oxygen use and activity
throughout any day.
Summary Report
The Summary Report puts general data
for the selected time frame onto a single
page report, complete with header
information.
This gives a means of printing one report
for a patient for a selected time period for
general review.
On chart is added, not seen in other
report views. The effective dose chart
shows the % of doses given at each level;
16, 32, 48, 64, etc.
A dose at a setting of 1 in Sport1 mode
will be 32 ml, which is the same dose as a
setting of 2 in normal mode. In this
chart, these are both shown as an
effective dose of “2”.
10
Appendix A:
Raw data files from VIAspire unit.
The VIAspire unit writes data to an SD Card at each breath after the first minute of operation.
It creates a new file each time the unit is turned on and off. The files are named to reflect their
creation date and time. Files are in comma separated value format (csv) and can be opened in
Excel to view raw data. The following outlines a sample file.
Header shows firmware parameters loaded for this VIAspire portable at the time the data was
created.
Data shows a record for each and every breath.
Date
Time
Breath Time (seconds)
I:E ratio - Shown as E when I=1. Example: value of 4.2 means I:E is 1:4.2
CBR – Current Breath Rate in breaths per minute (BPM)
NBR – Normal (resting) Breath Rate in BPM
Patient Setting – location of patient setting knob
Dose – Volume of oxygen given in ml
Valve used – A, B, or AB
Valve On-Time (msec)
11