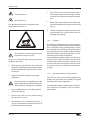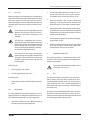
1
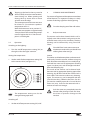
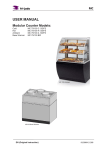
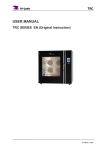
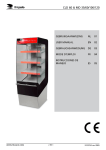
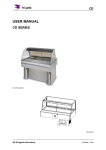
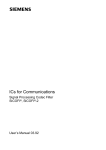
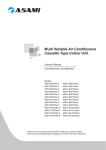
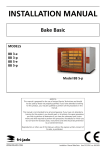
STW5/STW7
B2
B1
A
A1
A2
A
STW5/STW7 / 11-1998
DIRECTIONS FOR USE, CONTENTS
DIRECTIONS FOR USE STW-SERIE
Contents
1
INTRODUCTION
2-1
1.1 General
2-1
1.2 Description of the process
2-1
1.3 Description of the equipment
2-1
1.3.1 Description of the
various parts of
your Warmer
2-1
1.3.2 Technical description
2-1
1.4 Safety, hygiene and guarantee 2-1
2-1
1.4.1 Safety
1.4.2 Hygiene
2-2
1.4.3 General conditions and
2-2
guarantee
2
INSTALLATION AND INITIAL USE
2.1 Packing and transportation
requirements
2.2 Unpacking
2.3 First use
2.4 Positioning
2-3
2-4
2-5
2-5
3
OPERATION AND USE
3.1 Use
3.2 Operation
2-5
2-5
2-6
4
CLEANING AND MAINTENANCE
4.1 Daily maintenance
4.2 Regular maintenance
2-6
2-6
2-7
5
BREAKDOWN AND SERVICE HOW TO PROCEED
2-7
TECHNICAL SPECIFICATIONS
AND STANDARD ACCESSORIES
2-9
7
OPTIONS
2-9
8
REMOVAL
2-9
6
2-3
STORE THESE DIRECTIONS FOR USE CAREFULLY FOR FUTURE REFERENCE!
© 2008 Fri-Jado BV, Etten-Leur, The Netherlands
Customers are allowed to copy these instructions for private use.
No liability will be accepted by the manufacturer for any damage or injury resulting from failure to comply with these requirements, or through failure to take reasonable care or
careful handling, operation, or repair even when these are not explicitly dealt with in this manual.
en
2- Ι
nl //1-10
9123353_0804
INTRODUCTION
1
INTRODUCTION
1.1
General
Figure
1
This manual is intended for the user of the EuroGrill Warmer models. The possibilities and the
operation are described and directions are also
given for using the equipment for a long time in
the most safe and efficient manner.
Description
warmer STW5 or STW7
A
operating panel Warmer
B
standard equipment
B1 water tray with drain
B2 shelves
2
adjustable hinge
A
operating panel Warmer
A1
temperature indication
A2
on/off-temperature setting
Read the instructions carefully before using
the Warmer.
1.3.2
The Warmer should be operated exclusively
by qualified and expert staff.
Always keep the safety precautions that are
stated in this manual in mind.
1.2
Description of the process
In the Warmer the grilled products are kept at the
right temperature by means of a hot airflow with
a high humidity. Because of that the products
keep their quality for a maximum of three hours.
The clear illumination also helps toward an optimal
and attractive presentation of the products.
1.3
Description of the equipment
1.3.1
Description of the various parts of
your Warmer
FOLD OUT THE COVER OF YOUR USERS
MANUAL!
Technical description
In the Warmer an airflow that is heated by infrared
elements is used. The temperature of this can be
adjusted as you wish.
As the airflow is guided over the water tray, a very
humid atmosphere develops that helps keep the
quality of the presented products. The illumination
of the products takes place by one halotherm
lamp in the top of the STW5 and two in the top of
the STW7. These help to heat the product.
It is possible that your Warmer is built together
with an STG of the same size on top of it and
equipped with wheels. Each piece of equipment
must be operated individually.
The plate work is carried out in stainless steel
(RVS 304 and RVS 430). The connecting wire is
equipped with a 2-core plug with earth.
The type plate with the data that is appropriate
for your equipment is affixed on the side panel
next to the operating panel.
1.4
Safety, hygiene and guarantee
1.4.1
Safety
In this manual the following warning symbols are
used:
Denoted risk of personal injury, loss of
life or damage to the tool in case of nonobservance of the instructions in this
manual.
9123353_0804
en / 2-1
INTRODUCTION
Electrical tension.
Your Warmer must not be cleaned with a
waterspout, because of the danger of short
circuiting. For cleaning instructions see chapter 4.
Burning hazard.
The following indications are applied to the
equipment (see figure 1.1):
Beware that especially the door and the top
side of the equipment can get very hot during
the use.
Clean the equipment regularly to ensure correct operation and avoid possible fire risks
(through overheating).
1.4.2
Figure 1.1
The windows and the topside of the
equipment can get very hot.
During use, the following safety precautions
should be observed:
When moving your Warmer, first switch off
the power by taking the plug out of the socket
and let the equipment cool down for at least
10 minutes.
The quality of a fresh product is always dependent on hygienic conditions of keeping and handling.
This is especially true for grilled products. Due to
the possibility of transferring salmonella bacteria,
you should ensure that already grilled products,
especially chicken and turkey products, do not
come into contact with raw products.
Contact between grilled products and hands or
tools that have come into contact with raw meat
should also be avoided at all times. If hands and/
or tools have come into contact with raw meat,
the hands and tools should be cleaned thoroughly.
1.4.3
Empty the water tray before moving the
equipment.
Push the water tray completely into the
Warmer after placing it back and close the
drain to prevent damage to the window.
Press one of the sides at a spot about halfway
down from the top.
General conditions and guarantee
Euro-Grill has paid a great deal of attention to
quality and guarantees the suitability and good
working order of your equipment.
For complaints, requests, imperfections and ordering accessories and options, you can contact
your supplier.
Observe the necessary care while moving
over obstacles or steps.
Your Warmer is not suitable to be used in a
rainy or very humid environment, because of
the danger of short circuiting.
en / 2-2
Hygiene
9123353_0804
INSTALLATION AND INITIAL USE
2
INSTALLATION AND INITIAL USE
2.1
Packing and transportation
requirements
The top indicated by the arrows uppermost.
Keep the packaging dry.
The Warmer is packed in a plastic cover, protective corner pieces and a protection for the glass
at the front and rear side, all enclosed in a cardboard box. The equipment is mounted on a
wooden pallet. Two securing straps are fastened
around the box and pallet.
During transportation the transportation requirements should be observed.
For this purpose the following symbols are marked on the cardboard box:
Do not use hooks for lifting and tipping.
Fragile contents, handle with care.
In its packing, the equipment can be transported
by a fork lift or hand lift trolley.
If there is not enough space above the equipment
for the cardboard box to be slid off the Warmer,
remove the box outside and then move the
equipment inside.
9123353_0804
en / 2-3
INSTALLATION AND INITIAL USE
2.2
Unpacking
3
2
2
1
1
1
2
1
Remove all other packaging
materials from the equipment.
All the packaging materials used
by Euro-Grill can be recycled.
en / 2-4
9123352_0804
INSTALLATION AND INITIAL USE, OPERATION AND USE
2.3
First use
The distance between the serving side, customer side, the sides and any glass panels
or wooden walls should be at least 25 cm.
Before using the new equipment you should clean
the inside of the equipment thoroughly with soap.
The soapy water runs into the water tray which,
after cleaning the warmer, should be emptied and
cleaned. Rinse with clean water to remove soap
rests.
Keep the bottom side and the ventilation
opening in the topside of the Warmer free
from obstacles to guarantee a good airflow.
During the process the windows of the equipment become very hot; when positioning the
equipment ensure that the windows are out
of the reach of children.
Push the water tray completely into the
Warmer after placing it back and close
the drain to prevent damage to the
window.
For external use you must position the equipment under a roof.
The Warmer is equipped with a 2-core
plug with earth and should be connected
to the right voltage. A qualified technician
should install the wall socket. For the
necessary electrical installation, see chapter 6 (Technical specifications).
You should let the empty equipment
warm through at its highest temperature
setting for at least half an hour to let the
metallic odour that comes off the first
time disperse.
When positioning the equipment you should
also take account of the accessibility for
maintenance and service activities.
3
OPERATION AND USE
The heating cabinet is intended to keep warm
products at the correct quality and temperature,
not to re-heat them.
Switching on
The temperature of meat products must
always be at least 65 ºC.
Put the plug in the socket.
Set the temperature (A2) to ‘5’.
Switching off
After 30-45 minutes set the temperature (A2)
to ‘0’.
2.4
3.1
Use
The warmer keeps the products warm and tender by means of a very moist stream of air. You
should therefore fill the water tray 3/4 with clean,
cold drinking water. This should preferably be
done with soft water to prevent scale forming in
the water tray.
Positioning
It is very important to put the equipment in a strategic position to reach optimal performance. For
this, the following factors are very important:
During use you should check the water tray every
four hours and top up the level as necessary. Use
lukewarm water to prevent the formation of steam
and shrinkage of the bottom plate.
Your own staff must have sufficient room to
be able to operate the equipment.
9123353_804
en / 2-5
INSTALLATION AND INITIAL USE, CLEANING AND MAINTENANCE
Topping up the level in the tray must be
done carefully since the water becomes
warm during use. When opening and
closing the tray ensure that no water
splashes over the edge.
The set temperature in the warmer must
be at least 75 ºC to maintain a product
temperature of 65 ºC.
With the thermostat set to position ‘5’,
the water consumption is approximately
1 litre per hour. If the surrounding temperature is higher than 25 ºC the consumption is a little higher.
3.2
Operation
4
CLEANING AND MAINTENANCE
For reasons of hygiene and the optimum condition
of the Warmer, it is important to keep to a daily
routine of cleaning right from the beginning.
First take the plug out of the wall socket.
4.1
Daily maintenance
The warmer can be best cleaned while it still is
slightly warm. Meat remains and grease can be
removed more easily in this condition. The best
cleaning can be achieved by using ‘Euro-Grill
Clean’.
Switching on the lighting
‘Euro-Grill Clean’ can in some cases cause
irritation on sensitive skin; you should wear
rubber gloves when using it.
Turn the on/off temperature setting (A2) to
the right so that the lights come on.
Setting the temperature
Set the switch for the temperature setting (A2)
to the correct value (see figure 3.1).
Interior
The shelves and the bottom plate can be removed
quite easily from the warmer, without using any
tools. Place the removable parts in a suitably large
sink with hot water and an appropriate cleaning
agent. Let these parts soak overnight and clean
them the following day.
The inside of the warmer can be cleaned with
hot water and an appropriate cleaning agent. After
cleaning, dry off the inside of the warmer with a
clean cloth. Take care not to leave any cleaning
agent. The water tray can be emptied with the
special drain that is affixed at the front. For this
you need to carefully open this a bit and let the
water run away. Scale can be removed with a
mixture of water and vinegar.
Push the water tray completely into the
Warmer after placing it back and close
the drain to prevent damage to the
window.
Figure 3.1
The temperature setting can also be
changed during operation.
Switching off
Set the on/off temperature setting (A2) to ‘0’.
en / 2-6
9123353_0804
CLEANING AND MAINTENANCE, BREAKDOWN AND SERVICE - HOW TO PROCEED
Exterior
The outside of the equipment can be cleaned with
a little hot water, a cleaning agent and a soft brush
or sponge. We advice against the use of steel
wool because this will cause scratches in which
dirt particles stay behind. After cleaning, dry off
the outside with a cloth.
5
Before you consult your dealer or the service
agency when there is a fault, you can check the
following points yourself:
Is the power supply OK (fuses and earth
leakage switch in the meter cupboard)?
Moisture in the electrical compartment
can cause short circuits. Ensure that no
water runs inside via the ventilation
openings; the equipment must therefore
never be cleaned with a water hose.
You can cut down on cleaning time, by
covering the bottom plate with aluminium foil before use.
Make sure that you do not cover the
ventilation openings.
The control panel may only be cleaned with a
damp cloth. The windows can be cleaned with
the special ‘Euro-Grill Clean’ or with warm soap
suds. If possible, let the glass doors stand open
overnight. It is advisable to keep a good view of
the products during operation. Therefore the
windows should be cleaned regularly with a damp
cloth.
4.2
Regular maintenance
BREAKDOWN AND SERVICE HOW TO PROCEED
Is the control switch in the right position?
Contact your dealer/service agency
immediately when the cable is damaged.
Immediate replacement is necessary
because of possible danger.
You can fix the following faults:
Fault:
Solution:
The halotherm lap is defective.
Replace the halotherm lamp.
First take the plug out of the wall socket.
Do not touch the new lamps with your bare hands!
The moisture on your hands can shorten their
working lives. You can remove this moisture with
alcohol or methylated spirits once the lamp has
cooled down. Use a clean cloth or paper tissue
to hold the lamp.
Removing
First take the plug out of the socket.
Push the lamp to the right.
Halotherm lamp(s)
These are in the top of the equipment.
These lamps should be checked weekly to see if
they need cleaning. If necessary clean them with
a cloth soaked in alcohol or methylated spirits
after the lamps have cooled off.
Pull the left side down and remove the lamp.
Placing
Point the projection in the middle of the lamp
downwards.
Do not touch the halotherm lamps with
your bare hands.
Insert the right-hand side of the lamp in the
holder.
Push the lamp to the right and insert the lefthand side in the holder.
9123353_0804
en / 2-7
BREAKDOWN AND SERVICE - HOW TO PROCEED, TECHNICAL SPECIFICATIONS AND STANDARD ACCESSORIES
Fault:
Solution:
The temperature display
doesn’t show anything.
Replace the battery.
Tighten the adjusting screw.
Tighten both bolts on the hinge plate.
Check the position of the door.
First take the plug out off the wall socket.
Refit the side panel.
Remove the side panel and replace the
battery of the temperature display.
The lid can be removed and replaced according to the instructions on the thermometer
with a coin or a screwdriver.
6
Re-apply the side panel.
The technical specifications and standard accessories of the various models from the Euro-Grill
Warmer series are stated in the following list.
Fault:
Solution:
The door hangs at an angle.
Adjust the door.
TECHNICAL SPECIFICATIONS
AND STANDARD ACCESSORIES
Model
STW5
STW7
dimensions
B
C
width
825 mm
985 mm
depth
650 mm
850 mm
height
860 mm
1015 mm
gross
117 kg
176 kg
net
100 kg
150 kg
weight
A
electrical installation *
voltage
1N~50...60 Hz
230 V
power
2.8 kW
max. rated current
12.2 A
necessary plug
2-core
with earth
with cable length
noise level (on workfloor)
Figure 5.1
Close the door and remove the side panel at
the hinge side.
standard equipment
230 V
3.5 kW
15.25 A
2-core
with earth
approx. 2.8 m
approx. 2.8 m
< 70 dB(A)
< 70 dB(A)
user’s manual
user’s manual
3 shelves
3 shelves
* This data can vary for each country. Look for
the data for your Warmer on the type plate.
Support the door from underneath and loosen
both nuts (A) in the top hinge plate on the
inside of the front by one turn.
Position the door correctly so that the underside of the door, in the closed position, is
parallel to the base below
Loosen the lock nut (B) of the adjusting screw.
Turn the adjusting screw (C) to the right to
fixate the position of the door.
en / 2-8
1N~50...60 Hz
9123353_0804
OPTIONS, REMOVAL
7
OPTIONS
The following option is available for the discussed
models in the Euro-Grill Warmer series:
Wheeled frame
8
REMOVAL
If, after years of use, your Warmer is ready for
replacement your Euro-Grill dealer will gladly give
you advice about this. You can also ask advice
about the disposal of your used Warmer.
Attention must be paid that the materials are dealt
with according to the local environmental directions that are valid at that time.
9123353_0804
en / 2-9