1
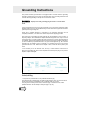
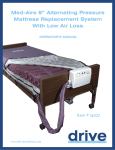
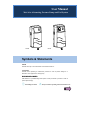
User Manual Med Aire Alternating Pressure Pump and Pad System 14002E 14001E Symbols & Statements NOTE Indicates some tips or some information users should be aware of. CAUTION Indicates correct operating or maintenance procedure in order to prevent damage to or destruction of the equipment or other property. WARNING/DANGER Calls attention to a potential danger that requires correct procedures or practices in order to prevent personal injury. Grounding Terminal Always read the operating instructions before use. 1 * AP/APG NO indicates the device is NOT suitable for use in the presence of flammable anesthetic mixture with air or with oxygen or nitrous oxide. ** Type BF symbol indicates the degree of protection against electric shock. 2 IMPORTANT SAFEGUARDS When using electrical products, especially when children are present, basic safety precautions should always be followed, including the following: READ ALL INSTRUCTIONS BEFORE USING DANGER To reduce the risk of electrocution: Always unplug this product immediately after use. Do not use while bathing. Do not place or store product where it can fall or be pulled into a tub or sink. Do not place in or drop into water or other liquids. Do not reach for a product that has fallen into water. Unplug immediately. WARNING To reduce the risk of burns, electrocution, fire, or injury to persons: A product should never be left unattended when plugged in. Close supervision is necessary when this product is used by, on, or near children or physically challenged individuals. Use this product only for its intended use as described in this manual. Do not use attachments not recommended by the manufacturer. Never operate this product if it has a damaged cord or plug, if it is not working properly, if it has been dropped or damaged, or dropped into water. Return the product to a service center for examination and repair. Keep the cord away from heated surfaces. Never block the air openings of the product or place it on a soft surface, such as a bed or couch, where the air openings may be blocked. Keep the air openings free of lint, hair, and the like. Never drop or insert any object into any opening or hose. Do not use outdoors or operate where aerosol (spray) products are being used or where oxygen is being administered. Connect this product to a properly grounded outlet only. See Grounding Instructions. GROUNDING Before any connection is made, make certain that this product shall be connected to a protective earth conductor via the three-wire power cord; the three-blade plug shall be inserted only into a socket outlet that provides a protective earth contact. Please refer to page 8 for more information. 2004 Mar Version 01 3 Introduction This manual should be used for the initial set up of the system and for reference purposes. General The Med Aire series is a high quality and affordable air support surface system suitable for pressure ulcer prevention and treatment. It has been specifically designed for prevention of pressure ulcers and offers an effective solution to 24-hour pressure area care. The Med Aire series has been tested and certified to the following standards: UL 1431 EN 60601-1 EN 60601-1-2 Intended Use The Med Aire series is intended to reduce the incidence of pressure ulcers while optimizing patient comfort. It also is appropriate for the following: Individual home care setting and long-term care facilities Pain management as prescribed by a physician. Contraindication Patient conditions for which the application of pressure relieving therapy on an alternation system is contraindicated are as follows: Cervical or skeletal traction Unstable spinal cord injuries Product Description Pump Power Switch (1) The switch is at the right side of the pump. Turn ON the power, the pump will start operation. Pressure-adjust Knob (2) Turn the soft/firm knob to set a comfortable pressure level. Bubble Pad Lay it on a foam base. Please refer to the Specifications section for details. Manual Always read this manual before using this product. 4 Installation Step 1 Place the bubble pad flat on the bed frame. The inflation tubes should be towards the foot end so that they can be connected to the inflation nozzles on the pump. Step 2 Cover with a cotton sheet to avoid direct skin contact and reduce friction. Step 3 Hang the pump over the frame or board at the foot end of the bed. Make sure the pump is secured. Step 4 Connect the inflation tubes from the bubble pad to the pump’s inflating nozzles. Make sure they are properly attached. CAUTION: Make sure the inflation tubes are not kinked or tucked under the pad. Step 5 Plug the power cord into an electrical outlet with grounded AC power. If the power cord has a grounding wire with a grounding pin, then this three-wire plug must be plugged properly into an outlet and grounded as shown in the figure in the Grounding Instructions section. NOTE: Before inserting the plug into the outlet, make sure the voltage is compatible. CAUTION: Make sure this product is well grounded. Step 6 Turn on the power by pressing the power switch at the right side of the pump. Proceed to the Operation section. Step 7 Make sure to disconnect the pump by unplugging the power cord when it is not in use. 5 Grounding Instructions This product should be grounded when it is equipped with a cord that contains a grounding wire with a grounding plug. In the event of an electrical short circuit, grounding reduces the risk of electric shock by providing an escape wire for the electric current. DANGER – Improper use of the grounding plug can result in a risk of electric shock. If repair or replacement of the cord or plug is necessary, do not connect the grounding to either flat blade terminal. The wire with insulation having an outer surface that is green with or without yellow stripe is the grounding wire. Check with a qualified electrician or serviceman if the grounding instructions are not completely understood, or if in doubt as to whether the product is properly grounded. This product has a grounding plug that looks like the plug illustrated in figure A below. A temporary adapter, which looks like the adapter illustrated in figure B and C, may be used to connect this plug to a 2-pole receptacle as shown in figure B if a properly grounded outlet is not available. The temporary adapter should be used only until properly grounded outlet (figure A) can be installed by a qualified electrician. The green colored rigid ear, lug, tab or the like extending from the adapter must be connected to a permanent ground such as properly grounded outlet box cover. Whenever the adapter is used, it must be held in place by the screw. If it is necessary to use an extension cord, use only a 3-wire extension cord that has a three-prong grounding plug and a 3-slot receptacle that will accept the plug on the product. Replace or repair if damaged. Polarized Plug – If the product is provided with a 2-wire polarized attachment plug This appliance has a polarized plug (one blade is wider than the other). To reduce the risk of electric shock, this plug is intended to fit into a polarized outlet only one way. If the plug does not fit fully into the outlet, reverse the plug. If it still does not fit, contact qualified electrician. Do not attempt to modify the plug in any way. 6 Operation step by step Always read the operating instructions before use. 14002E Step 1 Turn on the power. The indicator of the power switch will come on. The pump starts to pump air into the bubble pad. 14001E Step 1 Same as above. Step 2 For time-saving in the first inflation, turn the pressure knob to the full Firm position. NOTE: It requires approximately 10 minutes for a bubble pad to be fully inflated. Step 3 Turn the pressure-adjust knob to set a comfortable pressure level from soft to firm according to patient’s weight and comfort. Pressure set up It is recommended that the pressure-adjust knob being turned to Firm when the bubble pad is initially inflated. Users can then easily adjust the pressure level of the bubble pad to a desired firmness by themselves or according to the suggestion from a health care professional. If the pressure is consistently low, check for any leakage occurring in inflation tubes. Contact your local dealer for replacement of any damaged tubes. Troubleshooting Problems Solutions The pump doesn’t work 1. Check if the plug is inserted firmly into the outlet. 2. Turn on the power switch again. If the power indicator is ON and the pump still doesn’t work, contact your local dealer immediately. If the power indicator is OFF, there may be a faulty outlet. Try to connect the power cord to another outlet. If the power indicator is still OFF, contact a qualified electrician for main power check. Incomplete inflation (Low pressure) 1. For a quick check, adjust the pressure to Firm. 2. Check to see if the inflation tubes connected to the pump are twisted or disconnected, or any leakage occurring. Always keep the tubes straight. Change the tubes if there is any leakage. 7 Cleaning In this section, we describe the procedures to clean and decontaminate the pump and bubble pad. It is important to follow these procedures before using the system on patients. The cleaning task is required at least once a week to maintain personal hygiene. Pump DO NOT immerse or soak the pump. Check for external damage and move the pump to a cleaning area. Place the pump on a work surface and spray or wipe the outside of the case with quaternary ammonium solution. DO NOT spray any cleaning solution directly on the surface of the pump. DO NOT use a Hypocarbonate or Phenolic based cleaning solution as this may cause damage to the case. Allow the solution to incubate for 10 minutes or accordingly as stated by the cleaning product used. Spray cloth with cleaning solution and clean faceplate. DO NOT allow excess cleaning solution on faceplate or control panel. (If solution gets inside, damage will occur.) Allow surface to thoroughly dry after cleaning. After the pump is thoroughly cleaned and dried, proceed to plug in the pump and test to see if it runs normally. Bubble Pad Any obvious blood spots should be wet thoroughly with 1:9 Hypochlorite solution (1 part bleach to 9 parts water) and allow drying for at least 10 minutes. Then blot with a clean, damp cloth. Brush or wipe down all surfaces with soap and water before applying any liquid. Allow it to thoroughly air dry. Once the inside is dry, turn it back: wipe down the outside of the bag with disinfectant. Dry the bubble pad on a SUNLESS area after cleaning. Handling And Storage Lay the bubble pad flatly. Fold or roll it carefully. Unplug the pump and store with proper identification tag. Follow the national requirement to dispose the pump. Maintenance Check the power cord and plug to see if there are abrasions or excessive wear. Plug in the pump and check the airflow from the hose connection port. The airflow should alternate between ports every half-cycle time. 8 Specifications System System Specification Classification Class I; AP/APG NO*; Type BF** Applied Part Bubble pad Input Rating AC 120V 60Hz or 100V 50/60Hz or 230V 50Hz 12W, 1A Fuse Rating 250V, T1A Environment Requirements Safety Standards Temperature: Operation 50°F~95°F (10~35°C) Storage 5°F ~122°F (-15~50°C) Shipping 5°F ~158°F (-15~70°C) Humidity: Operation 20%~80% non-condensing Storage 10%~90% non-condensing UL, c-UL, CE Pump Pump Specification Dimensions (Pump) 28.0 × 13.0 × 8.5 cm (11.0 x 5.1 x 3.3 in) Weight (Pump: Q1-02) 1.1 kg (2.4 lbs) Pressure Range 14002E: 90 mmHg 14001E: 50 ~ 105 mmHg Cycle Time 6 min/50Hz, 5 min/60Hz Bubble Pad Part No. Arrangement Material Weight Support 14005E 14006E 14003 14003-EF 14005EF 14001T 14002T Pump only w/ variable pressure Pump only w/ fixed pressure PVC PVC 220 lbs 220 lbs Pad only Pad only with end flaps PVC PVC 220 lbs 220 lbs Filter for 14005E, 14006E Beige tubing for 14001E PVC PVC 220 lbs 220 lbs Clear tubing for 14002E PVC 220 lbs ◎ ◎ Due to the continual development of the above products, specifications are subject to change without prior notice. Instructions or reference information for repair of equipment parts are provided by the manufacturer, please contact local dealer for further information. 9