1
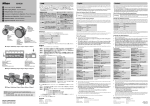
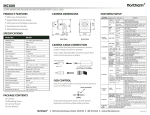
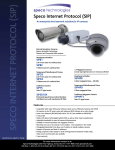
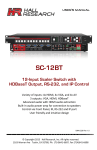
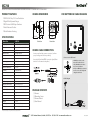
MC700
960H/700 LINE ULTRA-MINIATURE INDOOR DAY/NIGHT CAMERA WITH 3.6mm LENS
PRODUCT FEATURES
•SONY 960H Chip / 700 Line Resolution
•Digital Wide Dynamic Range
•OSD Control of All Major Functions
•Auto Electronic Shutter
•Ultra-Miniature Housing
Model No.
MC700
Imaging Device
1/3" SONY Super HAD II CCD
Resolution
Color 700 TV Lines – B/W 800 TV Lines
TV System
NTSC
Effective Pixels
976 (H) X 494 (V)
Lens
Fixed Focal 3.6mm
Sync System
Internal
Scanning System
2:1 Interlace
Video Output
1.0Vp-p 75 OHM Composite BNC
Minimum Illimination
0.1 Lux
S/N Ratio
52dB (AGC Off )
Gamma Characterisic
0.45
Electronic Shutter Speed
Auto - Manual (1/60 ~ 1/100,000 sec.)
OSD
Yes Built-in on Back of Camera
BLC (Backlight Compensation)
DWDR / BLC / HLC / OFF
AGC (Auto Gain Control)
x0.25 / x0.50 / x1.0
Day/Night
Electronic Type (Auto, Color, B/W)
D-WDR (ATR)
Yes, Luminance & Contrast Adjustable
Power Requirement
Regulated 12 volts DC +/- 10%
Power Consumption
120mA
Operating Temperature
14° ~ 122°F
Weight
1.8 oz
Housing
Metal Case (Black)
Dimensions (H x W x D)
1.25” x 1.25” x 1.19”
OSD BUTTON AND CABLE DIAGRAM
1. How to use the OSD Control and Cable Array.
29.6
SPECIFICATIONS
OSD Button and Cable Diagram
CAMERA DIMENSIONS
16. 4
Side-View
31.8
Front-View
1
2
CAMERA CABLE CONNECTION
Insert power lead into power connector (confirm
proper voltage and observe polarity).
Insert video lead into BNC connector (push, then
twist to lock connector in place).
1. How to use the OSD Control:
ㆍ ENTER(E): Used to Access the
Menu and Confirm Selection
ㆍ UP(U), DOWN(D): Used to Move
the Cursor Up and Down
ㆍ LEFT(L) and RIGHT(R): Used to Move
the Cursor to the Left or Right and
Change Desired Values
2. Cable Diagram
PACKAGE CONTENTS
(1) Camera
(1) Mounting Screw
(1) Camera Mount
(1) User Manual
VIDEO
12V DC
-
+
* All specifications subject to change without notice for quality improvement
3625 Cincinnati Avenue, Rocklin, CA 95765 ♦ 855-388-7422 ♦ www.northernvideo.com
Rev. 010814
the optimal white balance for current
environment
※All specification is subject to change without notice to improve the quality.
3625 Cincinnati Avenue, Rocklin, CA 95765 ♦ 855-388-7422 ♦ www.northernvideo.com
OSD MENU STRUCTURE
MC700
Rev. 010814
3B26022A
4. BACKLIGHT
OFF
Deactivated function
BLC
Back Light Compensation
AUDIO
HLC
High Light Compensation
960H/700 LINE ULTRA-MINIATURE INDOOR DAY/NIGHT
CAMERA
WITH
3.6mm
LENS
(option)
5. ATR(=DWDR) (Adaptive Tone Reproduction)
2. OSD menu structure
OFF
Set the ATR to OFF
VIDEO
Set the extent ofSummary
the luminance
Select Menu
Sub Menu
Summary
Select Menu
Sub Menu
Luminance : Low, Mid, High
12V DC
compression
LENS menu structure
Burst : OFF, ON
2.1. OSD
+
ON
Contrast
: Low,
Midlow, Mid,
: DC, Video
Auto iris lens(only DC type)
Delay
CNT
: 000~255(005)
Set the extent of the contrast enhancement
2.Select
OSDMenu
menuType
structure
Sub
Menu
Summary
Select Menu Day→Night
Summary
Midhigh, Sub
High
AUTO
Mode : Auto, Open, Close Auto/Open/Close select
: Menu
Day : Color ↔ Night
: B/W (Switching
1.
LENSMenu Speed : Sub
Burst
:
OFF,
ON
Select
Menu
Sub
Menu
Summary
Select
Menu
Summary
6.
DAY/NIGHT
AUTO
000~255(004)
0~255(48)
Iris speed select
time & speed adjustable)
Type
:
DC,
Video
Auto
iris
lens(only
DC
type)
Delay
CNT
:
000~255(005)
Burst
:
OFF,
ON
1.
LENS
Night→Day
:
MANUAL
Manual iris lens
AUTO
Mode
Auto,
Open, Close Auto/Open/Close
Day→Night
Delay
CNT :: 000~255(005) Day : Color ↔ Night : B/W (Switching
Type :: DC,
Video
Auto iris lens(only select
DC type)
000~255(016)
2. SHUTTER/AGC
AUTO
000~255(004)
Speed
:
0~255(48)
Iris
speed
select
Day→Night
:
AUTO
Mode
:
Auto,
Open,
Close
Auto/Open/Close
select
COLOR
Fixed:&at
color↔adjustable)
time
speed
High luminance
Day
Color
Night : B/W (Switching
AUTO
Night→Day
000~255(004)
MANUAL
Manual
iris lens
Speed::Auto
0~255(48)
Iris speed
select
Burst : OFF,: ON
time & speed adjustable)
Mode
iris, Shut +
000~255(016)
Night→Day
2.
SHUTTER/AGC
MANUAL
Manual iris lens
IR Optimizer :: OFF, ON
Auto iris, Shut
B/W
COLOR
Fixed
000~255(016)
Fixed at
at color
B/W
High
luminance
2. SHUTTER/AGC
Mode : Auto, Center
Brightness
: 0~255(30)
Auto exposure setting
Burst
:: OFF,
ON
COLOR
Fixed at color
Mode
:
Auto
iris,
Shut
+
High
luminance
Level
0~31(022)
Low Luminance
IR
Optimizer
Burst
: OFF,:ONOFF, ON
Auto
Shutiris,
AUTO
Modeiris,
Auto
EXT1
No use for this model
Mode
:: AGC,
OFFShut +
B/W
Fixed at B/W
Mode
: Auto,
IR Optimizer
: Center
OFF, ON
Brightness
:
0~255(30)
Auto
iris,
Shut
EXT2
No use for this model
Brightness : X0.25, X0.50, Auto exposure setting
B/W
Fixed at B/W
Level
Mode : 0~31(022)
: Auto, Center
Low
Luminance
Brightness
: 0~255(30)
X0.75,
X1.00
7.
NR(=2DNR)
Auto exposure setting
AUTO
EXT1
No
for this
modelReduction) filter
Level : 0~31(022)
Mode
: :AGC,
Low Luminance
Mode
ShutOFF
+ AGC
Set use
the 2D
NR(Noise
NR MODE
Y/C, OFF, Y, C
AUTO
EXT2
No
use for this model
EXT1
Brightness
:
X0.25,
X0.50,
Mode
:
AGC,
OFF
mode
Shutter : 1/60(1/50),
X0.75,
X1.00
7.
NR(=2DNR) 000~015(004)
EXT2
No
for this modelsignal) filter strength
Brightness
: X0.25, X0.50,
1/120(1/100),
Y LEVEL
Set use
the Y(luminance
Mode
: Shut 1/1000,
+ AGC
Set
NR(Noise Reduction)
filter
7. NR(=2DNR)
X0.75, X1.00
1/250,
1/500,
Set the
the 2D
C(chrominance
signal) filter
NR
MODE
Y/C,
OFF,
Y,
C
C LEVEL
000~015(004)
mode
Manual exposure setting
1/2000,
Shutter
1/60(1/50),
Set
the 2D NR(Noise Reduction) filter
Mode ::1/4000,
Shut + AGC
strength
NR MODE
Y/C, OFF, Y, C
MANUAL
1/10000
1/120(1/100),
Y
000~015(004)
Set
the Y(luminance signal) filter strength
mode
Shutter : 1/60(1/50),
8. LEVEL
PICT ADJUST
1/250,
1/500,12.00,
1/1000,
AGC
: 6.00,
18.00,
Set
signal)
Y
LEVEL
000~015(004)
Y(luminance
filterfilter
strength
1/120(1/100),
MIRROR
OFF, ON
Set the
the C(chrominance
horizontal flip signal)
C
LEVEL
000~015(004)
1/2000,
1/4000,
Manual exposure setting
24.00,
30.00,
36.00,
strength
1/250, 1/500,
1/1000,
Set
the
C(chrominance
signal) filter
BRIGHTNESS
000~255(000)
Set
the
screen
brightness
C LEVEL
000~015(004)
1/10000
MANUAL
42.00,
Manual exposure setting
1/2000, 44.80
1/4000,
8.
PICT ADJUST
strength
CONTRAST
000~255(128)
Set the screen contrast
: 6.00, 12.00, 18.00,
MANUAL
1/10000
3.
WHITE BAL AGC
MIRROR
OFF,
ON
Set
flip
8.
PICT ADJUST
SHARPNESS
000~255(128)
Set the
the horizontal
screen sharpness
24.00,
30.00,
36.00,
AGC : :6.00,
12.00,
18.00,
Speed
0~255(250)
BRIGHTNESS
000~255(000)
Set
thethe
screen
brightness
MIRROR
OFF,
ON
horizontal
flip
HUE
000~255(128)
Adjust
hue
42.00,
44.80
24.00,CNT
30.00,
36.00,
Delay
: 0~255(16)
CONTRAST
000~255(128)
Set
the
screen
contrast
BRIGHTNESS
000~255(000)
brightness
GAIN
000~255(128)
Adjust the color gain
3. WHITE BAL ATW
42.00,Frame
44.80
: X0.50, X1.00, Auto trace white balance setting
SHARPNESS
Set the screen sharpness
CONTRAST
contrast
9. CAMERA ID 000~255(128)
: 0~255(250)
3. WHITE BAL Speed
X1.50,
X2.00
ATW
(1,800°k~ 10,500°k)
HUE
000~255(128)
Adjust
the
hue
SHARPNESS
Set
the
screen
OFF
Set the camera sharpness
ID to OFF
Delay
: :0~255(16)
SpeedCNT
: 0~255(250)
Environment
Indoor,
GAIN
000~255(128)
HUE
hue gain
Letters A to Z, Numerals 0 Adjust the color
ATW Frame
X0.50, X1.00, Auto trace white balance setting
Delay
CNT ::0~255(16)
Outdoor
ON
You
can
enter
up
to 26 letters & 2 lines
9.
CAMERA ID 000~255(128)
GAIN
Adjust the color gain
to 9, Symbols
X1.50,
X2.00: X0.50, X1.00, (1,800
ATW Frame
Automatically
adjust
balance
°k~ white
°k)the white
10,500
ATW
Auto trace
balance
setting
PUSH
OFF
Set
the
camera
ID
to OFF
9.
CAMERA
ID
10. MOTION DET
Environment
X1.50,
X2.00 : Indoor,
under
all~conditions
10,500°k)
ATW
(1,800°k
Letters
A
to
Z,
Numerals
0
OFF
Set
the
camera
ID
to OFFto OFF
Outdoor
OFF
Set
the
motion
detection
Environment : Indoor,
The gain values for the outdoor fixed
ON
You can enter up to 26 letters
& 2 lines
to
9, Symbols
Letters
A to Z, Block
Numerals
0
Automatically adjust the white balance
Outdoor R-Gain
USER1
B-Gain,
mode
Detect
sense,
disp,
ON
You can enter up to 26 letters & 2 lines
PUSH
10.
to
9, Symbols
under alltheconditions
(Adjust
Red
or Blue
values)balance
ON MOTION DET
Monitor
area, Area sel (Top, Adjust the settings of motion detection
Automatically
adjust
the white
PUSH
OFF
Set the motion detection to OFF
10. MOTION DET
Bottom, Left, Right)
The gain
values for the outdoor
fixed
under
all conditions
fluorescent
light
USER2
B-Gain, R-Gain
USER1
B-Gain, R-Gain
modegain
OFF
Set the motion detection to OFF
fixed
mode(Adjust
or Blue
values)
11. PRIVACY Detect sense, Block disp,
The
values forthe
theRed
outdoor
fixed
(Adjustrolling
the Red
or Blue values)
ON
Monitor
area, Area
(Top, Adjust
settings
of motion
USER1
B-Gain,
R-Gain
mode
Detect sense,
Blocksel
disp,
ANTI CR
Level(0~255)
Color
suppression
OFF
Set thethe
privacy
masks
to OFFdetection
Bottom,
Left, Right)
The
gain
values
forBlue
the fluorescent
light
(Adjust
the
Red
or
values)
ON
Monitor
area,
Area
selLeft,
(Top, Adjust the settings of motion detection
MANUAL
Manual
white
balance
Area sel(Top,
Bottom,
USER2
B-Gain, R-Gain
ON PRIVACY Bottom, Left, Right)
Adjust the settings of privacy
fixed
mode(Adjust
or Blue
values)
11.
The gain
theRed
fluorescent
light
Right), Color, Trasp, Mosaic
Move
the values
cameraforthe
lens
toward
to white
USER2
B-Gain, R-Gain
ANTI CR
Level(0~255)
Color mode(Adjust
rolling
suppression
fixed
the set
Redbutton
or Blue
values)
OFF
Set
the privacy masks to OFF
11.
PRIVACY
paper
then press
the
to find
12. LANGUAGE
PUSH LOCK
MANUAL
Manual
white
balance
ANTI
CR
Level(0~255)
Color
rolling
suppression
AreaChinese,
sel(Top, Deutsch,
Bottom, Left, Set the privacy masks to OFF
OFF
the
optimal
white
balance for current
English,
Japanese,
Adjust
the settings of privacy
ON
Select language
Right),
Color, Trasp,
Mosaic
environment
Move the
camera
lens toward to white
MANUAL
Manual
white
balance
Area Portugues,
sel(Top,
Bottom,
Left,
Francais, Pyccknn,
Espanol
ON
Adjust the settings of privacy
paper
then
press
the
set
button
to
find
12.
LANGUAGE
Right),
Color,
Trasp,
Mosaic
4. BACKLIGHT
Move the camera lens toward to white
13. CAMERA RESET
PUSH LOCK
the
optimal
balance
for current
paper
then white
press
the set button
to find
English,
Japanese, Chinese, Deutsch,
12. LANGUAGE
OFF
Deactivated
function
Restorelanguage
all the settings to the default
PUSH LOCK
Select
environment
the
optimal
white balance for current
Francais,
Pyccknn, Chinese,
Portugues,
Espanol
English, Japanese,
Deutsch,
BLC
Back
Light Compensation
values
Select
language
4.
BACKLIGHT
environment
13.
RESETPortugues, Espanol
Francais,
HLC
High Light Compensation
14. CAMERA
EXIT Pyccknn,
OFF
Deactivated function
4.
BACKLIGHT (Adaptive Tone Reproduction)
Restore
settings
to the default
13.
CAMERA
5.
ATR(=DWDR)
SAVE
ALL RESET
Save all all
thethe
setting
made
BLC
Back
OFF
Deactivated
function
values
Restore
all themenu
settings to the default
OFF
Set theLight
ATRCompensation
to OFF
EXIT
Exit the OSD
HLC
High
Light
Compensation
BLC
Back
Light
Compensation
14. EXIT
values
Set the
extent
of the luminance
Low,Reproduction)
Mid, High High Light Compensation
5. ATR(=DWDR)Luminance
(Adaptive :Tone
HLC
SAVE
ALL
Save all the setting made
14. EXIT
compression
OFF
5.
ATR(=DWDR)Contrast
(Adaptive
ToneMidlow,
Reproduction)
EXIT
Exit
menu made
SAVE ALL
Savethe
all OSD
the setting
ON
: Low,
Mid, Set the ATR to OFF
Set the extent of the contrast enhancement
extenttoofOFF
the luminance
OFF
Set the ATR
EXIT
Exit the OSD menu
Midhigh, High
Luminance : Low, Mid, High
compression
Set the extent of the luminance
6. DAY/NIGHT
Luminance : Low, Mid, High
ON
Contrast : Low, Midlow, Mid, compression
Set the extent of the contrast enhancement
※All specification is subject to change without notice to improve the quality.
3B26022A
Midhigh,
ON
Contrast :High
Low, Midlow, Mid,
Set the extent of the contrast enhancement
6. DAY/NIGHT Midhigh, High
6. DAY/NIGHT
※All specification is subject to change without notice to improve the quality.
3B26022A
PUSH LOCK