1
9HUVD)RUP;/
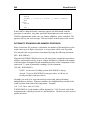
8VHU
V*XLGH
IRU
06'26
DQG
0LFURVRIW:LQGRZV
VersaForm Systems
VERSAFORM XL USER'S GUIDE
Copyright © 1991, 1994, 1998 VersaForm Systems
This software product is copyrighted, and all rights are reserved by VersaForm
Systems. Lawful users of this program are licensed only to read the program from
its medium into memory of a computer, solely for the purpose of executing the
program. In the case of a multi-user program, users are licensed only to read the
program into a single network file server. Copying, duplicating, selling, or
otherwise distributing this product is a violation of the law.
This manual is copyrighted and all rights are reserved. This document may not, in
whole or in part, be copied, photocopied, reproduced, translated, or reduced to
any electronic medium or machine readable form without prior consent, in writing,
from VersaForm Systems.
Revised 11/91, 5/92, 12/92, 9/94, 7/98. Printed in U.S.A.
VersaForm ™ is a registered trademark of VersaForm Systems.
MS-DOS™ and Windows™ are registered trademarks of Microsoft Corporation.
VERSAFORM SYSTEMS
591 W. Hamilton Ave. Suite 201
Campbell, CA 95008
Voice (800) 678-1111
Fax (408) 370-3393
Technical Support
(800) 999-6081
CONTENTS
PART I INTRODUCTION
1
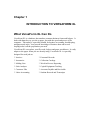
Chapter 1 INTRODUCTION TO VERSAFORM XL
What VersaForm XL Can Do
How You'll Use VersaForm XL
General Information
The Screen and the Cursor
Dates
Disk Drives
Diskettes
Warning
Files
File Capacity
Form Size
Numbers
The Enter Key
ASCII Files
Backup and Copying
Installation
Equipment
Required Equipment
Optional Equipment
DOS Configuration
Check User Available Memory
DOS and Memory Size
Installing on a Hard Disk System
Installing on Microsoft Windows
Mouse Installation
Networks
Setting Up Serial Printers
Installation of Color Displays
Starting Up VersaForm XL
3
3
4
9
9
10
10
10
10
10
11
11
11
12
12
12
12
12
12
13
13
13
13
14
14
15
15
15
15
15
Chapter 2 HANDS ON EXERCISE
Fill in the Single Items
Enter Data in the Column Lines
Save the form
The Filing Commands
Locate Forms in Your File
Change a Column Line
Remove a Form
17
18
22
28
28
29
34
35
Chapter 3 HANDS-ON EXERCISE: PREPARING A REPORT
Choose the Items to Report on
How Will the Data Be Printed?
Selecting Items to Subtotal and Total
37
37
39
39
Select the Data You Want
Produce the Report
PART II USING THE VERSAFORM XL DATABASE
41
45
49
Chapter 4 CREATE A FILE AND DESIGN A FORM
Form Design Overview
Designing a Form
Text and Single Items
Text
Single Items
Examples of Single Items
Enter Text and Single Items
The Key
A Key Item
Two Part Keys
Choosing The Key
Columns
Entering Column Headings
Column Lines
Change The Design Of A Form
Copy an Existing Form Design
Delete an Existing Form Design
Checking and Automatic Filling
Print the Form Definition
51
51
51
53
53
53
55
55
56
57
57
57
57
58
59
60
61
61
62
62
Chapter 5 FILING -- DATA ENTRY AND RETRIEVAL
VersaForm XL Commands
Data Entry Commands
Zoom
Validate (Edit Menu)
To Enter Data on a Form
Save (Forms Menu)
What If You Make a Mistake?
Undo (Edit Menu)
Delete (Edit Menu)
Clear (Edit Menu)
Insert (Edit Menu)
Page Forward
Page Backward
To Fill in Another Form in the Same File
To Print the Form
Print (Forms Menu)
Retrieve Forms
The Arrangement of Forms in a File
Index (Forms Menu)
Using the Key Item Directly
Get (Forms Menu)
Next (Forms Menu)
Search (Forms Menu)
Browse Through a File
63
63
64
64
65
65
66
66
67
67
67
68
68
68
68
68
69
69
69
70
70
70
70
71
73
First (Forms Menu)
Last (Forms Menu)
Next (Forms Menu)
Back (Forms Menu)
Other Commands
Remove (Forms Menu)
Space Report (Utils Menu)
Exit (File Menu)
Procedures
Run Procedure (Run Menu)
Switch File (File Menu)
The Calculator
Calculate (Utils Menu)
Perform Arithmetic Operations
Errors
Other Calculator Commands
Chain Calculations
Calculator HELP Command
Chapter 6 AUTOMATIC CHECKING AND AUTOMATIC FILLING
Overview
Choosing Checking and Automatic Filling
Checking Options
Minimum-Length
Maximum Length
Justify
Numeric
Yes Or No
Self-Checking
Mandatory
Extended Checks
Range Check
Format Check
List Check
Automatic Filling
Lookup
Todaysdate
Calculation
Running Totals
Default Values
Column Total
Chapter 7 REPORTS
Report Control Instructions
Creating a Report
Totaling
Averages
Counts
Percentages
Report Variables
The Report Definition Form
Selection Conditions
73
73
73
73
73
73
74
74
74
74
75
75
75
76
76
77
78
78
81
81
81
83
83
83
83
83
83
84
84
84
84
85
86
88
88
90
90
92
94
94
95
95
96
99
101
106
107
108
109
116
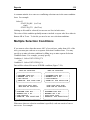
Multiple Selection Conditions
Variables in Selection Conditions
Note
Combining Files in a Report
After the Instructions Are Entered
Remove a Report
119
120
120
121
122
123
Chapter 8 PRINT ON PREPRINTED FORMS
Create a Print Format
Print Line and Column Numbers
Enter a Print Format
The Print Format
Columnar Items
Page 2 Items
Page 3 Items
Operator-Entered Values
System-Generated Values
Global Variables
Other Options on the Print Format Menu
Electronic Print Formats
Electronic Print Format Fields
Columnar Items
Page 2 Items
Page 3 Items
Print The Forms
Select the Forms to Print
Specify Your Selection Choice
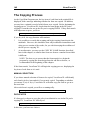
The Printing Process
Manual Selection in Copy/Print Forms
125
125
126
127
130
130
131
132
133
133
133
133
134
135
135
136
136
136
136
137
138
139
Chapter 9 COPY FORMS AND DATA
Overview
Copy Filled-in Forms
Select the Forms to Be Copied
The Copying Process
Manual Selection
Duplicates
Use Copy/Print to Remove Forms
Copy Print Formats and Control Instructions
Transfer Data With Copy By Name
How To Use Copy By Name
Changing the Key Item
141
141
141
141
142
142
142
143
143
144
145
147
Chapter 10 PRINT MAILING LABELS
Program Features and Overview
Creating the Label Text File With a Report
Entering the Instructions
149
149
149
150
Chapter 11 SETUP AND SECURITY
How To Do Setup
Setup Options
Function Key Options
155
155
156
160
Report Options
Adding Users / Security
The User Registration Form
Chapter 12 MULTI-USER OPERATION
Multi-User Features
Transactions
Locking
Locking On Interactive Commands
Locking In Procedures
Locking in Reports
Operational Modes
Technical Note
Multi-User Commands
Save, Save_Continue
Next, Next_Continue, Back, Back_Continue
Locks
PART III VERSAFORM XL ADVANCED FEATURES
160
160
162
165
165
166
167
168
169
170
170
171
171
171
171
171
173
Chapter 13 INTRODUCTION TO PROCEDURES
A Simple Look-Up Procedure
Primary and Secondary Files
The Procedure
Procedure Names
Secondary Files
Key-From1 and Key-From2
The Procedure
Procedure Statements
Using Form Items in a Procedure
Identifying Form Items With the Same Name
Form Items With Spaces or Symbols
175
175
177
178
180
181
181
181
182
183
183
183
Chapter 14 WRITING PROCEDURES
Changing a Procedure or Writing a New One
Procedure Types
Checking Procedures
Edit Procedures
Filling Procedures
Pick Procedures
Start Procedures
Save Procedures
Stop Procedures
Command Procedures
User Procedures
Elements of a Procedure (Procedure Syntax)
Identifiers
Form Id (Notation: AorB
Form Items (Notation: Formitem)
Column Items in Procedures
Comments
185
185
186
186
187
187
188
188
189
189
189
190
191
191
191
191
191
192
Literals
Constants
Variables
Reserved Words
Building Procedure Statements
Built-In Procedures and Functions
Computation Exceptions
Assignment Statements
Compound Statements
Procedure Chaining
Calling Procedures
Procedure Calling
Cancelling Procedures
Automatic Rounding and Numeric Precision
Automatic Padding
Reading or Importing Ascii Files
Writing Ascii Files
I/O Error Handling
More Than Two Files
Windowing Routines
Include
File Handling
Procedure Handling
Errors and Exceptions
The Continue Message
193
193
194
195
196
196
198
199
200
204
204
204
205
206
207
208
209
210
211
212
213
213
214
214
215
Chapter 15 BUILT-IN PROCEDURES AND FUNCTIONS
Built-in Routines
Manipulating Forms
Manipulating Column Lines
Entering and Transfering Data
Manipulating Strings
Other Procedures and Functions
Alphabetical Listing of Built-In Routines
Filing Command Procedures
217
218
218
219
220
221
223
224
234
Chapter 16 SAMPLE PROCEDURES
A Menu Procedue
Invoicing - Sequential Numbering
Removing Selected Lines Prior To Printing Statements
Posting Several Transactions to an Inventory
Procedure Post
Procedure Post
Global Changes to a File
Sample Procedure Files
Sample Application Files
267
268
270
272
274
276
276
278
280
280
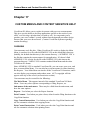
Chapter 17 CUSTOM MENUS AND CONTEXT SENSITIVE HELP
Custom Menus
Overview
Sample Menus
Creating Custom Menus
281
281
281
282
283
Background Files
Context Sensitive Help
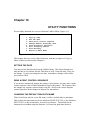
Chapter 18 Utility Functions
Setting the Date
Send a Print Control Sequence
Changing the Default Disk / Path Name
File Integrity Test
File Recovery
Transfer Utility
Activity Trace
Activity Trace
DOS Command Line
Utility Popup Menu
PART IV APPENDICES
285
286
287
287
287
287
288
288
291
291
291
291
292
295
APPENDIX A FORMATTING AND BACKUP
Formatting Diskettes
Backup
297
297
297
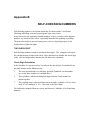
APPENDIX B SELF-CHECKING NUMBERS
The Check Digit
299
299
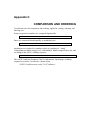
APPENDIX C COMPARISON AND ORDERING
301
APPENDIX D FILE FORMATS IN EARLIER RELEASES
302
INDEX
304
Part I
Introduction
Chapter 1
INTRODUCTION TO VERSAFORM XL
What VersaForm XL Can Do
VersaForm XL is a database that emulates common business forms and ledgers. It
deals with data the way you do on paper, but with the speed and power of the
computer. This makes it especially suitable for business accounting, bookkeeping,
and paperwork tasks. Your present knowledge of business data and recordkeeping tasks is all the preparation you need.
VersaForm XL can replace your file cards, ledgers and paper worksheets. It easily
adapts to the paper forms you are already using. VersaForm XL is especially
designed for such jobs as:
* Invoices
* Personnel Records
* Inventories
* Collection Catalogs
* Mailing Lists
* Work-in-Process Reporting
* Sales Analyses
* Capital Equipment Tracking
* Customer Files
* Accounts Payable and Receivable
* Labor Accounting
* Student Records and Transcripts
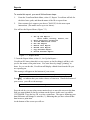
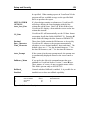
How You'll Use VersaForm XL
You will follow five general steps:
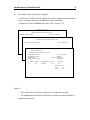
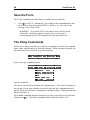
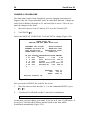
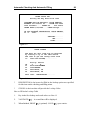
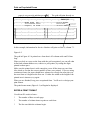
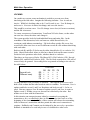
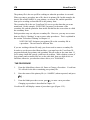
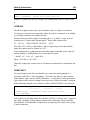
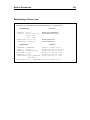
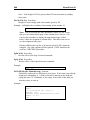
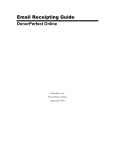
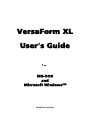
1.
First you'll design a form that fits your data processing job. You probably
already have a paper business form that is suitable; sketch it quickly on the
screen (Figure 1-1).
ALPHA TOOLS INC.
SERVING THE BAY AREA SINCE 1925
CUSTOMER ...............
ADDRESS ................
CITY ............. STATE
ORDER DATE .............
L#
1
2
3
4
5
QTY
...
...
...
...
...
STOCK#
......
......
......
......
......
ACCT# ..........
PHONE ..........
.. ZIP .........
CLERK ..........
.DESCRIPTION.
.............
.............
.............
.............
.............
PRICE
.....
.....
.....
.....
.....
AMOUNT.
.......
.......
.......
.......
.......
SUBTOTAL .......
TAX .......
TOTAL .......
Figure 1-1
Introduction to VersaForm XL
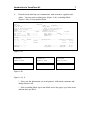
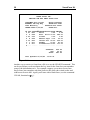
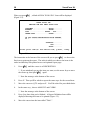
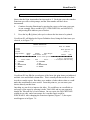
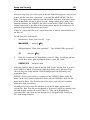
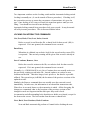
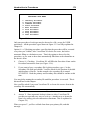
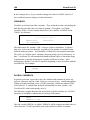
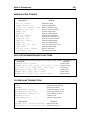
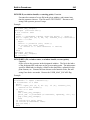
2.
5
Enter data on the form you've designed.
VersaForm XL will check your entries for accuracy and perform calculations
you've requested, then save the filled-in form on your hard
A collection of saved FORMS make up a FILE. (Figure 1-2).
ALPHA TOOLS,, INC
SERVING THE BAY AREA SINCE 1925
CUSTOMER JOHN COOPER
ACCT# COO45678
ALPHA TOOLS, INC
SERVING THE BAY AREA SINCE 1925
CUSTOMER ED CARTWRIGHT
ACCT# CAR33521
ALPHA TOOLS INC.
SERVING THE BAY AREA SINCE 1925
CUSTOMER Jane Steel
ADDRESS 123 Main St.
CITY Elm Park
ORDER DATE 10/21/83
L# QTY STOCK#↓
1 1..
100...
ACCT# STE12345
PHONE ........
STATE IL ZIP 23456
CLERK Sam.....
DESCRIPTION
Hammer.....
PRICE
5.95.
AMOUNT.
5.95..
..SUBTOTAL 5.95........
TAX .
0.30 .......
TOTAL .
6.25.......
Figure 1-2
* These forms may be retrieved, inspected, or changed at any time.
* The information on the forms can be moved from one form to another or
printed in any format.
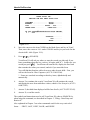
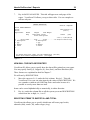
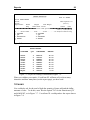
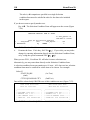
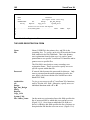
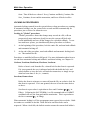
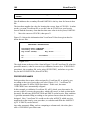
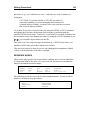
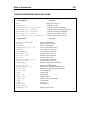
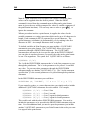
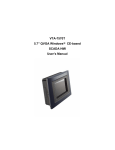
3.
Request reports to analyze the data in your files.
VersaForm XL will organize information you select and print it
(Figure 1-3).
07/28/98
Page 1
SALES ANALYSIS
Description
--------------------------------Chisel set
Chisel Set
Chisel Set
Totals for Chisel set:
Metric Skts
Metric Skts
Totals for Metric Skts:
Ratchet Wr.
Ratchet Wr.
Ratchet Wr.
Totals for Ratchet Wr.:
Screwdriver
Screwdriver
Screwdriver
Screwdriver
Totals for Screwdriver:
Qty
----13
13
5
----31
Amount
---------325.00
325.00
125.00
---------775.00
Clerk
----Art
Art
Sam
9
99
----108
297.00
3267.00
---------3564.00
Joe
Joe
20
12
20
----52
199.00
119.40
199.00
---------517.40
Art
Joe
Joe
6
6
6
6
----24
111.00
111.00
111.00
111.00
---------444.00
Art
Sam
Art
Art
=====
Totals:
215
==========
5300.40
Figure 1-3
* The information you select will be sorted and printed in any manner you
specify, in summary or in detail.
Introduction to VersaForm XL
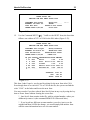
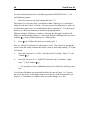
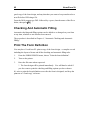
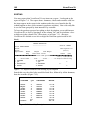
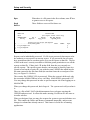
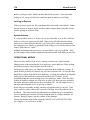
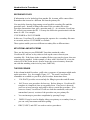
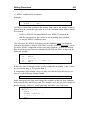
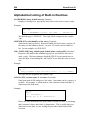
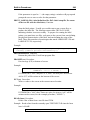
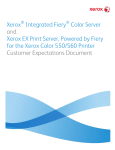
4.
7
Print the forms that help you communicate with customers, suppliers and
others. You may print on plain paper (Figure 1-4a), on mailing labels
(Figure 1-4b), or on preprinted forms.
INV# 2
INVOICE
INV_DATE ........
YYMM .... SHIPDATE ........
CUST_ID 101
CR_DR_MEMO ...........
SOLD_TO Able Enterprises
SHIP_TO Able Enterprises
ADDR1 102 6'th Ave.
SHIPAD1 44 Dockside St.
ADDR2 .............................. SHIPAD2 Pier 44
CITY Gotham City
ST MM
SHIPCITY Gotham City
SST MM
ZIP 12345
CTRY ..........
SZIP 12346
SCTRY ..........
TEL ............ REP ..........
SALESPERSON ......
PO# .............
VIA Motor Freigh FOB ..........
TERMS N30
REMARKS ..............................
L# .B_O. .QTY. ..ITEM#... ...........DESCRIPTION........... UNITPRICE EXTPRICE.
1 .....
2 4
Chisel
11.40
22.80
2 .....
3 1
Hammer
12.95
38.85
SALES_TX ........
FREIGHT ........
AMT_PAID .........
DIS_TAKEN ........
SALE_AMT
61.65
AMT_DUE …...61.65
Figure 1-4a
William R. Hutchinson
123 Main Street
Cupertino, CA 95014
Mary Blake
5961 Millich Ave
Campbell, CA 95008
Mr. John Pasquale
961 Front Street
San Jose, CA 95128
Figure 1-4b
Figure 1-4 a, b
* Select just the information you want printed. Add timely comments and
change them at will.
* Print on mailing labels; up to nine labels across the paper, up to nine items
and nine lines per label.
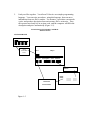
5.
Link your files together. VersaForm XL has its own simple programming
language. You can write procedures, using this language, that can move
information from one file to another. For instance, a procedure can transfer
a price and product description from an inventory file to an invoice. Thus
the operator need only key in an item code, and the computer will fill in the
description and price automatically (Figure 1-5).
INVOICING-INVENTORY CONTROL
APPLICATION
CUSTOMER FILE
Figure 1-5
INVOI CE
PROCEDURE
GETS
CUSTOMER
DATA
Bill to
Qty Item
Ship to
Description
Price Amount
PROCEDURE GETS
PRICES
INVENTORY FILE
PROCEDURE
UPDATES
INVENTORY
Figure 1-5
Introduction to VersaForm XL
9
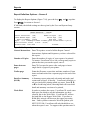
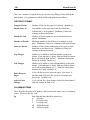
General Information
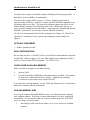
THE SCREEN AND THE CURSOR
In VersaForm XL a form is usually 160 characters wide and 60 lines high. Of
course the screen on most computers isn't this big, so you will normally see only a
part of your form. Imagine that the screen is a window that lets you see a portion
of your form that is 80 characters by 23. Moving this window is called scrolling.
The cursor is the marker on the screen that shows where the next character will
appear. It can be moved by pressing the arrow keys, and a number of others:
7, (
67
` a
`` aa
$
&5 4
2 1
& &A
&2 1
&` a
and
and
and
and
7
(
These keys move the cursor from one data item to the
next. If the form is larger than the screen,
will
cause scrolling (i.e., move the window);
not.
will
Moves to the previous item; just the opposite of
7
Move to the left and right ends of the visible part of
the line. They do not move the window.
Pressing twice moves to the upper left and lower right
corners of the visible screen.
Moves the cursor to the next empty column line.
Scroll (move the window) right and left.
Move up or down to the next visible column line.
and
Move to the next column line, either up or down. If
not visiible, the next line is made so.
and
Scroll up and down.
and
Move the cursor all the way left and right, then (when
pressed a second time) to the upper left or lower right
corners of the form. If the edge or corner of the
screen isn't visible at the moment, scrolling occurs.
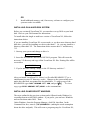
DATES
A date is always written numerically, as month, day, and year. Use either slashes
(/) or hyphens (-) as separators. Use one or two digits for the month and day, and
either two or four digits for the year. For example, 4/18/90 or 11/9/1991 or
04/02/91 or 12-21-2002.
These formats enable VersaForm XL to recognize dates and put them in
chronological order.
You may modify the system to choose the dates non-U.S. convention of day,
month, and year. Refer to Chapter 11, "Setup and Security."
DISK DRIVES
The two diskette drives are referred to as A and B. The designation for hard disk
drives varies with the machine but is usually drive C. In this manual, we will
assume that your hard disk is drive C.
DISKETTES
Handle your diskettes gently and keep them clean. Refer to your computer
handbook for information on diskettes.
Label each file diskette with both a diskette number and file name. Write with a
soft, felt-tip pen, not a ball point pen.
Many diskettes have a small "write-protect" notch on the right side. When the
notch is covered (on a 5 1/4" diskette), or if there is no notch, no data can be
written on the diskette.
WARNING:
DON'T REMOVE DISKETTES WHEN A PROGRAM IS RUNNING. Incorrect
diskette removal could cause the program to record data in the wrong place or
erase data already entered.
Also, DON'T SHUT THE SYSTEM DOWN WHEN A PROGRAM IS
RUNNING. You could lose data.
FILES
A VersaForm XL file is a collection of business forms, such as invoices, customer
files, collection catalogs, freight documents, or personnel records, stored on a
magnetic disk. Like standard paper business forms, the forms in a VersaForm XL
Introduction to VersaForm XL
11
file contain printed information, such as messages and titles, and blank lines to fill
in. Some forms also have columns for multiple entries.
A form need be designed only once for each file, and then a blank form may be
requested at any time. When a form is displayed on the screen, information may be
keyed in. Forms that have been filled in can be retrieved, examined, updated or
deleted whenever required.
All the forms in a single VersaForm XL file are of the same design. For example,
one file contains purchase order forms, another, inventory records.
FILE CAPACITY
VersaForm XL supports files up to 2,000,000,000 bytes (2 gigabytes) in size. The
number of forms that can be stored in this space varies, because forms are
compressed before they are stored on disk.
FORM SIZE
Each form may contain up to 20,000 bytes of data, before compression.
NUMBERS
In VersaForm XL a number may include up to 13 digits to the left of the decimal
point and up to 8 decimal places. The largest number that can be used is therefore
9,999,999,999,999.99999999 (almost 10 trillion). A leading + or - sign may be
used. +05.5, -3345, 2, and -1.88888888 are valid numbers. Money symbols (e.g.,
$) and separators (e.g., commas between the hundreds and thousands, as in
10,000) are not allowed.
* Some common "numbers" such as telephone and social security numbers
are not considered to be true numbers by VersaForm XL, because they
cannot be used in arithmetic. Only numbers which can be added and
subtracted qualify.
* Numbers are compared by VersaForm XL on the basis of their true
values. Thus, 0 is equal to 00000 and 0.00; 9.9, 9.90, and 009.900 are all
equal.
* For use outside the U.S. the decimal character may be changed. See
Chapter 11, "Setup and Security" for instructions.
THE ENTER KEY
On many computers, this key is also called the Return key. Most of the time you'll
need to press the Enter key after giving instructions or responding to the system,
to indicate that your instruction or response is complete. Some exceptions is when
you choose items from your form by pressing "X" (e.g., selecting items to report
on) or when you use the command menu. The system will recognize these
responses by performing the appropriate action immediately.
ASCII FILES
When VersaForm XL sends information to a disk, rather than to a printer, it
creates a DOS "ASCII" file. Such a file can be used to produce form letters,
labels, and other documents, and to interface with other DOS programs.
VersaForm XL procedures can also be used to read and write ASCII files.
BACKUP AND COPYING
The VersaForm XL program is protected by copyright. It may be copied only for
your own use as backup copies.
You can use the DOS utility DISKCOPY to make these copies.
If you have a hard disk, you may copy VersaForm XL to it, but if you have a
second computer, you must purchase a second copy of VersaForm XL. The rule
is that only one copy may be in use at any one time.
Keep your backup copies in a safe place. If your program disk is damaged, and
you do not have a backup copy, a replacement may be ordered.
Installation
1.
Make sure you have the required equipment.
2.
Back up your VersaForm XL disks.
3.
Complete and return the Registration Card so you will receive notices of
system updates and additional features
REQUIRED EQUIPMENT
•
IBM PC, PC/XT, PC/AT, PS/2 or compatible computer.
•
440K available RAM. For large applications, 500K may be needed.
Introduction to VersaForm XL
13
VersaForm XL requires a hard disk capable of holding all of the program files. A
hard disk of at least 40MB is recommended.
VersaForm XL requires DOS version 2.1 or later. Multi-user operation is
supported only on DOS 3.1 and later versions; the DOS SHARE command (or its
equivalent) must be in effect. The networks used must support the DOS record
locking facility (Interrupt 21H, Function code 5CH). All networks that we are
aware of at this writing provide this facility. Some networks automatically provide
SHARE (if yours does, you need not issue the SHARE command).
Use the Test subcommand of the LOcks command (see Chapter 12, "Multi-User
Operations") to find out if your system is providing the required multi-user
support.
OPTIONAL EQUIPMENT
•
Printer--parallel or serial.
DOS CONFIGURATION
Be sure that you have a CONFIG.SYS on your DOS boot disk and that it specifies
enough files. Fifteen is plenty. (See your DOS manual on Configuration if this is
new to you; look at the FILES statement. Try "FILES=15").
CHECK USER AVAILABLE MEMORY
Make sure there's enough user available memory.
1.
Start up DOS.
2.
Use the DOS utility CHKDSK to determine memory available. The number
of "bytes free" should be 440,000 or greater. Applications with large
VersaForm XL procedures may require 500,000.
If you don't have enough memory, see the "DOS and Memory Size" section below.
Otherwise, continue with the instructions .
DOS AND MEMORY SIZE
Even if your computer has 640K RAM or more, you still may not have enough
user available memory. DOS may be larger than normal if you have configured
extra buffers. Or you may be using one or more resident programs. If the DOS
area is too large, you must either:
1.
Reconfigure DOS (with fewer buffers, etc.) to free some user available
memory.
OR
2
Install additional memory, and, if necessary, software to configure your
system to make it available.
INSTALLING ON A HARD DISK SYSTEM
Before you can install VersaForm XL, you must have set up DOS on your hard
disk. Refer to your DOS manual for instructions.
To install either the single or multi-user version of VersaForm XL, follow the
instructions below:
If you are installing VersaForm XL on a network, or you have more than one hard
disk drive, you may be installing on a drive other than C. Or, you may install to a
directory other than \VF. The instructions below assume drive C and directory
\VF.
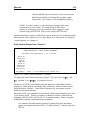
1. Start up your system and change to drive A:
C> A:
2. Insert the first diskette and run the INSTALL program. This will create the
necessary VF directory and copy all the VersaForm XL files. Existing files will be
overwritten.
A> INSTALL
3. If you're not there already, change to the VF directory on drive C:
A> C:
C> CD \VF
After you install VersaForm XL, if there is a file called README.VF7 (or a
similar name) in your VF directory, read it. Changes to the system which were
made after this book was printed are described there. To print a copy of the
README file type COPY README.VF7 PRN, and press
. To view a
copy, type TYPE README.VF7|MORE at the command line.
(
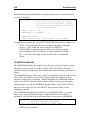
INSTALLING ON MICROSOFT WINDOWS
The steps outlined in the previous section can be followed under Windows by
executing them in an MS-DOS window. If you prefer, you can leave Windows
and execute them under DOS. Then:
Under Windows, from the Program Manager, click File, then Run. In the
Command Line box, enter C:\VF\WVFSETUP (making the usual assumption
about the drive and path). This will create a program group for VersaForm XL,
Introduction to VersaForm XL
15
containing a VersaForm icon, and another for the Readme file. VersaForm may
now be invoked as any Windows application.
As installed, VersaForm will run within a window. If you wish it to run in fullscreen mode, you may change VF.PIF in the usual way.
To use the mouse in VersaForm under Windows, you must install the mouse
drivers in DOS. See below.
MOUSE INSTALLATION
If you intend to use a mouse, you must install its driver in your DOS configuration
or Autoexec file. This is true even for Windows--the mouse facilities of Windows
will not be usable in VersaForm XL unless the mouse driver has been installed to
operate under DOS.
NETWORKS
Unless your network specifies otherwise, for multi-user operation you should put
the DOS SHARE command in the AUTOEXEC.BAT file on each of the network
workstations.
SETTING UP SERIAL PRINTERS
Almost all printers on IBM PC compatibles are parallel printers, but serial printers
may be used. To install a serial printer, use the DOS command called MODE.
Instructions are found in your DOS user's guide. You will initialize the
Asynchronous Communications Adapter and then redirect the parallel printer
output to it.
INSTALLATION OF COLOR DISPLAYS
If you have a color display, you may select the colors you wish to use. Each user
can have his or her own colors. See Chapter 11, "Setup and Security" for
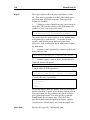
instructions.
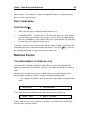
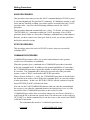
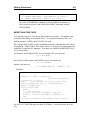
Starting Up VersaForm XL
If you are using DOS, boot the DOS system if you haven’t already,
and then continue with these steps:
The following assumes that you have installed VersaForm XL on drive C and
subdirectory VF.
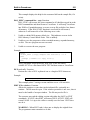
1. If you're not there already,change to the VF directory on drive C:
C> CD \VF
2. Type VF at the prompt.
C:\VF> VF
If you are using Windows, select (double-click) the VersaForm program group,
and then select the VersaForm icon.
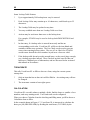
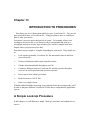
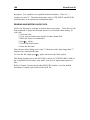
In either case you will be asked for your user ID. Enter, and then enter VF when
asked for the password. VF is the initial password for Manager. If security is a
consideration, it should be changed as soon as possible. You will now see the
Main Menu (Figure 1-6).
VersaForm XL Main Menu
1.
2.
3.
4.
5.
6.
7.
8.
9.
Form Design
Filing
Reports
Design a Print Format
Copy or Print Forms
Mailing Label Printer
VersaForm Utilities
Enter or change a procedure
Exit
Figure 1-6
You may now begin to use the system. To change user setup information such as
screen colors, see Chapter 11, "Setup and Security". To add user IDs or change
passwords, see the same chapter. We recommend that you read Chapter 11 soon.
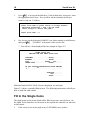
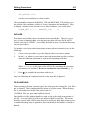
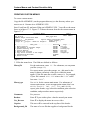
At the Main Menu (Figure 1-6), enter the number of the function you want. After
you make this choice, VersaForm XL will ask what file you will use.
Enter the drive letter or path name of your file
(or press escape to return to the menu): C:\VF
Press E to indicate that your file is on the path displayed, or enter the path that
contains your file. VersaForm XL will ask for the file name:
Enter file name or press return to accept default.
(Wildcard characters ? and * may be used.
Press escape to select new path.)
Enter file name: *.*
Introduction to VersaForm XL
17
Enter the file name. If you don't know the file name, enter a question mark or a
filename with wild cards (such as "*.*") to see a list of the files on the hard disk.
From this list, select the file you wish to work on.
To return to the previous prompt and enter a new drive letter or path, press the
Escape key.
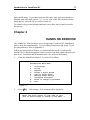
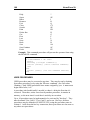
Chapter 2
HANDS ON EXERCISE
The "Hands-On" Exercise allows you to begin using VersaForm XL immediately
and see how the program works. It covers filling in and retrieving forms. If you
are using diskettes, refer to Appendix A.
Follow the instructions in Chapter 1 to install and start up the VersaForm XL
System. We've already designed a form for you to work with which will show you
how to use VersaForm and demonstrate just a few of its useful features.
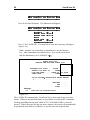
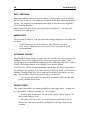
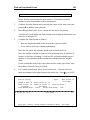
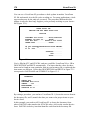
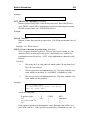
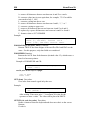
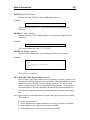
1.
From the Main Menu (figure 2-1), select #2 for Filing.
VersaForm XL Main Menu
1.
2.
3.
4.
5.
6.
7.
8.
9.
Form Design
Filing
Reports
Design a Print Format
Copy or Print Forms
Mailing Label Printer
VersaForm Utilities
Enter or change a procedure
Exit
Figure 2-1
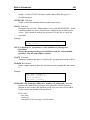
2.
Press
(
. This message, or a variation,will be displayed:
Enter the drive letter or path name of your
file or press escape to return to the menu: C
18
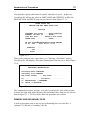
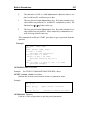
3.
VersaForm XL
(
Press
to accept the default drive. If the default drive is incorrect, enter
the appropriate drive letter. Now you'll be asked to identify the file you
want to work on. You'll see:
Enter file name or press return to accept default.
(Wildcard characters ? and * may be used.
Press escape to select new path.)
Enter file name: *.*
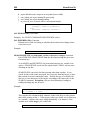
4.
(
Key in (type on the keyboard) SAMPLE (use either capitals or small letters),
. "SAMPLE" is the name of the exercise file.
then press
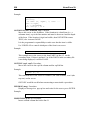
* You will see a form displayed like the example in Figure 2-2.
ALPHA TOOLS INC.
SERVING THE BAY AREA SINCE 1925
CUSTOMER ............... ACCT# ........
ADDRESS ................ PHONE ........
CITY ............... STATE .. ZIP .....
ORDER DATE ............. CLERK ........
L# QTY STOCK#↓ DESCRIPTION PRICE AMOUNT.
1 ... ...... ........... ..... .......
SUBTOTAL .......
TAX ........
TOTAL ........
Figure 2-2
When the blank ALPHA TOOLS form is displayed, we can begin.
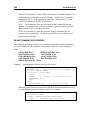
Figure 2-3 shows a partially filled-in form. The following instructions will tell you
how to make the same entries.
Fill In the Single Items
The single items are the items which will be filled in just once on each form. On
the Alpha Tools form these are the items at the top and also subtotal, tax and total
at the bottom.
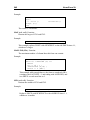
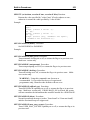
1.
If the cursor is not at the single item, CUSTOMER, move it there.
Hands On Exercise
19
If you can't find the cursor, press one of the arrow keys to make it move.
ALPHA TOOLS INC.
SERVING THE BAY AREA SINCE 1925
CUSTOMER Jane Steel..... ACCT# ........
ADDRESS 123 Main St..... PHONE ........
CITY Elm Park....... STATE IL ZIP 23456
ORDER DATE ............. CLERK ........
L# QTY STOCK#↓ DESCRIPTION PRICE AMOUNT.
1 ... ...... ........... ..... .......
SUBTOTAL ........
TAX ........
TOTAL ........
Figure 2-3
2.
Key JANE STEEL into CUSTOMER. If you make a typing error,
backspace until the cursor is on the incorrect character; then key the correct
one over it.
Notice that backspacing over characters does not erase them. To remove a
character, position the cursor on it and press the space bar.
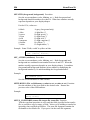
3.
(
Press
or the tab key once to move the cursor into the next item,
ACCT#. (Don't key anything here yet.)
The tab and
4.
(
(
keys move the cursor to the next item.
or tab to move to ADDRESS and key in 123 MAIN ST. Tab
Press
twice to CITY and key in ELM PARK; tab to STATE and key in IL; tab to
ZIP and key in 23456.
Compare your screen to the illustration in Figure 2-3; the items you've keyed
in should look the same.
(
Continue pressing
or tab and notice that the cursor moves to each item in
turn. Eventually it moves back to CUSTOMER.
5.
Press ESC once, to display the command menu at the top of the screen. The
command menu is the place where all VersaForm XL commands are entered
(unless a function key is used):
20
VersaForm XL
ËÏÏÏÏÏÏÏÏÏÏÏÏÏÏÏÏÏÏÏÏÏÏÏÏÏÏÏÏÏÏÏÏÏϽ
¼Hkng hQtou Gfkv Twp Wvknkvkgu Jgnr¼
ÊÏÏÏÏÏÏÏÏÏÏÏÏÏÏÏÏÏÏÏÏÏÏÏÏÏÏÏÏÏÏÏÏÏϾ
Press E (for the Edit menu). The Edit menu will appear.
ËÏÏÏÏÏÏÏÏÏÏÏÏÏÏÏÏÏÏÏÏÏÏÏÏÏÏÏÏÏÏÏÏÏϽ
¼Hkng hQtou Gfkv Twp Wvknkvkgu Jgnr¼
ÊÏÏÏÏÏÏËÏÏÏÏÏÏÏÏÏÏÏÏÏÏÏÏÏÏϽÏÏÏÏÏÏϾ
¼Xcnkfcvg
>H3@ ¼
¼Kpugtv nkpg >CnvH:@¼
¼Fgngvg nkpg >CnvH9@¼
¼Wpfq
¼
¼Engct hqto >H;@ ¼
¼Pgy Nkpg
>CnvH6@¼
ÊÏÏÏÏÏÏÏÏÏÏÏÏÏÏÏÏÏÏϾ
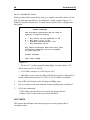
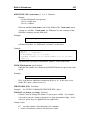
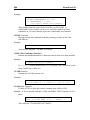
Press V for VALIDATE. You may hear a beep and a message will appear
(Figure 2-4):
Note: Another way of invoking a command is to use the function
key. Most commands have function keys. Note on the menu above
that the function key for VALIDATE is
.
ALPHA TOOLS INC.
SERVING THE BAY AREA SINCE 1925
Cursor
CUSTOMER Jane Steel..... ACCT# ........
ADDRESS 123 Main St..... PHONE ........
CITY ELM PARK....... STATE IL ZIP 23456
ORDER DATE ............. CLERK ........
L# QTY STOCK#↓ DESCRIPTION PRICE AMOUNT.
1 ... ...... ........... ..... .......
SUBTOTAL ........
TAX ........
TOTAL ........
Message
---->
Item must be entered-Acct#
Figure 2-4
The VALIDATE command asks VersaForm XL to check and accept your data
entries. When we designed this form, we specified in VersaForm XL's automaticchecking and filling that the item called ACCT# is MANDATORY; it must be
entered. When a message like the one above appears, the cursor will automatically
be positioned at the item to be filled in, so you can enter the required data.
Hands On Exercise
21
VersaForm XL's automatic checking and filling feature will be explained at length
in Chapter 6.
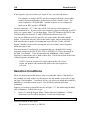
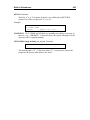
6.
Key STE-101 in ACCT#. Now try to VALIDATE your entries by pressing
. Another message now tells you that all entries into ACCT# must follow
a particular format or pattern (Figure 2-5). We used automatic checking and
filling to specify a FORMAT check for ACCT#. The cursor is again
positioned at ACCT#.
Cursor
ALPHA TOOLS INC.
SERVING THE BAY AREA SINCE 1925
CUSTOMER Jane Steel..... ACCT# STE-101.
ADDRESS 123 Main St..... PHONE ........
CITY Elm Park .......STATE IL ZIP 23456
ORDER DATE ............. CLERK ........
L# QTY STOCK#↓ DESCRIPTION PRICE AMOUNT.
1 ... ...... ........... ..... .......
SUBTOTAL ........
TAX ........
TOTAL ........
Message
Acct# failed format check for pattern &&&#####
Figure 2-5
7.
Key in STE12345. The format we specified is three letters followed by five
numerical digits. VALIDATE ( ) your entry. VersaForm XL will tell you
that everything checks (Figure 2-6).
22
VersaForm XL
ALPHA TOOLS INC.
SERVING THE BAY AREA SINCE 1925
Cursor
CUSTOMER Jane Steel
ACCT# STE12345
ADDRESS 123 Main St.
PHONE ........
CITY Elm Park
STATE IL ZIP 23456
ORDER DATE 10/21/83
CLERK ........
L# QTY STOCK#↓ DESCRIPTION PRICE AMOUNT.
1 ... ...... ........... ..... .......
SUBTOTAL ........
TAX ........
TOTAL ........
Message
Entries checked-ok
Figure 2-6
Notice that ORDER DATE now shows the current date (or whatever date DOS
finds on your computer's clock). We chose the TODAYSDATE feature in
automatic checking and filling for this item.
8. Tab to CLERK, key in Sam and VALIDATE (
).
Enter Data in the Column lines
1.
Move the cursor to Line #1 in the item called QTY. Fill in the first line as
shown in Figure 2-7.
Hands On Exercise
23
ALPHA TOOLS INC.
SERVING THE BAY AREA SINCE 1925
CUSTOMER Jane Steel
ACCT# STE12345
ADDRESS 123 Main St.
PHONE ........
CITY Elm Park
STATE IL ZIP 23456
ORDER DATE 10/21/83
CLERK Sam.....
---->
L# QTY STOCK#↓ DESCRIPTION PRICE AMOUNT.
1 1.. 100... Hammer..... 5.95. 5.95...
PRICE ...... AMOUNT ..SUBTOTAL ........
TAX ........
TOTAL ........
Figure 2-7
When you VALIDATE your entries, a second line will appear.
* You must validate after filling in each column line before you can enter
data into another line.
Note several changes in the form when Validation occurs (Figure 2-8).
L# QTY STOCK#↓ DESCRIPTION PRICE AMOUNT.
1 1
100
Hammer
5.95
5.95
2 ... ...... ........... ..... .......
SUBTOTAL
TAX
TOTAL
5.95
0.30
6.25
Entries checked - OK
Figure 2-8
VersaForm XL has removed the dots or highlights (i.e., displays in reverse video
or in a different color) the characters in Line 1 to show they are valid. (Which it
does depends on how your screen is set up.) We chose VersaForm XL's automatic
filling feature, CALCULATE, to compute the SUBTOTAL (based on the amount
you keyed in), the TAX, and TOTAL, and fill them in. Also, the figures in the
PRICE and AMOUNT columns were moved to the right, because we chose the
JUSTIFY option for those items .
$O
Notice the down arrow (↓) next to the STOCK# column heading. This indicates
that a pick list has been set up for STOCK#. Press
(for list) will display
the pop up list that was set up in Automatic Checking and Filling for this field.
24
VersaForm XL
(,
Items are selected from the list by highlighting the entry using the up and down
arrow keys and then pressing
2.
or by using the mouse.
While on line #2, select A44 from the STOCK# list and VALIDATE. You'll
see (Figure 2-9) . . .
L# QTY STOCK#↓ DESCRIPTION PRICE AMOUNT.
1 1
100
Hammer
5.95
5.95
2 ... A44... ........... ..... .......
SUBTOTAL
TAX
TOTAL
Message
5.95
0.30
6.25
Qty must be entered
Figure 2-9
QTY is another MANDATORY entry.
3.
Key in 2 under QTY, then VALIDATE again.
Notice what happens! The system automatically fills in DESCRIPTION and
PRICE (based on the STOCK#). It found these items on a Lookup Table that was
prepared when we chose LOOKUP as an automatic filling feature.
VersaForm XL also supplied the AMOUNT (QTY times PRICE). Then it
updated the SUBTOTAL, computed the TAX, and filled in the correct TOTAL. It
lined up (justified) all the figures, checked your entries, and provided a third
column line. Your form now looks like Figure 2-10.
L#
1
2
3
QTY
1
2
...
STOCK#↓ DESCRIPTION PRICE AMOUNT.
100
Hammer
5.95
5.95
A44
Elec. Drill 47.00
94.00
...... ........... ..... .......
SUBTOTAL
TAX
TOTAL
99.95
5.00
104.95
Entries checked - OK
Figure 2-10
You already know you can type or space over characters. However, if you have a
lot of data to remove, you may use the UNDO command on entries that have not
yet been validated. UNDO removes all entries back to the last validation.
Hands On Exercise
25
4.
In Line 3, key in 1 under QTY; A54 under STOCK#; Hammer under
DESCRIPTION, and 32.50 under PRICE.
5.
Press ESC, then E for the Edit menu.
6.
Key in U for Undo and press
. (To remove data that has already been
validated, use the DELETE command, discussed later.)
7.
Key in the letter A under QTY. Key in A11 (A-eleven) under STOCK#.
Try to VALIDATE. You'll see the message shown in Figure 2-11.
(
L#
1
2
3
QTY
1
2
A
STOCK#↓
100
A44
A11...
DESCRIPTION PRICE AMOUNT.
Hammer
5.95
5.95
Elec. Drill 47.00
94.00
........... .....
.....
SUBTOTAL
TAX
Message
99.95
5.00
104.95
Qty must be numeric
Figure 2-11
Another data entry check was set up for QTY: all entries into that item must be
NUMERIC. Remember--the system will not accept entries that do not meet the
specifications set up in automatic checking and filling when a form is designed.
8.
Key in 2 over the A under QTY. NOW validate, and watch!
L#
1
2
3
4
QTY
1
2
2
...
STOCK#↓
100
A44
A11
......
DESCRIPTION
Hammer
Elec. Drill
Hammer
...........
PRICE AMOUNT.
5.95
5.95
47.00
94.00
12.50
25.00
..... .......
SUBTOTAL
TAX
TOTAL
124.95
6.25
131.20
Entries checked-OK
Figure 2-12
The DESCRIPTION, PRICE, AMOUNT, SUBTOTAL, TAX and TOTAL will all
be filled in, calculated, totaled, and justified. (Figure 2-12)
26
VersaForm XL
* When you design your own forms, you can set up specifications like these
in automatic checking and filling, so your data will be automatically checked,
computed and filled in.
Although a Lookup Table, another automatic checking and filling option, was
prepared for DESCRIPTION and PRICE when this form was designed, you may
override it if you wish.
9.
In Line #4, key in 2 under QTY and A11 under STOCK#.
10.
Move the cursor into the PRICE column. Key in 7.95 under PRICE. This is
not the price on the Lookup Table, but the system will accept whatever is
keyed in. Remember--manual keying overrides automatic lookup and filling.
11.
VALIDATE your entries. The system will fill in the DESCRIPTION and
calculate the AMOUNT, SUBTOTAL, TAX and TOTAL, based on the
QUANTITY and PRICE that you keyed in. (Figure 2-13)
Though the system didn't fill in PRICE (since you keyed it in yourself), it still filled
in DESCRIPTION (Hammer), since automatic filling had been chosen for that
item, and you didn't override it.
L#
1
2
3
4
5
QTY
1
2
2
2
...
STOCK#↓
100
A44
A11
A11
......
DESCRIPTION
Hammer
Elec. Drill
Hammer
Hammer
...........
PRICE AMOUNT.
5.95
5.95
47.00
94.00
12.50
25.00
7.95
15.90
..... .......
SUBTOTAL
TAX
TOTAL
140.85
7.04
147.89
Entries checked - OK
Figure 2-13
12.
In Line #5, key in: 3 under QTY; A55 under STOCK#; 22.50 under PRICE.
VALIDATE your entries.
VersaForm XL will fill in the DESCRIPTION, AMOUNT, SUBTOTAL, TAX
and TOTAL, as shown in Figure 2-14.
Hands On Exercise
L#
1
2
3
4
5
6
QTY
1
2
2
2
3
...
27
STOCK#↓
100
A44
A11
A11
A55
......
DESCRIPTION
Hammer
Elec. Drill
Hammer
Hammer
Carbide Set
...........
PRICE AMOUNT.
5.95
5.95
47.00
94.00
12.50
25.00
7.95
15.90
22.50
67.50
..... .......
SUBTOTAL
TAX
TOTAL
208.35
10.42
218.77
Entries checked-OK
Figure 2-14
Now suppose you decide you want to have VersaForm XL put in the PRICE
instead, using the Table Lookup feature.
(
13.
Move the cursor back to Line #5, then press
item called STOCK#.
14.
Key in A55 again, over the A55 already entered.
15.
VALIDATE your entry. PRICE, AMOUNT, SUBTOTAL, TAX and
TOTAL will all be changed to agree with the STOCK# as they appear on the
Lookup Table. Since you did not key in a value for PRICE yourself,
VersaForm XL automatically filled it in and recalculated the other items
(Figure 2-15).
L#
1
2
3
4
5
6
QTY
1
2
2
2
3
...
STOCK#↓
100
A44
A11
A11
A55
......
DESCRIPTION
Hammer
Elec. Drill
Hammer
Hammer
Carbide Set
...........
until the cursor is in the
PRICE AMOUNT.
5.95
5.95
47.00
94.00
12.50
25.00
7.95
15.90
52.50 157.50
..... .......
SUBTOTAL
TAX
TOTAL
298.35
14.92
313.27
Entries checked-OK
Figure 2-15
Whenever you change or re-enter data on a form, VersaForm XL will adjust
everything that depends on that entry.
28
VersaForm XL
Save the Form
#
The SAVE command writes the entries you make into your data file.
1.
Press
to SAVE. Alternatively, you could use the command menu, with
the mouse or from the keyboard (ESC-O (fOrms) - S). You will see the
message "New Form Saved".
WARNING: If you don't SAVE your entries, they won't be stored
on the disk. Once the computer is turned off or your screen is
cleared (without the SAVE command), the new data will be lost.
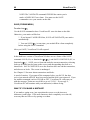
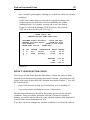
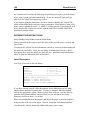
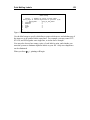
The Filing Commands
Unless you're using a function key to activate a command, you'll use the command
menu, either with the mouse or from the keyboard. When using the keyboard, you
must enter three keys: first ESC to get the menu bar,
ËÏÏÏÏÏÏÏÏÏÏÏÏÏÏÏÏÏÏÏÏÏÏÏÏÏÏÏÏÏÏÏÏÏϽ
¼Hkng hQtou Gfkv Twp Wvknkvkgu Jgnr¼
ÊÏÏÏÏÏÏÏÏÏÏÏÏÏÏÏÏÏÏÏÏÏÏÏÏÏÏÏÏÏÏÏÏÏϾ
then a key to get a pulldown menu,
ËÏÏÏÏÏÏÏÏÏÏÏÏÏÏÏÏÏÏÏÏÏÏÏÏÏÏÏÏÏÏÏÏÏϽ
¼Hkng hQtou Gfkv Twp Wvknkvkgu Jgnr¼
ÊÏÏÏÏÏÏËÏÏÏÏÏÏÏÏÏÏÏÏÏÏÏÏÏÏϽÏÏÏÏÏÏϾ
¼Xcnkfcvg
>H3@ ¼
¼Kpugtv nkpg >CnvH:@¼
¼Fgngvg nkpg >CnvH9@¼
¼Wpfq
¼
¼Engct hqto >H;@ ¼
¼Pgy Nkpg
>CnvH6@¼
ÊÏÏÏÏÏÏÏÏÏÏÏÏÏÏÏÏÏÏϾ
then the command.
The mouse can also be used call up the command menu. If you move the mouse to
the top line of your form, outside of any field, and click, the command menu will
pop up. Then you can choose commands by clicking on them. Clicking outside the
menu will remove it.
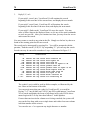
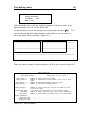
All available commands and their function keys can be seen when you ask for help
). The Filing Commands will be displayed (Figure 2-17).
(function key
Hands On Exercise
29
ËÏÏÏÏÏEQOOCPFÏÏÏÏÏÏÏÏÏÏÏÏÏÏÏÏÏOGPWÏÏÏÏHWPEVKQP MG[ÍÏÏÏÏÏÏXgtucHqto ZN x09ÏÏÏϽ
¼DCEM qpg hqto *Eqpvkpwg+
hQtou µ H7 *Cnv/H7+¼Vq TGVWTP. rtguu GUE
¼
¼ECNEwncvqt
Wvknu µ H9
ÉÆÆÆÆÆÆÆÆÆÆÆÆÆÆÆÆÆÆÆÆÆÆÆÆÆƸ
¼ENGCT vq dncpm hqto
hQtou µ H;
¼Vq OQXG VJG UETGGP<
¼
¼Eqnwopu Wr1Fqyp
//
µ Evtn/H71H8 ¼ Wr<
Evtn/RiWr
¼
¼FGNGVG c nkpg
hQtou µ Cnv/H9
¼ Fqyp< Evtn/RiFp
¼
¼FKURNC[ rtkoct{1ugeqpf hqto Gfkv µ Cnv/H32
¼ Tkijv< Evtn/ /@
¼
¼GZGEWVG c rtqegfwtg
Rtqeu µ Cnv/H3
É Nghv< Evtn/ >/
¼
¼GZKV *vq ockp ogpw+
Hkng µ Cnv/Z
¼ÆÆÆÆÆÆÆÆÆÆÆÆÆÆÆÆÆÆÆÆÆÆÆÆÆƸ
¼HKTUV1NCUV hqto kp hkng
hQtou µ
¼Vq OQXG VJG EWTUQT<
¼
¼IGV c hqto
hQtou µ H5
¼ Cttqy mg{
¼
¼JGNR
Jgnr µ H32
¼ Vjku nkpg< Jqog. Gpf
¼
¼KPFGZ nkuv
hQtou µ H6
¼ Eqtpgtu<
¼
¼KPUGTV c nkpg
Gfkv µ Cnv/H:
¼
Jqog/Jqog. Gpf/Gpf
¼
¼PGZV hqto *Eqpvkpwg+
hQtou µ H8
¼ Vq1Htqo Eqoocpf< Gue
¼
¼Rcig Hqtyctf1Dcemyctf
//
µ Ri Fp1Wr ¼ Pgzv kvgo < Gpvgt
¼
¼RTKPV ewttgpv hqto
hQtou µ H:
¼
ykvj uetqnn< *Dcem+Vcd¼
¼TGOQXG vjg ewttgpv hqto
hQtou µ Cnv/T
É vq ncuv fgvckn< Cnv/H6 ¼
¼UCXG c hqto
hQtou µ H4
¼ÆÆÆÆÆÆÆÆÆÆÆÆÆÆÆÆÆÆÆÆÆÆÆÆÆƸ
¼UGCTEJ cnn hqtou hqt xcnwg hQtou µ Cnv/H5
¼Wvknkvkgu
Cnv/W ¼
¼URCEG tgrqtv qp hkng
Wvknu µ
¼\qqo c eqnwop nkpg Cnv/\ ¼
¼WPFQ wpxcnkfcvgf fcvc
Gfkv µ
¼Eqpvgzv/ugpu0 jgnr Cnv/J ¼
¼XCNKFCVG
Gfkv µ H3
¼Rkem Nkuv
Cnv/N ¼
ÊÏÏÏÏÏÏÏÏÏÏÏÏÏÏÏÏÏÏÏÏÏÏÏÏÏÏÏÏÏÏÏÏÏÏÏÏÏÏÏÏÏÏÏÏÏÏÏÏÏÌÏÏÏÏÏÏÏÏÏÏÏÏÏÏÏÏÏÏÏÏÏÏÏÏÏϾ
Figure 2-17
You may issue a command while viewing the menu by entering its abbreviation, or
using the function key. To go back to your form, simply press escape.
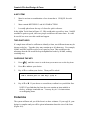
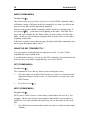
LOCATE FORMS IN YOUR FILE
The quickest way to display a particular form in the file is by using the key item.
The key item is specified when a form is designed and it is the data item by which
the file is indexed. For example, to locate the form with the key JOY34521, start
with a blank form:
1.
Press
(clear); you'll see a blank form.
2.
Move the cursor into ACCT# and type in JOY34521.
3.
. This tells the system to the form with this account number
Now press
(Figure 2-18.)
30
VersaForm XL
ALPHA TOOLS INC.
SERVING THE BAY AREA SINCE 1925
CUSTOMER Chas Joyner
ACCT# JOY34521
ADDRESS 458 Bog Way
PHONE 453-5580
CITY Wheeling
STATE WV ZIP 24567
ORDER DATE 11/15/80
CLERK Art
L#
1
2
3
4
5
6
7
8
QTY
11
6
20
8
13
7
6
...
STOCK#↓
B55
A44
V33
A66
A22
A11
A77
......
DESCRIPTION
Nails
Elec. Drill
Screws
Measur Tape
Chisel Set
Hammer
Screwdriver
...........
PRICE AMOUNT.
0.24
2.64
47.00 282.00
0.09
1.80
3.75
30.00
25.00 325.00
12.50
87.50
18.50 111.00
..... .......
SUBTOTAL
TAX
TOTAL
Last Updated 11/15/80
839.94
42.00
881.94
13:45:00
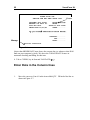
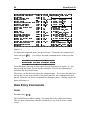
Figure 2-18
Another way to retrieve a form from a file is to use the SEARCH command. This
can be used when you do not know the key item for the form, but can remember
some of the information on it. For example, suppose you want to locate Jane
Steel's form, but remember only that Sam was the clerk who waited on her and
sold her an electric drill. Again, you'll start with a blank form (use the command
CLEAR, function key
).
Hands On Exercise
31
ALPHA TOOLS INC.
SERVING THE BAY AREA SINCE 1925
CUSTOMER .............. ACCT# ........
ADDRESS ............... PHONE ........
CITY ............... STATE .. ZIP .....
ORDER DATE .........
CLERK Sam......
L# QTY STOCK#↓ DESCRIPTION PRICE AMOUNT.
1 ... A44... ........... ..... .......
SUBTOTAL ........
TAX ........
TOTAL ........
Figure 2-19
4.
Move the cursor to the item CLERK on the blank form, and key in "Sam".
Then, move the cursor to L# 1 under STOCK# and key in your code for the
electric drill-- A44 (Figure 2-19).
5.
Press
$
(SEARCH).
VersaForm XL will ask you where to start the search (use this only if you
know something about the key, such as “it begins with W”). In this case you
would just press
. VersaForm will scan the file, display the first form
that contains the values you entered, and ask if you want this form.
(
You will find that Sam has sold at least two other electric drills. First, you
will see the form for Chas Carpenter (ACCT# CAR12344).
* Forms are searched according to their key items, alphabetically and
numerically.
6.
Answer F to continue the search; VersaForm XL will continue the search
and display the next form with those values, which is Geo Sawyer's (ACCT#
SAW33521).
7.
Answer F; the third form displayed will be Jane Steel's (ACCT# STE12345).
8.
Answer E, to end the search.
The symbols and instructions used to tell VersaForm XL what to SEARCH for,
when using this command, are described in Chapter 5, "Filing - Data Entry and
Retrieval."
Also explained in Chapter 5 are other commands used for the easy retrieval of
forms . . . FIRST, LAST, NEXT, BACK, and INDEX.
32
VersaForm XL
You may also use the GET command to find a form without clearing the screen to
a blank form. Try it with Jane Steel's form.
ALPHA TOOLS INC.
SERVING THE BAY AREA SINCE 1925
CUSTOMER Jane Steel
ACCT# COO87655
ADDRESS 123 Main St.
PHONE ........
CITY Elm Park
STATE IL ZIP 23456
ORDER DATE 10/21/83
CLERK Sam
L#
1
2
3
QTY
1
2
2
STOCK#↓
100
A44
A11
DESCRIPTION PRICE AMOUNT.
Hammer
5.95
5.95
Elec. Drill 47.00
94.00
Hammer
12.50
25.00
Figure 2-20
9.
Move the cursor to ACCT#; key in COO87655 over the old number (Figure
2-20).
10.
Command GET (
). You'll see the message in Figure 2-21.
ALPHA TOOLS INC.
SERVING THE BAY AREA SINCE 1925
CUSTOMER Jane Steel
ACCT# COO87655
5 3
A55
Carbide Set 52.50 157.50
6 ... ...... ........... ..... .......
SUBTOTAL
TAX
TOTAL
298.35
14.92
313.27
---->Form not in file
Figure 2-21
This tells you that the ACCT# you entered doesn't belong to any of the forms in
this file. And, VersaForm XL leaves the current form on the screen. We're
looking for John Cooper's form, but we've forgotten his ACCT#. You can find the
form another way:
11.
Move the cursor back to the 8 in ACCT#. DO NOT erase the first three
characters, COO. Space over the digits 87655 to remove them (Figure 222).
Hands On Exercise
33
ALPHA TOOLS INC.
SERVING THE BAY AREA SINCE 1925
CUSTOMER Jane Steel
ACCT# COO
ADDRESS 123 Main St.
PHONE ........
CITY Elm Park
STATE IL ZIP 23456
ORDER DATE 10/21/83
Clerk Sam
Figure 2-22
12.
<----
A
Use the Command NEXT ( ). You'll see the NEXT form, the form that
follows one with an ACCT# of COO in the file's index (Figure 2-23).
ALPHA TOOLS INC.
SERVING THE BAY AREA SINCE 1925
CUSTOMER John Cooper
ACCT# COO45678
ADDRESS 45 Church St.
PHONE 456-7890
CITY Centerville
STATE MN ZIP 34567
ORDER DATE 11/15/80
CLERK Joe
L#
1
2
3
4
5
6
QTY
11
6
4
99
20
...
STOCK#↓
B55
A44
V33
A99
A33
......
DESCRIPTION
Nails
Elec. Drill
Screws
Metric Skts
Ratchet Wr
...........
PRICE AMOUNT.
0.24
2.64
47.00 282.00
0.09
0.36
33.00 3267.00
9.95 199.00
..... .......
SUBTOTAL
TAX
TOTAL
3751.00
187.55
3938.55
Figure 2-23
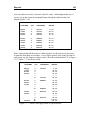
This form, John Cooper's, was located by asking for the next form after COO.
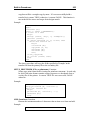
Even though there is no such ACCT# as COO in the file, the system can find the
value "COO" in the Index and locate the next form.
You may wonder if you have altered Jane Steel's form in any way by using the key
item to locate forms without clearing the screen first.
* Jane Steel's form remains in the file, with its original number, unless you
deliberately remove it (the command REMOVE is discussed later.)
* If you keyed in a different account number (a new key item) over the
original and then SAVEd the change, you would simply add another form
with the same information but a new account number.
34
VersaForm XL
CHANGE A COLUMN LINE
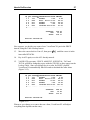
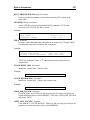
Now that John Cooper's form is displayed, practice changing some data on it.
Suppose after Mr. Cooper placed his order, he called back and said, "Change my
order from 20 Ratchet Wrenches to 25, and cancel the 4 screws." How do you
make the changes on the form?
1.
Move the cursor to Line #5 and key in 25 over the 20 under QTY.
2.
VALIDATE (
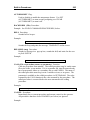
).
Notice the AMOUNT, SUBTOTAL, TAX and TOTAL change (Figure 2-24).
ALPHA TOOLS INC.
SERVING THE BAY AREA SINCE 1925
CUSTOMER John Cooper
ACCT# COO45678
ADDRESS 45 Church St.
PHONE 456-7890
CITY Centerville
STATE MN ZIP 34567
ORDER DATE 11/15/80
CLERK Joe
L#
1
2
3
4
5
6
QTY
11
6
4
99
25
...
STOCK#↓
B55
A44
V33
A99
A33
......
DESCRIPTION
Nails
Elec. Drill
Screws
Metric Skts
Ratchet Wr
...........
PRICE AMOUNT.
0.24
2.64
47.00 282.00
0.09
.36
33.00 3267.00
9.95 248.75
..... .......
SUBTOTAL
TAX
TOTAL
3800.75
190.04
3990.79
Entries checked- OK
Figure 2-24
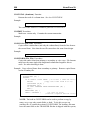
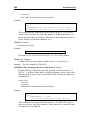
Now you need to DELETE the order for the screws.
$
3.
Move the cursor to that line (line 3). Use the command DELETE--press
.
4.
VersaForm XL will blank out line 3 and ask for confirmation:
Correct? (Y/N)
At this point, you may change your mind. If you key in N, Line #3 will remain. If
you key in Y, the line will be deleted, and the totals on the form will be
recalculated automatically (Figure 2-25).
Hands On Exercise
L#
1
2
3
4
5
QTY
11
6
99
25
...
35
STOCK#↓
B55
A44
A99
A33
......
DESCRIPTION
Nails
Elec. Drill
Metric Skts
Ratchet Wr
...........
PRICE AMOUNT.
0.24
2.64
47.00 282.00
33.00 3267.00
9.95 248.75
..... .......
SUBTOTAL
TAX
TOTAL
3800.39
190.02
3990.41
---->Line deleted
Figure 2-25
#
Now you must SAVE the changes to make them permanent.
5.
Use the command SAVE, (
.) The screen will be cleared.
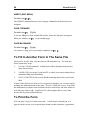
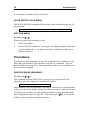
REMOVE A FORM
At times you'll want to REMOVE a form from your permanent records. Suppose
you want to remove a form with an ACCT# of FLE34567. First, retrieve it with
GET as you did before.
1.
Move the cursor to ACCT#, key in FLE34567, and use the command GET
( ). The system will locate the form and display it with the message, "Last
Updated (date & time)".
* You need to GET the form first because the REMOVE command
removes the CURRENT form--the one displayed on the screen.
$U
2.
Use the command REMOVE (
). Now you'll be asked "Destroy this
form? (Y/N)". VersaForm XL is giving you a chance to change your mind.
3.
Key in Y to indicate you do want this form removed.
Even though you've removed the form from the file, it will still be displayed
on the screen. At this point, before you clear the screen or turn off the
computer, you may still change your mind. If you see it on the screen , you
can keep it.
4.
#
Command SAVE ( ). You'll see the message "New Form Saved" and the
form will be restored to the file. You may check the Index to make sure (as
explained in Chapter 5).
36
VersaForm XL
$[
To return to the Main Menu, use the EXIT command (ESCAPE, F, X) or
. You may see the message "Ending transactions". You have finished
the Hands-On Exercise in entering information.
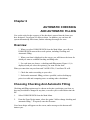
Chapter 3
HANDS-ON EXERCISE: PREPARING A
REPORT
Follow the instructions in Chapter 1 to start VersaForm XL.
1.
Select #3, Reports, from the Main Menu. After you enter the drive and file
name (use the same file-- SAMPLE --as in the previous exercise), you will
see the following message:
Enter report name (up to 6 letters) or '?' for a list
> ?
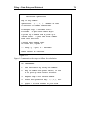
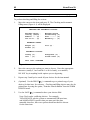
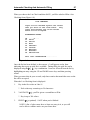
2.
Enter a new report name; the name can be up to six letters, so SAMPLE
would be a good choice. VersaForm XL will confirm your choice for a new
report. Answer "Y"; the report menu (figure 3-1) will appear.
Report Menu
1.
2.
3.
4.
5.
6.
7.
8.
9.
Set Up the Report
Enter Selection Conditions
Include Additional Files
Run the Report
Remove this Report
Rename this Report
Copy Another Report
Choose Another Report
Return to the Main Menu
Figure 3-1
There are two main steps in creating a report. First, we must tell VersaForm
which items to print, and second, under which conditions to include the items in
the report.
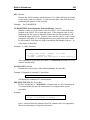
CHOOSE THE ITEMS TO REPORT ON
3.
Select #1, "Set up the Report", from the Report Menu.
38
VersaForm XL
When you press
(Figure 3-2).
(
, a blank ALPHA TOOLS INC. form will be displayed
ALPHA TOOLS INC.
SERVING THE BAY AREA SINCE 1925
CUSTOMER ............... ACCT# ........
ADDRESS ................ PHONE ........
CITY ............... STATE .. ZIP .....
ORDER DATE ............. CLERK ........
L# QTY STOCK# DESCRIPTION PRICE AMOUNT.
01 ... ...... ........... ..... .......
SUBTOTAL ........
TAX ........
TOTAL ........
Choose print item #1: Rtn-Choose item, Q-done, ?-Help
Figure 3-2
(
The instruction at the bottom of the screen tells you to press
to choose the
first item to print on the report. The order in which you choose the items is the
order in which they'll be printed across each printed report page.
1.
Press
(
until the cursor is at DESCRIPTION.
(
* If you mistakenly go past the item you want, use the arrow keys to move
the cursor up, then press
again.
* Note the message at the bottom of the screen.
2.
Press X. Then you'll be asked to repeat the same steps for the second item.
3.
Move the cursor to QTY and press X. You'll be asked for your third choice.
4.
In the same way , choose AMOUNT and CLERK.
* Note the message at the bottom of the screen.
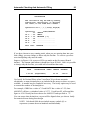
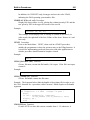
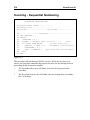
5.
Press Q to show that you're finished. A Report Definition form will be
displayed showing the items to be printed (Figure 3-3).
6.
Move the cursor into the item called "Title1."
Hands On Exercise / Reports
7.
Key in SALES ANALYSIS. This title will appear on each page of the
report. VersaForm XL allows you up to three titles. For our example we
will use only one.
------------------REPORT DEFINITION
-------------------
Title1 SALES ANALYSIS
Title2
Title3
Page Format:
Width
Skip
L#
1
2
3
4
5
39
Screen 1
Form Id: sampleR1
More Options ==>
(ctrl->)
Length
Left Margin
lines after titles
Print-item Options
Counts
(Y/N)
1-99 +/- Y/N Y/N Y/N
.....Print-items...... Size .......Title........ J S Srt# Dir Sub Ttl Avg
Description
33 Description
Qty
5 Qty
Amount
10 Amount
Clerk
8 Clerk
*
To choose more print items, use the command Fill (alt-F10)
Enter Print Control Sequences below (ctrl-PgDn)
Figure 3-3
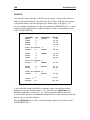
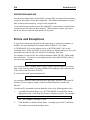
HOW WILL THE DATA BE PRINTED?
VersaForm XL allows you to specify how the data will be printed on your report.
You may specify Justify (J), Suppress (S), Sort (Srt#), and Sort Direction (Dir).
These features are explained in detail in Chapter 7.
We will sort by DESCRIPTION.
1.
Move the cursor to L# 1, under the Srt# column. Key in 1. This tells
VersaForm XL to sort our print items by the values in DESCRIPTION. We
use a number to indicate our SORTing choice and order because it is
possible to sort by more than one item.
Items can be sorted alphabetically or numerically, in either direction.
2.
Key in + under the column Dir to tell the system you want DESCRIPTION
sorted from low to high, i.e., A to Z.
SELECTING ITEMS TO SUBTOTAL AND TOTAL.
VersaForm also allows you to specify which items will cause page breaks,
subtotals (Sub), totals (Ttl), and averages (Avg).
40
VersaForm XL
We want subtotals printed for each different product DESCRIPTION, i.e., for
each different product.
3.
Move the cursor to the Sub column and enter "Y".
Description is a text data field, it is helpful to think of this type of a subtotal as
telling VersaForm "where" to break. In some reports this might also be where we
would want a page break, we would indicate this by entering "P". For this report,
however, we have just indicated a subtotal or paragraph break.
Filling in a Report Definition is similar to entering data through VersaForm XL.
When you finish making changes to a line in the Report Definition form, you must
Validate ( ) before making changes to a different line.
4.
Press
to Validate the choices you made in L# 1.
Now we will tell VersaForm XL what items to total. This is done by moving the
cursor to the line which contains the field we want to total, and entering "Y" in the
Ttl column.
5.
Move the cursor to L# 2, QTY, and tab to the Ttl column. Enter "Y" and
Validate ( ).
6.
Move the cursor to L# 3, AMOUNT and tab to the Ttl column. Again,
enter "Y" and Validate ( ).
* It is possible to choose additional items to be totaled, but we'll stop with
two.
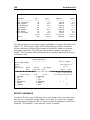
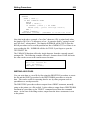
Your Report Definition screen should look like the one in Figure 3-4. If it does
not, move the cursor to the fields on the screen and key in the information from
Figure 3-4. Remember to Validate when you make changes to a line.
Hands On Exercise / Reports
------------------REPORT DEFINITION
------------------Title1 SALES ANALYSIS
Title2
Title3
Page Format:
Width
Skip
41
Screen 1
Form Id: SAMPLER1
More Options ==>
(ctrl->)
Length
Left Margin
lines after titles
Counts
(Y/N)
ÏÏÏÏÏÏÏÏÏÏÏÏÏÏÏÏÏÏÏÏÏÏÏÏÏÏÏÏ Print-item Options ÏÏÏÏÏÏÏÏÏÏÏÏÏÏÏÏÏÏÏÏÏÏÏÏÏÏÏÏ
1-99 +/- Y/N Y/N Y/N
L# .....Print-items...... Size .......Title........ J S Srt# Dir Sub Ttl Avg
1 Description
33 Description
1 +
Y
2 Qty
5 Qty
Y
3 Amount
10 Amount
Y
4 Clerk
8 Clerk
5
Figure 3-4
We have finished the first step in creating our report, telling VersaForm XL which
items to print and how they should be printed. In the next section we will discuss
the second step, telling VersaForm XL under which conditions items should be
selected.
7.
#
Command SAVE ( ). VersaForm XL will save the Report Control
Instructions in your file and return to the report menu (Figure 3-1).
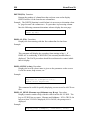
SELECT THE DATA YOU WANT
Now you will specify which data to extract from your file, by establishing
"selection conditions".
1.
From the Report Menu (Fig. 3-1), select #2, Enter Selection Conditions.
42
VersaForm XL
ALPHA TOOLS, INC.
Serving the Bay Area Since 1925
Customer ..............................
Address: ..............................
City ............... State .. Zip .....
Order Date ........
L#
1
2
3
.Qty.
.....
.....
.....
..Stock#..
..........
..........
..........
...........Description...........
.................................
.................................
.................................
Acct# ........
Phone ........
Clerk ........
..Price..
.........
.........
.........
..Amount..
..........
..........
..........
Sub-Total ...........
Tax ...........
Total ...........
Selection Condition #1 Test #1; Choose item to test: Rtn-Choose/?-Help/Q-done..
Figure 3-5
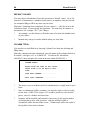
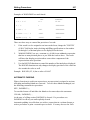
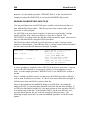
2.
(
Press
. Again, the ALPHA TOOLS form will be displayed with an
instruction at the bottom of the screen (Figure 3-6).
ALPHA TOOLS, INC.
Serving the Bay Area Since 1925
Customer ..............................
Address: ..............................
City ............... State .. Zip .....
Order Date ........
L#
1
2
3
.Qty.
.....
.....
.....
..Stock#..
..........
..........
..........
...........Description...........
.................................
.................................
.................................
Acct# ........
Phone ........
Clerk ........
..Price..
.........
.........
.........
..Amount..
..........
..........
..........
Sub-Total ...........
Tax ...........
Total ...........
Move cursor to item, then press X .
Figure 3-6
3.
Move the cursor to the item called AMOUNT. When the cursor is in the
amount column, press X. The dots will turn to stars indicating you have
made a choice.
This tells VersaForm XL you want the item called AMOUNT on each form to be
tested; if the data meets the test you specify, you want the information extracted
for the report.
Now the following tests will be displayed at the bottom of your screen:
Hands On Exercise / Reports
43
Enter comparison type--EQ,NE,GT,GE,LT,LE,CO,EX,?:
4.
Key in GE (Greater than or Equal to); then press
the bottom of the screen you'll see:
Compare to:
5.
(
. GE is the test. At
Rtn-another Item on the form, V-a Value, ?-Help
Key in V and press Rtn. This tells the system that you want to enter a value
(V) to test AMOUNT against.
* An item can be tested either against another item on the form, or against a
value which you enter.
6.
When you are told to "Type the value," key in 10.00. Press
(
.
You have just finished setting up one "test" of a selection condition. Each test
consists of three parts:
*
the item to test (AMOUNT);
*
the test itself (GE); and
*
the item or value to test against (10.00).
This tells VersaForm XL to extract the data from each form if: AMOUNT is
Greater Than Or Equal To 10.00.
Now you will be asked if you want to enter a second test. Each selection
condition can consist of up to 99 tests. We will enter two more tests following the
same steps as above.
Selection Condition #1 Test #2; Choose item to test: Rtn-Choose/?-Help/Q-done
(
7.
Press
to choose another item to test. Move the cursor to ORDER
DATE, and press the letter X to indicate your choice. Read the prompt at
the bottom of the screen.
8.
Enter the comparison type GE, Greater than or Equal to, and press
9.
Enter V to tell VersaForm we will be comparing to a Value.
(
.
44
VersaForm XL
Suppose we want to select orders processed on a specific day, but we know we
will want to run this same report every day, and sometimes every week. Using
report variables will allow us to replace the date each time we produce the report,
without changing or re-entering the report instructions.
10.
Enter the report variable symbol, &, immediately followed by the variable to
be replaced, date-from (&date-from).
* The "&" as used here is a "" symbol. It allows you to change the value to
be tested against each time you run the report. VersaForm XL will replace
"&" with the word "Enter". In this example, when you run the report,
VersaForm will ask "Enter date-from". (Any word can be used following
the "&".)
11.
Press
(
. You will see the message:
Selection Condition #1 Test #3; Choose item to test: Rtn-Choose/?-Help/Q-done
(
12.
Press
to choose another item. We will select ORDER DATE again
so we may specify a date range. Move the cursor to ORDER DATE and
press X.
13.
Enter the comparison type LE, Less than or Equal to. Press
14.
Select V for value and press
15.
Enter the value &date-to. Press
bottom of the screen.
16.
Key in Q to indicate you are done and press
. After a moment, a
Selection Condition Form, filled in, will be displayed. (Figure 3-7).
(
(
(
.
.
and read the prompt displayed at the
(
Hands On Exercise / Reports
45
REPORT DEFINITION
SELECTION CONDITION FORM ID: sampleS1
Screen 1
Is "Test_Against" an
Item Name or a Value?
Tests for this Selection Condition
.....Item_Tested......
Test
.....Test_Against......
Amount
ge
10.00
Order Date
ge
&date-from
Order Date
le
&date-to
L#
1
2
3
4
N/V
V
V
V
*
Data will not be selected unless it passes ALL tests above.
Edit this form or use the command FILL (alt-F10) to add more tests to
this condition. When it is OK, SAve (F2) this form.
To add another selection condition, SAve or use the command Next.
Figure 3-7
17.
SAVE (
#
) your entries. You'll be asked:
Enter another selection condition? (Y/N) N
Up to nine selection condition forms may be entered for each report, but we'll just
enter one here.
18.
(
. VersaForm XL will return you to the Report Menu. Now we
Press
are ready to produce the report.
Produce the Report
The current file you are reporting from and the current report are named at the top
of the screen. It should look similar to Figure 3-8, showing the file and report
name as, Sample.
46
VersaForm XL
Report Menu
1. Set Up the Report -Print Items, Sorting, Totals, etc.
2. Enter Selection Conditions
3. Include Additional Files
4. Run the Report
5. Remove this Report
6. Rename this Report
7. Copy Another Report
8. Choose Another Report
9. Return to the Main Menu
Figure 3-8
When we produce the report (i.e., print it), VersaForm XL will ask you to specify
Report Options. Report Options are a set of instructions you may enter when a
report is designed. If Report Options are not entered in a report, VersaForm XL
uses a set of default options. In this example, we will be asked to answer the
default Report Options. All VersaForm's Report Options, and how they may be
entered will be discussed in Chapter 11 (Setup) and Chapter 7 (Reports).
1.
Make sure your printer is turned on. Choose Option 4, "Run the Report",
from the report menu.
(
Print control instructions?
2.
(Y/N)
Key in Y and press
. A printed copy of the Report Control
Instructions is a useful reference. It is a summary of the instructions you
entered and saved for this report, Sample.
You will then be asked to supply the value for any variables you have specified -in this case, the values for ORDER DATE (&date-from and
&date-to).
Enter date-from
3.
Key in the value 11/15/80 and return.
You will be asked:
Enter date-to
4.
Key in 11/15/80.
(
Once the instructions have been entered, VersaForm XL can produce the report.
5.
Press
. You'll see a message similar to the following:
Hands On Exercise / Reports
47
Report Complete.
There are 21 detail lines to be printed.
Print all the detail lines,
or summaries (totals, etc.) only?
6.
(D/S) D
Key in D (Details) to have all the lines in the report printed. Another time,
you may want to choose S to print just the Summaries--subtotals and totals
only. You'll be asked:
Output to the Printer, Screen, or to a File? (P/S/F) P
7.
Press Enter and VersaForm XL will print the report.
When the report is printed, you'll be asked:
Print the report again? (Y/N) N
You can have the report displayed on the screen once and then printed, or vice
versa. Or, you may want to have more than one copy.
8.
Enter Y, and the report will print again. OR, enter N to return to the report
menu.
9.
Press Esc (Escape) to return to the Main Menu.
You have finished the Hands-On Exercise in creating and running a report.
Part II
Using The
VersaForm XL Database
Chapter 4
CREATE A FILE
AND DESIGN A FORM
Form Design Overview
When you select FORM DESIGN from the Main Menu, you will be able to choose
from several options on the Form Design menu.
*
You may design on the screen a new form that meets your special needs.
- A new file will be created.
*
Change an existing form design.
- Add or delete data items (fields) or change field lengths as your
requirements change.
*
Copy a form design from another file.
- This creates a new file with an existing form design.
*
Select checking and filling options for any items on your form.
- When data is later entered into the form through the FILING function,
VersaForm XL will check for accuracy and fill items in automatically.
*
Print the form definition.
- A "hard copy" of your form design is a useful reference.
All these are described in this chapter except for the checking and filling option.
This is described separately in Chapter 6, "Automatic Checking and Automatic
Filling."
Designing a Form
1.
From the Main Menu, select #1, Form Design. The Form Design menu will
be displayed (Figure 4-1).
52
VersaForm XL
Form Design Menu
1.
2.
3.
4.
5.
6.
Design a new form
Change an existing form design
Copy an existing form design
Add or change checking and automatic filling
Print the form definition
Return to Main Menu
Figure 4-1
2.
Select "Design a new form" from the Form Design menu.
VersaForm XL will ask for a name for the new file that will be created when the
form is designed.
It must start with a letter, and may contain up to 8 characters. Optionally, you
may add an "extension" to the file name consisting of a period and three characters
(e.g., "FILENAME.VFM"). Don't use a slash or backslash (/ or \). Name files
according to their contents, such as "PAYROL83."
3.
Enter a name for the new file.
You will see a simple form design, and you'll be asked if you need additional help
designing forms (Figure 4-2).
Basic instructions:
Your form can be up to 160 spaces wide and 60 lines high. Watch the
ruler lines (----+----1----+----2----+-) to see where you are.
Begin by typing text and single items on the screen where you wish them
to appear. For example:
STUDENT FORM
NAME .........................
ADDRESS .........................
If you plan to have columns on this form, don't put them in now.
room to type them in later.
Leave
Special keys you can use:
Ins, Del:
Insert and delete characters
Alt-F8 and Alt-F7:
Insert and delete lines
The arrow keys:
Move the cursor
Ctrl-Arrow:
Move the entire screen right and left
Ctrl PgUp and PgDn:
Move the entire screen up and down
Home/End, Ctrl Home/End Upper left/Bottom right of screen or form
Do you need additional instructions? (Y/N) N
Figure 4-2
Create A File And Design A Form
53
(
1.
Press Y or N and then
. Selecting Y will produce instructions for
designing a form (similar to those printed in this manual).
2.
When you are finished reading instructions, you'll be asked to specify the
form width and depth.
Enter the form width 160
Enter the form depth 60
3.
After specifying the form size you will have a blank screen on which to
design your form. The cursor will appear at the top of the screen, and at the
bottom will be the message below:
Design the single items. Press Esc to end or for help.
NOTE:You may use a 160 column wide by 60 lines high display
space to design your form. This is, of course, too big for the
screen. When you move the cursor to the edge of the screen, it will
automatically scroll. Scrolling may be controlled by using the cursor
control keys, discussed in Chapter 1.
Neither of these limits affect filling out your pre-printed form, as
you will later design a print format which can print forms much
wider than the screen.
TEXT AND SINGLE ITEMS
TEXT refers to words such as headings, messages, and comments, which do not
contain data.
SINGLE ITEMS are non-columnar fields which are going to be filled in with data.
(Columnar fields will be discussed later.)
TEXT
*
Place it anywhere on a form.
*
Separate text from single items by at least TWO spaces.
SINGLE ITEMS
*
Consist of a NAME and a ROW OF DOTS, separated by one blank space.
54
*
VersaForm XL
Each name must be UNIQUE, should start with a letter of the alphabet and
can contain up to 20 characters.
_________________________________________
|
|
TEXT>------>
|
ALPHA TOOLS, INC.
|
TEXT>------>
|
SERVING THE BAY AREA SINCE 1925
|
|
|
SINGLE ITEMS >-->| NAME ...................... ID# ....... |
SINGLE ITEMS >-->| ADDRESS ............................... |
SINGLE ITEMS >-->| CITY ........... STATE .. ZIP ......... |
SINGLE ITEMS >-->| AREA CODE ... PHONE ........ EXT ...... |
SINGLE ITEM >-->| SALES REP ............................. |
|
|
|
(Space left for columns)
|
|
|
SINGLE ITEM >--->|
SUBTOTAL ...... |
SINGLE ITEM >--->|
TAX ...... |
SINGLE ITEM >--->|
TOTAL ...... |
|_________________________________________|
Figure 4-3
*
A row of dots represents the length of the data item. Each dot is a space
which may later be filled in by a letter or digit.
*
The name and row of dots are SEPARATED BY A SINGLE SPACE.
*
There must be at least ONE space between the end of the row of dots and
the name of the next item when they are on the same line.
*
If the item names are short, there will be room on the form and in the
computer's memory for more items. Combining items or reducing the
amount of text will also allow more room.
NOTE:In the sample form (Fig. 4-3), columns are planned for the
space between single items and SUBTOTAL. Remember to leave
space where you plan to insert column headings, as discussed later.
*
$
When designing a form, you may insert and delete lines using
$
. These only affect the screen in view, not the whole form.
and
Create A File And Design A Form
55
EXAMPLES OF SINGLE ITEMS
____________Right!_______________
|
|
| NAME ........................ |
| STREET ...................... |
| CITY ........................ |
| STATE .. ZIP .........
|
|_________________________________|
____________Wrong!_______________
|
|
| NAME......................... |
| ADDRESS ..................... |
| ADDRESS ..................... |
| ............................. |
| STATE ..ZIP .........
|
|_________________________________|
Each single item
consists of a unique
name, a single
space, and a row of
dots.
No space after NAME
or between STATE and
ZIP. ADDRESS is
used as a name
twice. One line of
dots has no name.
(
In the example above, VersaForm XL will call attention to the omission of the
space after NAME, and automatically insert the space when you press
.
Most other errors in defining single items will cause the system to issue an error
message. For example, the second mistake in the form above would cause an error
message similar to Figure 4-4.
Error in designing the following item:
ADDRESS
This item name has been used twice.
Each item must be given a unique name.
If you want to go back and change
it, type "R".
If you want to cancel this form
definition, type "Q".
Figure 4-4
Enter Text and Single Items
1.
Key in text and single items.
* If you make a typing error, just reposition the cursor and type over the
wrong characters. Use the space bar to get rid of extra characters.
56
2..
VersaForm XL
When you are done, press Escape, then press Enter.
* VersaForm XL will process the form design and display it. Asterisks
replace dots when the items have been designed correctly (Figure 4-5).
ALPHA TOOLS, INC.
Vendor List
NAME ********************** ID# *******
ADDRESS *******************************
CITY *********** STATE ** ZIP *********
AREA CODE *** PHONE ******** EXT *****
SALES REP *****************************
SUBTOTAL *******
TAX *******
TOTAL *******
C-Confirm,
R-Redesign, Q-Quit, ?-Help
Figure 4-5
3.
Inspect the form for correctness and choose one of the options at the bottom
of the screen. If you key in
?, (Help), instructions will be displayed.
Q, the file will be erased and you will be returned to the FORM DESIGN
menu.
R, you'll be able to redesign the form.
C, the form will reappear on the screen with the dots in place, and you'll go
on to the next step, choosing a key item.
The Key
The key is the item or pair of items VersaForm XL uses to identify each form in a
file.
VersaForm XL always stores forms according to their key item.
Create A File And Design A Form
57
A KEY ITEM
*
Must be an item or combination of two items that is UNIQUE for each
form.
*
Must contain BETWEEN 3 and 40 CHARACTERS.
*
Is usually placed near the top of a form for quick reference.
In the Alpha Tools form in Figure 4-3, ID# would make a good key item. NAME
wouldn't be quite as good, since two people could have the same name. It could
be used if one were sure this would not happen.
TWO PART KEYS
If a single item will not be sufficient to identify a form, two different items may be
chosen as the key. Together, they may contain up to 40 characters. For example,
NAME and ID# could be used as a two-part key item. This would have the
advantage that the file would be kept in alphabetical order by NAME, making
searching easy.
CHOOSING THE KEY
(
1.
Press
until the cursor is at the item you want to use as the key item.
2.
Press X to indicate your choice.
3.
Key in Y to confirm your choice. Then you'll be asked:
Add a second part to the key? (Y/N) N
4.
Key in Y or N. If you choose a second item, confirm it as you did the first.
NOTE:If you find that the form does not contain an item suitable as
the key, redesign it and add one. You may key in ? for instructions
on redesigning items.
Columns
The system will now ask you if the form is to have columns. If you reply N, your
design is complete and you will be given information about the size of the form
(Figure 4-8).
58
VersaForm XL
If you reply Y, the form will reappear on the screen, showing the single items and
text; you will be instructed to move the cursor to the line on which you want the
column headings.
* Columns may be placed on any line of the form except a line containing
single items.
ENTERING COLUMN HEADINGS
1.
Press the up or down arrow until the cursor is on the line where you want to
place the column headings. Press X. VersaForm XL will automatically fill
in the notation "L#" on the line you select.
2.
Enter all column headings on the same line (Figure 4-6).
* Each column must have a heading.
* Each column heading must be separated from the one next to it by at least
one space.
* No spaces are allowed WITHIN column headings. To separate words,
use an underscore (recommended) or a hyphen or slash--not a dot or space.
* A column name can contain up to 20 characters.
* Use dots, as shown in Figure 4-6, to extend the column width to contain
more characters than the column name. (VersaForm XL will automatically
center the headings).
ALPHA TOOLS, INC.
SERVING THE BAY AREA SINCE 1925
NAME ............................. ID# ........
ADDRESS .......................................
CITY .................. STATE .. ZIP ..........
AREA CODE ... PHONE ........ EXT .....
SALES REP ...................................
L# QTY .STOCK#. .DESCRIPTION. .PRICE.. .AMOUNT.
SUBTOTAL ........
TAX ........
TOTAL ........
Figure 4-6
Create A File And Design A Form
59
NOTE:A form can have more column line entries than fit the
LENGTH of the screen. Additional pages are provided by
VersaForm XL as data is entered.
If DATE is a column item, allow at least 8 spaces for the correct VersaForm XL
format (Figure 4-7).
PATIENT NAME Jones John Morris............
ADDRESS 748 Park Avenue....................
CITY Webster........ STATE CA ZIP 95729....
L#
1
2
3
..DATE..
10-31-83
11-07-83
11-14-83
....DESCRIPTION...
Office Visit......
Check Received....
Office Recheck....
.CHG/PMT
...30.00
...30.00
...15.00
Figure 4-7
COLUMN LINES
1.
(
Press
after keying in column headings. VersaForm XL will process
your entries, centering column headings and adding numbered column lines.
Your form will be displayed on the screen. The dots will be replaced by asterisks,
and column lines will be added. The dots will reappear after the design is
confirmed.
2.
Check the design of your form. Are all the columns set up the way you want
them to be? Is there at least one space between each column heading?
3.
Key in:
*
Q if you want to quit and cancel this form design.
*
? to see instructions on the screen.
*
R to redesign the form.
*
C to confirm; you will be given information about the size of the form you've
designed (Figure 4-8).
60
VersaForm XL
The form has now been designed.
Form display size: XXX characters wide by XX lines
If not compressed, form requires at lease XX bytes (X
storage units).
Column line size: XXX characters
Maximum possible column lines per form: XXX
If desired, enter limit on the number
of column lines: XXX
Press Return to continue
Figure 4-8
Your may limit the number of column lines that can be stored on any form by
entering a limit as displayed in Figure 4-8.
Press
(
to continue designing the form.
If you confirm the design but want to redesign it later, follow the instructions in
the section of this chapter called "Change the design of a form."
When you confirm, your form is established and you will be asked two more
questions (Figure 4-9).
Do you want to prevent form deletions
and column line changes? (Y/N) N
Is this file to be protected? (Y/N) N
If you want users to be able to change information in the column area of the form
and delete forms from the system, press Enter in response to the first question.
If you want to restrict form access to only those users specified in the
USERS.VFS file, answer 'Y' to the second question. Under normal circumstances
your response will be 'N'. (See Chapter 11, Setup and Security.)
NOTE: It is a good idea to print the form definition when you are finished
designing it or changing it; it is a useful reference for many operations. Refer to
the section, later in this chapter, called "Print the form definition."
Change The Design Of A Form
You may redesign the items on a form ONLY BEFORE data has been stored.
From the FORM DESIGN menu, choose "Change an existing form design."
You'll go through the same process as designing a new form.
Create A File And Design A Form
61
After changing the form itself, you will have an opportunity to change its size--that
is, to make it wider than 160 characters (up to 255) or longer than 60 (up to 255)
lines, provided that the width times the length is not greater than 9600.
If you want to change the design of a form--to add or delete items, or to change
the length of one or more items--AFTER data has been stored:
1.
Copy the form design to another file (choose "Copy an existing form design"
from the Form Design menu; the procedure is discussed below.) The form
design, but no data, will be copied.
2.
Choose "Change an existing form design" from the FORM DESIGN menu
to redesign the layout of items on the copy. (Data from the old file will later
be transferred only between items of the same name, so do not change the
names of items you want to keep.)
3.
Use the COPY BY NAME function described in Chapter 9, "Copy Forms
and Data," to transfer data from the old file to the new one.
Copy An Existing Form Design
Once you have designed a form for one file, you may also use it in another file by
copying the design.
It's better to copy a form than to design it again, since a copy is
sure to match the original.
To copy a form design:
1.
From the Form Design menu, select "Copy an existing form design".
2.
Enter the name of your new file just as if you were designing a new form.
VersaForm XL will create the file and begin the copying process.
* Checking and automatic filling specifications will also be copied onto the
new file. If you wish, Report Control Instructions, Print Formats, and
Procedures will be copied too.
This procedure does NOT copy data when it copies the form design. To transfer
data from one form to another, use the COPY BY NAME function. (See Chapter
9, "Copy Forms and Data.")
Delete an Existing Form Design
There is no command in VersaForm XL to delete a form design, or an entire file.
This should be done from DOS with the DELete command. Be sure to have a
62
VersaForm XL
good copy of the form design, and any data that you want to keep transferred to a
new file before DELeting a file.
(
From the DOS prompt type DEL followed by a space, then the name of the file to
delete, then press
.
Checking And Automatic Filling
Automatic checking and filling options can be added to or changed on your form
at any time, whether or not data has been entered.
The procedure is described in Chapter 6, "Automatic Checking and Automatic
Filling."
Print The Form Definition
You may have VersaForm XL print a copy of the form design: a complete record
including the layout of items and all the checking and automatic filling rules.
1.
From the FORM DESIGN menu, choose "Print the form definition".
2.
Turn on the printer.
3.
Enter the file name when requested.
* The form design will be printed immediately. You will then be asked if
you also want to print the checking and filling options you have chosen.
It's wise to print the form definition soon after the form is designed, and keep the
printout as a "hard copy" reference.
Chapter 5
FILING -- DATA ENTRY AND RETRIEVAL
After you've created a file and designed a form, use the Filing function to enter
data. This function is also used to retrieve forms from your file and to examine,
update, print, or remove them.
1.
Start up the system. Select FILING from the Main Menu.
2.
Enter the name of the file, if asked.
When a blank form is displayed, you may begin entering data.
Keying information into a form is like typing. The cursor marks the place where
the next character will be entered. The tab key moves the cursor from item to
item. If the next item is not visible on the screen, the screen will scroll to make that
key acts similarly, but does not scroll.
item visible. The
(
You may also move the cursor by pressing the space bar - but remember that this
will erase any data you space over.
VERSAFORM XL COMMANDS
In VersaForm XL, there are two ways to enter a command: pressing a function
key and using the command menu.
1.
Most of the commands can be activated by pressing a function key. The list
of commands and function keys is shown in Fig 5-1.
64
VersaForm XL
ËÏÏÏÏÏEQOOCPFÏÏÏÏÏÏÏÏÏÏÏÏÏÏÏÏÏOGPWÏÏÏÏHWPEVKQP MG[ÍÏÏÏÏÏÏXgtucHqto ZN x09ÏÏÏϽ
¼DCEM qpg hqto *Eqpvkpwg+
hQtou µ H7 *Cnv/H7+¼Vq TGVWTP. rtguu GUE
¼
¼ECNEwncvqt
Wvknu µ H9
ÉÆÆÆÆÆÆÆÆÆÆÆÆÆÆÆÆÆÆÆÆÆÆÆÆÆƸ
¼ENGCT vq dncpm hqto
hQtou µ H;
¼Vq OQXG VJG UETGGP<
¼
¼Eqnwopu Wr1Fqyp
//
µ Evtn/H71H8 ¼ Wr<
Evtn/RiWr
¼
¼FGNGVG c nkpg
hQtou µ Cnv/H9
¼ Fqyp< Evtn/RiFp
¼
¼FKURNC[ rtkoct{1ugeqpf hqto Gfkv µ Cnv/H32
¼ Tkijv< Evtn/ /@
¼
¼GZGEWVG c rtqegfwtg
Rtqeu µ Cnv/H3
É Nghv< Evtn/ >/
¼
¼GZKV *vq ockp ogpw+
Hkng µ Cnv/Z
¼ÆÆÆÆÆÆÆÆÆÆÆÆÆÆÆÆÆÆÆÆÆÆÆÆÆƸ
¼HKTUV1NCUV hqto kp hkng
hQtou µ
¼Vq OQXG VJG EWTUQT<
¼
¼IGV c hqto
hQtou µ H5
¼ Cttqy mg{
¼
¼JGNR
Jgnr µ H32
¼ Vjku nkpg< Jqog. Gpf
¼
¼KPFGZ nkuv
hQtou µ H6
¼ Eqtpgtu<
¼
¼KPUGTV c nkpg
Gfkv µ Cnv/H:
¼
Jqog/Jqog. Gpf/Gpf
¼
¼PGZV hqto *Eqpvkpwg+
hQtou µ H8
¼ Vq1Htqo Eqoocpf< Gue
¼
¼Rcig Hqtyctf1Dcemyctf
//
µ Ri Fp1Wr ¼ Pgzv kvgo < Gpvgt
¼
¼RTKPV ewttgpv hqto
hQtou µ H:
¼
ykvj uetqnn< *Dcem+Vcd¼
¼TGOQXG vjg ewttgpv hqto
hQtou µ Cnv/T
É vq ncuv fgvckn< Cnv/H6 ¼
¼UCXG c hqto
hQtou µ H4
¼ÆÆÆÆÆÆÆÆÆÆÆÆÆÆÆÆÆÆÆÆÆÆÆÆÆƸ
¼UGCTEJ cnn hqtou hqt xcnwg hQtou µ Cnv/H5
¼Wvknkvkgu
Cnv/W ¼
¼URCEG tgrqtv qp hkng
Wvknu µ
¼\qqo c eqnwop nkpg Cnv/\ ¼
¼WPFQ wpxcnkfcvgf fcvc
Gfkv µ
¼Eqpvgzv/ugpu0 jgnr Cnv/J ¼
¼XCNKFCVG
Gfkv µ H3
¼Rkem Nkuv
Cnv/N ¼
ÊÏÏÏÏÏÏÏÏÏÏÏÏÏÏÏÏÏÏÏÏÏÏÏÏÏÏÏÏÏÏÏÏÏÏÏÏÏÏÏÏÏÏÏÏÏÏÏÏÏÌÏÏÏÏÏÏÏÏÏÏÏÏÏÏÏÏÏÏÏÏÏÏÏÏÏϾ
Figure 5-1
(
To display the command menu, just press Escape. Then enter the command you
. You will see the main command menu, at the top of the
want, and press
screen:
ËÏÏÏÏÏÏÏÏÏÏÏÏÏÏÏÏÏÏÏÏÏÏÏÏÏÏÏÏÏÏÏÏÏϽ
¼Hkng hQtou Gfkv Twp Wvknkvkgu Jgnr¼
ÊÏÏÏÏÏÏÏÏÏÏÏÏÏÏÏÏÏÏÏÏÏÏÏÏÏÏÏÏÏÏÏÏÏϾ
From this menu, choosing an item causes a drop-down menu to appear. As you
move trough the items, you can see the submenus. Choose the command you
want from the drop-down menu.
The mouse can also be used call up the command menu. If you move the mouse to
the top line of your form, outside of any field, and click, the command menu will
pop up. Then you can choose commands by clicking on them. Clicking outside the
menu will remove it.
Data Entry Commands
ZOOM
Function key
$]
The ZOOM function allows editing of a column line in the single-item format.
This is a great convenience when the column area is too wide to fit on a single
screen.
Filing -- Data Entry and Retrieval
65
ZOOM actually creates a small form that contains all the column items, and pops it
up in a window that the user can edit. When the user validates, the data are moved
to their normal place on the form. ZOOM is activated and de-activated by
. When zoomed,
(PgUp) and
(PgDn) are used to move up or
$]
2
& &A
1
down a line.
and
can be used too. Any command that changes
the form on display (Next, Clear, etc.) forces deactivation of the ZOOM.
VALIDATE (EDIT MENU)
Function key
The VALIDATE command does three things.
1.
It checks your data entries against the checking specifications that were set
up when the form was designed.
2.
It performs any calculations and automatic filling that you requested when
you designed the form. Automatic checking and automatic filling are
discussed in Chapter 6.
3.
If you have written any procedures that were intended to be executed during
the validation process, VALIDATE will invoke them. See Part III for
information about procedures.
For example, if you used the Mandatory check to specify that an item MUST be
filled in, VersaForm XL won't allow you to leave the item blank. If you haven't
entered data, VersaForm XL will detect the error when you attempt to
VALIDATE. You'll hear a "beep" and see an error message. You may then return
to the item and add the required data.
TO ENTER DATA ON A FORM:
1.
Key data into the single items on the form, and fill in the first column line if
the form has columns. (On forms with automatic filling, you will see only
one blank column line at a time; new ones will appear after each validation.)
& &A
* The column area can be moved up and down one line at a time. Function
keys
and
are assigned to perform this function.
2.
VALIDATE (
).
* VersaForm XL will tell you if your entries do not meet the data checking
specifications you have set.
3.
Continue to fill in column lines, VALIDATING after each line.
66
VersaForm XL
NOTE:The VALIDATE command CHECKS the entries you've
made--it DOES NOT save them. You must use the SAVE
command to save your entries on the disk.
SAVE (FORMS MENU)
Function key
#
Use the SAVE command to have VersaForm XL store the data on the disk.
Otherwise, your entries will be lost.
* If you haven't VALIDATEd first, SAVE will VALIDATE your entries
automatically.
#
* You can SAVE ( ) at any time; you needn't fill in a form completely
before using the SAVE command.
After you SAVE, VersaForm XL will respond:
Form saved
$#
In the multi-user version of VersaForm XL there are two forms of the SAVE
command: SAVE (SA, or function key
) and SAVE-CONTINUE (SC, or
#
function key
). SAVE saves a form and ends the current transaction, releasing
locks on all forms but the form on the screen, and downgrading that lock to a
shared lock. SAVE-CONTINUE saves the form but does not end the transaction,
and releases no locks. The screen is unchanged.
See Chapter 12 for more about transactions and locks.
A word of caution: If you turn off the computer before you SAVE, the data
you've just entered will NOT have been stored and the lock is not removed. If you
use another command, such as CLEAR or GET, VersaForm XL will warn you
with the message "Form not saved-OK to go on? (Y/N)". If you reply Y,
VersaForm XL will continue with your instruction, without saving.
WHAT IF YOU MAKE A MISTAKE?
If you make a typing error, just reposition the cursor over the incorrect
character(s) and retype. If the new characters don't completely cover the old,
erase any that are left over by spacing over them.
Filing -- Data Entry and Retrieval
67
UNDO (EDIT MENU)
The UNDO (formerly ERASE) command erases all data entries that haven't yet
been validated. It returns your form to its state following the last validation.
DELETE (D)
Function key
$
The DELETE command removes column data that has already been validated.
NAME A.B. Smith
ADDRESS 123 Main St.
ST CA ZIP 93028-1374
L#
01
02
03
..DATE..
04/06/83
05/07/83
07/01/83
CODE
4398
4270
4376
PHONE 415-207-3049
CITY Anytown
ACCT# 00-30595
....SERVICE.... .CHARGE.
Complete Workup
25.00
Examination
15.00
Blood Test
20.00
Figure 5-2
In Figure 5-2, suppose you decide to remove the data on Line 2. But since you
have already validated that line, you cannot UNDO the entries. You may return
the cursor to Line 2 and key different information over what you've already
entered. Or, use the DELETE command to remove all the entries in the line.
Delete will ask for the line number (2, in this case). After entering it, you will be
asked to confirm:
Delete line number : 2 OK?
(Y/N)
Enter Y. Line 2 will be deleted, and Line 3 will be moved up to its position and
renumbered 2.
CLEAR (EDIT MENU)
Function key
The CLEAR command replaces the current form (showing on the screen) with a
blank form. If the current form has not been SAVED, VersaForm XL will issue a
warning message.
68
VersaForm XL
INSERT (EDIT MENU)
Function key
$
The INSERT command inserts a new (empty) column line at the location you
designate.
PAGE FORWARD
Function key
1
(PgDn)
1
If you are filling in a form, column line by line, and a new line does not appear
when you validate, use
to get another page.
PAGE BACKWARD
Function key
2
2
(PgUp)
To return to a page you've previously completed, use
.
To Fill In Another Form In The Same File
After you've saved a form, you may want to fill in another one. For each new
form, repeat these steps:
1.
Use the CLEAR command. A blank form will be displayed and you may
enter data as before.
2.
VALIDATE if you want VersaForm XL to check your entries and perform
automatic filling and calculations.
3.
SAVE_CONTINUE when you're finished entering data to have your form
filed.
If most of the data on one form is to be repeated on another, you can save time by
retaining the information that is the same. Do not CLEAR the screen. Just delete
the information you don't want to include on the second form, and enter whatever
new data you want to add. VersaForm XL will recognize this as a new form
because the key item will be different.
To Print the Form
You can print a copy of a form at any time. A form may be printed just as it
appears on the screen, or in a special print format so that it matches a preprinted
Filing -- Data Entry and Retrieval
69
form or label. (See Chapter 8, "Print on Preprinted Forms," for instructions on
how to create a print format.)
PRINT (FORMS MENU)
FUNCTION KEY
1.
Make sure the paper is aligned and the printer is on.
2.
Command PRINT. VersaForm XL will ask for the name of a print format;
you can either type the name or just type ? to get a list of the print formats
you have established. If you choose not to use a print format, the form will
be printed just as it appears on the screen.
(
If you have chosen to use a print format, the next time you print, VersaForm XL
to accept
will display the name of the print format last entered. Just press
the default print format, or type in the name of a new one.
Retrieve Forms
THE ARRANGEMENT OF FORMS IN A FILE
VersaForm XL establishes an Index when a file is created, and automatically
updates it when forms are added or removed. The Index lists all the key items in
order.
Numeric keys are indexed from low to high; dates are in chronological order;
words, names, and other character strings are indexed alphabetically.
* For example, if NAME is the key item, the forms will be arranged in this
order:
1. Betty Smith
2. Jack Jones
3. William Ames
4. Yolanda Wells
If you want the forms indexed by last name, then enter the NAME as:
1. Ames, William
2. Jones, Jack
3. Smith, Betty
4. Wells, Yolanda
If more than one type of key appears in an index, the numeric keys will be first,
then the dates, then any others.
70
VersaForm XL
INDEX (FORMS MENU)
Function key
One of the easiest ways to retrieve forms is to use the INDEX command. Index
will display a menu of all forms in the file, arranged by key item. Just choose the
form you want and it will be immediately displayed.
(
When you choose the INDEX command, you'll be asked for a starting point. If
you just press
, you'll start at the beginning of the index. But if the file is
large, and you're looking for, say Smith, John, you don't want to scan the entire
index. In this case you would just respond with S or maybe SM to see the index
beginning at that point.
If the index extends to more than one page, the PgUp and PgDn commands can be
used to page through the index entries.
USING THE KEY ITEM DIRECTLY
You may request a particular form by using the key item. Use the CLEAR
command first to get a blank form.
If you know the exact key, you can use the GET command. If you don't know the
exact key but you do know it approximately, you can use NEXT.
GET (FORMS MENU)
Function key
The command GET uses the key item to locate and display a form.
1.
Enter the entire key item data for the form you want to see directly into the
appropriate blank(s) on the screen. (If your form has a two-part key, enter
BOTH items.)
2.
Press Esc/O/G (or
).
NEXT (FORMS MENU)
Function key
A
NEXT can be used to retrieve a form when you don't know the exact key. For
example - The key item is the account number; John Smith's account number is
SMI22438. You can't remember the whole key, but you know that it starts with
SM.
1.
Key SM into the account number (make sure the rest of the account number
is blank).
Filing -- Data Entry and Retrieval
2.
71
Use the command NEXT.
VersaForm XL will search the index for a key of SM, then display the next form
whose key comes after SM alphabetically. It's just like using a dictionary.
Perhaps the next one isn't John Smith's, but Charles Smathers', with a key of
SMA21003. This form would be found first because its key is between SM and
SMI. Just continue to use NEXT until the form you need is displayed.
If the key is a number, you must use a full length number as a starting point. For
instance, if you know that the key you want is a three-digit number in the ninehundreds, key in 900, not 9. If you keyed in 9, NEXT would look for 10, not 901.
SEARCH (FORMS MENU)
Function key
$
SEARCH is the command to use when you don't know the key at all. It is slower
than INDEX, GET or NEXT, but it can locate forms based on any item on the
form. In fact, you can test more than one item, and you can look for items that are
greater than or less than a value you specify, or even items that contain (or don't
contain) certain letters.
When a blank form from the file you want to examine is displayed:
1.
Move the cursor to the item which will contain the information to search for,
and enter just the values you want found.
2.
Command SEARCH.
For example, enter "BAKER" in the item NAME; VersaForm XL will
display, one by one, all forms which contain those letters in the item, NAME.
Both "JIM BAKER" and "JANE'S bakery" would be found.
You can also search on column items.
Before it starts the search, VersaForm XL will ask you where to start the
search. If you can give a key from which to start, this will save time. For
instance, if the file you are searching is indexed by zip code, and you know
that the record you are searching for is on the West Coast, you could start
your search with 90000, and the system wouldn’t have to search the zip
codes between 00000 and 89999. Remember, this only applies to values of
the primary key field.
VersaForm XL will scan the file, and display the first form that matches the
values you entered, and ask if you want this form. If the data that matched
was a column line, you have a choice of going on to the next matching line,
the next form, or stopping the search.
72
3.
VersaForm XL
Reply E, F, or L.
If you reply L (next Line), VersaForm XL will continue the search
beginning at the next line of the current form, and display the next match.
If you reply F (next Form), VersaForm XL will continue the search
beginning at the first line of the next form, and display the next match.
If you reply E (End search), VersaForm XL stops the search. You may
enter or delete data on the displayed form, or use any of the usual commands
to work on your file. After you examine one form, you may clear the screen
and resume the search.
You may resume a search at any point in the file. Simply use the last key that was
found as the starting point for the next search.
The search can be interrupted by pressing Esc. You will be prompted with the
question, "End the search? (Y/N) N". By responding "Y" you can stop the search.
Search tests may be entered in a number of ways, as illustrated in Figure 5-3.
Entry
99
=99
<99
<=99
>99
>=99
99..
..99
/99
..99..
/..99..
Instruction
Search
Search
Search
Search
Search
Search
Search
Search
Search
Search
Search
for
for
for
for
for
for
for
for
for
for
for
the
the
any
any
any
any
any
any
any
any
any
value
value
value
value
value
value
value
value
value
value
value
that contains 99
that equals 99
less than 99
less than or equal to 99
greater than 99
greater than or equal to 99
which begins with 99
which ends with 99
not equal to 99
which contains 99
not containing 99
Figure 5-3
The symbol / (not) could be used in all the examples, as illustrated by the
two values at the bottom of the table.
You can put in more than one value for VersaForm XL to search for:
Keying ">=T" into NAME and "95030" into ZIP would instruct VersaForm
XL to search and display the forms of all clients in Zip code 95030 whose
names begin with T or any letter that follows T in the alphabet.
If more than one item in the column area is being searched, the system will
stop on the first form with correct single items and with at least one column
item that matches all the criteria.
You can also use a ? to represent any single character or number.
Filing -- Data Entry and Retrieval
73
9?9 would locate forms with 909, 919, 929, 939, etc.
Peters?n would produce all forms with either Peterson or Petersen in the
item you have chosen for the search.
Browse Through a File
The commands FIRST, LAST, NEXT and BACK allow you to scan a file form by
form.
FIRST (FORMS MENU)
The command FIRST displays the first form in a file.
LAST (FORMS MENU)
The command LAST displays the last form in a file.
NEXT (FORMS MENU)
Function key
A
The command NEXT (discussed above) displays the form with the next higher
key.
BACK (FORMS MENU)
Function key
The command BACK allows you to examine the previous form in a file (the one
with the next lower key).
Other Commands
REMOVE (FORMS MENU)
Function key
$U
When you want to remove a form from a file, have it displayed and then use the
REMOVE command.
NOTE:After removing a form, it will still be on the screen. WHILE
THE FORM IS STILL DISPLAYED, you may change your mind
about removing it. Once the screen is cleared, it's too late.
74
VersaForm XL
If you change your mind, just SAVE the form.
SPACE REPORT (UTILS MENU)
The SPACE REPORT command tells how much of the available storage in a file
has been used.
Size of <filename> is
xx bytes
EXIT (FILE MENU)
Function key
$[
When you want to stop working on a file:
1.
SAVE your entries.
2.
Choose the EXIT command. You may use the Filing program to select and
work on another file, or you may use another VersaForm XL function, or
turn the system off.
Procedures
Procedures are short programs you can write to link one file to another, or to do
things that can't be done by the standard VersaForm XL commands. They are
discussed fully later in this book. Some procedures (called User procedures) can
be executed on command.
RUN PROCEDURE (RUN MENU)
Function key
$
This command (formerly EXECUTE) is used to run a VersaForm XL user
procedure. After the command, VersaForm XL will ask:
Execute what procedure:?
Enter the name of the user procedure you want to execute or use a question mark
to have VersaForm XL display a menu of available procedures. After the first time
you EXecute a procedure, the name of that procedure becomes the default name
and is displayed each time you type EX. You can just press
to execute the
default, or enter the name of another procedure.
(
Filing -- Data Entry and Retrieval
75
SWITCH FILE (FILE MENU)
Function key
$
VersaForm XL has the capability to edit (i.e., to enter data and to make file
changes) in more than one file. This command (formerly DISPLAY) presents a
list of the open files and lets you open new ones. Once you switch to a new file,
you can use all the filing commands on it, including VALIDATE and SAVE. You
can execute procedures on the new file as well.
If you are on a file other than the primary file (the first one opened), and command
EXIT, you get the same menu of files as you get when you switch files. If you
choose a file from this menu (i.e., if you don't escape) the file you EXIT from is
closed.
$
There are three ways to switch to a new file without leaving Filing.
).
*
by the SWITCH FILE command (
*
by EXITing (
) from a file other than the primary file. That file will be
closed, and the list of open files will be presented as for SWITCH FILES.
*
by calling a procedure that displays a secondary file. This works because the
last secondary file is left open when the procedure chain ends, if it is
displayed.
$[
A procedure's secondary file that is not displayed when the procedure chain ends is
automatically closed (this is a change from earlier versions). The display command
will no longer automatically switch to the old secondary file; you must name it.
The Calculator
VersaForm XL provides a calculator for "scratch pad calculations" while the form
is displayed.
CALCULATE (UTILS MENU)
Function key
When you use the Calculate command, the normal line at the bottom of your
screen is replaced by the "calculator display" area.
Calc ..........
..........
..........
...........
76
VersaForm XL
You may key in ? to see the calculator command line, which will appear in place of
the calculator display area:
Calc: ?,P,=,+,-,*,/,S,R,I,N,T,C,V,Q
If you type ? again you will see a more detailed help screen.
PERFORM ARITHMETIC OPERATIONS
1.
Key in any number. It will automatically be placed in the left hand space in
the calculator display area.
* Calculator functions can be performed regardless of the position of the
cursor.
(
2.
Press
. The cursor will return to its previous position on the form.
3.
Key in another number. (The first one will move to the right.) Press
.
(If you're going to perform arithmetic operations, you don't need to press
first.)
4.
Key in "+", "-", "*" (multiply), or "/" (divide). VersaForm XL will calculate
the answer and display it in the left hand space.
(
(
* Arithmetic operations are performed on the two numbers to the left.
Numbers on the right remain unchanged, but move to the left after a
calculation is performed.
* Addition and multiplication are done in the usual way. In division, the
number to the left is the divisor. In subtraction, the number to the left is
subtracted from the number on the right.
ERRORS
If an error occurs, you'll hear a "beep." Usually you'll realize what's wrong-perhaps a number is too large for the space you're trying to assign it to, or maybe
you've tried to divide by zero. If you don't understand, though, press ? to see an
error message on the screen, indicating what is wrong.
(
NOTE:In order to receive an error message, you must press ?
RIGHT AFTER the "beep." To continue, press
.
Filing -- Data Entry and Retrieval
77
OTHER CALCULATOR COMMANDS
*
CLEAR (C) erases the number in the left hand space in the calculator display
area. Numbers on the right will move to the left. Using CLEAR repeatedly
empties all the spaces.
*
ROUNDING (R) asks VersaForm XL to round a number; for example:
(
Key in 98.8999. Press
. Key in R. You'll see the message "Round to
how many places?" Key in the number. Thus, if you key in 2, the number
will be rounded to 98.90.
*
NEGATIVE (N) changes the sign of a number; for example:
(
(
. Key in N. 25 will become -25. Press
and
Key in 25. Press
key in N again. The minus sign will be removed and 25 will be positive
again.
*
INVERT (I) divides a number into 1; for example:
Key in the number 5. Key in I. The number 0.2 will be displayed. (1/5 =
0.2)
*
SELFCHECK DIGIT (S) calculates a self-check digit. When setting up a
self-checking number, you may use this command to pre-calculate the check
digit.
For example, key in the number 1234. Key in S. 1234 will now be replaced
by the digit 4, the self-checking digit. The entire self-checking number is
12344.
More information is contained in the Appendix, "Self-Checking Numbers."
*
PICKUP (P) picks up a number from your form and brings it down to the
calculator display area, without requiring that you rekey it.
For example, position the cursor over a number you want to pick up. The
entire item must be numeric; e.g., AB-1234 is not allowed. Press P. The
number will be placed in the left hand space in the calculator display area.
*
TOTAL (T) provides a column total. If a form contains more than one page
of columns, the computed total is for the entire column spanning all the
pages. If there are any items in the column that are not all numeric, they will
be disregarded when the total is computed.
First position the cursor on any number in a column. Then press T. The
column total will appear at the bottom of the screen on the leftmost space.
78
VersaForm XL
If all the spaces are full, the total will occupy the left space and the others
will move over, with the last number dropping off.
*
ASSIGNMENT (=) puts a number onto the form from the calculator display
area; you needn't rekey it.
For example, after performing a calculation, you may move the number in
the left space of the display area back onto the form. First position the
cursor in the item where you want the number to be placed, then key in =.
The number will be moved to that item.
*
QUIT (Q) returns you to the normal screen when you're finished using the
calculator. Pressing Escape will do the same.
CHAIN CALCULATIONS
The VersaForm XL calculator makes it especially easy to do multiple calculations.
Suppose, for example, that you must calculate:
(1 + 2)
*
(5 - 7)
To do this,
1.
2.
3.
4.
5.
6.
7.
Key in 1 (RETURN)
Key in 2.
Press +.
Key in 5 (RETURN)
Key in 7 (RETURN)
Press -.
Press *.
Calc
Calc
Calc
Calc
Calc
Calc
Calc
......1
......2
+.....3
......5
......7
-....-2
*....-6
.......
......1
.......
......3
......5
......3
.......
.......
.......
.......
.......
......3
.......
.......
Calculator HELP Command
If you key in ? when the calculator command line is on the screen, you'll see the
menu of Calculator Operations (Figure 5-4):
Filing -- Data Entry and Retrieval
79
Calculator Operations
Key in any number.
Operations: +, -, *, /. Number on left
is divisor or number subtracted.
N changes sign, I divides into 1.
R rounds. S gets self-check digit.
P picks up a number and T picks up a
column total. = puts the first number
back onto the form.
C moves each number left.
To clear all, repeat C.
? - help; Q - quit; V - Validate
Press return to continue.
Figure 5-4
Figure 5-5 summarizes the steps to follow for calculation.
TO
CALCULATE:
1.
Get Calculator by using CA command
2.
Key in number and press return, or use
P to pick up from cursor location.
3.
Repeat step 2 for second number.
4.
Press the operation key:
5.
Press = to move answer to your form.
Figure 5-5
+,-,*,/, etc.
Chapter 6
AUTOMATIC CHECKING
AND AUTOMATIC FILLING
You set the rules for the accuracy of the data that is entered into the forms you
have designed--VersaForm XL enforces them. In addition, you can have the
system automatically fill in items, further reducing the margin for error.
Overview
* When you select FORM DESIGN from the Main Menu, you will see a
FORM DESIGN menu with several options, including Checking and
Automatic Filling.
* When your form is displayed on the screen, you will choose the items for
which you want to establish checking and filling rules.
* For each item you choose, a checking and filling menu (Figure 6-1) is
displayed, and you select the option(s) you want for that item.
When you enter data on your form and VALIDATE it, VersaForm XL will:
* Check the entries according to your rules.
* Perform the automatic filling you have specified, such as looking up
prices in a table and computing taxes or making other calculations.
Choosing Checking And Automatic Filling
Checking and filling options may be chosen at the time you design your form, or
they may be added or changed at any time, even after you've entered data into the
file.
1.
Select FORM DESIGN from the Main Menu.
2.
From the Form Design menu, select the option "Add or change checking and
automatic filling." If required, enter the file name.
Your form design will appear on the screen, and a message at the bottom will
instruct you:
82
VersaForm XL
Move cursor to item: X-choose checking; D-delete checking; Q-done:
To perform checking and filling for an item:
1.
Move the cursor to the item, and press X. The Checking and Automatic
Filling menu (Figure 6-1) will be displayed.
CHECKING AND AUTOMATIC FILLING
Minimum-length ..
Justify (L/R/#) .
Numeric --- (Y) .
Yes-or-no - (Y) .
Maximum-length
Selfchecking (Y)
Date ------- (Y)
Mandatory -- (Y)
EXTENDED CHECKS
Ranges (Y) .
Format (Y) .
List (Y) .
AUTOMATIC FILLING
Lookup (Y) .
Calc - (Y) .
Todaysdate (Y) .
Column Total (Y)
This item: CUSTOMER
Figure 6-1
2.
Move the cursor to the option you want to choose. Enter the appropriate
character (usually Y, but could be L or R for Justify, or a number).
DO NOT key in anything beside options you are bypassing.
3.
Repeat step 2 until you've made all your choices for the item named.
4.
(Optional) Use the PRINT ( ) command to get a printed copy of your
choices for that item, for reference. Checking and filling choices may also be
printed later by using the option, "Print the form definition" from the FORM
DESIGN menu.
5.
Use the SAVE (
#
) command to have your choices filed.
Note: Don’t make conflicting choices. For example,
TODAYSDATE asks the system to automatically fill in an item,
and MANDATORY specifies that you must enter the data
manually; therefore, these two options should not both be chosen
for the same item.
Automatic Checking And Automatic Filling
83
Checking Options
MINIMUM-LENGTH
Entries must contain at least the minimum number of characters specified.
You might enter 5 for a ZIP code to help avoid errors.
Specify Minimum-Length as 99 to prevent any manual data entries into an item.
This gives you a "protected field" that can only be filled automatically.
MAXIMUM-LENGTH
Entries may contain no more than the maximum number of characters specified.
The number must be greater than zero.
JUSTIFY
Aligns the data you enter. Justify will move your data to the left or right side of an
item on your form, so it will line up in columns on your reports. Justify can also
line up the decimal points. Rounding off occurs as needed.
Key in L (left) or R (right), or a digit between 0 and 8 to specify the number of
decimal places for your entries. For dollars-and-cents items, key in 2.
* If 2 is keyed in, entries of 3 and 2.996 will both be changed to 3.00 (2
decimal places) and right justified.
NUMERIC
Entries must be numeric. Digits, decimal points, and leading + and - signs are
accepted.
Use of this checking feature prevents the entry of non-numeric values into items
that should contain a number usable in an arithmetic calculation.
* An incorrectly keyed entry such as 2R5.98 would not be allowed. Neither
would a social security number or a phone number (because they're not truly
numbers--for instance, you can't add them up.)
YES OR NO
Entries are limited to Y or N only.
84
VersaForm XL
SELF-CHECKING
Important numbers entered on a form, such as account numbers, can be checked
for accuracy by the use of an additional calculated check digit, when this option is
chosen. The method of calculating the check digit is described in the Appendix,
"Self-Checking Numbers."
Entries must be in date format (see About Dates in Chapter 1). The item must
contain at least eight spaces.
MANDATORY
The item must be filled in. This prevents inadvertently skipping the item when data
is entered.
NOTE:Mandatory means that the user must fill in the item; DO
NOT choose Mandatory for an item you want VersaForm XL to fill
in automatically.
EXTENDED CHECKS
The Extended Checks--Range, Format, and List--test data for accuracy before it is
validated. Choose the Extended Checks in the same way as the others. Then
provide the system with additional information by establishing a RANGE of values,
a LIST of acceptable entries, or a FORMAT for a specific pattern.
VersaForm XL will ask for the information it needs after you SAVE your choices
for each item. For example, if you have chosen the RANGE check, you'll be shown
a Range Checking Form after you've made and saved all of your choices for that
item. Then you'll be asked to specify the range(s) to check for.
* You may use the normal VersaForm XL commands when entering data
on the extended check forms.
RANGE CHECK
This ensures that entries are within specified lower and upper limits. A range may
be "open-ended", with only one limit set. For example:
* If entries must be between 5.95 and 50.00, specify a lower limit of 5.95
and an upper limit of 50.00.
* For entries of 50.00 or less, you may set just an upper limit of 50.00.
When a low limit is not specified, anything below the upper limit will be
accepted.
Automatic Checking And Automatic Filling
85
* If forms are being filed by CUSTOMER, a lower value of A and an upper
value of LZ would allow entry of names beginning with A through L. A
range of M to ZZ would cover the remaining names.
* Decimals are recognized and put in proper order within a range. Thus, if
a range of 25 to 100 is specified, entries of 37.21 and 66.43 are accepted.
How To Establish The Range
A Range Checking form is presented whenever Range is chosen as an option
(Figure 6-2).
RANGE CHECKING
On each line type the limits of one
range. Input will be OK if it falls
in any one range. If you give only the
low (high) value, any input higher
(lower) will be accepted.
Low Value High Value
H
1-1-84
6-30-84
L#L
01
This item: ORDER DATE
Figure 6-2
When the Range Checking form is displayed:
1.
Key in a low limit and/or a high limit.
* AT LEAST ONE LIMIT must be specified.
2.
VALIDATE (
be entered.
). A second line will be displayed, and another range may
* The VALIDATE command checks your entries and provides additional
lines for you to fill in.
3.
PRINT (
) (optional); then SAVE (
#
).
FORMAT CHECK
Entries must follow certain rules or patterns, such as letters or digits only, or a
particular combination. (Do NOT use the Format Check for dollars-and-cents
items.)
86
VersaForm XL
How To Establish the Format
When you select the Format check, after you complete your other choices for the
item, the form shown in Figure 6-3 is displayed. In this example (Figure 6-3),
&&&-### specifies that the ACCT# must consist of three letters, a hyphen and
three digits.
FORMAT CHECKING
The following characters may be used to
specify a required format:
&
#
/
?
-----
Any letter of the alphabet is OK
Any digit (0-9) is OK
Optional leading digit (0-9)
Any character is OK
Any other characters mean that only that
particular character will be accepted
in that position.
Format &&&-###.............
This Item: ACCT#...........
Figure 6-3
* The use of "/" permits optional leading digits; a format such as ///VF
allows entries of 1VF to 999VF.
* A.### allows an entry of A.495 but not A.49.
* #&.S allows you to enter any digit, followed by any letter, followed by a
period, followed by the letter S; so 4F.S or 5A.S would be acceptable.
1.
Key in Y beside Format on the checking and filling menu.
2.
Key in a format for the item when the Format checking form is displayed.
3.
SAVE the information.
NOTE:Make sure the format you specify isn't longer than the
number of dots for the item on your form will allow.
LIST CHECK
This ensures that all entries into an item appear on a user-prepared list of
acceptable values.
Automatic Checking And Automatic Filling
87
When you choose the List Check and then SAVE, you'll be asked to fill in a List
Checking form (Figure 6-4).
LIST CHECKING
Input will be checked against the values
that you enter on the lines below. Only
input that matches one of the values
below will be accepted.
ACCEPTABLE VALUES
L#
01
02
03
04
05
06
07
08
.....V.....
Pants
Shirts
Hose
Sweaters
Jackets
Neckties
Blankets
Tablecloths
This item: DESCRIPTION............
Figure 6-4
Once the list has been defined, a down arrow (↓) will appear on the form
indicating that a pop up pick list is available. During filing, the pick list can be
key combination. Items are selected from the list by
displayed using the
highlighting an entry using the UP and DOWN arrow keys and then pressing
return.
$O
When you enter data in your records, only those entries that match the ones on the
list will be accepted.
When the List Checking form is displayed:
1.
Key in the first value on Line #1.
* Each value may contain up to 20 characters.
2.
VALIDATE (
); you'll be given a second line to fill in.
* Key in up to 300 values.
3.
PRINT (
) (optional). SAVE when you're finished.
NOTE:A list of values must have at least one entry in it, or you will
not be able to validate entries on your forms later.
88
VersaForm XL
Three VersaForm XL commands, explained in Chapter 5, will be used
often when you make or change entries on the List Checking form:
* If a new line doesn't appear on the List Checking form when you validate
the last line, use the PAGE FORWARD (PgDn) command.
* Use the PAGE BACKWARD (PgUp) command to return to previous
pages.
* Use DELETE (ESC/E/D) to remove data you don't want.
Automatic Filling
Automatic filling options instruct VersaForm XL to fill in items on a form.
MANUAL ENTRY ALWAYS OVERRIDES AUTOMATIC FILLING, so even if
you choose automatic filling, you may later key in data yourself.
LOOKUP
VersaForm XL can look up and automatically fill in information for one item, from
data entered into another item, using a table that you have prepared. On the
checking and filling menu, specify Lookup for the item you want filled in
automatically. VersaForm XL will find this information (the Result value) when
you enter information into another item (the Lookup value).
*
REMEMBER: Specify Lookup for the item you want filled in automatically,
NOT the item that will trigger the lookup.
In Figure 6-5, the DESCRIPTION may be filled in by VersaForm XL from a table
which lists the values for STOCK# and DESCRIPTION. Figure 6-6 shows the
Lookup Table prepared for DESCRIPTION in which the user has entered stock
numbers (Lookup Values) and descriptions (Result Values).
Automatic Checking And Automatic Filling
89
ALPHA TOOLS INC.
Serving the Bay Area Since 1925
CUSTOMER William Marshall. ACCT# MAR3247.
ADDRESS 321 Central St.... PHONE 622-2384
CITY Columbia..... STATE GA
ZIP 32478
ORDER DATE 6/30/1984.... CLERK George....
L# QTY STOCK#↓ .DESCRIPTION. PRICE AMOUNT.
01 .1. .3204. ............. ..... .......
SUBTOTAL .......
TAX .......
TOTAL .......
Figure 6-5
TABLE LOOKUP
The data for this item will be obtained
by looking it up in the table below.
The item to get the lookup value from
is: Item name STOCK#.............
L#
01
02
03
04
Look
L
3204
1394
0422
0423
Up
Result
R
CLAW HAMMER
WRENCH
NAILS, 6d
NAILS, 8d
This item:
DESCRIPTION.........
Figure 6-6
*
DESCRIPTION is the item to be filled in; the lookup option was specified
for this item on the checking and filling menu.
*
STOCK# is the item that will provide the Lookup Value.
How to Fill in the Lookup Table
1.
Key in the first lookup and result values on Line #1.
2.
VALIDATE (
3.
When finished, PRINT (
). A second line will be displayed.
)(optional). SAVE (
#
) your entries.
90
VersaForm XL
Some Lookup Table Pointers
*
Up to approximately 300 lookup items may be entered.
*
Each Lookup Value may contain up to 10 characters, each Result up to 25
characters.
*
The Lookup Table may be updated at any time.
*
You may establish more than one Lookup Table on a form.
*
An item may be used more than once as the lookup item.
For example, STOCK# may be used to look up both DESCRIPTION and
PRICE.
*
In data entry, if a lookup value is entered incorrectly and has no
corresponding result value, VersaForm XL will leave the item blank and
continue with the next operation. The List Check can be used to prevent
errors when entering lookup values. The use of List Check for STOCK#
would ensure that all the stock numbers keyed in on a form are valid.
*
If the lookup table doesn't provide enough items, or they aren't large enough,
use a lookup procedure instead. These can look up data on a file that can
hold up to 4 million bytes of information, and are discussed in the section of
this manual on Procedures.
TODAYSDATE
This tells VersaForm XL to fill in a date on a form, using the current system
startup date.
*
Only an item that has no data in it will be filled in. An existing entry will not
be changed.
*
The item must contain at least eight spaces.
CALCULATION
VersaForm XL can add, subtract, multiply, divide, find the larger or smaller of two
numbers, and carry running totals. Taxes and totals can be computed.
When you choose Calculate from the checking and filling menu, you'll be shown a
Calculation form to fill in.
In the example shown in Figure 6-7, VersaForm XL is instructed to calculate the
hours per job (HRS PER JOB) by dividing the total hours (TOT HRS) by the
Automatic Checking And Automatic Filling
91
number of jobs (NO JOBS), using the values entered for those items on the form
(Figure 6-8):
CALCULATION
The calculation may be made by adding,
subtracting, multiplying, or dividing
two items, or one item and a number.
Operations are +,-,*,/,Low (L),High(H)
Operations
Items/numbers
I1: TOT HRS.
OP1: /I2: NO JOBS.
OP2: .I3: ........
OP3: .I4: ........
OP4: .I5: ........
OP5: .I6: ........
This item: HRS PER JOB..............
Figure 6-7
NAME Mary Hutchinson......... ID# HUT137
DEPT Service................. BLDG D-1..
MGR Stevens.................. EXT 1378..
DATE 8/23/84. HR START 7:30 HR END 3:30
TOT HRS 8.00......... NO JOBS 16.......
HRS PER JOB .50.......
Figure 6-8
Up to six items and five operations may be entered on a Calculation form. The
operations are:
+
*
addition
subtraction
multiplication
/
L
H
division
low (the lower of two numbers)
high (the higher of two numbers)
Operations are performed from top to bottom, with no parentheses or operation
priority assumed. In another example (Figure 6-9), VersaForm XL has been asked
to calculate the lower or higher of two numbers. In this case, the tax charged is to
be at least $10% of a price but no less than $2.00. VersaForm XL must calculate
the higher of 10% and $2.00. To do this, VersaForm XL will compute .10 x
PRICE, compare that result with $2.00, and enter the higher of the two numbers
as the value for TAX.
92
VersaForm XL
CALCULATION
The calculation may be made by adding,
subtracting, multiplying, or dividing
two items, or one item and a number.
Operations are +,-,*,/,Low (L),High(H)
Operations
I1:
OP1: * I2:
OP2: H I3:
OP3: . I4:
OP4: . I5:
OP5: . I6:
This item:
Items/numbers
0.10...
PRICE..
2.00...
.......
.......
.......
TAX......................
Figure 6-9
RUNNING TOTALS
Running totals may be kept for information entered in columns. In Figure 6-10,
the BALANCE is the running total of the DEBIT and CREDIT columns,
calculated by adding a new amount to the previous value of the balance.
DATE
1-12-83
1-15-83
1-26-83
DESCRIPTION
DEBIT
CREDIT
BALANCE
Rental income
100.00
Permit fee
Royalty payment 40.00
15.00
100.00
85.00
125.00
Figure 6-10
Figure 6-11 shows the information which would be entered on the Calculation
Form to calculate the BALANCE in Figure 6-10.
In figure 6-11, I1 is CREDIT, and I2 is DEBIT. I3, BALANCE [-1] tells
VersaForm XL to add the latest credit or debit figure to the value of the previous
line [-1] in order to obtain the running total.
Automatic Checking And Automatic Filling
93
CALCULATION
The calculation may be made by adding,
subtracting, multiplying, or dividing
two items, or one item and a number.
Operations are +,-,*,/,Low(L),High(H)
Operations
I1:
OP 1: - I2:
OP 2: + I3:
OP 3: . I4:
OP 4: . I5:
OP 5: . I6:
Items/Numbers
CREDIT
DEBIT
BALANCE [-1]
...................
...................
...................
This item:
BALANCE...............
Figure 6-11
If you have chosen to carry running totals, when you are entering data into your
form (filing), you may change or delete only the last line. To correct a previous
error an adjusting entry must be made.
Suppose, in Figure 6-10, an error of $20 was made on the first entry (Rental
income). The amount (and balance) should have been $120.00. Since it is possible
to change only the last line, you could add a fourth line that reads:
DATE
DESCRIPTION
1-31-83
(Adjustment)
DEBIT
CREDIT
BALANCE
20.00
145.00
Use Justify for Decimal Places when VersaForm XL performs automatic
calculations, as many decimal places are included in the answer as there are spaces
available. A number may be rounded if necessary. The Justify option may be used
to control the number of decimal places.
For example, if HRS has a value of 3.5 and RATE has a value of 1.25, then
AMOUNT will have a calculated value of 4.375. VersaForm XL will round this
figure to 4.38 if Justify has been chosen for AMOUNT and specified as "2".
You can ensure that decimals on a report will be aligned when you choose Justify
for numerical items during form design.
NOTE: Calculated fields do not include money symbols ($) or
separators (commas between hundreds and thousands).
94
VersaForm XL
DEFAULT VALUES
You may choose calculation to have the system enter "default" values. Up to 20
characters of information-- standard words, phrases or numbers--may be selected
for automatic filling to fill in any items on your form.
When the Calculation form is displayed, key the value in I1 (the first item on the
Calculation form). Do not specify any operation. The value may be numeric or
non-numeric, for example, "N/C" (No Charge).
*
An example: use this feature to fill in the name of a clerk who handles most
of your orders.
*
Manual entry always overrides defaults when you enter data.
COLUMN TOTAL
You may have a total filled in by choosing Column Total from the checking and
filling menu.
When the column total form is displayed, enter the name of the column which is to
be totaled. (In Figure 6-12, it is AMOUNT. VersaForm XL will add the
AMOUNT values and place the result in the item called SUBTOTAL.)
COLUMN TOTALS
Enter below the name of the column
whose total is to be kept in this
item:
Item name: AMOUNT................
This item: SUBTOTAL..............
Figure 6-12
*
The item you use to hold the total of a column must be a single item on your
form.
*
Since a column total will be a number, you may also want to choose Justify
for the item. SUBTOTAL (Figure 6-5) would be justified to two decimal
places, since it's a dollars-and-cents item.
*
Numbers will be justified (and rounded, if necessary) to the proper number
of decimal places after each operation. Only the justified results of
calculations will be shown on the screen. Column totals will be the totals of
the justified values in the columns.
Chapter 7
REPORTS
VersaForm XL's Report Function selects data which you have entered into a file
and organizes it into reports. You can use the reports you create to analyze and
evaluate any information in your files. Reports can be saved and used repeatedly.
"Report Variables" may be entered to make changes easily, when the report is run.
Summary reports, which print only sub-totaled and totaled data, can be specified.
There is no limit to the number of reports you can create and there are few limits
to report layout and style.
VersaForm XL produces reports in two phases:
1.
You create the report by entering the Report Control Instructions.
2.
VersaForm XL follows your instructions and:
- extracts the data you selected,
- sorts it into the order you specified, and
- prints the report.
REPORT CONTROL INSTRUCTIONS
Report Control Instructions are the instructions VersaForm XL follows for
producing a report. They are entered on a set of forms, which you fill on the
screen. There are three forms:
*
Report Definition Form - identifies which data items to print, and how they
will be formatted, sorted, and totaled.
*
Selection Condition Form - sets the conditions that must be met for a data
item to be included in your report.
*
Additional Files Form - a list of additional VersaForm XL data files you
want included in this report.
96
VersaForm XL
Examples showing how to create each of these forms will be followed by detailed
information about the items on each.
Creating a Report
Suppose you have a file of invoice forms like the one in Figure 7-1, and you want a
simple report showing what you have sold, how many, and to whom, like the
report in Figure 7-2.
ALPHA TOOLS, INC.
SERVING THE BAY AREA SINCE 1925
CUSTOMER Carpenter A
ACCT# CAR056
ADDRESS 33 Bridge St
PHONE 234-5678
CITY Bigtown
STATE CA ZIP 90909
CLERK Joe
ORDER DATE 11/11/80
L# QTY STOCK#
01
3 A55
02
2 A45
03
2 A56
04 ... ......
DESCRIPTION PRICE AMOUNT
Hammer
5.00 15.00
Chisel
3.00
6.00
Wrench
10.00 20.00
........... ..... ......
SUB-TOTAL
TAX
TOTAL
41.00
2.67
43.67
Figure 7-1
SALES REPORT
CUSTOMER
Smith
Smith
Smith
Jones
Jones
Brown
Brown
Green
Whyte
QTY
3
5
3
4
5
5
2
2
3
Figure 7-2. Sales Report
DESCRIPTION
Wrench
Chisel
Hammer
Chisel
Hammer
Chisel
Hammer
Wrench
Chisel
AMOUNT
30.00
15.00
15.00
12.00
25.00
15.00
10.00
20.00
9.00
Reports
97
To create this report, you would follow these steps:
1.
From the VersaForm Main Menu, select #3, Report. VersaForm will ask for
the drive letter, path, and then the name of the file to report from.
2.
Enter a name (let's suppose you choose "SALES") for the new report
instructions. (The name can be up to six letters).
You will see the Report Menu: (Figure 7-3)
Report Menu
1. Set Up the Report -Print Items, Sorting, Totals, etc.
2. Enter Selection Conditions
3. Include Additional Files
4. Run the Report
5. Remove this Report
6. Rename this Report
7. Copy Another Report
8. Choose Another Report
Figure 7-3. Report Menu
3. From the Report Menu, select # 1, Set Up the Report -VersaForm XL knows that this is a new report; so the first thing it will do is ask
you for the names of the print items. You enter these by simply "pointing" to
them. So you can do this, VersaForm will display a blank form from the file you
are reporting on.
This message will appear at the bottom of your screen:
Choose Print Item #1: Rtn-Choose item, Q-done, ?-Help
(
Press
to indicate that you wish to choose a Print-item. Watch the bottom of
your screen; you will see the message:
Move cursor to item, then press X
Press the tab key (or any other cursor motion keys) to move the cursor to the data
field you want printed as the first column on the report--in this case it would be
CUSTOMER. Press the key, X, to select a print-item. The spaces following your
data field name will change to asterisks (*), indicating that you have selected that
data item as a print-item.
At the bottom of the screen you will see:
98
VersaForm XL
Choose Print Item #2: Rtn-Choose item, Q-done, ?-Help
Notice that the Print item number has increased to 2. Each time you select another
Print-item you will see this prompt, and the Print number will have been
incremented.
4.
Continue choosing Print-items by moving the cursor to the items you want,
(in our example, these would be QTY, DESCRIPTION, and AMOUNT)
and pressing X to indicate your selection.
5.
Press the key Q (Q-done) after you've chosen the last item to be printed.
VersaForm XL will display the Report Definition form, listing the Print-items you
selected, as in Figure 7-4.
-----------------REPORT DEFINITION
-----------------Title1
Title2
Title3
Page Format:
Form Id: SALES1
More Options ==>
(ctrl->)
Width
Skip
Length
Left Margin
lines after titles
Counts
(Y/N)
ÏÏÏÏÏÏÏÏÏÏÏÏÏÏÏÏÏÏÏÏÏÏÏÏÏÏÏÏ Print-item Options ÏÏÏÏÏÏÏÏÏÏÏÏÏÏÏÏÏÏÏÏÏÏÏÏÏÏÏÏ
1-99 +/- Y/N Y/N Y/N
L# .....Print-items...... Size .......Title........ J S Srt# Dir Sub Ttl Avg
1 CUSTOMER
30 CUSTOMER
2 QTY
5 QTY
3 DESCRIPTION
33 DESCRIPTION
4 AMOUNT
10 AMOUNT
5
Figure 7-4 Report Definition
VersaForm XL has filled in several parts of the form--the print items you indicated,
and their sizes and default column titles. This is actually all that needs to be done
in order to run the report. But there are a number of other choices that we could
make that would make it more useful. From this point on, you can enter your
choices directly on this form.
One thing we can do is to improve the titles. We could have an overall title on
each page of the report by entering it in the Title1 field, and we can separately
change the Title and Size of each column. On our report, the DESCRIPTION
column is too wide, and a better name for it on this report would be
PURCHASES. After changing the Print-item Options (Figure 7-5) the report
would appear as in Figure 7-6.
Reports
99
-----------------REPORT DEFINITION
------------------
Screen 1
Form Id: SALES1
Title1 SALES REPORT
Title2
Title3
Page Format:
Width
Skip
More Options ==>
(ctrl->)
Length
Left Margin
lines after titles
Counts
(Y/N)
ÏÏÏÏÏÏÏÏÏÏÏÏÏÏÏÏÏÏÏÏÏÏÏÏÏÏÏÏ Print-item Options ÏÏÏÏÏÏÏÏÏÏÏÏÏÏÏÏÏÏÏÏÏÏÏÏÏÏÏÏ
1-99 +/- Y/N Y/N Y/N
L# .....Print-items...... Size .......Title........ J S Srt# Dir Sub Ttl Avg
1 CUSTOMER
30 CUSTOMER
2 QTY
5 QTY
3 DESCRIPTION
10 PURCHASES
4 AMOUNT
10 AMOUNT
5
Figure 7-5
SALES REPORT
CUSTOMER
Smith
Smith
Smith
Jones
Jones
Brown
Brown
Green
Whyte
QTY
3
5
3
4
5
5
2
2
3
PURCHASES
Wrench
Chisel
Hammer
Chisel
Hammer
Chisel
Hammer
Wrench
Chisel
AMOUNT
30.00
15.00
15.00
12.00
25.00
15.00
10.00
20.00
9.00
Figure 7-6 Report according to definition in Figure 7-5.
When you validate your entries, VersaForm XL will now tell you how many
characters and how many lines (on the report page) you have used.
TOTALING
You could also ask for the total of both the quantity of items sold and the dollar
amounts of sales. To do this, enter Y in the option "Ttl" for the Print-items QTY
and AMOUNT, as in Figure 7-7. VersaForm XL would produce the report shown
in Figure 7-8.
100
VersaForm XL
-----------------REPORT DEFINITION
------------------
Screen 1
Form Id: SALES1
Title1 SALES REPORT
Title2
Title3
Page Format:
Width
Skip
More Options ==>
(ctrl->)
Length
Left Margin
lines after titles
Counts
(Y/N)
ÏÏÏÏÏÏÏÏÏÏÏÏÏÏÏÏÏÏÏÏÏÏÏÏÏÏÏÏ Print-item Options ÏÏÏÏÏÏÏÏÏÏÏÏÏÏÏÏÏÏÏÏÏÏÏÏÏÏÏÏ
1-99 +/- Y/N Y/N Y/N
L# .....Print-items...... Size .......Title........ J S Srt# Dir Sub Ttl Avg
1 CUSTOMER
30 CUSTOMER
2 QTY
5 QTY
Y
3 DESCRIPTION
10 PURCHASES
4 AMOUNT
10 AMOUNT
Y
5
Figure 7-7 Adding totals to the report.
SALES REPORT
CUSTOMER
QTY
PURCHASES
AMOUNT
Smith
Smith
Smith
Jones
Jones
Brown
Brown
Green
Whyte
3
5
3
4
5
5
2
2
3
--32
Wrench
Chisel
Hammer
Chisel
Hammer
Chisel
Hammer
Wrench
Chisel
30.00
15.00
15.00
12.00
25.00
15.00
10.00
20.00
9.00
-----151.00
Totals:
Figure 7-8 Report with totals.
Avoid adding single-field items from your forms into a total more than once.
When you ask VersaForm XL to print both single-item fields and column items
from your form, that single-item will appear once for each report column line.
Figure 7-9 shows a total TAX item of 1.50 for all items sold.
If you request a report in which the items to be printed are the STOCK#, QTY,
DESCRIPTION and TAX (see Figure 7-10), then TAX, which is a single-field
Reports
101
item, will appear on each line (one line per item sold in Figure 7-9), instead of once
per form as it did originally.
ALPHA TOOLS, INC.
SERVING THE BAY AREA SINCE 1925
CUSTOMER STAR, DOUGLAS.. ACCT# STA75791
ADDRESS 7 Mayfield Rd... PHONE ........
CITY Mayfield....... STATE NH ZIP .....
ORDER DATE 8/9/65....... CLERK Abbey...
L# QTY STOCK# DESCRIPTION PRICE AMOUNT.
01 1
A1
Hammer
10.00 10.00
02 1
A2
Wrench
10.00 10.00
03 1
A3
Chisel
10.00 10.00
04 ... ...... ........... ..... ......
SUBTOTAL
TAX
TOTAL
30.00
1.50
31.50
Figure 7-9 Invoice showing Tax single item
STOCK#
QTY
PURCHASES
TAX
A1
A2
A3
1
1
1
===
3
Hammer
Chisel
Wrench
1.95
1.95
1.95
====
5.85
Totals:
Figure 7-10 Report with repeated Tax field
In this case, the dollar amount calculated for the tax on each line actually
represents the total TAX for ALL the items on the form in Figure 7-9. Thus, if
you request totals for QTY and TAX, you will be given a correct total for QTY,
but an erroneous total for TAX (Figure 7-10).
VersaForm XL will catch this error and print a warning message, but it's better to
avoid the problem. DO NOT ask for the total of a single-field item from a form if
you are going to have it printed on a report with print-items which are column
items.
AVERAGES
You may request the average of each totalled item by entering Y in the Average
column for that item.
102
VersaForm XL
SORTING
You may request that VersaForm XL sort items on a report. Look again at the
report in Figure 7-8. The report shows hammers, chisels and wrenches sold, but
the items appear in the report in the random order they were found in the file
(which happens to have each customer's purchases together). But we'd really like
to see the items grouped by item instead of by customer.
To have the products grouped according to their description, you would instruct
VersaForm XL to Sort by entering 1 in the column "Srt" and + to indicate a lowto-high sort in the column "Dir" (Direction), as in Figure 7-11. (Because
VersaForm XL defaults a sort low-to-high, the Direction option could be left
blank.)
-----------------REPORT DEFINITION
------------------
Screen 1
Form Id: SALES1
Title1 SALES REPORT
Title2
Title3
Page Format:
Width
Skip
More Options ==>
(ctrl->)
Length
Left Margin
lines after titles
Counts
(Y/N)
ÏÏÏÏÏÏÏÏÏÏÏÏÏÏÏÏÏÏÏÏÏÏÏÏÏÏÏÏ Print-item Options ÏÏÏÏÏÏÏÏÏÏÏÏÏÏÏÏÏÏÏÏÏÏÏÏÏÏÏÏ
1-99 +/- Y/N Y/N Y/N
L# .....Print-items...... Size .......Title........ J S Srt# Dir Sub Ttl Avg
1 CUSTOMER
30 CUSTOMER
2 QTY
5 QTY
Y
3 DESCRIPTION
10 PURCHASES
1 +
4 AMOUNT
10 AMOUNT
Y
5
Figure 7-11. Report Definition with Sorting by Description
Sorted this way, the chisel sales would be listed first, followed by all the hammers,
then the wrenches (Figure 7-12).
SALES REPORT
CUSTOMER
Smith
Whyte
Jones
Brown
Jones
Smith
Green
Smith
Totals:
QTY
5
3
4
5
5
3
2
3
===
30
PURCHASES
AMOUNT
Chisel
Chisel
Chisel
Chisel
Hammer
Hammer
Wrench
Wrench
15.00
9.00
12.00
15.00
25.00
15.00
20.00
30.00
======
141.00
Figure 7-12. Sorted by Description
Reports
103
It's often useful to sort on more than one item. In Figure 7-13, both
DESCRIPTION and AMOUNT (within DESCRIPTION) have been sorted.
Items are sorted in the order specified by the number you enter in the option "Srt".
In Figure 7-13 DESCRIPTION was sorted first (Srt = 1), then AMOUNT within
DESCRIPTION (Srt = 2).
SALES REPORT
CUSTOMER
QTY
PURCHASES
AMOUNT
Whyte
Jones
Brown
Smith
Brown
Smith
Jones
Green
Smith
3
4
5
5
2
3
5
2
3
===
32
Chisel
Chisel
Chisel
Chisel
Hammer
Hammer
Hammer
Wrench
Wrench
9.00
12.00
15.00
15.00
10.00
15.00
25.00
20.00
30.00
======
151.00
Totals:
Figure 7-13 Report sorted by Description, then Amount
Reports may sort on line number.
If you want to sort on a field that you don't want to print, just make the column
width zero.
VersaForm XL can print subtotals of the items that are to be totalled, for each
group of sorted items. To include subtotals in the report as in Figure 7-14, you'd
enter Y in the report option "Sub". (Figure 7-15).
Note that you request subtotals based on the item being sorted, not the item that is
being totalled. You tell VersaForm XL WHEN to subtotal, not what to subtotal.
Thus, in Figure 7-13, if we want subtotals of Amount for each different Purchase
type, we would subtotal on Purchases. VersaForm XL knows that Qty and
Amount are the columns to be subtotaled, since we have already asked for totaling
of those columns.
104
VersaForm XL
SALES REPORT
CUSTOMER
Whyte
Jones
Brown
Smith
Brown
Smith
Jones
Green
Smith
Totals:
QTY
PURCHASES
3
4
5
5
-17
Chisel
Chisel
Chisel
Chisel
2
3
5
-10
Hammer
Hammer
Hammer
2
3
-5
==
32
Wrench
Wrench
AMOUNT
9.00
12.00
15.00
15.00
----51.00
Chisel
10.00
15.00
25.00
----50.00
Hammer
Wrench
20.00
30.00
----50.00
======
151.00
Figure 7-14 Report with subtotals
NOTE:It isn't practical to ask for subtotals of items that aren't
sorted, since they won't be together in the report.
-----------------REPORT DEFINITION
-----------------Title1 SALES REPORT
Title2
Title3
Page Format:
Width
Skip
Screen 1
Form Id: SALES1
More Options ==>
(ctrl->)
Length
Left Margin
lines after titles
Counts
(Y/N)
ÏÏÏÏÏÏÏÏÏÏÏÏÏÏÏÏÏÏÏÏÏÏÏÏÏÏÏÏ Print-item Options ÏÏÏÏÏÏÏÏÏÏÏÏÏÏÏÏÏÏÏÏÏÏÏÏÏÏÏÏ
1-99 +/- Y/N Y/N Y/N
L# .....Print-items...... Size .......Title........ J S Srt# Dir Sub Ttl Avg
1 CUSTOMER
30 CUSTOMER
2 QTY
5 QTY
Y
3 DESCRIPTION
10 PURCHASES
1 +
Y
4 AMOUNT
10 AMOUNT
Y
5
Figure 7-15 Definition of report with subtotals
You may direct VersaForm XL to start a new page after each group of sorted
items. Use P instead of Y in selecting the subtotal item.
Reports
105
You can subtotal even if you haven't asked for totals. Subtotaling in this case is
used to set up the report in paragraph format, though no subtotal values are
printed (Figure 7-16).
SALES REPORT
CUSTOMER
QTY
PURCHASES
AMOUNT
Whyte
Jones
Brown
Smith
3
4
5
5
Chisel
Chisel
Chisel
Chisel
9.00
12.00
15.00
15.00
Brown
Smith
Jones
2
3
5
Hammer
Hammer
Hammer
10.00
15.00
25.00
Green
Smith
2
3
Wrench
Wrench
20.00
30.00
Figure 7-16. Report in paragraph format.
Since sorting brings all the items of a kind together, it will often not be necessary
to print the item name on each line. If you want to print it only on the first line of
each group, use the Suppress option--enter a Y in the column headed "S" in Figure
7-15. Figure 7-17 shows the result.
CUSTOMER
Whyte
Jones
Brown
Smith
Brown
Smith
Jones
Green
Smith
Totals:
SALES REPORT
QTY
PURCHASES
3
4
5
5
-17
Chisel
2
3
5
-10
Hammer
2
3
-5
==
32
Wrench
Chisel
Hammer
Wrench
AMOUNT
9.00
12.00
15.00
15.00
----51.00
10.00
15.00
25.00
----50.00
20.00
30.00
----50.00
======
151.00
Figure 7-17. Report with suppression of repeated items.
106
VersaForm XL
COUNTS
You may also want to include COUNTS in your report. Counts will perform a
tally for each sub-total break. Y entered into the "Counts" field will cause counts
to be printed below each sub-total group in a detail report, as in Figure 7-18.
For our example Sales Report, we have sub-totalled by DESCRIPTION. A count
requested here would provide us with the number of sales, sub-totalled for each
value of DESCRIPTION.
SALES REPORT
CUSTOMER
Whyte
Jones
Brown
Smith
QTY
PURCHASES
3
Chisel
4
5
5
-Count for Chisel: 4
Totals:
17
Chisel
AMOUNT
9.00
12.00
15.00
15.00
----.
51.00
Brown
Smith
Jones
2
Hammer
3
5
-Count for Hammer: 3
Totals:
10
Hammer
10.00
15.00
25.00
----.
50.00
Green
Smith
2
Wrench
3
-Count for Wrench: 2
Totals:
5
Wrench
20.00
30.00
----.
50.00
==
======
.
151.00
Count: 9
Totals:
32
Figure 7-18. Detail Report with Counts
If you would like counts included in a summary report, you can have counts
printed as a separate column (Figure 7-19). Enter the word @Count as an
additional Print-item, as in Figure 7-20. When you print summary lines only,
VersaForm XL will create an additional column for the counts, which you can title
and size just as any other column.
Entering @Count has no effect on detail printing, and no effect on the Counts
field described above.
Reports
107
SALES REPORT
CUSTOMER
Totals:
QTY
17
10
5
==
32
PURCHASES
Chisel
Hammer
Wrench
AMOUNT
51.00
50.00
50.00
======
151.00
COUNT
4
3
2
=====
9
Figure 7-19. Summary report with Counts in separate column
----------------REPORT DEFINITION
----------------Title1 SALES REPORT
Title2
Title3
Page Format:
Width
Skip
Screen 1
Form Id: SALES1
More Options ==>
(ctrl->)
Length
Left Margin
lines after titles
Counts
(Y/N)
ÏÏÏÏÏÏÏÏÏÏÏÏÏÏÏÏÏÏÏÏÏÏÏÏÏÏÏÏ Print-item Options ÏÏÏÏÏÏÏÏÏÏÏÏÏÏÏÏÏÏÏÏÏÏÏÏÏÏÏÏ
1-99 +/- Y/N Y/N Y/N
L# .....Print-items...... Size .......Title........ J S Srt# Dir Sub Ttl Avg
1 CUSTOMER
30 CUSTOMER
2 QTY
5 QTY
Y
3 DESCRIPTION
10 PURCHASES
1 +
Y
4 AMOUNT
10 AMOUNT
Y
5 @COUNT
5 COUNT
Figure 7-20. Definition of summary report with Counts.
PERCENTAGES
Reports can calculate percentages of numerical fields that are totalled. It prints the
percentages in a separate column, which may be placed anywhere on the report.
For our example Sales Report, we could calculate percentages for the quantity and
amount columns (Figure 7-21).
108
VersaForm XL
SALES ANALYSIS
Customer
-----------------Chas Carpenter
Chas Joyner
Ed Cartwright
Geo Sawyer
John Cooper
Mary Mason
Will Fletcher
Qty
----22
32
52
24
125
19
38
=====
312
Totals:
%Qty
-----7.1
10.3
16.7
7.7
40.1
6.1
12.2
======
100.0
Amount
--------434.75
805.50
1004.50
605.50
3748.00
480.50
778.15
=========
7856.90
%Amt
----5.5
10.3
12.8
7.7
47.7
6.1
9.9
=====
100.0
Figure 7-21. Summary Report with Percentages
To print percentages, enter the percentage command as a separate Print-item, as in
Figure 7-22. The characters @% tell VersaForm that you want to calculate a
percent, and they are followed by the name of the field for which you want the
percentages calculated. The field you refer to must be numeric, and must be
totalled. The Percentage field itself should also be totalled, and should be at least
5 characters wide.
----------------REPORT DEFINITION
----------------Title1 SALES REPORT
Title2
Title3
Page Format:
Width
Skip
Screen 1
Form Id: SALES1
More Options ==>
(ctrl->)
Length
Left Margin
lines after titles
Counts
(Y/N)
ÏÏÏÏÏÏÏÏÏÏÏÏÏÏÏÏÏÏÏÏÏÏÏÏÏÏÏÏ Print-item Options ÏÏÏÏÏÏÏÏÏÏÏÏÏÏÏÏÏÏÏÏÏÏÏÏÏÏÏÏ
1-99 +/- Y/N Y/N Y/N
L# .....Print-items...... Size .......Title........ J S Srt# Dir Sub Ttl Avg
1 CUSTOMER
30 CUSTOMER
2 QTY
5 QTY
Y
3 @%QTY
5 %QTY
Y
4 DESCRIPTION
10 PURCHASES
1 +
Y
5 AMOUNT
10 AMOUNT
Y
6 @%AMOUNT
5 %AMT
Y
Figure 7-22. Definition of report with Percentages
REPORT VARIABLES
VersaForm XL has a way of allowing you to enter changes into your report at the
time it is run. Sometimes a simple change is necessary to a report. For example,
you might wish to change the title of a report to reflect the purpose for which it is
being run.."Trial Balance" at one time and "Audit" at another.
Reports
109
By entering the a word or phrase beginning with &, you tell VersaForm XL to ask
you for a value which will replace that word or phrase at the time the report is run.
Use the & character with an expression that represents the information you wish to
replace. For example, "&the Title" will cause VersaForm XL to prompt,"Enter the
Title:". The exception to this is the variable "&date". VersaForm XL will always
replace "&date" with the current date in your computer. To be prompted to enter
a date use a phrase like "&Todays date", or "&Beginning date".
Report Variables can also be used to change printer font when a report is run.
(Specifying fonts in reports will be discussed in the section, Print Control
Sequences -Screen 3).
The Report Definition Form
The Report Definition form has three parts, each on a separate screen: Report
Definition, Report Options, and Print Control Sequences. Only the first screen
was used in the previous example; use of the other screens will be clear from the
explanation below.
All three screens are explained in detail in this section.
-----------------REPORT DEFINITION
-----------------Title1
Title2
Title3
Page Format:
Form Id:
More Options ==>
(ctrl->)
Width
Skip
Length
Left Margin
lines after titles
Counts
(Y/N)
ÏÏÏÏÏÏÏÏÏÏÏÏÏÏÏÏÏÏÏÏÏÏÏÏÏÏÏÏ Print-item Options ÏÏÏÏÏÏÏÏÏÏÏÏÏÏÏÏÏÏÏÏÏÏÏÏÏÏÏÏ
1-99 +/- Y/N Y/N Y/N
L# .....Print-items...... Size .......Title........ J S Srt# Dir Sub Ttl Avg
1
*
To choose more print items, use the command Fill (Alt F10)
Enter Print Control Sequences below (ctrl-PgDn)
Figure 7-23 Report Definition
110
VersaForm XL
Report Definition Screen 1 (Figure 7-23)
Title1, Title2, Title3
The title to be printed on your report may be up to three
lines. Title lines will be centered on the page. Report
Variables can be used to change a title from the keyboard
when the report is run.
Page Format
Length,
Width,
Margin,
Skip
These fields allow you to set page Length, Width, Left
Margin and number of lines to Skip after titles have been
printed. Page Width and Left Margin are set in character
width increments, e.g., if you are printing at 17
characters-per-inch (compressed mode) and you want a
one-inch left margin, you would enter 17 in the Left
Margin field. Width must be between 10 and 255
characters; Length between 10 and 100 lines. If you select
a page width that is narrower than the width of all the
characters and spaces in your report, VersaForm XL will
"wrap" the report lines, that is, the characters in excess of
the report page width will print on the following line.
Counts
Enter Y to tell VersaForm XL to count the number of
data-items included within each group of each sub-totalled
print-item. A total count appears at the end of the report
with totals and averages (if you have specified them, also).
Print-items and associated options
The columnar section of the Report Definition form tells VersaForm XL which
data items to print and how to print them. The data items you select to print are
fields on your form and will be Listed as Print-items. Following each print-item
there are nine options which can be changed to control the formatting, sorting and
totaling of each print-item in the report.
Option name
Description
Print-Item
The first report option will list the Print-items to be
included in your report. The Print-items will appear in
columns on your report, automatically arranged in the
order in which you selected them. You may insert and
delete lines from the print item column using the
commands D and I, as in VersaForm XL's filing mode.
Size
The size option allows you to specify the width of the
column. You may specify a column width larger or
smaller than the actual print-item's width. VersaForm XL
will automatically separate columns in a report by at least
one space. Keep this in mind when you set the overall
Reports
111
page width of your report. The default column setting is
the width of the named print-item.
Title
You may enter any title you choose as a column heading
for each print-item. Remember, however, that your title
may only be as long as your column is wide. The default
column title is the name of the print-item.
J
J is for Justify. In the option headed J, you tell VersaForm
XL how to print your data within the report column.
Enter L for left-flush margin (left justified), R for rightflush margin (right justified), C for centered with equal
margins, or a number of digits to indicate decimal places.
Numeric data with decimal places will print right justified.
If you do not use this option, data will be printed exactly
as it appears in your file.
S
The S option allows you to suppress the printing of data
items that have been printed in the previous line of the
report. By entering Y in this option, you tell VersaForm
XL not to print duplicate data items within the same
column. Suppression may be used to emphasize sorting,
or sub-total breaks within the report. VersaForm's default
is not to suppress.
Srt#
You may sort up to 50 print-items within a report. They
may be sorted alphabetically or numerically. By entering a
number in the sort column, you select the order in which
the print-items on the report will be sorted. If sorting has
not been specified VersaForm XL will not sort report
lines; they will be printed in the order encountered.
Dir
If you have entered a number in the"Srt#" column, you can
indicate the direction in which the data will be sorted by
entering + or -. If this column is blank, VersaForm XL
will automatically sort data items Low-to-High(+). (Lowto-High is A to Z, or 1-10.) You may specify a High-toLow(-)sort by entering a -.
Sub
You may specify up to ten Subtotal breaks in the report.
These are used to organize data in a format that
summarizes important parts of the overall report. Use Y
to specify a subtotal break or P to indicate that each
subtotal break should begin a new report page. If you
entered Y for counts, the number of data items in each
sub-total will be counted. Summary Reports will print
only the print-items for which a Sub-total has been
112
VersaForm XL
requested. VersaForm XL does not set default sub-totals.
Note: Use this item to tell VersaForm WHEN to subtotal,
not WHAT to subtotal. For instance, if you want to have
a subtotal of Cost for each inventory part number, you
would enter Y in the total (Ttl) column for Cost and enter
Y in the Subtotal column for part number. Then, each
time part number changes, VersaForm will print a subtotal
of Cost.
Ttl
Use Y to indicate that an item should be totalled. Report
totals print at the end of the columns for which a total has
been selected. VersaForm XL does not set default totals.
If a non-numeric value is entered for an item you're
totaling, it will be valued at zero. For example, if the
words "No Charge" appear in an item to be totalled,
VersaForm XL will rightly count the entry as zero. An
incorrectly typed number, such as 2A4.40 instead of
295.40, is also counted as zero, causing errors. You may
avoid this problem through data entry checks chosen in
Automatic Checking and Filling for the form design.
VersaForm will perform a check to assure entries contain
valid numbers in an item that will be totalled later.
You may total up to 50 print items.
Avg
Entering Y in the option "Avg" will cause VersaForm XL
to calculate an average for numeric data. Averages will
print at sub-total breaks and at the end of the column for
which an average has been requested.
Counts as a Separate Column
@Count is a special print-item you may use to list counts in a separate column. It
is used only in when printing Summary lines only. When printing details, it is
ignored. It is unrelated to the counts field described above, which will print counts
on a separate line in each sub-total break.
If you wish to have a separate counts column in summary report, include a printitem called @Count. @Count can be inserted anywhere in the list of Print-items
and all of its options may be changed or left as defaults, just as any print-item.
Reports
113
Report Definition Options -- Screen 2
&4
To display the Report Options (Figure 7-24), press the keys
Press
to return to Screen 1.
& 5
and
together.
If left blank, the default settings are those given by the User and System Setup
screens.
--------------------------Screen 2
REPORT DEFINITION -- OPTIONS
--------------------------Control Instructions . (Y/N)
Number of Copies . (#/?)
Pause Between Pages . (Y/N)
Trailer Page . (Y/N)
Detail or Summary . (D/S/B)
Work Disk . (Y/N)
Export . (1-5; 1-VF/Merge 2-Commas 3-Commas,Quotes 4-Fixed width 5-1 per ln)
Print on Printer, Screen, or File . (P/S/F)
Printfile name: Disk:\Path .................
Filename ..................
Figure 7-24. Report Options
Control Instructions Enter Y to print a record of all the Report Control
Instructions, Options and Sequences you have selected for
this report.
Number of Copies
Enter the number of copies of your report to be printed.
To instruct VersaForm XL to ask you how many copies to
print at the time you run the report, enter ?.
Pause between
pages
Enter Y if you need to pause after each page to insert
single sheets of paper in your printer.
Trailer page
Prints the file name, report date and time, number of form
items read and written on a separate page at the end of the
report.
Detail or Summary
(D/S/B)
A Summary report prints only sub-totals and totals (and
counts and averages, if chosen). VersaForm's default is to
ask you just before printing which you want. Enter D, S,
or B to avoid being asked; choosing Both will cause both
detail and summary versions to be printed,
Work Disk
In order to produce the report, VersaForm XL needs extra
disk space on which to sort the information you have
selected, this is the Work Disk. VersaForm XL will use
the hard disk as the Report Work Disk. If you have a
RAM disk, using it will decrease the report processing
time. Unless you have entered a Work file path in your
SETUP.VFS file, VersaForm will ask which disk to use
when the report is run. To suppress this question enter N.
114
Export
VersaForm XL
The Export option will write your report data to a disk
file. This makes it possible to produce files which can be
used with other MS-DOS programs. Four export file
formats are available:
1.
VF/Merge: values separated by tabs, each record on
a new line. The first line consists of the field names (the
symbol » is here used to represent a tab).
Name»Address»City»State»Zip
Sam Smith»123 Main Street»Clovis»CA»98906
This format must be used in order to create mailing labels
to be printed by VersaForm XL. It can also be used
together with the mail merge option of some word
processors, such as Microsoft Word, which can recognize
the field names.
2.
Commas: values separated by commas, each record
begun on a new line.
Sam Smith, 123 Main St., Clovis, CA, 98906
Joe Smith, 456 Elm St., Covina, CA, 91722
3.
Commas, quotes: same as above, but non-numeric
values are enclosed in quotes.
"Sam Smith", "123 Main St.", "Clovis", "Ca", 98906
4. Fixed width: no field separators.
Sam Smith
Joe Smith
123 Main St.
456 Elm St.
Clovis
Covina
CA
Ca
98906
91722
5. Each value on a separate line
Sam Smith
123 Main St.
Clovis
CA
98906
To use this option, enter the number of the desired export
format in the field "Export" on the Report Options screen.
When the report is to be produced, the system will note
your export instructions. You may specify a path and
Printfile name for the export data. If you have not
specified Printfile name and path in the Report Options,
VersaForm XL will ask where you want the output sent.
Disk:\Path
Path for the report file. "&Datapath" and
Reports
115
"&ProgramPath" may be entered, to refer to the current
data file path and the VersaForm XL program’s path,
respectively. (See Chapter 15 for explanation of these).
NOTE: You may want to set up your Report Options in the same
way on most of your reports. To avoid having to fill in these
options on each report, you can set default values on page 2 of the
System Setup (SYSSETUP.VFS) or User Setup (SETUP.VFS).
Options entered in a report override those entered at the user level, which override
those entered at the system level. For more about user- and system- level Report
Control Options, see Chapter 11.
Print Control Sequences - Screen 3
Screen 3
REPORT DEFINITION -- PRINT CONTROL SEQUENCES
Use ASCII codes separated by \, as
27\34\139
Titles_on
Titles_off
Body_on
Body_off
Totals_on
Totals_off
Trailer_on
Trailer_off
Use_default
(Y/N/? -- to use default print control seq)
Figure 7-25. Print Control Sequences -- Screen 3
1
&2
To display the Print Control Sequences (Figure 7-25), press the keys
together. Press
to return to Screen 1.
&
and
Sequences of ASCII codes which control the printer are called Print Control
Sequences. Most printers can change fonts, print bold , italics or underscore if
given the proper sequence. Print control sequences for your printer must be
found in your printer manual.
Enter the ASCII code sequences to turn on and off the printer functions you want
to use in these fields. Each is a sequence of numbers or letters, almost always
beginning with ESCAPE (ASCII code 27) or another number. Enter a sequence
of numbers by placing a backslash between numbers.
For example, the print control sequence to change an Epson dot-matrix
printer to compressed mode is ESC (27) followed by 15, which is entered as
\27\15.
116
VersaForm XL
If the sequence is given as letters (or if part of it is), just enter the letters.
For example, to change an HP LaserJet to compressed mode, one possible
control sequence the number of characters per inch, which is 16.66. The
entire sequence is \27(s16.66H. Another sequence to set compressed
mode on an HP LaserJet is \27&k2S.
In these sequences, “27” is the only ASCII code; the rest of the characters
represent themselves. If you need to enter a numeric character following an ASCII
code, use a quote mark (“) to set them apart. Thus \15”2 denotes the ASCII code
15 followed by the character 2, while \152 denotes the ascii code 152.
You can use different styles for the titles, the report body, the totals, and the
trailers. If you want only one style for the entire report, enter it in the Body_on
field and enter the sequence for turning that style off in the Trailer_off field.
Report Variables can be used to prompt the user for a Print Control Sequence
when the report is run.
You may instruct VersaForm XL to automatically use a default Print Control
Sequence entered in the File SETUP.VFS or SYSSETUP.VFS by entering Y in
the field "Use-default". If you do not mark this field N and a Print Control
Sequence is entered into one or both of these files, VersaForm will ask if the Print
Control Sequence should be sent.
NOTE: if you do not turn off a print control at the end of your
report, the printer will remain in the mode of the last sequence it
received.
Selection Conditions
Often you want a report that focuses only on a particular subset of the data in a
file--perhaps you only want to see the invoices for this month, or the sales of only
one type of merchandise. VersaForm XL lets you select just which data you'd like
included (or excluded) in your report. You do this by entering Selection
Conditions.
Suppose you wanted a report like the one in Figure 7-17, but which only included
sales of hammers. Follow these steps:
1.
Select #2, from the Report Menu, "Enter Selection Conditions". A blank
form from your file will be displayed. VersaForm will prompt:
Selection Condition #1 Test #1; Choose item to test:
Each test consists of three parts:
-
The item to be tested (e.g., PRICE)
Rtn-Choose/?-Help/Q-done
Reports
117
-
The comparison type (e.g., EQ)
-
The item to compare to: either another item on the form (E.G.,AMOUNT)
or a value that you enter (e.g., 15.00)
In this case you'd want to set up a test that would require the DESCRIPTION field
to be EQUAL to HAMMER.
1.
(
Press
until the cursor moves to the item to be tested (in this case,
DESCRIPTION). Then press X.
Now you'll be asked to specify the comparison type:
Enter
Comparison Type - EQ,NE,GT,GE,LT,LE,CO,EX,?:
Eight different comparison types can be used:
Equal (EQ)
Not Equal (NE)
Greater Than (GT)
Less Than (LT)
2.
Less Than or Equal to (LE)
Greater Than or Equal to (GE)
Contains (CO)
Excludes (EX)
Key in the letters of the comparison type you want to use, then press
(
You'll be asked for the item to compare to:
Compare to: Rtn-Another Item on the form, V-Value, ?-Help
(
If you want to test against an another ITEM from the form:
3.
Press
. VersaForm XL will display the form. Move the cursor to the
item you wish to compare against. Press X to indicate your choice.
Or, If you want to enter a VALUE to compare against (In this case, HAMMER):
4.
(
Enter V. VersaForm XL will ask you for the value. Enter the value to
.
compare against and press
* You may use a report variable (a word beginning with &) to defer
entering a value until the report is actually produced. In this case,
VersaForm will ask you to enter the value when the report is run.
* The special variable "&DATE" will automatically be replaced by the
current date.
5.
When you've finished entering Test #1, VersaForm XL will ask if you want
to specify another test. If so, reply Y.
.
118
VersaForm XL
The rule is, all comparisons specified on a single Selection
condition form must be satisfied in order for the data to be included
in the report.
If you do not want to specify another test:
Key in N. The Selection Condition Form will appear on the screen (Figure
7-26).
REPORT DEFINITION
SELECTION CONDITION FORM ID: SALES1
Is "Test_Against" an
Item Name or a Value?
L#
1
Tests for this Selection Condition
.....Item_Tested......
Test
.....Test_Against......
DESCRIPTION
EQ
HAMMER
Figure 7-26 Selection Condition
6.
N/V
V
#
$
Examine the form. If it's okay, SAVE it ( ). If you wish, you may make
changes by entering information directly into the Selection Condition Form,
or by using the special command FILL (
).
When you use FILL, VersaForm XL will asks for more selection tests.
Alternatively, you may enter them directly on the Selection Condition form.
A selection condition form can contain up to 99 tests. ALL the tests in a selection
condition form must be satisfied for a data item to be chosen. For example:
Select If
STATE EQ KS
(And)
CITY EQ KANSAS CITY
(1st Test)
(2nd Test)
Data will be selected only if BOTH tests of this condition are met (Figure 7-27).
Data from this form
WILL be selected.
__________________________
|
|
| CUSTOMER John Doe....... |
| ADDRESS 123 J St........ |
| CITY KANSAS CITY........ |
| STATE KS ZIP 66109-1234 |
|__________________________|
Data from this form
WILL NOT be selected.
__________________________
|
|
| CUSTOMER John Doe....... |
| ADDRESS 123 J St........ |
| CITY ST KANSAS CITY......|
| STATE MO ZIP 63106-1234 |
|__________________________|
Figure 7-27 Data selected only if both tests met.
Reports
119
A common mistake is to enter two conflicting selection tests in the same condition
form. For example:
Select If
STATE EQ KS (1st Test)
(And)
STATE EQ TX (2nd Test)
Nothing at all would be selected, because no one lives in both states.
The writer of this condition probably meant to include everyone who lives either in
Kansas OR in Texas. To do this you need to use two selection conditions.
Multiple Selection Conditions
If you want to select data that meets ANY of several tests, rather than ALL of the
tests, you must put each test on a separate Selection Condition form. You may
specify up to nine selection conditions by filling in up to nine separate Selection
Condition forms. For example, you may specify:
Condition 1: Select If STATE EQ TX
(Or)
Condition 2: Select If STATE EQ CA
Data will be selected if it meets EITHER condition (Figure 7-28):
Data from this form
WILL be selected.
__________________________
|
|
| CUSTOMER John Doe....... |
| ADDRESS 123 J St........ |
| CITY Dallas............. |
| STATE TX ZIP 72301-1234 |
|__________________________|
Data from this form
WILL NOT be selected.
__________________________
|
|
| CUSTOMER John Doe....... |
| ADDRESS 123 J St........ |
| CITY Houston............ |
| STATE MI ZIP 15241-3421 |
|__________________________|
Data from this form
WILL be selected.
__________________________
|
|
| CUSTOMER John Doe....... |
| ADDRESS 123 J St........ |
| CITY Anaheim............ |
| STATE CA ZIP 90031-1234 |
|__________________________|
Data from this form
WILL NOT be selected.
__________________________
|
|
| CUSTOMER John Doe....... |
| ADDRESS 123 J St........ |
| CITY Santa Cruz......... |
| STATE FL ZIP 90031-5678 |
|__________________________|
Figure 7-28 Data selected if either condition is met.
When more than one selection condition is specified, each can consist of one or
more tests. For example:
120
VersaForm XL
Condition 1:
Select If STATE EQ TX
(and)
CITY EQ DALLAS
Condition 2:
Select if STATE EQ CA
For a form to satisfy Condition 1, STATE must be filled in with TX, and CITY
must be filled in with DALLAS.
To satisfy Condition 2, STATE must be filled in with CA.
When two conditions are specified, VersaForm XL will extract data IF EITHER
CONDITION IS MET COMPLETELY.
VARIABLES IN SELECTION CONDITIONS
When you precede a selection test value with & on the Selection Condition form,
you'll be asked to specify the value WHEN THE REPORT IS RUN. This allows
you to change a selection condition to meet different requirements.
For example:
STATE Equals &THE STATE
can become
STATE Equals TX
on one day, and
STATE Equals NY
on another.
You would be asked each time to enter THE STATE.
NOTE:
*
You may fill in up to nine separate Selection Conditions.
*
If no selection condition is specified, the items you've chosen to print will be
extracted from ALL the forms in your file.
*
Items included in selection conditions need not be print-items. They can be
any item on your form.
* Comparisons are not case-sensitive. In other words, values will be compared as
if all letters were capitals, both in the form and in the test, regardless of whether
the data was entered in caps or small letters.
Reports
121
Eight comparison tests may be used:
Equal (EQ)
The two items must be the same.
Not Equal (NE)
The two items must not be equal.
Greater Than (GT)
The first item is greater than the second. Greater
means a later date, or higher in the alphabet. When
numbers, dates, and words are compared with each
other, numbers are considered the smallest, followed
by dates, then words and phrases.
Less Than (LT)
The first item is less than the second.
Less Than Or Equal To The first item is not greater than the second.
(LE)
Greater Than Or Equal The first item is not less than the second.
To (GE)
The second item appears in the first item; e.g., EVE
Contains (CO)
appears in EVENING.
Excludes (EX)
The second item does not appear in the first; e.g.,
ADJ is not contained in the data field PAYCODE.
Combining Files in a Report
Sometimes several files need to be combined into a single report. As long as all of
the files have the same form design, this can be done.
1.
Choose Option 3 on the Report Menu, Include Additional Files.
2.
Enter each of the paths and filenames as they are requested.
3.
Press Escape when you are done. You will see the form in Figure 7-29.
4.
Check the filenames and make corrections if necessary.
5.
SAVE (
#
) the form.
Instead of entering a filename, you may simply enter a ? in the Additional Files
form. This tells VersaForm XL to ask you to designate the additional files at the
time the report is run.
122
VersaForm XL
-------------------------------REPORT DEFINITION
ADDITIONAL FILES FOR THIS REPORT
--------------------------------
Screen 1
FORM ID: SALEST1
L#
1
2
3
...........................PATH\FILENAME............................
filename1
filename1
Figure 7-29. Additional files.
After the Instructions are Entered
Choose option 4, Run the report from the Report Menu. VersaForm XL will read
the Report Control Instructions and check them for accuracy. In addition, if
you've used any report variables, you'll be asked to supply their values.
*
VersaForm XL will ask if you want the Report Control Instructions printed.
If you do, turn on the printer and key in Y. It's useful to have a printed copy
as a record of the information requested in the report.
VersaForm XL reads through the file and displays the number of forms scanned
and the number of records selected, so you can watch the selection process as it
happens.
If you've requested sorting, the process may be only partly finished when
VersaForm XL finishes reading your file. The remainder of the work (called
merging) will be done automatically.
VersaForm XL is then ready to print the results. For example, if 120 records were
selected, and you've requested totals, you'll be asked:
120 records in this report.
Print all the detail lines,
or summaries only? (D/S)
If there are many records, you may decide to print only the summary lines - that is,
the totals and subtotals.
Press D () to print the entire report; or press S () to print just the totals and
subtotals.
A report may be printed, displayed on your screen, or sent to a disk file. You'll be
asked:
Output directly to Printer?
If the report is to be printed:
1.
Turn on the printer; then key in Y.
(Y/N)
Reports
123
VersaForm XL will ask:
Pause between pages? (Y/N)
This allows you to hand feed each sheet of paper into the printer.
2.
(
Key in Y if you want to use separate sheets of paper, such as letterhead
stationery, and press
.
OR
Check to see that the continuous feed paper is correctly adjusted; then key in N,
and printing will begin.
(
NOTE:You can temporarily halt printing by pressing any key on
to continue.
your keyboard; press
If you want the report displayed on your screen:
*
When asked if you want the output (report) sent directly to your printer, key
in N; when asked if it's to be sent to your screen, Key in Y.
If you want the report sent to a disk file:
*
When asked if you want the output sent directly to your printer and to your
screen, key in N; when asked if you want it sent to a disk file, key in Y.
Follow instructions given for locating and naming the file to send the report output
TO.
After the report is either printed, displayed, or sent to a disk file, and depending on
your Report Options, VersaForm XL asks:
Print the report again? (Y/N)
This enables you to look at the report on the screen first, and then have it printed,
or to print the summaries first and then the details, or to obtain multiple copies.
All of these options which govern how the report is printed can be pre-set on the
Report Options screen. By pre-setting the options, you can arrange for printing of
the report to begin with no questions at all. Thus you need not be present when
printing occurs.
REMOVE A REPORT
When you are finished with a set of instructions, you may remove them from your
file. Select option #5, Remove This Report.
Chapter 8
PRINT ON PREPRINTED FORMS
This chapter tells how to set up printing on preprinted forms, and how to do the
printing.
*
Print information from your files on standard forms, or on forms you have
created.
*
Tell the system what to print and where to print it. These instructions are
called a "print format".
*
Include messages, comments, or other text; change them at each printing to
suit the occasion.
*
Direct information to a file for electronic data interchange instead of to a
paper form.
*
Save print formats for repeated use.
Create A Print Format
1.
Select DESIGN A PRINT FORMAT from the Main Menu.
2.
Enter the path and file name, if required.
VersaForm XL will ask:
Enter a new print format name or "?" to select an old one. >> ?
3.
(
Press
to see a list of existing formats. If you are defining a new print
format, enter a name (up to 35 characters) for the new print format. The
print format menu (Figure 8-1) will appear.
126
VersaForm XL
PRINT FORMAT MENU
1.
2.
3.
4.
5.
6.
7.
8.
Print Line & Column Numbers
Enter or Change the Print Format
Test the Print Format
Remove This Print Format
Rename This Print Format
Copy Another Print Format
Convert Old Print Format
Choose Another Print Format
Figure 8-1, Print Format Menu.
NOTE: In the descriptions of these options, we refer to "preprinted forms," but
the discussion applies to printing on blank paper as well.
PRINT LINE AND COLUMN NUMBERS
The printing position of an item will usually be different from its position on the
screen. In order to tell VersaForm XL exactly where to print each item on the
form, you'll need to give the line and column number for each item.
1.
Insert a form (or letterhead, etc.) in the printer. If your printer has more
than one character size, make sure it is set correctly. Line up the form so the
printer will print at the top. Choose some mark on the printer and some line
or mark on the form so you'll be able to insert each form in the printer
exactly the same way.
2.
Choose number 1 from the menu and press
(
. You'll see:
How many lines are there, top edge to bottom?
3.
Enter the number of lines that can be printed on the form. For example, if
your printer prints 6 lines per inch (most do) and the form is 11 inches from
top to bottom, enter 66. The number need not be exact at this point, as this
is only a test to see where things come out on the paper, and you can do it
over. You'll be asked:
How many print positions are there across the page?
4.
Enter the approximate number. Most printers print either 10, 12 or 15
characters per inch. Try 80 or 85 characters across for standard 8.5 x 11
inch paper. Press
. VersaForm XL will ask you to make sure the
(
Print on Preprinted Forms
01
127
paper is set correctly and then press
2
4
your1 form (Figure
8-2).3
(
. The grid will print directly on
5
6
7
8
022345678901234567890123456789012345678901234567890123456789012INVOICE34568890
03
1
2
3
4
5
6
7
8
042345678901234ALPHA TOOLS, INC345678901234567890123456Invoice Number ________
05
1
4
5
1479 Alexander Street
Invoice Date _____________
062345678901234Campbell, CA 950085678901234567890123456Account Number ________
1
2
3
S7
O823456789012345678901234567890123456789
1
2
3
L9
D023456789012345678901234567890123456789
1
2
3
T1
O223456789012345678901234567890123456789
5
6
7
8
S
H234567890123456789012345678901234567890
5
I
6
7
8
P234567890123456789012345678901234567890
5
6
7
8
T
O234567890123456789012345678901234567890
13
1
2
3
4
4
6
7
8
142345678901234567890123456789012345678901234567890123456789012345678901234567890
In this example, information for Invoice Number will print on Line 4, column 73.
Figure 8-2
The grid in Figure 8-2 is printed on a form that is 85 columns wide and 36 lines
long.
When you look at a spot on the form with the grid overprinted, you can tell what
its line and column numbers are, relative to your printer, by noting the digits
printed on that space.
Make sure the printed area is wide enough to cover all the items on your form.
Also check to see that the correct number of lines were printed. If you are using
continuous forms, the paper should have advanced to exactly the same place on
the next form as it began on the first one. If either the width or the length of the
printed area is incorrect, try again.
When you are finished, keep your overprinted form. You'll use it to design your
print format.
The print format menu (Figure 8-1) will again be displayed.
ENTER A PRINT FORMAT
VersaForm XL needs to know:
*
The number of lines on each page.
*
The number of column items to print on each form.
*
The line on which the columns begin.
128
*
VersaForm XL
The line and column where each single item will start.
From the Print Format menu:
1.
Choose option 2 (Enter or Change the Print Format) from the menu.
VersaForm will ask,
Is this a Paper or an electronic format? (P/E): P
Answer P to create a paper format.
VersaForm XL knows that this is a new format; so the first thing it will do is
ask you for the names of the print items. You enter these by simply
"pointing" to them. So you can do this, VersaForm will display a blank form
from the file you are reporting on.
This message will appear at the bottom of your screen:
Choose Print Item #1: Rtn-Choose item, Q-done, ?-Help
2.
(
Press
to indicate that you wish to pick a Print-item. Watch the
bottom of your screen; you will see the message:
Move cursor to item, then press X
Press the tab key (or any other cursor motion keys) to move the cursor to
the data field you want to select--suppose it's CUSTOMER. Press X to
select a Print-item. The spaces following your data field name will change to
asterisks (*), indicating that you have selected that field.
There is no need to select items in any particular order; you can print any
item anywhere. VersaForm will ask,
Enter the line number you want Customer (30
characters) to print on:
Enter the line number where you want this item to print. VersaForm will
ask:
Enter the column number you want Customer (30
characters) to print on:
Enter the column number where you want this item to print. At the bottom
of the screen you will see:
Print on Preprinted Forms
129
Choose Print Item #2: Rtn-Choose item, Q-done, ?-Help
Notice that the item number has increased to 2. Each time you select
another item the Print number will be incremented.
3.
Continue choosing Print-items by moving the cursor to the items you want,
pressing X to indicate your selection.
4.
Enter Q (quit-done) after you've chosen the last item to be printed.
VersaForm XL will display the Print Format form, listing the Print-items you
selected, as in Figure 8-3.
5.
Complete the Print Format as follows:
* Enter the length and width of the form in the respective fields.
* If you want to print any columnar information:
Enter the line where the columns should start in Details Start At.
Enter the number of details to print on each preprinted form, in Number of
Details. At the time of printing, VersaForm XL will print multiple pages if
needed, to accommodate all the column lines included from the original
form.
If each column line will occupy more than one line on the paper form, enter
the number of lines in Lines per Detail.
6.
#
For a simple print format, this is all you need to do. You may, however,
make any changes in the print format in the usual way. Press
to SAVE.
Print Format Definition
Form ID: Invoice
Screen 1
Type P
More Options ==>
(ctrl-right)
Length of Form 66
Details Start At
22
Width of Form
80
Number of Details 10
Lines per Detail 1
Top Margin ...
Left Margin ...
Pause Between Pages . (Y/N/?)
Ask For Form Change . (Y/N)
ÏÏÏÏÏÏÏÏÏÏÏÏÏÏÏÏÏÏÏÏÏÏÏÏÏÏÏÏÏÏÏÏÏÏÏÏÏÏÏÏÏÏÏÏÏÏÏÏÏÏÏÏÏÏÏÏÏÏÏÏÏÏÏÏÏÏÏÏÏÏÏÏÏÏÏÏÏÏÏÏ
L#
1
Pg Line Col. Sz J ....................Print-Items.....................
.. .... .... .. . ....................................................
Enter Font, Overlay & Escape Sequence Information Below
Figure 8-3. Print Format
(Ctrl-PgDn)
S E
. .
130
VersaForm XL
There are a number of options that you can choose by filling in other fields in the
print format. An explanation of all the fields in the print format follows.
THE PRINT FORMAT
Length of Form
Number of lines on the page to be printed. Mandatory.
Details Start At
Line number on the page where the first detail line
(column line) is to be printed. Mandatory if there are
columns on this print format.
Width of Form
Number of spaces/characters across on the form to be
printed. Mandatory.
Number of Details
Maximum number of detail lines to be printed on each
page. Mandatory if there are columns on this print format.
Lines per Detail
Number of lines on the printed page to be given to each
detail line on the data record. Mandatory if there are
columns on this print format.
Top Margin
Number to be added to each line number on the print
format. If top margin is 3 then a field specified to print on
line 4 will actually print on line 7. Shifts the whole print
format up or down. Default is 0.
Left Margin
Number to be added to each column number on the print
format. If left margin is 3 then a field specified to print at
col. 4 will actually print at col. 7. Shifts the whole print
format left or right. Default is 0.
Pause Between
Pages
Y(es) will always pause between pages, N(o) won't. A
question mark will cause the system to ask which you
want to do. Default is No.
Ask for Form
Change
Y(es) will ask for a form change on the first form printed
with this format. Default is No.
COLUMNAR ITEMS
These describe the items to be printed, which can be data items, text, or computed
values. Fill in one line for each.
Pg
Page that this item should be printed on.
A
All pages
F
First page only
L
Last page only
NF All but first page
NL All but last page
Print on Preprinted Forms
N
Line
131
No printing at all
Line number to print on. Leave this column blank when
the item you are printing is a detail (columnar item) on
your form, since details are printed on several lines of the
printed form.
Exception: if each detail line of the original takes up more
than one line on the printed form, you need to tell which of
those lines to print this item on. In this case, enter D1-D9
to indicate line 1-9 of the detail.
Col
Column number for this item to start printing at.
Mandatory.
Sz
Number of characters or spaces for this item. Values must
be between 1 and 80. Default is field or string length.
Mandatory for other expressions.
J
Justification
L
Left justify (in size)
R
Right justify (in size)
C
Center (within size)
Z
Right justify and zero fill on the left.
Print-items
The expression to be printed. It can be a field name, a
word or phrase in quotes, or any expression that would be
legal if used to denote a value in a procedure. Examples:
Customer
"Merry Christmas" (no semicolon)
Coltotal (Amount) (no semicolon)
S
The number (1-9) of the starting printer control sequence
for this print item. The actual sequences are on Page 3 of
the print format.
E
The number (1-9) of the ending printer control sequence
for this print item. The actual sequences are on Page 3 of
the print format.
PAGE 2 ITEMS
Secondary File
This field is currently not used.
Key-From1
This field is currently not used.
Key-From2
This field is currently not used.
132
VersaForm XL
Initial Procedure
The name of a VersaForm procedure to execute before the
print format is written.
Detail Procedure
The name of a VersaForm procedure to execute before
each detail line in the print format is written.
Ending Procedure
The name of a VersaForm procedure to execute after the
print format is written.
Format
Contains a code or series of codes that control the format
of the data to be printed
0-9 Specifies the number of decimal places for a number
#
Removes all characters not between 0 and 9
A
Removes all characters not between A and Z
C
Capitalizes the first letter of each word in the string.
D
Converts a date into "long form", spelling the month
K
Converts date as full 10-character date
L
Converts to lower case
N
Removes all characters except 0 to 9, +, -, and .
U
Converts to upper case
V
Removes all characters except A to Z and 0 to 9
W Blanks all characters except A to Z or 0 to 9
Y
Format a date as YYYYMMDD
PAGE 3 ITEMS.
Overlay Files
Enter Y in order to have fonts and overlay files (if any)
downloaded before the first form of this format is printed,
or when print format setup is requested.
Download File
Name of up to 3 files of fonts and overlays (if any) to be
downloaded before the first form of this format is printed,
or when print format setup is requested.
Reset Esc Seq
The printer control sequence sent before the first form of
this format is printed. It precedes downloading as well.
Initial Esc Seq
The printer control sequence sent before each form of this
format is printed.
Ending Esc Seq
The printer control sequence sent after each form of this
format is printed.
Esc Sequence #
These printer control sequences are sent when their
number (1 through 9) is indicated in the S or E columns
above.
Print on Preprinted Forms
Use Default
133
If Y, the default printer control sequence (from the Setup
file) is sent before anything else.
OPERATOR-ENTERED VALUES
You can have the operator enter values that you need in a print format but which
you don't know until run time. To do this, enter V@GETARG (0, message) in the
Print_item field. At the time of printing, VersaForm XL will then ask you to
supply a value, and it will use whatever the message is to ask. For example, if you
entered V@GETARG (0, 'Enter the warning message'), then VersaForm XL
would ask the operator, "Enter the warning message", and if the operator entered
"Second Notice" or "Final Notice", that is what would be printed.
SYSTEM-GENERATED VALUES
The function VDATE gives the current date. Wherever VDATE is used in a print
format, the current date will be printed.
The function V@PAGE gives the current page number of a multi-page form. The
function V@PAGES gives the number of pages in the form. This enables you to
print phrases like "page 2 of 3" in a print format.
The function V@LINE gives the current detail line number. The function
V@LINES gives the number of details (column lines) in the form.
GLOBAL VARIABLES
Print formats can recognize global variables--the same variables that procedures
do. This provides a means of setting print format data, which may have been
obtained from a data file or other source. To provide a way to set such variables
when forms are printed in batch mode, any procedure named *STARTPRINT will
be automatically run at the beginning of batch printing (#5 on the Main Menu.)
Variables declared in such a procedure will be global.
To use this feature, use your global variable as a print item in the print format.
OTHER OPTIONS ON THE PRINT FORMAT MENU
*
Test. VersaForm XL will print one form with asterisks (*) instead of data,
so you can make sure everything appears in the right place.
*
Remove. The program will remove the print format from the file.
*
Rename. You may rename a print format.
134
VersaForm XL
*
Copy. You may copy another print format (from the same file) to this one.
Then, of course, you can follow the instructions above to make changes to
it.
*
Convert old print format. If you are upgrading from version 5.xx to the
current version, use this option to convert the print formats.
Electronic Print Formats
You can also use print formats to help prepare files for electronic transmission of
data.
NOTE: The print format controls the order in which data within a
form is placed on a file. To open the file, write headers and trailers,
and control which forms are written, you must use a VersaForm XL
procedure. Writing procedures is explained in Part III of this
manual.
When you answer E to the question,
Is this a Paper or an electronic format? (P/E): P
VersaForm XL proceeds as before, but uses a different print format form (Figure
8-4). The fields on this form are explained below:
File Format Definition
Form ID: Electronic--.............
Length of Record ....
Details Start At ....
Offset ....
Screen 1
Type E
More Options ==>
(ctrl-right)
Length of Detail ....
Number of Details ...
ÏÏÏÏÏÏÏÏÏÏÏÏÏÏÏÏÏÏÏÏÏÏÏÏÏÏÏÏÏÏÏÏÏÏÏÏÏÏÏÏÏÏÏÏÏÏÏÏÏÏÏÏÏÏÏÏÏÏÏÏÏÏÏÏÏÏÏÏÏÏÏÏÏÏÏÏÏÏÏÏ
L#
1
2
3
4
5
6
7
8
R
.
.
.
.
.
.
.
.
D
.
.
.
.
.
.
.
.
Pos. Sz
... ...
... ...
... ...
... ...
... ...
... ...
... ...
... ...
J
.
.
.
.
.
.
.
.
....................Print-Items.....................
....................................................
....................................................
....................................................
....................................................
....................................................
....................................................
....................................................
....................................................
Redefinition Conditions (ctrl-pagedown)
Figure 8-4. Electronic Print Format
Format
......
......
......
......
......
......
......
......
Print on Preprinted Forms
135
ELECTRONIC PRINT FORMAT FIELDS
Length of Record
Length of output record in bytes. The record will be
padded with spaces or truncated to this length.
Length of Detail
Length of output detail in bytes. The detail will be padded
with spaces or truncated to this length.
Details Start At
Offset in the output record where the first detail line
(column line) is to be written.
Mandatory if there are columns on this print format.
Number of Details
Maximum number of detail lines to be written to each
output record.
Mandatory if there are columns on this print format.
Offset
Number of bytes to offset each output data record within
the given output record length. Results in the specified
number of blank bytes at the beginning of the output.
COLUMNAR ITEMS
R
Blank or 1-9. Used only if Redefine area on Screen 3 is
TRUE for that line number.
D
Y or N. Y if this is a detail item.
Pos
Position in the record where the field begins.
Sz
Number of characters or spaces for this item. Values must
be between 1 and 80.
Default is field or string length. Mandatory for other
expressions.
J
Justification. See the justification codes for paper print
formats, above.
Print-items
The expression to be printed. It can be a field name, a
word or phrase in quotes, or any expression that would be
legal if used to denote a value in a procedure. Examples:
Customer
"Merry Christmas" (no semicolon)
Coltotal (Amount) (no semicolon)
Format
See the format codes for paper print formats, above.
136
VersaForm XL
PAGE 2 ITEMS
Secondary File
This field is currently not used.
Key-From1
This field is currently not used.
Key-From2
This field is currently not used.
Initial Procedure
The name of a VersaForm procedure to execute before the
print format is written.
Detail Procedure
The name of a VersaForm procedure to execute before
each detail line in the print format is written.
Ending Procedure
The name of a VersaForm procedure to execute after the
print format is written.
PAGE 3 ITEMS
Redefine N
Redefinition condition number N. Controls whether any
line with N in the R column will be output. Output will
take place only if this condition is true.
Write the condition as you would an IF condition in a
procedure. For instance, if a Print-item refers to
redefinition condition 3, and redefinition condition 3 is
"State = NY", then that item will be printed only if the
form item State is indeed NY.
Print The Forms
To print forms using a format you have designed, you may use the PRINT
command when you are keying data into a form (See Chapter 5). But if you have
many forms to print, you may also use the VersaForm XL Copy/Print function.
Select the Forms to Print
The Copy/Print function provides three ways to specify which forms to print:
1.
SELECT ALL FORMS- VersaForm XL will print all the forms in the file.
2.
MANUAL SELECTION - You may select the forms to be printed one by
one; answer Y(es) or N(o) as VersaForm XL identifies each form in the file.
3.
AUTOMATIC SELECTION - You may set up selection conditions. This is
the same process used for generating reports (Chapter 7, "Reports"). The
Print on Preprinted Forms
137
same "variable" option applies, allowing you to defer the choice of selection
conditions.
NOTE:Since entire forms are selected for copying or printing, only
single items may be used in the selection conditions, not column
(multiple) items. For example, you may ask to have the form in
Figure 8-5 selected for printing if "ZIP EQ 04938," but you may
NOT ask to have it selected if "QTY EQ 3."
ALPHA TOOLS, INC.
SERVING THE BAY AREA SINCE 1925
CUSTOMER Seymour Brothers... ACCT3 SEY-8807
ADDRESS 9201 West Hazel..... PHONE 803-4752
CITY Hammond............ STATE In ZIP 04938
ORDER DATE 6/12/82.. CLERK Andy............
L#
1
2
3
QTY
7..
3..
...
È
STOCK#
321...
340A..
......
DESCRIPTION PRICE AMOUNT.
Pliers..... 10.95
76.65
Shovels.... 15.00
45.00
........... ..... .......
SUBTOTAL ..121.65
TAX ....7.91
TOTAL ..129.56
Figure 8-5
SPECIFY YOUR SELECTION CHOICE
Select Copy or Print Forms from the Main Menu. Choose the option to print.
From the form selection menu, choose Automatic Selection. From this point, the
routine is the same as in the REPORT function, described in Chapter 7. You will
tell VersaForm XL:
*
if you want to use an existing set of instructions, as is or modified; or
*
if you want to name and design a new set of instructions.
The only control instructions needed by the printing process are the selection
conditions. When you choose automatic selection of forms for copying or
printing, you will be asked to fill in the same selection condition form required for
a report if the Control Instructions are new.
If you have entered or changed any selection conditions, VersaForm XL will ask:
138
VersaForm XL
Control Instructions Entered.
Do you want to run the copy/print now?
1.
Enter Y if you want to continue. If you chose automatic selection, the
printing control instructions will now be processed. These can also be
printed. VersaForm XL will ask:
Print the control instructions?
2.
Y
(Y/N)
N
Turn on the printer and enter Y to have the printing control instructions
(selection conditions) printed. Or enter N, and they will be displayed on the
screen.
The Printing Process
As the program runs, it displays the key item of each form and shows whether or
not the form was printed. This is an action log which can also be printed (or
placed on a text file) so you will have a permanent record.
VersaForm XL will ask if you want to use a print format. If you do, you will see a
menu of all the print formats you have defined, from which you may choose the
one you want to use.
If you don't use a print format, your forms will be printed as they appear on the
screen. Next you must choose where you want the output to go. Usually output
will be sent directly to the printer, but sometimes you may want it saved for
printing later or sent to a remote device. VersaForm XL will ask:
Output directly to printer?
1.
(Y/N)
Enter Y if you want to print immediately. Or enter N if you want the output
to go directly to a disk file or to another device.
The next steps depend upon special print fonts (character style) your printer may
have, and the instructions you have given VersaForm XL for the use of a print
control sequence. (See Chapter 11, "Setup and Security.")
If your system is configured for a print control sequence, you will be asked:
Send a control sequence to the printer?
2.
(Y/N)
Enter Y if you wish the pre-defined control sequence to be sent to the
printer.
Print on Preprinted Forms
139
Whether you require a sequence or not, VersaForm XL will ask:
Pause between pages?
3.
Enter Y if you are using hand-fed forms. Enter N to use continuous feed
paper. VersaForm XL will ask whether you want to have a single test form
printed.
Test Form alignment?
4.
(Y/N)
(Y/N)
Enter Y so you can adjust the paper if necessary. If you're sure of the
alignment, enter N and VersaForm XL will begin printing. If you are using
single sheets that must be fed by hand, press
after each page.
(
If you are NOT directing the output to a printer now, you need to tell VersaForm
XL where to send it. Follow the prompts to identify the file that is to contain the
output.
MANUAL SELECTION IN COPY/PRINT FORMS
If you have chosen manual selection, VersaForm XL will identify each form in
succession, by key item, and ask if you want to print it. For example, if the key
item is "ACCT#", VersaForm XL will ask:
ACCT# = (account number). Print the form?
(Y/N/Q-Quit)
Enter Y to print, or enter N if you don't want the form printed. Q will return to
the original menu.
After each form is printed, VersaForm XL will display a tally:
3 printed of 5
Chapter 9
COPY FORMS AND DATA
Overview
There are two separate functions that can copy forms or other information from
one file to another.
Use the COPY OR PRINT FORMS function to:
*
Copy filled-in forms from one file to another. You could use this to begin a
new file or to copy forms from an active to an inactive file; you may copy all
forms in a file or choose selectively.
*
Copy print formats, or control instructions for reports, copying, and printing
on preprinted forms.
Use the COPY BY NAME function to:
*
Copy all data from an existing file to a file with a new form design. The new
file may contain more or fewer fields or a different key.
Copy Filled-in Forms
A filled-in form can be copied to another file which contains a form of the same
design. (To copy the form design, refer to Chapter 4, "Create a File and Design a
Form," the section called Copying an Existing Form Design.)
1.
Select COPY OR PRINT FORMS from the Main Menu.
2.
From the Copy/Print function menu, select option 1, Copy Forms.
SELECT THE FORMS TO BE COPIED
You may specify either automatic, manual, or no selection of the forms to be
copied. If you choose "automatic selection," you can use a selection condition to
copy the forms. These options are the same as the options you have when using
selection conditions in a report. Detailed instructions on using selection conditions
is given in Chapter 7 "Reports".
142
VersaForm XL
The Copying Process
As the Copy/Print Program runs, the key item of each form in the original file is
displayed, with a message indicating whether the form was copied. In addition,
you may have a printed record of which forms were copied. Before beginning the
copying process, VersaForm XL checks that the form design in the file you're
copying TO matches the one in the file you're copying FROM. If they don't match
in all important respects, you'll see:
Warning: Forms don't match. Continue anyhow? (Y/N)
If you key in N, the copy function will terminate.
*
It is possible to override this warning and begin copying forms despite the
mismatch. However, this should be done only in unusual circumstances and
when you are certain of the results, for you risk destroying the usefulness of
the file you are copying TO.
*
As an alternative, you may use the COPY BY NAME function, described
later in this chapter, to transfer data from one form to a another form which
is different.
NOTE: The best way to ensure that the forms match is to begin the
program by copying the form design from the old file to the new, as
recommended at the beginning of this chapter.
If the forms match, VersaForm XL will begin the copying process, displaying the
key item of each form as it is read.
MANUAL SELECTION
If you chose manual selection of forms to be copied, VersaForm XL will identify
each form by its key item and ask if you want it copied. Depending on whether
you answer Y(es) or N(o), VersaForm XL will either copy the form or go on to
the next form.
After each form is copied, you will see a running tally:
3 copied of 5
DUPLICATES
If a form you've chosen to copy has a key item identical to one in the file you're
copying TO, VersaForm XL will tell you:
Duplicate key on index
In this case, you have two choices:
Delete the old form? (Y/N)
Copy Forms and Data
143
_______________________________________________________
*
Respond Y to remove the old form and replace it with the new copy.
*
Respond N skip copying this form. In either case, the action log will record
your choice.
NOTE:Copying forms does not change the original file. The forms
you copied may be kept in that file or removed (using the Filing
function).
USE COPY/PRINT TO REMOVE FORMS
One way to remove forms from a file is to use the Copy/Print Program again,
copying to a DIFFERENT file all the forms that weren't copied the first time. In
this way, your original file, containing ALL the forms, could be archived, and the
two new files retained for daily use.
Copy Print Formats and Control Instructions
The COPY OR PRINT FORMS function may also be used to copy control
information. For example, if you have set up Report control Instructions on one
file and would like the same instructions available on another file (with the same
kind of form), you may copy them from the first to the second.
The following options are listed on the Copy/Print menu, in addition to filled-in
forms:
*
Report Control Instructions
*
Print Formats
*
Printing Control Instructions
*
Copying Control Instructions
*
Procedures--both source and code
*
Procedures--code only (When you copy procedure code only, your
procedures will be operable, but no one will be able to read or change them.)
The steps are the same as for copying forms, except there is no automatic
selection. You must either copy all the instructions or formats, or select them
manually.
Report Control Instructions, Printing Control Instructions, and Copying Control
Instructions are all stored in filled-in forms. Each set of instructions may require
more than one instruction form. For example:
144
VersaForm XL
*
A set of Report Control Instructions called SALES would be contained on
forms identified as SALESR1 (the form that tells which items to print);
SALESS1 (the form that tells which items to select); and SALEST1 (the
form that specifies sorting and totaling).
*
Thus, in order to copy the complete set of instructions, you would copy all
Report Control Instruction forms whose names begin with SALES.
Transfer Data with Copy By Name
COPY BY NAME allows you to transfer data from an existing form to a new and
different form, wherever the item names match. Figure 9-1 shows an existing
form.
ALPHA TOOLS, INC.
Serving The Bay Area Since 1925
CUSTOMER ...............
ADDRESS ................
CITY ............. STATE
BILLING DATE ..........
ACCT# ........
PHONE ........
... ZIP ......
CODE .........
Figure 9-1
Figure 9-2 shows the same form with two new items added--AREA CODE and
EXT. The length of CUSTOMER, ADDRESS, and ZIP have been increased,
PHONE has been moved, and the order of some items has been changed.
ALPHA TOOLS, INC.
Serving The Bay Area Since 1925
CUSTOMER ................... ACCT# ........
ADDRESS ...................................
CITY ............. STATE ... ZIP ..........
AREA CODE ... PHONE ........ EXT ......
BILLING DATE .......... CODE .........
Figure 9-2
To redesign a form in a new file, when you plan to transfer data:
1.
Copy the existing form design to a new file (discussed in Chapter 4, "Create
a File and Design a Form."
2.
Change the design in any way, but be sure item names match where data is
to be transferred.
Copy Forms and Data
145
_______________________________________________________
You may increase or decrease the length of items, and change their positions on
the new form; but information transferred into items that have been shortened will
be truncated if necessary.
NOTE: A different key item may be designated for the new form.
HOW TO USE COPY BY NAME
1.
Select #7 from the Main Menu for "VersaForm XL Utilities,"then select #1,
"Copy by name.".
2.
VersaForm XL will ask for the name of the file you are copying TO, then
you are asked for the name of the file you are copying FROM.
COPY BY NAME will list all items from both forms and indicate which will be
transferred.
Remember, item names must match if data is to be transferred.
The screen will resemble Figure 9-3.
TRANSFER LIST
1
2
3
4
5
6
7
<CUSTOMER> WILL BE TRANSFERRED
<ACCT#> WILL BE TRANSFERRED
<ADDRESS> WILL BE TRANSFERRED
<CITY> WILL BE TRANSFERRED
<STATE> WILL BE TRANSFERRED
<ZIP> WILL BE TRANSFERRED
<AREA CODE> NOT PRESENT IN OLDDISK.SAMPLE
& WILL NOT BE TRANSFERRED
8 <PHONE> WILL BE TRANSFERRED
9 <EXT> NOT PRESENT IN OLDDISK.SAMPLE
& WILL NOT BE TRANSFERRED
10 <BILLING DATE> WILL BE TRANSFERRED
11 <CODE> WILL BE TRANSFERRED
Figure 9-3
After listing the items, COPY BY NAME will begin the actual transfer, and will
list the forms (identified by their key items) being transferred (Figure 9-4):
146
VersaForm XL
TRANSFERRING FROM OLDDISK:SAMPLE
TO NEWDISK:SAMPLE2
1 <ACCT#>CAR12344
TRANSFERRED
2 <ACCT#>CAR33251
TRANSFERRED
3 <ACCT#>COO45678
TRANSFERRED
4 <ACCT#>FLE34521
TRANSFERRED
5 <ACCT#>JOY34521
TRANSFERRED
6 <ACCT#>MAS24521
TRANSFERRED
7 <ACCT#>SAW33521
TRANSFERRED
7 FORMS TRANSFERRED
*** TRANSFER COMPLETED ***
Figure 9-4
Figure 9-5 shows how a form might look in the original file.
ALPHA TOOLS, INC.
Serving The Bay Area Since 1925
CUSTOMER Bill Carpenter
ADDRESS 321 Maple St.
CITY Jackson
STATE
BILLING DATE 11/15/80
ACCT# CAR12344
PHONE 445 0809
MI ZIP 44567
CODE 54-7Y
Figure 9-5
Figure 9-6 shows how the new version would look after the transfer.
ALPHA TOOLS, INC.
Serving The Bay Area Since 1925
CUSTOMER Bill Carpenter
ACCT# CAR12344
ADDRESS 321 Maple St.
CITY Jackson
STATE MI ZIP 44567-1234
AREA CODE ... PHONE 445 0809 EXT ......
BILLING DATE 11/15/80
CODE 54-7Y
Figure 9-6
Copy Forms and Data
147
_______________________________________________________
Note that all the data items with corresponding names have been filled in, even
though they are not in the same position. AREA CODE and EXT have not been
filled in, since they are new items.
Remember, if the item you're copying data FROM is longer than the item you're
copying TO, the system will transfer the data but will truncate it.
DUPLICATE FORMS
When the transferring process begins, the system will notify you if there are
duplicate forms (forms with the same keys), as in Figure 9-7:
TRANSFERRING FROM OLDDISK:SAMPLE
TO NEWDISK;SAMPLE2
1 <ACCT#> CAR12344
IS ALREADY IN NEWDISK.SAMPLE2
REPLACE WITH NEW FORM? (Y/N)
1 <ACCT#> CAR12344
TRANSFERRED
2 <ACCT#> CAR33251
IS ALREADY IN NEWDISK.SAMPLE2
REPLACE WITH NEW FORM? (Y/N)
NOT TRANSFERRED
If you
answer Y,
you will
see:
<---If you
answer N,
you will
see:
<----
Figure 9-7
If you reply Y to have the form transferred, it will replace the form and any data on
it that is already on the file you're copying TO and the old data will be lost.
CHANGING THE KEY ITEM
COPY BY NAME permits new forms to have different keys from the old ones.
NOTE:The data for the key item(s) on the file you're copying TO
must be found on the file you're copying FROM. Otherwise, the
program will not be able to perform the copying operation.
You may choose a different key item when you redesign the form. Then, when
COPY BY NAME is run, the new forms will be listed during the transfer process
by their new key(s).
Suppose that when the Alpha Tools form was redesigned, we replaced ACCT# as
a key item with CUSTOMER and BILLING DATE as a two-part key.
When the forms are transferred, the function will acknowledge the new keys in a
display resembling Figure 9-8.
148
VersaForm XL
TRANSFERRING FROM OLDDISK:SAMPLE
TO NEWDISK:SAMPLE2
1 <ACCT#>CAR12344 -->
<CUSTOMER>Chas Carpenter,
<BILLING DATE> 11/15/80
TRANSFERRED
2 <ACCT#>CAR33251 -->
<CUSTOMER>Ed Cartwright,
<BILLING DATE> 11/14/80
TRANSFERRED
\/\/\/\/\/\/\/\/\/\/\/\/\/\/\/\/\/
\/\/\/\/\/\/\/\/\/\/\/\/\/\/\/\/\/
7 <ACCT#SAW33521 -->
<CUSTOMER>Geo Sawyer,
<BILLING DATE> 11/15/80
TRANSFERRED
7 FORMS TRANSFERRED
*** TRANSFER COMPLETED ***
Figure 9-8
WARNING:Transferred values won't be recalculated or
rechecked. If the form you're copying TO was designed with
DIFFERENT checking or calculation options than the form you're
copying FROM, data that is transferred might not be correct
according to the checking or calculation specifications in the new
form.
The program does not recalculate or recheck the values that are transferred; thus,
they will still follow the checking and calculation rules of the old form.
Chapter 10
PRINT MAILING LABELS
PROGRAM FEATURES AND OVERVIEW
*
Prints up to nine labels across paper; nine items per label; nine lines per label.
*
Compresses information by removing excess blanks and blank lines.
*
Skips exact duplicates if you choose.
Mailing Labels are produced in three steps:
1.
1. Create and run a report that produces the information that you want on
your labels. This produces an export file, the label text file, containing the
data to be printed on your labels.
2.
Enter the instructions for printing the items on your labels using the Mailing
Label Printer function.
3.
Print the labels.
CREATING THE LABEL TEXT FILE WITH A REPORT
Before printing labels, you must prepare a label text file containing the data from
which your labels will be produced. The file is created by using the Export option
of the VersaForm XL Report function.
Follow the instructions in Chapter 7, "Reports". When entering the Report
Control Instructions
•
Choose just the items to be printed; for example, NAME, ADDRESS,
CITY, STATE, and ZIP for an address label.
•
Enter 1 beside "Export?" on the Report Definition form when it's displayed.
•
If you wish, you can choose File output and enter the label text file name on
the Report Definition Form.
You may enter selection conditions and choose sorting in the manner described for
reports.
150
VersaForm XL
As VersaForm XL reaches the final stage of producing the report, you'll be asked
if you want to print the labels immediately. If you do, answer Y and you’ll go
directly to the Label Description step, below.
If you want to print the labels later, you’ll be asked to identify the "output" file
which will hold the labels until you want to print them. When asked to enter a file
name, enter a suitable file name. “LABELS” will do just fine. VersaForm XL will
create the text file, which you will use with the MAILING LABEL PRINTER
function to produce labels.
ENTERING THE INSTRUCTIONS
Select Mailing Label Printer from the Main Menu.
When requested by the system, enter the name of the text file you've created, and
press Enter.
VersaForm XL will ask for the information it needs to correctly position and print
the items on your labels. There are two kinds of information it needs--a label
description (how wide the labels are, how tall, etc.), and label setup information-where to print the individual fields on the label.
Label Description
You’ll see a list such as the one below:
Laser
Laser
Pinfeed
Pinfeed
1
1
3
4
1/3
x 2
1/2
x 1
x 4
5/8
x 15/16
7/16
-------------------------------------Add a label definition
Change a label definition
Remove a label definition
Print line and column numbers
If you have already entered a label description for the label that you are using,
simply choose that label from the list. To enter or change a label description,
choose the appropriate option. Before you do that, however, you may need to
print line and column numbers on your labels, so you will know how many
characters will fit on them. To do this:
Place your mailing labels in the printer, and adjust the paper so that the printer is
ready to print at the top of the paper. Choose “Print line and column numbers”.
VersaForm XL will ask about the width of the paper you're using:
Print Mailing Labels
151
Print how many
columns?
(40)
Max = 200
Enter the number that equals the width (the number of characters wide) of the
paper the labels are on, or use the default (40).
(
As instructed by an on-screen message, turn on the printer and press
. The
system will print line and column numbers on the labels so you can easily see
where the items will be positioned. (Figure 10-1)
01
1
2
3
4
5
6
7
8
02 45678901234567890123456789012345678901234567890123456789012345678901234567890
03
04
1
2
3
4
5
6
7
8
05 45678901234567890123456789012345678901234567890123456789012345678901234567890
06
07
1
2
3
4
5
6
7
8
08 45678901234567890123456789012345678901234567890123456789012345678901234567890
09
10
1
2
3
4
5
6
7
8
Figure 10-1
When you enter or change a label description, you’ll see the screen in Figure 10-2.
Label Definition
Label_Name Pinfeed
Num_across 1..
Label_width 35.
Left_margin ..0
Label_spacing ...
Label_height 6..
Continuous_feed Y
Num_down .
Top_margin .
Number
Number
label
Number
Number
Label_Type
3 1/2 x 15/16
of labels across the paper
of characters to be printed on one line of each
of characters before printing starts
of characters between labels
Number of lines from first line of one label to first
line of the next
Y if labels are continuous, N if on separate pages
Number of labels down the page (only if not continuous)
Number of lines before printing (only if not continuous)
Escape Sequences:
Reset Esc Seq .............................................
Initial Esc Seq .............................................
Ending Esc Seq .............................................
Figure 10-2 Label Definition
152
VersaForm XL
In Figure 10-2, the fields are:
Num_across
The number of labels across the paper.
Label_width
The number of characters that will fit on one line of one
label.
Left_margin
The number of characters that should be skipped before
printing the first character on the leftmost label.
Label_spacing
Used only if there is more than one label across the
paper. Enter the number of characters between labels.
Label_height
The number of lines between the first line of one label
and the first line of the next.
Continuous_feed
Enter Y if the labels are continuously mounted, as for a
dot-matrix printer. Enter N if they are on separate
sheets.
Num_down
If the labels are on separate sheets, how many are there
down the sheet? For instance, if each page has 30
labels, three across and 10 down, enter 10.
Top_Margin
If the labels are on separate sheets, how many lines
should the program space down at the top of each
sheet?
Reset Esc Seq
Initial Esc Seq
Ending Esc Seq
You may enter printer escape sequences: the reset and
initial escape sequences are sent before printing begins;
the ending sequence is sent after printing.
#
When you are done entering the description, Save ( ). Then you’ll see the form
for entering the label setup--the relation between the fields and the label. The
fields you’ve chosen for your labels will already be entered on the form
(Figure 10-3).
Print Mailing Labels
153
Label Setup
L#
1
2
3
4
5
6
Copies .1 Number of copies of each label
Print_dups? N Should duplicates be printed? (Y/N)
.....Field_Name..... Line_of_the_Label
Customer
1
Address:
2
City
3
State
3
Zip
3
Figure 10-3 Label Setup
Use the label setup to specify which line to print each item on, and whether any of
the items are to be printed on the same lines. For example, you may want CITY,
STATE, and ZIP together on a single line, as in the above example.
You may also choose how many copies of each label to print, and whether you
want the system to eliminate duplicate labels on your file. Only exact duplicates
can be eliminated.
When you Save (
#
), printing will begin.
Chapter 11
SETUP AND SECURITY
The setup functions allow you to configure the system to suit your equipment and
your users. On a multi-user system, each user can have his own setup. Different
users can have different color schemes, default directories, printer control
sequences, and so forth. There is also a system setup file, so you can set up
defaults for all users.
HOW TO DO SETUP
1.
Start your VersaForm XL system. When asked, "Enter your user ID:" log
on as MANAGER. Type:
MANAGER
and press
(
.
When prompted, "Enter your password:" type:
VF
and press
(
.
2.
Select #2, Filing, from the VersaForm XL Main Menu.
3.
Select your data file :
Accept the default drive letter by pressing
4.
(
To alter system parameters, enter the file name:
SYSSETUP.VFS
To alter user parameters, enter the file name:
SETUP.VFS
.
156
VersaForm XL
SETUP OPTIONS
Most setup options appear on both SETUP.VFS and SYSSETUP.VFS. Function
keys, however, can be configured only in SYSSETUP.VFS. If you specify an
option in both places, the one in SETUP.VFS prevails. This allows you to set up
defaults for everyone in SYSSETUP.VFS, and special setup for each user in
SETUP.VFS. Some of the setup fields control the REPORT function. Report
options chosen in individual reports will override both SETUP.VFS and
SYSSETUP.VFS report options.
VersaForm System Setup
Name MANAGER
Sharing Mode S (Share/Excl/Readonly/?)
Display:
Colors:
Use_Reverse? Y (Y or N)
Forms 30 Validated_Data
Menus 112 Menu_Hilite
Printer:
Device_name .................... Fill_character .
Default_width 80
Default_length 66 Test_ready? Y (Y/N)
FormFeed Y (Y/N)
Send_Line_Feed N (Y/N) Left Margin ..
Default_prt_ctl .............................................
Files:
User_file_path ..................................
Work_file_path ..................................
Other:
Auto_last_line N (Y/N) US Date Y (Y/N) Decimal .
Date_Character /
Time_Character :
Auto_Prompt . (Y/N)
Pulldown_Menu Y (Y/N)
Multi:
Rollback_Enabled Y (Y/N)
È
È
48
23
È
È
Dummy_character .
Error_box 52 Info_Box
Menu_Bold 116 Zoom
È
È
48
11
È
È
Figure 11-1 Setup Options
Name
In this field enter the user name, an eight character unique
identifier. In the file, SYSSETUP.VFS, there will be only
one user form, that belonging to MANAGER. In the file
SETUP.VFS each user may have his own setup options
saved in a form with his user ID.
Sharing Mode
This field may be marked Share, Exclusive, Read only, or
"?" (S/E/R/?), with Share being the normal multi-user
mode. A user in exclusive mode causes VersaForm XL to
run as a single user system, denying access to all other
users while he has exclusive access to the file. A read only
user may get data from a file but make no changes. For
example, a read only user may run reports knowing that
his data may not be current to the latest transaction, yet
allow other users to continue making changes in the same
file. By entering a ? in this field you tell VersaForm XL
you want to select your sharing mode when you log on to
the system. For a more complete discussion see the
section titled sharing:Operational Modes in Chapter 12.
Setup and Security
Use Reverse
157
Entering a Y in this field will tell VersaForm XL to use
reverse video -- a monochrome display is light on dark for
item names and unvalidated data. Validated data is
displayed dark on light. If you have a color monitor, using
reverse video will allow more color combinations.
Dummy Characters Often VersaForm XL must display a character to indicate
a blank space on a form. Normally, this will be a blank
space, shown in color or reverse video. If you do not use
color or reverse video, you may want to enter a different
default fill character in this field.
Forms
Validated Data
Error_Box,
Info_Box, Menus,
Menu_Hilite,
Menu_Bold, Zoom
If you have a color monitor you may select the colors you
want to use. Different color combinations may be selected
for different uses. Each of these fields have pick lists
) which provide a menu of colors.
(
PRINTER:
Device Name
Fill Character
Reserved for future use.
Default_width
This is the page width that will be used by the REPORT
Function, unless the Report Control Instructions specify
otherwise. It can be any value between 20 and 200.
Default_length
This is used by the REPORT Function in the same way as
default page width. It can be any value between 3 and
255.
Test_ready
Normally VersaForm XL will test the printer before
printing. Some "compatible" computers do not execute
this test correctly. This option is provided so the test can
be bypassed in such cases. If the test is not made,
VersaForm XL will always assume that the printer is
ready. Enter Y in this field to select the printer test.
Form_Feed,
Send_Line_Feed
If your printer honors the ASCII form feed character, this
characteristic may be used by VersaForm XL to speed
printing. Enter a Y in the Form_Feed field if appropriate.
The Send_Line_Feed field is currently not used.
Left_Margin
The left margin indents reports by a specified number of
characters. The default is 0. If you want to print reports
$O
VersaForm XL can use a character to indicate a blank
space on a printed form. Normally, this will be a blank
space. You may enter a different default fill character in
this field.
158
VersaForm XL
left indented 1 inch and you are using 10 characters per
inch on your printer (for instance, Pica) enter 10 in this
field.
Default_Prt_Ctl
Some printers can print characters of different sizes. For
example in "compressed mode" printing, 132 characters
are printed across an 8-1/2 inch page instead of 80 (pica
type) or 96 (elite).
VersaForm XL can instruct the printer to activate special
features, such as changing the character size, via a "print
control sequence."
The numbers that make up the sequence for your
particular printer must be found in your printer manual.
Here you can enter a default print control sequence to be
used by VersaForm XL. Enter the sequence in ASCII
codes and separate each number with a backslash
character, \.
For example, to enter a default sequence for compressed
printing on Epson printers, enter: 27\15.
Alternatively, you may enter a character string in the print
control sequence. For example, to change an HP LaserJet
to compressed mode, enter the control sequence
\27&k2S. For more detalil, see the chapter on Reports.
Note that Reports may have several print control sequences to control printing.
Setting up print control sequences in reports is discussed in the Reports chapter.
This default sequence, if entered, can be used in any portion of the VersaForm XL
program that outputs to the printer.
FILES:
These tell VersaForm XL where to find user data files and
the report work disk or files.
When VersaForm XL asks you for a file name, it offers a
default drive letter or path name (usually c:). If your files
are in a subdirectory or on a different disk, you may
change this default.
User_File_Path
In this field you may enter the drive letter and full path
name to use as a default path for accessing data files. For
example: c:\vf\data.
Work_File_Path
In this field you may enter the drive letter of the disk
which is to be used for Report Work files, if you don't
want to use the default disk. Only the drive letter needs to
Setup and Security
159
be specified. When running reports in VersaForm XL the
program will use available storage on the specified disk
drives to produce the report.
SETUP OTHER
OPTIONS
Auto_Last_Line
If a form design contains a column area, VersaForm XL
will always display the form beginning with the first
column line on the form. Enter a Y in this field to have
VersaForm XL display a form with the cursor on the last
column line instead.
US_Date
VersaForm XL will automatically use the US date format
convention for all date fields (MM/DD/YY). Entering N
in this field will change the date format to DD/MM/YY.
Decimal
Date_Character
Time_Character
These three fields contain the fill character to be used by
VersaForm XL whenever the program automatically
calculates or uses decimal numbers, dates and times. The
default values are a "." for the decimal character, "/" for
the date fill character, and ":" for the time fill character.
Auto_Prompt
If the system is in the auto-prompt mode, the prompt text
is automatically displayed whenever the cursor enters a
field
Pulldown_Menu
If you prefer the old-style command menus that were
standard on VersaForm before Version 7, enter N here.
These menus, of course, do not recognize mouse-clicks.
This field is present only on SYSSETUP.
Rollback_
Enabled;
Controls whether Rollback is enabled. It is possible for an
installed user to have no rollback capability.
L#
1
2
Table of Assignable Function Keys
FunctionName
ASCII
ExtendedCode?
Validate
59
Y
Save
60
Y
.
.
Figure 11-2 Function Key Options
160
VersaForm XL
To enter or change display colors, enter a "?"
in N_Letters and then validate (F1).
To enter or change function key assignments, place
a "?" in the ASCII column of the function you want
to change. Then validate, and you'll be asked for
the key assignments.
Report Option Defaults
Print Control Instructions Y (Y/N/?)
Details Summaries Both ? (D/S/B/?)
Print Trailer Pages
(Y/N)
Pause Between Pages
(Y/N/?)
Ask for Work Disk
Number of Copies
Suppress Dittos
Print Counts
(Y/N)
(#/?)
(Y/N)
(Y/N)
Figure 11-3 Report Options
FUNCTION KEY OPTIONS
Function key assignments (Figure 11-2) may be set only on SYSSETUP.VFS, not
in SETUP.VFS. Use Control-PgDn to see the portion of the screen that contains
these items.
VersaForm XL is delivered with function key assignments as described in this
manual. You may change these by entering the keyboard codes you want to use,
or by entering a question mark in the ASCII column of the command you want to
change. When you validate you will be asked to press the key you want to use and
the field will be filled in automatically.
REPORT OPTIONS
Use Control-right arrow to see the portion of the screen that contains report
options (Figure 11-3).
These are the default options for your reports; they may be overridden by choices
made on each report. (See the Reports section of these notes.)
Adding Users / Security
The Security subsystem allows you to control access in several ways. You may
allow a user to use only certain VersaForm XL functions (e.g., Filing and Reports
but not Form Design), or only certain files, or only certain reports on those files.
Setup and Security
161
Each user must "log on" to the system before the Main Menu appears, and you can
require that the user enter a password. A security file called USERS.VFS (See
figure 11-4 below) must contain at least one form for each user; if the user's name
is not in this file he will not be able to log on. Along with the user's name, (an 8character identifier, the USERID), the user's record in the USERS.VFS file may
contain a password, a checklist of the system options that he has authority to use,
and a list of protected files that he may access.
If there is a password in the user's registration form, it must be entered when he or
she logs on.
To add users to VersaForm XL:
1.
When asked, "Enter your user ID:" Type:
MANAGER
and press
(
.
When prompted, "Enter your password:" Type MANAGER's password:
VF
2.
and press
(
.
From the VersaForm XL Main Menu, select #2, Filing. VersaForm will ask
for the drive letter, path and then the name of your file. Enter
USERS.VFS
and press enter.
Each time a unique name is entered into the field "Name" and the form is saved, a
new USERID is added. This form is called the primary user registration form.
The user may now login with the USERID and password in his primary user
registration form.
USERS.VFS has a two part key, composed of the USERID (Name) and a file
name. In the user's primary registration form, only the USERID is used; the file
name must be blank. The file name part of the key is used only in a secondary
registration form (see below).
Normally users may access files whether or not the file name appears in the
security file. But, if the file was designated as "protected" only users who have the
file name in their security file record can use it. Files can be designated as
"protected files" only when they are designed or re-designed using VersaForm
XL's form design function.
162
VersaForm XL
USER REGISTRATION
Name
File
AUTHORITIES:
Filing
L#
1
2
3
4
All
Reports
Password
(for report access lists only)
Design
Rpt_Fmt_Design
Copy_Utils
System_Utils
Access List for Files and Reports
...............File/Other_Name................
Read
RdWrt
Rpts
Figure 11-4 User Registration Form
THE USER REGISTRATION FORM
Name
File
Name (USERID) is the primary key, and File is the
secondary key. To set up a new user, fill in only the Name
field, and leave the File field blank. This is the primary
user registration form for that user; it is used to grant
permission to use specific VersaForm XL functions and to
grant access to specific files.
The File field is used only to create secondary user
registration forms. These are used to specify access to
specific reports within that file.
Password
If entered, this becomes the password for this user. Only
enter a password on the main registration form for the
user, that is, the form with the user NAME but with a
blank FILE field,
Authorities:
All
Design
Rpt_fmt_Design
Filing
Reports
Copy_Utils
System_Utils
File/ Other_Name
To give a user access to all of VersaForm XL's functions,
enter a Y in the ALL field. Otherwise, specify access to
individual functions with a Y or N.
On the main user registration form, this field specifies the
list of protected files to which this user can have access
(Figure 11-5). On a form on which the File field (see
above) is filled in, this field specifies the list of reports on
that particular file that the user can access. (Figure 11-6)
Setup and Security
163
Rpts
When there is a file name in the first column, enter Y here
to grant access to all reports.
Read
RdWrt
These fields are reserved for future use.
USER REGISTRATION
Name CJA
File
AUTHORITIES:
Filing
L#
1
2
3
4
All Y
Reports
Password ME
(for report access lists only)
Design
Rpt_Fmt_Design
Copy_Utils
System_Utils
Access List for Files and Reports
...............File/Other_Name................
c:\cja\ledger.v5a
c:\cja\ledgtst2
Read
RdWrt
Rpts
y
n
Figure 11-5 Filled in user registration form. Note filename is blank.
Reports can be individually protected. If a file is not protected, then anyone who
has authority to run reports can run any report. If it is protected, the user must
have permission either to run that report or to run all reports on that file. The list
of files in the user's security record has a field that grants permission to use all the
reports on that file. If there isn't a Y in that field, then the user can only use
specific reports. The specific reports that he can run must be listed by name in a
second record on the security file, one with the same USERID but which has the
file name entered in the file name field (the one that forms the second part of the
key. (see Figure 11-6 below).
The security file (USERS.VFS) is protected. When the system is delivered, only
the user name MANAGER has access via Filing. MANAGER's password is VF.
You may change this password in order to prevent anyone else from logging on as
MANAGER.
When you change this password, don't forget it. The system won't tell you what it
is.
There is a file called V.BAT which demonstrates how to bypass entering the
USERID and password. In effect this makes starting VersaForm XL the same as
in earlier releases.
When you design a form you may also request the system to prevent deletions on a
file. This renders the Delete and Remove commands inoperable, and prevents
changes in column lines already entered. This feature is useful for accounting
applications.
164
VersaForm XL
USER REGISTRATION
Name CJA
File LEDGER.V5A
AUTHORITIES:
All
Filing
Reports
L#
1
2
3
4
Password
(for report access lists only)
Design
Rpt_Fmt_Design
Copy_Utils
System_Utils
Access List for Files and Reports
...............File/Other_Name................
charges
aged
Read
RdWrt
Rpts
Figure 11-6 Authorizing specific reports. Note filename is filled in.
WARNING. This security function is designed to make
unauthorized attempts to use the VersaForm XL system more
difficult. It is not absolute, however, and VersaForm Systems
makes no representation or guarantee that it cannot be broken. It
should be understood that the underlying operating system, DOS, is
itself not secure and permits anyone with sufficient technical
capability to access and change any data at all.
Chapter 12
MULTI-USER OPERATION
Multi-User Features
VersaForm XL supports multi-user operation by:
1)
Providing a way of locking both files and individual records so one user can
update data without interfering with another.
2)
Dividing the work that a user does into transactions. A transaction is a
logical unit of work in a database--maybe an order or payment entry --that
you want to succeed or fail as a whole.
3)
Providing a security system to prevent unauthorized access and to allow
different users to have different access capabilities.
Design features are:
--
Existing applications will run correctly in a multi-user environment without
change. Note however that VersaForm XL procedures may require some
modification to enhance their performance.
--
Multi-User VersaForm XL assures correct operation by performing the
required file and record locking automatically, without any action on the part
of the user.
--
Programmers may disable automatic locking and control the multi-user
functions themselves.
--
VersaForm XL will run on a wide variety of networks. The system is
designed for fast networks such as IBM or Novell. Although VersaForm
XL may run on RS-232 (no-slot) LANs, good performance on these LANs
was not a design goal and is not assured.
166
VersaForm XL
Transactions
A transaction begins at Filing startup, or when the previous transaction ends.
Transactions can end in two ways--rollback or commit.
To roll back a transaction is to undo it. All affected files are returned to their state
(as far as this transaction is concerned) as of the beginning of the transaction.
Committing a transaction makes the transaction permanent. After a commit you
can no longer roll back.
When a transaction ends, all locks acquired in the course of that transaction are
released, except for the current form in each open file. Locks on the current forms
are not released, but exclusive locks become shared locks. Thus, each transaction
starts with shared locks on the current forms (if any).
Normally, locks accumulate as records are read and written until the end of the
transaction. Holding locks until transactions end is a good practice, as it prevents
users from altering each other's data while the transaction is in progress.
o
If the transaction is rolled back, all records for that transaction are returned
to their state as of the beginning of the transaction. Any records that were
added to the file are removed, and any records that were removed are
restored.
o
If the transaction is committed, all records that were saved to provide
rollback capability for that transaction are freed.
When a transaction accumulates 50 record locks in a file, VersaForm XL will
attempt to lock the file automatically. This prevents a buildup of locks which
would slow the program and reduce available memory. Procedures that would
retrieve many records should lock the file explicitly, to avoid the slowdown that
would be caused by many records being locked individually.
Transactions end:
o
#
Automatically (by a commit), when a Save command (
(if there is no Save procedure). Save-Continue (
$#
) is executed
) does not commit.
o
Automatically (commit), when a Clear, Next, or Back command is executed.
Not, of course, when the Continue version is.
o
Automatically (commit), when the user EXITs Filing.
o
When a user requests either Rollback or Commit.
o
When a procedure requests either Rollback or Commit.
Multi-User Operation
167
LOCKING
On a multi-user system, some mechanism is needed to prevent users from
interfering with each other. Imagine the following situation: User A reads an
invoice. While he's deciding what to do, User B reads it, too. User B changes it,
and saves it. Now user A makes his change, and saves the invoice.
This would be a serious error. User B's change is now lost (it's been overwritten),
and the file is incorrect.
To ensure correctness of transactions, VersaForm XL locks forms, so that when
one user has a form, the other can't change it.
The system provides locks for both individual forms and entire files. In the
remainder of this discussion, locks on forms are called Record locks, for
consistency with industry terminology. File locks allow quicker file access, but
record locks allow two users to access different records in a file without interfering
with each other.
Both record (R) and file (F) locks may be either shared locks (S) or exclusive (X)
locks. Shared locks allow others to also have shared locks on the same resource.
Exclusive locks permit no other locks, whether shared or exclusive.
Thus there are four types of locks: File Shared (FS), File Exclusive (FX), Record
Shared (RS), and Record Exclusive (RX). The first lock requested on a file will of
course always be granted. Succeeding locks are granted according to the rules in
the table below:
Second Lock
(Different user)
RS
RX
FS
FX
First Lock
RS RX FS
Y
N
Y
N
N
N
Y
N
Y
N
N
N
FX
N
N
N
N
Locking introduces the possibility of deadlock. This happens if two users each
hold a lock on data that the other needs in order to continue. For instance, User A
updates and locks record 1 and User B updates and locks record 2. So far, so
good. But now suppose User B wants to update record 1 and User A wants to
update record 2. Neither can go on, because he is blocked by the other. But
neither user is done with his transaction.
In this situation one transaction must either be committed (accepting the
transaction so far), or rolled back (have its files restored to their state as of the
beginning of the transaction). Either of these actions will release the outstanding
locks for that user's transaction and thus permit the other user's transaction to
continue. Rollbacks and Commits can be initiated by the user or by a procedure.
Rollback is intended to be used only in case of a deadlock or other error.
168
VersaForm XL
Two important switches are the Locking switch and the Automatic locking switch.
Locking is normally on. (It can be turned off from a procedure.) If locking is off,
the system does not try to ensure the correctness of transactions--it's up to the
user. Once locking is off, it stays off until it is turned on again or until you exit
Filing. You should never need to turn locking off.
Automatic locking controls how procedures lock your records. It may be turned
off safely in some procedures. This is discussed further below.
LOCKING ON INTERACTIVE COMMANDS
Get, Next, Back, First, Last, Index, Search
Before a record is read from the file, a shared lock for that record (RS) is
requested. If it is not granted, the command is not executed.
Data Entry
When data is validated, an exclusive lock for the record on the screen (RX)
is requested. Thus an early warning will be given if the record is already in
use.
Save-Continue, Remove, Save
Before the record is written to the file, an exclusive lock for that record is
requested. If it is not granted, the command is not executed.
Normally, (i.e. if ROLLBACK is on) Save-Continue does not actually write over
the previously existing record in the file. Instead, updates are written to new
locations on the disk. This takes longer, but it preserves the data for a possible
rollback. The system keeps (in RAM) the locations of the previous versions of the
updated records.
Similarly, the Remove command does not actually erase the removed record
immediately. In both cases, the information is saved until the transaction ends.
When Save is executed, however, the transaction is ended. All the foregoing file
changes are committed--that is, the locations of the previous versions of the
changed records are forgotten and the disk space they used is freed.
At transaction end all outstanding locks that this user holds are released, except for
the form on the screen. The lock on that form becomes a shared lock.
Next, Back, Next-Continue, Back-Continue
Next and Back automatically perform a Commit before fetching the next
Multi-User Operation
169
form. Thus all locks are cleared. Next_Continue and Back_Continue, like
Save_Continue, do not end the transaction, and leave all locks in effect.
LOCKING IN PROCEDURES
Automatic locking controls how the system behaves when procedures are running.
If automatic locking is on, the system locks records and files automatically for
procedures just as it does for interactive use.
Locking in "Global" procedures
"Global" procedures--those that change many records in a file, will run
progressively more and more slowly because the system will lock each
record individually and save all the changes for a possible rollback. To run
in a multi-user system, you should modify these procedures as follows:
1.
At the beginning of the procedure, lock the entire file, and turn both rollback
and automatic locking off.
2.
At the end of the procedure, turn both rollback and automatic locking back
on. Then unlock the file.
Procedures so modified will run at full speed. For more information about how to
set and clear automatic locking and rollback, and about locking, see Chapter 16.
Getform, Nextform, Backform, Firstform, Lastform
Before a form is read from the file, a shared lock for that form is requested.
If it is not granted, the user is informed and told who holds the lock, and
asked whether to retry the lock, roll back the transaction, or simply accept
what has been done so far (i.e., commit).
Saveform, Removeform
Before the form is written to or removed from the file, an exclusive lock for
that form is requested. If it is not granted, the user is has the same choices
as above.
$#
Saveform in a procedure is equivalent to Save and Continue (
in
Filing). Following the SAVEFORM (A or B) command with a COMMIT
command will save the form and end the transaction. This is equivalent to
the Save command (
in Filing).
#
When automatic locking is off, the programmer must request his own locks. Builtin routines are available to do this. Both file locks and form locks can be
requested. When a lock fails, the built-in routine returns the current lock holder's
170
VersaForm XL
name to your procedure, which can then inform the operator. Once automatic
locking is off, it stays off until it is turned on again or until you exit Filing.
Locking in Reports
When you run a report, the file is automatically locked with a shared lock. Others
can run reports or inspect forms, but they cannot change them (since that would
involve getting an exclusive lock).
System Failures
If a system failure occurs, or if you re-boot, any locks that were in force will stay
in force, as they are written on the disk. Other users will still experience them.
When you re-enter Filing for that file, your locks will be removed automatically.
For emergency use, there is a command on the Filing screen (LOcks) that lets you
remove locks that are "stuck".
Rollback information does not survive system failures, since it is in RAM. Thus
any file changes that partially completed transactions made will still be in your files.
OPERATIONAL MODES
There are three modes of file access--sharing, exclusive use, and read-only.
Sharing mode is the normal mode for a multi-user system and uses all the locking
and transaction processing features described above.
Exclusive use mode gives you single user operation in the multi-user system. It
opens all files in such a way that no one else can use them at all. (It uses the Deny
Read-Write option of the DOS Open function.) Locking and rollback are disabled.
When you use this mode the system will run faster, but of course you are
essentially using the system in single user, not multi-user, mode. Note that since
locking is disabled, another user who tries to open a file that you have opened in
this mode will not be told that you have locked the file. He will simply receive a
message indicating that access to this file is denied.
Read-only access disables locking, and does not permit writes to any file. Thus
users can look at files without the overhead of locking, but still permit the file to
be shared. They must realize that information so obtained may be inconsistent
(because nothing prevents the file being changed while it is being examined, for
instance, during a report), but they cannot do any damage.
Choose the sharing mode in the setup file (SETUP.VFS or SYSSETUP.VFS).
See Chapter 11 to see how to do this.
Multi-User Operation
171
TECHNICAL NOTE
Since the locks described above are within the file itself, VersaForm XL must gain
exclusive control of the file at a lower level while it is setting and testing the locks.
To do this, it uses the record locking function of DOS. (This is provided by DOS
in Interrupt 21H, function call 5CH.) Only one byte of the file is locked at this
level, and this byte provides a semaphore which tells VersaForm XL whether it can
proceed with its locks.
If this lock cannot be obtained, the system retries several times. Since the DOS
lock is never held for long, the lock should be granted shortly. If the lock fails, the
operator is informed and has the option to retry or to exit from VersaForm XL.
There are no other options because no further file activity can be undertaken on
the file as long as it is locked.
Multi-User Commands
Several commands specifically support multi-user operation:
SAVE, SAVE_CONTINUE
$#
There are two forms of the SAVE command: SAVE (SA) and
SAVE_CONTINUE (
). SAVE saves a form and ends the current
transaction, releasing all locks except the lock on the current form. If the lock on
the current form is exclusive, it is “downgraded” to a shared lock (since the form
has not been changed in the now-current transaction). SAVE_CONTINUE saves
a form but does not end the transaction, and releases no locks. The screen is
unchanged.
NEXT, NEXT_CONTINUE, BACK, BACK_CONTINUE
$A
$
Similarly, there are two forms of the NEXT and BACK commands:
NEXT_CONTINUE (
) and BACK_CONTINUE (
) supplement
NEXT and BACK. NEXT and BACK end the current transaction, releasing all
locks, except for a shared lock on the now-current form. The CONTINUE forms
do not end the transaction, and release no locks.
LOCKS
(Esc-U-L)
To issue the LOCKS command you must be in Filing on the file whose locks are to
be checked. The LOCKS command has 5 options:
172
VersaForm XL
C
Commit the current transaction.
Accept the current transaction's activity to this point and release all of its
locks.
R
Rollback the current transaction.
Undo the current transaction's activity and release all of its locks.
L
List all locks in effect on this file.
U
Unlock locks.
Can unlock any locks on this file (no matter who holds them. Only Manager
can invoke this function.
T
Test your network's locking capability.
Verify that your network implements the DOS record locking facility
(Interrupt 21H, function code 5CH). Without this function, VersaForm XL
multi-user facilities don't work.
To perform this test, bring up two work stations on your network. Choose
VersaForm XL Filing on both stations, for the same file (any file). From the
command menu (Utils) line, choose the Locks command on both stations.
Now on the first station, choose the Test option from the Locks command
submenu. If DOS record locking is working, you will get a message saying
that the file has been locked (if you don't, maybe you don't have a SHARE
command in effect on your machine, or your network doesn't have DOS
record locking support active).
Next, go to another work station and do the same. The system should
report that the file is already locked, and ask if you want to abort or retry.
Do neither now, but go back to the first work station and press
. This
releases the lock. Back to the second station and retry. This time the
second station should acquire the lock successfully.
(
Part III
VersaForm XL
Advanced Features
Chapter 13
INTRODUCTION TO PROCEDURES
Procedures are sets of instructions which you give VersaForm XL. They are the
most powerful feature of VersaForm XL. Using procedures, there is virtually no
limit to what you can do.
Procedures can access more than one file at a time. For example, when you're
working on an invoice file, a two-line procedure can automatically look up a
description and a price from a large inventory file--and the example in the next
chapter shows you just how to do that.
Procedures may be simple or complex, depending on your needs. They enable you
to:
•
Look up data in another VersaForm XL file and transfer data to and from
your current file.
•
Perform calculations and/or make logical decisions.
•
Change data automatically throughout your file.
•
Conduct a dialogue between VersaForm XL and the operator through a
series of on-screen questions and operator responses.
•
Run a report from within a procedure
•
Read and write to ASCII files
•
Print very complex forms
With this added flexibility in meeting your particular forms processing needs, you'll
be able to integrate different VersaForm XL files into a comprehensive application
system.
A Simple Look-Up Procedure
In this chapter, we will illustrate a simple "look-up" procedure and explain how to
enter it.
176
VersaForm XL
You can use a VersaForm XL procedure to look up data in another VersaForm
XL file and transfer it to the file you're working on. For many applications, a lookup procedure may be the only one you need. The procedure illustrated in this
chapter is only two lines long. Suppose you're presently working on your Invoice
file (Figure 13-1).
ALPHA TOOLS INC
SERVING THE BAY AREA SINCE 1925
INVOICE
CUSTOMER Jane Steel..... ACCT# STE12345
ADDRESS 123 Main St..... PHONE ........
CITY Elm Park....... STATE IL ZIP 23456
ORDER DATE ............. CLERK ........
L# QTY STOCK#↓ DESCRIPTION PRICE AMOUNT.
01 30 A44... ........... ..... .......
SUBTOTAL ........
TAX ........
TOTAL ........
Figure 13-1
You've filled in QTY and STOCK#, and now you'd like VersaForm XL to fill in
DESCRIPTION and PRICE automatically. You know that the values for those
items can be found on some particular form in your Inventory file, even though the
item names are different. Notice that DESCRIPTION and PRICE in Figure 13-1
correspond to PARTNAME and STDPRICE in Figure 13-2.
INVENTORY
PARTNO A44
PARTNAME Elec Drill
ONHAND ...136
BACKORDERED ......
STDPRICE 20.00
Figure 13-2
By writing a procedure, you can have VersaForm XL 1) locate the correct form in
the Inventory file, and 2) transfer the data you want to the proper items on your
Invoice form.
In this example, you need to tell VersaForm XL to locate the Inventory form
whose PARTNO value matches the STOCK# value (A44) on the current Invoice
form. PARTNO is the key item that identifies each form in the Inventory file.
Introduction to Procedures
177
You must also specify which data to transfer, and where to put it. In this case,
VersaForm XL will use the values in PARTNAME and STDPRICE to fill in the
DESCRIPTION and PRICE items on your Invoice form (Figure 13-3).
ALPHA TOOLS INC.
SERVING THE BAY AREA SINCE 1925
INVOICE
CUSTOMER Jane Steel..... ACCT# STE12345
ADDRESS 123 Main St..... PHONE ........
CITY Elm Park....... STATE IL ZIP 23456
ORDER DATE ............. CLERK ........
L# QTY STOCK#↓ DESCRIPTION PRICE AMOUNT.
01 30 A44
Elec Drill 20.00 .......
SUBTOTAL ........
TAX ........
TOTAL ........
Figure 13-3
When you're ready to write a procedure, (see "Entering a Procedure", below)
VersaForm XL will display a Procedure Instructions Form for you to fill in (Figure
13-4).
PROCEDURE INSTRUCTIONS
Procedure Name *CHECKING
Secondary File INVENTRY
Key-from1 STOCK#..... Key-from2
L#
01
02
........
.................Procedure................
DESCRIPTION := PARTNAME;
PRICE := STDPRICE;
Figure 13-4
The completed Procedure in Figure 13-4 tells VersaForm XL all it needs to know
to locate the right form in the Inventory file and transfer data from it to the Invoice
form in Figure 13-3. We'll see below how this procedure was written.
PRIMARY AND SECONDARY FILES
A look-up procedure such as the one we're illustrating here uses two files: a
"primary" (A) file and a "secondary" (B) file.
178
VersaForm XL
The primary file is the one you'll be working on when the procedure is executed.
When you enter a procedure into a file, that is its primary file. In this example, the
invoice file called SAMPLE is your primary, or current, file, and the particular
form you're working on from this file is the primary form.
The secondary file is the one VersaForm XL uses to get the data that you want
transferred. In this example, INVENTRY (Inventory) is the name of the
secondary file, and the particular form in this file that has the correct data is called
the secondary form.
Each procedure may use only one secondary file. However, you may access more
than two files by "chaining" to one or more other procedures. This is explained in
the section "Procedure Chaining" in Chapter 14.
NOTE:DO NOT designate your primary file as the secondary file in
a procedure. The two must be different files.
If you are working with one file only, you do not need to name a secondary file.
In order to use the procedure illustrated here, you must have the VersaForm XL
program disk and your primary and secondary files all on-line at the same time. If
you're using a hard disk system, you'll have no problem. With a diskette system, if
your primary and secondary files are on the same disk, then two disk drives are
sufficient; otherwise, you must have three drives (or a "RAM-disk").
THE PROCEDURE
1.
From the Main Menu, choose #8, Enter or Change a Procedure. VersaForm
XL will ask for the drive containing your primary file.
2.
Enter the name of the primary file (i.e. SAMPLE) when requested, and press
.
3.
From the blank procedure screen, press
to enter a new procedure.
Changing a procedure is described in Chapter 14.
(
VersaForm XL will display a menu of procedure types (Figure 13-5).
Introduction to Procedures
179
PROCEDURE TYPE MENU
1.
2.
3.
4.
5.
6.
7.
8.
9.
Checking Procedure
Filling Procedure
Command Procedure
Start Procedure
Edit Procedure
Pick Procedure
Save Procedure
Stop Procedure
User Procedure
Figure 13-5
Only one procedure of each type may be chosen for a file, except for USER
procedures. All the procedure types shown in Figure 13-5 are fully explained in
Chapter 14.
Option #1--a *Checking procedure--specifies that the procedure will be executed
every time you Validate, after VersaForm XL checks for errors, but before
automatic filling or calculation occurs. That's the option to choose for this
procedure, as you want to have data automatically filled into each column line on
the Invoice form.
4.
Choose #1, Checking. VersaForm XL will fill in the Procedure Name on the
Procedure Instructions form (see Figure 13-6).
5.
If you want to have a secondary file for this procedure, type a ? in the
Secondary File field and validate. You'll be asked for the location of the disk
and the name of the file. In this example, the secondary file is named
INVENTRY. Both the primary and secondary files should be on-line at this
time.
You may delay naming the secondary file until the procedure is executed. This is
discussed later in this chapter.
Now you'll be asked if you want VersaForm XL to locate the correct form in the
secondary file automatically.
Do you want automatic lookup?
6.
(Y/N)
N
Answer Y. Since automatic lookup is done so often, VersaForm XL
provides an especially easy way to set it up. (Another way to locate the
form is by writing your own instruction statements. This is explained in
Chapter 14.)
When you press Y, you'll see a blank form from your primary file, and this
message:
180
VersaForm XL
Press RETURN to choose item that supplies lookup value for
B.PARTNO.
Here B indicates the secondary file and PARTNO is the key item for forms in that
file.
The item that supplies the value for locating the correct form is STOCK#. In other
words, you want VersaForm XL to use the value in STOCK# on your Invoice
form to find the Inventory form that has that same value in its key item, PARTNO.
7.
Move the cursor to STOCK#, then press X.
Figure 13-6 shows the information that VersaForm XL has been given thus far
about the two files.
PROCEDURE INSTRUCTIONS
Procedure Name *CHECKING..........
Secondary File INVENTRY.......
Key-from1 STOCK#....
Key-from2 .......
L# ................Procedure..................
01 ...........................................
Figure 13-6
The single items at the top of the form in Figure 13-6 tell VersaForm XL what the
procedure name is, when to execute it (at validation, because it's a *CHECKING
procedure), the secondary file you're using (INVENTRY), and where to get the
key for the INVENTRY file (from STOCK#).
PROCEDURE NAMES
Each procedure has a name, either assigned by VersaForm XL or given by you,
according to the type of procedure you select (Figure 13-5). VersaForm XL
assigns the names to all but USER procedures. In this case, the name
*CHECKING was automatically assigned.
In this example, at validation VersaForm XL will 1) check your data entries for
accuracy; then 2) execute the procedure, which will cause it to look up data in the
Inventory file and enter DESCRIPTION and PRICE on the Invoice form, and then
3) perform automatic filling according to the options chosen when the form was
designed. Here, VersaForm XL would use the value in PRICE, which was just
transferred to that item by your procedure, to calculate and fill in the AMOUNT
(QTY X PRICE) on the Invoice.
Any other automatic filling, such as computing a column total, also takes place
after a CHECKING procedure runs.
Introduction to Procedures
181
SECONDARY FILES
If information is to be looked up from another file, its name will be entered here.
Remember that it must be a different file from the primary file.
You may delay choosing from among several possible secondary files until the
procedure runs. Instead of filling in the name of the secondary file on the
Procedure Instructions form, type a question mark (?). At execution, VersaForm
XL will ask you to name the file. You may also follow the question mark with the
name of a file. For example:
?CUSTOMER or ?B:CUSTOMER
In this case, VersaForm XL would prompt the operator for a secondary file name
at execution, and use CUSTOMER as a default.
These options enable you to use different secondary files at different times.
KEY-FROM1 AND KEY-FROM2
These are the items on your PRIMARY form that contain the values
VersaForm XL will use as key values to look up the correct form in your
secondary file. If the forms in the secondary file have two-part key items, then two
values must be supplied. In this example, we have told VersaForm XL to use the
value in STOCK# on the invoice form to locate the correct inventory form (the
one with the matching value in its key item, PARTNO).
THE PROCEDURE
In the column headed Procedure, you'll write a sequence of statements which make
up the procedure. See, for example, Figure 13-7. The usual VersaForm XL
commands are available as you fill in your Procedure Instructions form.
•
VALIDATE provides on-screen help for filling in procedure and file name.
•
SAVE saves your procedure for later use. Before doing so, VersaForm XL
translates it (compiles it) into an executable form. If any error is detected,
you'll see an error message and you'll be able to rewrite the procedure. If no
errors are found, VersaForm XL will save both the translated (code) and
untranslated (source) versions of the procedure on your primary file.
•
You can interrupt a procedure compilation by pressing Escape.
•
DISPLAY may be used to display either your primary or secondary form, so
you can verify item names and their spelling.
•
FIRST, NEXT, and GET are used to retrieve procedures.
182
VersaForm XL
•
INDEX lists procedures by their key item, Procedure Name. You can
retrieve a procedure you want to change directly from the index.
•
INSERT LINE and DELETE LINE do what their names imply.
•
CLEAR, PRINT and REMOVE serve their usual functions.
•
PgUp and PgDn (Page Up and Page Down) are used to scroll up or down,
since only 16 lines of a procedure are visible at one time.
•
When you press
, you'll see the menu of commands.
PROCEDURE STATEMENTS
The procedure we're writing in this example moves values from one form to
another. In this case, the values from PARTNAME and STDPRICE on the
INVENTORY form (Figure 13-2) will be moved to DESCRIPTION and PRICE
on the INVOICE form (Figure 13-3).
L# ................Procedure...................
01 DESCRIPTION := PARTNAME;
02 PRICE := STDPRICE;
Figure 13-7
The two statements in Figure 13-7 are called "assignment" statements because they
assign the value of one item to another. Assignment is represented by the
following symbol:
:=
These statements tell VersaForm XL that:
*
DESCRIPTION is to be assigned the value from PARTNAME.
*
PRICE is to be assigned the value from STDPRICE.
Enter each statement by typing the item to be filled in, followed by the assignment
symbol (a colon followed by an equal sign), followed by the item that contains the
data. Every complete statement must be followed by a semicolon (;).
(
After completing each statement line, press
to continue on the next line.
You do not need to validate after entering each line. When you are finished,
SAVE your procedure.
Introduction to Procedures
183
When you write procedure statements,
-
Each statement must be followed by a semicolon (;).
-
More than one statement may occupy a line.
-
Uppercase or lowercase letters or a combination may be used.
-
Spaces within statements are ignored. Therefore, each of the lines below are
equally correct:
01 DESCRIPTION := PARTNAME; PRICE := STDPRICE ; OR
01 DESCRIPTION:=PARTNAME; PRICE:=STDPRICE;
Using Form Items in a Procedure
IDENTIFYING FORM ITEMS WITH THE SAME NAME
What happens if an item name on the secondary form has the same name as one on
the primary form? When there is a possibility of confusion, identify the primary
form with "A." and the secondary form with "B."
For example, if the Inventory form had an item called PRICE instead of
STDPRICE, you'd make the assignment statement read:
A.PRICE := B.PRICE ;
|
|
Primary
Secondary
FORM ITEMS WITH SPACES OR SYMBOLS
What if an item name has a space, hyphen, colon, or other symbol in it (e.g., PART
NAME, or STD-PRICE, or Price/Each)? VersaForm XL is flexible about spaces
or symbols in item names on forms, but in a procedure these could cause confusion
(e.g., STD-PRICE could be interpreted as STD minus PRICE).
To avoid this problem, when an item name includes a space or a symbol, enclose it
in exclamation marks (!): !STD-PRICE! or !Address:! or !PART NAME! If the
item needs to be additionally identified by A. or B., as explained above, the letter is
NOT enclosed: B.!STD-PRICE!
184
VersaForm XL
Exception: Two symbols are acceptable in form item names. They are "_"
(underscore) and "#". Therefore,item names such as STD_PRICE and STOCK#
would not have to be enclosed in exclamation marks.
READING AND WRITING ASCII FILES.
ASCII text files may be read into or written from a procedure. To do this, use the
Print command. It keeps the file name and uses it as a default when writing. To
read a file:
1. Clear the form.
2. Type your procedure name in the Procedure Name field.
3. Place the cursor on column line 1.
4. Press
(Print).
5. Choose the Read option.
6. Enter the file name.
Since the procedure editing area is only 77 characters wide, lines longer than 77
characters are automatically split.
To write the file, simply press
again, and choose the Write option.
This facility permits you to edit ASCII files (such as AUTOEXEC.BAT) while in
the VersaForm XL Procedure entry mode, as well as to import and export text
files.
Refer to Chapter 14 under the heading INCLUDE on how to use the Include
statement to compile a procedure in an ASCII file.
Chapter 14
WRITING PROCEDURES
Chapter 13 introduced a simple procedure. This chapter describes more advanced
uses of VersaForm XL procedures and discusses the language used to build
procedures.
It isn't necessary to learn all the terms and options described in this manual before
starting to use procedures. Begin with simple operations, then build on your
knowledge and experience.
Changing A Procedure Or Writing A New One
After you choose "Enter or Change a Procedure" from the Main Menu and select
your file, a blank Procedure Instructions form will be displayed (Figure 14-1).
You may change or remove procedures just as you would any other form in your
VersaForm XL files. You can even copy a procedure (on the same file) by
changing the Procedure Name, then hit
to SAVE the procedure.
#
PROCEDURE INSTRUCTIONS
Procedure Name ...................
Secondary File ...................
Key-from1 STOCK#...... Key-from2 ..........
L#
....................Procedure........................
01 ................................................
02 ................................................
Figure 14-1
$
When entering a procedure, you can compile all the procedures in a file. This is
useful when making major changes in an application. Use
.
To write a new procedure, enter the procedure name - either one of the *
procedures shown in Figure 14-2 or a user procedure where you provide the
procedure name. Then you'll be asked to supply the information for filling in the
remaining items (see "Entering the Procedure" in chapter 13).
186
VersaForm XL
Procedure Types
Figure 14-2 shows the types of procedures you may write. The type of procedure
determines when it is executed. Otherwise, there are few differences between
them.
PROCEDURE TYPES
Type
Name
CHECKING
*CHECKING
at validation, after checking but
before automatic filling, calculation
*EDIT
when a file is switched to
*FILLING
at validation,after automatic filling
*PICK
when
is pressed
*START
at Filing startup
*SAVE
when form is SAVED
*STOP
at Filing termination
*COMMAND
when certain commands are used
(any name)
when directly invoked
EDIT
FILLING
PICK
START
SAVE
STOP
COMMAND
USER
When Executed
$O
Figure 14-2
A file may have only one procedure of each type, except for USER procedures.
CHECKING PROCEDURES
A *CHECKING procedure runs during validation, after all data checking has been
done but before any automatic filling occurs.
When a *CHECKING procedure changes the value of an item on the primary
form, it triggers automatic filling just as if the user had typed in a new value. For
example, look at the following line:
L#
01
QTY
30
STOCK#
A44
DESCRIPTION
Elec Drill
PRICE
20.00
AMOUNT.
600.00
Suppose a *CHECKING procedure changes the value in PRICE to $15.00.
VersaForm XL will recalculate the AMOUNT during automatic filling, just as it
would if the $15.00 had been keyed in.
L#
01
QTY
30
STOCK#
A44
DESCRIPTION
Elec Drill
PRICE
15.00
AMOUNT.
450.00
WARNING: A changed value like the one shown in this example
triggers automatic filling ONLY on the primary form.
Writing Procedures
187
If you were transferring data to a secondary form, and the procedure changed a
similar value, your procedure would have to contain statements for recalculating
the amount on that form.
RESTRICTIONs on checking procedures
These restrictions apply not just to *CHECKING procedures, but to any
procedures CHAINed to by a *CHECKING procedure.
The value of A.L# cannot be changed during data checking. The item A.L#, the
current line number, is either zero (if no lines were changed) or the line number of
the column item(s) that were keyed into by the user just before the validation
command was issued.
Only items on the current line of the column area can be modified.
You cannot add or insert lines to a form during checking.
The PAGE procedure will not change the currently displayed page on the primary
form.
Saving the primary form during checking will not save any changes that your
procedure has made to the form, since validation has not yet been completed.
These restrictions do not apply to secondary files, nor do they apply to procedures
chained to by a *FILLING procedure. To get around them, use a *FILLING
procedure instead of a *CHECKING.
EDIT PROCEDURES
The *EDIT procedure for a file is executed every time the user starts FILING on
or switches to the file. It gives the programmer a way to perform setup activity
before the user uses a file. For instance, if the user switched to a new file using
, the *EDIT procedure for that file would be executed before editing on
that file began.
$
FILLING PROCEDURES
A *FILLING procedure also runs during validation, but after both checking and
automatic filling have occurred. This type of procedure can be used to perform
additional calculations or a file lookup after automatic filling has taken place.
NOTE:If the procedure changes a value which contributes to a
column total, the procedure MUST include statements to do its
own recalculation of that total, since Validation's calculation phase
has already taken place.
188
VersaForm XL
PICK PROCEDURES
"Pick Lists" are popup lists that let the user make a choice. They are implemented
both by the system and by procedures. If a file has a *PICK procedure, it will run
whenever the user types
, or double-clicks the mouse. This will occur
wherever the cursor is at the time. Thus, the first thing a *PICK procedure must
do is determine where the cursor is, and so whether to respond.
$O
Procedures can turn the pick list indicator (the down arrow) on for any field, using
SETFLDINFO.
If the *PICK procedure returns FALSE (0), the "validation needed" indicator will
be turned on, causing validation to occur the next time it is requested. (Normally,
the system regards data changed by a procedure as not requiring validation.) If it
returns TRUE (1), validation will not be required. If it returns -1, the system's
pick list (consisting of the items on a list check) will be allowed to function.
START PROCEDURES
This procedure runs when you begin FILING operations, before the first form is
displayed.
Variables in a *START procedure are global--that is, they retain any value given
to them for the duration of a FILING session. For example, you could set up a
"running counter" to keep track of the number of forms processed during a
FILING session.
NOTE: If you add global variables to a *START procedure, all
procedures that use any global variables must be recompiled.
A secondary file may not be used with a *START procedure. However a
*START procedure can CHAIN to a user procedure which in turn can access a
secondary file. It is possible to perform a variety of functions at the beginning of
the filing session. Some of these are demonstrated in the file of sample procedures
(See Chapter 15).
When you switch from one file to another by using the DISPLAY command, the
*START procedure for that file will be run unless the file was already open. When
you close that file, the *STOP procedure will run. If you CANCEL in a *START
procedure, the system will return to the main menu. NOTE: This is a change
from earlier versions; CANCEL in a *START procedure used to terminate the
program.
Writing Procedures
189
SAVE PROCEDURES
This procedure runs when you use the SAVE command during a FILING session.
It executes in place of the usual SAVE command. If validation is needed, it will
occur and any checking or filling procedures will be executed before the *SAVE
procedure runs. Any error detected during validation cancels the *SAVE
procedure.
This procedure does not automatically save a form. To do that, you must write a
"SAVEFORM (A);" statement in either the *SAVE procedure or in a USER
procedure that it chains to. (Procedure Chaining is explained later in this chapter.)
Because you have control over when your form is saved, you can do operations
both before and after saving.
STOP PROCEDURES
This procedure runs at the end of a FILING session, when you execute the
command EXIT.
COMMAND PROCEDURES
COMMAND
procedures allow you to take control whenever the operator
executes one of a number of commands.
When the operator gives a command, the COMMAND procedure is invoked
before the command itself. In addition to the normal capabilities of a procedure
the *COMMAND procedure can decide whether to allow the given command to
be executed. The command will be allowed to proceed only if the procedure
returns a value of TRUE via the built-in RETURN procedure.
When a form is fetched (i. e., read), the *COMMAND procedure is invoked after
the form has been read as well as before the command itself, (so you can examine
it in the procedure). In this case, RETURN (TRUE) tells the system to keep the
form; RETURN (FALSE) will clear the form.
You can use the LASTCOMMAND built-in to find out what the command that
the user gave (via either the command menu or the function keys) was, or if the
invocation of the COMMAND procedure is the result of a fetch.
*COMMAND procedures also are invoked whenever a new form is fetched (i.e.,
read) from the file to become the current form. This often occurs as the result of a
GET, NEXT, or similar command, but it can also occur as the result of an INDEX
or SEARCH operation.
The commands that invoke a *COMMAND procedure are:
Command
LASTCOMMAND Yields
190
VersaForm XL
Help
Space
Index
Remove
Exit
Clear
Search
Print
Delete line
Get
First
Last
Next
Back
Save
SaveContinue
Fetch
?
SP
I
R
Q
CL
SE
PR
D
G
F
L
N
B
SA
SC
FE
Example: This command procedure will prevent the operator from using
the REMOVE command.
begin
if lastcommand = 'R' then
begin
bellmsg ('Illegal Command');
return (false); {don't execute command}
end
else
return (true); {let the command execute}
end;
USER PROCEDURES
USER procedures may be executed at any time. They may be run by chaining
from other procedures or by using the EXecute command. (See Procedure
Chaining.) Only USER procedures have names assigned by you. A name must
begin with a letter, A-Z.
A procedure isn't loaded until it's needed, so there's a delay the first time it's
executed. Thereafter, unless forced out by another procedure, it remains in
memory, so the next time it's used there's no delay in execution.
Up to 10 procedures may be implemented to be activated by "hot keys". They
must be named 'User Cmd 1', 'User Cmd 2', and so on. Hot keys for these
procedures may be defined in SYSSETUP.VFS, using the procedure name in
column 1. Aside from the hot key connection, these procedures are the same as
any other user procedures.
Writing Procedures
191
Elements of a Procedure (Procedure Syntax)
Procedure statements are made up of identifiers, literals, reserved words, special
symbols such as [, ], (, ), and (+,-,*,/, etc.). By combining these, you can form
expressions, comparisons, assignment statements, and compound statements.
IDENTIFIERS
Identifiers can be item names on forms, variables, or constants. (Variables and
constants are discussed in subsequent paragraphs.)
An identifier must begin with a letter, which may be followed only by one or more
letters, or digits (0 thru 9), or the special characters _" (underscore) or "#". It may
contain up to 20 characters. UpperCase and LowerCase letters may be used
interchangeably.
Exception: Names of form items containing blanks,hyphens, or other symbols may
be used as identifiers so long as they are enclosed in exclamation marks. For
example:
!STD-PRICE! or !price/each! or !PART NAME! or !Address:!
FORM ID (NOTATION: AorB)
Identifies the primary form (A) or the secondary form (B).
FORM ITEMS (NOTATION: FORMITEM)
A form item is an identifier that refers to an item on your form. For example, these
statements include four form items:
DESCRIPTION := PARTNAME ;
A.PRICE := B.STDPRICE ;
COLUMN ITEMS IN PROCEDURES
A form has two kinds of items, or fields: single and column. A column may contain
up to 99 values. In a procedure, you may refer to a specific column line. For
example, to refer to the 10th line of the column item AMOUNT on a primary
form, you may write:
AMOUNT [10]
The line number is enclosed in brackets and preceded by the column name.
192
VersaForm XL
VersaForm XL uses the special identifier "L#" to refer to the current line. Except
in a checking procedure, you may change its value. On a primary form, the default
L# is whatever line you're entering when the procedure runs.
The value of B.L#, the current line on a secondary form, is initially zero. It
changes value only when you assign a valid line number to it. Remember,
therefore, to assign a number to B.L# if you want to refer to a column item on the
secondary form. The value of B.L# is re-set to 0 if another secondary file is
accessed.
NOTE: If you refer to a column item without explicitly using a line number, the
current value of L# is used.
Examples of L# use are:
L# := 1 ;
Set current line to 1 on the primary
form.
B.L# := K ;
Set current line to K on the secondary
form (B). If K is 5, then B.L# will now
be 5.
B.AMOUNT :=
20.55 ;
If B.L# is 5, B.AMOUNT [5] is assigned the
value 20.55. B.AMOUNT is the AMOUNT
column on the secondary form. The L#
will be whatever value you've assigned it
in the procedure.
AMOUNT :=
AMOUNT[2] ;
The current line in the AMOUNT
column on the primary form is assigned a
value from line 2 in the AMOUNT column.
AMOUNT :=
AMOUNT[L#-1];
The current line in the AMOUNT
column on the primary form is assigned
the value from AMOUNT on the previous line.
NOTE: When the primary and secondary forms both have column lines, you must
qualify L# with the letter A or B, as shown in the second and third examples
above.
COMMENTS
Comments are notes which you may include freely in a procedure; they are for
your reference only, and no action is taken on them. They are set in braces { } or
parentheses with asterisks (* *). For example:
Writing Procedures
193
DESCRIPTION := PARTNAME ; (*fills in description on Invoice*)
PRICE := STDPRICE ; {enters price from Inventory}
Whichever symbol you choose to begin your comment must also be used to close
it.
LITERALS
Literals are explicit values; they can be numbers, dates or strings of characters.
You may use a literal in your procedure either directly in a statement or by making
it a constant (constants are explained below).
Numbers must start with a digit or a leading plus (+) or minus (-) sign, and can
contain up to 13 digits and 8 decimal places. Some valid examples are:
21
-321.50
1234567890123.12345678
0.159
Note that .327 is NOT a valid number: Since a digit must precede the decimal
point, the number must be written as 0.327.
Dates and character strings must be enclosed in single or double quotes, and can
include leading or trailing blanks as you want them to print:
: 'abcdef' or " + tax" or " you're late "
Dates: '2/25/84' or "12/31/99"
Character strings may consist of up to 80 characters and must be contained on one
line.
CONSTANTS
You may designate (declare) an identifier as a constant at the beginning of a
procedure (and ONLY at the beginning). Thereafter, the name of that constant,
rather than its value, may be used in statements. A value that is used repeatedly in
a procedure will be easier to change when necessary if it has been made a constant.
In the following example, two constants, LIMIT and FIRSTDATE, are declared:
CONST LIMIT=4 ; FIRSTDATE = '6/30/80' ;
----- ----- --------------/
|
\
|
|
abbreviation
identifier value identifier value
for "CONSTANT"
In a declaration, the abbreviation for constant (CONST) is always used. It appears
once only, regardless of how many constants you're declaring, and precedes the
first identifier. Each identifier is followed by an equal sign, the value you're giving
it, and a semicolon.
194
VersaForm XL
In the example above, if you wanted to change the value for LIMIT from 4 to 5,
you would only need to change it in the declaration.
VARIABLES
Variables are declared just after constants. They retain their values only during the
time that the procedure that uses them is running. (Exception: see Global
Variables, below.) In the example that follows, the variables AVGPRICE and
TODAY are declared:
VAR AVGPRICE; TODAY ;
--- --------- ----- |
|
|
abbreviation
identifiers
for "VARIABLE"
The abbreviation for variable, VAR, is always used in a declaration. It appears
only once, before the first identifier, regardless of the number of variables being
declared in this procedure. Each identifier is followed by the required semicolon.
The value of a variable can be a number, character string (up to 80 characters), or
date. VersaForm XL will automatically handle different types of data when doing
computations or moving data between variables and items on forms. After
declaring the variables, you MUST signal the beginning of your procedure with the
word BEGIN. For example:
VAR AVGPRICE; TODAY;
BEGIN
.....
GLOBAL VARIABLES
In general, each time a procedure runs, the variables and constants in it lose any
previous value they may have had. However, you may keep a variable throughout
a filing session by declaring it in a *START procedure, which runs when FILING
is first entered. A variable thus declared automatically becomes "global," and
VersaForm XL won't subsequently erase it.
The following example illustrates the declaration of global variables in a *START
procedure to establish a continuously increasing serial number:
VAR SERIAL# ;
BEGIN
SERIAL# := 1000 ; ...
Here the variable SERIAL# is global. SERIAL# will be assigned an initial value of
1000 when this *START procedure runs, and could be used later in another
Writing Procedures
195
procedure (e.g., you could increase it by 1 each time you used it) without redeclaring it.
CAUTION: If you later modify a *START procedure by
removing, renaming, or even rearranging the declaration of
constants and/or variables, you must correct any references to them
that occur in other procedures.
To do that, first retrieve each procedure by using the INDEX or GET command,
and change the Procedure Instructions form to make it consistent with the
modified *START procedure. Then have VersaForm XL recompile (translate into
an executable form) each changed procedure by using the SAVE command, or use
to recompile all procedures on the file.
$
Note that even if you only rearrange declarations in a *START procedure, you
should re-SAVE other procedures which refer to them.
This does not need to be done if you are only changing the assignment of initial
values, as in the third line of the above example.
RESERVED WORDS
These words play special roles in procedures, and may not be used as identifiers.
If a form item name is the same as a reserved word, you must use exclamation
marks(!) around the form item name.
AND
BEGIN
CONST
DIV
DO
ELSE
END
IF
MOD
NOT
OR
REPEAT
THEN
UNTIL
VAR
WHILE
PADDING
ROUNDING
CLOSE
A,B (form ID)
The following words are reserved for future implementation. Do not use these
names as variables in your procedures.
ERROR#
EXIT
FUNCTION
LOAD
OPEN
PROCEDURE
IOMESSAGE
UNLOAD
196
VersaForm XL
Building Procedure Statements
BUILT-IN PROCEDURES AND FUNCTIONS
Certain often-used operations can be performed by built-in routines--procedures
and functions. You can call them by using the procedure or function name, and
giving the values you want it to work with (these are called parameters).
A Procedure Example
The built-in procedure deletes a line from a form. For example, you may use it by
writing
DELETELINE (A,5) ;
to delete line 5 from the primary form; or
DELETELINE (B, LINENUM) ;
to delete from the secondary form whichever line is indicated by the variable
LINENUM. 5 and LINENUM are the parameters. The procedure call (illustrated
above) forms a complete statement.
A Function Example
Functions are procedures that return a result. When you supply a function with
values or items (arguments), it uses them to compute a result which it returns to
you as its value.
For example, COLTOTAL is a function that computes the total of a column.
Thus,
COLTOTAL (B.COST)
computes the total of the column called COST on the secondary form. To use it,
you might write
A.TOTALCOST := COLTOTAL (B.COST) ;
Here the item TOTALCOST on the primary form would be assigned the value of
the computed total of the COST item on the secondary form.
Note that functions can be used in assignment statements, while procedures
cannot. Functions do not form complete statements by themselves; they must be
used in other statements, such as the assignment statement above.
A list of built-in procedures and functions is presented in Chapter 15.
Writing Procedures
197
Expressions
Expressions are computations to be performed that result in a value. The value of
the expression can then be assigned to a variable or item, or compared to another
expression, or passed to a built-in procedure or function. Examples of expressions
are:
a)
b)
c)
PRICE [1] + 2.50
( COST + 4.2 ) * ( TOTAL - a.lastamt )
coltotal (b.amount) + tax
The above expressions imply that the value computed will be a number, but you
can also use values like dates and character strings in expressions. The resulting
value depends upon what operations are performed.
Expressions are built using identifiers, operators, parentheses, and functions. In
addition to the usual operators:
+ (add)
- (subtract)
* (multiply)
/ (divide)
there are three other operators DIV, MOD, and &.
DIV and MOD are operators that perform integer (whole number) arithmetic.
DIV is like divide, but the result is always a whole number, not a decimal. MOD
provides the remainder after division. For example:
11 DIV 4 has a value of 2
11 MOD 4 has a value of 3
If the numbers being operated on are not whole numbers, they are truncated to
whole numbers before the operation of MOD or DIV is performed. For example,
3.5 would become 3 before being used in DIV or MOD.
String Expressions
The “&” operator allows you to combine (concatenate) character strings into
longer strings. Strings can be concatenated to a total length of 80 characters.
Characters beyond that will be ignored.
Here is an example of concatenation using the & operator:
If A.TOTAL is 11.50 and A.DUEDATE is 12/15/85, then the concatenation
'Please pay $' & A.TOTAL &
' by the following date: ' & A.DUEDATE
would appear as:
198
VersaForm XL
Please pay $11.50 by the following date: 2/15/95
To use an arithmetic expression within a string expression, surround it with
parenthesis. Example:
'It has been ' & (VDATE - A.PAYDATE)
& ' days since your last payment.'
In the above example the expression ( VDATE - A.PAYDATE ) is computed
before the string expression is composed. Note that character strings must be
enclosed in single or double quotation marks.
When a VersaForm XL procedure gets a value from an item on a form, all leading
and trailing blanks are removed. It is possible to preserve these blanks by using the
"SET (PADDING)" statement. See the section on "AUTOMATIC PADDING."
Technical Note: Order of Evaluation
When evaluating an expression, VersaForm XL performs operations in this order:
First, it performs the operations
*, /, DIV, MOD, AND
Next, it performs
+, -, OR, &
Finally, it evaluates
=, >=, <=, <, >, <>
For example, since multiplication is done first,
2 + 3 * 5
will yield 17.
If you want the addition done first, write
(2+3) * 5
which will yield 25.
COMPUTATION EXCEPTIONS
VersaForm XL automatically recognizes what type of data it is using when doing a
computation. It will handle addition and subtraction between dates and numbers
(see also Date Arithmetic, below).
Here are some exceptional situations:
*
When VersaForm XL encounters a (a character string) during addition or
subtraction, it treats the non-numeric as zero and proceeds with the rest of
the calculation.
Writing Procedures
199
*
If a non-numeric value is encountered during multiplication, VersaForm XL
treats it as 1, which allows the rest of the calculation to proceed as if the
non-numeric was ignored.
*
If a procedure divides a number by zero, the result will be the largest number
possible in VersaForm XL.
Date Arithmetic: VersaForm XL procedures can automatically add and
subtract dates and numbers, when meaningful. For example:
DATE1 - DATE2
Yields the difference in days.
DATE1 + number
number + DATE1
DATE1 - number
These yield a date, treating the
number as a number of days.
All other combinations involving dates are undefined.
Dates between 1/1/100 and 12/31/9999 may be used in date arithmetic.
ASSIGNMENT STATEMENT
Assignment is the operation of transferring a value from an item, or variable, or the
result of an expression, to a form item or variable. It is stated in the following
way:
ABC := XYZ ;
|
|
identifier
expression
The symbol ":=" is the assignment operator. Note the required semicolon at the
end of the statement.
In an assignment statement, the form item or variable to the left of the assignment
symbol receives the value of the item or expression on the right. Here, ABC will
receive the value of the expression XYZ.
Moving Data Onto Forms
When moving data to an item on a form, VersaForm XL will justify it according to
the "Justify (L/R/#)" specification made for that item when the form was designed.
If a character string value is too long to fit in an item, it will be (cut off) on the
right. A numeric value will be rounded as necessary (down to 0 decimal places) to
make it fit.
Sometimes a date or rounded number may still be too large to fit in an item; in that
case, the value "?" will be used. A warning message will be displayed, and a
"beep" will sound, but the procedure will continue to run.
200
VersaForm XL
Comparisons
Comparisons are expressions that can be either TRUE or FALSE. Symbols used
in comparisons are:
=
<
>
<=
>=
<>
The use of these symbols is illustrated in the following examples:
a)
b)
c)
d)
COST = 4
coltotal ( B.AMOUNT ) > 400
( COST=4 ) or ( PRICE>10 )
(STATE <> 'NY') and (INCOME > 10000)
Comparisons are most commonly used to make a decision using an "IF" statement:
IF STDPRICE > 4 THEN PRICE := STDPRICE ;
If the value in STDPRICE is greater than 4, then that value is to be assigned to
PRICE.
Compound Comparisons
Compound comparisons are built by surrounding each sub-expression with
parentheses. The logical operators AND, OR, and NOT are used between subexpressions. Examples c) and d) above are compound comparisons.
COMPOUND STATEMENTS
Compound statements allow you to construct complex statements from simple
ones.
You may form compound statements in these ways:
BEGIN and END
a) BEGIN statement1 ; statement2 ; ... END ;
Writing Procedures
201
Example:
BEGIN
B.L# := LASTLINE (B) + 1 ;
INSERTLINE (B,B.L#) ;
B.INV# := A.INV# ; B.TDATE := A.DATE ;
B.QTY := A.QTY ;
B.TOTALQTY := COLTOTAL (B.QTY) ;
SAVEFORM (B) ;
IF NOT IOERROR THEN A.POSTED := 'Y' ;
END ;
This compound statement is made up of eight other statements, each ending with
the required semicolon. Notice that when the word BEGIN is used, it must be
paired with an END.
IF Statements
b) IF condition THEN statement1;
Example:
If A.DATE <= TEMPDATE THEN DELETELINE (A,A.L#);
If the date on the primary form is earlier than or equal to the value held in
TEMPDATE, then delete the current line on that form.
c) IF condition THEN statement1 ELSE statement2 ;
Example:
IF IOERROR THEN PROMPT ( "ERROR" )
ELSE PRICE := STDPRICE ;
If the previous I/O operation was not successful and produced an IOERROR, then
the user should see the prompt "ERROR"; otherwise, PRICE should be assigned
the value in STDPRICE.
IMPORTANT: Note that NO punctuation separates the THEN
and ELSE statements. There should never be a semicolon directly
before an ELSE.
The statements called for in an IF statement may themselves be IF statements (as
well as other types). This allows you to form compounds of the pattern:
202
VersaForm XL
IF TEMP > 100 THEN
PROMPT ('TOO HOT')
ELSE IF TEMP < 50 THEN
PROMPT ('TOO COLD')
ELSE PROMPT ('JUST RIGHT');
In this case, the ELSE clause of the first statement is itself an IF statement.
Anywhere a simple statement can be used, a compound statement can be used
instead. This allows you to form "nested" statements such as:
IF X>Y THEN
BEGIN
B.NAME := A.NAME ;
IF X > 10 THEN
CANCEL
ELSE
PROMPT ('Continue?');
IF NOT YESNO THEN X := 11 ;
END ;
Here, lines 2 - 5 play the role of a single statement in the IF...THEN of line 1.
REPEAT and WHILE
The REPEAT and WHILE statements provide a way of performing "loops" -groups of statements that are executed over and over.
d) REPEAT statement1 ; statement2 ; .....statementN ;
UNTIL condition;
Example:
L# := LASTLINE (A);
REPEAT
IF L# >0 THEN
IF A.DATE <= TEMPDATE THEN
DELETELINE (A,L#);
L# := L# - 1;
UNTIL L# = 0;
Each line on the primary form is to be compared. If the date is earlier than or
equal to the variable TEMPDATE, the line should be removed. This action is to
repeat, using the next previous line, until there are no lines left to process.
NOTE: In a REPEAT loop, the statements ALWAYS execute at
least once; whether they actually repeat, depends on when the
UNTIL condition becomes true.
All the statements between REPEAT and UNTIL are executed each time.
Writing Procedures
203
e) WHILE condition DO statement1 ;
Example:
While LASTLINE (A) > L# DO
BEGIN ..... END ;
As long as column lines remain on the primary form, that is, the number of lines is
greater than the current line (the value in L#), the statement which follows should
be executed.
NOTE:A WHILE statement differs from a REPEAT statement in
that the statement may not execute at all, depending upon whether
or not the WHILE condition is true.
This is because the WHILE statement tests the condition before executing the
statement that follows, whereas a REPEAT tests the condition afterward. Notice
too that a WHILE compound executes only one statement. If more are needed,
they should be grouped into one statement by BEGIN and END, as shown in the
following example:
01
02
03
04
05
WHILE X>Y DO
BEGIN
X := X-1 ;
PRICE [X] := COST [Y] ;
END ;
In this case, lines 2 through 5 make up one (compound) statement. Lines 3 and 4
are executed as long as X is greater than Y.
It is important, when writing a loop, to make sure that the loop does not go on
forever, as the following example would:
I := 9; WHILE I > 0 DO PROMPT ("HELLO") ;
Some statement in the loop must change the variables so that the loop condition
will eventually fail, and the loop end. For example, to fix the previous example so
that the message "HELLO" would print only nine times, you could write:
I := 9
WHILE I > 0 DO
BEGIN
PROMPT ("HELLO") ;
I := I - 1 ;
END ;
204
VersaForm XL
Procedure Chaining
Chaining allows several VersaForm XL procedures to execute in sequence, thus
permitting you to control which procedures execute and when.
NOTE: You may only chain to a USER procedure.
Suppose an invoice form needs to look up items in both a customer file and an
inventory file, but only when certain items on the invoice have been changed by the
user.
The appropriate time for this to happen is during validation, after data checking
but before automatic data filling and calculation. A CHECKING procedure might
then contain the following statements:
IF CHANGED (ACCOUNT#) THEN CHAIN ('GET CUSTOMER');
IF CHANGED ( ITEM# ) THEN BEGIN
PROMPT ( 'Lookup part? ' );
IF YESNO THEN CHAIN ( 'GET PART#' ) ;
END ;
The first statement will cause the USER procedure GET CUSTOMER to run
when the user enters a new account number.
The second statement will cause the USER procedure GET PART# to run if the
user keyed in a new ITEM# and responded Y to the prompt.
If both user procedures are chained, they will be run in turn, after the CHECKING
procedure has been executed. Each procedure may access a different secondary
file.
All chaining is done on a first-in first-out basis. If a procedure that was "chained
to" also does a chain, that request will be met after all pending requests are
satisfied. If procedure A chains to procedures B and C, and B chains to
procedure D, the order of execution will be ABCD.
$
After exiting a chain of procedures, the last secondary file is closed unless it is on
display (this is a change from earlier releases). This means that
no longer
goes to the last secondary file automatically and unsaved changes in the last
secondary file are lost.
Calling Procedures
Procedures can call other procedures. When one procedure calls another, the
called procedure executes immediately, and when it ends control returns to the
caller. A single variable can be passed to the called procedure, which is retrieved
Writing Procedures
205
by using the GETPARAM function. A single value can be returned (using
RETURN) to the caller, since the built-in routine CALL is a function.
The called procedure does not have to be on the same file as the caller. It can be
on the secondary file, or a VOPENed file. If you call a procedure on another file,
be sure that the file is open! (Secondary files are automatically opened by the
system.)
The called procedure can itself have secondary files and other files. Item names
(e.g., A.CUSTOMER, B.ADDRESS) in the called procedure refer to the same
files as they would normally. Global variables in the called procedure refer to
*START variables in the CALLed procedure's file. If the CALLed procedure is on
a file other than the original primary file, the *START procedure for that file won't
have been run, and therefore the globals for that file won't have been initialized. If
you want to initialize them, you must do so explicitly.
Warning: Procedures are not recursive. That is, a procedure
should not CALL itself, or a procedure that calls it, etc.
CHAINs from a called procedure occur only at the end of the top level calling
procedure.
For example, if SAMPLE is the original file, and procedure X on SAMPLE
chains to Y (on SAMPLE) and then calls Z on INVENTORY, Z will run before
X finishes, and of course before Y. If Z refers to an item called A.CUSTOMER,
that denotes an item on INVENTORY, not SAMPLE. Likewise if Z refers to a
global variable, that would be a global established by INVENTORY's *START,
not SAMPLE's. This would be true whether INVENTORY's *START
procedure had run or not.
CANCELLING PROCEDURES
You may want to cancel further procedure execution under certain circumstances.
For example, when looking up a PART# on an inventory form from ITEM# on an
invoice, you would want to stop validation if the matching PART# was not in the
inventory file. The user procedure GET PART# would have the following
statements in it to handle this situation:
206
VersaForm XL
IF A.ITEM# <> B.PART# THEN
BEGIN
PROMPT ( 'Item not found' ); BELL; CANCEL;
END
ELSE
BEGIN
...
END ;
If the PART# cannot be found, a message appears, the bell sounds, and the
procedure is cancelled. Any other procedure that might run as the result of a
CHAIN command and, in this case, any further validation, is also cancelled. The
operator will see the error message "Item not found" at the bottom of the screen.
AUTOMATIC ROUNDING AND NUMERIC PRECISION
When VersaForm XL performs a calculation, the number of decimal places in the
result can be up to 8 digits of precision. Less precision will be used if possible.
You may alter the way precision is determined by using the following statement:
SET ( ROUNDING ) ;
When the ROUNDING flag has been set, all expressions computed in procedures
will have an internal accuracy of up to 8 digits and then be rounded to the number
of decimal places determined by the maximum precision of the components of the
expression. To turn off automatic rounding, use the statement:
CLEAR ( ROUNDING ) ;
NOTE: At the start of a filing session, ROUNDING is always
cleared. If you set ROUNDING in any procedure, it will stay set
for all procedures until you clear it.
Normally you need to be concerned with precision only when performing
multiplication or division. When two numbers are multiplied the precision of the
result is greater than each of the components. Example:
1.01 * 1.01 has a value of 1.0201
If ROUNDING is set the number will be displayed as "1.02" because each of the
components has a display precision of 2 decimal places. Division can also result in
greater precision.
Writing Procedures
207
Examples of ROUNDING set and cleared:
EXPRESSION
5.8 * 2.6
ROUNDING
SET
15.1
ROUNDING
CLEARED
15.08
2 / 3
1
.66666666
2.000 / 3
.667
.66666666
0.0000 + 2 / 3
.6667
.66666666
ROUND (2/3, 5)
.66667
.66667
There are three ways to control the precision of a result.
1.
If the result is to be assigned to an item on the form, change the "JUSTIFY
(L/R/#)" field in the item's checking and filling specifications to the number
(0 through 9) of decimal places to be displayed for the item.
2.
With ROUNDING set use a constant (e.g 0.000) in an arithmetic expression
that has as many decimal places as you wish the result to have. The result
will have that display precision unless some other component of the
expression has more precision.
3.
Use the ROUND function to control the number of decimal places displayed.
The ROUND function not only changes the display precision of the value but
also rounds the value as well.
Example: ROUND (2/3, 4) has a value of 0.6667
AUTOMATIC PADDING
When a form item is used in an expression or an expression is assigned to an item,
all leading and trailing blanks are removed. To leave these blanks unchanged, use
the following statement in a procedure:
SET ( PADDING ) ;
To turn this feature off and allow the blanks to be removed,use the statement:
CLEAR ( PADDING ) ;
At the start of a filing session PADDING is cleared. If a procedure sets
PADDING it will stay set until explicitly cleared.
Automatic padding is useful when you wish to export data in a column format or
write a procedure to print a custom report or form. You may also use the PAD
208
VersaForm XL
function. See the sample procedure "EXPORT DATA" in the VersaForm XL
sample procedure file PROCFILE to see how the PADDING flag is used.
READING OR IMPORTING ASCII FILES
You may read data from an ASCII file into a variable or form item one line at a
time with the READ procedure. This file may have been created with a word
processor or other program.
An ASCII file is no more than a sequence of characters separated by "carriage
return" and "line feed" characters whenever a new line is wanted. The
TEXTINPUT procedure names the file that will be opened for input. Lines of text
may be read from this file using the READ procedure.
The READ procedure will read up to 80 characters or until a "carriage return"
character is encountered. You will know that a "carriage return" has been found if
the line read is less than 80 characters in length. Example:
TEXTINPUT ( 'B:MEMO.TXT' ) ; {this opens a file called
MEMO.TXT on Drive B}
READ ( DATA ) ;
{a line of text is
read from MEMO.TXT
into the variable DATA}
TEXTINPUT ( CLOSE );
{this closes the file
MEMO.TXT so that another
file can be opened}
It is now possible to assign the value of DATA to an item on your form. You can
also use the STR function to extract parts of DATA to be assigned to several
items. See the sample procedure "IMPORT DATA" (on PROCFILE) on how to
do this.
Since a variable can hold, at most, 80 characters, the READ procedure will only
read at most 80 characters at a time. If a line is 80 or more characters in length, it
will take more that one READ to process that line.
Lines of any length may be handled by doing several READs. By testing the
length of DATA you can determine when the end of the line has been reached. If
you READ a line and its length is 80, you must perform at least one more READ
to reach the end of that line. If the length of DATA on the next READ is zero,
you then know that the line just read was exactly 80 characters long. The
following example shows how to read and faithfully reproduce a text file on the
printer:
Writing Procedures
209
TEXTINPUT ( 'B:MEMO.TXT' );
REPEAT
READ ( DATA );
IF NOT IOERROR THEN
BEGIN
PRINT ( DATA );
IF LENGTH ( DATA ) < 80 THEN
PRINT (CR); {print carriage return}
END ;
UNTIL IOERROR ;
TEXTINPUT (CLOSE); {remember to close the file}
Note that in the above example a "new line" character (CR) is printed only when
the length of DATA is 79 characters or less. It generates both a "carriage return"
and "line feed" when printed. The function IOERROR will be TRUE when the
READ procedure tries to read beyond the last line of MEMO.TXT or if there is an
error reading the file. IOERROR will also be TRUE if you forgot to open the
TEXTINPUT file.
The VREADCH function will read a single character from the currently opened
textinput file. The following example will read 1 character from COM1 and write
the value on the screen at the current cursor location:
textinput ('COM1');
while not ioerror do
put (vreadch);
textinput (close);
WRITING ASCII FILES
You can write data to a text file by first using the PRINTFILE procedure to create
the file and the PRINT procedure or the PRINTFORM procedure to write the
data. This can be useful for exporting data for use by other programs such as
spreadsheets or word processors.
The PRINTFILE procedure redirects output from a PRINT statement, normally
going to the printer, to a file on disk. It also redirects output from a PRINTFORM
statement in a procedure or the "PRINT" command issued from the command
menu. At the start of the filing session, output from the above statements is sent
to the printer.
210
VersaForm XL
If the file named in the PRINTFILE statement already exists, its current contents
are erased. Example:
PRINTFILE ( 'B:OUTPUT.TXT' ) ;
{this creates a file on drive B, erasing
any previous file by that name. Output
from the following statements is now sent
to the file OUTPUT.TXT }
PRINT ( 'Hello' & CR ) ;
PRINTFORM ( A, 'INVFMT', '' );
PRINTFILE (CLOSE);
{PRINT statements will now send data to the printer}
To append to an existing file, use the EXT_PRINTFILE built-in (see Chapter 15).
NOTE: The current print file stays open until a procedure statement
closes it. If the output file is never closed, any PRINT or
PRINTFORM statement in any procedures executed later during
the same filing session will continue to write its data to the output
file. At the end of the filing session, the print file is automatically
closed.
I/O ERROR HANDLING
The IOERROR function tells whether or not the most recent I/O (input or output
operation) was successful. Its value is reset to TRUE or FALSE each time a
procedure performs an operation that transfers data between memory and a disk or
printer.
The IOERROR function will be set to TRUE if an attempt is made to read past the
end of a file. It will also be set to TRUE when a form is not found, or a form
cannot be read because of bad data. When writing data, the IOERROR function
will be set to TRUE if the file or disk is full or the file was not open for output.
When opening a text file, the IOERROR function will be set to TRUE if the file
does not exist (in the case of a TEXTINPUT file) or the file name or drive
designator is invalid.
The IOERROR function may be tested (e.g. IF IOERROR THEN ...) as many
times as you wish and will not change its value until the next I/O routine is
performed. Here are the built-in procedures that reset the value of IOERROR:
Form I/O: FIRSTFORM, LASTFORM, GETFORM, SAVEFORM,
NEXTFORM, BACKFORM, REMOVEFORM
Text I/O: TEXTINPUT, PRINTFILE, PRINT, READ
NOTE: In the statement
Writing Procedures
211
FIRSTFORM (A);
IF IOERROR THEN PRINT ('FIRSTFORM had an error' );
IF IOERROR THEN PRINT ('PRINT had an error.');
the value of IOERROR is changed by the first PRINT statement, so
the second test refers to the result of the PRINT statement, not the
FIRSTFORM.
MORE THAN TWO FILES
You may have up to 10 VersaForm files open in a procedure. The primary and
secondary files behave as described above. To open more than two files, two
built-in routines, VOPEN and VCLOSE, are used.
Files opened with VOPEN can be manipulated with any function that uses a file as
an argument. Fields in these files cannot, however, be accessed in the normal way
within the VersaForm XL language. You must use ASSIGN and RETRIEVE to
access these fields.
For instance, if the field TOTAL is in a secondary file, you can write
X := B.TOTAL;
But if it is in a file opened with VOPEN, say D, you cannot say
X := D.TOTAL;
instead, you must say
X := RETRIEVE (D, 'TOTAL', 0);
Example:
var lookupfile;
...
lookupfile := vopen ('lookup.vf');
{opens the lookup file}
if lookupfile <> 0 then
begin
{ put cust name in the key field, "key" }
assign (lookupfile, 'key',0, a.customername);
getform (lookupfile);
if not ioerror then
begin
{get the data}
B.name := retrieve (lookupfile,'name',0);
B.addr := retrieve (lookupfile,'address1',0);
end;
if vclose (lookupfile) then prompt ('File closed');
...
Be sure to VCLOSE files that you have VOPENed. VersaForm won't do it for
you.
212
VersaForm XL
To use ENTERITEM on a third file you need to declare a variable and set it equal
to the name of the field you want to fill in. Then use that variable as a parameter in
the ENTERITEM statement. For example:
prompt ('Calculate interest (Y/N)');
Z:= 'Interest?';
if enteritem (stmtfile, Z, 0) then;
where:
stmtfile is the name of the variable assigned to the third file,
Z is the variable to hold the field name "Interest" on the third file
0 indicates that the field is a single item field
To use INSERTLINE on a third file, you need to declare a variable and set it equal
to the line number, before executing an INSERTLINE in a procedure.
For example:
var cline;
{line number for the third file}
...
cline := 1;
INSERTLINE (stmtfile, cline);
WINDOWING ROUTINES
Four simple routines, INFOMSG, BELLMSG, YESNOMSG, and ANSWERMSG
display a message in a pop-up box and wait for the user to answer or press
ENTER.
For examples, see the routine descriptions in Chapter 15.
For more general window usage, functions are provided to create and delete a
window of arbitrary size and color.
The function VOPEN_WIN (x, y, width, height, color, title) opens a window of
the given width and height with its upper left corner at (x,y). When a window is
open, GOTOXY, GET, PUT, and CLEARSCREEN operate within the window.
Only the last window opened is active.
The total size of all windows open at once is limited to approximately 1800
characters.
The function VCLOSE_WIN (handle) closes the window.
The windowing functions use a single number for the attributes, which is the same
as the VersaForm setup uses. This leaves the SETATTR function as the only one
which uses separate arguments for foreground and background. To be consistent,
a new version of SETATTR has been provided, which uses the single number
form. It is called SET_ATTRIB.
Example:
Writing Procedures
213
SET_ATTRIB (31);
sets the screen attributes to white on blue.
The argumentless functions NORMAL_VID and REVERSE_VID will give you
the current video attributes (which, of course, depend on the installation.) Thus,
to display a window in the current reverse video attributes, you would write:
VOPEN_WIN (....., REVERSE_VID, ...);
INCLUDE
Procedures may include source statements from external files. This gives you a
way of using a standard editor or word processor that will save files in ASCII
format (one such is VFEDIT, a text editor included on your VersaForm directory)
on your procedures.
To include a set of procedure instructions written with an external text or, do the
following:
1.
Create a new procedure or get the old procedure you want to update.
2.
In line 1, or wherever you want to insert the instructions you have written,
enter the following statement by itself at the beginning of the line:
{$I filename}
Where filename is the name of the ASCII file containing the procedure
statements to be included. Be sure to include the curly brackets.({ })
3.
Press
#
to compile the procedure and save it.
Any text following the comment bracket on the same line is ignored.
FILE HANDLING
When opening a file that is already open, the caller gets the existing file. The file is
not re-opened. This is implemented by means of an open count. When closing a
file, it is actually closed only if the open count is 0.
VOPENed files stay open until explicitly closed.
Data buffers for files without details are only as big as the single item portion of
the file. A screen buffer for a file is not allocated until it is needed. This means
that files opened with VOPEN that don't have details are fairly light memory users.
A similar advantage may be gained on files with details if the number of details is
limited.
214
VersaForm XL
PROCEDURE HANDLING
At end of procedure chain, all procedures on open files are removed from memory,
except for procedures on the the original file. All validation information on open
files is removed from memory, except for the original file.
At the end of any procedure not on the original file, all procedures on that file not
currently in use are removed from memory. When memory is short, procedures
not in use may be removed from memory at any time.
Errors and Exceptions
If your form contains an item that has the same name as a function, constant, or
variable, you must qualify the item name with a FORM ID. Use either
A.ITEMNAME, if it's on the primary form, or B.ITEMNAME, if it's on the
secondary form. If this isn't done, you may only get a warning when you save your
procedure, but when it runs, you won't be referencing a form item.
For example, VersaForm XL has a built-in function called VDATE, which yields
the current date. If an item on your primary form is also called VDATE, then if
you wrote this statement:
SHIPDATE := VDATE ;
you would only get a warning about VDATE when your procedure is saved; but
later, when your procedure executes, SHIPDATE would get today's date instead
of the value of the form item VDATE.
If, on the other hand, your statement was:
VDATE := SHIPDATE ;
you would get an error when you saved your procedure because VersaForm XL
assumes you are trying to assign a value to a built-in function, which is not
allowed.
VersaForm XL determines what an identifier refers to by following these rules:
1.
A qualified form item name (e.g., B.CUSTOMER) is searched for on the
appropriate form. If the item isn't found, a warning is issued. For example:
WARNING - A.CUSTOMER not found on form.
Continue? (Y/N)
See "The Continue? Message" below.
2.
If the identifier is found on both forms, a warning is given but VersaForm
XL assumes you mean the primary form:
Writing Procedures
215
WARNING-DATE is on both forms, primary assumed. Continue?
3.
(Y/N)
If an item name on either form has the same name as a built-in procedure or
function, variable or constant, an appropriate warning is given. One example
of such a conflict has been given above (VDATE). For another, the
statement "VAR ADDRESS" would cause an error message if it was also a
form item:
WARNING-ADDRESS variable has same name as form item. Continue? (Y/N)
4.
When a variable or constant is given, an error message appears if it
duplicates another variable or constant (local or global) or a standard
function. For example:
ERROR - Identifier already global:
or
ERROR - Identifier is a reserved word:
5.
For an unqualified identifier (i.e., a form item not identified by A or B),
VersaForm XL first determines if the identifier has been declared as a
function, variable, or constant. If it has not, first the primary form, then the
secondary form (if available) is searched. If the item isn't found a warning is
issued:
WARNING - CUSTOMER not found on form.
Continue?
(Y/N)
THE “CONTINUE MESSAGE”
When you SAVE a procedure, you may see a WARNING message followed by a
"Continue?" prompt. If you respond Y, VersaForm XL will continue to check
other items in the procedure and then SAVE it.
Later, when you enter the FILING program and this procedure is loaded,
VersaForm XL will once again check to see if the items are on the form(s). You'll
see the same message again. This time, a Y response tells VersaForm XL that it's
okay to run the procedure.
If you reply N to the "Continue?" prompt when attempting to SAVE a procedure,
the cursor will be returned to the last line on the procedure instructions form and
you'll have a chance to fix the error. If the error occurred in an included ASCII
file, then you'll have to fix the error using VFEDIT or your own word processor.
If a line number is given, make a note of it before you switch to your editor so you
can locate it more quickly.
A response of N to "Continue?" during the FILING session will usually return you
to the Main Menu.
216
VersaForm XL
When a procedure runs, if it makes reference to an item that has not been found,
the item will return a "null value" (a blank). If a value was assigned to a missing
item, the assignment operation is ignored.
Chapter 15
BUILT-IN PROCEDURES AND FUNCTIONS
NOTATION
As explained earlier, you can call built-in procedures and functions by name, giving
them the values (parameters) you want them to work with.
The notations defined below are used to identify the language elements which
replace them in procedure statements. For instance:
Somefunction (AorB, EX1, formitem) means that Somefunction has 3 parameters,
the first of which is either A or B, the second can be any expression, and the third
of which must be an item from a form.
AorB
Identification for either the primary form (A) or secondary
form (B).
FILE
Either the primary form (A) or secondary form (B), or a file
handle opened by VOPEN.
EX, EX1, EX2
Expressions.
FORMITEM
An item on a form. May be qualified by A or B, as A.QTY or
B.PRICE.
FORMTYPE
A VersaForm form type--these are: VFDATA, VFORMAT,
VREPORT, VPRINTCTL, VCOPYCTL, VPRINTFMT,
VPROCSRC, VPROCOBJ, VMISC, VCHECKS,
VRANGES, VLISTCHECK, VTABLE, VCOMP, VFMT,
VACCUM, VPFMTSRC, VPFMTOBJ.
ITEM
Either a form item or a variable.
L#
Current line number. You can set L# only to values between
1 and LASTLINE+1. For example: A.L# := 1 sets the
primary form current line number to 1.
N
A line number.
218
VersaForm XL
Built-in Routines
MANIPULATING FORMS
Procedures
CLOSE_COPYFORM
COPYCOLS (File, File)
COPYFORM (File, File)
DISPLAY
(File)
PAGE
(File, EX)
PgDn
(File)
PgUp
(File)
PRINTFORM (File,EX1,EX2)
TEST_PRINTFORM (File,EX1)
VDISPLAY (File,EX1,EX2)
Functions
Action
Removes transfer list from memory
Copies column lines
Copies a form between files
Displays the form
Displays form starting at Line#
Page Forward
Page Backward
Prints form with format
Test print form with format
Displays form at coordinates
Action
SETFLDINFO (File, EX1, EX2, EX3) Sets field attribute
SETUP_COPYFORM (File, File, File) Sets up for COPYFORM
SETUP_PRINTFORM (File, EX1)
Sets up print format before PRINTFORM
VNOKEY
Sets whether data can be entered in field
VPICK
Sets PICKLIST field attribute
These procedures perform a VersaForm command:
GETFORM
SAVEFORM
NEXTFORM
FIRSTFORM
ERASEFORM
(File)
(File)
(File)
(File)
(File)
REMOVEFORM
CLEARFORM
BACKFORM
LASTFORM
(File)
(File)
(File)
(File)
Built-In Procedures
219
Manipulating Column Lines
Procedures and functions that deal with column lines on a form include:
Procedures
CLEARCOL (File)
COLSORT (File,fld1,ord1,
fld2, ord2,
fld3, ord3)
DELETELINE (File, N)
INSERTLINE (File, N)
Functions
COLTOTAL (FORMITEM)
DEPTH
(File)
FINDLINE (FORMITEM, EX)
LASTLINE (File)
MAXLINE (File)
SEARCHLINE (File,FORMITEM,
EX1,EX2)
VCOLTOTAL (File, FORMITEM)
Action
Removes all column lines
Sorts column area of form
Deletes column line
Inserts a blank line
Action
Returns column total
Maximum lines displayed
Finds particular line
Number of column lines
Maximum lines on form
Finds particular line
Returns column total
220
VersaForm XL
ENTERING AND TRANSFERING DATA
Procedures
Action
ASSIGN (File, name, N, item)
BELLMSG (ex-msg)
CLEARSCREEN
ERRORMSG (ex-msg)
EXT_PRINTFILE (ex-filename)
FGET (str, code, kval)
GET (item)
GETCH (ch, code, keyvalue)
GETXY (item-x, item-y)
GOTOXY (ex-x, ex-y)
INFOMSG (ex-msg)
PRINT (ex)
PRINTFILE (ex)
PROMPT (ex)
PUT (ex)
READ (item)
RESTATTR
SETATTR (foregnd, backgnd)
SET_ATTRIB (attributes)
TEXTINPUT (ex)
VOUTPUT (ex)
VREADCH
Assigns a value
Popup msg with bell
Clears the screen
Popup error message
Extends text file
Gets a response
User enters item
Reads KB, no echo
Gets cursor location
Moves the cursor to x,y
Popup message
Writes to printer or file
Opens text output file
Writes message to screen
Writes to the screen
Reads text file line
Restores colors
Sets screen colors
Sets screen colors
Opens text input file
Writes to printer or text file
Reads text file character
Functions
Action
ANSWERMSG (ex-msg, ex-default)
ASK_FILENAME (ex, ex, ex, ex)
CURSORITEM (name, n)
ENTERITEM (File, formitem, n)
FIELDTYPE (File, name)
GOTOITEM (File, formitem, ex)
KEYSTRUCK
NORMAL_VID
PRINT_LABELS (file, file, ex)
RETRIEVE (File, name, n)
REVERSE_VID
RUN_REPORT (File, Report name)
SAVENEEDED (File)
USER_DID_ESCAPE
YESNO
YESNOMSG (ex-msg, ex-Y/N)
Popup msg with answer
Ask for filename
Where is cursor?
Enter a data item
Locates a field
Moves the cursor
TRUE if key pressed
Normal video attributes
Prints labels
Gets a value
Reverse video attributes
Runs a report
Has form changed?
Did user escape?
Waits for a 'Y' or 'N'
Popup, waits for 'Y' or 'N'
Built-In Procedures
221
MANIPULATING STRINGS
Functions
DUP (ex, length)
FORMAT (format, ex)
JUSTIFY (ex, length, type)
LASTPOSN (ex1, ex2)
LENGTH (ex)
LTRIM (ex)
PAD (ex, length)
POS (ex1, ex2)
POSN (ex1, ex2)
RPAD (ex, length)
RTRIM (ex)
SELECT (ex, ex1, ex2)
SIZE (item)
STR (ex, start, length)
VSIZE (File, ex)
Action
Duplicate a string
Change string format
Return a justified string
Position of last ex1 in ex2
Current string length
Removes leading blanks
Pad with trailing blanks
Position of ex1 within ex2
Non-case-sensitive position
Pad with leading blanks
Removes trailing blanks
Uses ex to choose ex1 or ex2
Maximum item length
Return a sub-string
Maximum item length
APPLICATION MAINTENANCE FUNCTIONS
These functions can operate on data forms, reports, print formats, procedures, etc.
Function
Action
VCOLTOTAL (file, column)
Column Total
VCOMPARE (file, file, ftype, key1, key2, n, neq) Compare Forms
VCOPY (file, file, ftype, key1, key2, repl)
Copy Forms
VCOUNT (file, ftype, KEY, n-item)
Count Forms
VDELETE (file, ftype, KEY, n-item)
Delete Forms
VRENAME (file, ftype, key1, key2, n-item)
Rename Forms
LOCKING AND TRANSACTION
Procedures
COMMIT
ROLLBACK
SET/CLEAR/POP (locking)
SET/CLEAR/POP (auto_lock)
SET/CLEAR/POP (rollback_on)
UNLOCKFILE (File)
UNLOCKFORM (File)
Actions
Commits the transaction
Performs a rollback
Turns all locking on or off
Turns auto locking on/off
Turns rollback on or off
Unlocks a file
Unlocks current form
Functions
LOCKFILE (File, exclusive/shared)
LOCKFORM (File, exclusive/shared)
Actions
Requests file lock
Requests form lock
222
VersaForm XL
WINDOWS AND PICK LISTS
Functions
Action
APPENDLIST (list handle, list entry)
DISPLAY_HELP (file, field, H)
MENU (ex, ex, ex, item, item, item)
PICKFIELD (file, field)
PICKFILE (win handle, start point)
PICKINDEX (file, index name,
win handle, start point)
PICKLIST (win handle, list handle
item)
VCLOSE_LIST (ex-list handle)
VCLOSE_WIN (ex-window handle)
VOPEN_LIST
VOPEN_WIN (x, y, wid, ht, attr,
title)
Adds entry to list
Displays context sensitive help
Displays menu, user choice
Picks a field from a form
Picks item from text file in window
Picks form from index list
Picks item from previously
created list
Closes list
Closes window
Opens list
Opens window
PROGRAM CONTROL
Procedures
CANCEL
CHAIN (Procedure name)
RETURN (ex)
VEXIT
VQUIT
Functions
CALL (File, EX1, EX2)
DOS_EXEC (EX1)
EDIT (File, window)
GETPARAM
Action
Ends procedure, returns control to user
Runs another procedure
Ends procedure, returns ex
Exits to the Main Menu
Returns to DOS
Action
Calls one procedure from another
DOS will execute the command
Allows entry in indicated file
Gets passed parameter in called procedure
Built-In Procedures
223
OTHER PROCEDURES AND FUNCTIONS
Procedures
BELL
DISPLAYFILE
SET/CLEAR/POP
SET/CLEAR/POP
SET/CLEAR/POP
SET/CLEAR/POP
SET/CLEAR/POP
Action
(auto_prompt)
(padding)
(rounding)
(silent)
(user_may_escape)
Functions
CHANGED (FORMITEM)
CHR (EX)
DATAPATH
FORMATSEQUAL (F1, F2)
IOERROR
LASTCOMMAND
MAX (EX1, EX2)
MIN (EX1, EX2)
ORD (ex)
PREVENT_DELETE (File)
PRINT_CTL_STR
PROGRAMPATH
ROUND (EX, N)
SYSTEM_COLOR (ex)
TEST (Flag)
VCLOSE (EX)
VDATE
VDAY (EX)
VMONTH (EX)
VOPEN (EX)
VTIME
VUSER
VYEAR (EX)
TRUE, FALSE,
FORMFEED, CR
Rings bell or beeper
Displays text file
Controls automatic prompting
Controls blank padding of expression
Controls rounding in calculation
Controls user's ability to escape
Controls user's ability to escape
Action
True if item changed
Returns character value
Returns default path
True if forms are the same
True if I/O error occurred
Last command requested
Larger of EX1 and EX2
Smaller of EX1 and EX2
Returns ASCII value
Are deletions prevented?
Returns printer control str
Returns VF path of program files
Round EX to N decimals
System color attribute depending on ex
Returns value depending on test result
Close handle EX
Current date
Day number
Month number
Open file EX, return handle
Current time
User ID
Year number
Return special values
224
VersaForm XL
Alphabetical Listing of Built-in Routines
ANSWERMSG (msg, default answer) Function.
Displays a message in a pop-up box and waits for the user to enter a reply.
Example:
var inp;
inp := ANSWERMSG ('Enter the name: ', 'MYFILE');
The default reply is "MYFILE". The reply will be assigned to the variable
"inp".
APPENDLIST (ex-list handle, ex-list entry) Function.
Adds the list entry to the list. Returns a handle for the list entry; returns 0 if
the entry was not added to the list. At most 127 entries can be added to a
list. For an example, see PICKLIST.
ASK_FILENAME (msg, default path, default name, existing file?) Function.
Requests a file name in the standard pop-up box and waits for the user to
enter a reply. The last parameter should be TRUE if you want the user to
enter the name of an existing file, and FALSE if you want the name of a new
one.
Example:
var inp;
inp :=
Ask_filename ('For the next file:', '', '', TRUE);
The reply will be assigned to the variable "inp".
ASSIGN (File, ex-item name, N, ex-value) Procedure.
Finds item name in File and gives it the value. Item name can be a string or a
variable. If item name is a field name it is the contents of that field that is
denoted, not the field itself.
Example:
var x:
begin
x := 'Customer';
Assign (A, x, 0, 'Robinson');
...
Places the value Robinson in the field called Customer on form A (assuming
that Customer is there and it isn't a column item). This is useful when you
don't know at the time you are writing the procedure which field will be
accessed.
Built-In Procedures
225
AUTOPROMPT Flag.
Used to disable or enable the autoprompt feature. Use SET
(AUTOPROMPT) to turn on auto prompting, use CLEAR
(AUTOPROMPT) to turn it off.
BACKFORM (File) Procedure.
Example: See FILING COMMAND PROCEDURES, below.
BELL Procedure.
Sounds bell or beeper.
Example:
BELL; PROMPT ('WARNING') ;
Sounds the beep and prints the message "WARNING" on the screen.
BELLMSG (msg) Procedure.
Displays a message in a pop-up box, sounds the bell, and waits for the user
to press ENTER.
Example:
BELLMSG ('I/O Error');
CALL (File, ex-procedure name, ex-parameter) Function.
Calls one procedure from another. The called procedure may be on the same
file as the caller, or on another. If it is on another file, that file must already
have been opened, either as a secondary file or with VOPEN. The name of
the called procedure must be given in a variable or item, or in quotes. The
parameter is available to the called procedure via GETPARAM. The value
returned by the CALL function is the value returned by the procedure. The
called procedure is executed before the next statement in the calling
procedure.
Example:
returned_value := CALL (a, 'subroutine', parameter);
CANCEL Procedure.
Immediately leaves current procedure and returns control to the operator.
All procedures that have been CHAINED (see below) are ignored.
Example:
226
VersaForm XL
IF IOERROR THEN
BEGIN
PROMPT ('I/O ERROR') ;
CANCEL ;
END ;
Prints the message ('I/O ERROR') on the screen and stops the procedure if an I/O
error has occurred.
CHAIN (ex-Procedure name); Procedure.
Adds the procedure whose name is given to the list of procedures to be run
when this one finishes. The name of the procedure chained to (FILLCUST)
must be in quotes if it is given literally, like any other string.
Example: The USER procedure FILLCUST is chained only if the item
CUSTNUMBER has been changed.
IF CHANGED (CUSTNUMBER) THEN
CHAIN ('FILLCUST') ;
CHANGED (formitem) Function.
Returns TRUE if form item has been modified since the last validation.
Used mostly in CHECKING procedures, since they run before validation is
complete.
Example: Recomputes AMOUNT, but only if the operator didn't key anything
into AMOUNT.
IF NOT CHANGED (AMOUNT) THEN
AMOUNT := QUANTITY * PRICE ;
This routine can also be used to prevent unnecessary procedure invocations.
Example: The USER procedure FILLCUST will be run only if the item
CUSTNUMBER has been changed. This saves using the procedure
FILLCUST when it isn't needed.
IF CHANGED (CUSTNUMBER) THEN
CHAIN (‘FILLCUST’) ;
CHR (ex) Function.
Returns the character that corresponds to the value of EX when EX has a
value in 0...255.
Example: CHR (65) is the character 'A'. The CHR function can be used to send
a control sequence to your printer to change the font:
PRINT (CHR (15));
Built-In Procedures
227
Using this statement will put most IBM PC printers into compressed mode.
By contrast, the statement PRINT (15) would simply print the two
characters "15" on the printer.
CLEAR (flag) Procedure.
Clear an internal flag. See SET for a list.
Example:
CLEAR (ROUNDING) ;
CLEARCOL (File) Procedure.
Removes all column lines from a form.
Example:
CLEARCOL (B) ;
Removes all existing column lines from the current form on the secondary
file.
CLEARFORM (File) Procedure.
Example: See FILING COMMAND PROCEDURES, below.
CLEARSCREEN Procedure.
Clears the screen.
Example:
CLEARSCREEN;
CLOSE_COPYFORM Procedure.
Removes the transfer list from memory and returns copyform to its normal
function. See SETUP_COPYFORM for an example.
COLSORT (File, ex-fieldname1, ex-order1, ex-fieldname2, ex-order2, exfieldname3, ex-order3) Procedure.
Sorts the column area of a form in either ascending or descending order.
The order argument can be either '+' for ascending order or '-' for descending
order.
Example:
colsort (a, 'Date', '+', 'Qty', '-', '','');
display (a);
saveform (a);
This would sort the column area of the primary form. The date column
would be in ascending order and if two lines have the same date then the line
with the highest qty would come first.
228
VersaForm XL
COLTOTAL (formitem) Function.
Returns the total of a column item. See also VCOLTOTAL
Example:
A.TOTALCOST := COLTOTAL (A.AMOUNT) ;
The total of the AMOUNT column is placed in TOTALCOST.
COMMIT Procedure.
Multi-user version only. Commits the current transaction.
Example:
Commit;
COPYCOLS (File, File) Procedure.
Copies all the column lines (and only the column lines) from the first form to
the second form. Note that the two files must have the same form design.
Example:
Copycols (a, b);
COPYFORM (File, File) Procedure.
Copies the entire form from primary to secondary or vice versa. File formats
must have the same single item length and column line length for this to
work. No other checking is done.
Example: Copy selected forms from secondary to primary. Remove copied forms
on the secondary file.
FIRSTFORM (B) ;
REPEAT
IF B.TOTAL >1000 THEN {if total > 1000 we will}
BEGIN
{copy the form from B to A}
COPYFORM (B,A) ;
SAVEFORM (A);
IF NOT IOERROR THEN REMOVEFORM (B) ;
END ;
NEXTFORM (B) ;
UNTIL IOERROR ;
{or end of file}
{ioerror signals end of file}
NOTE: The built-in COPYFORM can be used to perform a copy by
name, or to copy only certain fields, or both. To do this you use an
auxiliary file, to control the action of COPYFORM. The auxiliary file must
have the same fields as the TRANSFER file that is shipped with the system,
Built-In Procedures
229
CR Function.
Returns the ASCII carriage return character (13) which will cause a carriage
return on the printer or console. VersaForm also adds a line feed character,
positioning the printer for the next line.
Example:
See FORMFEED.
CURSORITEM (item-itemname, item-detailnum) Function.
Returns a value of 0 if the cursor is not in a field; 1 if it is in the field name
portion of the field; 2 if it is in the data area. If the returned value is not 0
(indicating that the cursor is indeed in a field, then the first parameter will
contain the name of the item. Further, if the returned value is 2, the second
parameter will enable you to distinguish between a single item and a detail.
It will contain 0 if the item is a single item and the line number (always > 0)
if the item is a detail line.
Example: (a "help" function)
var name, number;
If cursoritem (name, number) <> 0 then
if name = 'salary' then
prompt ('Enter the employee''s base salary');
This command is useful when used with a *COMMAND procedure to create
context sensitive help.
DATAPATH Function.
Returns the current value of the default pathname for data files.
Example: If datapath is currently 'C:\data' then
displayfile (datapath & '\mymenu');
will display the contents of C:\data\mymenu
DELETELINE (File, N) Procedure.
Deletes column line N. WARNING: Column totals are NOT recomputed.
You must include the specific instructions to recompute them in your
procedure.
Example:
DELETELINE (A,3) ;
A.TOTAL := COLTOTAL (A.PRICE) ;
Line 3 is deleted from the primary form.The column total is recomputed by
the second statement to keep the total correct.
230
VersaForm XL
DEPTH (File) Function.
Returns the number of column lines that can been seen on the display.
DEPTH will be 0 if the form has no column lines.
Example: The DEPTH function is useful when it is necessary to determine when
to "page forward" the column area. If a procedure is processing column
lines the following statement determines when to display the next page:
IF L# MOD DEPTH (A)=1 THEN
PAGE (A,L#);
DISPLAY (File) Procedure.
Displays the form starting with the first column line for that form.
Example:
DISPLAY (B) ;
This statement will display the secondary form starting at line 1. If
DISPLAY is used during *CHECKING, the currently modified line is
displayed. The PAGE procedure should be used instead to control which
lines to display.
DISPLAYFILE (value) Procedure.
Displays the text file whose name is given as the parameter on the screen.
Useful for menus, help screens, etc.
Example:
clearscreen;
displayfile ('helpfile.txt');
repeat until keystruck;
This command is useful for quickly displaying screens stored as ASCII text
files.
DISPLAY_HELP (filename-exp, fieldname-exp, H-exp) Procedure.
Displays context-sensitive help, which it reads from the file VF.HLP. The
key on VF.HLP has two parts: filename and fieldname. If H is TRUE, the
help text from VF.HLP is displayed; if H is FALSE, the prompt text is
displayed.
Example:
Display_help ('sample', 'customer', true);
Built-In Procedures
231
This example displays the help for the customer field on the sample file (if it
exists).
DOS_EXEC (command line - exp) Function.
DOS_EXEC will execute the given command as if it had been typed in at the
DOS command line and then return to VersaForm. It will swap VersaForm
into XMS or Expanded memory or create a swap file on disk to free almost
all memory. If the DOS_EXEC function is successful it will return 0;
otherwise it will return one of the following error codes:
1.
Unable to shrink DOS memory block size. This indicates an error in the
DOS Memory Control Block chain. This is unlikely.
2.
Unable to save the program to either extended memory, expanded memory,
or disk. The new program was not executed.
3.
Unable to execute the new program.
Example:
begin
if dos_exec ('Copy sample.txt new.txt') <> 0
then
prompt ('Unable to copy file');
end;
These statements would perform a DOS copy of the file named
SAMPLE.TXT to a file named NEW.TXT and then return to VersaForm.
DUP (ex1, ex2) Function.
Returns the value of EX1 replicated out to a length of EX2 characters.
Example:
PRINT (DUP (CR,5) & DUP ('*',60));
This example prints 5 carriage returns and then a row of 60 asterisks.
EDIT (File, window) Function.
Allows the operator to enter data in the indicated file, optionally in a
window. The file must be open. If the window parameter is not zero, then it
must be the handle of an open window. The file may not be file A.
The operator may end the editing session with either the SAVE or EXIT
commands. If SAVE, then EDIT will return TRUE; if EXIT, EDIT will
return FALSE. It is up to the caller to actually save the form. EDIT does
not do it.
WARNING: When EDIT ends, it does not re-display the original form.
The programmer must remember to do this.
232
VersaForm XL
NOTE: When using the EDIT function the *CHECKING, *EDIT,
*FILLING, and *PICK procedures of the edited file are executed. When
entering data under EDIT, the filing commands that change to another form
(get, next, etc.) may not be used. The *START, *STOP, *SAVE, and
*COMMAND procedures are not executed. CHAINs and CALLs are
handled normally.
Example: Enter data on form B. There is no window, so B is displayed full
screen.
if yesnomsg ('Enter new data now? (Y/N ', 'Y')
then
begin
if edit (b, 0) then saveform (b);
display (a);
end;
ENTERITEM (File, formitem, exp) Function.
Moves the cursor to the formitem. If the formitem is a detail item, exp is the
line number and must be between 0 and the depth of the form. If the
location is legal and visible, then the operator may enter data into the
formitem. If the operator just presses Enter, the formitem is not changed.
The cursor is not permitted to move out of the formitem, as it would be if
GET were used. ENTERITEM returns TRUE if the item was found, was
visible, and was indeed changed by the user, FALSE otherwise.
It is the programmer's responsibility to make sure that the item is visible.
Use VDISPLAY to control which part of the form is on screen.
Example:
IF ENTERITEM (B, PART#, 2) THEN ...
This moves the cursor to the item PART# in line # 2 on the secondary form,
and lets the operator key in data. If there is no line# 2 or if the PART# in
the secondary file is not being displayed, or if the operator doesn't key in any
data (i.e., just presses Enter) it will be FALSE.
ENTERITEM and GOTOITEM are useful for having users enter data under
the control of a procedure. By using them you can allow users to enter data
into a secondary form.
ERASEFORM (filename) Procedure.
Example: See FILING COMMAND PROCEDURES, below.
ERRORMSG (msg) Procedure.
Displays a message in a pop-up box and waits for the user to press ENTER.
Uses the current error box color.
Built-In Procedures
233
Example:
ERRORMSG ('I/O Error');
EXT_PRINTFILE (filename) Procedure.
Behaves just as PRINTFILE if the file does not exist. But if the file does
exist, PRINT output will be appended to it (instead of deleting the existing
file and creating a new one, as PRINTFILE does).
Example:
ext_printfile ('myoutput.txt');
FALSE Function.
Returns a value when used in an expression. FALSE has an internal value of
zero.
Example: See TRUE, below.
FGET (S-item, code-item, keyvalue-item) Procedure.
Gets a response from the keyboard. The user may key in a string, or, if no
characters have been keyed in, may press a function key or a control key
combination or the Escape key. FGET echos alphanumeric characters only.
Returns:
If code is:
0
The string (in S) is valid, and was ended with a CR (the Enter key).
The CR is not echoed.
1
The user pressed a non-alphanumeric key. Keyvalue contains a key
value which was prefixed, (i.e. an IBM PC extended key code).
2
The user pressed a non-alphanumeric key. Keyvalue contains a key
value which was not prefixed.
Example:
VAR S, CODE, KEY;
{declaration of three variables}
FGET (S, CODE, KEY);
will do the following:
If operator types:
ABC
PgUp (ext. code 73)
Esc
S
‘ABC'
CODE
0
1
2
KEY
undefined
73
27
If the operator typed in an alphanumeric value, then that value will be in S
and CODE will be 0. If the operator pressed PgUp (Extended key code 73),
234
VersaForm XL
then KEY will contain 73 and CODE will contain 1 to indicate that the 73 is
an Extended key code and not an ASCII code. (ASCII code 73 would be
the capital letter I.) If the operator pressed ESC (ASCII code 27), then
CODE will contain 2 and KEY will contain 27.
Note: The keyboard codes are listed in the IBM Technical Reference
Manual. If you don't have a reference manual, write a procedure that will
show you the codes as you press the keys.
FGET is used when you want the operator to press a function key in
response to your procedure. The more usual GET does not allow use of
function keys or Escape.
FILING COMMAND PROCEDURES
The following procedures perform a VersaForm command on either the primary
(A) or secondary (B) file, using the current values of the key items to locate a
form:
GETFORM (File)
REMOVEFORM (File)
FIRSTFORM (File)
SAVEFORM (File)
CLEARFORM (File)
LASTFORM; (File)
NEXTFORM (File)
BACKFORM (File)
ERASEFORM (File) (Undo)
Example:
Assuming that PART# is the key for form A,
PART# := 55;
GETFORM (A) ; {Gets form for part number 55}
IF NOT IOERROR THEN
IF PRICE > 10.00 THEN
BEGIN
PRICE = 1.1 * PRICE ; {raise the price}
SAVEFORM (A) ;
END
ELSE
REMOVEFORM (A) ; {or remove the item}
When these procedures are used, the IOERROR function should be used to
test whether the operation was successful. For example:
GETFORM (B) ;
IF IOERROR THEN
PROMPT ("ERROR READING FORM")ELSE
BEGIN
{GETFORM was successful}
Built-In Procedures
235
FIELDTYPE (File, item name): 0, 1, or 2 Function.
Returns:
0 if the field named is not present
1 if it is a single item
2 if it is a column.
Finds out whether item name is one of the fields in File. Item name can be
a string or a variable. If item name is a field name it is the contents of that
field that is denoted, not the field itself.
Example:
If fieldtype (A, 'Customer') > 0 then
...
will find out if there is a field named "customer" on this form.
Example:
var x;
begin x := 'address';
if fieldtype (a, x) = 0 then
infomsg ('There is no field named '& x &' on this
form.');
will inform the user that no field named "address" exists on the form.
FINDLINE(formitem, ex) Function.
Finds the line number for column item FORMITEM that is equal to the value
of EX.
Example:
B.L# := FINDLINE (B.QTY, 10) ;
B.L# is the line on which the column item B.Qty is 10. If the value is not
found, B.L# gets a value of zero (0).
FIRSTFORM (File) Procedure.
Example:
See FILING COMMAND PROCEDURES, above.
FORMAT (ex-format, ex-string) Function
Format is used to change the format of a given piece of data. For example,
it is used to convert a string to uppercase or strip non-numeric digits. If two
codes are given, they are applied in left-to-right order.
Format Codes:
0-9 specifies number of decimal places for a number
# remove all characters that are not between 0 and 9.
236
VersaForm XL
A remove all characters that are not between A and Z or a and z.
D converts a date into its text equivalent; for example, 7/3/95 would be
converted to July 3, 1995
L converts a string into lower case
N remove all characters that are not between 0 and 9, '+', '-' or '.'
U converts a string to upper case
V removes all characters that are not between A and Z or 0 and 9.
W replaces by a space all characters not between A and Z or 0 and 9.
Y formats a date as YYYYMMDD
Example:
format ('DU', '4/1/95') returns APRIL 1, 1995
format (1, 123.4567) returns 123.4
format ('2#', 344.3241) returns 34432
FORMATSEQUAL (File1, File2) Function.
Returns TRUE if the form designs of the two files File1 and File2 are the
same. For this purpose, only data fields are considered.
FORMFEED Function.
Returns the ASCII form feed character (decimal value 12), which causes a
form feed on most printers.
Example of FORMFEED and CR:
PRINT (FORMFEED & 'Top of page' & CR
& 'Next line')
would print at the top of a page:
Top of page
Next line
GET (item) Procedure.
Gets value from console typed in by the user.
Example:
PROMPT ('Enter new price ') ;
GET (PRICE) ;
After writing "Enter new price ", VersaForm XL waits for the
operator to enter a value. The value will be placed in PRICE.
GETCH (ch, code, keyvalue) Procedure.
Reads a character from the keyboard and does not echo it to the screen.
Returns:
If code is:
Built-In Procedures
237
0
The character (in CH) is a valid alphanumeric character (that is, one
that VersaForm XL would accept as data.
1
The user pressed a non-alphanumeric key. Keyvalue contains a key
value which was prefixed, (i.e. an IBM PC extended key code). The
function keys
behave this way.
2
The user pressed a non-alphanumeric key. Keyvalue contains a key
value which was not prefixed. Most control key combinations (as
well as Escape) behave this way.
This command is useful in a START procedure to get a password from the
operator.
Example
var char, code, key;
begin
getch (char, code, key);
if code = 0 then
{process the character}
else if code = 1 then
begin if key = 59 then
{process function key F1};
end
else if code = 2 then if key = 27 then
{process escape};
GETFORM (File) Procedure.
Example:
See FILING COMMAND PROCEDURES, above
GETXY (x-item, y-item) Procedure.
Returns the current cursor location in the two parameter items.
Example:
var x, y;
...
getxy (x,y);
...
gotoxy (x,y);
{gets cursor location}
{return to where you were}
GETPARAM Function.
Used in a CALLed procedure to get the passed parameter.
238
VersaForm XL
Example:
if SQRT is a procedure that was
called by
if CALL (a, 'SQRT', 7) then ...
then in SQRT,
x := GETPARAM;
will assign 7 to x.
GOTOITEM (File, formitem, exp) Function.
Moves the cursor to the formitem. If the formitem is a detail item (i.e., a
columnar item), exp is the line number and must be between 0 and the depth
of the form. If the location is legal and visible, then GOTOITEM returns
TRUE, else it returns FALSE.
It is the programmer's responsibility to make sure that the item is visible.
Use VDISPLAY to control which part of the form is on screen.
Example:
IF GOTOITEM (B, PART#, 2) THEN ...
This example moves the cursor to the item PART# in line # 2 on the
secondary form. If there is no line# 2 or if the PART# in the secondary file
is not being displayed, it will be FALSE.
GOTOXY (exp1, exp2) Procedure.
Moves the cursor to the exp1'th column and the exp2'th line.
Example:
GOTOXY (5, 0)
This statement moves the cursor to column 5 (the sixth column), row 0 (the
top row) on the screen.
GOTOXY would be useful when constructing a menu inside a procedure.
INFOMSG (msg) Procedure.
Displays a message in a pop-up box and waits for the user to press ENTER.
Example:
INFOMSG ('Hello, World');
INSERTLINE (File, N) Procedure.
Inserts a blank column line before line N.
Built-In Procedures
239
Example:
INSERTLINE (A,1) ;
DESCRIPTION [1] := 'BALANCE FORWARD';
AMOUNT [1] := 25.00;
This inserts a blank line as the first column line on the form (before existing
line 1) and sets up a balance forward charge on that line.
In order to insert a line after the last column line on a form, do the following:
B.L# := LASTLINE (B) + 1 ;
INSERTLINE (B, B.L#) ;
On a form with 10 lines, this would first make B.L# have the value 11, and
then insert a new line before line 11 (i.e., after line 10). INSERTLINE
(B,12) would be illegal. You cannot assign a value to an item on a new line
until the INSERTLINE procedure has been used to add the line to the form.
When a procedure first runs, L# is assumed to be zero (0) on the secondary
form. You must assign a legal line number value to B.L# before referencing
column lines on the secondary form.
IOERROR Function.
Returns TRUE if an input/output error has occurred when reading or writing
a form, or a DOS file.
IOERROR also becomes true when trying to read or write after end of file is
reached. Thus it can be used to stop procedures that repeat until the end of
file is reached.
Example:
REPEAT
NEXTFORM (A) ;
UNTIL IOERROR ;
This reads each form in the file until the last form has been read or
an error occurs reading a form.
JUSTIFY (ex-string, ex-length, ex-type) Function.
Returns a string that is justified left, right, center or right justified and zero
filled. The string returned will be the length specified.
Type can be one of the following:
C Center the string
L Left justify the string
R Right justify the string
Z Right justify the string and fill the blanks with zeros
240
VersaForm XL
Example:
var S;
begin
clearscreen;
gotoxy (0,12);
s := justify ('Hello World!', 80, 'C');
put (s);
end;
The result is "Hello World" centered in an 80-character string.
KEYSTRUCK Function.
Returns TRUE if a key has been pressed, and ignores the character that was
entered.
Example:
IF KEYSTRUCK THEN
BEGIN
PROMPT('Printing halted. Press any key to resume');
REPEAT
{empty loop--waits for user}
UNTIL KEYSTRUCK ;
END ;
This will send the prompt only if the user has pressed a key, and then allows
the user to resume by pressing another key. This function can be used in a
loop to allow the operator to quit the process.
LASTCOMMAND Function.
Returns a value (see Command Procedures, above) indicating which was the
last command requested.
Example:
if lastcommand = '?' then {provide help}
LASTFORM (File) Procedure.
Example:
See FILING COMMAND PROCEDURES, above
LASTLINE (File) Function.
Returns the current number of column lines on a form.
Example:
L# := 1
REPEAT
PRICE
L# :=
UNTIL
;
:= .9 * PRICE;
L# + 1 ;
L# > LASTLINE (A);
Built-In Procedures
241
This example reduces the PRICE on each line, including the last line, by
10%.
LASTPOSN (s1, s2) Function.
Returns the location of the last occurence of s1 in s2. See POSN.
LENGTH (ex) Function.
Returns the length of EX.
Example:
PRINT (LENGTH ('12345678')) ;
This prints the value "8" because the length of the string '12345678' is 8
characters.
LOCKFILE (File, exclusive/shared) Function.
Multi-user version only. Requests a lock of the current file. Returns blank if
the lock was granted, holder's name if not.
Example:
VAR X;
Begin
X := LockFile (A, exclusive);
if X <> '' then
infomsg('this lock is held by ' & x)
else {the lock was granted}
begin...
LOCKFORM (File, exclusive/shared) Function
Multi-user version only. Used to request a lock of the current form, returns
blank if the lock was granted or the holder's name if someone already holds
the lock.
Example:
VAR X;
Begin
X := LockForm (A, exclusive);
if X <> '' then
infomsg ('this lock is held by ' & x)
else {the lock was granted}
begin...
LTRIM (ex-string) Function
Removes the leading blanks from a string and returns the new string.
242
VersaForm XL
Example:
var s;
begin
s := ltrim ('
prompt (s);
end;
VersaForm');
The result is 'VersaForm'.
MAX (ex1, ex2) Function.
Returns the larger of EX1 and EX2.
Example:
PRICE := MAX (NEWPRICE, 1.1 * PRICE);
This example replaces PRICE with NEWPRICE or the old PRICE times 1.1,
whichever is larger.
MAXLINE (File) Function.
The maximum number of column lines this form can contain.
Example:
L# := LASTLINE (A);
WHILE L# < MAXLINE (A) DO
BEGIN
L# := L# + 1 ;
INSERTLINE (A,L#) ;
PRICE := 0 ;END ;
This example adds enough lines to the form to completely fill it
(starting with LASTLINE + 1 and ending with MAXLINE) and
sets PRICE on each new line to 0.
MIN (ex1, ex2) Function.
Returns the smaller of EX1 and EX2.
Example:
PRICE := MIN (NEWPRICE, 1.1 * PRICE);
Replaces PRICE with NEWPRICE or the old PRICE times 1.1,
whichever is smaller.
Built-In Procedures
243
MENU (File--handle of an open menu file
ex2--part 1 of the key of the menu record on the menu file
ex3--part 2 of the key of the menu record file on the menu file,
item--function chosen by the user
item--arg 1 of the function chosen by the user,
item--arg 2 of the function chosen by the user) Function.
Displays a menu as defined on a custom menu file, which must be an open
file, and returns a code indicating whether the menu was displayed
successfully, and three codes indicating the choice made. The menu
definiton form on the custom menu file must match that of the files
APPMENU and VMENU.VFS.
Example:
var funct, arg1, arg2;
if menu (menufile, 'menukey1', 'menukey2',
funct, arg1, arg2) then
if funct = '' then infomsg ('no choice was made.')
else
infomsg ('Choice was made. Function chosen = ' &
funct &
', arg1 = '& arg1 &
', arg2 = '& arg2);
NEXTFORM (File) Procedure.
Example:
See FILING COMMAND PROCEDURES, above.
NORMAL_VID Function.
Returns current normal video attributes as a single number
ORD (value) Function.
Returns the ASCII value of the character passed as the value. If the value
passed to ORD is not exactly one character long, then ORD will return a
value of -1.
Example: Converts upper case to lower
var s;
if (ord (s) >= ord ('A')) and
(ord (s) <= ord ('Z')) then
s := chr (ord (s) + 32);
PAD (Ex1, Ex2) Function.
Returns the value of EX1 left justified in a string with a length of EX2
characters.
Example: Prints the value "ABC *"
PRINT (PAD ('ABC',5) & '*')
244
VersaForm XL
Note: If the length of EX1 is greater than EX2 no truncation or padding
takes place.
PAGE (File, Ex) Procedure.
Displays a form starting with a line number given by EX.
Example: will display the secondary form starting at line number 10.
PAGE (B, 10);
Note: PAGE performs the same function as DISPLAY (B) except
that you can control which page of the column area is shown. You
can use this procedure to display the appropriate range of lines
before values are assigned to column items. This allows the user to
see the assignment take place.
During validation the top line to be shown (given by EX) cannot be
changed. Any value supplied will be ignored. PAGE should not be
used in a CHECKING procedure.
PgDn (File) Procedure.
Has the effect of the Page Forward command.
PgUp (File) Procedure.
Has the effect of the Page Backward command.
Example:
PGUP (A);
PICKFIELD (file, fieldname-exp) Function.
Pickfield is used to pick a field from a given form. If the form is not already
displayed it will display it. A field is selected by moving to the field and
typing the letter 'X'. Fieldname, if not empty, is the name of the field you
want the cursor to start at.
Example:
var x;
begin
x := pickfield (b, 'City');
display (a);
infomsg ('You selected the field
named ' & x);
end;
Built-In Procedures
245
PICKFILE (ex-window handle, ex-starting point) Function.
Presents the contents of a text file in the given window, and returns item
that the operator chooses. The file used is TEXTINPUT. Returns a null
string if the operator presses Escape.
Example:
set (silent);
set (user_may_escape);
textinput ('choices.txt');
if not ioerror then
begin
start := answermsg ('Enter starting point: ', start);
win := vopen_win (2, 2, 44, 20, reverse_vid, 'Choices');
if win > 0 then
begin
choice := pickfile (win, start);
if vclose_win (win) then;
if choice <> '' then newvalue := choice;
end;
end;
textinput (close);
pop (user_may_escape);
pop (silent);
PICKINDEX (file, ex-index name, ex-window handle, ex-start point);
Function.
Offers a list to the operator in the designated window. The list is the index
of the designated file, and starts at the given starting point. The index name
specifies which index to display; vfdata for the data index, vpfmtobj for the
print formats, etc. Returns the item chosen as the function value, the null
string if no choice was made. Honors the USER_MAY_ESCAPE flag.
Example:
set (silent);
filehandle := vopen ('datafile');
if filehandle <> 0 then
begin
win := vopen_win (2, 2, 40 {w}, 10 {h}, reverse_vid,
'Choose Print Format');
if win <> 0 then
begin
set (user_may_escape);
print_fmt := pickindex (filehandle, vpfmtobj, win, 0);
pop (user_may_escape);
end;
if vclose_win (win) then;
if vclose (filehandle) then;
pop (silent);
end;
246
VersaForm XL
PICKLIST (ex-window handle, ex-list handle, item) Function.
Offers a list to the operator in the designated window. The list must have
been made previously with VOPEN_LIST and APPENDLIST. Returns as
the function value the number of the item chosen; 0 if no choice was made.
Honors the USER_MAY_ESCAPE flag. The choice itself is returned in the
third parameter.
Example:
list := vopen_list;
if list > 0 then
begin
dummy := appendlist (list, blue);
dummy := appendlist (list, green);
dummy := appendlist (list, red);
dummy := appendlist (list, yellow);
win := vopen_win (2, 2, 20, 6, revers_vid, '4 Choices');
if win > 0 then
begin
set (user_may_escape);
choice := picklist (list, win, dummy);
pop(user_may_escape);
if vclose_win (win) then;
end;
if vclose_list (list) then;
end;
POP (flag) Procedure.
Returns an internal flag to its previous state, before the last SET or CLEAR.
POS (ex1, ex2) Function.
Returns a number indicating the first position of EX1 within EX2. If EX1 is
not contained in EX2, the value returned is 0.
Example:
POS ('/', '12345/78/')
This example returns a value of 6.
WARNING: This function is case-sensitive. The statement, POS ('a',
'CAT'), returns 0, not 2.
POSN (pattern, target) Function.
This is like POS, but it is not case-sensitive. If you're looking for Bob, POS
will find only Bob but POSN will find bob, BOB, BoB, etc.
Built-In Procedures
247
PREVENT_DELETE (File) Function
Returns True if the file has been set up (in the Form Design process) so that
deleting lines and removing forms are prohibited. Procedures need to know
this to avoid deleting lines and forms when they really shouldn't.
PRINT (ex) Procedure.
Writes a value (given by EX) to the printer.
Example:
PRINT ('The new price for item no.' &
ITEMNUM & 'is $' & PRICE) ;
If ITEMNUM is "A66" and price is 33 then "The new price for item no. A66
is $33" will be printed.
PRINT_CTL_STR Function.
Returns the current user default printer control string.
PRINTFILE (ex) Procedure.
Opens a file (usually on disk) that will receive any data from a PRINT
statement. The data is redirected to this file instead of going to the printer.
An existing file is overwritten. If EX is the reserved word CLOSE, the
current print file is closed and any further PRINT statements will go to the
printer. See also EXT-PRINTFILE.
Example:
PRINTFILE ('A:OUTPUT.TXT');
{ this opens a file on drive A }
PRINT ('HELLO' & CR);
{ writes a line to OUTPUT.TXT}
PRINTFILE (CLOSE);
{ closes the file }
PRINT ('HELLO' & CR);
{this will appear on the printer}
PRINTFORM (File, ex1, ex2) Procedure.
Prints according to the format named by EX1 stored in the file.
If EX1 is blank or null, the screen format is used (just as in the PRINT
command).
EX2 is a string expression containing the values of variable comments that
would otherwise be prompted for by the print format.
Example: Prints the data currently on the primary form using the format
'INVFMT'. EX2 is null because we assume there are no variable comments
in this format.
248
VersaForm XL
PRINTFORM (A, 'INVFMT', '');
Note: If a print format has been designed with variable comments, these
values can be supplied when the form is printed. When the PRINT
command is issued from the command menu in filing and a print format
name is given, the user will be prompted for values to variable comments (if
the print format has them). The user may enter a value or press
to
ignore the comment.
(
When a procedure invokes a print format, it supplies the values for the
variable comments as a string expression which can be up to 80 characters in
length. Each comment in EX2 is separated by a special character. The
special character (a delimiter) is determined by you, by making it the first
character in EX2. An example illustrates what is required:
To include variables in Print Formats you must include a V@GETARG
statement in your print format. The V@GETARG allows you to pass
parameters through a PRINTFORM statement. The V@GETARG
statement does not need to be in a specific order in the PRINT FORMAT,
you can place it anywhere because you specify the order in the print format
as one of its arguments. The syntax for a V@GETARG is as follows:
V@GETARG (1,'x')
The 1 tells the PRINTFORM statement that 'x' is the first parameter to pass
through the printformat. The 'x' is the parameter to be passed. 'x' can hold
any value. To pass any other parameters through the PRINTFORM
statement simply use another V@GETARG (2,'y'). The 2 in this statement
specifies that 'y' is the second parameter to be passed through the printform
statement.
In the PRINTFORM statement you could have:
PRINTFORM (A, 'INVFMT', '!' & x & '!' & y & '!')
If you wanted to print x or y more than one time you simply need to include
additional V@GETARG statements for each variable. For example,
V@GETARG
V@GETARG
V@GETARG
V@GETARG
(1,'x')
(2,'y')
(3,'x')
(4,'y')
--> Pass 'x' first
--> Pass 'y' second
--> Pass 'x' again for third parameter
--> Pass 'y' again for fourth parameter
This would work with the above PRINTFORM statement. You need to
include the parameters to be passed in the PRINTFORM statement only one
time. For each additional time you need to pass the parameter just include
another V@GETARG statement to your Print Format in the order you want
it to appear in the print format.
Built-In Procedures
249
If the parameter is equal to '' (the empty string) a window will pop-up and
prompt the user to enter a value for that parameter.
PRINT_LABELS (file1--label definition file, file2--label setup file, Ex--name
of the text file with the label data) Function.
Runs the label printer. Usually you would want to run a report first, to
produce the label file. The function returns either TRUE or FALSE,
indicating whether it ran successfully. To prepare for running the label
printer, you must have two files, each open to the correct form, one defining
the physical characteristics of the label, and one defining the setup of the
label. These files must have form designs that match LABELDEF.VFS and
LABELSET.VFS, respectively.
Example:
if print_labels (deffile, setupfile, label_file_name) then
infomsg ('Labels printed successfully');
PROGRAMPATH Function.
Returns the path of the VersaForm program files.
PROMPT (ex) Procedure.
Puts message (EX) at bottom of screen.
Example:
PROMPT ('The new price for item no.' &
ITEMNUM & 'is $' & PRICE) ;
If ITEMNUM is "A66" and price is 33, then "The new price for item no.
A66 is $33" will be written at the bottom of the screen.
PUT (ex) Procedure.
Writes a value to the screen at the current cursor location.
Example:
PUT ('Enter new price for item no.' & ITEMNUM);
If ITEMNUM is "A66" then "Enter new price for item no. A66" will be
written on the screen.(See the example procedure, "MENU.")
READ (item) Procedure.
Reads a line of data from a text file into ITEM.
Example: Reads a line from the currently open TEXTINPUT file into the form
item A.NAME.
READ (A.NAME)
250
VersaForm XL
Note: Only 80 characters at most are read in at a time. A
subsequent READ command will read the next 80 characters or
until an "end-of-line" (a carriage return character) is encountered.
REMOVEFORM (File) Procedure.
Example: See FILING COMMAND PROCEDURES, above
Note: You must use GETFORM, or another form retrieval
command, before using REMOVEFORM.
RESTATTR Procedure.
Restores the screen attributes in force before SETATTR was issued.
RETRIEVE (File, item name, N) Function.
Finds item name in File and returns the value. Item name can be a string or a
variable. If item name is a field name it is the contents of that field that is
denoted, not the field itself.
Example:
var x, y;
begin x := 'address';
y := retrieve (a, x, 0);
If there is a single item on the form called address, y will now have whatever
was in it.
RETURN (ex) Procedure.
Exits from the procedure immediately. Returns the value (usually TRUE or
FALSE) to the system. Required for a correct return from a *COMMAND
procedure. If a RETURN is not issued, the default value returned is TRUE.
This is reset at the beginning of each chain of procedures.
Example:
return (false);
(See also *COMMAND procedures in Chapter 14)
REVERSE_VID Function.
Returns current reverse video attributes as a single number.
ROLLBACK Procedure.
Multi-user version only. Performs a rollback.
Example:
rollback;
Built-In Procedures
251
ROUND (ex1, n) Function.
Returns the value of EX1 rounded to N decimal places.
Example:
ROUND (8.1234567, 4)
This returns the value 8.1235. Note that the value was rounded, not
truncated.
RPAD (ex1, ex2) Function.
Returns the value of EX1 right justified in a string with a length of EX2
characters.
Example:
PRINT ('*' & RPAD (10.55,7));
This example prints the value '*******10.55'
RTRIM (ex-string) Function.
Removes the trailing blanks from a string and returns a new string.
Example:
var s
begin
s := rtrim ('VersaForm
prompt (s);
end;
');
The result is 'VersaForm'.
RUN_REPORT (File, Report name) Function
Runs a report. The report must have been defined previously, as there is no
provision for defining a report from a procedure. This function does not lock
either the report or the file; you must do that yourself. Nor does it print
labels, you must also do that (see the built-in Print_labels). If the report is
in export format, a file name should be defined in the report definition too
prevent the user being asked by the system whether he wants to print labels
now.
Run_report returns a code that indicates whether the report was run successfully.
The codes are:
0
1
2
3
report was produced
report failed because input parameters were not processed successfully
report failed because file was not read successfully
report failed because file was not sorted successfully
252
VersaForm XL
4
5
6
7
report failed because output was not printed successfully
user_halted_the report during file processing
user_halted_the report during printing
no_records_were selected; there is no outputExample:
if run_report (a, 'slsrpt') = 0 then
infomsg ('Report produced')
else
errormsg ('Report failed');
SAVEFORM (File) Procedure.
Example: See FILING COMMAND PROCEDURES, above.
SAVENEEDED (File) Function.
Returns true or false according to whether the form has been changed since
it was last saved.
Example:
if saveneeded (a) then saveform (a);
SEARCHLINE (File, ex-item name, ex-line to start at, ex-target) Function.
Like FINDLINE, SEARCHLINE finds the first line meeting the given test.
Extensions are:
As in ASSIGN and RETRIEVE, the item name must be in a variable or in
quotes. SEARCHLINE works on files opened with VOPEN, and can start
searching at any line.
SEARCHLINE can search for lines meeting other than equality. It can
search for lines with values not equal, less or greater than the target, or lines
that contain or do not contain the target. Specify the type of search by the
first one or two characters of the target, according to the same rules as the
SEARCH command. Exception: the two dots indicating a leading or
trailing substring may not be used.
Example:
linenum := SEARCHLINE (b, 'amount', 1, '>1000');
if linenum > 0 then ...
This searches the column headed "amount" in the form B for a value greater
than 1000, starting at line 1. If the target (in this case 1000) is in a form item
or a variable, construct the target string dynamically. For instance, if the
variable were called target, you could write:
SEARCHLINE (b, 'amount', 1, '>' & target);
Built-In Procedures
253
SELECT (ex-boolean, ex-value if true, ex-value if false) Function.
Returns the value specified by "value if true" if bool evaluates to true;
otherwise it returns the value specified by "value if false".
Example:
var x, y;
begin
prompt ('Enter
get (x);
prompt ('Enter
get (y);
prompt (select
'Numbers are
end;
x value: ');
y value: ');
(x=y, 'Numbers are equal',
different'));
SET/CLEAR/POP (mode) Procedure.
Set ROUNDING or PADDING.
Example:
SET (ROUNDING) ;
SET/CLEAR/POP (auto_lock) Procedure.
Turns automatic locking on or off, or returns the flag to its previous state.
Multi-user version only.
SET/CLEAR/POP (autoprompt) Procedure.
Turns autoprompting on or off, or returns the flag to its previous state.
SET/CLEAR/POP (locking) Procedure.
Turns all locking on or off, or returns the flag to its previous state. Multiuser version only.
WARNING: Using this command is not foreseen or
recommended. It is provided for the use of experienced
programmers only, when the other facilities will not serve.
SET/CLEAR/POP (rollback_on) Procedure.
Turns ROLLBACK capability on or off, or returns the flag to its previous
state. Multi-user version only. If ROLLBACK_ON is cleared, the system
will not remember the information that would be needed for a ROLLBACK.
SET/CLEAR/POP (silent) Procedure.
Normal operational messages (such as "form found" or "form not found")
and the associated beeps are suppressed.
SET/CLEAR/POP (user_may_escape) Procedure.
Turns USER_MAY_ESCAPE capability on or off, or returns the flag to its
previous state.
254
VersaForm XL
SETATTR (foreground, background) Procedure.
Sets the screen attributes (color, blinking, etc.). Both foreground and
background should be numbers less than 16. What these numbers actually
represent depends on your display adapter.
For the CGA, values are:
0=black
1=blue
2=green
3=cyan
4=red
5=magenta
6=brown
7=white
8=gray (foreground only)
9=light blue (")
10=light green (")
11=light cyan (")
12=light red (")
13=light. magenta (")
14=yellow (")
15=bright white (")
Example: Prints "Hello, world" in yellow on blue.
setattr (14,1);
put ('Hello, world');
SET_ATTRIB (attributes) Procedure.
Sets the screen attributes (color, blinking, etc.). Both foreground and
background are combined in one number between 0 and 255. What this
number actually represents depends on your display adapter. It combines
foreground and background attribute in one number by multiplying the
background number by 16 and then adding the foreground number.
Example:
SET_ATTRIB (31);
Sets the screen attributes to white on blue.
SETFLDINFO (File, ex-field name, ex-what to set, ex-value to set) Function.
Sets the attribute of the given field to the desired value. Returns the
previous value of that field attribute.
Example:
x := SETFLDINFO (a, 'customer',
vpick, true);
SETUP_COPYFORM (source-file, target-file, trans-file) Function.
Tells the copyform procedure to copy only the fields specified in the transfer
file, to perform a copy by name, or both. It does so by building a transfer list
in memory that copyform will follow. The trans-file argument contains the
file handle to the transfer file. If you put a 0 in the trans-file argument,
Built-In Procedures
255
copyform will do a straight copy by name. If it can successfully build a
transfer list it returns TRUE; otherwise, it returns FALSE. This function is
not needed if the source and target form designs match.
Example:
var trans;
begin
firstform (a);
trans := vopen ('TRANSFER');
if trans <> 0 then
begin
assign (trans, 'key', 0, 'Example');
getform (trans);
if setup_copyform (a, b, trans) then
while not ioerror do
begin
clearform (b);
copyform (a, b);
saveform (b);
nextform (b);
end;
close_copyform;
if vclose (trans) then;
end;
end;
The above procedure will copy the fields specified in 'Example' in the
transfer file from the primary file to the secondary file.
SETUP_PRINTFORM (File, ex-pfmtname) Function.
Setups up a print format before issuing the printform statement. It need only
be used if the print format contains escape sequences or downloads font or
overlay files to the printer. It returns TRUE if it was successful, FALSE
otherwise.
Example:
firstform (b);
setup_printform (b, 'Invoice');
while not ioerror do
begin
printform (b, 'Invoice', '');
nextform (b);
end;
SIZE (formitem) Function.
Returns the maximum number of characters that an item on a form can hold.
Example:
SIZE (A.PART#)
256
VersaForm XL
If the item PART# has space for 5 characters on the form, SIZE has a value
of 5.
STR (ex1, ex2, ex3) Function.
Returns a sub-string of EX1 where EX2 is the starting position and EX3 is
the maximum length of the result. If EX2 or EX3 are zero or negative or
EX2 is out of bounds, the result is an empty string. EX3 may indicate a
length that is greater than the length of EX1. In that case only the remaining
portion of EX1 is returned.
Example:
If the value of EX1 is 'ABCDEFGHIJ' then
STR (EX1, 1, 3) {returns the value 'ABC'}
STR (EX1, 8, 5) {returns the value 'HIJ'}
STR (EX1, 12, 3) {returns the value ''}
If you wish to always have a result be a specific length (say 10 characters) in
cases where the input value may be longer or shorter, combine the STR and
PAD (or RPAD) functions as follows:
PAD (STR (EX1, 1, 10), 10);
If EX1 is longer than 10 characters STR will truncate it; if shorter, PAD will
extend it.
SYSTEM_COLOR (ex-system color number) Function.
Returns the value of the system color attribute corresponding to the given
system color number, as set by the currently effective user or system setup.
The system color numbers are:
1:
2:
3.
4.
5:
6:
Menus attribute
Menu hilite attribute
Menu bold attribute
Information box attribute
Error box attribute
Zoom attribute
If any other argument is given, the function returns 0.
Example: get the current menu hilite attribute.
attrib := system_color (2);
TEST (Flag) Function.
Returns a value, (TRUE if Flag is ON, or FALSE of Flag is OFF) depending
on test result. All flags that can be set using SET/CLEAR/POP procedures
can be tested using this function.
Built-In Procedures
257
TEST_PRINTFORM (File, ex1) Procedure.
Prints a test form according to the format named by EX1 stored in the
named file.
TEXTINPUT (ex) Procedure.
Opens a file that can be read with the READ command. If EX is the
reserved word, CLOSE, the file is closed.
Example:
TEXTINPUT ('A:OUTPUT.TXT'); { opens file }
READ (DATA) ;
{ reads a line }
TEXTINPUT (CLOSE) ;
{ closes file}
TRUE Function.
Returns a value denoting truth when used in an expression. Though TRUE
is technically a function, it behaves like a constant.
Example:
FLAG := TRUE ;
IF FLAG THEN BEGIN
IF FLAG = TRUE THEN BEGIN
{set the value}
{test the flag}
{means the same}
TRUE has an internal value of "1" and may be used in expressions or
comparisons.
UNLOCKFILE (File) Procedure.
Multi-user version only. Unlocks a file.
Example:
UnlockFile (a);
UNLOCKFORM (File) Procedure.
Multi-user version only. Unlocks the current form.
Example:
UnlockForm (a);
USER_DID_ESCAPE Function.
If USER_MAY_ESCAPE is set, the user may press Escape in response to
certain functions such as ANSWERMSG. If he does, USER_DID_ESCAPE
will return TRUE.
USER_MAY_ESCAPE Function.
Used with SET, CLEAR, and POP. When set, the user may press Escape in
response to certain functions such as ANSWERMSG.
258
VersaForm XL
VALNEEDED (File) Function.
VALNEEDED is used to determine if the current form on the specified file
needs to be validated. If the form needs validation, VALNEEDED returns
TRUE, otherwise it returns FALSE.
VCLOSE (Ex-File_handle) Function.
Closes a file and returns true if the file was closed, false otherwise. The
parameter is the handle, NOT the file name.
Example:
if vclose (lookupfile) then
prompt ('File closed');
VCLOSE_LIST (ex-list handle) Function.
Closes a list and returns TRUE if the closure was successful.
VCLOSE_WIN (window_handle) Function.
Closes the window and returns TRUE or FALSE.
Example:
if vclose_win (winhandle) then;
VCOLTOTAL (ex-file, ex-column name) Function.
Computes the total of the column whose name is given. As in ASSIGN and
RETRIEVE, the column name must be in a variable or in quotes.
VCOLTOTAL works on files opened with VOPEN. See also COLTOTAL.
Example:
myfile := vopen ('filename');
if myfile > 0 then
total := VCOLTOTAL (myfile, 'amount');
VCOMPARE (from-file, to-file, formtype, oldkey-ex, newkey-ex,
numcompared-ex, numequal-item) Function.
Compares the form of the given type in the FROM file with key = OLDKEY
to the form in the TO file with key = NEWKEY. The two files may be the
same. VCOMPARE returns an error code as the function result; if no error
has occurred then NUMCOMPARED contains the number of forms
compared and NUMEQUAL contains the number of those forms that were
equal.
Error codes:
0-no error
1-reserved
2-the index for the FROM form type was not found.
3-the index for the TO form type was not found.
Built-In Procedures
259
Example:
if (VCOMPARE (A, B, VREPORT, 'SALES', 'INCOME',
NUMCOMPARED, NUMEQUAL)=0) then
if (NUMCOMPARED>0) and (NUMCOMPARED = NUMEQUAL) then
...
{the report SALES on A and the report INCOME on B
are equal}..
This example would compare the report SALES on file A to the report
INCOME on B. If VCOMPARE returns 0 there was no error, and if the
NUMCOMPARED was equal to NUMEQUAL then all the forms compared
were equal.
VCOPY (from-file, to-file, formtype, oldkey-ex, newkey-ex, replace?-ex, numitem) Function.
Copies the form of the given type in the FROM file with the OLDKEY to
the TO file with NEWKEY. The two files may be the same. REPLACE?
must be either TRUE or FALSE; if TRUE, existing forms on the TO file are
to be replaced. VCOPY Returns an error code as the function result; if no
error has occurred then NUM contains the number of forms copied.
Error codes:
0-no error
1-reserved
2-the index for the FROM form type was not found.
3-the index for the TO form type was not found.
Example:
if (VCOPY (A, B, VREPORT, 'SALES', 'INCOME', TRUE,
NUMCOPIED)=0)
then
if NUMCOPIED >= 1 then...
{the report SALES was copied}..
This would copy the report SALES on file A to INCOME on file B,
replacing any old reports of the same name. If VCOPY returns 0 there was
no error, and if the NUMCOPIED was 1 or more then the report was found
and it was copied.
VCOUNT (file, formtype, key-ex1, num-item) Function.
Counts the number of forms of the given type in the given file with the given
key. If KEY is *.*, all forms in that index are counted. Returns an error
code as the function result; if no error has occurred then NUM contains the
number of forms.
Error codes:
0-no error
260
VersaForm XL
1-reserved
2-the index for the form type was not found.
Example:
if (VCOUNT (A, VREPORT, 'SALES', NUMCOUNTED)=0)
then
{NUMCOUNTED has the number of report forms
encountered that belong to the report SALES.}
This would count the forms in the report SALES on file A. If VCOUNT
returns 0 there was no error, and if the number of forms counted was 1 or
greater then the report was found. (There may be more than one form in a
report, because of selection conditions, etc.)
VDATE Function.
Returns current date.
Example:
PRINT ('BILLING DATE: ' & VDATE) ;
If the date is 12/17/84,"BILLING DATE: 12/17/84" will be printed.
VDAY (ex) Function.
If value of EX is a date, returns a number from 1..31; otherwise, 0.
Example:
See the example for VMONTH.
VDELETE (File, Formtype, Key-Ex1, Num-Item) Function.
Deletes the form of the given type in the given file with the given key. If
KEY is *.*, all forms in that index are deleted. Returns an error code as the
function result; if no error has occurred then NUM contains the number of
forms deleted.
Error codes:
0-no error
1-reserved
2-the index for the form type was not found
Example:
if (VDELETE (A, VREPORT, 'SALES', NUMDELETED)=0)
then
if NUMDELETED = 1 then...
{the report SALES was deleted from A}..
This would delete the report SALES from file A. If VDELETE returns 0
there was no error, and if the number of forms deleted was 1 then the report
was found and it was deleted.
Built-In Procedures
261
In addition, for VDELETE only, formtype can have the value VDOS,
indicating the DOS operating system and its files.
VDISPLAY (File, ex1, ex2) Procedure.
Displays the form (either A or B), placing the column given by EX1 and the
row given by EX2 at the upper left corner of the screen.
Example:
VDISPLAY (A, 80, 0);
This example would display form A starting at column 80 and row 0; in
other words, the right half of the first 24 lines of the form. Release 4.1 and
later only.
VEXIT Procedure.
Exits to the Main Menu. VEXIT, when used in a START procedure,
enables the programmer to deny the operator entry to the Filing function. It
is useful for implementing password protection, and other applications in
which a procedure should remain in complete control.
Example:
VEXIT;
VFILE_HANDLE (file) Function.
Given a file name, returns the file handle, if it is open. If the file is not open,
returns 0.
Example:
ledgerfile := vfile_handle ('ledger.vfm');
VFILE_NAME (ex) Function.
Given a file handle, returns the file name.
Example: The fragment below finds the handle of the primary file in order to use
the CALL function for a procedure called "nextaux" which requires a file handle
argument.
ledgerfile := vfile_handle ('ledger.vfm');
if ledgerfile > 0 then {ledger is open }
begin
if call (ledgerfile, 'nextaux',
vfile_handle (vfile_name(a))) then;
display (a);
end;
VMONTH (ex) Function.
If value of EX is a date, this returns a number from 1..12; otherwise, 0.
262
VersaForm XL
Example:
IF VMONTH (VDATE) = 12 AND
VDAY (VDATE) > 9 THEN
PRINT ('SEASONS GREETINGS');
Prints greetings if the date is between December 10th and December 31st.
VNOKEY Function.
Designates the "no key" field attribute, for use with SETFLDINFO. This
controls whether data can be entered into the field.
Example:
x := SETFLDINFO (a, 'customer',
VNOKEY, true);
VOPEN Function.
Opens a file and returns the handle. Returns 0 if file was not opened.
Example:
lookupfile := vopen ('lookup.vf');
if lookupfile <> 0 then
begin
VOPEN_LIST Function.
Opens a list and returns the list handle. Returns 0 if the list was not opened.
VOPEN_WIN (x, y, width, height, color, title); Function.
Opens a window of the given width and height with its upper left corner at
(x,y). The values of x, y, width, and height must be such that the window
fits on the screen.
Example:
var winhandle;
begin
winhandle := VOPEN_WIN (10, 10, 40,
6, 31, 'VF WINDOW');
if winhandle > 0 then
begin
...
VOUTPUT (string-exp) Procedure.
Writes the given string to the printer or textoutput file, but does not convert
the Carriage Return Character to a Carriage Return/Line Feed sequence.
VPFMTOBJ Function.
Yields a value that internally denotes the compiled, or object, form of a print
Built-In Procedures
263
format. Used in VCOPY and other routines that call for the type of a
VersaForm object.
VPFMTSRC Function.
Yields a value that internally denotes print format source.
VPICK Function.
Designates the "pick list" field attribute, for use with SETFLDINFO. Fields
with this attribute set have a "down arrow" displayed next to them on the
screen. This is meant to indicate the presence of a pick list or a pick list
procedure.
Example:
x := SETFLDINFO (a, 'customer',
VPICK, true);
VPUT (X position-ex, Y position-ex, color attribute-ex, message-ex);
Procedure
Writes the message at the given coordinates with the color attribute
specified. May be used within a window.
VQUIT Procedure.
Abruptly terminates the entire VersaForm XL program and returns to DOS.
VREADCH Function.
Reads a single character from the currently opened textinput file and returns
it.
Example:
textinput ('COM1');
while not ioerror do
put (vreadch);
textinput (close);
VRENAME (file, formtype, oldkey-ex1, newkey-ex2, num-item) Function.
Renames the form of the given type in the given file with the given key.
Returns an error code as the function result; if no error has occurred then
NUM contains the number of forms deleted.
Error codes:
0-no error
1-reserved
2-the index for the form type was not found
264
VersaForm XL
Example:
if (VRENAME (A, VREPORT, 'SALES',
'INCOME',NUMRENAMED)=0) then
if NUMRENAMED = 1 then...
{the report SALES was renamed}..
This would rename the report SALES on file A to INCOME. If
VRENAME returns 0 there was no error, and if the number of forms
renamed was 1 or more then the report was found and it was renamed.
VTIME Function.
Returns current time (obtained from the operating system), in the form
HH:MM:SS.
Example:
PRINT ('The time is ' & VTIME);
At noon, this will print "The time is 12:00:00".
VSIZE (File, Fieldname) Function.
Returns the maximum number of characters that an item on a form can hold.
Example:
VSIZE (thisfile, 'PART#')
If thisfile is open and the item PART# has space for 5 characters on the
form, VSIZE has a value of 5.
VUSER Function
Returns the ID of the current user.
Example:
Prompt
('your name is ' & vuser & ', isn''t it?);
VYEAR (ex) Function.
If value of EX is a date, this returns a number from 1900 to 1999.
Example: If X is a variable, and this is 1984, and FIRST YEAR contains 6/16/64,
then:
X := VYEAR (VDATE) - VYEAR (FIRSTYEAR) ;
PRINT ('IT HAS BEEN '& X & ' YEARS') ;
This will print "IT HAS BEEN 20 YEARS."
Built-In Procedures
265
YESNO Function.
Waits for a 'Y' or 'N' response from the user (followed by RETURN);
returns True if the user pressed "Y" (or "y").
Example:
PROMPT ('Update the form? (Y/N) ') ;
IF YESNO THEN
BEGIN ... { update the form }
WARNING: GET (ITEM) and YESNO are normally preceded by a message to
the user, (e.g., a PROMPT). If this isn't done, the system will appear to the
operator to have stopped running.
YESNOMSG (msg, default_yes_or_no) Function.
if YESNOMSG ('Continue? ', 'Y') then
...;
The default reply is "Y". If the user enters "Y" or just presses return, the
program will execute what follows the "then".
Chapter 16
SAMPLE PROCEDURES
This chapter illustrates a few advanced uses of procedures by presenting several
examples. A line-by-line explanation follows each procedure. Many more sample
procedures may be found in the VersaForm XL file PROCFILE. The reader is
encouraged to study and use these examples, especially if he or she is not an
experienced programmer.
Each example and its explanation are printed on facing pages, for easy
examination.
268
VersaForm XL
A Menu Procedure
This procedure puts a menu on the screen and allows the user to select one of two
USER procedures. The Secondary File and Key-from items are left blank, as there
is no look-up.
PROCEDURE INSTRUCTIONS
Procedure Name MENU............
Secondary File ................
Key-from1 ................ Key-from2 ...........
L# ..................Procedure..................
01 VAR CHOICE ;
02
BEGIN
03
CLEARSCREEN ;
04
PUT ( 'Update functions available' & cr & cr) ;
05
PUT ( '
1. Post several transactions' & cr) ;
06
PUT ( '
2. Perform global update' & cr & cr) ;
07
PUT ( 'Enter your choice: ') ;
08
GET ( CHOICE) ;
09
IF CHOICE = 1 THEN CHAIN ('POST') {no semicolon}
10
ELSE
{before ELSE}
11
IF CHOICE = 2 THEN CHAIN ( 'GLOBAL' ) ;
12
END ;
Figure 16-1
Built-In Procedures
269
EXPLANATION:
01 - The variable will hold the operator's choice.
02 - BEGIN signals the end of the variables and the beginning of the procedure.
03-07 These statements first clear the screen and then write the menu.
08 - The operator's choice is read from the keyboard.
09-11 A pair of nested IF statements determine what action to take. If the
operator has keyed in anything other than 1 or 2, nothing will happen.
12 -END indicates the end of the procedure.
270
VersaForm XL
Invoicing - Sequential Numbering
PROCEDURE INSTRUCTIONS
Procedure Name *SAVE..............
Secondary File ...................
Key-from1 .................. Key-from2 ...............
L#
01
02
03
04
05
06
07
08
09
10
..................Procedure........................
VAR TEMPINV ;
BEGIN
SAVEFORM ( A ) ;
PROMPT ( 'Prepare next invoice? ' ) ;
{ask}
IF YESNO THEN BEGIN
{if user says yes,}
TEMPINV := INV# + 1;
{increment invoice mber}
CLEARFORM ( A ) ;
INV# := TEMPINV ;
{put back new invoice mber}
END ;
END ;
Figure 16-2
This procedure will run during a FILING session. When the user SAves an
invoice, the procedure automatically prepares the next one by clearing the form
and setting up the next invoice number.
*
The Secondary File item is left blank, since none is being used in this
procedure.
*
The Key-from items are also left blank, since no lookup from a secondary
file is to be done.
Built-In Procedures
271
EXPLANATION:
01 - Establishes the variable TEMPINV to hold the invoice number temporarily.
02 - Indicates the beginning of a sequence of statements. The statements in this
sequence are indented for clarity. A semicolon is not required after BEGIN.
03 - VersaForm XL will save the current (A) form and then...
04 - Ask (on the command line) if the user wants to prepare a new invoice.
Note the use of comments. Comments placed in braces { } are only for reference.
No action is taken by the system.
05 - A response of "Y" will begin a second sequence by doing everything listed
from the "BEGIN" until the first "END."
06 - Increments (raises) the previous invoice number by 1 and places it in the
variable TEMPINV;
07 - Clears the form.
08 - Enters the new number in the proper place for the next invoice.
09 - Ends the sequence begun in line 05.
10 - Ends the sequence begun in line 02.
272
VersaForm XL
Removing Selected Lines Prior To Printing
Statements
PROCEDURE INSTRUCTIONS
Procedure Name REMOVELINES........
Secondary File ...................
Key-from1 .................. Key-from2 ..............
L#
01
02
03
04
05
06
07
08
09
10
11
12
13
14
.................Procedure........................
VAR TEMPDATE ;
BEGIN
REPEAT PROMPT ('Enter removal date (mm/dd/yy): '
GET (TEMPDATE);
{get date from user}
UNTIL (TEMPDATE > '1/1/80') AND
(TEMPDATE < '12/30/99');
L# := LASTLINE (A);
REPEAT IF L# > 0 THEN
IF A.DATE <= TEMPDATE THEN DELETELINE (A, #);
L# := L# - 1; {go to next earlier date}
UNTIL L#=0 ;{until we are done}
BALANCEDUE := COLTOTAL ( AMOUNT ) ;
{recompute column total}
END ;
Figure 16-3
NOTE:An unusually long line in a procedure (see line 5 above) may
be entered on two lines, breaking at any point which would allow a
space. Indenting the second line further is a matter of preference.
This procedure removes column lines from a form, selected by date. In this
example, a statement is to be generated showing activity after (greater than) a user
specified date. The user will make available the form to be prepared, and then
EXecute the USER procedure REMOVELINES.
As in the previous example, Secondary File and Key-from items are not filled in
because the procedure does not involve another form or a lookup.
Built-In Procedures
273
EXPLANATION:
01 - VAR TEMPDATE (variable temporary date)
03-06 - The operator is asked for the date which will control the removal process.
The request will be repeated until a date after 1/1/80 and before 12/30/99 is
keyed.
07-11 - Removes the lines (DELETELINE) that meet this criteria, repeating until
all such lines are located by counting down from the last line on the form
until L# = 0.
12 - After removing the lines, the current balance due must be computed by the
procedure before the form can be printed.
13 - Comment.
14 - End of procedure.
274
VersaForm XL
Posting Several Transactions to an Inventory
PROCEDURE INSTRUCTIONS
Procedure Name *SAVE .............
Secondary File INVENTRY ..........
Key-from1 .................. Key-from2 ..............
L# .................Procedure........................
01 A.L# := 1;
02 WHILE LASTLINE (A) >= A.L# DO
03
BEGIN
04
IF A.POSTED <> 'Y' THEN BEGIN
05
B.PART# := ITEM# ;
06
GETFORM (B) ;
07
IF IOERROR THEN PROMPT ( "ERROR" )
08
ELSE BEGIN
09
IF LASTLINE (B) < MAXLINE (B) THEN
10
BEGIN
11
B.L# := LASTLINE (B) + 1 ;
12
INSERTLINE ( B, B.L# ) ;
13
B.INV# := A.INV#;
14
B.TDATE := A.DATE;
15
B.QTY := A.QTY ;
16
B.TOTALQTY := COLTOTAL (B.QTY);
17
SAVEFORM (B) ;
18
IF NOT IOERROR THEN A.POSTED := 'Y';
19
END ;
20
END ;
21
END;
22
A.L# := A.L# + 1 ;
23
END ;
Figure 16-4
In this example, all the column line items on an invoice are to be posted to an
inventory file.
For each line, the procedure looks up a PART# in INVENTRY. If the inventory
form is found and the form is not full, a line is added to it with particulars on the
part order. The item A.POSTED on the invoice will record a successful order.
Built-In Procedures
275
EXPLANATION:
01 - The current line number for the primary form is set to 1.
02 - Here begins a loop which will be executed until L# reaches the last line on
the primary form.
04 - Lines 05 to 21 will not be executed if posting has already occurred.
05 - The value of A.ITEM# is moved to B.PART#.
06 - A new secondary form (B.PART# is the key) is retrieved.
07 - If an I/O error has occurred, then the operator is warned; otherwise,
08 - all the statements through line 20 will be executed.
09 - If there is room on the secondary form for another line, then
10 - all the statements through line 19 will be executed.
11 - The current line number on B is advanced to the next available line.
12 - A new line is inserted on B.
13-15 - Values for INV#, TDATE, and QTY on the secondary form are
transferred from the primary form.
16 - The total of the column B.QTY is recomputed and placed in
B.TOTALQTY. This is necessary since there will be no validation on the
secondary form to compute totals.
17 - The secondary form is saved.
18 - If no I/O error has occurred, then we record that this inventory posting
operation has indeed taken place. This will prevent posting the same amount
twice.
19, 20, 21 - Match the BEGINs on lines 4, 8, and 10.
22 - Advance to the next line on the primary form.
23 - Matches the BEGIN on line 3, thus closing the WHILE statement in line 2.
276
VersaForm XL
Procedure Post
This procedure has a secondary file--"ORDERS"--but Key-from is left blank,
which means no automatic look-up will take place. It isn't needed, because the
procedure does a GETFORM. The primary form has a column item named
ORDER# which has been filled in with several order numbers that are to be looked
up and closed by posting a closing date to each order.
PROCEDURE INSTRUCTIONS
Procedure Name POST..............
Secondary File ORDERS............
Key-from1 ................. Key-from2..............
L#.....................Procedure.....................
01 A.L# := 1 ;
02 WHILE A.L# <= LASTLINE (A) DO
03
BEGIN
{ process all column lines }
04
CLEARFORM (B) ;
05
B.ORDERKEY := A.ORDER ;
06
GETFORM (B) ;
DISPLAY (B) ;
07
B.CLOSEDATE := VDATE ;
08
IF NOT IOERROR THEN SAVEFORM (B)
09
ELSE
10
BEGIN
11
PROMPT ('Form not found, quit processing? Y/N ’);
12
IF YESNO THEN CANCEL ; {doing this will exit }
13
END ;
14
A.L# := A.L# + 1 ;
{ go to next line }
15
END ;
{end of while loop }
16 DISPLAY (A) ;
17 PROMPT ( 'Done processing' ) ;
Figure 16-5
Built-In Procedures
EXPLANATION:
01 - Begin at first line on primary form.
02 - Repeat lines 04 to 15 for each line.
04 - Prepare to get a secondary form by clearing anything not needed.
05 - Set the key on the secondary form so a GETFORM will work.
06 - Read and display the secondary form with the key just set up.
07 - Post today's date as the closing date.
08 - If no error in reading the form, then save it.
09 - But if there was one,
11 - Tell the operator and ask whether to cancel.
12 - If so, then cancel.
14 - Go to the next line.
16 - Re-display the primary form.
17 - And tell the operator we are done.
277
278
VersaForm XL
Global Changes to a File
This procedure will start at the beginning of a secondary file and make a change to
the item PRICE on each form. The field "Secondary File" is filled in with the file
to process (SOMEFILE) but Key-from1 is left blank, so no automatic lookup is
done. IOERROR becomes TRUE after trying NEXTFORM on the last form in
the file.
Note: This procedure will work properly only if the key item on
the second file is not altered during the REPEAT loop. If it were,
the form would be saved in a different place than it came from.
PROCEDURE INSTRUCTIONS
Procedure Name GLOBAL.............
Secondary File SOMEFILE...........
Key-from1 ................. Key-from2 ...............
L# ..................Procedure........................
01 FIRSTFORM (B) ;
02 IF NOT IOERROR THEN REPEAT
03
DISPLAY (B) ;
04
B.PRICE := B.PRICE * 1.1 ;
05
SAVEFORM (B) ;
06
IF NOT IOERROR THEN NEXTFORM (B) ;
07
UNTIL IOERROR ;
Figure 16-6
Built-In Procedures
279
EXPLANATION:
01 - The procedure begins with the first form on the secondary file.
02 - If the first form has been read then repeat lines 3-7 for each form on the file.
03 - Display the form. Doing this slows things down. In a production version
you would remove this statement, perhaps substituting a short prompt.
04 - Raise the price by 10%.
05 - Save the form.
06 - And read the next one.
07 - After the last form has been saved, the attempt to read the next one will
cause an error, and this will terminate the repeat loop.
280
VersaForm XL
SAMPLE PROCEDURE FILES
One of the VersaForm XL files distributed with the system is called PROCFILE. It
contains several sample procedures that demonstrate features of VersaForm-XL's
language. You can browse through these procedures by selecting the "Enter or
Change a Procedure" option from the Main Menu and then pick the one you want
to see from the procedure index. You can then use the "Next" and "Back"
commands to see other procedures.
Of particular interest is the procedure "MAIL MERGE". This procedure will print
a letter using the name and address from the current invoice on the screen and
merging it with a DOS text file, LETTER.TXT, (also distributed with the system).
SAMPLE APPLICATION FILES
Among the sample files included with the system are three that demonstrate a
comprehensive example of procedures. These files show a skeleton example of an
Invoicing and Accounts Receivable application:
- An invoice file (INVC.SPL)
- A customer ledger (CLEDGER.SPL)
- An inventory file (INVENTRY.SPL)
The invoice file has four procedures:
*CHECKING - Chains to the USER procedure CUSTNAME if the customer ID
is changed on the invoice, and then chains to the USER procedure GET
INVENTORY if the column item ITEM# is added or changed.
CUSTNAME - Looks up a customer's shipping and billing address and transfers
them to the invoice. If the customer is not found, a new customer ledger record
can be created.
GET INVENTORY - Looks up an item number in the inventory file and gets the
unit cost and description. If the item is not found, the procedure is CANCELed
with an error message, "Item not found."
*SAVE - This procedure takes the invoice amount and posts it to the customer
ledger by adding a line to the ledger.
The customer ledger file (CLEDGER.SPL) has two procedures in it:
*CHECKING - This procedure takes a payment (credit) and applies it
successively to the oldest balance starting with the item OVER-90.
AGING - This procedure will age the receivables for the entire file.
MONTHEND - This procedure will clear the column lines on all forms on the
ledger file.
The inventory file has no procedures.
Custom Menus and Context Sensitive Help
281
Chapter 17
CUSTOM MENUS AND CONTEXT SENSITIVE HELP
VersaForm XL allows you to replace its menus with your own custom menus.
This gives you the ability to develop applications specific to the needs of your
office, or to develop a product that you wish to sell. It even permits you to
produce your own "runtime" system, without form design and procedure design
features that your users do not need. (Contact VersaForm Systems regarding
runtime licensing.)
OVERVIEW
Custom menus work like this: When VersaForm XL needs to display the Main
Menu, it searches for a file called APPMENU.VFS on the default data directory.
(Initially, the default data directory is the current directory.) APPMENU.VFS is
the file that contains the custom menus for an application. If it doesn’t find
APPMENU.VFS, it looks for the file called VMENU.VFS, this time on the
program directory. VMENU.VFS contains standard Main Menu and the other
VersaForm XL menus.
Since APPMENU.VFS is standard VersaForm file, you can create your own , and
have a custom Main Menu. You can also have custom menus for other functions,
like Reports. Your Main Menu can invoke all the VersaForm XL functions, and it
can also display your company and product name. AST's copyright will also
appear at the top of the screen (we must insist on that.)
Custom menus may be created for the following:
The Main Menu. This appears instead of the standard VersaForm XL Main
Menu. Users may select options corresponding to Filing, Reports, etc.
Sub-menus of the main menu. These may be called from the main menu, and
have the same options.
Reports. Used when you select the Report function.
Print Formats. Used when you print a form, either from the Filing function or the
Copy/Print function.
Copy Control Instructions. Used when you select the Copy/Print function and
ask for automatic selection when copying forms.
Print Control Instructions. Used when you select the Copy/Print function and
ask for automatic selection when printing forms.
282
VersaForm XL
Procedures. Used when you select the Filing function and issue the "Execute"
command.
For example: when it is time for a user to choose a report, VersaForm XL will
look in APPMENU.VFS for a report menu. If it does not find one, no harm - the
system will behave normally. However, if it does find the menu, it will be
displayed and the user may choose which report to run.
SAMPLE MENUS
A set of sample menus has been included. They are found in the file
APPMENU.SPL. To see or modify these menus, just use VersaForm XL to
access that file. To actually use these sample menus, rename the file
APPMENU.SPL to APPMENU.VFS and start VersaForm XL. Rename the file
back to APPMENU.SPL to return to normal operation.The sample menus are:
A sample Main Menu which appears when the program is started. Its key (a twopart key) is VF/MAIN. The key VF/MAIN always identifies a main menu.
A menu for reports in the sample invoice file, INVC.SPL. Its key is INVC/RPT.
A menu of print formats for INVC.SPL. Its key is INVC/FMT.
A menu of user procedures for INVC.SPL. Its key is INVC/PRO.
A menu of copy control instructions for the sample customer ledger file,
CLEDGER.SPL. Its key is CLEDGER./CPC.
To try out the sample CUSTOM system do the following:
1.
Copy the file APPMENU.SPL (on the program directory) to
APPMENU.VFS
2.
Start VersaForm from the DOS prompt by typing: VF <cr>. After you log
in, the custom Main Menu will appear. You may select any of the options.
Each option has a VersaForm file that will automatically be selected.
1.
2.
3.
4.
5.
6.
7.
8.
Sample Custom Main Menu
Enter Invoices
Add payments to customer ledger
Update inventory file
Invoice Reports
Batch print invoices
Copy active accounts to new ledger
VersaForm XL Main Menu
Return to DOS
Figure 17-1
3.
To restore the standard menus, delete APPMENU.VFS.
Custom Menus and Context Sensitive Help
283
CREATING CUSTOM MENUS
To create custom menus:
Copy the file APPMENU (on the program directory) to the directory where you
want to use it. Rename it to APPMENU.VFS.
Start VersaForm XL and enter Filing on APPMENU.VFS. You will see the menu
form, as in figure 17-2. Figure 17-2 shows the menu form for the custom menu in
Figure 17-1.
VersaForm Menus
Menu_file vf
Comments Sample custom main menu
Borders? Y
Use_Reverse
Background_file
x_Origin 15 y_Origin 7 Width 50
L#
1
2
3
4
5
6
7
8
Page 1
More: CTRL=>
Menu_type main
Caption Sample Custom Main Menu
Clear_screen? y
Height 8
Numbers? y
..................Menu_text...................
Enter Invoices
Add payments to customer ledger
Update inventory file
Invoice Reports
Batch print invoices
Copy active accounts to new ledger
VersaForm XL Main Menu
Return to DOS
Function↓
FILING
FILING
FILING
REPORT
CPRINT
CPCOPY
VF_MAIN
EXIT
....Arg1.......
invc.spl
c:cledger
inventry.spl
invc.spl
invc.spl
cledger.spl
Figure 17-2
3. Fill in the menu form. The fields are defined as follows:
Menu_file
For the main menu, enter VF. For submenus, use any name
you like (except VF).
For report menus, procedure menus, etc., this must be the
name (without extension) of the file to which the menu
applies. If the file name has a suffix, remove it. For example,
if your file is named INVC.VFX remove the “VFX” suffix.
Just enter “INVC”.
Menu_type
Use MAIN for the custom main menu. For submenus of
custom main menus, create an appropriate name (don’t use
MAIN). Use RPT, FMT, CPC, PRC, and PRO for
report, print format, copy selection condition, print selection
condition, and procedure menus respectively.
Comments
For your use.
Borders
Enter Y if you wish to place a border around your menu.
Use_Reverse
Enter Y to display the menu in reverse video.
Caption
This text will be centered in the top line of the border.
Background_file
The name of a text file that supplies a background for the
284
VersaForm XL
menu. You can use it to add text to the menu screen.
Clear_screen
Enter Y if you wish the screen to be cleared before the menu
is displayed.
x_origin, y_origin
The location of the top left corner of the menu window.
width, height
The width and height of the menu window.
Numbers?
Enter Y to have VersaForm XL number the menu items, and
accept numeric choices from the operator. The default is N.
Menu_text
The text of each menu item. If an ampersand (&) appears in
the text, the character that follows it will be a hotkey for that
menu item, and will be displayed in the “menu_bold” color.
The ampersand itself will not be displayed.
Function
The function that is to be performed if the item is chosen.
On a main menu or a submenu, the valid choices are given in
Table 17-1. On report, print format, copy selection
condition, print selection condition, and procedure menus,
the menu is used only to choose a particular report, print
format, etc. In these cases, use the appropriate designation
RPT, FMT, CPC, PRC, and PRO, and use VF to call the
standard VersaForm menu for that function. Check the
picklist for acceptable values
Arg1
The first argument for the menu item. On main menus and
submenus, this is the file name of the primary file for the
function. On report, print format, copy selection condition,
print selection condition, and procedure menus, this is the
name of the report, etc.
Arg2
The second argument for the menu item. On main menus and
submenus, this depends on the function. If the function is
Filing, you may use Arg2 to name a procedure to be
automatically executed. For other functions, it is the file
name of the secondary file for the function, if any. On report,
print format, copy selection condition, print selection
condition, and procedure menus, Arg2 is not used.
Custom Menus and Context Sensitive Help
FUNCT
Function to be
performed
DESIGN
Form Design
FILING
285
Arg1
Arg2
Filing
File name
Procedure name
REPORT
Reports
File name
Report name
PFMT
Print Format Design
File name
CP
Copy or Print Forms
File name
CPCOPY
Copy Forms
File name
CPRINT
Print Forms
File name
LABELS
Mailing Label Printer
UTILS
VersaForm Utilities
PROCS
Enter or Change Procedures
RELOGIN
Log in again
SHELL
Shell to DOS
File to be executed
USERFUN
Call a linked user function
First argument
Second argument
EXIT
Return to calling menu (or
OS)
SUBMENU
Call another menu
“Menu_file” (key
part 1)
“Menu_type” (key
part 2)
VF_MAIN
Standard VF Main Menu
File name
Table 17-1. Menu Functions
BACKGROUND FILES
Menu background files are simply ASCII files. These are text files that can be
edited by any MS-DOS word processor. The only requirement is that each line in
the menu be followed by a CR and LF (carriage return and linefeed) characters.
The file should be free of other control characters that some word processors use
for document formatting. Your word processor probably has a “text” "nondocument" mode. If not, you can still create the menus by using the the utility
editor VFEDIT, which comes with VersaForm XL.
286
VersaForm XL
CONTEXT SENSITIVE HELP
You may provide context-sensitive help for your application. The file VF.HLP is
provided, and contains the help text, and additional text that is used in the autoprompt mode. This file has a key composed of a file name and the name of a field.
If the user requests context-sensitive help (
) when the cursor is in a field,
the record for that file and field will be retrieved and the help text will be displayed
in a window. If there is no help text and there is prompt text, the prompt text is
displayed.
$K
Place the help file (VF.HLP) in the subdirectory containing the data file that you
need help on.
If the system is in the auto-prompt mode, the prompt text is automatically
displayed whenever the cursor enters a field.
In both cases, if the cursor is not in a field, the system looks for a record indexed
by the name of the file only.
Chapter 18
UTILITY FUNCTIONS
Several utility functions are accessed from the Utilities Menu, Figure 18-1.
VersaForm Utilities
1.
2.
3.
4.
5.
6.
7.
8.
Copy by name
Set the date
Send print control sequence
Change default disk/path name
File Diagnostic functions
File Integrity Checks
File Recovery
Return to Main Menu
Figure 18-1. Utilities Menu
This chapter discusses each of these functions, with the exception of Copy by
Name, which was discussed in Chapter 9.
SETTING THE DATE
You may set the date directly from the Utilities Menu. This action changes not
only the date in VersaForm, but the DOS date as well. Network dates, if any, do
not change. If you're not using the true date, remember to change it back when
you return to DOS.
SEND A PRINT CONTROL SEQUENCE
If you need to temporarily change the setting of your printer, you may enter a print
control sequence, and it will be immediately sent to the printer. The sequence does
not change any sequence entered in the setup file. Refer to the section on print
control sequences in the chapter on Reports for instructions.
CHANGING THE DEFAULT DISK/PATH NAME
When VersaForm asks for a user file name, it offers a default disk or path name.
This is either last path name used, the default in SYSSETUP.VFS, or the default in
SETUP.VFS, or the current drive, in order of preference. This default can be
temporarily overridden using this function. Just enter the path name desired.
288
VersaForm XL
FILE DIAGNOSTIC FUNCTIONS
The File Diagnostic function contains a number of tools useful to a programmer or
a technician. It can print information about form designs, and list the contents of
entire indexes. It can dump files in hexadecimal format to the printer or the screen.
FILE INTEGRITY TEST
In versions of VersaForm XL before 5.0, running a report automatically verified
file integrity, because the report writer read through the file by following the index.
In release 5 the report writer was changed to make it faster, and it no longer
follows the index. Thus reports no longer provide the verification that the index is
complete. It is useful to check file integrity periodically, as various DOS events
can result in file damage, and you want to find out about it while you still have
backup for the file.
The integrity test can test the form design, the free storage chain, the main index,
and the linkage of the forms to the index. It can also test for and eliminate
duplicate records. A batch version can be used to test file integrity separately (you
could run it at night). The syntax is
C:> vf filetest [/fix] filename
The filename may contain a path and wild cards. If the fix parameter is used (do
not include the brackets), the program will eliminate and unindexed forms, if it
can. A log is produced which may be printed when the program terminates.
FILE RECOVERY
When a file is damaged but not irretrievably lost, the recovery facility can often
recover the data. It does so by reading through the file and attempting to identify
data records, then writing them to a new file.
The file being recovered does not need to have a readable form design present.
But if it doesn't, you must provide an empty file with the correct form design, to
receive the records found. Such a file can usually be built from an older backup of
the lost file by use of the "Copy an existing form design" subfunction of Form
Design.
Unless you are an experienced technician, use this program only as instructed by
VersaForm XL Tech Support. If you are asked to run file recovery by VersaForm
Tech Support, follow these steps:
Note: For this illustration, we will assume that the name of your damaged file is
LEDGER.VFM.
1.
If you are on a Multi User System, make sure no one is using or trying to
access the damaged file LEDGER.VFM.
2.
Back up LEDGER.VFM.
Utility Functions
3.
289
Rename LEDGER.VFM to LEDGER.BAD. If you already have a file named
LEDGER.BAD, it must be deleted before you can success- fully execute the
RENAME command.
WARNING: If the file LEDGER.BAD contains information that should not
be deleted, stop here and call AST for help! The commands are:
Delete:
Rename:
DELETE LEDGER.BAD
RENAME LEDGER.VFM LEDGER.BAD
4.
Start up your VersaForm System.
5.
Select the option for "VersaForm XL Main Menu" from the Main Menu.
(This step applies to MD VersaForm users only. VersaForm XL users should
proceed to step 6.)
6.
Choose option #1, Form Design, from the Main Menu.
7.
Choose option #3, Copy an Existing Form Design, from the Form Design
Menu.
8.
"Enter the drive letter or path of your file." The system is asking you for the
path of the new file. If you would like to create this file in the default
directory, press
to accept the default.
9.
"Enter new file name:" The new file will be used to hold the recovered data.
Enter LEDGER.VFM for new file name.
(
Note: If the system beeps and prompts "LEDGER.VFM already
exists. Remove it?", it means your RENAME command did not
work. Answer 'N', and go back and try renaming your file again.
Or, call Tech Support.
(
10.
"Enter the drive letter or path of your file." The system is now asking you
for the path of the damaged file. Press
if LEDGER.BAD is in the
same directory as LEDGER.VFM. Otherwise, enter the appropriate drive
letter or path name.
11.
Enter LEDGER.BAD in response to, "Enter file name: " This is the file you
are copying the form design FROM.
12.
Answer 'Y' to the question, "Do you want to copy reports, procedures etc?
(Y/N)."
13.
Answer 'Y' to the question, "Do you want to copy checking and filling
information? (Y/N)."
290
14.
VersaForm XL
The system will ask you two more questions after copying the form design.
If you do not want to implement file security for this file, answer 'N' to both
questions.
Note: At this point you have made a copy of the form design of the file
LEDGER.BAD. It is called LEDGER.VFM. Now you will use the File
Recovery Utility to recover the data from LEDGER.BAD, and copy it to
LEDGER.VFM.
15.
Choose option #6, Return to Main Menu.
16.
Choose option #7, VersaForm Utilities, from the Main Menu.
17.
Choose option #7, File Recovery, from the Utilities Menu.
18.
Answer 'N' to the question, "Do you wish to create a new file?"
19.
"Enter the drive letter or path name of your file." The system is asking for
the path of your new file. Press
to accept the default or, enter the
correct path of LEDGER.VFM.
20.
"Enter file name:" Enter LEDGER.VFM for the file you are recovering TO.
21.
"Enter the drive letter or path name of your file." Enter the appropriate path
of your damaged file. You may press
to accept the default if
LEDGER.BAD is in the same directory as LEDGER.VFM.
22.
"Enter file name:" Enter LEDGER.BAD for the file you are recovering
FROM.
(
(
(
Note: The File Recovery Utility is now rebuilding your file. Your computer
may beep and ask you to press
several times through this process.
This is normal.
23.
When the recovery is finished, print the log. Since you copied reports,
procedures, etc. in step 12, there will be a number of duplicates reported on
the log. Don't worry about these.
Examine your rebuilt file (LEDGER.VFM) thoroughly. For example, if
previously you could not retrieve certain records, verify that they can be
retrieved now. If you saw duplicate items in reports, run the same report and
confirm that this no longer occurs. This is the time to make the necessary
checks to be satisfied with your rebuilt file. If you feel uncertain for any
reason, call Tech Support.
24.
Back up your rebuilt file.
Utility Functions
291
TRANSFER UTILITY
The Transfer utility has the capability of transferring data from one file to another,
and allowing the user to specify which fields to transfer to which. In other words,
it's like "Copy By Name", but you aren't restricted to copying only fields that have
the same name. This utility is implemented entirely as a VersaForm procedure.
Thus you can study it (it's an excellent example of the use of a third and fourth file
in a procedure) or modify it. To use it:
Enter Filing on the file TRANSFER. There is one form already on the file,
which contains an explanation of how it is filled. Get a clear form, and fill it
out indicating the transfer you want to do -- which files and which fields.
Then run the procedure "copy forms". There is also a procedure which will
remove all the forms on the target file, in case you make a mistake and want
to try again.
ACTIVITY TRACE
The activity trace produces a trace of file reads and writes of significant entities
(e.g., forms, print formats, report instructions), locks, and index events. It is
initiated by including the word "trace" in the command line, and is directed to the
DOS standard output. It may be redirected to the printer or to a file in the usual
way:
VF trace >filename
WARNING: Do not use the name of an existing file; you'll destroy it if you do!
DOS COMMAND LINE
When VersaForm XL is initiated, it inspects the DOS command line for several
parameters. The complete command line description is:
VF [trace] [strace] [prtrace] [input=filename]
[id=name/password] [filing] [filetest[/fix]] [filename]
The parameters may appear in any order, and they are not case-sensitive.
292
VersaForm XL
Parameter
Usage
trace
turns the activity trace on
strace
turns the programmer's trace on with
output to stdout. It is thus redirectable.
prtrace
turns the programmer's trace on with
output to the printer
input=filename
directs VersaForm to read input from
the named file instead of the keyboard.
When end of file is reached VersaForm
accepts input from the keyboard. A
colon can be used in place of the equal
sign (this is useful to have the parameter
passed through a DOS batch file).
id
the user’s id and (if needed) password.
filing
the system will bypass the main menu
and go directly into filing.
filetest
the system will bypass the main menu
and execute the filetest function. If the
fix argument is present, certain
records will be fixed by filetest.
filename
If there is a parameter on the command
line that isn't one of the above,
VersaForm assumes it is a filename, and
uses it as the default path and file name.
Example:
vf id=joe filing ledger.vfm
will automatically answer the signon prompt with "joe" and, make
ledger.vfm the default file, and directly enter Filing.
UTILITY POPUP MENU
The utility popup menu allows access to printer and trace control, DOS date
setting, procedure debugging, and shelling to DOS. The menu pops up when you
press
.
$X
Utility Functions
293
UTILITY MENU
Turn procedure Debug on
Printer Functions...
Set the Date
Shell to DOS
Turn Autoprompt on
turn Memory Saver on
System Information
Trace Functions
turn procedure Debug on allows starting and ending the procedure trace. This
displays each procedure statement as it is executed, and variables as they change.
Printer Functions allows switching between LPT1, LPT2, LPT3, and a file.
Report printing, however, is not affected. You can send a printer control
sequence, and test the printer.
Set the Date allows you to set the DOS date.
Shell to DOS allows you to suspend VersaForm XL and escape to a DOS
command line. You can issue DOS commands or run other programs. Return to
VersaForm by using the DOS command EXIT.
If Autoprompt is ON and you have provided context-sensitive help for your
application, the help text will appear on the user's screen during filing.
System Information reports on your system configuration, including installed
memory and display type.
Trace Functions allows starting and ending the programmer's trace.
Part IV
Appendices
Appendix A
297
Appendix A
FORMATTING AND BACKUP
Formatting Diskettes
Diskettes (floppy disks) must be formatted before they are used. Refer to your
operating system manual for complete instructions. Whatever you do, though, do
not inadvertently format your hard disk. This is an error with disastrous
consequences, and DOS does not protect you against it.
Backup
Both diskettes and hard disks are backed up using DOS utilities or other backup
products. The importance of backing up your work cannot be
overemphasized. Sooner or later, your hard disk will fail. Keeping backup
copies is the only way to ensure that you don't lose important information due to
equipment troubles or accidents. Backing up on tape is preferable to backing up
on diskette.
We recommend that you use the "structured backup" procedure and maintain two
copies of all files. Under this procedure you keep three tapes or disks, which you
label "A," "B," and "C." Back up to diskette set A on the first day. Use set B on
the second day, set C on the third day, and then return to set A again.
Day
1,4,...
2,5,...
3,6,...
Back Up To
disk A
disk B
disk C
Every month, take one of the backups home and buy a new tape (or disks) to
replace it. This will protect you in case of fire.
Every three months, hold a fire drill. Make sure that you can actually use your
backups to restore from. But be especially careful not to restore over your
active data files, which would destroy them.
298
VersaForm XL
There are two good reasons for using structured backup:
1.
If something goes wrong with a diskette or a file, you may not know it until
you try to do a backup. If you have only one backup diskette, the bad disk
will be copied to the good one. Suddenly you would have no backup at all.
With three copies of each diskette (or hard disk file), this is less likely to
occur.
2.
Rotating the backup diskettes gives you a chance to spread the wear and to
make sure that the backup copies are readable.
Appendix B
SELF-CHECKING NUMBERS
Self-checking numbers is an option which may be chosen under VersaForm's
Checking and Filling system to guard against data entry errors.
Items chosen for this option are usually numbers, such as account codes and part
numbers, by which records will be repeatedly identified for updating or printing.
The procedure helps to prevent keying errors such as single-digit typos or the
transposition of adjacent digits.
THE CHECK DIGIT
Self-checking numbers include a calculated check digit. The computer will repeat
the calculation that produced the check digit, and then test whether the check digit
in the self-checking number matches the one that it has calculated.
Check Digit Calculation
In the Modulus 10 system, used by VersaForm, the check digit is calculated from
the basic number in the following way:
1.
The units position and every alternate position (hundreds, ten thousands,
etc.) in the basic number are multiplied by 2.
2.
These products and the un-multiplied digits from the basic number are
added together.
3.
The resulting sum is subtracted from the next higher multiple of 10 (or from
itself, if it is a multiple of 10). The result is the check digit.
The following examples illustrate correct and incorrect Modulus 10 self-checking
numbers:
300
VersaForm XL
Numbers to be checked:
Basic number:
Check digit:
456261
45626
1
730743
73074
3
Computing The Check Digit
1. number is 45626
2. take 4,6,6 (leaving 5,2)
3. 4,6,6 x 2 = 8,12,12
4. 8+12+12 + 5+2 = 39
5. 40 - 39 = 1
6. Result: 456261
Number is:
Correct
number is 73074
take out 7,0,4(leaving 3,7)
7,0,4 x 2 = 14,0,8
14+0+8 + 3+7 = 32
40 - 32 = 8
Result: 730748
Incorrect
To assign a self-checking number, compute the proper check digit and add it to
the end of the original number. You may use the VersaForm Calculator feature to
calculate the check digit.
Appendix C
COMPARISON AND ORDERING
VersaForm's rules for comparison and ordering, applied in sorting, selecting, and
indexing, are:
Items recognized as numbers are compared algebraically:
-9 < 7.2 = 007.200 < 7.2001
Dates are compared chronologically, as month/day/year:
7/2/38 < 7/2/39
=
07/02/1939
=
7-2-39
Anything not recognized as a number or date is considered a "string".
Comparisons are made in upper case, with multiple blanks compressed to one, and
according to the ASCII collating sequence:
"John Smith"
=
"John
Smith"
=
"JOHN SMITH"
The ASCII (American Standard Code for Information Interchange) collating
sequence as used by VersaForm is shown below.
NOTE:VersaForm uses codes 32-127 inclusive.
302
VersaForm XL
32
33
34
35
36
37
38
39
40
41
42
43
44
45
46
47
48
49
50
51
52
53
54
55
SPACE
!
"
#
$
%
&
'
(
)
*
+
,
.
/
0
1
2
3
4
5
6
7
56
57
58
59
60
61
62
63
64
65
66
67
68
69
70
71
72
73
74
75
76
77
78
79
8
9
:
;
<
=
>
?
@
A
B
C
D
E
F
G
H
I
J
K
L
M
N
O
80
81
82
83
84
85
86
87
88
89
90
91
92
93
94
95
96
97
98
99
100
101
102
103
P
Q
R
S
T
U
V
W
X
Y
Z
[
\
^
_
`
a
b
c
d
e
f
g
104
105
106
107
108
109
110
111
112
113
114
115
116
117
118
119
120
121
122
123
124
125
126
127
h
i
j
k
l
m
n
o
p
q
r
s
t
u
v
w
x
y
z
{
|
}
~
DEL
C-1 ASCII table
Appendix D
FILE FORMATS IN EARLIER VERSIONS
The original VersaForm program (before November, 1983) created UCSD Pascal
(not DOS) files. (The Apple versions created Apple Pascal files.) However,
beginning with version 2.7, VersaForm created DOS files.
Files created with VersaForm and VersaForm XL through Version 4 all have the
same structure. These releases were all compatible in the sense that each release
could use files from earlier releases. This is true even for the Apple versions;
Apple II files transferred by modem or network to a PC using DOS were
immediately usable.
Version 5 of VersaForm XL is not compatible with files created using earlier
versions. You must upgrade these files before using them with Version 5.
Index
303
Version 6 of VersaForm XL is file-compatible with Version 5. However, at
release 6.12 the file format was changed to speed allocation and free-space
management. Files from version 5 and earlier releases of version 6 are
automatically upgraded to the new format. To return to the old format one must
re-create the file with VersaForm File Recovery under the earlier version.
Version 7 is file-compatible with the later Version 6 file format. Custom menus
from earlier versions are honored, but use of the mouse requires new custom
menus to be made in the new format.
If you write procedures to access files that were created on VersaForm release 2.7
or earlier, you should re-install any "Justify" instructions using the Automatic
Checking and Filling option in the VersaForm XL Form Design function.
If you are upgrading from Release 3.xx to a later release, all your old procedures
must be re-saved. You must save the *START procedure first.
If you have files from before release 3.23, we recommend that you re-create all
your old files by copying the form design, then copying all the data to the new file
thus created. This will enable the system to automatically extend your files.
If you have release 2.1 or earlier, you will need to convert your data disks from
the Pascal format to the DOS 2.0 format. Contact AST regarding file conversion.
WARNING: If you have a release of the Medical Billing or Legal Billing
Applications earlier than release 5, do not use them with the current VersaForm
XL release, as file damage may result. Call AST regarding the program upgrade.
304
VersaForm XL
INDEX
*
*Checking
Sample Procedure, 280
*Checking Procedure, 186
*Command Procedures.
*Edit Procedures, 187
*Filling Procedures, 187
Pick Lists, 188
*Pick Procedures, 188
*Save
Sample Procedure, 280
*Save Procedures, 189
*Start Procedures, 188
*Stop Procedures, 189
A
Activity Trace, 291
Add, 197
Adding Users, 160
Additional Files Form, 95
Aging, 280
Alt-F4, 9
And, 200
Answermsg, 224
Aorb, 191, 217
Appendlist, 224
Arithmetic Operations, 76
Arrow Keys, 9
Ascii, 12
Ascii Files, 208
Ascii Files
Exporting, 114
Importing, 208
Ascii Files., 184
Ask_Filename, 224
Assign, 224
Assignment
Operator, 199
Statement, 182
Assignment
Statements, 199
Assignment (=), 78
Attributes, 254
Auto_Last_Line, 159
Auto_Lock, 253
Auto_Prompt, 159
Automatic Checking And Automatic Filling, 81
Automatic Filling, 88
Automatic Lookup, 179
Autoprompt, 253
Autoprompt, 225
Averages, 101
B
Back (B), 73
Backform, 234
Backup, 297
Begin
Statement, 194
Begin, 201
Bell, 225
Bellmsg (Msg), 225
Built In
Functions, 217
Functions, 196
Built-In
Routines, 196
Built-In
Procedures, 196, 217
C
Calculate (Ca), 75
Calculation
Order, 198
Calculation, 90
Calculator, 75
Calculator Commands, 77
Call, 225
Call_External, 225
Cancel, 225
Cancel Form Design, 59
Cancelling Procedures, 205
Chain, 226
Chain Calculations, 78
Chaining, 204
Change A Procedure, 185, 195
Change A Column Line, 34
Change The Date, 287
Change The Design Of A Form, 60
Changed, 226
Changing The Key Item, 147
Character Strings
In Procedures, 193
Check Digit, 299
Checking
See Automatic Checking And Filling, 81
Checking
Index
Procedures, 186
Sample Procedure, 280
Checking Procedure
Chaining From, 204
Chkdsk, 13
Choosing The Key, 57
Chr, 226
Clear, 67, 77, 206, 227
In Procedures, 182
Clear ( Padding ), 207
Clearcol, 227
Clearform, 234
Clearscreen, 227
Cledger.Spl Sample File, 280
Close_Copyform, 227
Color, 254
Color
System, 256
Color Display, 15
Colsort, 227
Coltotal, 196, 228
Column Items
In Procedures, 191
Column Lines, 22, 59
Column Total, 94
Combine Character Strings, 197
Combining Files In A Report, 121
Command
Procedures, 189
Command Line
Dos, 291
Command Line, 63
Commands
Print, 69
Commands
Back, 73, 171
Back_Continue, 171
Calculate, 75
Clear, 67
Delete, 67
Display, 75
Execute, 74
First, 73
Get, 70
Index, 70
Insert, 68
Last, 73
Multi-User, 171
Next, 70, 171
Next_Continue, 171
Page Backward, 68
Page Forward, 68
Quit, 74
Remove, 73
Save, 66, 171
Save_Continue, 171
Search, 71
Space Report, 74
305
Undo, 67
Comments
In Procedures, 192
Commit, 166
Commit, 228
Comparison, 301
Comparisons, 200
Compound Comparisons, 200
Compound Statements, 200
Computation Exceptions, 198
Concatenate Strings, 197
Config.Sys, 13
Confirm Form Design, 59
Constants
In Procedures, 193
Constants
In Procedures, 194
Contains (Co), 121
Context Sensitive Help, 286
Continue Message, 215
Control --> And <--, 9
Control-Home And -End, 9
Control-Pgup And Pgdn, 9
Convert
Print Format, 134
Copy
Form Design, 61
Copy
By Name, 144
Forms
Manual Selection, 142
Forms
Duplicates, 142
Print Format, 134
Print Formats, 143
Printing Control Instructions, 143
Report Control Instructions, 143
Copy Forms And Data, 141
Copycols, 228
Copyform, 228
Counts, 106
Cr, 229
Create A Print Format, 125
Cursor, 9
Cursor, 9
Cursoritem, 229
Custname Sample Procedure, 280
Custom Menu And Context Sensitive Help, 281
D
Damaged Files, 288
Data Items To Print
In Reports, 110
Database Format, Export, 114
Datapath, 114, 229
Date, 159
306
VersaForm XL
Arithmetic, 199
In Procedures, 193
Date, Setting In Utilities, 287
Date_Character, 159
Dates
Non-U.S. Convention, 10
Dates, 10
Deadlock, 167
Decimal, 159
Declaration Of Identifiers In Procedures, 193
Default Disk/Path Name, 287
Default Values, 94
Default_Length, 157
Default_Width, 157
Delete (D), 67
Delete Form Design, 61
Delete Line
In Procedures, 182
Deleteline, 229
Example, 196
Depth, 230
Design A Print Format, 125
Designing A Form, 51
Detail Lines In Reports, 122
Diagnostic File Recovery Function, 288
Disk Drives, 10
Disk/Path Names, 158
Diskettes, 10
Display, 230
In Procedures, 181
Display (Di), 75
Display_Help, 230
Displayfile, 230
Div, 197
Divide, 197
Divide
By Zero, 199
Do Statement, 203
Documentation Files, 280
Dos Command Line, 291
Dos Configuration, 13
Dos_Exec, 231
Dots
In Form Design, 53
Dummy Characters, 157
Dup, 231
Duplicate Forms, 288
Duplicate Forms, 147
E
Edit, 231
Edit A Procedure, 195
Edit Procedures, 187
Else, 201
End, 201
End Key, 9
End-End Key, 9
Enter A Print Format, 127
Enter Data On A Form, 65
Enter Key, 12
Enter Single Items, 55
Enter Text, 55
Entering Column Headings, 58
Entering Procedures, 178
Enteritem, 232
Equal (Eq), 121
Equal To
In Procedure Statements, 200
Equipment
Optional, 13
Required, 12
Erase Command, 24
Eraseform, 232, 234
Errormsg, 232
Errors In Designing A Form, 55
Esc, 25
Evaluating An Expression, 198
Ex (Notation), 217
Exclamation Marks, 195
Excludes (Ex), 121
Execute (Ex), 74
Expressions, 197
Ext_Printfile, 233
Extended Checks, 84
F
False, 200, 233
Fget, 233
Field Names, 53
Fieldtype, 235
File
Size, 11
File, 217
File Functions, 288
File Capacity, 11
File Formats, 303
File Handling, 213
File Integrity, 288
File Names, 52
Files
Protected, 161
Files, 12
Files, 10, 158, 211
Filetest, Can Be Used To Test File Integrity
Separately (You Could Run It At Night). The
Syntax Is:, 288
Filing, 17
Filing Command Procedures, 234
Filing Commands, 28
Fill Character, 157
Filling, 88
Filling
Index
307
See Automatic Checking And Filling, 81
Filling Procedures, 187
Findline, 235
First
In Procedures, 181
First (F), 73
Firstform, 234
Form Design
Maximum Size, 9
Form Design
Columns, 57
Form Design
Menu, 51
Form Feed, 157
Form Id, 191
Form Items, 191
Form Names In Procedures, 183
Form Size, 53
Form Type, 217
Format, 235
Format Check, 85
Formatsequal, 236
Formatting Diskettes, 297
Formfeed, 236
Formitem, 191, 217
Formtype, 217
Function Keys
Filing Commands, 64
Functions, 197
G
Get, 236
Get (G), 70
Get Command, 29
Get Inventory Sample Procedure, 280
Getch, 236
Getform, 234
Getparam, 237
Getxy, 237
Global Changes, 278
Global Variables, 133
Global Variables
In Procedures, 194
Gotoitem, 238
Gotoxy, 238
Greater Than
In Procedure Statements, 200
Greater Than (Gt), 121
Greater Than Or Equal To
In Procedure Statements, 200
Greater Than Or Equal To (Ge), 121
H
Home Key, 9
I
I/O Error Handling, 210
Identifiers, 197
Identifiers, 191
Identifiers Procedure, 191
If Statement, 200
Import Data, 208
Import Long Lines, 208
Include, 213
Index
In Procedures, 182
Index (I), 70
Infomsg, 238
Insert (In), 68
Insert Line
In Procedures, 182
Insertline, 238
Installation
Color Displays, 15
Memory Required, 13
Serial Printers, 15
Installation, 12
Integer, 197
Invc.Spl Sample File, 280
Inventry.Spl Sample File, 280
Invert (I), 77
Invoicing - Sequential Numbering, Sample, 270
Ioerror, 239
Function, 210
Item, In Procedure Statements, 217
J
Justify, 83, 239
K
Key Field, 56
Key-From1, 181
Key-From2, 181
Keystruck, 240
L
L#, 192, 217
Label Text File, 149
Labels, 149
Large Character Strings, 199
Last (L), 73
Last Column Line, 159
Lastcommand, 240
Lastform, 234
Lastline, 240
Lastposn, 241
Leading And Trailing Blanks, 198
Left_Margin, 157
308
VersaForm XL
Length, 241
Less Than
In Procedure Statements, 200
Less Than (Lt), 121
Less Than Or Equal To
In Procedure Statements, 200
Less Than Or Equal To (Le), 121
Line Numbers In Procedures, 192
List Check, 86
Literals
In Procedures, 193
Literals In Procedures, 191
Lockfile, 241
Lockform, 241
Locking, 253
Errors, 170
Technical Note, 171
Locking, 167
Locking In Procedures, 169
Locking In Reports, 170
Locking On Interactive Commands, 168
Locks
Test, 172
Locks, 171
Log
Printing Forms, 138
Log
Copying Forms, 143
Log On, 155, 161
Bypass, 163
Logical Operators, 200
Lookup, 88
Look-Up Procedure, 175
Loops, 202
Lowercase, 191
Ltrim, 241
M
Mail Merge, 280
Mailing Labels. See Labels
Mailing Labels
Label Text File, 149
Manager, 155, 161
Mandatory, 84
Max, 242
Maximum Form Size, 53
Maximum-Length, 83
Maxline, 242
Memory, 13
Menu, 243
Menu, Sample Procedure, 268
Min, 242
Minimum-Length, 83
Mod, 197
Mode, 253
Mode Command, 15
Modify A *Start Procedure, 195
Monthend Sample Procedure, 280
Mouse, 15
Move Data, 144
Moving Data
With Procedures, 199
Moving The Cursor, 9
Multiple Selection Conditions, 118
Multiply, 197
Multi-User Features, 165
N
Negative (N), 77
Nested Statements, 202
Next (N), 70, 73
Nextform, 234, 243
Non-Numeric Values, 198
Normal_Vid, 243
Not, 200
Not Equal (Ne), 121
Not Equal To
In Procedure Statements, 200
Notation, 191
Numbers, 11
In Procedures, 193
Numeric, 83
Numeric Precision, 206
O
Operational Modes, 170
Operator
!, 195
&, 197
*, 197
/, 197
Div, 197
Mod, 197
Operators, 197
In Procedures, 191
Or, 200
Ord, 243
Order Of Evaluation, 198
Ordering, 301
P
Pad, 243
Padding, 207, 253
Page
Length, 157
Width, 157
Page, 244
Page Backward (Pb), 68
Page Forward (Pf), 68
Parameters, 196, 217
Index
Parentheses, 197
Password, 161
V.Bat, 163
Path, 114
Path, 229
Percentages, 107
Pgdn, 68, 244
In Procedures, 182
Pgup, 68, 244
In Procedures, 182
Pick Procedures, 188
Pickfield, 244
Pickfile, 245
Pickindex, 245
Picklist, 246
Pickup (P), 77
Pif, 15
Pop, 246
Pos, 246
Posn, 246
Prevent_Delete, 247
Primary Files, 177
Primary Form (A), 191
Print, 247
In Procedures, 182
Print (Pr), 69
Print Control Sequence, 158
Print Control Sequence, 115, 287
Print Format, 125
Design, 126
Form, 129
Print Formats In Procedures, 248
Print Line And Column Numbers, 126
Print Mailing Labels, 149
Print The Form, 68
Print The Form Definition, 62
Print_Ctl_Str, 247
Print_Labels, 249
Printer
Configuration, 157
Print Control Setup, 158
Test Ready, 157
Printfile, 247
Printfile Procedure, 209
Printform, 247
Printform Procedure, 209
Printing Control Instructions, 143
Procedure Call, 196
Procedure Calling, 204
Procedure Chaining, 204
Procedure Handling, 214
Procedure Names, 180
Procedure Post, Sample Procedure, 276
Procedure Statements, 183, 191
Procedure Statements, 196
Procedure Statements, 182
Procedure Types, 186
Procedures
309
Look-Up, 175
Programpath, 249
Prompt, 249
Put, 249
Q
Quit (Q), 74
R
Range Check, 84
Read, 249
Read Procedure, 208
Recovery, 288
Redesign The Form, 59
Remove
Print Format, 133
Remove (R), 73
Remove A Form, 35
Remove A Report, 123
Remove Forms
With Copy/Print, 143
Removeform, 234, 250
Removing Selected Lines , Sample Procedure,
272
Rename
Print Format, 133
Repeat, 202
Repeat Loop, 202
Report
Definition Form, 98
Definition Form, 95
Definition Form, 109
Displayed On Screen, 123
Sent To A Disk File, 123
Variables, 108
Variables, 120
Report:, 112
Re-Save Procedures, 195
Reserved Words, 195
Reserved Words In Procedures, 191
Restattr, 250
Restrictions On Checking Procedures, 187
Retrieve, 250
Retrieve Forms, 69
Return
Procedure, 250
Reverse Video, 157
Reverse_Vid, 250
Roll Back, 166
Rollback, 250
Rollback_, 159
Rollback_On, 253
Round, 251
Rounding, 206, 253
Rounding (R), 77
310
VersaForm XL
Rpad, 251
Rtrim, 251
Run_Report, 251
Running Totals, 92
S
Sample
Menus, 282
Procedure Files, 280
Procedures, 267
Sample Application Files, 280
Save
In Procedures, 181
Save (Sa), 66
Save Procedures, 189
Saveform, 234
Saveneeded, 252
Scrolling, 9
Search (Se), 71
Search Command, 30
Searchline, 252
Secondary Files, 181
Secondary Files, 177
Secondary Form (B), 191
Security, 164
Protected Files, 161
User Authorities, 162
Security, 160
Select, 253
Select Data For Reports, 118
Select The Forms To Be Copied, 141
Selection Condition Form, 95
Selection Conditions
Multiple, 119
Selection Conditions, 116
Selfcheck Digit (S), 77
Self-Checking, 84
Self-Checking Numbers, 299
Semicolon, 201
Serial Printer, 15
Set, 206
Set ( Padding ), 207
Set/Clear/Pop, 253
Set_Attrib, 254
Setattr, 254
Setfldinfo, 254
Setting The Date, 287
Setup
Adding Users, 160
Display, 157
Function Key Options, 160
Other Options:, 159
Printer, 157
Read Only, 156
Report Options, 160
Users.Vfs, 161
Setup, 155
Setup.Vfs, 155
Setup_Copyform, 254
Setup_Printform, 255
Sharing Mode, 156
Silent, 253
Single Items, 18
Single Items, 53
Size, 255, 264
Sorting In Reports, 102
Space Report (Sp), 74
Spaces
In Form Design, 54
Special Symbols In Procedures, 191
Spreadsheet Format, Export, 114
Start Procedures, 188
Starting Up Versaform Xl, 15
Stop Procedures, 189
Str, 256
Structured Backup, 297
Sub-Expression, 200
Subtract, 197
Summaries Reports, 122
Syssetup.Vfs, 155
System_Color, 256
System-Generated Values
In Print Formats, 133
T
Tab, 9
Table Lookup, 88
Test, 256
Test The Print Format, 133
Test_Printform, 257
Text, 53
Textinput, 257
Textinput Procedure, 208
Then Statement1, 201
Time_Character, 159
Todaysdate, 90
Total (T), 77
Totaling, 99
Totaling In Reports, 112
Trace
Activity, 291
Trailing Blanks, 198
Transactions, 165
Transactions, 166
Transfer Data With Copy By Name, 144
Transfer Utility, 291
Transferring A Value, 199
True, 200, 257
Truncated Character Strings, 199
Truncation, 197
Tutorial Files, 280
Two Part Keys, 57
Index
311
U
Undo (E), 67
Unindexed Forms, 288
Unlock Locks, 172
Unlockfile, 257
Unlockform, 257
Until, 202
Uppercase, 191
User
Authorities, 162
User Commands
Hot Keys, 190
User Id, 155
User Procedures, 190
User Procedures, Chaining, 204
User Registration Form, 162
User_Did_Escape, 257
User_May_Escape, 253
User_May_Escape, 257
Userid, 161
Users.Vfs, 161
Utilities Menu, 287
Utility Functions, 287
Utility Popup Menu, 292
V
V@Getarg, 133, 248
V@Line, 133
V@Lines, 133
V@Page, 133
V@Pages, 133
Validate, 20
In Procedures, 181
Valneeded, 258
Variable In Reports, 44
Variables
In Procedures, 194
Variables In A *Start Procedure, 188
Vclose, 211, 258
Vclose_List, 258
Vclose_Win, 258
Vcoltotal, 258
Vcompare, 258
Vcopy, 259
Vcount, 259
Vdate, 133, 214, 260
Vday, 260
Vdelete, 260
Vdisplay, 261
Vexit, 261
Vmonth, 261
Vnokey, 262
Vopen, 211, 262
Vopen_List, 262
Vopen_Win, 262
Voutput, 262
Vpfmtobj, 262
Vpfmtsrc, 263
Vpick, 263
Vput, 263
Vquit, 263
Vreadch, 263
Vrename, 263
Vtime, 264
Vuser, 264
Vyear, 264
W
Warning
Totaling Single Items, In Reports, 100
While, 202
Whole Numbers, 197
Windowing Routines, 212
Windows, 14
With Reports, 114
Word Processor Format(E., Export, 114
Writing Ascii Files, 209
Y
Yes Or No, 83
Yesno, 265
Yesnomsg, 265
Z
Zoom, 64