1
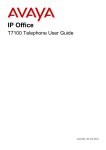
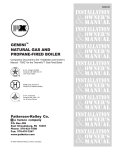
Intruder Alarm System
MAS 800 User manual
TABLE OF CONTENTS
1
2
3
4
5
6
7
8
9
INTRODUCTION ......................................................................................................... 3
1.1
About your security system ................................................................................... 3
1.2
Components of MAS 800 ...................................................................................... 3
SYSTEM CONTROL.................................................................................................... 4
2.1
Location of controls ............................................................................................... 4
2.2
Emergency call buttons.......................................................................................... 4
2.3
Programmable function buttons............................................................................. 4
2.4
To use menu........................................................................................................... 5
TO CHANGE THE TEMPORARY PIN....................................................................... 6
ARMING AND DISARMING THE SYSTEM ............................................................ 7
4.1
Regular disarming.................................................................................................. 7
4.2
Selective disarming................................................................................................ 7
4.3
Regular arming....................................................................................................... 8
4.4
Selective arming..................................................................................................... 9
4.3.1
Selective arming in „Regular“ mode ............................................................. 9
4.3.2
Selective arming in „Home“ mode .............................................................. 10
4.3.3
Selective arming in „Night“ mode............................................................... 11
4.3.4
Selective arming in „Vacation“ mode.......................................................... 12
4.5
Activating pre-alarm ............................................................................................ 13
4.6
Cancellation of an activated alarm....................................................................... 14
CLEARING THE ALARM MEMORY ...................................................................... 15
ZONE BYPASS........................................................................................................... 16
VIEW TROUBLES AND MEMORY CLEAR........................................................... 17
OTHER FEATURES ................................................................................................... 18
8.1
Date and Time Setting ......................................................................................... 18
8.2
Changing User PIN .............................................................................................. 19
8.3
Editing User Settings ........................................................................................... 20
8.3.1
Accessing User Edit Mode.......................................................................... 20
8.3.2
Editing User Name....................................................................................... 21
8.3.3
Creating and Canceling Users...................................................................... 22
8.3.4
Changing User Rights .................................................................................. 23
8.3.5
Assigning partitions to a user....................................................................... 24
8.3.6
Reassigning a temporary PIN to a user........................................................ 25
8.4
Setting timers ....................................................................................................... 26
8.5
Changing LCD settings and sound ...................................................................... 27
8.5.1
Switching LCD on and off........................................................................... 27
8.5.2
Adjusting the LCD backlighting intensity ................................................... 28
8.5.3
Adjusting LCD contrast ............................................................................... 29
8.5.4
To switch the keypad confirmation sound on/off ........................................ 30
8.6
Viewing system information................................................................................ 31
8.7
Chime function..................................................................................................... 32
SERVICE MODE ........................................................................................................ 33
9.1
Enabling service mode......................................................................................... 33
9.2
Disabling service mode........................................................................................ 33
2
1
INTRODUCTION
1.1
About your security system
Thank you for purchasing Intruder Alarm System MAS800. This modern system
not only provides you with a highest level of security, but also is exceptionally user
friendly and boosts a lot of convenient features. MAS800 securely protects your
home from intruder, fire and other emergencies as well as allows you to control
such home appliance as lights, heating, open and close blinds, gates, etc.
Read this manual closely to become familiar with the system features and keep it
for future reference.
1.2
Components of MAS 800
Basic set of MAS800 consists of following components: Mainboard (1), LCD
Keypad (2), Battery (3), Siren (4) Sensors and Detectors (5-7) quantities and
types of which is determined by size and locations of the object and user
requirements.
1.
4.
3.
2.
5.
6.
7.
To increase functionality and possibilities of the system you can purchase optional
accessories: Extension modules, Remote Control module, GSM add-on.
Mainboard is designed to maintain all functionality of the system.
LCD Keypad allows user to arm and disarm the system, set parameters and
perform the programming of the system.
Battery ensures functionality of the system in case of power failure.
Siren locally warns about intruder, fire and other emergencies.
Extension modules allows to connect more sensors and controlled equipment
With Remote Control module installed you can arm and disarm system remotely.
GSM add-on is designed to control system by means of your GSM phone.
3
2
SYSTEM CONTROL
2.1
Location of controls
The MAS800 security system is designed to ensure flexibility, user friendly operation and
uniquely reliable protection. Please read this manual closely. The installer will introduce
you to the system and inform you about which features are activated.
Alarm
LCD
Arming
Pre-alarm
indication
Troubles
Emergency call
buttons
Cancel
Menu navigation
buttons
Speed function
button
Menu/
Enter button
Buttons for entering PIN
and other digital data
Selection button
The main features of the system (regular arming, disarming, etc.) are activated by simply
entering a user PIN. Most of the other functions can be accessed using the menu.
The MAS800 is also equipped with emergency buttons to call different emergency
services, and a programmable speed function button to access the selected system
features instantly.
2.2
Emergency call buttons
Buttons [ A ], [ B ] and [ C ] allow calling emergency services directly. To call the necessary
emergency service, press the corresponding emergency call button and digital button next
to it simultaneously, and hold for at least 1 second:
[ A ] + [ 1 ] – To call firefighters.
[ B ] + [ 4 ] – To call an ambulance.
[ C ] + [ 7 ] – To call a security service.
2.3
Programmable function buttons
You can press the [ F ] button followed by one of the digital buttons to access
preprogrammed features such as arming specified partitions, accessing frequently used
menu items, etc. These features can be programmed by the service personnel at your
request.
4
2.4
To use menu
Most of the system features are operated by means of the user friendly and
intuitive menu.
The System menu is accessed by pressing the [ENT] button or any of the menu
navigation buttons [◄] and [►]:
Menu:
◄Arm
►
To select menu items use the [◄] and [►] buttons.
The selected settings are changed using [ # ], and then confirmed by pressing [ENT]. To
return to the previous menu level without saving changes, press [CLR]:
Parts:#234
Sitting room
5
3 TO CHANGE THE TEMPORARY PIN
The installer creates one or more users in a newly installed security system with a temporary PIN.
As you start to use the security system, ALL users must change their temporary PIN to new one,
which is known only to the user. If there are one or more users with an unchanged temporary
PIN, the system prompts to change it:
To perform other functions without changing the PIN (not
recommended), press [CLR]. To change the PIN:
1) Press [ENT].
John Stone
must change PIN
Change PIN:
2) Enter the temporary user PIN and press [ENT].
PIN:▓
3) Enter the new user PIN and press [ENT].
New PIN: ▓
Repeat:
4) Repeat the new user PIN and press [ENT].
The PIN will be changed. If there are more users with a
temporary PIN, they must change by using the same method.
When all the PIN codes are changed, the system will switch to
New PIN:1234
Repeat: ▓
Changed...
its date/time display mode. If you make a mistake when
entering data, press [CLR] and try again.
Note: Write down your PIN and keep it in a safe place away from the LCD keypad.
6
4 ARMING AND DISARMING THE SYSTEM
4.1
Regular disarming
1) After entering the premises through the entry zone, one must enter their PIN
within a specified time (entry delay time);
When the entry zone is passed, short beeps will be heard. The beeps stop when a valid
PIN is entered with the LCD keypad. All partitions to which the user has access will be
disarmed.
Note: If one fails to enter the correct PIN within the specified time, the alarm will activate
and the alarm message will be sent to the security service.
4.2
Selective disarming
If you want to disarm some partitions but not all of them, you can use selective disarming:
1) Press [ENT] to access the menu.
2008.02.12
13:15:00
2) Press [◄] or [►] to select Disarm and press [ENT].
Menu:
3) Enter your user PIN, and then press [ENT].
◄Disarm
Armed partitions are indicated as #, and the name of
Disarming:
selected partition is shown below.
PIN:
4) Select the required partitions with the [◄] or
[►] button, and press [ # ] to change its
condition or
Press the numbers of the partitions you want to
disarm or, if you want to disarm all the partitions to
which you have access,
Press [*].
5) Press [ENT] to confirm your selection.
The selected partitions will be disarmed.
7
Parts:##
Sitting room
Parts:1#
Sitting room
►
4.3 Regular arming
This feature is usually used for normal everyday arming
1) Be sure that all the zones in all the partitions you are going to arm are
closed (except entry/exit zone);
2) Enter your PIN;
After entering a valid PIN the exit time will start and you will hear short beeps.
3) Leave the premises within the specified exit time and close the exit
zone.
After the exit time expires or when the exit zone is closed (depends on the setting),
all the zones you have access to are armed.
Notes:
•
If there are any open zones, except for the entry/exit zone, you will hear an audible
error signal (three short beeps) after you enter your PIN, and an error message will
be displayed indicating the violated zone.
Close the violated zone and repeat the arming
procedure, or if you want to leave that zone unarmed,
Not ready:1
Kitchen window
see “Zone bypass” (page 16)
•
If you enter the wrong PIN you will hear an audible error
Wrong PIN...
signal (three short beeps) and the “Wrong PIN”
message will be displayed for 5 seconds:
•
If you didn’t leave the premises within the specified exit time, the system will be
armed in the “Home” mode (see page 10).
8
4.4 Selective arming
This feature allows you to arm one or more partitions to which the user has access. One of
the following arming modes can also be selected:
-
“Regular” (Arming all zones)
-
“Home” (Arming without internal zones)
-
“Night“ (Arming without internal zones and without entry delay)
-
“Vacation” (Arming all zones without entry delay)
-
“Pre-alarm” (Local alarm without sending a report to the security service)
4.3.1 Selective arming in „Regular“ mode
Use this feature if you are going to leave and not arm all partitions.
1)
Be sure that all the zones in all the partitions
you are arming are closed (except entry/exit zone).
2)
Press [ENT] to access the menu.
2008.02.12
13:15:00
Menu:
◄Arming
3)
Press [ENT] again to select “Arm”.
Arming:
◄Regular
4)
►
►
Press [ENT] to select “Regular”.
Arm Regular:
5)
Enter your user PIN and press [ENT].
The numbers of the disarmed partitions to which you have
access will be displayed. The name of the selected partition
Parts:134
Kitchen
will be indicated at the bottom.
6)
PIN:
Select the required partitions with the [◄] or
[►] button, and press [ # ] to change its condition
Parts:#3#
Dinning room
or Press the numbers of the partitions you want to
arm or, if you want to arm all the partitions to which
you have access, Press [*].
7)
Arming...
Press [ENT] to confirm your selection.
The delay timer will start, and short beeps will be heard.
8)
Leave the premises within the specified exit time and close the exit
zone.
9
4.3.2 Selective arming in „Home“ mode
This feature is designed to protect you from intruders when you are at home. In
this case, the internal zones (such as movement sensors) are not armed. Use this
function if somebody with access permission may arrive.
1) Be sure that all the zones in all the partitions you are arming are
closed (except internal zones).
2008.02.12
13:15:00
2) Press [ENT] to access the menu.
Menu:
3) Press [ENT] again to select “Arm”.
◄Arming
4) Use the [◄] and [►] buttons to select “Home”
Arming:
◄Home
arming mode, then press [ENT].
5) Enter your user PIN and press [ENT].
The numbers of the disarmed partitions to which you have
access is displayed. The name of the selected partition will
►
►
Arm Home:
PIN:
be indicated at the bottom.
6) Select the required partitions with the [◄] or
[►] button, and press [ # ] to change its
condition or
Parts:#3#
Sitting Room
Press the numbers of the partitions you wish to
Parts:134
arm or, if you want to arm all the partitions to which
Kitchen
you have access,
Arming...
Press [*].
7) Press [ENT] to confirm your selection.
The delay timer will start, and short beeps will be heard.
You can leave the premises within the specified exit time and close the
exit zone, or stay on the premises.
Note: To arm immediately before the exit time expires, press [ # ], then [ENT], as
countdown starts.
10
4.3.3 Selective arming in „Night“ mode
This feature is designed to protect you from intruders when you are at home. In
this case, if you are sure that nobody with access permission will arrive, e.g., at
night.
1) Be sure, that all the zones in all the partitions
you are arming are closed (except internal
2008.02.12
13:15:00
zones);
2) Press [ENT] to access the menu.
Menu:
◄Arm
►
3) Press [ENT] again, to select “Arm”.
4) Use [◄] and [►] buttons to select arming mode
Arming:
◄Night
„Nihgt“, then press [ENT]
5) Enter your user PIN and press [ENT].
The numbers of disarmed partitions to which you have
Arm Night:
access will be displayed. The name of selected partition
PIN:
will be indicated at the bottom.
Parts:134
6) Select required partitions with [◄] or [►]
button, and press [ # ] to change its condition or
Press the numbers of the partitions you wish to
arm or, if you want to arm all the partitions to which
you have access,
Sitting Room
Parts:#3#
Kitchen
Arming...
Press [*].
7) Press [ENT] to confirm your selection.
11
►
4.3.4 Selective arming in „Vacation“ mode
This feature is used to enhance the security when the premises are not accessed
for long periods of time (e.g., leaving for vacations). In this case, the alarm
message is sent after entering the premises without an entry delay, and you must
inform the security service immediately about your arrival.
1) Be sure, that all the zones in all the partitions
you are arming are closed;
2008.02.12
13:15:00
2) Press [ENT] to access the menu;
Maim menu:
◄Arm
►
3) Press [ENT] again, to select “Arm”.
4) Use [◄] and [►]buttons to select the arming
Arming:
mode „Vacation“, then press [ENT]
◄Vacations
5) Enter your user PIN and press [ENT].
The numbers of disarmed partitions to which you have
Arm Vacations:
access will be displayed. The name of selected partition
PIN:
will be indicated at the bottom.
Parts:134
6) Select required partitions with [◄] or [►]
Sitting Room
button, and press [ # ] to change its condition or
Parts:134
Press the numbers of the partitions you wish to
Sitting Room
arm or, if you want to arm all partitions to which
you have access, Press [*].
Arming...
7) Press [ENT] to confirm your selection.
The delay timer starts, and short beeps will be heard.
Leave the premise in specified exit time and close the exit zone.
12
►
4.5 Activating pre-alarm
This function is used to warn the user about zone violation locally by means of an
audible siren without sending an alarm message to the security service.
1) Be sure, that all the zones in all the partitions
you are arming are closed;
2008.02.12
13:15:00
2) Press [ENT] to access the menu;
Menu:
◄Arm
►
3) Press [ENT] again, to select “Arm”;
4) Use [◄] and [►] buttons to select arming mode
Arming:
“Pre-alarm”, then press [ENT];
◄Pre-alarm
5) Enter your user PIN and press [ENT].
The numbers of the disarmed partitions to which you
Pre-alarm:
have access will be displayed. The name of the selected
PIN:
partition will be indicated at the bottom.
6) Select required partitions with [◄] or [►]
button, and press [ # ] to change its condition or
Parts:134
Sitting Room
Press the numbers of the partitions you wish to
arm or, if you want to arm all partitions to which you
Parts:134
have access,
Sitting Room
Press [ * ].
7) Press [ENT] to confirm your selection.
Pre-alarm is activated immediately.
13
Arming...
►
4.6 Cancellation of an activated alarm
To cancel an activated alarm:
1) Enter your PIN.
The alarm will be canceled. Be sure to inform the security service if there
was a faulty alarm.
14
5 CLEARING THE ALARM MEMORY
The red LED (alarm) will be blinking if an alarm was activated. To view and/or clear
the alarm memory:
1) Press [ENT] to access the menu;
2) Use [◄] and [►] buttons to select “Clear
Menu:
◄Arm
►
Menu:
Alarm”, then press [ENT];
◄Clear Alarm
3) Enter your user PIN and press [ENT].
The partition and zone where the most recent alarm was
activated will be displayed.
4) Pres [◄] and [►] to check if there where more
alarms;
5) Press [CLR] to exit this feature;
You will be prompted to clear the alarm memory
Clear Alarm:
PIN:
Kitchen:
Fire.
Clear All?
ENT=Yes CLR=No
6) Press [ENT] to clear alarm memory or press [CLR] to keep it.
The red LED stops blinking, if you clear the alarm memory ([ENT] is pressed).
Note: Currently active alarms are not cleared from the memory.
15
►
6 ZONE BYPASS
If you wish to arm the system, when one or few zones will be violated (e.g., you
want to leave with a window open), you can specify the system to bypass the
selected zones.
1) Press [ENT] to access the menu;
2) Use [◄] and [►] buttons to select “Zone
Menu:
◄Arm
►
Menu:
Bypass”, then press [ENT];
◄Zone Bypass
3) Enter your user PIN and press [ENT].
The zone list will be displayed.
►
Zone Bypass:
PIN:
Zona:12345
4) Use the [◄] and [►] buttons to select the zone
Balcony
you wish to bypass, then press [#]. Repeat this
procedure with any other zones you wish to
Zona:1x345
bypass.
Kitchen window
5) Press [ENT] to confirm bypass of specified zones or [CLR], to cancel your
selection.
Note Zone Bypass is valid for one arming cycle. Zone Bypass is canceled automatically as
soon as the system is disarmed.
16
7 VIEW TROUBLES AND MEMORY CLEAR
If there are any technical problems with the system (tamper or failure of sensor or
module, communication problems, etc.) the yellow LED (trouble) will be on. To
display and/or clear the trouble list:
1) Press [ENT] to access the menu;
Menu:
2) Use [◄] and [►] buttons to select “View
◄Arm
►
Troubles”, then press [ENT];
Menu:
3) Enter your user PIN and press [ENT].
A short description of the trouble will be displayed.
◄View Troubles ►
View Troubles:
PIN:
4) Pres [◄] or [►] to check if there are more
Trbl Tamper:
troubles;
Entry door
5) Press [CLR] to exit this feature;
You will be prompted to clear trouble memory
Clear All?
ENT=Yes CLR=No
6) Press [ENT] to clear trouble memory or press [CLR] to keep it.
The yellow LED will go off if you clear the trouble memory ([ENT] is pressed).
Note: This function only clears fixed troubles. Current troubles are not cleared from the memory.
17
8 OTHER FEATURES
8.1 Date and Time Setting
When not in use, the date and time are displayed on the LCD keypad. To adjust the date
and time do the following:
1) Press [ENT] to access the menu;
Menu:
◄Arm
►
2) Use [◄] and [►] buttons to select “Options”,
then press [ENT];
Menu:
3) Use [◄] and [►] buttons to select “Date/Time”,
then press [ENT];
◄Options
►
Options:
4) Enter your user PIN and press [ENT].
The date and time will be displayed.
◄Date/Time
►
Date/Time:
PIN:
5) Use numbered buttons to set current dare and
time. Use [◄] and [►] buttons to move to next
item.
Date: 18.01.2008
Time: 16:25:00
6) Press [ENT] to accept changes
If [CLR] is pressed, the changes are not saved and the previous date and time remains.
18
8.2 Changing User PIN
Users must change their temporary PIN code before they start to use the system. If there
is doubt about the security of the code, the users can change their code at any time:
1) Press [ENT] to access the menu;
Menu:
◄Arm
2) Use [◄] and [►] buttons to select “Options”,
then press [ENT];
Menu:
◄Options
3) Use [◄] and [►]buttons to select “Users”, then
►
Options:
◄Users
press [ENT];
►
►
Users:
4) Use [◄] and [►]buttons to select „Change PIN“,
then press [ENT];
◄Change PIN
Users:
PIN:
5) Enter the temporal user PIN and press [ENT].
New PIN: ▓
Repeat:
6) Enter the new user PIN and press [ENT].
New PIN:1234
7) Repeat the new user PIN and press [ENT].
The user PIN is now changed
Repeat: ▓
Changed...
19
►
8.3 Editing User Settings
If a user is allowed to edit the user data, he can create new users, change user data and
rights, and can also reset the default temporary PIN if any user has forgotten his PIN.
8.3.1 Accessing User Edit Mode
1) Press [ENT] to access the menu;
Menu:
◄Arm
►
2) Use [◄] and [►] buttons to select „Options“, then
press [ENT];
Menu:
3) Use [◄] and [►] buttons to select „Users“, then
◄Options
►
Options:
press [ENT];
◄Users
4) Use [◄] and [►] buttons to select „Edit Users“,
then press [ENT];
Users:
◄Edit Users
5) Enter your user PIN and press [ENT].
►
►
Users:
PIN:
6) Press [ * ] to select the user.
U01:◄Name
7) Press [◄] and [►] to select the feature and press
[ENT] to edit.
Dady
U02:◄Name
Billy
For details see pages 21 – 25.
20
►
►
Editing user settings (continued)
8.3.2 Editing User Name
You can create and edit a User Name:
1) Perform steps 1 to 6 in the “Access User Edit Mode” section.
U01:◄Name
2) Use [◄] and [►] buttons to select „Name“,
►
Bily
then press [ENT];
3) Press the numbered buttons repeatedly to
select the characters (see table 1), then use
U01: Name
Bily
[►] to move to the next position and [◄] to move to the previous
character.
U01: Name
4) Press [ENT] to complete the editing.
Table1. Entering characters
Numbered
Characters
Button
[1]
1
[2]
ABC2abc
[3]
DEF3def
[4]
GHI4ghi
[5]
JKL5jkl
[6]
MNO6mno
[7]
PQRS7pqrs
[8]
TUV8tuv
[9]
WXYZ9wxyz
[0]
<space> 0
21
Billy
Editing user settings (continued)
8.3.3 Creating and Canceling Users
To create a new user one must change the user status from Disabled to Enabled, and to
cancel an existing user one must change the user status from Enabled to Disabled.
1) Perform steps 1 to 6 in the “Access User Edit Mode” section
U02:◄Name
2) Use [◄] and [►] buttons to select “Status”,
►
No Name
then press [ENT];
U02:◄Status
3) Use the [◄] and [►] buttons to select Enabled,
if you want to create a user, or Disabled if you
want to cancel one.
Disabled
U02: Status
◄ Disabled
4) Press [ENT] to complete the editing.
►
U02: Status
◄Enabled
22
►
►
Editing user settings (continued)
8.3.4 Changing User Rights
After a new user is created, you must select the rights of the user, and you can also edit
the rights of any existing user:
1) Perform steps 1 to 6 in the “Access User Edit Mode” section.
U02:◄Name
2) Use the [◄] and [►] buttons to select
►
Billy
“Rights”, then press [ENT];
U02:◄Rights
3) Pres [◄] and [►] to select rights, and use [ # ]
to enable or disable it.
Enabled rights are marked with “+”, and disabled with
“-“. See Table 2 for details.
4) Press [ENT] to apply the settings.
-Arm
U02: Rights
◄-Arm
Display
◄+Arm
User is allowed (+) or not allowed (-):
1.
Arm
To arm the system
2.
Disarm
To disarm the system
3.
ClearAlarm
To clear the Alarm Memory
4.
AarmClr
To cancel auto-arming
5.
ZoneBypass
To perform Zone Bypass
6.
OptnChange
To change settings
7.
EventsView
To view log
8.
FireTest
To perform a fire test
9.
ArcTest
To perform an ARC test
10.
OtherTest
To perform other tests
11.
OutputCtrl
To perform PGM programming
12.
UserEdit
To edit users
13.
ServEnable
To enable and disable the service mode
23
►
U02: Rights
Table 2. User rights
Nr.
►
►
Editing user settings (continued)
8.3.5 Assigning partitions to a user
If a structure is divided into partitions (up to 4 partitions), a user can be allowed to control
all or only specified partitions:
1) Perform steps 1 to 6 in the “Access User Edit Mode” section.
U02:◄Name
2) Use the [◄] and [►] buttons to select
►
Billy
“Partitions”, then press [ENT];
U02:◄Partitions ►
3) Use [◄] and [►] to navigate through the
partitions, and press [ # ] to allow or prevent
the user from controlling the selected partition.
A partition assigned to a user is indicated with “+”, and
not allowed is indicated with “-“.
+Part1
U02: Partitions
◄+Part1
►
U02: Rights
4) Press [ENT] to apply the settings.
24
◄-Part3
►
Editing user settings (continued)
8.3.6 Reassigning a temporary PIN to a user
This feature allows resetting a temporary PIN for a user if they forget their PIN. After this, a
user must change this PIN to a new one (See “Changing user PIN” on page 19):
1) Perform steps 1 to 6 in the “Access User Edit Mode” section.
U02:◄Name
2) Use the [◄] and [►] buttons to select
►
Billy
“Temporal PIN”, then press [ENT].
U02:◄Tempor.PIN ►
3) Use [◄] and [►] buttons to select “Yes”, then
press [ENT].
A temporary PIN is now assigned to the user:
First user
- 0001
Second user - 0002
Third user
- 0003
25
No
U02: Tempor.PIN
◄Yes
►
8.4 Setting timers
The system allows automatic arming and disarming at a preset time, or for the switching of
different equipment (lights, heating, etc.) System timers are used for that purpose. A user
can control up to 4 timers. The installer assigns the functions to each timer at the user’s
request. A user can activate or disable any timer, change on/off times, or select the days
of the week for the timers.
1) Access the menu and press [◄] and [►]
Menu:
buttons to select “Options”, then press [ENT]
◄Arm
►
Menu:
2) Use the [◄] and [►] buttons to select “Timers”,
then press [ENT];
◄Options
►
Options:
3) Enter your user PIN and press [ENT].
The timer name will be displayed at the bottom.
◄Timers
►
T01◄Name
►
Full arming
4) Press [ * ] to select the timer.
5) Use [◄] and [►] buttons to select “On Time”,
then press [ENT];
Timers:
PIN:
T01 On Time
6) Enter the desired On time, press [◄] and [►] to
00:00 ◄Disabled►
select “Enabled” or “Disabled”, and then press
T01 Off Time
[ENT].
08:30 ◄Enabled ►
7) Similarly, select „Off Time” and set the off time.
8) Use
the
[◄]
and
[►]
buttons
to
T01◄Schedule
►
1234567
select
T01 Schedule
“Schedule”, then press [ENT].
1234567 Tuesday
9) Use the [◄] and [►] buttons to go through the days of the week and
press [ # ] to check the days when the timer has to operate. Press
[ENT] to apply the settings.
26
8.5 Changing LCD settings and sound
You can change LCD contrast, backlighting intensity, set automatic dimming of the LCD
and keypad, and switch the confirming beeps of the keypad on/off.
8.5.1 Switching LCD on and off
You can switch the backlighting of the LCD and keypad on/off. You can also set the
backlighting to switch off automatically if no buttons are pressed within 15 seconds.
1) Press [ENT] to access the menu;
Menu:
◄Arm
2) Use [◄] and [►] buttons to select “Options”,
then press [ENT];
Menu:
◄Options
3) Use [◄] and [►]buttons to select “Interface”,
►
Options:
◄Interface
then press [ENT];
►
►
Interface:
4) Use [◄] and [►]buttons to select “Light
On/Off”, then press [ENT].
◄Light On/Off
►
Light On/Off:
5) Press [◄] or [►] to select desired option, the
◄Auto
►
press [ENT] .
You can choose the following options for the backlighting:
Off
– LCD and keypad backlighting always off.
On
– LCD and keypad backlighting always on.
Auto
– LCD and keypad backlighting goes off if no buttons are pressed within 15 seconds.
27
8.5.2 Adjusting the LCD backlighting intensity
To adjust LCD backlight intensity:
1) Press [ENT] to access the menu;
Menu:
◄Arm
2) Use [◄] and [►] buttons to select “Options”,
then press [ENT];
Menu:
◄Options
3) Use [◄] and [►] buttons to select “Interface”,
►
Options:
◄Interface
then press [ENT];
►
►
Interface:
4) Use [◄] and [►] buttons to select “Light
intensit”, then press [ENT];
◄Light intensit►
Light intensit:
5) Press [◄] to decrease the backlighting intensity
◄████░░░░░░░░░░►
or press [►] to increase it.
6) Press [ENT] to confirm the selected backlighting intensity.
28
8.5.3 Adjusting LCD contrast
To adjust the LCD contrast:
1) Press [ENT] to access the menu;
Menu:
◄Arm
2) Use [◄] and [►] buttons to select “Options”,
then press [ENT];
Menu:
◄Options
3) Use [◄] and [►] buttons to select “Interface”,
►
Options:
◄Interface
then press [ENT];
►
►
Interface:
4) Use [◄] and [►] buttons to select “Contrast”,
then press [ENT];
◄Contrast
►
Contrast:
5) Press [◄] to decrease the contrast or press [►]
to increase it.
6) Press [ENT] to confirm the selected contrast.
29
◄███████░░░░░░░►
8.5.4 To switch the keypad confirmation sound on/off
You can switch the keypad confirmation beeps on or off.
1) Press [ENT] to access the menu;
Menu:
◄Arm
2) Use [◄] and [►] buttons to select “Options”,
then press [ENT];
Menu:
◄Options
3) Use [◄] and [►] buttons to select “Interface”,
►
Options:
◄Interface
then press [ENT];
►
►
Interface:
4) Use [◄] and [►] buttons to select “Sound”,
then press [ENT];
◄Sound
►
Sound:
5) Use [◄] and [►] buttons to select “Enabled” or
“Disabled”, then press [ENT] .
30
◄Auto
►
8.6 Viewing system information
This feature allows viewing information about the system resources being used.
1) Press [ENT] to access the menu;
Menu:
◄Arm
►
2) Use [◄] and [►] buttons to select “Options”,
then press [ENT];
Menu:
◄Options
►
3) Use [◄] and [►] buttons to select “System
Options:
Summary”, then press [ENT];
◄System Summary►
4) Enter your user PIN and press [ENT].
Identification of the resource being used and the
available amount of resources are displayed in the
System Summary:
PIN:
bottom of LCD.
System Summary:
5) You can view the system resources being used
by pressing [◄] and [►].
Resources are displayed in following format:
Name N/M
where
Name
- identification of the recourse,
N
- used items,
M
- available items.
31
◄Partitions 2/4►
8.7 Chime function
A user can assign a chime function to the desired zones. In this case, the keypad beeps to
inform about a violation of the zones in a disarmed mode.
1) Press [ENT] to access the menu;
Menu:
◄Arm
►
2) Use [◄] and [►] buttons to select “Options”,
then press [ENT];
Menu:
3) Use [◄] and [►]buttons to select “Chime”, then
press [ENT];
◄Optinons
►
Options:
4) Enter your user PIN and press [ENT].
◄Chime
Chime:
5) Use the [◄] and [►] buttons to select the
PIN:
desired zone, and press [ # ] to enable or
disable the chime function for the selected
zone.
6) Press [ENT] to save changes.
32
Chaim:12345♫
Entry door
►
9 SERVICE MODE
The service mode is intended for the use of the installer and service personnel. To access
the service mode, the installer enters the service PIN. Service mode functions are
described in the “Installation manual”. Service mode can’t be accessed without permission
of a user.
9.1 Enabling service mode
Service mode is normally disabled. To allow the installer to enter service mode, a user
must enable service mode first. To enable service mode:
1)
Press [ENT] to access the menu.
Menu:
2)
Use the [◄] and [►] buttons to select “Service
◄Service mode
►
mode”, then press [ENT].
Service Status:
3)
Enter your user PIN and press [ENT].
4)
Press [◄] or [►] to select “Enabled” to enable
PIN:▓
Service Status:
◄Enabled
►
service mode, and then press [ENT] to confirm
Service Mode:
your selection.
PIN:▓
Now Service mode is enabled and installer can enter his PIN to access service mode.
9.2 Disabling service mode
After the service personnel finish their job, service mode must be disabled again.
To disable service mode:
1) Pres [ENT], when prompt to disable service mode
is shown on LCD.
DISABLE SERVICE!
Press ENT.
2) Enter your user PIN and press [ENT].
Service Status:
PIN:▓
3) Press [◄] or [►] to select “Disabled” to disable
service mode, and then press [ENT] to confirm
Service Status:
◄Disabled
your selection.
33
►