1
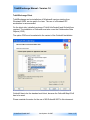
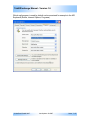
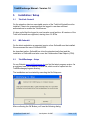
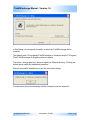
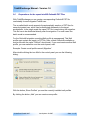
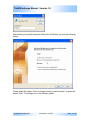
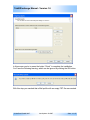
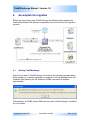
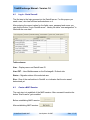
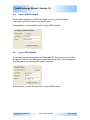
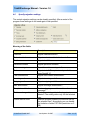
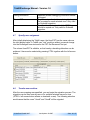
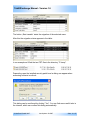
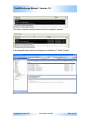
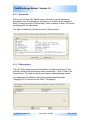
Tobit2Exchange Manual - Version 1.6
Tobit2Exchange
Professional application for the simple,
fast and reliable data export of Tobit®
servers into various target formats
© NetProof GmbH 2007
Last Update: 08.2007
Seite: 1 / 27
Tobit2Exchange Manual - Version 1.6
List of contents
1.
INTRODUCTION ...........................................................................................4
2.
SYSTEM REQUIREMENTS ..........................................................................5
3.
INSTALLATION / SETUP..............................................................................8
3.1
Tobit Info Center®....................................................................................................................... 8
3.2
MS Outlook®................................................................................................................................. 8
3.3
Tobit2Exchange – Setup ........................................................................................................... 8
3.4
Special adjustment for Outlook® 2007 ................................................................................ 10
3.5
Preparations for the export into MS Exchange® .............................................................. 10
3.6
Preparations for the export into MS Outlook® PST Files ............................................... 11
3.7
User Authorization .................................................................................................................... 14
4.
ACCOMPLISH THE MIGRATION ...............................................................15
4.1
Starting Tobit2Exchange......................................................................................................... 15
4.2
Log in - David Server® ............................................................................................................. 17
4.3
Create a MAPI Session............................................................................................................. 17
4.4
Log in - MS Exchange® ........................................................................................................... 18
4.5
Log In - MS Outlook® ............................................................................................................... 18
4.6
Specify migration settings...................................................................................................... 19
4.7
Specify user assignment......................................................................................................... 20
4.8
Transfer user archives ............................................................................................................. 20
4.9
Migrate global folders .............................................................................................................. 22
4.10
Logging........................................................................................................................................ 24
4.11
Extended Settings ..................................................................................................................... 25
4.12
System Info ................................................................................................................................. 26
4.13
Folder options ............................................................................................................................ 26
© NetProof GmbH 2007
Last Update: 08.2007
Seite: 2 / 27
Tobit2Exchange Manual - Version 1.6
5.
ADDITIONAL INFORMATION ....................................................................27
5.1
Support ........................................................................................................................................ 27
5.2
Legal references ........................................................................................................................ 27
© NetProof GmbH 2007
Last Update: 08.2007
Seite: 3 / 27
Tobit2Exchange Manual - Version 1.6
1.
Introduction
A huge number of users has decided to use Tobit® David® Servers in the past.
Because of different reasons (e.g. company coalescences, location changes,
user preferences etc.) there could be a requirement to change the mail server
system.
When changing a mail system the central problem is the data migration. You'll
need addresses, tasks, mail, faxes, Voice news, calendar entries etc. in the new
mail system as well.
For this requirement we have developed in the end of 2003 the migration tool
Tobit2Exchange. Meanwhile about 300 users have migrated their Tobit® data
successfully into different target systems.
Besides, Tobit2Exchange has proved itself for smaller data migrations into
Outlook® PST files as well as in particular with extensive server migrations with
more than 1000 users.
Tobit2Exchange is a fast, easy and reliable tool to transfer data from Tobit®
Server into various target formats
Program features:
•
•
•
•
•
•
•
•
•
Fast, easy and reliable data transfer from Tobit® Server into various target
formats
Migration data is highly customizable
Manual steps are reduced to a minimum
Supports single user and batch mode migration
Applicable for the migration of single Tobit® Server as well as for IT
companies, who migrate Tobit® data many times
No time limit for the program usage
Not limited to a Tobit® site id
Extensive logging of the migration activities. Therefore it‘s possible to
review the migration at a later stage
Supports also older Tobit® versions (since version 6.6 with SP5a)
The following description will help you to migrate your data successfully with
Tobit2Exchange into the new system environment.
© NetProof GmbH 2007
Last Update: 08.2007
Seite: 4 / 27
Tobit2Exchange Manual - Version 1.6
2.
System requirements
For the migration, Tobit2Exchange should be installed on a workstation, which is
connected to the Tobit® server and in case of a direct migration into MS
Exchange® also to this server.
As programming model Tobit2Exchange uses the so-called Collaboration Data
Objects (CDO), which can be installed in the context of the Outlook® (until
version 2007) Setup. This programming model allows a more professional and
stable migration in the comparison to the use of the Outlook® programming
model.
Tobit2Exchange is a Windows® application with graphic interface and database
support. The database is used for the logging, audit trail, status administration
and user allocation.
Tobit® Server
The Tobit® server must fulfill the following conditions:
–
–
–
–
–
–
–
6.6 SP5a
Home
SL
XL
V8 / V8+
V8.5
V10
It plays thereby no role whether the Tobit® server runs under Microsoft®
Windows®, Novell® Netware® or Linux.
Exchange® Server
If the migration has to take place directly into MS Exchange® 2003 or 2007
server systems.
© NetProof GmbH 2007
Last Update: 08.2007
Seite: 5 / 27
Tobit2Exchange Manual - Version 1.6
Tobit2Exchange Client
Tobit2Exchange can be installed on all Windows® versions starting from
Windows® 2000, service patch 4 or later. The use of a Windows® XP
workstation is recommended.
On the client side, intstalled versions of Tobit® InfoCenter® and Outlook® are
required. The installation of Outlook® must also cover the Collaborative Data
Objects (CDO).
The option CDO must be selected in the context of the Outlook® installation.
Outlook® has to be the standard mail client, because the Outlook® Mapi32.dll
has to be used.
Please consider the notes for the use of MS Outlook® 2007 in this document.
© NetProof GmbH 2007
Last Update: 08.2007
Seite: 6 / 27
Tobit2Exchange Manual - Version 1.6
Which mail program is used by default can be examined for example in the MS
Explorer® (Extras, Internet Options, Programs).
© NetProof GmbH 2007
Last Update: 08.2007
Seite: 7 / 27
Tobit2Exchange Manual - Version 1.6
3.
Installation / Setup
3.1
Tobit Info Center®
On the migration client an executable version of the Tobit InfoCenter® must be
installed. it has to be guaranteed that the logged in user has sufficient
authorizations to access the Tobit® server.
It’s also useful that the logged in user has also a mail archive. All versions of the
Tobit InfoCenter® are supported, starting from 6.6 SP5a.
3.2
MS Outlook®
On the client workstation a supported version of ms Outlook® must be installed.
We recommend the use of Outlook® 2003.
As described earlier, Outlook® has to be the standard mail client and the
installation of Outlook® must also cover the Collaborative Data Objects (CDO).
3.3
Tobit2Exchange – Setup
On our Website www.tobit2exchange.de you find the latest program version. As
a registered user you’ll receive a license file, which must be copied into the
Tobit2Exchange program directory.
The installation can be started by executing the file Setup.exe.
After confirming the OK Button you’ll see the following dialog:
© NetProof GmbH 2007
Last Update: 08.2007
Seite: 8 / 27
Tobit2Exchange Manual - Version 1.6
In this dialog you can specify the path, in which the Tobit2Exchange will be
installed.
The default path C:\Programme\Tobit2Exchange on Germans and/or C:\Program
Files\Tobit2Exchange on English systems is preset.
The button „change directory“ allows to specify a different directory. Clicking the
button above starts the installation procedure.
After an successful installation you see the conclusion dialog:
In some cases it can be necessary that the computer must be restarted.
© NetProof GmbH 2007
Last Update: 08.2007
Seite: 9 / 27
Tobit2Exchange Manual - Version 1.6
3.4
Special adjustment for Outlook® 2007
Starting from Outlook® 2007 the required Collaboration Data Objects (CDO)
can't be installed any longer in the context of the Outlook® Setup. The
installation of the CDO Libraries has to take place manually.
The following steps are required:
-
Download CDO2007.zip from our Website
Execute the file ExchangeCDO.msi
Copy the file mapi32.dll into the directory „c:\windows\system32”
After a successful installation of the CDO you can also Outlook® 2007 for the
migration.
3.5
Preparations for the export into MS Exchange®
Before the migration all mailboxes for the target users should have been created
in Exchange®. An Admin user should get corresponding access authorizations
on the mailboxes.
The correct connection to the Exchange® server should be tested before starting
migration. You should try to create a connection with Outlook® to the Exchange®
server.
Detailed How-To documents are available to all registered Users on our website
www.tobit2exchange.de. Within these documents the assignment of the user
authorizations is described in detail.
The documents contain 1:1 ready to use examples on David® and Exchange®
side.
© NetProof GmbH 2007
Last Update: 08.2007
Seite: 10 / 27
Tobit2Exchange Manual - Version 1.6
3.6
Preparations for the export into MS Outlook® PST Files
With Tobit2Exchange you can create a corresponding Outlook® PST file
comfortably for each migrated Tobit® user.
The so-called batch mode supports the automatically creation of PST files for
several migrated user, which can be distributed afterwards to the target
workstations. In the single mode the same PST file is used during the migration.
This file has to be distributed directly after the migration. For most cases the
batch mode is recommended.
For the Outlook® migration a working Mail profile is presupposed. This Mail
profile must contain an (empty) a PST file. After a fresh Outlook® installation a
mail profile with the name "Outlook" should exist. If you must create another Mail
profile, you can make this over the control panel, mail.
Example: Create a mail profile named „Migration“
After double clicking the icon Mail in the control panel you see the following
dialog:
With the button „Show Profiles“ you see the currently installed mail profiles
By clicking the button „Add“ you can create a new profile.
© NetProof GmbH 2007
Last Update: 08.2007
Seite: 11 / 27
Tobit2Exchange Manual - Version 1.6
After entering the profile name and clicking the OK button, you see the following
dialog.
Please select the option „View or change existing e-mail accounts” an press the
button “Next”. This brings you to the following screen.
© NetProof GmbH 2007
Last Update: 08.2007
Seite: 12 / 27
Tobit2Exchange Manual - Version 1.6
In this screen you’ve to press the button “Finish” to complete the installation.
You’ll see the following warning, which can be ignored by clicking the OK button.
With this step you reached that a Mail profile with an empty PST file was created.
© NetProof GmbH 2007
Last Update: 08.2007
Seite: 13 / 27
Tobit2Exchange Manual - Version 1.6
3.7
User Authorization
The largest part of the support inquiries has to do with problems with the
assignment of the user authorizations. The migration can be accomplished
problem-free only if there are sufficient authorizations on the Tobit® and
Exchange® side.
Detailed How-To documents are available to all registered Users. Within these
documents the assignment of the user authorizations is described in detail.
The documents contain 1:1 usable examples on David® and Exchange® side
© NetProof GmbH 2007
Last Update: 08.2007
Seite: 14 / 27
Tobit2Exchange Manual - Version 1.6
4.
Accomplish the migration
Before we start working with Tobit2Exchange the following chart explains the
relationship between the different components that are involved in the migration
process.
4.1
Starting Tobit2Exchange
After the first start of Tobit2Exchange you’ll see to the following message dialog,
which shows to you that the necessary connection to the log database is not yet
installed. After pressing the OK button the ODBC connection is installed
automatically.
Subsequently, an ODBC system DSN with the name "tobit2exchange" is installed
on your system.
© NetProof GmbH 2007
Last Update: 08.2007
Seite: 15 / 27
Tobit2Exchange Manual - Version 1.6
Now you see the main screen of Tobit2Exchange
© NetProof GmbH 2007
Last Update: 08.2007
Seite: 16 / 27
Tobit2Exchange Manual - Version 1.6
4.2
Log in - David Server®
The first step is the login process into the David® server. For this purpos you
need a user, who has sufficient authorizations on it.
After entering the correct values for the fields users, password and server you
can click the button "Login David® server". Hereby the table "user assignment" is
filled with the user data.
Table columns
User – Display name und David® user ID
User-PST – User-/Mailboxname on the Exchange® / Outlook side
Status – Migration status of the selected user
Size – Size of the mail archive in David®. n.a. indicates that the size wasn’t
determined yet
4.3
Create a MAPI Session
The next step is to establish of the MAPI session. After successful creation the
button “Start transfer” gets enabled.
Before establishing MAPI session:
After establishing MAPI session:
© NetProof GmbH 2007
Last Update: 08.2007
Seite: 17 / 27
Tobit2Exchange Manual - Version 1.6
4.4
Log in - MS Exchange®
For the direct migration into MS Exchange® you’ve to select the option
"Exchange" and enter the user and server name.
Subsequently, you can click the button "Login MAPI session".
4.5
Log In - MS Outlook®
If you want to make the migration into Outlook® PST files, then you’ve to select
the option "Outlook" and specify the name of the mail profile. In our example we
use the previously created profile named "migration".
Subsequently, you can click the button "Login MAPI session".
© NetProof GmbH 2007
Last Update: 08.2007
Seite: 18 / 27
Tobit2Exchange Manual - Version 1.6
4.6
Specify migration settings
The central migration settings can be durably specified. After a restart of the
program these settings do not need again to be specified.
Meaning of the fields
Field
Description
Calendar
Migrate calendar entries?
Calendar attachments
Migrate calendar related attachments?
Drafts
Migrate drafts?
Personal contacts
Migrate personal contacts?
Address categories
Export the address categories?
Tasks
Task attachments
Migrate tasks? This option is only available
since David® V7
Migrate task related attachments?
Incoming mails
Migrate incoming mails?
Outgoing mails
Migrate outgoing mails?
Mail attachments
Migrate message attachments?
Complete audit trail
Create a logging record for each transfered
message?
Should the existing data in the target system
deleted? The setting refers only for the selected
user.
Shall the program examine the archive size for
the selected user? Accordingly you can handle
the limitation of elder PST files (restriction on 2
GB)
Delete exchange data
Check archive sizes
© NetProof GmbH 2007
Last Update: 08.2007
Seite: 19 / 27
Tobit2Exchange Manual - Version 1.6
Debug Information
Create PST
in
4.7
Specifies whether debugging information should
be logged
Do you want use the batch mode, in which a pst
file is created for each selected user? Only valid
for Outlook® migration.
Specifies the directory in which the PST files
should be copied out. Only valid for Outlook®
migration.
Specify user assignment
After initially displaying the Tobit® users, the User/PST has the same value as
the tobit display name. A Tobit® user "test" would go without a manual change
into the Exchange® user test and/or the PST file the named Test.pst.
The column User/PST is editable, so that hereby a deviating allocation can be
achieved. Users can be selected by pressing CTRL together with the left mouse
button.
4.8
Transfer user archives
After the user mapping was specified, you can begin the migration process. The
migration can be done user by user or for multiple selected users at a time
(STRG + left mouse button selects or deselects a user). The following selection
would cause that the users "UserA" and "UserB" will be migrated.
© NetProof GmbH 2007
Last Update: 08.2007
Seite: 20 / 27
Tobit2Exchange Manual - Version 1.6
The button „Start transfer“ starts the migration of the selected users.
After this the migration status appears in the table:
In our example we’ll find the two PST files in the directory “C:\temp”.
Depending upon the installed security patch level a dialog can appear when
accessing contacts in outlook:
This dialog can be confirmed by clicking "Yes". You can find some useful tools in
the internet, which can confirm this dialog automatically.
© NetProof GmbH 2007
Last Update: 08.2007
Seite: 21 / 27
Tobit2Exchange Manual - Version 1.6
4.9
Migrate global folders
Over the tab "Global folders" the migration of the global/public folders can be
made.
The first step is to determine the global folder names. This can be achieved by
clicking the button "Read global folders". Subsequently, the table is filled with the
folder names.
In the table you can select (CTRL + left mouse button) the folders you want to
transfer in Exchange®. It is to be noted that the fine-granulated selection options
allows you to exclude/include specific folders from the migration.
In following example the folder "Faxbox" is transferred as well as its subfolders
"Voice Messages" and "Voice Messages German". The subfolders "Voice
Messages English" and "Voice Messages Francais" are not selected and won’t
be transferred into MS Exchange®.
© NetProof GmbH 2007
Last Update: 08.2007
Seite: 22 / 27
Tobit2Exchange Manual - Version 1.6
The button transfer selected folders starts the migration process.
In Exchange® these folders are display as subfolders of “Public Folders”.
© NetProof GmbH 2007
Last Update: 08.2007
Seite: 23 / 27
Tobit2Exchange Manual - Version 1.6
4.10
Logging
The entire program activities are stored in a logging table and can be displayed
within the program. The audit trail can be shown be clicking on the tab “Audit
trail”:
The entries in the previos screen inform about the global folders that were
migrated before. For a user-referred migration the user is indicated in the
appropriate column.
If the logging entries are not longer needed and/or were before archived, then
you can remove them with the button “Delete log files”.
© NetProof GmbH 2007
Last Update: 08.2007
Seite: 24 / 27
Tobit2Exchange Manual - Version 1.6
4.11
Extended Settings
Also very special migration scenarios can be handled over the tab "extended
settings".
Meaning of the fields
Field
Description
Calendar since
Starting date for calendar entries
Calendar until
Final date for calendar entries
Tasks since
Starting date for task items
Tasks until
Final date for task items
Mails since
Starting date for messages
Mails until
Final date for messages
Mark all mails as viewed
If this checkbox is checked all messages will be
marked as read. Otherwise the original status
from Tobit® is taken over
Permits the migration of the Tobit® system files,
which are according to standard not taken over
Date restrictions do not apply to the inbox
Migrate system folder
Not for inbox
Delete temporary file
attachments manually
Confirmation dialog before
user migration
© NetProof GmbH 2007
Does not delete the temporary file attachments
automatically from the temp directory
Indicates a dialog before migrating the next user
Last Update: 08.2007
Seite: 25 / 27
Tobit2Exchange Manual - Version 1.6
4.12
System Info
With the tab “System info” helpful system information can be determined
automated. Over a flexible plug in mechanism new tasks can be integrated
easily. Clicking the button "Systemcheck" starts a number of tasks. The results
are displayed in the table below.
The data can deleted by clicking the button "Delete entries".
4.13
Folder options
The tab "Folder options" permits the definition of folder redirections. If here
nothing is entered the file structure will be transferred 1:1 from Tobit® to the
target system. This table is editable and supports adding/deleting records.
It is reached by the attitude in the following example that the folder
"EingangXXX" is rerouted into the folder "Testeingang".
© NetProof GmbH 2007
Last Update: 08.2007
Seite: 26 / 27
Tobit2Exchange Manual - Version 1.6
5.
Additional Information
We’re constantly working on Tobit2Exchange to improve and introduce new
functionality. Our website http://www.tobit2exchange.de informs you about new
releases and contains up to date information.
5.1
Support
The product support is charge free and also available on weekends. Don’t
hesitate to contact us if you have any questions.
5.2
Legal references
Non-liability
The NetProof GmbH does not take over any guarantee for the topicality, the
correctness, completeness or quality of the made available information.
All offers are not-binding and noncommittal.
The NetProof GmbH reserves itself it expressly to change parts of the sides or
the entire offer without separate announcement to supplement to delete or the
publication occasionally or finally to stop.
Label names
The label and product names used in this document are called exclusively for
description.
Microsoft®, Exchange®, Office®, Outlook®, Windows® are registered brand
names of the Microsoft corporation.
Tobit®, David® as well as Tobit Info Center® are registered brand names of the
Tobit AG.
Novell®, Netware® are registered Markenzeicher of the Novell, Inc.
© NetProof GmbH 2007
Last Update: 08.2007
Seite: 27 / 27