1
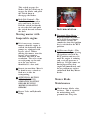
Table of Contents
Basic Information…………………………………………………….………….2
Bad Boy Safety Guidelines……………… ……………………………………..3
Operation ………………………………………………………….……………...5
Maintenan ce…… ……………… …………………………….…………………..6
Storage and Transportati on……………… ………………….……… …………6
Adjustments…………………………… …………………………… ….………..7
Troubleshooting and FAQ…………… …… ……………………… …...……...7
Controls…………………………… ………………………………… ….……….8
Moving Inoperabl e Mower………………… ……………………… …………..9
Instrumentation…… ……………………………………………… ….…………9
Blade Maintenance and Cutting Tips…...………………………….….……..9
Greasing Bearings………………………………………………………..……10
1
BASIC INFORMATION
This manual applies to the followi ng
equipment:
Bad Boy ZT Series
o ZT 2600 36” 26 hp
Briggs ELS
o ZT 2600 50” 26 hp
Briggs ELS
o ZT 2600 60” 26 hp
Briggs ELS
o ZT 2300 36” 23 hp
Vangu ard
o ZT 2300 50” 23 hp
Vangu ard
o ZT 2300 60” 23 hp
Vangu ard
Bad Boy Pup Series
o 4800 Pup 23 hp
Vanguard
o 5200 Pup 23 hp
Vanguard
o 6000 Pup 23 hp
Vanguard
o 4800 Pup 30 hp
Kohler
o 5200 Pup 30 hp
Kohler
o 6000 Pup 30 hp
Kohler
o 7200 Pup 30 hp
Kohler
Bad Boy Lightning Z Series
o 5200 Lightning 26 hp
Kawasak i LC
o 6000 Lightning 26 hp
Kawasak i LC
o 6000S Lightning 32
hp Vangu ard
o 7200S Lightning 32
hp Vangu ard
Bad Boy AOS Series
o 6000 AOS 27 hp
Kawasaki LC
o 7200 AOS 27 hp
Kawasaki LC
o 6000 AOS 35 hp
Vangu ard
o 7200 AOS 35 hp
Vangu ard
Bad Boy Diesel Series
o 6000 AOS 28 hp
Caterpillar Diesel LC
o 7200 AOS 28 hp
Caterpillar Diesel LC
o 6000 AOS 35 hp
Caterpillar Diesel LC
o 7200 AOS 35 hp
Caterpillar Diesel LC
Bad Boy Team Series
o 5200 Lightning 26 hp
Kawasaki LC
o 6000 Lightning 26
hp Kawasaki LC
To The New Bad
Boy Owner:
Congratulations on the
purchase of your new Bad Boy
Mower! The purpose of this
manual is to assist operators in
maintaini ng and oper ating
their Bad Boy Mower. The
information and instructi ons in
this manual can help you
attain years of performance
from your new Bad Boy.
Remember
All Bad Boy engines use
2
new parts when repl acem ents
become necessary.
10W30 engi ne oil.
All Bad Boy hydraulic
systems use 20W50 engine
oil.
All Bad Boy Mowers use
hi-temp multi-purpose
grease. NLGI No. 2 for the
grease fittings.
ZT models have 12 psi in
both front and rear tires.
Pups, AOS, and Diesel
models have 12 psi in front
tires and 10 psi rear tires.
Parts/Service
Only Bad Boy replacem ent
parts are to be used on your
mower. Replacem ent parts are
available through your local
Bad Boy Mower Dealer.
Remember to always provide
the following informat ion
when ordering parts:
1. Correct part number
2. Correct serial number
Warranty
Registration
All warranty repair and
service must be handl ed
through your authori zed Bad
Boy Mowers dealer. To locate
the nearest dealer, go to our
website and cli ck on Locat e A
Dealer.
The Warranty Registration
form must be completed an d
signed to validat e your
warranty. As the new
equipment owner, you are
expect ed to see that th e form
is completed an d forwarded to
Bad Boy, Inc. at time of
delivery.
Safety (general)
Model/Serial
Number
Never allow untrained
people to operate this
machine. It is the owner’s
responsibility to get training
and see to it that anyone who
has permission to use your
machin e receives the proper
training.
Do not mow around people.
The factory discharge chute is
designed to deflect debris
downward, but it coul d be
possible for debris to be
thrown in a way that can cause
damage to people or property.
Lightning, Pup, AOS,
Diesel model serial numbers
are found on the SIN plate,
located underneath the floor
panel. ZT model serial
numbers are found on the SIN
plate und erneat h seat. The
serial numbers are necessary
on the warranty registrati on
form. Also, these numbers can
assist you in the ordering of
3
Seek additi onal traini ng
when possible to learn more
about safety techniqu es and
practices.
Safety Precautions
Always remain seat ed whil e
operating machine.
Always maint ain a safe
distance from peopl e and
pets while mowing.
Always disengage blad es,
place steerin g controls in
neutral, engage parking
brake, and remov e ignition
key when leaving op erators
seat.
Always operat e machi ne in
daylight or with ad equat e
working lights.
Always keep machin e
clean, removin g dirt, trash,
and other materi als from
machin e.
Be alert of surroundings.
Watch for rocks, stumps,
and mounds or depressions
while mowing
Always wear eye protection
while mowing and
servicing.
Always wear ear
protection, such as
earplugs, while mowing.
If you strike something
with the mower turn the
blades and mower off,
engage the parking brake,
and inspect the m achin e for
4
damage b efore resuming.
Be aware of low hanging
limbs or objects that could
potential ly be hazardous
while mowing.
Never oper ate a poorly
maintained machine.
Never carry passengers.
Always buckl e seat belt, if
provided one.
Never att empt high speed
maneuvering, especi ally
around peopl e or property.
Never put hands or feet
under the machine whil e
ignition is on.
Never refuel machine when
engine is running.
Never leave key in ignit ion,
especiall y around chil dren.
Never run engine in
enclosed ar ea.
Do not touch hot parts of
machine.
Do not remove deck
wheels.
Conditions that can affect
traction resulting in the
loss of control of machine:
o Wet terrain
o Depressions in the
ground
o Mounds of dirt
o Extremely dry grass
o Soil type (gravel,
sand, clay)
o Tire pressure
Be aware of what of what is
located at the bottom of
slopes. For example,
o
o
o
o
Rocks
Water
Cliffs
Roads and highways
Safety warning d ecals are
located on the mower an d
should always be observed
and followed.
Operation
Never oper ate the machine
with faulty equi pment. Always
be alert of sudden changes in
landscape, as the mower will
react differentl y on slopes or
embankm ents than it will on
flat surfaces. Never operate
the mower with the discharge
chute open. Do not cross
terrain, other than grass, with
blades turning. This could
cause dam age to property or
bystanders.
Driving the Machine
Owners must become
Starting Machine
Place parki ng brake in up
(Roll Over Protection
System) then you must
fasten seatbelt.
If machine has not been
started recentl y, engage the
choke.
Make sure nothing is under
or around machine.
Place key in ignition and
turn.
Once machine is started,
disengage the choke.
Increase RPM by sliding
the throttle to fast position,
toward the rabbit.
position
Drive arms must be in the
“open” position. While
sitting on the machin e,
each arm is positioned
away from the oper ator, to
the right and left. Drive
arms will lock into place
and must be in this position
to start machine.
Put PTO switch in the OFF
position.
If your machine has been
equipped with a ROPS
5
familiar with the controls
before operati ng a zeroturn radius vehicle.
Start slowly and build your
skill level. Have amp le
practice before using the
machine at full capabilities.
Be comfortable with
machine before engaging
blades. Know what each
component controls before
using machine.
Engine
Maintenance
Recommendations
Refer to manufacturer for
specific information on
maintenance schedules.
Daily
Check each and provide
maintenance when needed.
Storage and
Transportation
Engine Oil
Engine Air Filter
Tire Pressure
Radiator Screen (** It is
Keep machine from
important to check screen
several times a day wh en
mower is in use)
Radiator Anti-Freeze
Inspect Blades
Every 30 Hours of
Usage
Grease Machin e
Every 100 Hours of
Usage
All Filters
(**Check filters
once a year if under 100
hours)
Every 500 Hours of
Usage
Change Hydraul ic Fluid
6
collect ing debris by storing
in a covered ar ea whil e not
in use.
Fuel can harm your
machine if left for more
than 30 days without
changing.
Disconnect the negative
battery cable when machi ne
will be stored for more than
30 days.
Always secure machine
properly when transporti ng
machine.
Do not load machine on
trailer with blad es engaged.
Do not use ramps to load
the machine.
Your mower will perform
differently on an
incline/decli ne. Be
cautious, slow down, and
do not make any sudden
jerking movem ents with
control arms. The machine
could lose traction on a
decline or tip backwards on
an incline.
Adjustments
Drive Arm
Adjustment
Deck Leveling
Visit Authorized Bad Boy
Put mower on flat, level
surface
Remove drive Belt
Check tire air pressure
Put deck on high est setting
Measure all Four corners of
the deck
Rear and front corners of
the deck should be equal in
height
Set front corners to 1/8”
lower than rear corn ers
Use the deck hanger chains
for rear adjustments
Use turnbuckles for front
adjustments
Dealer
Troubleshooting and
Frequently Asked
Questions
Q: H ow do I shar pe n my
bl ades?
A: We r ec omme nd t hat
s har pe ni ng be done by a n
author ize d Ba d Boy de aler.
Q: H ow shoul d I pre pare my
Ba d Boy M ower f or t he off
sea son?
A: Whe n pre pari ng f or a ny
down peri od of 90 da ys or
more, t he most i mpor ta nt
thi ng is pr oper f uel
pre par ati on. Us e a f uel
sta bi liz er i n your fi nal ta nk
of f uel or r un dr y. Choke
and re peate dl y cra nk e ngi ne
unt il it wi ll not star t. T hi s
wil l decrea se t he pote ntia l
for var ni s h or gum de posit s
for mi ng i n your s yste m.
Al s o, ma ke s ure your
mac hi ne ha s pl e nt y of
antifree ze. Y ou ca n get a n
antifree ze te st er at your
local har dware st ore t o
ens ure your ma c hi ne i s rea dy
for w i nter .
Q: H ow do I pre ve nt a n
une ve n c utti ng patter n a nd
increa se t he quali ty of c ut?
A: Chec k tire pre s sur e,
Brake Adjustment
Turn knob clockwise to
tighten and counterclockwise to loosen brake
cable
Locate set screw on top of
brake handl e knob
DO NOT OVER ADJUST –
CABLE BREAKAGE MAY
OCCUR.
7
che c k bla de s har pne s s
(repl ace bl a de s or s har pen at
leas t once per year or w he n
nee de d), ma ke s ure bl a des
are ti ght e ne d pr operl y, c he c k
s pri ng a nd bel t te nsi on,
che c k t he under si de of t he
dec k t o e nsur e t he mower
dec k is fr ee of gras s bui l dup a nd de bri s, ma ke s ur e
your ma c hi ne i s a t full
thr ot tle, a nd var y your
mowi ng pa tter n e ac h ti me
you c ut your gra s s.
Q: Wha t shoul d I do if my
mower w on’t start ?
A: Chec k ba tter y char ge a nd
conne cti on, c hec k your f uel
(ma ke s ure f uel i s le s s t ha n
30 da ys ol d a nd c ontai ns no
water), ma ke s ure your s par k
pl ug i s i n good c onditi on
and s par k pl ug wire i s
attac he d, a nd ma ke s ure a ir
filter i s c lea n (a dirt y fil ter
makes it more diffic ul t f or
the e ngi ne to dr aw a ir).
Q: Wha t shoul d I do if t he
bl ades w on’t e nga ge?
A: M a ke s ure t he safe t y
sw itc h i s pl ugge d i n on t he
bot tom of s eat. Chec k t he
under si de of t he P TO
enga ger t o e ns ure t he pl ug is
sec ure at swi tc h.
Q: Wha t shoul d I do if
mower ar ms ar e i n ne utr al
positi on a nd mow er st ill
cree ps?
Conta ct a uthor ize d Ba d Boy
M ower Dea ler.
Controls
Ignition Switch -- Bad Boy
Mowers have a three
position ignition switch:
off, run, and start. With
key inserted, rotate it
clockwise to START
position and release key
when
engine starts, and switch
will automati cally ret urn to
the RUN position.
Throttle Control -- A cable
is connected to the engine
throttle for controlling
engine speed. Move lever
forward to increase engine
rpm, move lever backward
to decrease engine rpm.
Choke Control -- A cable is
linked to manually oper ate
the engin e choke. When the
lever is in the down
position, the choke is in the
off (run) position. When
the lever is pulled up, the
choke is in the on (start)
position. Do not operate th e
machine in the on (start)
position.
Control Levers -- These
levers control the mower’s
speed, direction, and
neutral lock. These levers
are used to steer,
accelerate, decel erate and
change direction.
Blade Engage Swit ch --
8
This switch engages the
blades. Pull the switch up to
engage the blades and push
the switch down to
disengage the blades.
Deck Lift Control -- The
deck lift switch is used to
raise and lower the deck.
Pull the switch backwards
to raise the deck and push
the switch forward to lower
the deck.
Bypass Valve
Instrumentation
Moving mower with
Inoperable engine
Electronic Hour Meter -Registers Hour increments
up to 9,999.9 total hours.
This meter records the
cumulative time the ignition
key is switched to the RUN
position.
If it is necessary to move
mower when the engine is
stalled, the hydraulic drive
pumps are equipped with
bypass valves. Before
moving the mower, turn the
bypass valves counterclockwise one-half to one
revolution. The valve stems
on each pump are located
near the top and are
identified as a hex stud.
Oil Pressure Light -- This
light comes on upon placing
the ignition switch in the
RUN position and stays lit
until the engine is running
and a safe oil pressure is
built up. If light comes on
during operation, shut
engine off immediately and
locate problem or contact
authorized Bad Boy Mower
dealer.
Do not tow machine. Move it
by hand or use a winch to
load on a trailer for
transporting.
ATTENTION: RETURN
BYPASS VALVES TO
OPERATING POSITION
BEFORE RUNNING
MOWER FOLLOWING
REPAIRS.
Mower Blade
Maintenance
Check mower blades after
each use. This is essential
for maintaining wellgroomed turf. Keep the
Bypass Valve on Hydraulic
Pump:
9
blades sharp. If a dull
blade is used for cutting,
the grass will tear rather
than cut. This could
damage the grass leaving a
brown frayed top on the
grass within a few hours. A
dull blade will also require
more power from the
engine.
NEVER attempt to
straighten a bent bl ade by
heating. NEVER attempt to
weld a cracked blade. The
blades can break and cause
serious injury or death.
NEVER work with blades
while engi ne is running or
deck clut ch is engag ed.
ALWAYS place deck
clutch in DISENGAGE
position while performing
maintenance.
Use blocks when you
MUST work under mower.
ALWAYS wear thick
gloves when handling
blades.
ALWAYS check for blade
damage if mower strikes
rock, branch, or other
objects that co uld
potential ly damage the
blade. (REMEMBER:
NEVER CHECK BLADE
WHILE ENGINE IS ON!
NEVER CHECK BLADES
WHILE BLADES ARE
ENGAGED!)
Cutting more than that is
not recommen ded unl ess
grass is sparse, or it is late
fall when grass grows
slowly.
Alternat e mowing direction
to keep grass standing
straight. This also helps
disperse clippings which
enhance decomposition an d
fertilization.
Mow in intervals. Usually,
you should mow every four
days. However, grass
grows at different rates at
different times of the year.
Maintain the same cutting
height and mo w often in
early spring. As grass
growth slows in the
summer, mow less
frequently.
Greasing the
Bearings
Grease Type: NGLI grade
Cutting
Cut 1/3 of Grass Blade.
10
#2 multi-purpose gun
grease. Grease the front
caster pivots and wheels.
Park the machine on a level
surface and disengage the
blade control switch.
Move the motion control
levers outward to the
neutral position, engage
parking brake, stop the
engine, remove the key,
and wait for all moving
parts to stop before leaving
the operatin g position.
Clean the grease fittings
with a cloth. Make sure
to scrape ant paint off
of the front of
fitting(s).
Connect a grease gun to
each fitting. Pump
grease in fittings until
greases begins to seep
out of the bearings.
Wipe up excess grease.
The pictures on the
following pages show
suggested grease points
general location.
Front Fork
Housing
Front Fork
Housing
Front Tire
Front Tire
Steering
Arm
Housing
Steering
Arm
Housing
Actuator
Bar Block
Actuator
Bar Block
Pump Idler
11
Pump
Idler
Isolator Pivot
Arm
Isolator Pivot
Arm
12