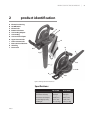
1
®
ELECTRIC BLOWER/VAC
OWNER’S MANUAL
MODELS: BV12200A, BV12200AT
IMPORTANT: Read and understand this manual before assembling or
operating this appliance. Improper use of this appliance can cause severe
injury or death. Keep this manual for future reference.
Double Insulated
120133
Remington electric blower/vac | iii
table of contents
1
Important Safety Information
1
2
Product Identification
3
3
Blower/Vac Assembly
4
Assembling Blower . . . . . . . . . . . . . . . . . . . . . . . . . . . . 4
Converting from Blower to Vacuum. . . . . . . . . . . . . . . . . . . . . 5
4
Blower/Vac Operation
7
Extension Cords. . . . . . . . . . . . . . . . . . . . . . . . . . . . . . 7
Operating the Blower/Vac . . . . . . . . . . . . . . . . . . . . . . . . . 8
5
Blower/Vac Maintenance
11
Cleaning and Maintenance. . . . . . . . . . . . . . . . . . . . . . . . 11
Servicing of Double-Insulated Appliances. . . . . . . . . . . . . . . . . . 11
120133
6
Troubleshooting
12
7
Replacement Parts
13
8
Warranty Information
14
iv |
welcome
Thank you for purchasing this Remington brand Electric Blower/Vac. We are proud
to offer this quality product to assist you in keeping your property neat and wellgroomed.
This owner’s manual provides complete instructions for safely assembling, operating, and
maintaining your Blower/Vac. Read and save these instructions. Refer to this manual
each time before using your Blower/Vac.
For easy reference, record the information from the carton and Remington brand
nameplate label located on the appliance.
Model Number: ________________
Date Purchased: ________________
Where Purchased: ________________
If you have a question or problem,
CALL TOLL FREE 1-800-858-8501
or visit www.desatech.com
120133
1
Remington electric blower/vac |
important safety information
SAFETY
WARNINGS
When using an electric appliance, basic
precautions should always be followed,
including the following:
WARNING: When using blower/vac, follow all basic safety
precautions to reduce the risk of
fire, electric shock, and personal
injury.
WARNING: This product contains chemicals known to the
State of California to cause
cancer or birth defects, or other
reproductive harm.
WARNING: To Reduce The
Risk of Electric Shock – Do not use
vacuum on wet surfaces. Do not
expose to rain. Store indoors.
120133
BEFORE OPERATING
BLOWER/VAC
WHILE OPERATING
Blower/vac
READ ALL INSTRUCTIONS BEFORE
OPERATING THIS BLOWER/VAC.
1. Avoid Dangerous Environments
• This blower/vac is intended for
indoor or outdoor use. Do not operate blower/vac in rain or in damp
or wet locations.
• Do not handle electric plug or
blower/vac with wet hands.
• Do not use to vacuum any liquids or
wet surfaces. Especially, do not use
to vacuum flammable or combustible liquids, such as gasoline, or in
areas where they may be present.
• Do not vacuum anything that is
burning or smoking, such as cigarettes, matches, or hot ashes.
• Do not operate blower/vac if it is
damaged or not securely and fully
assembled.
2. Do not allow blower/vac to be used as
a toy. Pay close attention when using
blower/vac near children.
3. Do not use blower/vac for any job
except that for which it is intended.
Use only as described in this manual.
Use only attachments included with
this blower/vac.
4. Do not use vacuum without dust bag
and/or filters in place.
5. Always wear eye protection that
meets or exceeds the requirements of
ANSI Z87.1.
6. Wear long pants and shoes when
operating this blower/vac.
7. Provide Ground Fault Circuit Interrupter (GFCI) protection on
the circuit or outlet to be used for
blower/vac. You may use receptacles
with built-in GFCI protection for
this safety measure.
1. Stay alert. Watch what you are doing.
Use common sense.
2. Keep hair, loose clothing, fingers, and
all parts of body away from openings
and moving parts.
3. Never operate this blower/vac with
defective guards or shields, or without
safety devices in place.
4. Disconnect from power supply before
clearing any blockage.
5. Do not abuse power cord. Never pull
or carry blower/vac by power cord.
Never yank cord to disconnect from
receptacle. To unplug, grasp plug, not
the cord. Do not close a door on the
cord. Keep power cord from heat, oil,
and sharp edges.
6. Use extra care when using blower/vac
on stairs.
7. Do not put any object into openings.
Do not use with any opening blocked.
Keep free of dust, lint, hair, and anything that may reduce air flow.
8. Disconnect blower/vac properly. Turn
off all controls before disconnecting
blower/vac from power supply.
9. The impeller rotates for a few seconds
after turning blower/vac off. The
rotating impeller can cut or injure
fingers. Do not remove the bottom
inlet cover while the motor is running
or when the blower/vac is plugged
into a power outlet.
10. Do not leave blower/vac when plugged
in. Unplug unit from outlet when not
in use and before servicing.
|
Chapter 1: Important Safety Information
MAINTENANCE AND
STORAGE OF Blower/vac
1. Maintain blower/vac with care.
• Do not use with damaged cord or
plug.
• If blower/vac is not working properly, has been dropped, damaged,
left outdoors, or dropped into water, have it repaired by a qualified
service center.
• Keep handles dry, clean, and free
from oil and grease.
2. Check damaged parts.
• If a part is damaged, carefully check
the damaged part before using the
blower/vac. Make sure the part will
operate properly and perform its
intended function.
• Check for alignment of moving parts,
binding of moving parts, breakage of
parts, mounting, and any other condition that may affect its operation.
• A guard or other part that is damaged should be properly repaired
or replaced by a qualified service
center unless indicated elsewhere
in this manual.
3. Store idle blower/vac indoors. When
not in use, store the blower/vac and
extension cord indoors in a dry location. Store blower/vac above the reach
of children or in a locked area out of
the reach of children.
4. This appliance is provided with
double insulation. Use only identical
replacement parts. See instructions
for servicing of double-insulated appliances on page 11.
This manual is your guide to safe and proper
operation of the blower/vac.
SAVE THESE
INSTRUCTIONS.
120133
2
A.
B.
C.
D.
E.
F. G.
H.
I.
J.
K.
L.
Remington electric blower/vac |
product identification
Blower/Vac Housing
On/Off Switch
Blower Tube
Bottom Inlet Cover
Vacuum Bag Adapter
Vacuum Bag
Vacuum Tube Adapter
Upper Vacuum Tube
Lower Vacuum Tube
Extension Cord Retainer
Inlet Plug
Draw Latch
L
E
F
B
G
C
H
L
I
A
K
J
D
Figure 2-1: Remington brand electric blower/vac
Specifications
120133
BV12200A
BV12200AT
Input
120V, 12A
120V, 12A
Max. Blower Velocity
200 mph
200 mph
Max. Blower Air Output
3
350 ft /min.
350 ft3/min.
Vacuum Bag Capacity
1.6 ft3 / 45 L
1.6 ft3 / 45 L
Net Weight
9 lbs. (4.1 Kg)
9 lbs. (4.1 Kg)
|
3
blower/vac assembly
Assembling Blower
1
WARNING: To Reduce The
Risk of Personal Injury or Electric
Shock – Disconnect from power
source before assembling or
changing attachments.
Follow the steps below to assemble the
blower. IMPORTANT: The blower will not
run unless the bottom inlet cover is locked
into place.
1. Slide the blower tube onto outlet on
front of blower/vac housing (see Figure 3-1). Securely connect the draw
latch to the blower tube (see Figure
3-2).
2. Position front of bottom inlet cover
over motor housing hook (see Figure
3-3).
3. Pivot bottom inlet cover to bottom
of blower/vac housing. Slightly press
locking lever on bottom inlet cover
to allow cover to lock into place (see
Figures 3-4 and 3-5).
Figure 3-1: Sliding blower tube into place
4
Figure 3-4: Pivoting bottom inlet cover to blower/vac
housing
Figure 3-2: Connect draw latch to blower tube
Figure 3-5: Pressing locking lever
3
2
Figure 3-3: Attaching bottom inlet cover to motor housing
hook
120133
Remington electric blower/vac |
Converting from
Blower to Vacuum
WARNING: To Reduce The
Risk of Personal Injury or Electric
Shock – Disconnect from power
source before assembling or
changing attachments.
Follow the steps below to convert from
blower to vacuum. IMPORTANT: The
vacuum will not run unless the vacuum
tube assembly is locked into place.
1. Press locking lever on bottom inlet
cover and remove bottom inlet cover
from blower/vac. Remove blower tube
from blower/vac.
2. Slide vacuum tube adapter onto outlet
on front of blower/vac housing (see
Figure 3-6). Securely connect the
draw latch to the vacuum bag adapter
(see Figure 3-7).
3. Connect the lower and upper vacuum
tubes together (see Figure 3-8). Align
the ridge on the bottom tube with
the channel on the top tube. Press
together until you hear a “snap”.
120133
Figure 3-6: Sliding vacuum tube adapter into place
1
Figure 3-7: Connect draw latch to vacuum bag adapter
Figure 3-8: Conntecting lower and upper vacuum tube
together
|
Chapter 3: Blower/Vac Assembly
Converting from
Blower to Vacuum, continued
4. Connect the tubes to the vacuum tube
adapter (see Figure 3-9). Align the tab
on the top tube with the notch on the
vacuum tube adapter. Press together
until you hear a “snap”.
5. Position front of vacuum tube adapter
assembly over motor housing hook
(see Figure 3-10).
6. Pivot vacuum tube adapter assembly
to bottom of blower/vac housing.
Slightly press locking lever on vacuum tube adapter to allow adapter to
lock into place (see Figures 3-11 and
3-12).
2
Notch
5
Figure 3-11: Pivoting vacuum tube adapter to
blower/vac housing
Tab
Figure 3-9: Connecting vacuum tubes to vacuum tube
adapter
3
Figure 3-12: Pressing locking lever
4
Figure 3-10: Attaching vacuum tube adapter to motor
housing hook
120133
4
Remington electric blower/vac |
blower/vac operation
IMPORTANT: This blower/vac is for household use only.
WARNING: Read and understand this owner’s manual before
operating blower/vac. Make certain you read and understand all
Safety Warnings on pages 1 and
2 of this manual. Improper use
of this blower/vac can result in
severe injury or death from fire,
electric shock, or body contact
with moving parts.
WARNING: To reduce the risk
of electric shock, use only with
an extension cord intended for
outdoor use, such as SW-A, SOW-A,
STW-A, STOW-A, SJW-A, SJOW-A,
SJTW-A, or SJTOW-A.
Extension Cords
Make sure your extension cord is in good
condition. Inspect extension cords periodically and replace if damaged. When using
an extension cord, be sure to use one heavy
enough to carry the current your blower/vac
will draw. An undersized extension cord
will cause a drop in line voltage resulting
in loss of power and overheating.
The table below shows the correct size extension cord to use depending on cord length
and nameplate ampere rating.If in doubt,use
the next larger gauge cord. The smaller the
gauge number, the larger the cord.To reduce
the risk of disconnection of blower/vac from
the extension cord during operation, use the
cord hitch described in this manual.
Cord Length
AWG Cord Size
25 feet
16 AWG
50 feet
16 AWG
100 feet
14 AWG
150 feet
12 AWG
120133
To reduce the risk of electric shock, this
blower/vac has a polarized plug (one blade
is wider than the other) and will require
the use of a polarized extension cord. The
blower/vac’s plug will fit into a polarized
extension cord only one way. If the plug
does not fit fully into the extension cord,
reverse the plug. If the plug still does not
fit, obtain a correct polarized extension
cord. A polarized extension cord will
require the use of a polarized wall outlet.
This plug will fit into the polarized wall
outlet only one way. If the plug does not
fit fully into the wall outlet, reverse the
plug. If the plug still does not fit, contact
a qualified electrician to install the proper
wall outlet. Do not change the blower/vac
plug, extension cord receptacle, or extension cord plug in any way.
Figure 4-1: Plugging extension cord into inlet plug
Inspect cord often. Replace if damaged.
Connecting Extension Cord
WARNING: Fully seat the extension cord on the inlet plug of
blower/vac. Failure to do so could
lead to overheating of blower/
vac. This could cause a fire that
results in personal injury to you
or others.
The blower/vac has a built-in extension
cord retainer. This cord hitch prevents accidental disconnection of the power cord
during use. The cord hitch is molded into
the lower rear of the blower/vac housing.
1. Plug extension cord into the inlet plug
of appliance (see Figure 4-1).
2. Create a loop in the extension cord
and insert the loop through the cord
slot of the blower/vac housing (see
Figure 4-2).
3. Pull the loop tight around the molded
cord hitch (see Figure 4-3).
Figure 4-2: Inserting extension cord loop through cord slot
Figure 4-3: Pull extension cord loop tight around molded
cord hitch
|
Chapter 4: Blower/Vac Operation
Operating the
Blower/Vac
The on/off toggle switch has three settings;
off, low, and high. The middle switch position, marked “O”, is off. The rear switch
position, marked “I”, is low. The forward
switch position, marked “II”, is high. See
Figure 4-4.
Blower Operation
WARNING: The blower can
throw debris, causing injury to
those nearby.
• Do not blow nails, bolts, rocks,
or other hard objects.
• Do not operate blower near
bystanders or pets.
• Be careful when blowing debris from stairs, corners, or
other tight areas. Objects can be
blown back toward operator.
• Wear approved eye protection,
long pants, and shoes while
operating this blower/vac.
Properly assemble the blower/vac for
blower operation (see page 4, Assembling
Blower). Follow the steps below to operate
the blower.
1. Hold blower/vac using the handle on
housing (see Figure 4-5).
2. When ready to start the blower, toggle
the on/off switch to either the low “I”
or high “II” setting (see Figure 4-6).
3. To stop the blower, toggle the on/off
switch to the off “O” setting.
Figure 4-4: On/Off switch positions
Figure 4-6: On/Off Switch to LOW position
Figure 4-5: Holding blower/vac for blower operation
Figure 4-7: Operating blower
120133
Vacuum Operation
WARNING: The vacuum can
throw debris, causing injury to
those nearby.
• Do not operate vacuum without
the vacuum bag attached or
with the bag zipper opened.
• Do not vacuum nails, glass,
rocks, wire, staples, or other
sharp, pointed, or hard objects.
These items could be thrown
through the cloth bag.
CAUTION: Vacuum only soft
items such as leaves and cut
grass. Hard items such as sticks,
rocks, and acorns will damage the
impeller.
CAUTION: Do not force the
vacuum tube into a pile of debris.
Do not hold the tube upright and
force-feed debris into the tube.
These actions may clog and damage the impeller. If the vacuum
vibrates excessively or makes
abnormal noises, turn vacuum off,
unplug power cord, and check for
clogging. Clear any clogged debris
from the blower/vac.
Remington electric blower/vac |
CAUTION: Normal vacuum
usage causes the vacuum bag to
wear and deteriorate. A worn or
deteriorated bag allows vacuum
to throw debris through the bag,
possibly hitting and injuring the
operator. Check vacuum bag frequently. If it is worn, deteriorated,
or damaged, replace with a genuine vacuum bag.
Properly assemble the blower/vac for
vacuum operation (see page 5, Converting
from Blower to Vacuum). Follow the steps
below to operate the vacuum.
1. Hang vacuum bag from your shoulder
using the attached strap. Hold blower/vac using the handles on housing
and vacuum tube adapter assembly
(see Figure 4-8).
2. When ready to start the vacuum,
toggle the on/off switch to either the
low “I” or high “II” setting (see Figure
4-4).
3. Move end of vacuum tube over soft
debris. Vacuum will pick up debris,
chop it up, and deposit it into vacuum
bag (see Figure 4-9).
4. To stop the vacuum, toggle the on/off
switch to the off “O” setting.
Figure 4-8: Holding blower/vac for vacuum operation
Figure 4-9: Picking up debris with vacuum
120133
10 |
Chapter 4: Blower/Vac Operation
Emptying the Vacuum Bag
1. Turn vacuum off and unplug power
cord.
2. Lift and release draw latch on vacuum
bag adapter and remove from blower/
vac housing (see Figure 4-10).
3. Unzip vacuum bag and shake out
contents (see Figure 4-11).
4. Zip the vacuum bag closed and
reassemble vacuum bag adapter to
blower/vac housing. Note: Be sure to
securely connect the draw latch to the
vacuum bag adapter.
Figure 4-10: Removing bag/adapter assembly
Removing Clogged Debris
from the Impeller
1. Turn vacuum off and unplug power
cord.
2. Press locking lever on vacuum tube
adapter and remove tube adapter assembly from blower/vac (see Figures
4-12 and 4-13).
3. Check the impeller for clogged debris
and any signs of damage. Carefully
remove debris from impellers (see
Figure 4-14).
4. Replace vacuum tube adapter assembly.
Figure 4-13: Removing vacuum tube adapter
Figure 4-12: Pressing locking lever
Figure 4-14: Removing debris from impellers
Figure 4-11: Unzipping and emptying bag
120133
Remington electric blower/vac | 11
5
blower/vac maintenance
Cleaning and
Maintenance
WARNING: Disconnect blower/
vac from power supply before
cleaning or servicing. Severe
injury or death could occur from
fire, electrical shock, or rotating
impeller.
Use a soft cloth dampened with a mild
soap and water mixture to wipe blower/vac
housing. Do not spray or pour water directly
onto blower/vac.
When not in use, store the blower/vac and
extension cord indoors in a dry location.
WARNING: When cleaning
blower/vac:
• Do not submerse in any
liquids
• Do not use products that contain Ammonia, Chlorine, or
abrasives
• Do not use chlorinated cleaning
solvents, Carbon Tetrachloride,
Kerosene, or Gasoline.
Figure 5-1: Cleaning blower/vac housing
120133
Servicing of
Double-Insulated
Appliances
A double-insulated appliance is marked
with one or more of the following: The
words “DOUBLE INSULATION”
or “DOUBLE INSULATED” or the
double insulation symbol (square within
a square).
In a double-insulated appliance, two systems of insulation are provided instead
of grounding. No grounding means is
provided on a double-insulated appliance,
nor should a means for grounding be added
to the appliance. Servicing a double-insulated appliance requires extreme care and
knowledge of the system, and should be
done only by qualified service personnel.
Replacement parts for a double-insulated
appliance must be identical to the parts
they replace.
12 |
6
troubleshooting
WARNING: Unplug blower/vac from power source before servicing. Severe
injury or death could occur from fire, electrical shock, or rotating impeller.
Note: For additional help, visit our
te c h ni c al s er v ic e we b si te at
www.desatech.com.
OBSERVED FAULT
POSSIBLE CAUSE
REMEDY
Motor does not run when you turn on/off
switch low or high
1. Bottom inlet cover or vacuum tube
adapter not locked into place
1. Check inlet cover or vacuum tube
adapter for proper installation (see
blower/vac assembly, page 4)
2. Check cord connection at electrical
outlet and at rear of blower/vac
1. Follow steps under Removing
Clogged Debris from the Impeller,
page 10
2. Empty vacuum bag (see Emptying
the Vacuum Bag, page 10
Follow steps under Removing Clogged
Debris from the Impeller, page 10
2. Extension cord connection is loose
Motor runs, but vacuum will not pick
up debris
1. Clogged vacuum tube or impeller
2. Vacuum bag full
Blower/vac vibrates excessively and/or
makes abnormal noises
Clogged vacuum tube or impeller
Technical Service
You may have further questions about
assembling, operating, or maintaining this
blower/vac. If so, you can visit our Technical
Service web site at www.desatech.com or
contact our Technical Service Department
at 1-800-858-8501 (English only). You
may also write to:
DESA Power Tools
ATTN: Technical Service Specialty
Products
P.O. Box 90004
Bowling Green, KY 42102-9004
When contacting DESA Power Tools,
have ready
• Your Name
• Your Address
• Your Phone Number
• Model Number of Product
• Date of Purchase (include copy of
receipt for written requests)
120133
Remington electric blower/vac | 13
7
replacement parts
Replacement Parts
Use the part numbers below to order replacement parts for your
blower/vac.
Part
Item
1
Description
Blower Tube
Number
120473-01
2
Bottom Inlet Cover
120474-01
3
Vacuum Bag with Adapter
120475-01
4
Upper Vacuum Tube with Adapter 120476-01
5
Lower Vacuum Tube
118069-01
1
3
2
4
5
120133
14 |
8
warranty information
Remington brand ELECTRIC Blower/Vac
LIMITED WARRANTIES
New Products
Standard Warranty
DESA Power Tools warrants this new product and any parts thereof to be free from defects in material and workmanship for a period of two (2) years from
the date of first purchase from an authorized dealer provided the product has been maintained and operated in accordance with DESA Power Tools’ warnings
and instructions.
Factory Reconditioned Products
Limited Warranty
DESA Power Tools warrants factory reconditioned products and any parts thereof to be free from defects in material and workmanship for 90 days from the
date of first purchase from an authorized dealer provided the product has been installed, maintained and operated in accordance with DESA Power Tools’
warnings and instructions.
Terms Common to All Warranties
The following terms apply to all of the above warranties:
• Always specify model number when contacting the manufacturer. To make a claim under this warranty the bill of sale or other proof of purchase must be
presented.
• This warranty is extended only to the original retail purchaser when purchased from an authorized dealer.
• This warranty covers the cost of part(s) required to restore this product to proper operating condition and an allowance for labor when provided by a DESA
Power Tools Authorized Service Center. Warranty parts must be obtained through authorized dealers of this product and/or DESA Power Tools who will
provide original factory replacement parts. Failure to use original factory replacement parts voids this warranty.
• Travel, handling, transportation, diagnostic, material, labor and incidental costs associated with warranty repairs, unless expressly covered by this warranty,
are not reimbursable under this warranty and are the responsibility of the owner.
• Excluded from this warranty are products or parts that fail or become damaged due to misuse, accidents, lack of proper maintenance, tampering, or
alterations.
• Excluded from this warranty are products purchased for commercial, industrial or rental usage.
• This is DESA Power Tools’ exclusive warranty, and to the full extent allowed by law; this express warranty excludes any and all other warranties, express
or implied, written or verbal and limits the duration of any and all implied warranties, including warranties of merchantability and fitness for a particular
purpose to two (2) years on new products and 90 days on factory reconditioned products from the date of first purchase. DESA Power Tools makes no
other warranties regarding this product.
• DESA Power Tools’ liability is limited to the purchase price of the product, and DESA Power Tools shall not be liable for any other damages whatsoever
under any circumstances including indirect, incidental, or consequential damages.
• Some states do not allow limitations on how long an implied warranty lasts or the exclusion or limitation of incidental or consequential damages, so the
above limitation or exclusion may not apply to you.
• This warranty gives you specific legal rights, and you may also have other rights which vary from state to state.
For information about this warranty contact:
P.O. Box 90004
Bowling Green, KY 42102-9004
www.desatech.com
Model __________________
Date Purchased __________________
120133