1
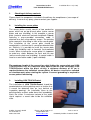
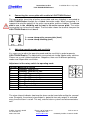
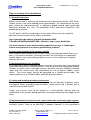
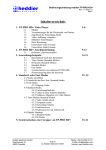
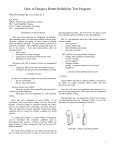
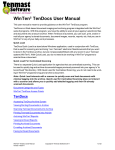
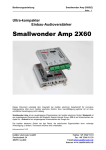
Instructions for Use
LISA TOUCH/AREA-Protect
Installation Rev. 1.0 (11/09)
Preliminary remarks
This user and instruction manual is applicable for the products LISA TOUCH-Protect
and LISA AREA-Protect. LISA AREA-Protect serves to secure large-scale
installations such as museum halls and pedestals. A significant component of LISA
AREA-Protect applications is LISA TOUCH-Protect. In order to not needlessly
stretch the content of this manual, the following chapters will generally refer to
LISA TOUCH-Protect.
General Notes
Dear customer,
we would like to congratulate you on your purchase of LISA TOUCHProtect. LISA TOUCH-Protect is high-performance electronic device
to secure art and cultural assets. LISA TOUCH-Protect efficiently
secures exhibits against vandalism, theft and damages resulting from
careless touching through visitors. Paintings, graphic art, statues,
sculptures, cabinets and even large-scale installations can be
supervised with LISA TOUCH-Protect.
•
•
Please read the following product information carefully. It includes
essential information on aspects of installation and usage of LISA
TOUCH-Protect.
The labeling oft he casing of LISA TOUCH-Protect is in English.
Functional description
LISA TOUCH-Protect is able to secure and supervise
standing as well as hanging art and cultural objects. The
supervision is realized by electronic alarm systems than
virtually cover the objects with a “protective shield”. If
someone intrudes this invisible “protective shield” an
alarm signal is triggered immediately. What is unique
about LISA TOUCH-Protect is the fact that it works with
a sophisticated early warning system. Visitors are
warned ahead of time by a discreet tone which does not
disturb the regular operation of the exhibition. Only if the
visitor does not leave the zone allocated to the early
warning system or if he further approaches the secured
object, will the alarm be triggered.
heddier electronic GmbH
Pascherhook 34
48653 Coesfeld
Phone +49 (0) 2546 911-0
Seite 1 von 14
[email protected]
www.heddier.com
© 2009 by heddier electronic GmbH
Instructions for Use
LISA TOUCH/AREA-Protect
Installation Rev. 1.0 (11/09)
The operational modes and the sensitivity can easily be
adjusted by a rotary switch. Additional to the normal
operational mode – such as permanent alarm and silent
alarm – it is also possible to set up the proximity alarm
as described above. All sensors are sensor circuit
boards and can be used as “nailable” sensor meshes
and sensor foils.
Scope of delivery
The following components are included in the
delivery of LISA TOUCH-Protect:
•
•
LISA TOUCH-Protect
Installation and user manual in English
Optional Equipment:
•
•
•
•
Sensor circuit boards for wall installation
Nailable sensor mesh
Sensor foils for floor installation
Connection cables
Installation and start up
The following example describes the installation and securing of a painting. The
securing of pedestals, statues, cabinets and exhibition areas works similar, only the
sensor plates are different. When securing item including metal, LISA TOUCH-Protect
couples into the object thus transforming the entire object into an active sensor area.
Important information:
•
The Installation of LISA TOUCH-Protect should be implemented by a
professional. Operations that include 230 Volt AC network are only legitimate if
done by a professional and are dangerous to life if conducted improperly.
heddier electronic GmbH
Pascherhook 34
48653 Coesfeld
Phone +49 (0) 2546 911-0
Seite 2 von 14
[email protected]
www.heddier.com
© 2009 by heddier electronic GmbH
Instructions for Use
LISA TOUCH/AREA-Protect
1.
Installation Rev. 1.0 (11/09)
Checking of delivery contents
Please check the components included in the delivery for completeness (see scope of
delivery). In case of any query, please contact your supplier.
2.
Installing the sensor plates
The sensor plates usually consist of two conductive
panes which are on top of each other (active sensor
plates and rear shielding). In this example, a sensor
plate (material aluminum laminate trademark Dibond)
featuring a pre-assembled connection cable is
attached to a wall using ordinary screws. The painting
to be secured is later hung in front of the sensor plate.
The installation of the sensor plate should be
conducted in a fashion that it cannot be detected later
on. Similarly, it is possible to install the sensor plate
inside the exhibition wall or beneath flush-mounted
inserts. When installing the sensor plate it is important
to avoid any shorts between the front and the rear
(active sensor plate and shielding). A coaxial cable is
used as a connection cable (1-pole shielded).
The maximum length of the connection cable linking the sensor plate and LISA
TOUCH-Protect is 15 m. If there are more objects that are to be secured by LISA
TOUCH-Protect within the direct vicinity, a minimum distance of 30 cm is
required between the individual sensor plates. All devices need to be switched
on simultaneously when starting the system. A correct grounding is required to
ensure perfect functioning.
3.
Installing LISA TOUCH-Protect
The installation of LISA TOUCH-Protect should be
conducted close to the painting and in a fashion that
it cannot be detected later on (e.g. behind an
inspection opening). An installation close to the
painting allows a direct audio alarm that immediately
alerts the visitor. A maximum volume of the audio
signal requires a sound tube inside the exhibition
area.
heddier electronic GmbH
Pascherhook 34
48653 Coesfeld
Phone +49 (0) 2546 911-0
Seite 3 von 14
[email protected]
www.heddier.com
© 2009 by heddier electronic GmbH
Instructions for Use
LISA TOUCH/AREA-Protect
4.
Installation Rev. 1.0 (11/09)
Connecting the sensor plate with a cable to LISA TOUCH-Protect
The sensor plate (consisting of active sensor plate and rear shielding) is connected to
LISA TOUCH-Protect through the shielded connection cable. When connecting, it is
important to mind the polarity of the active sensor plate and the shielding. The sensor
plate’s rear is the shielding and its front is the active sensor plate. The active
sensor plate has to face the art object. The illustration shows the terminal clamp on the
LISA TOUCH-Protect circuit board.
1 = screw clamp active sensor plate (front)
2 = screw clamp shielding (rear)
5.
Adjusting operating mode and sensitivity
It is necessary to adjust the operating mode and the sensitivity in order to operate
LISA TOUCH-Protect. The adjustments are carried out via two 10pole rotary switches.
Please use a small slotted screwdriver. Altogether, there are 10 different operating
modes and 10 possible sensitivities.
Adjustment of the rotary switch for operating mode
Position
0
1
2
3
4
5
6
7
8
9
Marking on casing
Proximity Time out = 0
Proximity Time out = 3 sec.
Proximity Time out = 10 sec.
Alarm Beep Time out = 0 sec.
Alarm Beep Time out = 3 sec.
Alarm Beep Time out = 10 sec.
Siren Time out = 0 sec.
Siren Time out = 3 sec.
Siren Time out = 10 sec.
Silence Alarm
The alarm interval indicates how long the alarm can be heard after exiting the secured
area. Principally, the external alarm output is (potential-free relay output) is activated
every time the alarm is set off. This way, external alarm systems can be connected as
well.
heddier electronic GmbH
Pascherhook 34
48653 Coesfeld
Phone +49 (0) 2546 911-0
Seite 4 von 14
[email protected]
www.heddier.com
© 2009 by heddier electronic GmbH
Instructions for Use
LISA TOUCH/AREA-Protect
Installation Rev. 1.0 (11/09)
Adjusting the rotary switch for sensitivity
The sensitivity can be adjusted on 10 levels. “0” means low sensitivity,
“9” means maximal sensitivity. Depending on the intensity of the
respective sensor in use, it is possible to reach a maximum range of
detection of 70 cm.
Further information on the adjustment of the individual operating
modes and he sensitivity can be found under “Survey of connections,
settings, and outputs”, points 5 und 6.
6.
Setting up the Measurement Mode
If you wish to implement more than one LISA Touch-Protect electronic system
featuring sensor covers in the immediate vicinity to one another (with a radius of
approx. 5 m within the range of the sensor cover), the measurement mode of each
Touch-Protect has to be internally set up differently. The measurement mode can be
adjusted on 4 levels via 2 jumpers. In order to set up the measurement mode it is
necessary to first open the case. The set up requires PIN1 to PIN4 of the 6-pole plug.
measurement
mode
1 (default)
2
3
4
7.
jumper (PIN1 /PIN3)
jumper (PIN2 /PIN4)
open
open
plugged
plugged
open
plugged
open
plugged
Connecting a power supply
Before beginning your work on the 230V AC network, please make sure to
switch of the supply voltage and control the absence of voltage of the feeders.
Power supply is carried out via 230V AC network, 50 Hz (standard European power
supply). On request, it is possible to order variants featuring 115V AC network (North
America).
A secure operation of LISA TOUCH-Protect requires proper grounding. It is
necessary to hook up an external grounding. Malfunctions are usually due to
incorrect ground plane. Malfunctions are usually a result of incorrect ground
wiring schemes. Our technical support will gladly give you further information:
+49 (0) 2546 911-25.
4 = PE = separate ground wire
5 = N = neutral conductor
6 = L = phase
heddier electronic GmbH
Pascherhook 34
48653 Coesfeld
Phone +49 (0) 2546 911-0
Seite 5 von 14
[email protected]
www.heddier.com
© 2009 by heddier electronic GmbH
Instructions for Use
LISA TOUCH/AREA-Protect
8.
Installation Rev. 1.0 (11/09)
External Alarm output (optional)
If desired, the external alarm output can be connected to another audio or visual alarm
transmitter. It is also possible to connect it to an intrusion detective system. The
maximum switching capacity of the relay is 250 V AC, 1 A.
1=
2=
3=
9.
NO Normally Open - switching output
Normal operation = contact to C open
Alarm status = contact to C closed
C Kontakt - switching input
NC Normally Close – switching output
Normal operation = contact to C closed
Alarm status = contact to C open
Setting up the art object
After the successful installation the painting can now be
hung up before the sensor plate. If you use a nail please
make sure to avoid shorts between the active sensor
plate and the shielding. It is possible to order special
“nailable” sensor plates.
10.
Switching on LISA TOUCH-Protect
In order to activate LISA TOUCH-Protect it is now necessary to switch on the mains
voltage. LISA TOUCH-Protect calibrates itself automatically when being started. This
procedure may take a few seconds. The calibration ends with a short audio signal.
Afterwards, LISA TOUCH-Protect is ready to operate. The calibration is repeated
every time it is switched on and off. You should not remain in the area that is to
be supervised during the time of the calibration. Should there be no audio signal,
check the mains voltage first. If the mains voltage is correct and there still is no
function, control the output of the status LEDs. Please see the “Survey of connections,
settings, and outputs” Point 3 „Status-LEDs“ for further information or call our support
team under +49 (0) 2546 911-25.
heddier electronic GmbH
Pascherhook 34
48653 Coesfeld
Phone +49 (0) 2546 911-0
Seite 6 von 14
[email protected]
www.heddier.com
© 2009 by heddier electronic GmbH
Instructions for Use
LISA TOUCH/AREA-Protect
Installation Rev. 1.0 (11/09)
Tips for installing Touch/AreaProtect
1) Ground Connection
Make sure to create a sufficient and interference-free ground connection. LISA TouchProtect sensors have to be hooked up to a ground point. The connection to the mass
point should be implemented with a separately guided ground cable (preferably
featuring a diameter of 4 mm). The connection to the mass point should be a star
ground wiring scheme.
The PE lead is not fit for functioning as a mass point. Please see the respective
document on our internet site for further information:
http://www.weka.de/elektrosicherheit-produktion/6586Y29udGVudF9pZD0yNzEwMTc2NA-~aktuelles~news~news_detail.html
The main causes of error when installing capacitive sensors is choosing an
inferior mass point or an incorrect ground wiring scheme!
2) Items made of metal in the sensors‘ vicinity
Items made of metal located in the sensors‘ vicinity have to be grounded. Please see
point 1) for further instructions. Be careful to make sure that there are no grounded
metallic objects in the area monitored by the sensors as this could have a negative
effect on the result.
3) Implementation of rear shielding
Rear shielding is mainly employed whenever sensors are used in areas that are prone
to possible interferences and disturbances. These areas can either be ground and wall
sections, or metal carriers and cable routings. Generally, the rear shielding should be
larger than the sensor cover. We recommend the use of original heddier sensor
covers. The sensor covers have to be connected via a suitable coaxial cable. We
recommend the use of RG-58U-cables and BNC plug connections.
4) Laying and installing of cables and sensors
Principally, the cable routing should be kept as short as possible. Especially sensor
and ground cables extending longer distances should not be laid in parallel and at
short distances to one another.
Cables and sensors have to be located in a fixed position. Moving and any
modification of the location during operation are not permitted and may trigger off an
alarm.
5) Implementation of several sensor covers within one sensor electronic system
Principally, it is possible to hook up several sensor covers to one LISA TouchProtect
electronic system. To do so, we offer BNC-T-adaptors. Normally, it is thus possible to
heddier electronic GmbH
Pascherhook 34
48653 Coesfeld
Phone +49 (0) 2546 911-0
Seite 7 von 14
[email protected]
www.heddier.com
© 2009 by heddier electronic GmbH
Instructions for Use
LISA TOUCH/AREA-Protect
Installation Rev. 1.0 (11/09)
hook up 2-3 sensor covers to one electronic system. The amount may vary depending
on the sensor cover’s size and operating conditions.
6) Implementation of several sensor electronic systems
It is principally possible to use several sensor electronic systems featuring separate
sensor covers to protect one large-size exhibit. Here, however, one needs to pay
attention to the fact that the neighboring sensor covers have to operate on different
frequencies. It is possible to configure up to 4 different frequencies. Neighboring
sensor covers should have a minimum distance of approx. 40 cm.
Please ensure that the sensor and ground cables are properly layed (see point 4).
Especially ground and sensor cables of neighboring sensor covers have to be layed
separately.
7) Miscellaneous
Please note the following suggestions for an error-free installation:
a) Check each sensor electronic system right after the installation for its proper
functioning. Simultaneously, also control neighboring sensor electronic systems.
b) Avoid interferences due to e.g. defective starters in neon tubes, unshielded
electric machines, and wireless and radio equipment.
c) Wait for the calibration interval of the LISA TouchProtect systems. The beep
following the switching on signals the end of the calibration interval. During this
time you must not stay within the monitored area.
d) Please read the user manual. Our technical support hotline will be happy to be
of assistance should you encounter any problems: +49 (0)2546 911 25
In addition to well-known possibilities, all our devices and systems have a PCdebugging-interface which identifies external interruptions and interferences. On
request, the PC-debugging-interface can be readout by our technicians or trained
mechanics.
heddier electronic GmbH
Pascherhook 34
48653 Coesfeld
Phone +49 (0) 2546 911-0
Seite 8 von 14
[email protected]
www.heddier.com
© 2009 by heddier electronic GmbH
Instructions for Use
LISA TOUCH/AREA-Protect
Installation Rev. 1.0 (11/09)
Survey of connections, settings, and outputs
1. Audio Alarm
Signal
2. Fuse
3. Status-LEDs
9. Debugging-interface and
measurement mode
4. Sensor
5. Operating mode
7. Alarm output
6. Sensitivity
8. Power supply
1. Audio Alarm Signal
The audio alarm signal is issued depending on the respective operating mode that is
activated (see operating mode Point 5).
2. Fuse
The 0,25 A fuse protects electronics against overload. In case of damaging or
destruction, the fuse can be replaced by our service center.
3. Status-LEDs
The status-LEDs signal the current condition of the LISA TOUCH-Protect electronics.
heddier electronic GmbH
Pascherhook 34
48653 Coesfeld
Phone +49 (0) 2546 911-0
Seite 9 von 14
[email protected]
www.heddier.com
© 2009 by heddier electronic GmbH
Instructions for Use
LISA TOUCH/AREA-Protect
green LED on:
green LED out:
red LED out:
red LED on:
red LED blinking:
Installation Rev. 1.0 (11/09)
LISA TOUCH-Protect switched on
LISA TOUCH-Protect switched off.
LISA TOUCH-Protect: no serious incidents.
shines as long as the sensor is activated.
error code status
Error code list:
Error code
1 x blink
2 x blinking
Error code description
Sensor connection error
Possible source:
1) Short between active sensor plate and shielding
2) Sensor plate not connected appropriately
Internal electronics error
Please contact our technical support!
4. Sensor
The active sensor is connected to PIN1 and the shielding is connected to PIN2. The
sensor connection cable should not exceed a length of 15 m.
5. Operating mode
There are 10 different operating modes for operating LISA TOUCH-Protect, all can be
adjusted via a rotary switch. Principally, there are 4 different groups of operating
modes: Proximity, Alarm Beep (permanent alarm signal), Siren and Silent Alarm.
Additionally, it is possible to set up a time out function in each operating mode group
(silent alarm excluded).
Time out means that the external alarm output and the alarm signal continue after the
previously set up interval has expired. This allows, for example, the staff to check a
triggered alarm in a reasonable amount of time.
Proximity Mode
In the proximity mode, the audio alarm output works similar to a parking assistance
system in a vehicle. It differentiates between a forewarning zone and an alarm zone,
i.e. the closer a person approaches the sensor plate (intrusion of the forewarning
zone), the shorter the interval between individual audio signals. Once the intruder
reaches the alarm zone or remains longer than 5 seconds within the forewarn zone,
the audio permanent signal tone is triggered and the external alarm is thus issued.
heddier electronic GmbH
Pascherhook 34
48653 Coesfeld
Phone +49 (0) 2546 911-0
Seite 10 von 14
[email protected]
www.heddier.com
© 2009 by heddier electronic GmbH
Instructions for Use
LISA TOUCH/AREA-Protect
Installation Rev. 1.0 (11/09)
Alarm Beep (permanent alarm)
In the alarm beep operating mode, an audio signal is triggered as soon as the alarm
zone is trespassed. Additionally, the external alarm output is switched on as well.
Siren alarm
The siren mode replaces the permanent alarm signal by a siren signal if an intruder
trespasses the secured zone. The external alarm output is also switched on.
Silent alarm
The silent alarm mode does not issue an audible signal. Only the external alarm is
triggered. There is no time out. The relay switches as longs as the trespasser remains
within the secured zone.
Overview of adjustments of the rotary switch for the operating mode
Position
0
1
2
3
4
5
6
7
8
9
marking on casing
Proximity Time out = 0
Proximity Time out = 3 sec.
Proximity Time out = 10 sec.
Alarm Beep Time out = 0
Alarm Beep Time out = 3
Alarm Beep Time out = 10
Siren Time out = 0
Siren Time out = 3
Siren Time out = 10
Silence Alarm
6. Sensitivity
There are ten levels to adjust the sensitivity. „0“ means low
sensitivity, „9“ means maximum sensitivity.
7. External alarm output
The external alarm output is not secured. The maximum voltage supply of 1A must not
be exceeded.
heddier electronic GmbH
Pascherhook 34
48653 Coesfeld
Phone +49 (0) 2546 911-0
Seite 11 von 14
[email protected]
www.heddier.com
© 2009 by heddier electronic GmbH
Instructions for Use
LISA TOUCH/AREA-Protect
1=
2=
3=
Installation Rev. 1.0 (11/09)
NO Normally Open – switching output
Normal operation = contact to C open
Alarm status = contact to C closed
C contact – switching input
NC Normally Close – switching output
Normal operation = contact to C closed
Alarm status = contact to C open
8. Power supply
Power supply is carried out via 230V AC network, 50 Hz (standard European power
supply). On request, it is possible to order variants featuring 115V AC network (North
America).
A secure operation of LISA TOUCH-Protect requires proper grounding. Should
grounding via the protective earth conductor PE not be sufficient, it is necessary
to connect an external grounding.
4=
5=
6=
PE
N
L
= separate ground wire
= neutral conductor
= phase
9. Debugging-interface and measurement mode
The debugging-interface identifies external interruptions and interferences. On request,
the PC-debugging-interface can be readout by our technicians or trained mechanics.
Furthermore, when using the LISA Touch-Protect electronic system in the direct
vicinity, it is necessary to set up the measurement mode has individually. The
measurement mode can be adjusted on 4 levels via 2 jumpers. In order to set up the
measurement mode it is necessary to first open the case. The set up requires PIN1 to
PIN4 of the 6-pole plug.
measurement
mode
1 (standard)
2
3
4
heddier electronic GmbH
Pascherhook 34
48653 Coesfeld
jumper (PIN1 /PIN3)
jumper (PIN2 /PIN4)
open
open
plugged
plugged
open
plugged
open
plugged
Phone +49 (0) 2546 911-0
Seite 12 von 14
[email protected]
www.heddier.com
© 2009 by heddier electronic GmbH
Instructions for Use
LISA TOUCH/AREA-Protect
Installation Rev. 1.0 (11/09)
LISA AREA-Protect
LISA AREA-Protect is a combination of different sensor technologies by heddier
electronics GmbH. A significant component of LISA AREA-Protect applications is
LISA TOUCH-Protect. Meters of touch foils can be laid on floors and beneath carpets,
stone plates and wooden floors. They build up a highly-secured area up to a height of
70 cm.
Thanks to appropriate combinations of different sensor technologies it is possible to
realize intelligent and customer-friendly security concepts.
We would be pleased to advise you in the implementation of our LISA AREAProtect components!
Applications LISA AREA-Protect:
•
•
•
•
•
•
Supervision of exhibition areas
Supervision of pedestals
Supervision cabinets, installation of sensors beneath large-scale sensors
Supervision of art objects on museum walls through large-scale sensors
Supervision of historic furniture
Supervision of emergency exits
Components for LISA AREA-Protect
One-Zone-Radar Sensor (article RS-1Z)
Supervising of air space of high, non-metallic exhibits and objects. The maximum
detection range is 2,5 m.
heddier electronic GmbH
Pascherhook 34
48653 Coesfeld
Phone +49 (0) 2546 911-0
Seite 13 von 14
[email protected]
www.heddier.com
© 2009 by heddier electronic GmbH
Instructions for Use
LISA TOUCH/AREA-Protect
Installation Rev. 1.0 (11/09)
Mirrormaid-Sensor (article MM-S or MM-Kit)
Inexpensive capacitive field sensor for direct connection of sensor wires. Serves to
protect glass cabinets and other three-dimensional objects.
IAP-1 Interactive Audio player (article IAP-1)
Natural voice output for alarm systems. Makes possible to include messages such as
“Please step back”. Only if these are not met by the intruder, the alarm is triggered
and supervising staff will be called.
MM-Controller (article MM-C)
Intelligent alarm controller including freely programmable firmware.
Please visit our website for further technical information on our products:
www.heddier.com
Technical Data
LISA TOUCH-Protect
Operating voltage:
Max. power consumption:
Potential-free switching output:
Max. switching capacity:
230 V~ 50/60 Hz
~15 mA
250 V AC, 1 A
250 VA
Subject to technical modifications and errors. We gladly advise we you on the
installation.technical support hotline +49 (0) 2546 911-25 or email
[email protected] .
heddier electronic GmbH
Pascherhook 34
48653 Coesfeld
Phone +49 (0) 2546 911-0
Seite 14 von 14
[email protected]
www.heddier.com
© 2009 by heddier electronic GmbH