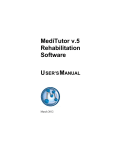
1
rsion:
e ist gültig ab Ve
Die Produktbeilag
:
on
rsi
ve
m
lid fro
This Manual is va
V2.64
oller
Steuereinheit/Contr
device V4.01.03
rät/Multi-purpose
sge
on
kti
un
ltif
Mu
Multifunktionsgerät
und Einstellen der Orthese
Multi-Purpose Device and Adjusting the Orthosis
VERBINDEN
DE
Druckdatum: 2015-02
Der Inhalt dieser Produktbeilage wird regelmäßig aktualisiert und ist beim Einsatz des Produktes unbedingt zu beachten.
Weitere Informationen zu diesem Produkt finden Sie unter: www.fior-gentz.com/neuro-tronic/de
Seite 2
GB
Date printed: 2015-02
This manual is regularly updated and should be strictly followed.
You will find further information at: www.fior-gentz.com/neuro-tronic/gb
Page 35
GB
Table of Contents
Page
1.Declaration of Conformity
2.Warranty
3.Safety Information
4.Safety Instructions
4.1  Classification of the Safety Instructions
4.2  Structure of the Safety Instructions
4.3  Overview of all Safety Instructions for the NEURO TRONIC Multi-purpose Device
5.Application
6.Scope of Delivery
7.Adjusting the Orthosis
7.1  Checking the Basic Alignment of the Orthosis
7.1.1  On the Workbench
7.1.2  Statically on the Patient
7.1.3  Dynamically on the Patient
8.Putting into Operation the Multi-purpose Device
9.Checking the Connection between Controller and Multi-purpose Device
10.Select a Mode
11.Signal Function for Training Purposes
11.1  Activating the Signal Function
11.2  Switching off the Signal Function
12.Main Menu
12.1
Language
47
12.2
Pairing (Putting into Operation Controller)
47
12.3
Controller Update
48
12.4
12.5
Activate (Putting into Operation Remote Control)49
12.4.1  For One Orthosis
49
12.4.2  For Two Orthoses
50
Cable Connection Test
12.5.1
12.6
12.7
Cable Connection Test Result Messages and Further Action
Sensor Test (only with p-Motion)
12.6.1
36
38
38
38
38
38
39
39
41
41
42
42
43
43
43
43
44
44
45
45
46
46
Sensor Test Result Messages and Further Action
Settings of e-Motion
51
51
52
53
53
12.7.1
Calibrate
54
12.7.2
Turn on p-Motion
54
12.7.3
Tone Selection
55
12.7.4
Volume
55
12.7.5
Signal Selection
55
12.7.6
Select other Leg
56
12.8
Settings of p-Motion
56
12.8.1
Sensor Sensitivity
56
12.8.2
Activity Level
58
12.8.3
Turn on e-Motion
58
12.8.4
Tone Selection
59
12.8.5
Volume
59
12.8.6
Signal Selection
59
12.8.7
Select other Leg
59
12.9
Battery Quality
59
12.10
Step Counter
61
12.11
Device Info62
62
62
63
63
16.1  Walking with Orthosis in Auto Mode with e-Motion
63
16.2  Remote Control
63
16.3  Multi-purpose Device
64
16.4  Controller64
16.5  System Knee Joint
64
17.Software Versions
68
13.Indication of Battery Status in Multi-purpose Device 14.Replacing the Batteries of the Multi-purpose Device
15.Updating the NEURO TRONIC Multi-purpose Device
16.Advices for an Optimal Functioning of the Orthosis
37
1. Declaration of Conformity
We declare that our medical devices as well as our accessories for medical devices are in conformity with the
requirements of the Medical Devices Directive 93/42/EEC. Regarding to these tests, all FIOR & GENTZ products
have the CE marking.
2. Warranty
The warranty applies only if the product has been used under the described conditions and for the intended
applications.
Because we are not able to check the compliance of handling and dealing with rechargeable batteries, we cannot
assume any liability for any damages or costs caused by batteries.
3. Safety Information
This manual is addressed to orthopaedic technicians. That is why the content basically confines to features of
the product. It does not contain any notes about dangers which are obvious to orthopaedic technicians. For
information reasons and for safety of your patients, please note all information provided in this manual including
notes, tables and illustrations. Please note especially the safety instructions indicated by ATTENTION! CAUTION!
WARNING! and DANGER! which are listed and explained in the following paragraph. Ignoring this information may
lead to patient injuries and property damage. In addition, please read the manual of the NEURO TRONIC system
knee joint as well as the patient information.
4. Safety Instructions
4.1 Classification of the Safety Instructions
DANGER!
¨¨Important information about a possible dangerous situation which, if not avoided,
leads to death or irreversible injuries.
WARNING!
¨¨Important information about a possible dangerous situation which, if not avoided,
leads to reversible injuries that need medical treatment.
CAUTION!
¨¨Important information about a possible dangerous situation which, if not avoided,
leads to light injuries that do not need medical treatment.
ATTENTION!
¨¨Important information about a possible dangerous situation which, if not avoided,
leads to damage of the product.
38
4.2 Structure of the Safety Instructions
The following example demonstrates the structure of the safety instructions:
Attention symbol
Signal word
ATTENTION!
Type of danger
Mechanical load is too high!
Possible consequences
for components
¨¨Wear of the joint parts.
Possible consequences
for the patient
¨¨Maintenance intervals shorten.
Measures
Explain the patient correct use of
the joint and possible dangers.
4.3 Overview of all Safety Instructions for the NEURO TRONIC Multi-purpose Device
There is detailed information to some of the safety instructions in the course of this manual. Respect the following
safety instructions to avoid patient injuries and property damage:
WARNING!
The patient is wearing a shoe to which the orthosis is not adjusted!
¨¨Failure of the joint function in Auto mode.
¨¨Fall.
Point out to the patient to only wear a shoe to which the orthosis is adjusted.
WARNING!
No gait re-education for the patient!
¨¨Fall.
Make sure that the patient can use the orthosis, recommend him a physiotherapeutic gait re-education and explain him the particularities of the joint.
WARNING!
The pressure sensor sensitivity is not adjusted correctly!
¨¨Failure of the joint function in Auto mode.
¨¨Fall.
Adjust the sensor sensitivity to the patient and the shoe.
WARNING!
A not certified technician uses the multi-purpose device!
¨¨Incorrect adjustments on the orthosis..
¨¨Fall.
Only a certified technician is allowed to use the multi-purpose device.
WARNING!
Moisture and water!
¨¨Failure of function.
¨¨Fall.
Do not expose the multi-purpose device to high humidity and do not immerse it
in water.
39
ATTENTION!
The activation of a remote control with the second controller has failed!
¨¨Using the orthosis is no longer possible.
Activate the remote control again as described in the manual. In case of
persistent failure, contact our technical support.
ATTENTION!
Useful life of the orthosis has shortened!
¨¨Failure of the joint function.
Insert fully charged batteries and carry out the battery quality test. In case of
persistent failure, contact our technical support.
ATTENTION!
Orthosis remains locked when starting to walk!
¨¨Danger of falling.
Point out to the patient to make the first step with the leg with orthosis,
especially in Auto mode when e-Motion is turned on.
ATTENTION!
The multi-purpose device is soiled!
¨¨Incorrect reading of the display and probable failure of the joint function.
Clean the display with an unsoiled, soft and dry cloth.
ATTENTION!
The volume of the signal tone for the signal function is still switched on after the patient
has finished gait re-education!
¨¨Failure of the joint function.
Set the volume of the signal tone for the signal function to 0 after finishing gait
re-education.
ATTENTION!
Batteries of the multi-purpose device were not replaced correctly!
¨¨Failure of function.
Replace the batteries of the multi-purpose device properly and as described in
this manual.
ATTENTION!
When replacing the batteries of the multi-purpose device, an incorrect battery type is
used!
¨¨Failure of function.
Use the battery type specified in this manual for the multi-purpose device.
40
5. Application
The multi-purpose device is used to adjust the knee joint system NEURO TRONIC. With the multi-purpose device,
you can adjust orthoses in which a NEURO TRONIC system knee joint is mounted.
6. Scope of Delivery
You purchased the knee joint system NEURO TRONIC. It consists of the following articles (fig. 1):
1
NEURO TRONIC system knee joint
2
NEURO TRONIC component set including controller
3
NEURO TRONIC remote control for the patient including microprocessor-controlled quick charger
4
NEURO TRONIC multi-purpose device for the technician including batteries
The system knee joint and the controller are mounted to the patient‘s orthosis. You need the multi-purpose
device to put the orthosis into operation and to adjust all settings. The patient needs the remote control to use
the orthosis.
PATIENT
3 Remote control
TECHNICIAN
4 Multi-purpose device
1 System knee joint
2 Controller
3 Microprocessorcontrolled quick
charger
Fig. 1
41
The NEURO TRONIC multi-purpose device is delivered in a case. The case includes the following (fig. 2):
1
PAIRING
2
Fig. 2
Item
1
2
without
fig.
Article number
Description
Unit
Quantity
ET3830-T
ET0710
Multi-purpose device for the technician with batteries
USB cable
Set
Piece
1
1
ET0830-2450
Coin cells, CR2450
Piece
2
7. Adjusting the Orthosis
Respect a proper alignment before putting the orthosis into operation. Depending on the sensor technique you
can make further adjustments of the orthosis with the multi-purpose device afterwards.
The following parameters influence the functionality of the orthosis and must be adjusted.
Alignment of the orthosis
Checking the basic alignment on the workbench (see paragraph 7.1.1)
Checking the basic alignment statically on the patient (see paragraph 7.1.2)
Checking the basic alignment dynamically on the patient (see paragraph 7.1.3)
e-Motion
Calibrate (see paragraph 12.7.1)
-
p-Motion
Sensor sensitivity (see paragraph 12.8.1)
Activity level (see paragraph 12.8.2)
7.1 Checking the Basic Alignment of the Orthosis
42
WARNING!
The patient is wearing a shoe to which the orthosis is not adjusted!
¨¨Failure of the joint function in Auto mode.
¨¨Fall.
Point out to the patient to only wear a shoe to which the orthosis is adjusted.
7.1.1 On the Workbench
Regardless of the plantar flexion, in automatic system knee joints it is obligatory to adjust the dorsal stop
systematically for an optimal function of the orthosis. The dorsal stop influences the unlocking moment of the
NEURO TRONIC system knee joint during mid stance. Furthermore, it causes an extension moment that applies
to the orthosis and the system knee joint, respectively. Such an extension moment is necessary to unlock the
system knee joint.
Fix the foot piece of the orthosis firmly in the patient‘s shoe and put the orthosis on the workbench. The ankle
joint‘s dorsal stop must be adjusted in such a way that the line of gravity passes through the middle of the
femoral shell and ventrally ahead of the ankle joint (see also leaflet Basic alignment NEURO MATIC or NEURO
TRONIC KAFO, article no.: PR2500-DE/GB).
7.1.2 Statically on the Patient
For checking the correct static alignment of the orthosis, the patient must wear the orthosis and stand upright
with parallel feet. When viewed from the side, the line of gravity must run from the centre of gravity through
one half of the distance between the mechanical pivot point at ankle height and the metatarsal joints. Usually,
this is already given by the correct basic alignment, since the orthosis itself and soft tissue may be deformed
when wearing the orthosis and the line of gravity, therefore, moves automatically into the desired position. If this
is not the case, the dorsal stop must be readjusted. If the dorsal stop is adjusted correctly, a lever arm between
forefoot and lower leg is formed which brings the patient into a stable balance and applies the necessary knee
extension moment.
7.1.3 Dynamically on the Patient
For checking the correct dynamic alignment of the orthosis, the patient must wear the orthosis and walk a few
steps with it. The dorsal stop must be adjusted in such a way that a heel off can be clearly seen in mid stance.
Due to this, a lever arm between forefoot and lower leg is formed which brings the patient into a stable balance
and applies the necessary knee extension moment. If the heel does not lift, you must limit the ankle joint‘s
range of motion in dorsiflexion.
8. Putting into Operation the Multi-purpose Device
1. The multi-purpose device is delivered with integrated rechargeable
batteries and can immediately be put into operation.
2. Press the
Set button to switch on the device. You can now see
the three modes AUTO, FREE and LOCK on the display (fig. 3).
3. You can select the available modes only when the controller is connected. Since the multi-purpose device and the controller are not
connected via cables, you have to establish a wireless connection.
Please read paragraph 12.2 for this.
4. If you do not use the multi-purpose device for more than 10 minutes,
it switches off automatically.
Note:
When the batteries of the multi-purpose device are almost empty, you
will see the message BATTERIES NEARLY EMPTY on the display (fig. 4).
AUTO
FREE
LOCK
Fig. 3
BATTERIES NEARLY EMPTY
Fig. 4
43
9. Checking the Connection between Controller and Multi-purpose Device
The second LED at the controller indicates that the controller and the multi-purpose device communicate with
each other. When you select one of the three modes, the following signal appears:
Keypress
Light signal
Meaning
Colour: blue
Signal duration:
The controller gets a
command of the multipurpose device.
One of the three modes is selected
10. Select a Mode
You can select the available modes AUTO, FREE and LOCK with the multi-purpose device. Proceed as follows:
1. For Auto mode, press the
Left arrow button. When you can see the word AUTO displayed larger in the
multi-purpose device, the mode is selected and the
LED mode indicator at the controller blinks green.
Keypress
Display after pressing key
Light signal
Colour: green
AUTO
FREE
LOCK
AUTO
FREE
LOCK
Signal duration:
every 5 sec.
2. For Free mode, press the
Set button. When you can see the word FREE displayed larger in the multipurpose device, the mode is selected and the
LED mode indicator at the controller blinks yellow.
Note:
If the signal function is deactivated, the LED mode indicator at the controller blinks green. For information
about the signal function, please read paragraph 11.
44
Keypress
Display after pressing key
Light signal
Colour: yellow
AUTO
FREE
LOCK
AUTO
FREE
LOCK
Signal duration:
every 5 sec.
3. For Lock mode, press the
Right arrow button. When you can see the word LOCK displayed larger in
the multi-purpose device, the mode is selected and there is no signal at the
LED mode indicator at
the controller.
Keypress
Display after pressing key
Light signal
No signal
AUTO
FREE
LOCK
AUTO
FREE
LOCK
11. Signal Function for Training Purposes
ATTENTION!
The volume of the signal tone for the signal function is still switched on after the patient
has finished gait re-education!
¨¨Failure of the joint function.
Set the volume of the signal tone for the signal function to 0 after finishing gait
re-education.
In order for the patient to get used to walking with orthosis, you have the possibility to switch on the signal function.
It is meant for training purposes and gives you and your patient better control on when the joint is locked or free
moving. The controller sends out a signal and thus informs about the state of the joint (locked or free moving).
You can set tone, volume and signal with the multi-purpose device. For the different setting possibilities read
paragraphs 12.7.3, 12.7.4 and 12.7.5.
11.1 Activating the Signal Function
At all controllers that have been delivered with version V2.64 or higher, the signal function is already activated.
At controllers with versions lower than V2.64, this function can be activated subsequently.
To do so, proceed as follows:
1. Switch on the controller and connect it with the multi-purpose device (see paragraph 12.2).
2. Go to the menu item
Device info.
45
3. Now, press both
arrow buttons at the same time for 6 seconds until you see the message
COMPLETED. The signal function is activated.
At e-Motion the signal function is now activated with signal tone 1 being preset at maximum volume and with
all other signal tone options available. At p-Motion there is only signal tone 2 available up to version V2.60.
You have the possibility to make all signal tones available for p-Motion by doing a software update at multipurpose devices with USB port.
If you have a multi-purpose device with USB port, you can alternatively activate the signal function by downloading
the latest update and updating the multi-purpose device as well as the controller (for updates see paragraph
14 and 12.3). By transferring the current software version to the controller of your NEURO TRONIC knee joint
system, the signal function will also be activated automatically.
11.2 Switching off the Signal Function
Switch off the signal tone by setting the volume to 0 (see paragraph 12.7.4).
12.Main Menu
In the main menu of the multi-purpose device you can adjust the orthosis and get information about potential
problems. To go to the main menu, press the
Set button for three seconds. You see the following menu
items on the display:
--
Pairing
--
Activate
--
Battery quality
--
Cable connection test
--
Sensor test (only with p-Motion)
--
Settings
--
Step counter
--
Language
--
Device info
-- Controller update
You can exit a menu item in two ways. If a menu item has more options,
exit via
Back arrow (fig. 5). If a menu item has no other option
and you want to cancel your selection, exit by selecting BACK with the
Set button (fig. 6).
46
BACK
Fig. 5
MULTI-PURPOSE DEVICE: VXX.XX
CONTROLLER: VXX.XX
BACK
Fig. 6
Note:
If you have connected two controllers, the menu item
Select other leg
additionally appears in the main menu (fig. 7). Furthermore, under the single
menu items, the name of the menu item itself and the chosen leg are blinking
alternately (exception:
Back,
Select other leg,
Pairing and
Language).
12.1
SELECT OTHER LEG
Language
Fig. 7
In the menu item
Language you can choose between English and German. The German language is preset
in the multi-purpose device. To change the language, proceed as follows:
1.
2.
3.
4.
To go to the main menu, press the
Set button for three seconds.
Search the menu item
Language by browsing with the
Left and right arrow buttons.
When you find the menu item, confirm your selection by pressing the
Set button.
You are now in the language menu where you are offered the languages German
and English
.
Select a language by browsing with the
Left and right arrow buttons and confirm your selection by pressing the
Set button.
5. By confirming your selection you will automatically go back to the main menu.
12.2
Pairing (Putting into Operation Controller)
To connect the controller with the multi-purpose device, proceed as follows:
1. To go to the main menu, press the
Set button for three seconds.
2. Search the menu item
Pairing by browsing with the
Left and right arrow buttons.
3. When you find the menu item, confirm your selection by pressing the
Set button.
4. Now you can see the options SEARCH and BACK on the display. Furthermore, the multi-purpose device shows
you that there are not found any devices yet (fig. 8).
5. Insert the rechargeable batteries into the battery compartment of the controller. If you have already inserted the rechargeable batteries into the controller, briefly remove one battery and reinsert it. The LEDs at the
controller are blinking yellow, blue and orange from left to right. The controller is ready to connect.
Light signal
Insert rechargeable batteries
View
Colour
Yellow
Blue
Orange
Signal
duration
Meaning
Controller is now ready for
connection within 30 sec.
6. Select SEARCH at the multi-purpose device by pressing the
Set button (fig. 8). When the device has
found the controller, in the upper left corner you can see FOUND VER. XXXX and left of SEARCH you can
confirm by selecting CONFIRM (fig. 9).
7. Connect the multi-purpose device with the controller within 30 seconds. Select CONFIRM by pressing the
Left arrow button for this (fig. 9).
8. The connection has been successfully established as soon as you can see the message COMPLETED on the
47
FOUND VER. XXXX
NO DEVICES
SEARCH
BACK
Fig. 8
CONFIRM
SEARCH
COMPLETED
BACK
Fig. 9
multi-purpose device display (fig. 10).
9. Now, you can see the message WOULD YOU LIKE TO CONNECT A
SECOND CONTROLLER? on the display as well as the options YES and
NO (fig. 11). To connect a second controller, select YES by pressing
the
Left arrow button. Otherwise, select NO by pressing the
Right arrow button.
10.If you have pressed YES, you can see the message SELECT SIDE FOR
THE SECOND CONTROLLER on the display. Select the required leg by
pressing the
Left arrow button for the left leg or the
Right
arrow button for the right leg (fig. 12).
11.Now, repeat the points 5 to 8 to connect the second controller.
Fig. 10
WOULD YOU LIKE TO CONNECT A
SECOND CONTROLLER?
YES
NO
Fig. 11
SELECT SIDE FOR THE SECOND
CONTROLLER
LEFT
RIGHT
Note:
If you have connected two controllers, you can switch between the
left and right leg. To do so, search the menu item
Select other
leg in the main menu and press the
Set button of the multipurpose device. Now, you can see the currently selected leg on the
display (fig. 13).
12.3
Fig. 12
RIGHT LEG SELECTED
SELECT LEG
Controller Update
When updating the multi-purpose device (see paragraph 14) the controller
update is downloaded simultaneously, if there is an update. At the menu
Fig. 13
item
Controller update, you can then see if there is an update.
If there is an update, you can now update the chosen controller by selecting the menu item
Controller
update. If there is no update, this menu item cannot be selected. Always keep all controllers in use up to date.
48
12.4
Activate (Putting into Operation Remote Control)
In the menu item
Activate you put the remote control for the patient into operation i.e. you connect the
controller with the remote control using the multi-purpose device.
12.4.1 For One Orthosis
To activate the remote control, proceed as follows:
1. To go to the main menu, press the
Set button for three seconds.
2. Search the menu item
Activate by browsing with the
Left and right arrow buttons.
3. Press the Auto and Lock button of the remote control at the same time for about four seconds (fig. 14).
3.1 When the LED of the remote control blinks red, the buttons were not pressed at the same time. The
remote control cannot be activated. Press the Auto and Lock button again at the same time (fig. 14).
press 4 sec.
blinks red
Fig. 14
3.2
When the LED blinks yellow, the remote control can be activated. Connect the controller with the remote
control by pressing the
Set button of the multi-purpose device within ten seconds (fig. 15).
press 4 sec.
10 seconds yellow
ACTIVATE
Fig. 15
49
4. The remote control is activated successfully as soon as you can see the message COMPLETED on the multipurpose device display and the LED of the remote control blinks green once.
Display
COMPLETED
Light signal remote control
Meaning
Colour: green
Signal duration:
The remote control is activated
successfully.
12.4.2 For Two Orthoses
When treating both legs, you can decide to connect the controllers with one or two remote controls. If you
activate two remote controls, you can change the mode separately on each controller and system knee joint,
respectively. If you activate only one remote control, you change the mode at the same time on both controllers
and system knee joints, respectively.
Activating Two Remote Controls
1. When you have successfully activated the first remote control as described in paragraph 12.4.1, search the
menu item
Select other leg in the main menu by browsing with the
Left and right
arrow buttons. When you find the menu item, confirm your selection by pressing the
Set button.
2. Search the menu item
Activate again by browsing with the
Left and right arrow buttons.
3. Now, pick up the second remote control and repeat point 3 of paragraph 12.4.1.
Activating One Remote Control
ATTENTION!
The activation of a remote control with the second controller has failed!
¨¨Using the orthosis is no longer possible.
Activate the remote control again as described in the manual. In case of persistent failure, contact our technical support.
1. To connect the remote control with a second controller, you must activate it a second time within 60 seconds
after having connected the first controller (see paragraph 12.4.1).
2. Search the menu item
Select other leg in the main menu by browsing with the
Left and
right arrow buttons. When you find the menu item, confirm your selection by pressing the
Set button.
3. Search the menu item
Activate again by browsing with the
Left and right arrow buttons.
4. Repeat point 3 from paragraph 12.4.1. Be sure to press the Auto and Lock button at the same time. If the
LED of the remote control does not blink yellow for a longer period, but instead not at all, red or one time
yellow, the buttons were not pressed at the same time and the remote control cannot be activated. In this
case, repeat the paragraphs 12.4.1 and 12.4.2.
50
Note:
If you do not connect the remote control with the first and second controller within 60 seconds, the connection with the first controller will be deleted and only the second controller is activated i.e. the remote
control is still connected with only one controller. In this case, repeat the paragraphs 12.4.1 and 12.4.2.
Mind the given time.
12.5
Cable Connection Test
Depending on the sensor technology selected, you can check the cable connections to the solenoid and pressure
sensor on the orthosis with this test. Carry out the test with the orthosis on the workbench and not when the
patient is wearing it. Proceed as follows:
1. To go to the main menu, press the
Set button for three seconds.
PRESS SENSOR SEVERAL TIMES AND
THEN PRESS <CONTINUE>
2. To start the test, first search the menu item
Cable connection
test by browsing with the
Left and right arrow buttons.
CONTINUE
3. When you have found the menu item, confirm your selection by pressing the
Set button.
4. If you have selected the e-Motion, you will get the result of the
Cable connection test already at this point.
5. If you have selected the p-Motion, you can see the message PRESS
Fig. 16
SENSOR SEVERAL TIMES AND THEN PRESS <CONTINUE> on the display (fig. 16). Follow the instruction and press the sensor under the foot piece several times. To get a result
of the
Cable connection test, select CONTINUE by pressing the
Set button.
Note:
When you start the
Cable connection test, the orthosis switches automatically into Lock mode and
remains in this mode after the test. To change the mode, use the remote control or multi-purpose device.
12.5.1
Cable Connection Test Result Messages and Further Action
The following test results displayed on the multi-purpose device refer to components that are explained more
detailed in the manual of the NEURO TRONIC system knee joint.
Result message
(Display)
Meaning
Connection of one solenoid
OK
The cable connection from
controller to solenoid is correct.
The cable connection from both
Connection of two solenoids
controllers to both solenoids is
OK
correct.
The cable connection from
Solenoid not connected
controller to solenoid is incorrect.
Further action
Check the cable connection from
controller to solenoid.
Solenoid short circuited
Short circuit in the cable from
controller to solenoid.
Check the cable joints at the controller
and at the solenoid.
Cables mixed-up?
The solenoid is connected to the
sensor cable joints and the other
way round.
Please connect solenoid and
pressure sensor again (see manual
NEURO TRONIC system knee joint,
paragraph 11).
51
Result message
(Display)
Meaning
Sensor connection OK
The cable connection from
controller to pressure sensor is
correct.
Sensor not connected
Either you have not pushed the
sensor when you were asked to
or the cable connection from
controller to pressure sensor is
incorrect.
Sensor short circuited
Short circuit in the cable from
controller to pressure sensor.
Sensor was not pressed
You have not pressed the sensor
when you were asked to.
C11: Read user manual
Controller BILATERAL is only
connected to one solenoid.
C12: Contact tech. support
Controller UNILATERAL is
connected with two solenoids.
C21: Read user manual
Sensor is under pressure.
C91: Contact tech. support
Device internal error
12.6
Further action
If you do not have pressed the sensor,
carry out the test again by pressing the
sensor when you are asked to.
If you have pushed the sensor, check
the cable connection from controller
to pressure sensor (see manual
NEURO TRONIC system knee joint,
paragraph 11).
Check the cable joints at the controller.
If you cannot find a solution, contact
technical support.
Carry out the test again and press the
sensor when you are asked to.
Check, if the cable connections to the
solenoids (see manual NEURO TRONIC
system knee joint, paragraph 11) are
correct.
Contact technical support.
During the test, the sensor should not
be under pressure. Make sure that
the pressure sensor is not assembled
deformed and that no outsole material
is adhered under tension onto the
sensor.
Contact technical support.
Sensor Test (only with p-Motion)
With this test, you can check the assembly of the pressure sensor into the orthosis. Carry out the test only after
the
Cable connection test was successful. The patient is wearing the orthosis during the
Sensor test.
Proceed as follows:
1. To go to the main menu, press the
Set button for three seconds.
2. To start the test, first search the menu item
Sensor test by browsing with the
Left and right arrow buttons.
3. When you have found the menu item, confirm your selection by
pressing the
Set button.
4. You can see the message ASK PATIENT TO WALK TWO STEPS, THEN
PRESS <CONTINUE> on the display. Follow the instruction and let the
patient walk two steps. To get a result of the
Sensor test, select
CONTINUE by pressing the
Set button (fig. 17).
52
ASK PATIENT TO WALK TWO STEPS,
THEN PRESS <CONTINUE>
CONTINUE
Fig. 17
5. After getting the result of the sensor test, exit the menu item
Sensor test by selecting EXIT with the
Set button (fig. 18).
SENSOR PLACEMENT OK
EXIT
Note:
When you start the
Sensor test, the orthosis switches automatically
into Lock mode and remains in this mode after the test. To change the
mode, use the remote control or multi-purpose device.
12.6.1
Fig. 18
Sensor Test Result Messages and Further Action
The following test results displayed on the multi-purpose device refer to a possible malpositioning of the sensor
that is explained more detailed in the production technique of the NEURO TRONIC system knee joint.
Result message
(Display)
Meaning
Sensor placement OK
The pressure sensor is placed
correctly.
C22: Read user manual
The pressure sensor is placed
in a space.
C23: Read user manual
Sensor is under pressure.
12.7
Further action
When walking, no pressure is applied
to the sensor e.g. because the shoe is
narrower than the orthosis shell and,
therefore, a hollow space results between
these two.
This problem can e.g. develop because
of a too narrow-formed heel part at the
insole or of too narrow shoes. Carry out
the sensor test with unlaced/open shoes or
other shoes. If you cannot find a solution,
contact technical support.
Settings of e-Motion
In the menu item
turned on e-Motion:
Settings you can adjust the orthosis. The following setting menus are available with
--
Calibrate
--
Turn on p-Motion
--
Tone selection
--
Volume
--
Signal selection
--
Select other leg (only with two connected controllers, see paragraph 12.7.6)
To enter a setting menu, proceed as follows:
1. To go to the main menu, press the
Set button for three seconds.
2. Search the menu item
Settings by browsing with the
Left and right arrow buttons.
3. When you have found the menu item, confirm your selection by pressing the
Set button. Now you can
53
see the above mentioned setting menus on the display. This will be described more detailed in the following.
12.7.1
Calibrate
In order for the motion sensors in the controller to detect the position of the lower leg, you have to calibrate
the orthosis before fitting.
1. Go to the menu item
Settings as described in paragraph 12.7.
2. Search the setting menu
Calibrate by browsing with the
Left and right arrow buttons.
3. When you have found the setting menu, confirm your
PLACE THE
IN VERTIselection by pressing the
Set button.
WÄHLEN
SIEORTHOSIS
DIE BEINSEITE
DER
CAL POSITION
AND THEN PRESS
ZWEITEN
STEUEREINHEIT
<CONTINUE>
4. You can see the message PLACE THE ORTHOSIS IN
CANCEL
LINKS CONTINUE RECHTS
VERTICAL POSITION AND THEN PRESS <CONTINUE>
on the display (fig. 19). This corresponds to the basic
alignment (see paragraph 7.1). Follow the instruction
and make sure that the orthosis is placed on an even
surface and hold it in this position. Select CONTINUE
by pressing the
Set button.
Fig. 19
Fig. 20
5. You can see the message PLACE THE ORTHOSIS IN
HORIZONTAL POSITION; THEN PRESS <CONTINUE> on the display (fig. 21). Follow the instruction and make
sure that the orthosis is lying on an even surface with the foot piece pointing upwards and hold it in this
position. Select CONTINUE by pressing the
Set button.
6. You can see the message CALIBRATION PROCEDURE COMPLETED on the display (fig. 23). The orthosis has
been calibrated successfully and can now be used.
7. Exit the setting menu
Calibrate by selecting EXIT with the
Set button.
CALIBRATION PROCEDURE
COMPLETED
PLACE THE
IN HORIWÄHLEN
SIEORTHOSIS
DIE BEINSEITE
DER
ZONTAL POSITION;
THEN PRESS
ZWEITEN
STEUEREINHEIT
<CONTINUE>
CANCEL
CONTINUE RECHTS
LINKS
Fig. 21
12.7.2
EXIT
Fig. 22
Fig. 23
Turn on p-Motion
WARNING!
No gait re-education for the patient!
¨¨Fall.
Make sure that the patient can use the orthosis, recommend him a physiotherapeutic gait re-education and explain him the particularities of the joint.
The p-Motion is recommended for patients who are treated bilaterally and for those who have an atactic gait
pattern. Even in patients who do not yet walk that harmonious or do not feel secure in using the orthosis, you
should turn on the p-Motion. With this sensor technology, the system knee joint is controlled only by pressure
and not by motion. To activate the pressure sensor, proceed as follows:
54
1. Search the setting menu
Turn on p-Motion by browsing with the
Left and right arrow buttons.
2. When you have found the setting menu, confirm your selection by
pressing the
Set button.
3. You can see the message COMPLETED on the display (fig. 24). The
pressure sensor has been successfully turned on and the orthosis is
switched to the p-Motion.
12.7.3
Fig. 24
–
see paragraph 11). You can select a volume from 0-5, with 5 being the
maximum volume. To switch off the tone, you have to select 0. If you
have activated the signal function yourself, the volume is preset on 5.
If the controller was delivered to you with the signal function already
activated, the volume is preset on 0. Choose the desired volume with
the
Left or
Right arrow button and confirm by pressing the
Set button (fig. 26).
If you do not have the menu item
Volume in your multi-purpose
device, proceed as described in paragraph 11.1.
2
CONFIRM
+
Fig. 25
Volume
You can also set the volume in which the signal tone should sound when
using the signal function (for information about the signal function
12.7.5
TURN ON P-MOTION
Tone Selection
Here you can choose the tone for the signal that sounds when you want
to use the signal function for training purposes for the patient (for
information about the signal function see paragraph 11). You have the
choice between two frequencies which help to distinguish between the
two controllers at an orthotic fitting of both legs. 1 stands for the lower
frequency and 2 for the higher one. The preset tone is tone 1. Choose the
desired frequency with the
Left or
Right arrow button and
confirm by pressing the
Set button (fig. 25).
If you do not have the menu item
Tone selection in your multi-purpose
device, proceed as described in paragraph 11.1.
12.7.4
COMPLETED
–
0
CONFIRM
+
Fig. 26
–
1
CONFIRM
+
Signal Selection
When using the signal function, you can decide between four different
settings regarding the sound of the signal tone (for information about
the signal function see paragraph 11). 1 is the preset signal tone. Choose
the desired signal with the
Left or
Right arrow button and
confirm by pressing the
Set button (fig. 27).
The following settings are available:
Fig. 27
55
1. A beep is emitted as long as the joint is free moving.
2. A beep is emitted as long as the joint is locked.
3. A short beep is emitted when the joint switches from free moving to locked and when it switches from
locked to free moving.
4. Two short beeps are emitted when the joint switches from locked to free moving and one short beep is emitted when the joint switches from free moving to locked.
If you do not have the menu item
paragraph 11.1.
12.7.6
Signal selection in your multi-purpose device, proceed as described in
Select other Leg
This additional setting menu makes it quick to switch between the left and
right leg when you have connected two controllers and want to calibrate
the orthosis or turn on the pressure sensor.
Switch the leg by pressing the
Set button of the multi-purpose
device. Now, you can see the currently selected leg on the display (fig.
28). Furthermore, under the single setting menus, the name of the setting
menu itself and the choosen leg are blinking alternately.
12.8
SELECT OTHER LEG
Settings you can adjust the orthosis. The following setting menus are available with
--
Sensor sensitivity
--
Activity level
--
Turn on e-Motion
--
Tone selection
--
Volume
--
Signal selection
--
Select other leg (only with two connected controllers, see paragraph 12.7.6)
12.8.1
Fig. 28
Settings of p-Motion
In the menu item
turned on p-Motion:
Sensor Sensitivity
WARNING!
The pressure sensor sensitivity is not adjusted correctly!
¨¨Failure of the joint function in Auto mode.
¨¨Fall.
Adjust the sensor sensitivity to the patient and the shoe.
56
RIGHT LEG SELECTED
The pressure sensor‘s sensitivity is adjusted for unlocking the joint. You can change the sensitivity from 3% to 99% in steps
of three with the multi-purpose device. You determine the exact point when the solenoid releases the locking mechanism
so that the joint in fact unlocks right in time before pre swing (directly after terminal stance, fig. 29). It is important that
the solenoid releases the locking mechanism before the extension moment of the forefoot lever causes the actual unlocking.
Fig. 29
Note:
If the solenoid does not release the locking mechanism right in time, the extension moment of the forefoot
lever cannot cause the actual unlocking. Therefore, the joint would remain locked in pre swing (directly after
terminal stance, fig. 29). Please read paragraph 6.1.2 of the manual NEURO TRONIC system knee joint for this.
To change the pressure sensor‘s sensitivity for unlocking, proceed as follows:
1.
2.
3.
4.
5.
Go to the menu item
Settings as described in paragraph 12.7.
Search the setting menu
Sensor sensitivity by browsing with the
Left and right arrow buttons.
When you have found the setting menu, confirm your selection by pressing the
Set button.
The preset unlocking value is 60% since this corresponds to the unlocking moment in natural gait.
If it is necessary to make the pressure sensor more sensitive e.g. because
the patient does not step firmly, increase the sensitivity by pressing
the
Right arrow button. There is a plus sign displayed at this
point (fig. 30). The solenoid releases the locking mechanism earlier.
6. If it is necessary to make the pressure sensor less sensitive e.g. because
the patient does step very firmly, decrease the sensitivity by pressing
the
Left arrow button. There is a minus sign displayed at this
point (fig. 30). The solenoid releases the locking mechanism later.
7. Confirm your selection by pressing the
–
60
CONFIRM
Set button.
Note:
If you want to set the pressure sensor sensitivity above 81% you can
see the message WARNING: SENSITIVITY VERY HIGH - CHECK SENSOR
PLACEMENT on the display (fig. 31). The higher you have to set the
sensitivity, the more likely the sensor is placed incorrectly e.g. it is
placed in a space and, therefore, does not sense any pressure. However,
if you want to set the sensitivity high on purpose, select OK with the
Set button and increase it by pressing the
Right arrow button.
+
Fig. 30
WARNING: SENSITIVITY VERY HIGH
- CHECK SENSOR PLACEMENT
OK
Fig. 31
57
12.8.2
Activity Level
You have to adapt the electronics of the orthosis to the patient‘s activity level. To adjust the activity level,
proceed as follows:
1. Go to the menu item
Settings as described in paragraph 12.7.
2. Search the setting menu
Activity level by browsing with the
3. When you have found the setting menu, confirm your selection by
pressing the
Set button.
4. Increase activity level by pressing the
Right arrow button. There
is a plus sign displayed at this point (fig. 32).
5. Decrease activity level by pressing the
Left arrow button. There
is a minus sign displayed at this point (fig. 32).
6. Confirm your selection by pressing the
Set button.
These are the activity levels available:
Left and right arrow buttons.
–
2
CONFIRM
+
Fig. 32
1.Indoor walker
The patient has the ability to make transfers and to walk with an orthosis on even surfaces with low
walking speed. Ambulation is possible for a very short distance and duration due to the physical condition of
the patient.
2. Restricted outdoor walker
The patient has the ability to ambulate with low walking speed and is able to overcome small obstacles
such as curbs, single steps or uneven surfaces.
3.Unrestricted outdoor walker
The patient has the ability to move with low, high or variable walking speed and overcome environmental
limitations. Additionally, the patient can walk on open terrain and perform other activities which do not apply
an above average load on the orthosis e.g. therapy, work.
4.Unrestricted outdoor walker with high demands
The patient has the ability or the potential to walk like the unrestricted outdoor walker. Additionally,
the increased functional ability can generate high impact, tension and/or deformation loads on the orthosis.
These patients are mainly athletes and children.
12.8.3
Turn on e-Motion
If the patient already has a harmonious gait pattern or has improved it through a gait re-education, you can turn
off the integrated pressure sensor and turn on the e-Motion. With this sensor technology, the orthosis reacts to
movements and changes in position and no longer to pressure. To turn off the pressure sensor, proceed as follows:
1. Search the setting menu
Turn on e-Motion by browsing with the
Left and right arrow buttons.
2. When you have found the setting menu, confirm your selection by pressing the
Set button.
58
3. You can see the message COMPLETED on the display (fig. 33). The
pressure sensor has been successfully turned off and the orthosis is
switched to the e-Motion.
12.8.4
COMPLETED
TURN ON E-MOTION
Tone Selection
Please read paragraph 12.7.3 for the tone selection.
12.8.5
Volume
Please read paragraph 12.7.4 for the volume selection.
12.8.6
Fig. 33
Signal Selection
Please read paragraph 12.7.5 for the signal selection.
12.8.7
Select other Leg
This additional setting menu makes it quick to switch between the left and right leg when you have connected
two controllers and want to adjust the pressure sensor‘s sensitivity or the patient‘s activity.
Switch the leg as described in paragraph 12.7.6.
12.9
Battery Quality
ATTENTION!
Useful life of the orthosis has shortened!
¨¨Failure of the joint function.
Insert fully charged batteries and carry out the battery quality test. In case of
persistent failure, contact our technical support.
You can check the quality of the rechargeable batteries in the controller with the multi-purpose device. The
battery quality test cannot be carried out with two solenoids at the same time. If you have connected two
NEURO TRONIC system knee joints to the controller, you have to disconnect one solenoid to carry out the test.
Note:
With new rechargeable batteries, the test can last up to five hours. Select an appropriate time for it. Rechargeable batteries have to be fully charged for the test.
To carry out the test, proceed as follows:
1.
2.
3.
4.
5.
6.
The patient is not allowed to wear the orthosis during the test.
Insert fully charged batteries into the battery compartment of the controller.
To go to the main menu, press the
Set button for three seconds.
Search the menu item
Battery quality by browsing with the
Left and right arrow buttons.
When you have found the menu item, confirm your selection by pressing the
Set button.
Now you can see the message THIS WILL TEST CAPACITY OF YOUR BATTERIES. THE TEST CAN TAKE UP TO
5 HOURS on the display.
7. To start the test, select CONTINUE by pressing the
Set button. The following messages can be displayed:
59
Message
(Display)
Meaning
Further action
ERROR: PLEASE PUT IN FULLY
CHARGED BATTERIES
TRY AGAIN
CANCEL
BATTERY TEST IMPOSSIBLE WITH
TWO SOLENOIDS. PLEASE
DISCONNECT ONE SOLENOID
TRY AGAIN CANCEL
Batteries in the controller are
not fully charged.
Please insert fully charged batteries
in the controller and select TRY
AGAIN with the
Set button.
You have mounted two NEURO
TRONIC system knee joints to
the orthosis.
Please disconnect one solenoid.
Battery quality is being tested.
Wait for 2 hours and look again at
the display.
TESTING BATTERIES..
CANCEL
8. The following messages can be displayed during or after the test:
Message
(Display)
Meaning
Further action
Test has been interrupted e.g.
because the batteries have
become loose from the holder or
the battery quality is too bad to
continue the test.
Exchange the rechargeable
batteries for new ones und make
sure that the controller/orthosis is
stored so that the batteries cannot
become loose from the holder.
Repeat the test.
BATTERY TEST INTERRUPTED
BACK
60
Message
(Display)
Meaning
Further action
TEST FINISHED. THE BATTERIES
ARE DEFECT, PLEASE CHANGE
BACK
Test is finished after 2 hours
maximum. The quality of the
rechargeable batteries is bad.
Exchange the rechargeable
batteries for new ones.
Test lasts more than 2 hours.
The battery quality is sufficient.
You can cancel the test and use the
rechargeable batteries or wait until
the test is finished.
Test is finished after 5 hours.
The quality of the rechargeable
batteries is good.
The test has shortened the useful
life of rechargeable batteries.
Charge the batteries completely
before using them again.
TESTING BATTERIES...
BATTERY QUALITY IS SUFFICIENT
CANCEL
TEST FINISHED.
BATTERY QUALITY IS SUFFICIENT
BACK
9. If you want to cancel the test, press the
12.10
Set button. There is the word CANCEL displayed at this point.
Step Counter
The controller counts the patient‘s steps with the orthosis. You can check the number of steps of the leg with
orthosis with the multi-purpose device. For the total number of steps double the indicated value. Proceed as follows:
1. To go to the main menu, press the
Set button for three seconds.
2. Search the menu item
Step counter by browsing with the
Left and right arrow buttons.
3. When you find the menu item, confirm your selection by pressing
the
Set button.
STEPS WALKED: X
4. You can see the message STEPS WALKED on the display (fig. 34).
BACK
5. Exit the menu by pressing the
Set button. There is the word
BACK displayed at this point.
Fig. 34
61
12.11
Device Info
The menu item
Device info informs you about the version of the multi-purpose device and of the controller.
To display this information, proceed as follows:
1. To go to the main menu, press the
Set button for three seconds.
2. Search the menu item
Device info by browsing with the
Left and right arrow buttons.
3. When you have found the menu item, confirm your selection by
pressing the
Set button.
4. There are e.g. the words MULTI-PURPOSE DEVICE: V3.14 and CONTROLLER:
V2.18-XXXX on the display (fig. 35).
5. Exit the menu item by pressing the
Set button. There is the
word BACK displayed at this point.
MULTI-PURPOSE DEVICE: V3.14
CONTROLLER: V2.18-XXXX
BACK
Fig. 35
13.Indication of Battery Status in Multi-purpose Device
There is a battery status indicator in the upper right corner of the multi-purpose device. It shows the status of
the rechargeable batteries of the controller.
View
Meaning
Rechargeable batteries full
AUTO
FREE
LOCK
Rechargeable batteries half full
Rechargeable batteries almost
empty
14.Replacing the Batteries of the Multi-purpose Device
ATTENTION!
Batteries of the multi-purpose device were not replaced correctly!
¨¨Failure of function.
Replace the batteries of the multi-purpose device properly and as described in
this manual.
ATTENTION!
When replacing the batteries of the multi-purpose device, an incorrect battery type is
used!
¨¨Failure of function.
Use the battery type specified in this manual for the multi-purpose device.
The multi-purpose device has two batteries of the type CR2450. You can replace the batteries by yourself when
they are empty. To do so, proceed as follows:
62
1. Carefully remove the four grey cover caps on the back of the multi-purpose device. There are four screws
underneath.
2. Unscrew the four screws with a PH1 screwdriver.
3. Take off the cover of the multi-purpose device.
4. Remove the two batteries.
5. Insert two new batteries of the type CR2450 with the positive pole facing up.
6. Put on the cover again, turn in the screws and place the grey cover caps above them.
Note:
If you want to save battery power, you can connect the multi-purpose device via USB cable to a PC or to a
mobile phone charger. The multi-purpose device uses no battery power while it is connected. We recommend
to connect the multi-purpose device while doing an update in order to increase the batteries‘ lifespan.
15.Updating the NEURO TRONIC Multi-purpose Device
The multi-purpose device can be updated with the included USB cable at www.fior-gentz.com/updates (for
controller updates see paragraph 12.3). Proceed as follows:
1. Download the update and open the file.
2. Connect the multi-purpose device to the computer with the USB cable.
3. Turn on the multi-purpose device.
4. You must not turn off the multi-purpose device during the updating procedure.
5. If an update is available, you can see the message „Connected with version XXX. The device can be updated
to version XXX.“. Click on „Start Update“. When the updating process was successful, you can see the message „The device was successfully updated to version XXX“.
Enter each update with the version number on the back page of this manual.
16.Advices for an Optimal Functioning of the Orthosis
16.1 Walking with Orthosis in Auto Mode with e-Motion
ATTENTION!
Orthosis remains locked when starting to walk!
¨¨Danger of falling.
Point out to the patient to make the first step with the leg with orthosis,
especially in Auto mode when e-Motion is turned on.
For safety reasons, the NEURO TRONIC system knee joint remains locked at the first step. When the patient
starts to walk from a standing position, he should make the first step with the leg with orthosis. The electronics
need a stride to switch from standing mode to walking mode in order to avoid disturbed gait or stumbling when
starting to walk.
16.2 Remote Control
Problem
LEDs do not blink after pressing a button
Device does not always react when pressing a
button
Further action
Contact technical support.
63
16.3 Multi-purpose Device
Problem
Further action
Display is blank
Device does not always react when pressing a
button
Contact technical support.
16.4 Controller
Problem
Further action
LEDs do not blink after inserting the
rechargeable batteries
No devices found during
controller
Pairing the
Check the polarity and quality of the rechargeable
batteries.
If the problem remains, contact the technical support.
Connect the multi-purpose device with the controller
within 30 seconds. Check the polarity and quality of the
rechargeable batteries.
If the problem remains, contact the technical support.
16.5 System Knee Joint
Problem
Joint does not lock
Problem
Joint does not lock
64
Cause
The patient touches the floor first with
his toes and not with his heel because
the foot lifting is not strong enough to
keep the foot in 90° position.
Cause
Solution
Enhance foot lifting.
Solution
The patient touches the floor first with
his toes and not with his heel because
of a broad bending forward of the upper
part of the body which compensates the Gait re-education! Ask the patient to
flexed position of the knee. Typical gait
walk as upright as possible.
characteristics in patients who depend
on orthopaedic appliances such as
crutches, walking frames or parallel bars.
Problem
Cause
The patient touches the floor first with
his toes and not with his heel because
of an insufficient integrated leg length
compensation. Therefore, no load can be
applied to the pressure sensor.
The patient applies not enough or no
pressure to the sensor because he depends
on orthopaedic appliances such as
crutches, walking frames or parallel bars.
Joint does not lock with
turned on p-Motion
Pressure sensor is not entirely or not at
all loaded after heel strike.
Joint does not lock with
turned on p-Motion after
heel strike
Joint does not lock with
turned on p-Motion after
heel strike
Pressure sensor placed in the foot piece:
The pressure sensor is not loaded after
heel strike because the heel rests at the
edge of the foot piece and, therefore, no
pressure is applied to the sensor.
Pressure sensor placed in the foot piece:
The pressure sensor is not loaded directly
after heel strike because the heel does
not entirely rest in the foot piece due to
a too tight fitted distal, dorsal leg band.
Pressure sensor placed under the foot
piece: The pressure sensor is not loaded
directly after heel strike because the
patient has changed his shoes and is now
wearing one whose insole form does not
fit with the underside of the foot piece.
The pressure sensor is thus placed in a
space.
Solution
Correct the integrated leg length
compensation.
Gait re-education! The patient needs
to get greater safety until he dares
to put his own body weight on the
affected leg.
Place the pressure sensor in such
a way that it is entirely loaded. A
partial sensor load causes failure. A
pressure sensor that is placed in a
space between foot and foot piece
or between foot piece and shoe can
only lead to partial loads.
Change the foot piece in such a way
that the heel fits well and loads the
sensor already at low pressure.
Change the leg band in such a way
that the heel touches the entire foot
piece and loads the sensor already at
low pressure.
Let the patient wear a shoe to which
the orthosis is adjusted or adapt the
shoe of his choice in such a way
that the pressure sensor is placed
correctly and loaded directly after
heel strike.
Change the foot piece in such a way
that the underside fits in the shoe in
Pressure sensor placed under the foot
the best way. Ideally, the underside
piece:
of the foot piece should directly
The pressure sensor is not loaded directly have contact with the shoe‘s insole.
after heel strike because the heel rests
Spaces between foot piece and
at the edge of the insole or the upper.
insole have to be compensated in
So the heel loads the sensor only after
such a way that the foot piece loads
compression of these areas.
the sensor already at low pressure. If
this is not possible, take a shoe with
more inside volume.
65
Problem
Cause
Extension stop damper is too long. You
can see ventrally viewed a clearly visible
opening between upper and lower part
of the system knee joint directly before
heel strike.
The patient gets into extension with a
Joint locks unintentionally strong momentum. If the leg comes into
in slightly flexed position full extension before the heel touches
the floor, the lower leg bounces off the
extension stop into a slightly flexed
position. You can see ventrally viewed
a clearly visible opening between upper
and lower part of the system knee joint
directly before heel strike.
Leg was put into cast too extended.
Therefore, the patient cannot apply the
necessary extension moment to the
orthosis to unlock the joint. You can see
ventrally viewed a clearly visible opening
between upper and lower part of the
system knee joint directly at heel off.
Joint does not unlock
Proximal, dorsal upper thigh band
transmits flexion load when putting the
leg backwards.
Extension stop damper is too long.
Therefore, the extension stop damper is
compressed so high that the necessary
extension moment to unlock the joint is
greater than the patient can apply.
Joint does not unlock
Joint does not unlock
with turned on p-Motion
66
Solution
Cut the extension stop damper.
Gait re-education! Teach the patient
a harmonious and natural swing
phase. As in natural gait, the heel
should touch the floor directly in
terminal swing phase.
To increase the flexion, mount the
5° joint‘s upper part to the NEURO
TRONIC system knee joint as well
as the 5° extension stop to the
medial support and check the basic
alignment.
Remove material from the upper
thigh band.
Cut the extension stop damper.
KAFO with ankle joint:
Adjust the dorsal stop at the system
ankle joint in such a way that the
forefoot lever can apply a knee
extension moment.
The patient does not reach the dorsal
stop due to short steps during heel off.
KAFO without ankle joint:
Therefore, he cannot apply a knee
The necessary forefoot lever can
extension moment to unlock the joint.
be applied through the foot piece
and/or shoe modifications or
adjustments. Produce the foot piece
stiffly enough and shift the rolling
off line further forward, if necessary.
Insert a carbon fibre sole into the
Forefoot lever of the foot piece does not shoe to strengthen the forefoot lever
achieve its effect on the knee extension. and shift the rolling off line further
forward, if necessary.
Pressure sensor is not freed of load - the Check the placement of the pressure
sensor is probably placed too far in front. sensor.
Walking speed lower as expected, activity
Decrease activity level.
level adjusted too high.
Problem
Joint does not unlock
with turned on e-Motion
Cause
The patient is treated bilaterally i.e. he
is wearing an orthosis on his left and his
right leg with a NEURO TRONIC system
knee joint.
The patient has a non-harmonious gait
pattern i.e. he makes one step and then
stops so that no repeating pattern can
develop.
The patient‘s step length is too short.
The motion sensors integrated in the
controller do not detect any movement.
Joint unlocks too late
Joint unlocks too late
with turned on p-Motion
Joint unlocks too early
with turned on p-Motion
The patient does not reach the dorsal
stop due to short steps during heel off.
Therefore, he cannot apply a knee
extension moment to unlock the joint.
Sensor sensitivity is set too low.
Pressure sensor placed in the foot piece:
The pressure sensor is not loaded after
heel strike because the heel rests at
the edge of the foot piece. Only when
loading the leg, the heel is pressed into
the foot piece and applies pressure to
the sensor.
Sensor sensitivity is set too high.
In stance phase at low body weight relief,
activity level is adjusted too low.
Rechargeable batteries are empty.
Rechargeable batteries are defect.
Joint switches
unintentionally into Lock
mode
Short circuit in cable.
Strong shocks when orthosis is in Free or
Auto mode.
Joint does a ratching
noise during swing phase
Washer for the plunger of the solenoid is
not assembled.
Solution
e-Motion is not suitable for patients
who are treated bilaterally. Switch
the orthosis to p-Motion.
Switch the orthosis at first to
p-Motion. Gait re-education! The
patient needs to feel more secure.
After a few days, you can switch to
the e-Motion.
Switch the orthosis at first to
p-Motion. Gait re-education! Teach
the patient a harmonious and natural
swing phase. After a few days, you
can switch to the e-Motion.
KAFO with ankle joint:
Adjust the dorsal stop at the system
ankle joint in such a way that the
forefoot lever can apply a knee
extension moment.
KAFO without ankle joint:
The necessary forefoot lever can be
applied through the foot piece and/or
shoe modifications or adjustments.
Produce the forefoot piece stiffly
enough and shift the rolling off line
further forward, if necessary.
Increase sensor sensitivity.
Change the foot piece in such a way
that the heel fits well and loads the
sensor already at low pressure.
Decrease sensor sensitivity.
Increase activity level.
Insert a new battery set and charge
empty batteries.
Insert a new battery set and dispose
defect batteries according to
regulations.
Carry out the
Cable connection
test and change cables if necessary.
Due to shocks, the magnetic field is
interrupted and the orthosis locks
automatically. Switch to other mode
and then back to the desired.
Assemble the washer. If the problem
remains, contact the technical
support.
67
17.Software-Versionen/Software Versions
Von der Firma FIOR & GENTZ auszufüllen/To be filled out by the company FIOR & GENTZ
Ausgelieferte Version:
Datum/Unterschrift:
Delivered version:
Multifunktionsgerät
Multi-purpose device
Date/Signature:
Steuereinheit
Controller
Vom Orthopädietechniker auszufüllen/To be filled out by the orthopaedic technician
Aktualisiert auf Version:
Updated to version:
Multifunktionsgerät
Multi-purpose device
Durch Mitarbeiter:
Orthopaedic technician:
Datum/Unterschrift:
Date/Signature:
Steuereinheit
Controller
Der Qualitätsstandard der Firma FIOR & GENTZ ist durch eine unabhängige Zertifizierungsgesellschaft nach
den internationalen Normen ISO 9001 und ISO 13485 geprüft und bescheinigt worden.
FIOR & GENTZ Gesellschaft für Entwicklung und Vertrieb von orthopädietechnischen Systemen mbH
Dorette-von-Stern-Straße 5 · D-21337 Lüneburg · +49 4131 24445-0 · +49 4131 24445-57
www.fior-gentz.de · [email protected]
PB3800-SK/T-02/2015
The quality standard of the FIOR & GENTZ company has been controlled and certified by an independent certification
organisation according to the international standards ISO 9001 and ISO 13485.