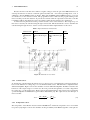
1
Code EE3L11 Group K1 A Robotic Arm for Zebro Delft University of Technology Bachelor Thesis Authors: Moritz Fieback 4163850 Ralph van Schelven 4162188 Martijn Seuters 4004892 2 Abstract This thesis describes the choices, the implementation and the testing of the robotic arm for the Zebro. The Zebro is a rover designed for the European Rover Challenge (ERC). The design of the arm should be modular and be able to perform the tasks of the ERC. An arm was designed with five degrees of freedom. The motors chosen to drive the joints are of the brushless DC type. The control system to control the joints is implemented using a fuzzy P controller and the driver electronics are built on a PCB. The internal communication in the arm is done using the I2 C protocol. Two master devices were defined in the base and in the end effector, the individual joints and temperature sensors are connected as slaves. The method of reduction of degrees of freedom is chosen as a way to solve the inverse kinematics problem. The constraints in order to implement trajectory planning is based on the stability of the Zebro during operation. A test plan is written and most tests are performed. It is found that the PCB did not function properly due to design errors. The motor control does function as expected. CONTENTS 3 Contents 1 Introduction 2 Design Choices 2.1 Arm design . . . . . . . 2.1.1 Requirements . . 2.1.2 Options . . . . . 2.1.3 Considerations . 2.1.4 Conclusion . . . 2.2 Motor choice . . . . . . 2.2.1 Requirements . . 2.2.2 Options . . . . . 2.2.3 Considerations . 2.2.4 Conclusion . . . 2.3 Joint controller choice . . 2.3.1 Requirements . . 2.3.2 Options . . . . . 2.3.3 Considerations . 2.3.4 Conclusion . . . 2.4 Communication choices . 2.4.1 Requirements . . 2.4.2 Options . . . . . 2.4.3 Considerations . 2.4.4 Conclusion . . . 2.5 Trajectory planning . . . 2.5.1 Requirements . . 2.5.2 Options . . . . . 2.5.3 Considerations . 2.5.4 Conclusion . . . 3 5 . . . . . . . . . . . . . . . . . . . . . . . . . . . . . . . . . . . . . . . . . . . . . . . . . . . . . . . . . . . . . . . . . . . . . . . . . . . . . . . . . . . . . . . . . . . . . . . . . . . . . . . . . . . . . . . . . . . . . . . . . . . . . . . . . . . . . . . . . . . . . . . . . . . . . . . . . . . . . . . . . . . . . . . . . . . . . . . . . . . . . . . . . . . . . . . . . . . . . . . . . . . . . . . . . . . . . . . . . . . . . . . . . . . . . . . . . . . . . . . . . . . . . . . . . . . . . . . . . . . . . . . . . . . . . . . . . . . . . . . . . . . . . . . . . . . . . . . . . . . . . . . . . . . . . . . . . . . . . . . . . . . . . . . . . . . . . . . . . . . . . . . . . . . . . . . . . . . . . . . . . . . . . . . . . . . . . . . . . . . . . . . . . . . . . . . . . . . . . . . . . . . . . . . . . . . . . . . . . . . . . . . . . . . . . . . . . . . . . . . . . . . . . . . . . . . . . . . . . . . . . . . . . . . . . . . . . . . . . . . . . . . . . . . . . . . . . . . . . . . . . . . . . . . . . . . . . . . . . . . . . . . . . . . . . . . . . . . . . . . . . . . . . . . . . . . . . . . . . . . . . . . . . . . . . . . . . . . . . . . . . . . . . . . . . . . . . . . . . . . . . . . . . . . . . . . . . . . . . . . . . . . . . . . . . . . . . . . . . . . . . . . . . . . . . . . . . . . . . . . . . . . . . . . . . . . . . . . . . . . . . . . . . . . . . . . . . . . . . . . . . . . . . . . . . . . . . . . . . . . . . . . . . . . . . . . . . . . . . . . . . . . . . . . . . . 6 6 6 6 7 8 9 9 9 10 10 11 11 11 12 12 13 13 13 14 14 16 16 16 17 17 Implementation 3.1 Joint control software . . . . . . . . . . 3.1.1 State machine . . . . . . . . . . 3.1.2 Fuzzy P controller . . . . . . . 3.2 Kinematics . . . . . . . . . . . . . . . 3.2.1 Definitions . . . . . . . . . . . 3.2.2 Theory . . . . . . . . . . . . . 3.3 Trajectory planning . . . . . . . . . . . 3.3.1 Reduction of degrees of freedom 3.3.2 Stability optimization algorithm 3.4 Circuit and Printed Circuit Board design 3.4.1 Buck converter . . . . . . . . . 3.4.2 I2 C buffer . . . . . . . . . . . . 3.4.3 Microcontroller . . . . . . . . . 3.4.4 Motor driver . . . . . . . . . . 3.4.5 Current sensor . . . . . . . . . 3.4.6 Temperature sensor . . . . . . . 3.4.7 PCB . . . . . . . . . . . . . . . 3.5 Communication . . . . . . . . . . . . . 3.5.1 Slaves . . . . . . . . . . . . . . 3.5.2 Masters . . . . . . . . . . . . . . . . . . . . . . . . . . . . . . . . . . . . . . . . . . . . . . . . . . . . . . . . . . . . . . . . . . . . . . . . . . . . . . . . . . . . . . . . . . . . . . . . . . . . . . . . . . . . . . . . . . . . . . . . . . . . . . . . . . . . . . . . . . . . . . . . . . . . . . . . . . . . . . . . . . . . . . . . . . . . . . . . . . . . . . . . . . . . . . . . . . . . . . . . . . . . . . . . . . . . . . . . . . . . . . . . . . . . . . . . . . . . . . . . . . . . . . . . . . . . . . . . . . . . . . . . . . . . . . . . . . . . . . . . . . . . . . . . . . . . . . . . . . . . . . . . . . . . . . . . . . . . . . . . . . . . . . . . . . . . . . . . . . . . . . . . . . . . . . . . . . . . . . . . . . . . . . . . . . . . . . . . . . . . . . . . . . . . . . . . . . . . . . . . . . . . . . . . . . . . . . . . . . . . . . . . . . . . . . . . . . . . . . . . . . . . . . . . . . . . . . . . . . . . . . . . . . . . . . . . . . . . . . . . . . . . . . . . . . . . . . . . . . . . . . . . . . . . . . . . . . . . . . . . . . . . . . . . . . . . . . . . . . . . . . . . . . . . . . . . . . . . . . . . . . . . . . . . . . . . . . . . . . . . . . . . . . . . . . . . . 18 18 18 19 20 20 20 23 23 23 28 28 29 29 30 31 31 32 34 34 34 . . . . . . . . . . . . . . . . . . . . . . . . . . . . . . . . . . . . . . . . . . . . . . . . . . . . . . . . . . . . . . . . . . . . . . . . . . . . . . . . . . . . . . . . . . . . . . . . . . . . . . . . . . . . . . . . . . . . . . . . . . . . . . . . . . . . . . . . . . . . . . . . . . . . . . . . . . . . . . . . . . . . . . . . . . . . . . . CONTENTS 4 5 4 Test plan 4.1 Printed Circuit Board . . . . 4.1.1 Buck converter . . . 4.1.2 I2 C buffer . . . . . . 4.1.3 Microcontroller . . . 4.1.4 Current measurement 4.1.5 Temperature sensor . 4.2 Software . . . . . . . . . . . 4.2.1 Motor controller . . 4.2.2 Communication . . . . . . . . . . . . . . . . . . . . . . . . . . . . . . . . . . . . . . . . . . . . . . . . . . . . . . . . . . . . . . . . . . . . . . . . . . . . . . . . . . . . . . . . . . . . . . . . . . . . . . . . . . . . . . . . . . . . . . . . . . . . . . . . . . . . . . . . . . . . . . . . . . . . . . . . . . . . . . . . . . . . . . . . . . . . . . . . . . . . . . . . . . . . . . . . . . . . . . . . . . . . . . . . . . . . . . . . . . . . . . . . . . . . . . . . . . . . . . . . . . . . . . . . . . . . . . . . . . . . . . . . . . . . . . . . . . . . . . . . . . . . . . . . . . . . . . . . . . . . . . . . . . . . . . . . . . . . . . 35 35 35 35 35 36 36 36 37 37 Results 5.1 Printed circuit board . . . . 5.1.1 Buckconverter . . . 5.1.2 I2 C buffer . . . . . . 5.1.3 Microcontroller . . . 5.1.4 Current measurement 5.1.5 Temperature sensor . 5.2 Software . . . . . . . . . . . 5.2.1 Motor controller . . 5.2.2 Communication . . . . . . . . . . . . . . . . . . . . . . . . . . . . . . . . . . . . . . . . . . . . . . . . . . . . . . . . . . . . . . . . . . . . . . . . . . . . . . . . . . . . . . . . . . . . . . . . . . . . . . . . . . . . . . . . . . . . . . . . . . . . . . . . . . . . . . . . . . . . . . . . . . . . . . . . . . . . . . . . . . . . . . . . . . . . . . . . . . . . . . . . . . . . . . . . . . . . . . . . . . . . . . . . . . . . . . . . . . . . . . . . . . . . . . . . . . . . . . . . . . . . . . . . . . . . . . . . . . . . . . . . . . . . . . . . . . . . . . . . . . . . . . . . . . . . . . . . . . . . . . . . . . . . . . . . . . . . . . 38 38 38 39 39 40 40 40 40 40 6 Conclusion 7 Discussion 7.1 Joint controller . . . . . . . . . 7.2 Communication . . . . . . . . . 7.3 Trajectory planning . . . . . . . 7.4 Base controller . . . . . . . . . 7.5 Circuit and printed circuit board 7.5.1 Buck converter . . . . . 7.5.2 Microcontroller . . . . . 7.5.3 Motor driver . . . . . . 7.5.4 Current sensor . . . . . 7.5.5 Printed circuit board . . 41 . . . . . . . . . . . . . . . . . . . . . . . . . . . . . . . . . . . . . . . . . . . . . . . . . . . . . . . . . . . . . . . . . . . . . . . . . . . . . . . . . . . . . . . . . . . . . . . . . . . . . . . . . . . . . . . . . . . . . . . . . . . . . . . . . . . . . . . . . . . . . . . . . . . . . . . . . . . . . . . . . . . . . . . . . . . . . . . . . . . . . . . . . . . . . . . . . . . . . . . . . . . . . . . . . . . . . . . . . . . . . . . . . . . . . . . . . . . . . . . . . . . . . . . . . . . . . . . . . . . . . . . . . . . . . . . . . . . . . . . . . . . . . . . . . . . . . . . . . . . . . . . . . . . . . . . . . . . . . . . . . . . . . . . . . . 42 42 42 42 42 42 42 43 43 43 43 A Ethical view on a possible usage of the arm 44 B Kinematics Matrices 46 C Componentlist 47 D Printed Circuit Board lay-out 48 References 49 1 1 INTRODUCTION 5 Introduction This thesis describes the choices, the implementation and the testing of the robotic arm for the Zebro. The Zebro is a rover designed for the European Rover Challenge, which walks on six C-shaped legs (Zebro stands for the Dutch Zesbenigerobot). The European Rover Challenge is an annual international competition organized by European Space Foundation and Planet PR Agency [1]. From all over the world teams travel to Poland to participate in this competition. The competition consist of four tasks the rovers, built by these teams, have to complete and a presentation task. The tasks are: • Science task • Terrain traversal task • Maintenance task • Assistance task • Presentation task During the science task the rover must obtain three samples from different locations and bring them to the start line. The first sample should be a piece of rock weighing at least 100 g. The team can choose from a collection of rocks which to pick up. The second sample to retrieve is a piece of loose surface soil weighing at least 200 g. The third sample which has to be collected is a piece of deeper soil. This sample should be extracted from a depth of at least 15 cm and has to weigh at least 25 g. Each of the samples has to be stored in separate containers. The terrain traversal task consists of moving the rover from the start to three specific locations. The locations will be given to the team is DMS format. The usage of cameras is not allowed during this task, so the rover has to rely solely on the onboard navigation installed. Between the first and the second location a 2 m wide obstacle is placed, which the rover has to bypass. The terrain traversal task is of no importance for the design of the robotic arm and therefore will not be further discussed. For the maintenance task the aim is to start a mock-up reactor, measure its power parameters and adjust a value using a knob. In order to start the reactor a specific setting of several switches has to be realized. The switches will be placed somewhere between 0.2 and 1.5 m above ground level. The voltage that has to be measured will be less than 30 V and the measurement error must be less than 0.5 V. The error of the adjusted value must be within 1 unit. During the assistance task the rover will pick up a spare part and transport it to a repair site. The spare part will be a solid and irregular body with a stick handle. The handle will be 30 mm in diameter and at least 100 mm long. The mass will not exceed 200 g. The presentation task consist of giving a presentation about the rover to a jury. The presentation task is of no importance for the design of the robotic arm and therefore will not be further discussed. From these tasks the following requirements are written: 1. The arm needs to have sufficient mobility to perform the tasks and be of a modular nature 2. The motors in the arm need to be able to provide enough torque to perform the tasks 3. The joints of the arm need to be controlled individually 4. The desired position of the individual joints needs to be communicated from the base of the robot to the joints 5. The arm needs to have some sort of trajectory planning to be able to move efficiently from point to point The specific requirements for each part of the system as well as the requirements presented by other teams working on the project are presented in detail in every section (chapter 2) describing the choices made based on these requirements. This thesis describes the design choices made to realize the arm with these requirements in chapter 2 as well as the implementation of the these choices in chapter 3. The test plan for the system is described in chapter 4 and the results of these tests can be found in chapter 5. The conclusion of the thesis is described in chapter 6 followed by a discussion of the process and results in chapter 7. Appendix A presents the ethical discussion considering a possible application for the robot arm other than to compete in the ERC: the possibility to assist elderly in nursing homes. 2 DESIGN CHOICES 2 6 Design Choices In this section the design of the robotic arm will be discussed. This is done by following the requirements set for the European Rover Challenge, as mentioned in the introduction. First the structural design choices of the arm are discussed in section 2.1. Then the choices about the motor type used in the arm are described in section 2.2. To control the chosen motor, a controller is needed. These corresponding choices are discussed in section 2.3. The internal arm communication is discussed next. Choices can be found in section 2.4. The last design choice made is can be found in section 2.5 and is about the trajectory planning of the end effector. 2.1 Arm design In this section the motivation behind the design of the arm is discussed. In the first part of this section the requirements for the arm will be discussed, hereafter the design options will be presented. These design options will be discussed in the considerations, and in the last part of this section a conclusion will be given on the design choice. 2.1.1 Requirements The following requirements follow from the task that Zebro needs to accomplish: 1. Reach up to 1.3 m high 2. Reach the specimen containers on the Zebro 3. Stable end effector control 4. Movement to flip a switch 5. Movement to scoop 6. Movement to handle a drill and turn a knob 7. Compact design 8. Modular design One of the tasks specified in the ERC, as can be found in section 1, is that the robot needs to have the capability to flip a switch between 0.2 m and the 1.5 m high. So Reaching up to 1.5 m is required. Since the arm is mounted on top of the Zebro, its starting height is about 0.2 m and so the arm has to have a reaching distance of 1.3 m. The arm needs to reach the holding containers of the Zebro so the specimen collected in the science task of the ERC, can be safely stored. For tasks like measuring the voltage and holding an object it is important the arm does not make sudden movements. Therefore a stable end effector control is needed, since sudden movements can break the end effector or drop objects. To complete all tasks the arm needs to have sufficient degrees of freedom and range to reach all positions. It is important that the arm can fold on top of the Zebro, so when the Zebro is moving across the terrain the arm will not bring the Zebro out of balance. Therefore making the design as compact as possible is desired. Since it is desired to be able to make quick repairs and replace individual parts a modular system is desired. This also makes it possible to control each joint with the same controller electronics. 2.1.2 Options When designing robotic arms, it is possible to create a multitude of robotic manipulators. By adding extra joints, the arm gets more freedom of movement. There are 5 classes of joints, as described in [2], and when they are linked together they make up the arm. A few designs where considered for the arm, the options shown in figure 1 with the suggested parameters in table 1. These options will be discussed in the following order: • Design 1, four degrees of freedom, see figure 1a • Design 2, five degrees of freedom, see figure 1b • Design 3, five degrees of freedom, see figure 1c • Design 4, six degrees of freedom, see figure 1d 2 DESIGN CHOICES 7 Arm design 1 This design, as shown in figure 1a, has four degrees of freedom. To create these degrees of freedom a twisting joint (shoulder joint 1(S1)) combined with a rotational joint (shoulder joint 2(S2)) at the base will make sure the arm can rotate around the robot and move the arm up and down. After the first link another rotational joint (elbow joint(E)) is placed. This joint is placed roughly half way of the total length of the arm, so the two links can fold besides each other on top of the Zebro. The elbow joint also creates extra flexibility in the vertical movement. Hereafter another link follows which is a little shorter than the link before, so combined with the length of the end effector it is about he same length as the first link. This is done so the arm can move to the specimen containers on the Zebro. Somewhere in this link a twisting joint is created to rotate the hand indefinitely, in order to rotate the hand for tasks, like drilling and turning a knob. In this design the links have a length of 0.7 m and 0.6 m, combined with height of the Zebro a total height of 1.5 m can be reached. Although it can reach all around the Zebro, there are still some regions that cannot be reached (deadzones). For example places close around the Zebro or near the base of the arm on top of the Zebro. Also the end effector cannot be placed horizontally for all end effector positions. Arm design 2 Arm design 2, as shown in figure 1b, consists of the same types of joints and amount of links as the first design. An extra linear joint (telescopic joint (T)) is placed between S2 and E. This is done for two reasons, one to increase the flexibility of the arm, because the arm gets an extra degree of freedom. The other reason is to make the arm more compact. This has the result that the torque needed to move the arm, can be reduced when the linear joint is pulled in. Another result is, that when the arm needs to be folded on the Zebro it is more compact. The arm can still reach the desired height, but this is only necessary for certain tasks. However an extra motor is needed to create this movement and it will increase the weight of the arm. By placing the motor in the first link and not in the second, the weight of this extra motor stays near the base and will not increase the torque for the motor in joint E. Only the motor in shoulder joint 2 needs to deliver more torque. Arm design 3 The third arm design is shown in figure 1c. In this design the number of degrees of freedom is also increased to five, however this is done by adding an extra rotational joint to create more flexibility. This extra joint is the wrist joint (W), which reduces the effective deadzone of the arm. The wrist joint also creates the possibility to keep the end effector in a certain angle while moving the rest of the arm. However, as with design 2, an extra motor is needed to create this movement and thus increasing the mass of the arm. Arm design 4 The last arm design, as shown in figure 1d, is a combination of the second and third arm design. In this design the linear and extra rotational joint are both used in the design. This gives the advantages of both other arm designs, like the compactness and extra flexibility and decreases the deadzone. Since two extra joints are used in this design the weight of both extra joints needs to be taken into account, as it will increase both the required torque and power needed by the arm. Table 1: Arm design parameters Unit Degrees of freedom Shoulder joint 1 Shoulder joint 2 Telescopic joint Elbow joint Wrist joint Rotation joint Link 1 Link 2 Link 3 2.1.3 degrees degrees m degrees degrees degrees m m m Design 1 4 ∞ 180 360 ∞ 0.7 0.6 - Design 2 5 ∞ 180 0.4 360 ∞ 0.6-1.0 0.3 - Design 3 5 ∞ 180 360 360 ∞ 0.6 0.5 0.2 Design 4 6 ∞ 180 0.3 360 360 ∞ 0.6-0.9 0.3 0.1 Considerations Looking at all the options for the robotic arm design the simplest is the first design with the complexity increasing with every joint added to the system. Also more powerful motors are needed to create the right amount of torque to move the arm with increasing mass. However it is more important that the arm creates the 2 DESIGN CHOICES 8 (a) Robotic manipulator design 1 (b) Robotic manipulator design 2 (c) Robotic manipulator design 3 (d) Robotic manipulator design 4 Figure 1: The four different arm design options right movements than minimizing the power consumption. Because the arm will not consume any power while the Zebro is moving, it is justified to use more motors for more flexibility. Reaching the required height is not a problem for any of the designs. Since the Zebro will be laying on the ground when the arm is in use, the chassis will be stable for most of the operations. Therefore the centre of mass is only an issue in certain cases, for example when the Zebro needs to pick something up from more than a meter away. This can also be solved with trajectory planning (section 2.5) and placing the Zebro in the right location. Since the arm of design 1 cannot reach the containers properly, it was decided that at least one extra degree of freedom was required. The solution to this problem is to use a wrist joint as the extra wrist joint allows for better positioning of the end effector. Since the compactness of the arm is a requirement, the telescopic joint should be used. 2.1.4 Conclusion The fourth design (figure 1d) of the arm was chosen as the primary design. By creating a modular arm (requirement 8) the possibility to add or remove joints will be an option in later iterations of the design. Using the three rotational joints and two twisting joints all movements and the reaching of the containers can be achieved as described in requirements 2, 3, 4, 5 and 6. While the shoulder joint and elbow joint also contribute to the compactness of the arm, when it needs to fold on the Zebro, adding an extra linear joint in the link closest to the base this compactness is increased, adding to requirement 7. However these decisions do not affect the ability to reach the appropriate height needed to perform the tasks, as described in section 1, therefore the arm meets requirement 1. During the further development of the project the telescopic joint had to be removed. It proved difficult to implement on a mechanical point of view, so the project leader decided to get rid of the telescopic joint. Thanks to the modularity of the design, it was possible to remove the telescopic part from the arm. 2 DESIGN CHOICES 2.2 9 Motor choice In this chapter the motor type choice will be discussed. First the requirements will be discussed and several options for motor type will be explained. Hereafter the options will be considered compared to each other and the choice will be made in the conclusion. 2.2.1 Requirements For the motor there are several requirements. Some come from the robotic arm design (e.g. torque specifications) and others from the Zebro project (e.g. the power consumption), these requirements are: 9. One motor needs to move a joint 10. A motor needs to deliver the right amount of torque to move a joint 11. The motor should have a suited torque to weight ratio 12. The power consumption should be kept as low as possible 13. One type of motor should be chosen, to keep the system modular The motors have the task to move every individual joint. This means every motor has to deliver a torque great enough to lift the part of the arm after the joint. If a lightweight motor is chosen, this will reduce the torque needed by every joint, because the joints beyond it are lighter. The motors are powered by the general battery on Zebro. It is therefore important to keep the power consumption low. Since the joints have to be modular and kept simple, one type of motor should be used in every joint. This makes it possible to use the same controller for every motor. Because a rotational movement is created, the motor should have the ability to rotate in two directions with ease. 2.2.2 Options There is quite a list of electric motors, but the brushed DC motor, brushless DC motor and stepper motor are used most commonly in robotic designs [3] (chapter 5) [4]. Another type of motor that is not used as much, but can be considered is the induction motor (asynchronous AC motor) [5]. The following motor types will be discussed: • Brushed DC motors • Brushless DC motors • Stepper motors • Induction motors Brushed DC motors The brushed DC motors are internally commutated electrical motors that are powered by direct current. The stator consists of a fixed electromagnet or a permanent magnet and the rotor consists of an armature with a set of windings. There are brushes that make mechanical contact with electrical contacts on the rotor. These contacts are connected to the windings, so an electrical circuit is formed with a winding. Most of the limitations on the Brushed DC motor come from these brushes, like loss of contact between the brushes and commutator. This can create sparks and electrical noise. The brushes also tend to wear of over time. Torque and speed control can be implemented with ease, but a controller is needed to do this, as well as for holding the motor in a certain position. The speed is limited, because torque decreases linearly with increasing speed [6] (chapters 2, 3, 4). Brushless DC motor With the brushless DC motor, a type of synchronous motor, the internally brushed switching system is replaced by an external controller element. This means, that the coils can be placed inside the stator around the rotor, which consists of permanent magnets. This improves the heat transport to the outside of the motor. To know the position of the rotors, feedback is needed. Commonly Hall effect sensors are used to measure the position or the back-EMF is measured. The external controller needs to calculate the position of the rotor and power every coil at the right time, to make the rotor rotate correctly. Because brushless DC motors don’t use brushes, there is less friction and a smaller voltage drop compared to brushed 2 DESIGN CHOICES 10 DC motors. This results in a better efficiency in comparison to the brushed DC motor. The torque generated by the motor is constant for operating speeds and the rotation speed range is large, but if the speed increases above the rated speed of the motor, the torque will decrease [6] (chapter 10) [7] [8]. Stepper motor The stepper motor is a synchronous motor, which takes discrete steps. This means, that one rotation of the motor is divided in a certain even amount of steps. Though a brushless DC motor does the same, a stepper motor takes smaller steps in its rotation, for more precise control. The stepper motor is also designed to create a greater holding torque than a brushless DC motor. To create this holding torque, more windings are used per coil. This results in a larger back-EMF, which reduces the maximum speed the stepper motor can reach. If the load on the motor is too large in comparison to the switching speed of the current, a step of the motor can be skipped and all steps of that cycle are lost. This can also occur when the driver for the motor or the motor itself is faulty. To prevent this a feedback controller is needed [6] (chapter 9) [9]. Induction motor The induction motor is a motor that operates on an AC current, often called asynchronous motor or AC motor. It rotates due to the slip generated by the difference in phase of the rotor and the phase of the stator field. This means, that the motor lags the frequency of the current oscillation. Since AC motors do not have brushes they are robust and can be used in most environments. However the starting torque is low as a result of a non-linearity between the torque and speed. When the motor starts, it draws a large current which results in a voltage drop on the supply line. When light loads are applied to the joint, the power factor decreases significantly, which reduces the efficiency of the motor. This is a result of the fact that both the stator and the rotor consist of coils. Since the induction motor rotates at the same speed at which the current is oscillating a controller is needed to change this speed [6] (chapters 5, 6). 2.2.3 Considerations While looking at the motors it became clear that for motors small enough to use in a robotic arm, the torque delivered was not high enough to rotate the joint using a direct drive. A gearing system is needed, to increase the torque. For the bottom joint it was required by the mechanical team that a torque of 4 N m to 6 N m was needed. The precise value is yet to be determined when the complete arm is designed. For brushed DC motors this resulted in larger, heavier and more power consuming motors, than AC motors, brushless DC motors and steppermotors. Since the arm has to be kept lightweight, this is an undesirable development. The AC induction motor uses both windings in the stator and rotor resulting in lower output power than a DC motor because of the permanent magnets in the latter. 2.2.4 Conclusion Taking everything into account the decision was made to use brushless DC motors. These motors give a wide range of operating speeds while maintaining a steady operating torque, fulfilling requirement 10. The brushless DC motor has a high efficiency, better than a brushed DC, and has a better torque to weight ratio, adding to the requirements 11 and 12. Though a brushed DC motor is easiest to drive, precise position control is easier with a stepper motor or a brushless DC motor. To control the position of a joint precise control is needed. The discrete nature of the stepper motor and the brushless DC motor make these two the better options to drive a robotic arm in comparison to the brushed DC motor and the induction motor. Since a higher rotational speed is desired to rotate the arm in combination with a gearbox the brushless DC motor would be the better choice of these two. The gearbox also increases the precision with a factor equal to the gear ratio which makes the larger amount of steps of the stepper motor unnecessary. Also the extra windings in a steppermotor weigh more in comparison to the brushless DC motor. By choosing the right brushless DC motor for every individual joint requirements 9 and 13 are met. 2 DESIGN CHOICES 2.3 11 Joint controller choice To control the arm and be able to move the joints in the desired positions a controller has to be designed. This section describes the requirements for the controller, several options to meet the requirements and the considerations about each of these options. Finally the choice of the controller is made and described in the conclusion. 2.3.1 Requirements For the controller of the arm the following requirements are found: 14. The desired position must be reached 15. The joints need to hold the desired position within a certain range of error The first requirement is quite straightforward. In order to perform the task described in section 1 the arm needs to be in the right position. The acceptable error in this position will be determined when the entire arm is completed. This way it can be guaranteed that the end effector can perform the tasks. The second requirement means that, when the desired position is reached, the joint must stay in this position without excessive vibrations. The maximum angle of vibration allowed will also be determined based on tests using the complete arm. 2.3.2 Options Two options for implementing the joint level controller are considered: • Conventional PID control • Fuzzy PID control Conventional PID control This type of controller is the most common controller [10]. A PID controller is a controller based on three parts, a proportional part, an integrating part and a derivative part. Using these three parts, a PID controller can accurately manipulate the transfer function of a system, for example a motor, and control it. A PID-controller can be modeled mathematically as equation 1 [11] (chapter 4). Z t u(t) = K p e(t) + Ki 0 e(τ)dτ + Kd d e(t) dt (1) In equation 1 u(t) is the output of the controller, e(t) is the input of the controller and K p , Ki and Kd are the proportional, integrating and derivative parameters respectively. e(t) is the difference between the input of the entire system, for example the angle needed for the joint, r(t) and the output of the system, for example the angle measured by the sensors, y(t). When the parameters are chosen correctly the system will rapidly go to the desired state and with minimal overshoot stay at this value. Fuzzy PID control The main difference between a conventional and a fuzzy PID controller is the nonlinearity of the parameters [12]. Using conditional statements the PID parameters can be changed during the process of control. This can be used for example if the possible loads, that have to be moved by the arm, are very different in mass. In that case the motor has to deliver torques with a large difference. When a fuzzy PID controller is used the torque could first be measured and the controller can switch to the most suited state of control. Because of the data given to the fuzzy PID controller by sensors, no precise model of the process to be controlled is needed [13]. Equation 2 describes a fuzzy PID controller. The only difference between equations 1 and 2 is that the PID parameters are now functions of some variable x. Z t u(t) = K p (x)e(t) + Ki (x) 0 e(τ)dτ + Kd (x) d e(t) dt (2) 2 DESIGN CHOICES 2.3.3 12 Considerations An advantage of a conventional PID-controller compared to a fuzzy PID controller is its simplicity, if the transfer function of the motor is known. The PID parameters K p , Ki and Kd can be found easily using the ultimate gain method, given a model of the motor to be controlled [11] (chapter 4). The main advantage of a fuzzy PID controller over conventional PID controllers is the improved performance due to the switching to the most suited state of control [13] [14]. Also the fuzzy PID controller can be made without exact knowledge of the transfer function of the process, which has to be controlled. 2.3.4 Conclusion Taking into account the considerations described in section 2.3.3 the choice has been made for the fuzzy PID controller. The main reason for this was the time pressure for completing the arm. Both controllers would have been precise enough to meet the requirements 14 and 15 stated in section 2.3.1. However the transfer function of the chosen motor could not have been deduced from the datasheet, so additional measurements would have been necessary to determine the back EMF and from that the EMF constant. Due to time considerations these measurements were not performed. During the testing of the motor it was found that a fuzzy P controller would suffice in driving the motor. Because of the inertia of the arm it is desired to slow the motor down before coming to a complete stand still. Therefore multiple velocities had to be implemented which is simple to do using a fuzzy P controller. 2 DESIGN CHOICES 2.4 13 Communication choices In this chapter the options for the communication in the arm will be discussed. To do this, first the requirements need to be known. Hereafter several options will be described. After this a consideration of these options will be given and then a choice will be made. 2.4.1 Requirements Since a modular system is created for the arm (section 2.1), communication plays an essential role in the system. That is why the following requirements were set for the communication in the arm: 16. keep a modular system 17. keep the amount of wires to a minimum 18. use a multi-master system Several packets of data need to be transferred from the joints to the user interface and back. The joint controllers need to receive a desired angle as input and can return the angle of the joint and the current used by the joint. The end effector needs to perform some operations of his own, to allow the end effector to send data when it wants to, a multi-master system is necessary. It is important to keep wiring to a minimum, because due to the movements of the joint the wires can snap or get entangled. By reducing the amount of wires at least the entanglement can be helped. If the communication is designed with modularity in mind, adding extra components or devices will become easy in the future. 2.4.2 Options To achieve the above requirements, some different types of wired communication will be discussed, like power line communication and different data protocols, like I2 C, SPI, UART. Also the option of using wireless communication was explored, in particular the option to use Bluetooth, since Bluetooth devices are easy accessible. The following options will be discussed: Dataprotocols: • I2 C • SPI • UART Media: • Wired communication – Dedicated wires – Power line communication • Wireless communication – Bluetooth I2 C I2 C is a robust communication system, as described in [15]. This system requires only 2 bus lines to transmit and receive data, while many different devices can be connected to the bus. To connect all these devices an addressing system is created, which is mostly a software defined implementation. Most of the time the I2 C interface is already implemented on microcontrollers. However if the amount of devices on a bus is too high or the cable length is too large, the system can exceed the bus capacitance. There are a few solutions to solve this, these are described in [15] (section 7.2). It is possible to connect multiple masters to the system and a good collision detection is integrated in the protocol. 2 DESIGN CHOICES 14 SPI SPI is a synchronous serial protocol, which uses at least 4 wires to communicate between two devices and for every device added to it, it needs another wire for the slave select line. A clock line puts all devices in synchronicity. The set slave line will set which device is in slave mode. While the two remaining wires are used to read and transfer data from a master to a slave and back. This makes it easy to write own protocols. However if more devices are added, extra slave select lines are needed. Therefore for a more complex system more communication wires are needed. Since there are two data lines, data is sent from slave to master and from master to slave concurrently. This makes a high operating speed possible [16]. UART UART is an asynchronous type of serial data communication, commonly integrated in microcontrollers. UART uses two data lines to communicate. Adding extra slave devices will not require more wires. However creating a multi-master network can become difficult, since in an UART system one of the devices is set to a master because of the wiring [17] and all other nodes are slaves. To change a device from master to slave with UART it needs a good protocol to handle bus arbitration. There is no standard UART protocol for this, however this is easily implemented. Power line communication Since the power cables are already in the arm, no extra wires are needed to use this type of data transferring. Since the data is send over the power line in the low-noise-frequency bands it is possible to communicate between multiple data nodes with this technique as discussed in [18]. While this is a possibility, there are a lot of factors that have influence on the performance of this communication method, like synchronization issues [19]. Also the effect of line loss needs to be taken into account, since this has an effect on the signal to noise ratio. For other wired communications this is also the case, but more for power line communication, since the data have a low amplitude compared to dedicated media. Also the effect that every joint motor and end effector will have on the low-noise-frequency band of the powerline needs to be considered. Because of this the communication can only be implemented after the electric design of the arm is finished [18]. Bluetooth To remove communication wires from the arm, the choice can be made to use a form of wireless communication. An easy way to do this is by using Bluetooth which consumes little power and is of low cost [20]. One Bluetooth device can connect with up to seven other Bluetooth devices in its piconet [21], this creates a restriction on the modularity of the system. It is possible to solve this by creating a scatternet, where a few devices communicate between different piconets. 2.4.3 Considerations From the user interface the movement commands are sent to the Zebro. The arm module in the base will receive these commands, as shown in figure 2. These commands are then translated to the desired input commands for the different modules (joints and end effector) in the robotic arm and sent to these modules by one of the communication types. While wireless would be the best option, considering entanglement and snapping of wires (requirement 2), it becomes harder to implement due to the restriction from the piconets. However the power line is already in the arm, so going for some wired communication in the arm would not be an issue. Considering power line communication to implement this, every device needs a system to read and sent data on the low-noise-frequency band, this can result in a larger control devices in the arm. UART and SPI both use two data lines and are less defined considering implementation compared to I2 C. Therefore these protocols could be implemented to communicate at a higher speed than I2 C. I2 C and UART only require two wires in the arm which reduces the chance of entanglement compared to SPI. Since the I2 C standard defines a maximum wire length, which is shorter than the length of the arm, at which it is guaranteed the data is correctly transmitted, buffers are necessary. UART and SPI do not have such a standard, but commonly they outrange I2 C. It is easier to implement a multi-master system in I2 C since this is already defined in the standard. There are a lot of temperature sensors based on I2 C and SPI. 2.4.4 Conclusion Communication in the arm between the joints and the end effector is done with the I2 C protocol. This interface uses two wires to connect all devices, keeping it modular and allowing a multi-master system. This fulfills all requirements 16, 17 and 18. The system consists of two master nodes, the microcontroller in the base of the arm and the microcontroller governing the end effector. Every joint motor is driven by an individual microcontroller. These controllers are I2 C slaves. The large availability of I2 C based temperature sensors 2 DESIGN CHOICES 15 Figure 2: The communication in and around the arm strengthens the choice for this communication protocol. These sensors are also as slaves connected to the communication bus. Buffers will be placed on every controller, that will be used to increase the maximum wire length. 2 DESIGN CHOICES 2.5 16 Trajectory planning To be able to make the arm move in a sensible way, some sort of trajectory planning needs to be implemented. This section focuses on the ways to make trajectory planning possible and the different ways to solve the inverse kinematics problem. 2.5.1 Requirements In order to choose the most appropriate way to realize the trajectory planning for the arm designed in section 2.1 several requirements were made: 19. The arm has to reach the desired position 20. The arm should not make large sweeps The first requirement is straightforward. When the arm should move to a specific point in space to perform an action or as a point on a pathway defined by the user to reach another point in space, the arm has to reach this position. The requirement stating the arm should not make large sweeps has been made to guarantee the stability of the robot. In the event of large sweeping motions of the arm the robot could easily tip over because of the momentum created by this motion. The trajectory planning does not have to take the environment into account when calculating the best route to be taken. The user can anticipate to obstacles around the robot and place way points along the way which the arm has to pass through first. 2.5.2 Options Several options to meet the requirements stated in section 2.5.1 have been considered. It is clear that an extra requirement had to be stated to be able to choose and design the most suitable way to perform trajectory planning. The options considered as the extra requirement are: • Stability optimization • Energy optimization • Path optimization The stability optimization means that the center of gravity of the arm should be as close as possible with the base of the arm. This way the stability of the robot is optimized. The second option, energy optimization, states that the energy consumed by the motors to reach the desired position is kept to a minimum. The option to optimize the path calculated to reach the destination holds that the path taken by the arm is as short as possible. This will generally mean that the end effector will move in a straight line. If it is physically impossible to move in a straight line (for example when the arm should move through itself, the Zebro or a deadzone) the shortest way around will be chosen. Inverse kinematics is a way to determine the desired angles of the joints for arm with n-degrees of freedom. By determining the n matrices which represent the individual joints (section 3.2) the position of the end effector and its orientation can be calculated given the angles of the joints. This is called forward kinematics. The angles of the n joints given the location and orientation of the end effector can be calculated using inverse kinematics [22] (chapter 7). Several algorithms to solve the inverse kinematics problem were considered: • Jacobian • Cyclic Coordinate Descent • Reduction of degrees of freedom Jacobian The first way considered to implement inverse kinematics is by using the Jacobian [22] (chapter 8) [23]. This implementation is widely used in robotics and can describe any number of degrees of freedom. Problems of using the Jacobian consists of the large number of solutions and the possibility of singularities in the Jacobian making it impossible to find a solution [24]. The large number of solutions can be reduced by placing constraints on the allowed angles of the joints and definition of the most desired option (for example choosing the angle of the base joint as small as possible). 2 DESIGN CHOICES 17 Cyclic Coordinate Descent Cyclic Coordinate Descent (CCD) is a numerical method to calculate a solution to an unlimited degrees of freedom inverse kinematics problem in a computational efficient way. The algorithm calculates for every joint the angle which brings the end effector closest to the desired point. It starts at the link ending in the end effector and goes down the chain of joints until the last link is reached and brought into position. When the error in position between the end effector and the desired point in space is small enough or when the algorithm reaches a certain amount of iterations, it stops. This algorithm has some drawbacks. The way to reach the end point can go through some of the arms own joints and joints can make unrealistic angles. To overcome these problems the algorithm can be extended with constraints on the joints or for example an algorithm to rotate the chain as a whole to reach the desired position faster [25] [26]. Reduction of degrees of freedom The third option surfaced after the decision was made by the project leader to remove the telescopic joint. In order to calculate the required angles for the joints the arm can be split into two pieces: joints S1, S2 and E as in figure 1c and joints W and R. The position of the base of joint W is used to calculate the angles of joints S1, S2 and E. Using simple, compared to Jacobian inverse kinematics, mathematics the required angles can be calculated. The final joints W and R could then be moved by the user. It is convenient for the user to be able to move only the final part of the arm without moving every joint, for example when scooping and drilling (section 1). 2.5.3 Considerations Stability optimization as the extra requirement is useful for the robot in order to guarantee its stability. Especially if the arm is picking up loads with a larger mass than anticipated. The optimization of energy consumption is useful in order to save battery power. However without passive braking systems the motors use as much energy when the position is held as when the motor axis is rotating. This is because in held position the current through the coils of a brushless DC motor is still flowing. If path optimization would be the extra requirement the positioning of the arm would take less time than using the other two options, since the shortest path would be chosen. Both Jacobian and CCD inverse kinematics require much more and relatively difficult calculations compared to the method of reduction of degrees of freedom. The system is more modular using these two algorithms since more joints can be introduced easily. Using the method of reduction of degrees of freedom it is not possible to use the same algorithm for an arm with one extra degree of freedom before the wrist joint. 2.5.4 Conclusion After consideration of the options, stability optimization is chosen as the extra requirement. Since no passive braking is present in the arm the energy consumption is just as much for a moving motor as for a motor standing still. Also the time it will take to move the arm will not be of major importance, because most of the time the arm will not be used. The stability however is very important since the tasks cannot be performed if the robot has tipped over. As the way to calculate the required angles the method of reduction of degrees of freedom is chosen, because the mathematical operations are much simpler than the usage of the Jacobian or CCD. The main reason is the time pressure of the project. The requirements 19 and 20 stated in section 2.5.1 as well as the stability optimization could be implemented easily as can be found in section 3.3. 3 IMPLEMENTATION 3 18 Implementation This chapter describes the implementation of the design choices made in chapter 2. First the implementation of the joint control software will be discussed in section 3.1. Hereafter the kinematic model of the arm is deduced in section 3.2. The implementation of the trajectory planning algorithm is presented in section 3.3. The PCB designed for the driver electronics can be found in section 3.4. Finally the implementation of the communication protocol is described in section 3.5. 3.1 Joint control software In order to make the brushless DC motor, as described in section 2.2 rotate, a control system had to be designed. The software is written in C and compiled with the GNU compiler collection (GCC). To make the motor rotate a state machine is implemented. To control the rotational speed of the motor a fuzzy P controller (section 2.3) is implemented. 3.1.1 State machine As can be read in section 3.4.4 the motor needs to be driven by three pairs of transistors which have to be switched on and off by the controller in a certain order. To make this possible a state machine is created as can be seen in figure 3. The states in the state machine describe which transistor is switched on and off for every change of output from the Hall sensors. State 0 in figure 3 is the idle state of the motor in which every transistor is switched off. Depending on the rotation direction of the motor the Hall sensors will give the output either from up to down in figure 3 or reverse. HS stands for the output of the Hall sensors. Figure 3: Statemachine of the control software 3 IMPLEMENTATION 19 To calculate the total rotations of the motor a counter is implemented. Every change of state either increases or decreases the counter, depending on the current and previous Hall sensor output. This way the direction of the motor is taken into account when calculating the total amount of rotations. An increase of six of the counter translates to one entire rotation of the motor axis. Using the gear ratio of the gearing system that will be attached to the shaft, the angle of the joint is calculated. The gear ratio is yet to be determined. 3.1.2 Fuzzy P controller The fuzzy P controller is implemented using the counter described in section 3.1.1 and divided in three states: 1. The difference between the counter and the desired value is larger than a reference number. 2. The difference between the counter and the desired value is between a reference number and 0. 3. The difference between the counter and the desired value is 0. The reference number mentioned is to be determined per joint when the entire arm is complete. The different states represent different K p parameters of the P controller. When the controller is operating in state 1 the motor rotates at full speed. As soon as the controller switches to state 2 the motor slows down linearly until the desired position is reached. Then the controller switches to state 3 and the motor is set to hold its position. The precise values of the linear function are yet to be determined per joint when the complete arm is assembled. 3 IMPLEMENTATION 3.2 20 Kinematics One of the ways to realize trajectory planning as discussed in section 2.5 is by using the kinematic model of the arm. A kinematic model is a way to to schematically represent a manipulator from a mechanical viewpoint [3] (chapter 2). The manipulator is modeled as a chain of rigid bodies connected by joints. The joints can be either revolute (rotational) or prismatic (telescopic). The rigid bodies can be completely described in space by their positions and orientations with respect to a reference frame. The reference frame is the combination of the orientation of the Cartesian coordinate system and the position of its origin before the joint. The new frame consists of the new Cartesian coordinate system and the position of its origin after the joint. This is shown in figure 4. Figure 4: Position and orientation of a rigid body copied from [3] 3.2.1 Definitions Every individual joint has been described as either revolute or prismatic and a reference frame has been defined at the base of each joint. In accordance with the convention used in [22] (chapter 7) the z-axis of the reference frame is parallel to the revolution axis in the case of revolute joints and parallel to the extension in the case of prismatic joints. The chain of rigid bodies with the axes for the individual joints of the arm designed in section 2.1 can be seen in figure 5. 3.2.2 Theory Based on the reference frames for each of the individual joints six matrices can be formulated to model the arm. Every matrix symbolizes the transfer from one reference frame to the next. The matrices are created from two parts: the rotation matrix, which symbolizes the rotation of the frame with respect to the reference frame, and the position vector, which models the change in position due to the joint and link [3] (chapter 2). In order to built the rotation matrix, equations 3, 4 and 5 need to be solved. xx0 x’ = xx0 x + xy0 y + xz0 z (3) y’ = y0x x + y0y y + y0z z (4) z’ = z0x x + z0y y + z0z z (5) In equation 3 symbolises the rotation of the x-axis of the new frame with respect to the x-axis of the reference frame. In the same way the term xy0 denotes rotation of the y-axis of the new frame with respect to the x-axis of the reference frame, et cetera. By multiplying these rotation factors with the original frame the new frame is found. The rotation matrix R then equals the (3x3) matrix: 0 xx y0x z0x R = xy0 y0y z0y (6) xz0 y0z z0z 3 IMPLEMENTATION 21 Z R Y X Y Z YT 2 Y S X Z X Z E Z X W Y X S 1 Z X Y Figure 5: Chain of rigid bodies of the designed arm The translation vector consists of the vector connecting the origin of the reference frame to the origin of the new frame. It can be represented as the (3x1) vector o’: 0 ox o’ = o0y (7) o0z The terms o0x , o0y and o0z represent the translation in the x-direction, the y-direction and the z-direction of the reference frame respectively. The entire matrix A describing the joint can now be built as a (4x4) matrix as found in equation 8. The fourth row is necessary to be able to multiply the matrix with matrices of other joints. By multiplying multiple matrices of the joints the new frame after multiple joints can be found. The matrix symbolizing the entire arm can be found by multiplying matrices A01 , A12 et cetera. 0 xx y0x z0x o0x xy0 y0y z0y o0y A= (8) xz0 y0z z0z o0z 0 0 0 1 As an example the matrix A01 , which represents the first joint as can be seen in figure 5, is given in equation 9. The length of the link is symbolized as a1 and the angle of the joint is φs1 . The other matrices representing 3 IMPLEMENTATION the entire arm can be found in Appendix B. cos(φs1 ) −sin(φs1 ) sin(φs1 ) cos(φs1 ) A01 = 0 0 0 0 22 0 0 0 0 1 a1 0 1 (9) 3 IMPLEMENTATION 3.3 23 Trajectory planning The trajectory planning for the arm is implemented using the extra requirement of stability optimization as described in section 2.5. The angles of the joints required to reach the desired position are calculated using the method of reduction of degrees of freedom. The trajectory planning algorithm will be implemented on the base controller of the arm. 3.3.1 Reduction of degrees of freedom As stated in section 2.5 the arm can be split into two parts. Joints S1, S2 and E are the first part, joints W and R the second. The method of reduction of degrees of freedom defines the location of the base of joint W as end of the arm. The final joints can be moved by the user manually. The arm is simplified to a three degree of freedom system: S1 which rotates in the θ-plane, S2 which rotates in the φ-plane, and E, which also rotates in the φ-plane. Since only two degrees of freedom exist in the φ-plane a triangle is found as can be seen in figure 6. In figure 6 φ1 represents the angle of S2, φ2 represents the angle of E and a1 and a2 represent the lengths of the arm pieces. r, the distance between the origin and the point in space denoted by (x,y,z), is found using equation 10. By rewriting equation 11, which is the rule of cosines, into equation 12 φ2 is found. p (10) r = x2 + y2 + z2 r2 = a21 + a22 − 2a1 a2 cos(φ2 ) (11) a2 + a22 − r2 φ2 = arccos 1 2a1 a2 (12) In order to calculate φ1 equations 13, 14 and 15 are used. 0 sin(φ2 )a2 φ1 = arcsin r 00 z φ1 = arcsin r 0 00 φ1 = φ1 + φ1 (13) (14) (15) Using this method the angles φ1 and φ2 are found which represent the angles of joints S2 and E. Since joint S1 is the only joint rotating in the θ-plane this angle is found easily using equation 16. ! y θS1 = arccos p (16) x2 + y2 3.3.2 Stability optimization algorithm To optimize the stability of the robot when the arm is moving, the center of mass needs to be as close to the vertical line above the base of the arm as possible. As can be seen in figure 7 this means minimizing the length of d. In figure 7 a1 and a2 represent the lengths of the two arm pieces, φ1 and φ2 represent the angles of the joints S2 and E. d1 and d2 are the distances in the xy-plane of the individual arm pieces, h1 and h2 are the heights of the individual arm pieces. d and h are the total distance in the xy-plane and the total height of the pieces combined. The ds and hs are calculated using the dashed right-angled triangles in figure 7. Another requirement 20 as described in section 2.5.1 is that the arm should not make large sweeps. This is implemented using a variable dθ_max which is the maximum d of the arm for which it is allowed to rotate a certain θ. The values of this dθ_max are to be determined when the complete arm is built. Figure 8 describes the algorithm implemented to optimize the stability schematically. First it is checked whether or not the desired position is inside the range of the arm. Then, using the calculations described in section 3.3.1 the angles the individual joints have to make are determined. Since this method of trajectory planning only takes two joints in the φ-plane into account, there are two intermediate positions to reach the desired position: φS2 is set to the new value first or φE is set to the new value first. The current d (dc ) and h (hc ) are calculated as well as the ds and hs for the two intermediate positions (d1 , d2 , h1 and h2 ). Since the 3 IMPLEMENTATION 24 Figure 6: Triangle consisting of joints S2 and E Figure 7: Triangle used for calculating d and h arm cannot move through the ground it is defined that the h of the chosen option has to be greater than zero. The option for which the d is the smallest is chosen as intermediate option, if the h is greater than zero. If both options apply and d1 is equal to d2 , the first option is chosen. When the intermediate position is chosen, it is checked whether or not the current dc is within limits of dθ_max . If so the arm is positioned in the θ-plane first, followed by the intermediate position and finally the desired position. If dc is larger than dθ_max however another path is to be taken. It is checked whether or not the d of the intermediate state is larger or smaller than dθ_max . If this d is smaller than dθ_max the arm moves into the intermediate position in the φ-plane, then the 3 IMPLEMENTATION 25 arm is positioned in the θ-plane and finally arm moves to the end position. If the d of the intermediate position is larger than dθ_max , four steps are required. First the angle φS2 (φ1 in figure 7) is set in such a way the d of the arm is equal to dθ_max , than the arm is positioned in the θ-plane. After this the arm is set in the intermediate position in the φ-plane and finally the end position is reached. Figure 9 shows the simulation results of the implemented algorithm. It is to be noted that the lengths of the arm pieces are not scaled to the physical arm designed in section 2.1. From figure 9 it can be deduced the algorithm is working properly. 3 IMPLEMENTATION 26 Figure 8: Algorithm for trajectory planning 3 IMPLEMENTATION 27 Figure 9: Results of the simulation of the trajectory planning 3 IMPLEMENTATION 3.4 28 Circuit and Printed Circuit Board design In order to keep the design of the arm controller modular a printed circuit board (PCB) was designed. The PCB has to be small and lightweight so the mechanical arm design is affected least as possible. This section starts with a description of the different modules. For every module the implementation will be discussed. After that, the design of the PCB is described. An overview of all component values can be found in Appendix C. 3.4.1 Buck converter To keep the amount of wires in the arm small, the choice was made to convert the 24 V from the battery to lower voltages on every PCB separately. Since the Hall sensors have to be fed with a supply voltage of 5 V [27] and all other components on the PCB with 3.3 V and the PCB design should be as small as possible, the choice was made to use a buck converter chip which combines two converters in one package. The chosen converter is the BD93291EFJ buck converter manufactured by Rohm Semiconductor [28]. The chip has a wide input range (8 V up to 26 V) converter and one low input voltage converter. The wide input range converter converts the supplied 24 V to a fixed value of 5 V. The low input voltage converter converts from the generated 5 V an adjustable output voltage, in this design 3.3 V. Figure 10 shows the typical application circuit as described on page 16 of the datasheet. The typical application circuit assumes an input voltage of 14 V, and delivers output voltages V1,out = 5 V and V2,out = 3.3 V and maximal output currents I1,out = 1 A and I2,out = 300 mA. To save time, the typical application circuit was adapted to fit the specifications for this project. From the datasheet (formulae 4 and 5) it follows that the values of the coils have to be changed to fit the requirements and the voltage ripple on the output voltage will change. The solution of formula 4 in the datasheet provides the values for coils L1 and L2 . Evaluation of this formula for the old and new input voltages gives a change for the value of L1 from 22.3 µH to 27.5 µH. As expected the value of L2 stays at 6.25 µH. The voltage ripple, formula 5, due to the increment of the supply voltage results in a minor increase of the ripple on V1 from 8.5 mV to 8.7 mV. The ripple on V2 does not change significantly at 1.9 mV. Table 2 summarizes the changes in values. The PCB design is based on the suggested design provided by the datasheet. Although one small change has been made to match the PCB design to the typical application circuit. From a small test it followed, that the datasheet was faulty regarding the suggested PCB design and the typical application circuit was correct. Figure 10: Buck converter schematic 3 IMPLEMENTATION 29 Table 2: Old and new values buck converter Value L1 L2 ∆V1,out ∆V2,out 3.4.2 Vin = 14 V 22.3 6.25 8.5 1.9 Vin = 24 V 27.5 6.25 8.7 1.9 Unit µH µH mV mV I2 C buffer As described in section 2.4.3 a buffer is needed for the I2 C communication in the arm. A cheap and commonly available chip to make this buffer is the P82B96 IC produced by NXP Semiconductors [29]. It is basically a level shifting device designed to work on the I2 C bus. It shifts the levels from 3.3 V on the PCB side to 5 V arm bus side. The component values are taken from datasheet table 6 on page 14. Figure 11 shows the implementation. Figure 11: Schematic of I2 C buffer 3.4.3 Microcontroller Some basic requirements for the microcontroller were deduced from the design choices made in chapter 2, other components placed on the PCB and ease of use. These requirements are: 1. I2 C capabilities 2. AD conversion 3. Interrupts 4. Easy to program and reprogram 5. Cheap and commonly available Dedicated I2 C hardware makes it easy to implement the desired communication protocol. The AD conversion is used to measure the output of the current sensor. Interrupts are needed to make implementing the motor drive algorithm easier. Easy programming is useful for debug purposes and to keep the design of the PCB modular. Because these requirements are not very uncommon in the range of microcontrollers available in stores to date, price and availability also become important requirements. In collaboration with the other electrical engineering subgroups of the Zebro project the choice was made to use the MKL05Z32VLC4 microcontroller manufactured by Freescale Semiconductor [30]. This microcontroller fulfills all requirements stated above. It has built-in I2 C possibilities which can easily be used. It has several pins which can be configured as AD conversion pins. The nested vector interrupt provides the needed 3 IMPLEMENTATION 30 interrupt capabilities. The chip can be programmed with the common used SDA and JTAG connections, so programming is easy to do. Figure 12 shows the microcontroller circuit with its peripherals. To the microcontroller are two LEDs attached. These can also be used for debug purposes as described in section 4. Figure 12: Schematic of microcontroller circuit 3.4.4 Motor driver The chosen brushless DC motor has three phases in delta configuration. From the datasheet it follows that the motor has to be driven according to the red lines in figure 13 [27]. When the signal is high, the node of the motor is connected to the supply voltage, 24 V. If the signal is low, the node is connected to the ground of the circuit. When the signal is neutral, the node is floating. The motor controller proceeds through these states and makes the motor axis rotate. The blue lines in figure 13 describe the output of the three Hall sensors. This information is fed back to the microcontroller. Hal lA Phas eA Hal lB Phas eB Hal lC Phas eC S t at e 1 2 3 4 5 6 1 Figure 13: Motor phases and corresponding Hall sensor output The motor driver consists of three PMOS and NMOS transistor pairs. Each pair drives one phase of the motor. Figure 14 shows the designed schematic. Important specifications for the driver design of the transistors derived from the datasheets [31] and [32] can be found in table 3. 3 IMPLEMENTATION 31 Because the microcontroller cannot deliver a negative voltage to drive the gate of the PMOS transistor, an extra bipolar transistor is added to switch the gate between 0 V and −24 V. The logical high level, 3.3 V, is sufficient to drive the NMOS transistors directly. When both the PMOS and the NMOS transistor of one pair are switched on, a short circuit is formed. The programmer needs to make sure the program running on the microcontroller prevents this situation. To prevent short circuits when the output state for the microcontroller is undefined, pull-up and pull-down resistors are added to make sure the transistors are switched off. A shunt resistor is placed between the power line and the sources of the transistors. The voltage drop over this resistor caused by the current flowing through it is measured. This measurement is used to determine the current flowing through the motor. Section 3.4.5 describes the further implementation of this sensor. Table 3: Important transistor characteristics Characteristic Type Manufacturer VDS RDS,on ID VGS(th),max NMOS IPP114N03L G Infineon Technologies 30 11.4 30 2.2 PMOS SPP15P10PL H Infineon Technologies -100 200 -15 -2 Unit V mΩ A V Figure 14: Schematic of motor driver 3.4.5 Current sensor To measure the current flowing through the motor a current sensor was implemented. The measurement is based on the difference in voltage drop over a well defined shunt resistor. This difference is amplified with a differential amplifier. Figure 15 shows the schematic of a basic differential amplifier. Formula 17 describes the behaviour of the output voltage. V1 is in this case the 24 V power line through Zebro, V2 is that voltage minus the voltage drop over the shunt resistor. Figure 16 shows the implementation of the current sensor circuit. The operational amplifier is a THS4531A type from Texas Instruments [33]. The output is fed to the ADC pin on microcontroller. Rf (R f + R1 ) Rg V2 − V1 (17) VOUT = (Rg + R2 ) R1 R1 3.4.6 Temperature sensor The temperature on the PCB is measured with a AT30TS75 I2 C interfaced temperature sensor from Atmel Corporation [34]. Figure 17 shows the schematic. To keep modularity in the PCB design three solder pads are 3 IMPLEMENTATION 32 Figure 15: Schematic of differential amplifier Copied from http://www.wikipedia.org Figure 16: Schematic of current sensor used to set the address for each temperature slave. The sensor has an accuracy of ±0.5 ◦C. This is sufficient for the intended use in the arm, as it is only used to determine whether or not the motor is overheating. Figure 17: Schematic of temperature sensor 3.4.7 PCB In order to implement all modules a PCB was designed. The lay-out can be seen in Appendix D, figure 21. Unfortunately this lay-out is not up to date with the schematics as described above due to a design flaw in the motor controller electronics. To be able to test the new schematics a strip board was used for this part. The PCB contains the following test pads to measure selected signals. • SDA and SCL I2 C lines on the PCB, after the buffer. 3 IMPLEMENTATION • A_L, A_H, ... , C_H lines from the microcontroller to the gates of the transistors • 5V and 3.3V the voltages generated by the buck converter • GND two pins connected directly to the ground 33 3 IMPLEMENTATION 3.5 34 Communication To implement the communication between the different modules, I2 C was chosen, as described in section 2.4. The MKL05Z32VLC4 microcontroller [30], which is used in every joint controller in the arm, as well as on the base board in the chassis on the Zebro, has a built-in I2 C interface. This makes the implementation of the communication a lot easier. The implementation of the communication is done in C and is compiled with the GNU compiler collection (GCC). 3.5.1 Slaves The microcontroller, that functions as joint controller, has two tasks it needs to complete. It needs to receive an angle and store this in a buffer and it should respond to the master when asked for its current angle and motor current. The data it receives are the desired angle calculated by the base controller, as explained in in section 3.3. This angle will have a total length of two bytes, which means the joint controller receives two data packets of one byte. In the transmit buffer four bytes containing the current angle and the motor current are stored. These data need to be refreshed every time a value changes. Other slaves on the bus are the temperature sensors [34]. These sensors are connected to the I2 C-bus and have their own address. The master on the base of the Zebro reads the temperatures. 3.5.2 Masters Since the frequency of read requests is low and only small packets need to be read from the slaves (joint controller and temperature sensors), there is a lot of capacity for other communication left on the I2 C-bus. Furthermore since the end effector needs to collect data from its own sensors as well, it was decided to implement a multi-master system. This way the end effector and the arm become more independent from each other, increasing the modularity of the system. When the line is free, the end effector can send its own data to the base controller so it can be sent to the user interface or read from its sensors. The multi-master node on the base of the arm needs to call the slave device it needs to write to or read from and hereafter collect the data packets for further processing. 4 TEST PLAN 4 35 Test plan To make sure the hardware and software designed and built is working properly, tests have to be performed. To make sure every aspect of the system is tested properly a test plan is written. The test plan consists of two major parts: the testing of the hardware (the printed circuit board) and the testing of the software (by using the tested printed circuit board and the motor). 4.1 Printed Circuit Board The PCB has test pads to measure several signals easily. These pins and their functions are described in section 3.4.7. Other signals like the incoming I2 C-bus and main power supply can be measured directly on the connector at the side of the board. The LEDs can also be used for test issues. Below the method of testing the manufactured and soldered circuit board is given. All the components are tested as individually as possible. This makes it easier to find sources of malfunctioning of the PCB. 4.1.1 Buck converter Since the buck converter provides the supply voltage for the other IC’s on the PCB, this part is tested first. This done by connecting an oscilloscope to the voltage test pads. Voltage and voltage ripple of both voltages are measured. When the voltage and the corresponding ripple are within the specifications provided by [28] and the calculations in section 3.4.1 the buck converter functions well. Table 4 shows these specifications. The tolerance for V1 is based on industrial typical values for digital electronics. Since this voltage is used to feed the Hall effect sensors and no exact specifications for the sensors can be found, the typical values are expected to satisfy. The tolerances for V2 come from the the temperature sensor and the microcontroller. The minimum supply voltage for the temperature sensor is 2.7 V, the maximum supply voltage for the microcontroller is 3.6 V. The maximum ripple for V2 is therefore defined as 300 mV [30] [34]. Table 4: Specifications buck converter Specification V1 V2 Ripple V1 Ripple V2 4.1.2 Designed value (V) 5.0 3.3 8.9 · 10−3 1.9 · 10−3 Tolerance (V) min 4.5; max 5.5 min 2.7; max 3.6 max 500 · 10−3 max 300 · 10−3 I2 C buffer As all communications with the controller board from the outside world go through the I2 C buffer, correct functioning of this part is tested next. The buffer is tested by measuring voltages on both sides of the buffer. Since both sides are pulled up using resistors both sides should show the values as shown in table 5, which describes the specifications of the buffer. If the wire side of the buffer is grounded the voltage on PCB side should drop to 0 V as well and vice versa. VSX and VSY are the connections to and from the bus through the arm, TX , TY , RX , and RY are the connections to the PCB side of the bus, the datasheet [29] describes this in more detail. Table 5: Specifications I2 C buffer Specification VSX VSY TX & RX TY & RY 4.1.3 Value (V) 5.0 5.0 3.3 3.3 Microcontroller The microcontroller is tested by uploading a simple test program to it. The test program contains three modules designed to test different parts of the hardware individually. 4 TEST PLAN 36 The first module will test the basic functionality with a blinking LED program. The LEDs will blink with a frequency of 1 Hz. When the LEDs do not blink with the right frequency, there could be something wrong with the oscillator settings. If the LEDs do not blink at all the programming of the chip should be reexamined. The second module will test the motor driving circuit. The program will step slowly through the different states of driving a brushless DC motor. No motor is connected at this point. With the test pads it is easy to verify if the correct signals are provided to the gates of the transistors. The voltages that will drive the motor can be measured on the header normally used for the motor connection. Table 6 gives the expected voltages for all input combinations (section 3.4.4). Table 6: Expected motor driving voltages for all states State 1 2 3 4 5 6 Expected output (V) Phase A Phase B Phase C 24 Floating 0 Floating 24 0 0 24 Floating 0 Floating 24 Floating 0 24 24 0 Floating The third module tests the methods of communication. For debug purposes it is possible to use the JTAG connector besides the I2 C-bus. Since the microcontroller is a I2 C slave, a master is connected to the tested I2 C buffer. If the slave responds to the test signals from the master correctly communication is established. If the communication using I2 C does not work properly, further testing and communication can be done using the programmer connection. 4.1.4 Current measurement The next step is to test the current measurement circuit. This is done by attaching a variable resistor to the motor output header. The software switches the transistors on to make sure the resistor is fed 24 V constantly. The resistor is adjusted to make sure the currents flowing through it are seven approximately linear spaced values. The output of the circuit is measured. Table 7 describes the tested values with the expected measurements. Table 7: Current measurement and amplifier test Resistance (Ω) 24,00 12,00 8,00 6,00 5,00 4,00 3,50 4.1.5 Current (A) 1,00 2,00 3,00 4,00 4,80 6,00 6,86 Expected output (V) 3,20 3,15 3,11 3,07 3,03 2,98 2,94 ADC value (12 bits precision) 13097 12920 12743 12566 12424 12212 12060 Temperature sensor Finally the temperature sensor is tested. Since this is also a slave on the I2 C-bus this test is also done with an attached master node. The protocol provided by the datasheet [34] is implemented and verified. Using a thermometer it is checked whether the temperature is measured and interpreted correctly. The temperature sensor is heated manually and the results are examined. 4.2 Software Once the correct functioning of the hardware is confirmed the software is tested. The main part of the software consists of the motor controller implementation. The other parts are the communication protocol and the current measurement. 4 TEST PLAN 4.2.1 37 Motor controller The first test drives the motor a defined amount of degrees in a certain direction and uses the Hall sensors to verify this. This test verifies the correct readout and processing of the output of the Hall sensors in the controller program. Because the controller does not control each individual step, but the amount of steps taken (section 3.1.1) a positive result of this test forms a stable base for further controller tests. Since a brushless DC motor cannot be driven to deliver more torque if a step cannot be taken, this test suffices. Secondly the combination of speed control and the measured amount of steps is examined. The controller should slow the motor down when it comes near the desired amount of rotations (section 3.1.2). Once it reaches its end position it should make sure this position is held. To verify this the axis is externally turned away from its desired holding position. The controller should measure the difference and compensate for that by returning to the desired position. The axis is turned both ways to make sure the direction of the motor is controlled correctly. Another test that will be done is a force test on the motor. This way it can be measured if the motors can deliver the required torque and the maximum weight the arm can lift and hold still can be calculated. 4.2.2 Communication Verification of the communication protocol is done by attaching a master to the I2 C-bus and sending a position to the controller. The controller should rotate the motor axis to the desired position. Once the desired motor position is set, the master polls the slave and asks the current angle and current. The slave will answer the master with the current values. Once the motor controller reaches the set position, the master will receive the set value as the current value and conclude the test positively. 5 RESULTS 5 38 Results This chapter describes the outcome of the tests described in chapter 4. Since some of the tests have yet to be done the results of these tests cannot be discussed. First the results of the test of the PCB as described in section 4.1 are presented. Hereafter the results of the tests concerning the software as described in section 4.2 can be found. 5.1 Printed circuit board This section describes the results concerning the PCB. 5.1.1 Buckconverter The output of the buck converter is measured. Table 8 states the expected voltages from the design, the acceptable tolerances and the measured values. All measurements are done with a Tektronix TDS2014B 4 channel digital oscilloscope [35]. Table 8: Specifications and results buck converter Specification Voltage 1 Voltage 2 Ripple voltage 1 Ripple voltage 2 Designed value (V) 5.0 3.3 8.9 · 10−3 1.9 · 10−3 Tolerance (V) min 4.5; max 5.5 min 2.7; max 3.6 max 500 · 10−3 max 300 · 10−3 Measured value (V) 5.11 3.77 5.8 · 10−3 10.1 · 10−3 From table 8 it follows that V1 , the ripple on V1 and V2 are within the tolerances. The higher measured output for V1 comes from the lower current flowing out of it than it was designed for. Figure 9 from the datasheet [28] describes a similar situation. The deviations in the ripple voltage can be caused by the tolerances of the used components for the capacitors and coils. V2 however is out of the tolerance range. Figure 18 shows the results measured with the oscilloscope when the 5 V test pin is measured. In order to zoom sufficiently a voltage divider was built which lowers the amplitude by a factor 100. Some switching effect can be seen clearly. Other measurements using AC coupling have been done to examine this switching effect. These results can be found in figure 19 and 20. It can be seen that the switching frequency is 1.66 kHz. This switching effect is a result of the internal H3 Reg system of the IC to control the output voltage. The switching time of the gate at the high side MOSFET is around 0.4 µs. This can be calculated by using formula 1 given in the datasheet [28]. In figure 20, the initial switching has the same timing, though the cause of the MOSFET switching on right after the initial switching is unknown. To find the cause of second switching, further research is required. Figure 18: DC coupled 5V with 100 times voltage division 5 RESULTS 39 Figure 19: 5V AC coupling unexpected switching, no voltage division Figure 20: 5V AC coupling unexpected switching zoomed in on rising edge, no voltage division 5.1.2 I2 C buffer The I2 C buffer was tested as described in section 4.1.2. The outcome of the test can be found in table 9. Since the output of the buck converter is 3.7 V instead of 3.3 V this is also expected on the PCB side of the I2 C buffer. Table 9: Results of the I2 C buffer Data Clk Data Clk Wire voltage (V) 5.0 5.0 0.0 0.0 PCB voltage (V) 3.7 3.7 0.0 0.0 As can be seen in tables 9 and 10 the I2 C buffer functions according to expectations. It can be concluded that the I2 C buffer is working correctly. 5.1.3 Microcontroller The tests concerning the microcontroller could not be performed because the microcontroller could not connect to a pc to be programmed. This may have been caused by a defect on the PCB, on the programmer connector or because the microcontroller was broken during the soldering of the PCB. The most probable cause is that the microcontroller was broken because of the supply voltage of 3.71 V from the buck converter. 5 RESULTS 40 Table 10: Results of the I2 C buffer in reversed direction Data Clk Data Clk 5.1.4 PCB voltage (V) 3.7 3.7 0.0 0.0 Wire voltage (V) 5.1 5.1 0.0 0.0 Current measurement The current measurement was performed as described in section 4.1.4. However during the first measurement it was found that there was a fundamental error in the design of the current measurement. Since the input voltages to the operational amplifier are larger than the supply voltage of the operational amplifier the circuit will never work. 5.1.5 Temperature sensor The test concerning the temperature sensor has yet to be done. Therefore no results can be presented. 5.2 Software This section describes the results concerning the software of the motor controller and the communication. 5.2.1 Motor controller The tests concerning the motor controller are performed according to the test plan (section 4.2.1). The motor was rotating until the required amount of rotations was met, then it stopped. This shows that the first test was successful. A maximal error of two steps occurred, which may be caused by a wrong increase or decrease of the counter. This could happen because the boundary conditions are not taken into account in the code. When the motor starts rotating the state of the shaft might be half way a Hall sensor output stage. The counter is then increased while only a partial step has been taken. This same effect could occur at the end position. The speed test is performed and it could be seen that, as the motor came close to the desired position, the motor slowed down and stopped. If the axis was turned away from the desired position it returned to this position. If the axis was turned away in the opposite direction it also returned. This test is also considered a success. The force test has not yet been done. Therefore no results can be presented. It is expected the specifications of the datasheet will be confirmed. 5.2.2 Communication To test the the communication implementation described in section 3.5, some tests were done with two test boards with a microcontroller from the same product family on it. These test boards were used because the PCB was malfunctioning (see section 5.1.3). Several data packets were sent from a master to a slave and from a master to another master. These packets were received by the device in slave mode. However when a packet of unknown size was sent to a slave device, the slave could not receive the data packet. This is because the I2 C interface on the microcontroller was lacking coding for this. Since only the master devices would exchange unknown sized data packets. It was decided as a short term solution that data packets of 4 bytes would be sent. The slave was also tested to put the right information into the buffer, when new data were available. Hereafter a master was connected to see if it could read the data from the slave, this worked as expected. 6 6 CONCLUSION 41 Conclusion This section describes the conclusions made based on the results (section 5) and the requirements on the arm as stated in section 1 are evaluated. These requirements are: 1. The arm needs to have sufficient mobility to perform the tasks and be of a modular nature 2. The motors in the arm need to be able to provide enough torque to perform the tasks 3. The joints of the arm need to be controlled individually 4. The desired position of the individual joints need to be communicated from the base of the robot to the joints 5. The arm needs to have some sort of trajectory planning to be able to move efficiently from point to point As described in section 2.1 the designed arm has the mobility to perform the tasks. Even though the telescopic joint is removed, the arm can reach the switches for the maintenance task. Because of the five degrees of freedom left in the arm the containers on the back of the Zebro can be reached for the science task. Using the joints S1, S2 and E (figure 1c) the arm can be positioned and using joints W and R the end effector can be controlled. The arm is designed to be a modular system of individual joints. Therefore it can be concluded the designed arm meets requirement 1. The brushless DC motors as presented in section 2.2 have the capability to meet the second requirement. By installing a motor powerful enough, the precise specifications have yet to be determined when the arm is completely assembled, the arm will meet requirement 2. The choice and implementation of the control system as described in sections 2.3 and 3.1 respectively provide the ability to control the joints of the arm individually. By using a state machine to drive the motor and a fuzzy P controller to control the speed the control system is realized. As described in section 5.2.1 the controller functions as expected when driving a motor. Since every motor is controlled by its own microcontroller to reach its desired position, the conclusion can be made that this design meets requirement 3. The communication choice and implementation as can be found in sections 2.4 and 3.5 make it possible for the base to communicate with the arm using I2 C. As every joint is a slave device the base can communicate with each joint individually. This way the required position for each individual joint can be communicated. The results as described in section 5.2.2 show that the communication system is working properly. When the arm is assembled completely it is expected the communication system will function correctly. Since I2 C uses only two wires the wiring is kept to a minimum and the temperature sensors (section 3.4.6) can be attached to the bus. It can be concluded that requirement 4 is met by the design. As described in sections 2.5 and 3.3 a the method of reduction of degrees of freedom to solve the inverse kinematics problem and the extra requirement of stability optimization for trajectory planning is chosen and implemented. The simulation results as can be found in figure 9 show promising results for the functionality of this algorithm. When the complete arm is built the algorithm for trajectory planning can be tested. Based on the results of the simulation it is expected the fifth requirement will be met. The design of the PCB as described in section 3.4 does not work properly. The results which can be found in section 5.1 show that multiple errors have been made in the design. These errors will be further discussed in section 7. In order to make the arm work and to actually perform the tasks the PCB will have to be redesigned. 7 DISCUSSION 7 42 Discussion During the process of designing, implementing and testing of the modular arm, several points for improvement have been found. These considerations and improvements for the next iteration step will be discussed in this chapter. This will be done by looking at different parts of the modular arm, starting with the joint controller. 7.1 Joint controller The implementation of the joint controller does not verify if a step is taken. It just counts the amount of taken steps. A future improvement could be to couple the readout of the Hall sensors to the motor driver. This way speed measurements could be done more accurate than in the current implementation. However as the torque delivered to the motor axis cannot be changed, speed control at the top range of speeds is not easily done. The accuracy of the joint controller could also be increased by applying an extra form of feedback, like a rotary encoder. This way the information of the Hall sensors could be checked against the feedback information of the rotary encoder. In the design of the PCB, the option was already considered, so on the PCB there is already a connection for it. 7.2 Communication To guarantee a stable data throughput the communication system could be changed to a system with only one master node on the base of the Zebro. This would schedule the data broadcasts between the end effector and the joint controllers, providing a more robust system. On the other hand this implementation would lower the modularity of the system as the end effector cannot take initiative over its communications. 7.3 Trajectory planning The chosen way to determine the angles of the joints to position the end effector is not modular, as stated in section 2.5.4. Therefore a future improvement could be implemented to make the system modular. The choice has been made to use the reduction of degrees of freedom mainly due to time considerations. The possibilities to use Jacobian or CCD inverse kinematics could be investigated more thoroughly and possibly be implemented for the arm. 7.4 Base controller The base controller, on which the trajectory planning of the robotic arm will be implemented, has yet to be implemented and a PCB for it needs to be designed. Based on the decision on how the trajectory planning will be implemented, the choice has to be made if the planning will be calculated on the Zebro or on a computer at the base station. When for example the choice is made to use the Jaobian to calculate the trajectory, the microcontroller on the Zebro would only be used to translate commands from the computer to joint coordinates, because the involved matrix calculations require too much computational power for the current microcontroller. The current trajectory planning based on the reduction of degrees of freedom and a CCD based algorithm can be implemented directly on the Zebro. 7.5 Circuit and printed circuit board 7.5.1 Buck converter The buck converter did not meet the specification for output voltage V2 . This has to be investigated and changed in a future design. Besides this, on output voltage V1 a triangular variation was measured, see figure 18. As stated in section 5.1.1 further investigations have to be done here. To prevent future damage to other components caused by a malfunctioning buck converter solder connections which disconnect the rest of the PCB from the converter could be implemented. This way the correct functioning of the buck converter can be tested and tuning can be done without damaging other components. 7 DISCUSSION 7.5.2 43 Microcontroller The microcontroller could not be programmed. After inspection it occurred that the circuit design was not able to do this. A second iteration for the PCB design should solve this problem. The reference voltages for the AD converter are not connected. This should also be done in the second PCB iteration. 7.5.3 Motor driver The selected PMOS transistor has a maximum gate-source voltage of ±20 V [32]. In the current design this voltage is 24 V when the PMOS transistor is switched on. An extra resistor in the pull-down circuit with the bipolar transistor could solve this problem. It is also an option to use NMOS transistors instead. These can also be driven directly with the voltages from the microcontroller. 7.5.4 Current sensor The expected output as described in table 7 does not fill the whole AD conversion range from 0 V to 3.3 V. Besides this, the current values of the resistors used in the amplifying network let the input voltages to the operational amplifier be higher than the supply voltage of the operational amplifier. This could easily be solved by placing the shunt resistor after the motor and before the ground connection. 7.5.5 Printed circuit board The designed PCB contains some errors. Also the designed footprints for some of the capacitors are too small. These should be changed to larger ones. Besides this a short circuit to the ground plane was made with a signal wire to a transistor. It proved useful to have test pads on the PCB. The second PCB iteration should have more test pads for signals like the output of the current sensor. A A ETHICAL VIEW ON A POSSIBLE USAGE OF THE ARM 44 Ethical view on a possible usage of the arm The robotic arm is designed for a mars rover, but robotic arms have multiple other uses in human society. They are used in industrial environments, health care and military. The possible application chosen to consider from an ethical point of view is the application in the health care sector and in particular for the nursing homes and home care. This is an ever growing sector, which results in a higher workload for nurses and more elderly living at home because of long waiting list for nursing homes. By developing a modular arm for this sector the main task is to reduce the long waiting lists for the nursing homes, by making elderly more independent due to the installment of a home-care-robot. Also relieving the work pressure felt by nurses is an expected consequence, however this does not mean the arm can replace nurses. Its main role is to help the elderly with simple tasks. To do this the arm needs to be safe to use, so all elderly or other humans or animals, who come in contact with the arm, will not be harmed. As a result of this we want to increase the happiness and welfare of the elderly, however this is hard to measure. The stakeholders encountered during the development of the robot arm and the interested are: • The elderly; they want to live a happy and comfortable life, which is not too expensive. • The nursing homes; they have long waiting list and often a shortage of nurses, but still want the elderly to live happily in there housing. • Nurses; they want to see their workload reduced, while still keeping their job. • Government; they want to have a good health care system for the elderly, while keeping the investments to a minimum. • Family of the elderly; they want their family members to live in a comfortable and safe environment. • The company; it wants to create more comfort for the elderly and make money of the product. The interest that aligns with most parties is, the one concerning the living environments of the elderly. This comes forth from the virtue ethics. The elderly cared for us in our early lives and so we have the responsibility, to care for them as they get older. There is a commitment to the elderly to take care of them. Money is also an interest, which plays a part in this scenario. Elderly often make some money from their pensions, but it is often not a lot. Nurses and nursing homes still want to make money, so they can live there own lives and keep the nursing homes running, while governments do not want to invest extra money in health care. The importance of money for the nurses and elderly can be justified, by the argument of sustaining their lives. The interest of money on the level of management and governments is a whole different story, this is mostly for the gain of a whole group or company. For all money invested a reward should stand in return. The workload for the nurses can be looked at from utilitarian point of view. By using the robotic arm in health care the workload of the nurses can be reduced, which will probably make them happier. However it should not come at a loss of quality of health care, since the largest group of stakeholders in this scenario are the elderly and they deserve good health care. The nurses have a functional responsibility to the elderly to make sure the quality of life and of health care is guaranteed. Creating a safe living environment is something which is important to all stakeholders. Therefore this is an issue a company building robotic arms needs to take responsibility for. Following the principle of Kant the company needs to make sure that the robotic arm operates conform all the safety regulations, so no one gets injured by the product. However this also has its limitations. It is also important, the user uses the arm correctly. An arm can be built in several safety structures, but still if users do not use the arm correctly after this some responsibility should be placed with the user. Also installation companies need to be responsible to make sure they do not install the arm incorrect. However the company has a professional responsibility regarding safety using the arm. There are not any real environmental effects when using the arm. Thanks to the modular system the arm is easy to repair and maintain, so it becomes a durable design. If there are any environmental effect caused by the arm, it will mostly be caused by the production of the arm and of the components used in the arm and what companies produce them. This goes hand in hand with where the production takes place and what kind of effect this has on the environment over there and on the local population, following the mental legacy of Levinas. The company needs to keep in mind, where the production will take place. The company want to produce an arm, that can be afforded by the elderly, which means it will probably be produced in countries with lower production costs. This way money can be saved on production and the arm becomes less expensive to purchase. A ETHICAL VIEW ON A POSSIBLE USAGE OF THE ARM 45 The company wants to produce a safe product, which is user friendly. While modules for the arm can be mass produced in low income countries to save costs, the assembly of the arm will be done by well instructed workers. Also the arm will be tested thoroughly, before it is used by the consumer. In the first place most of these instructed workers will be from external companies, but will receive training from the company. Also people working in the health care sector will be provided with short courses. The company wants to create the most comfortable environment for its consumers. The elderly are a group who deserve respect in our society. Since the group of elderly are growing over the last years and is still growing, they often need to stay at home, due to the lack of room in the nursing homes. The company wants to give them a more comfortable life while still keeping the respect for the elderly high, so all elderly should have access to the arm. By making it not to expensive or by creating a loaning system this could be achieved. This is an equality standard. By putting weight behind these standards, all employees should have the same chances and rights. However a difference in rewards should exist for the people who take more risks and people with a function which has more responsibilities. B B KINEMATICS MATRICES Kinematics Matrices Here the matrices described in section 3.2 are given. cos(φs1 ) −sin(φs1 ) 0 0 sin(φs1 ) cos(φs1 ) 0 0 A01 = 0 0 1 a1 0 0 0 1 1 0 0 0 0 cos(φs2 ) −sin(φs2 ) a2 cos(φs2 ) A12 = 0 sin(φs2 ) cos(φs2 ) a2 sin(φs2 ) 0 0 0 1 1 0 0 0 0 1 0 δT + a3 2 A3 = 0 0 1 0 0 0 0 1 1 0 0 0 0 cos(φe ) −sin(φe ) a4 cos(φe ) A34 = 0 sin(φe ) cos(φe ) a4 sin(φe ) 0 0 0 1 1 0 0 0 0 cos(φw ) −sin(φw ) a5 cos(φw ) A45 = 0 sin(φw ) cos(φw ) a5 sin(φw ) 0 0 0 1 cos(φr ) 0 −sin(φr ) 0 0 1 0 a6 A56 = sin(φr ) 0 cos(φr ) 0 0 0 0 1 46 C C COMPONENTLIST 47 Componentlist List of component values used in the motor control circuit. Table 11: Component values for the PCB design Part C1 C2 C3 C4 C5 C6 C7 C8 C9 C10 C_BS C_CO1 C_CO2 C_CO3 C_UP C_VC1 IC1 IC2 IC3 IC4 IC5 L1 L2 LED1 LED2 Q4 Q8 Q9 Q10 Q11 Q12 Q13 Q14 Q15 Q16 Value 12 12 100 100 100 100 100 100 680 680 100 22 22 10 680 10 BD93291EFJ MKL05Z32VLC4 AT30TS75 P82B96 THS4531A 27 6.8 RED GREEN MC-306 IPB114N03L IPB114N03L IPB114N03L IPP80P03P4L-04 IPP80P03P4L-04 IPP80P03P4L-04 BC849SMD BC849SMD BC849SMD Unit pF pF nF nF nF nF nF nF µF µF nF µF µF µF pF µF µH µH Part R1 R2 R3 R4 R5 R6 R7 R8 R9 R10 R11 R12 R13 R14 R18 R19 R20 R21 R22 R23 R24 R25 R26 R27 R28 R29 R30 R31 R32 R33 R34 R35 R_DW R_SHUNT R_UP Value 33 10 10 10 10 10 10 330 330 1 1 33 33 33 137 100 100 100 20 47 47 15 82 10 10 10 10 10 10 10 10 10 5.1 50 16 Unit kΩ kΩ kΩ kΩ kΩ kΩ kΩ Ω Ω kΩ kΩ kΩ kΩ kΩ kΩ kΩ kΩ kΩ Ω kΩ kΩ Ω Ω kΩ kΩ kΩ kΩ kΩ kΩ kΩ kΩ kΩ kΩ mΩ kΩ D D PRINTED CIRCUIT BOARD LAY-OUT Printed Circuit Board lay-out This appendix shows the board lay-out for the designed PCB. Figure 21: Printed circuit board lay-out 48 REFERENCES 49 References [1] European Rover Challenge 2015 Rules, European Space Foundation, 2015. [2] “Robot links and joints,” Robotic bible, visited 16th of June 2015. [Online]. Available: http://www.roboticsbible.com/robot-links-and-joints.html [3] B. Siciliano, L. Sciavicco, L. Villani, and G. Oriolo, Robotics: modelling, planning and control. Springer Science & Business Media, 2009. [4] J. F. Young, “Motor,” Rice University, Electrical and Computer Engineering Department, visited 15th of June 2015. [Online]. Available: https://www.clear.rice.edu/elec201/Book/motors.html [5] V. Vijayalakshmi and K. Karthikeyan, “Energy efficient multipurpose robotic manipulator using induction motor,” International Journal of Advanced Research in Electrical, Electronics and Instrumentation Engineering, vol. 3, December 2014. [6] A. Hughes and B. Drury, Electric motors and drives: fundamentals, types and applications. 2013. Newnes, [7] M. V. Mani, “A quick overview on rotatory brush and brushless dc motors,” Motion Control Department, Ingenia, Barcelona, Spain, Tech. Rep, 2006. [8] P. Yedamale, “Brushless dc (bldc) motor fundamentals,” 2003. [9] R. Condit and D. W. Jones, “Stepping motors fundamentals,” 2004. [10] K. Åström and T. Hägglund, “Revisiting the ziegler–nichols step response method for pid control,” Journal of process control, vol. 14, no. 6, pp. 635–650, 2004. [11] G. F. Franklin, J. D. Powell, and A. Emami-Naeini, Feedback control of dynamics systems, Global edition, 7th ed. Pearson Education Limited, 2014. [12] D. Misir, H. A. Malki, and G. Chen, “Design and analysis of a fuzzy proportional-integral-derivative controller,” Fuzzy sets and systems, vol. 79, no. 3, pp. 297–314, 1996. [13] M. Nour, J. Ooi, and K. Chan, “Fuzzy logic control vs. conventional pid control of an inverted pendulum robot,” in Intelligent and Advanced Systems, 2007. ICIAS 2007. International Conference on. IEEE, 2007, pp. 209–214. [14] H. Malki, D. Misir, D. Feigenspan, G. Chen et al., “Fuzzy pid control of a flexible-joint robot arm with uncertainties from time-varying loads,” Control Systems Technology, IEEE Transactions on, vol. 5, no. 3, pp. 371–378, 1997. [15] I2 C-bus specification and user manual, NXP Semiconductors N.V., 2014. [16] “Introduction to I2 C and SPI protocols,” Byte Paradigm, visited 15th of June 2015. [Online]. Available: http://www.byteparadigm.com/applications/introduction-to-i2c-and-spi-protocols/ [17] “Microcontroller UART tutorial,” Society for Robots, visited 15th of June 2015. [Online]. Available: http://www.societyofrobots.com/microcontroller_uart.shtml [18] M. Zimmermann and K. Dostert, “A multipath model for the powerline channel,” Communications, IEEE Transactions on, vol. 50, no. 4, pp. 553–559, 2002. [19] P. Langfeld and K. Dostert, “Ofdm system synchronization for powerline communications,” in Proc. 4th Int, Symp. On Powerline Communications and its applications, 2000, pp. 15–22. [20] R. Möckel, C. Jaquier, K. Drapel, E. Dittrich, A. Upegui, and A. Ijspeert, “Yamor and bluemove—an autonomous modular robot with bluetooth interface for exploring adaptive locomotion,” in Climbing and Walking Robots. Springer, 2006, pp. 685–692. [21] “A look at the basics of bluetooth technology,” Bluetooth, visited 15th of June 2015. [Online]. Available: http://www.bluetooth.com/Pages/Basics.aspx REFERENCES [22] P. Corke, Robotics, vision and control: fundamental algorithms in MATLAB. Business Media, 2011, vol. 73. 50 Springer Science & [23] B. Siciliano, “The tricept robot: Inverse kinematics, manipulability analysis and closed-loop direct kinematics algorithm,” Robotica, vol. 17, no. 04, pp. 437–445, 1999. [24] J. Uicker, J. Denavit, and R. Hartenberg, “An iterative method for the displacement analysis of spatial mechanisms,” Journal of Applied Mechanics, vol. 31, no. 2, pp. 309–314, 1964. [25] L.-C. T. Wang and C. C. Chen, “A combined optimization method for solving the inverse kinematics problems of mechanical manipulators,” Robotics and Automation, IEEE Transactions on, vol. 7, no. 4, pp. 489–499, 1991. [26] R. Mukundan, “A fast inverse kinematics solution for an n-link joint chain,” 2008. [27] DB42S03 Brushless DC Motor, Nanotec Electronic GmbH & Co. KG, 2007, revision 4, 2014. [28] BD93291EFJ Dual Synchronous Buck Converter, Rohm Semiconductor, 2012, revision 1 2012. [29] P82B96 Dual bidirectional bus buffer, NXP Semiconductors, 2001, revision 8, 2009. [30] Kinetis KL05 32 KB Flash, Freescale Semiconductor Incorporated, 2012, revision 4, 2014. [31] OptiMOSTM 3 Power-Transistor IPP114N03L G, Infineon Technologies AG, 2006, revision 2.0, 2010. R [32] SIPMOS Power Transistor SPP15P10PL H, Infineon Technologies AG, 2008, revision 1.4, 2011. [33] Ultra Low Power, Rail-to-Rail Output, Fully-Differential Amplifier THS4531A, Texas Instruments, 2012. [34] AT30TS75 9- to 12-bit Selectable, ±0.5 ◦C Accurate Digital Temperature Sensor, Atmel Corporation, 2011, revision 8748B, 2012. [35] TDS1000- and TDS2000-Series Digital Storage Oscilloscope, Textronix, 2006. REFERENCES 51