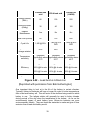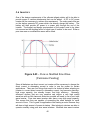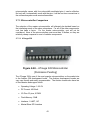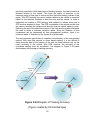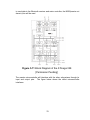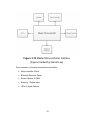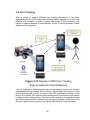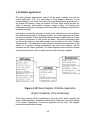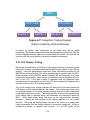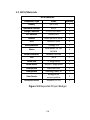
1
ABEC Autonomous Brilliantly Engineered Cooler UCF Senior Design Fall 2012 Team #23 Marc Bianco Andrew Boyles Chris Echanique Garrett Lee Sponsored By Table of Contents 1 2 Introduction.................................................................................................... 1 1.1 Executive Summary................................................................................. 1 1.2 Motivation ................................................................................................ 1 1.3 Objective and Goals ................................................................................ 2 1.4 Requirements and Specifications ............................................................ 2 1.4.1 Master Microcontroller Specifications and Requirements ................. 4 1.4.2 Sensor System Specifications and Requirements ............................ 4 1.4.3 Wireless Receiver Specifications and Requirements ........................ 6 Research ....................................................................................................... 8 2.1 Past Projects ........................................................................................... 8 2.1.1 The Tailgate Buddy ........................................................................... 8 2.1.2 Gaucho: An Internet-Controlled Power Wheels Car.......................... 9 2.1.3 Additional Resources ...................................................................... 11 2.2 Chassis.................................................................................................. 11 2.2.1 Motors for the Chassis .................................................................... 15 2.2.2 Power Supply (Batteries for Chassis Motors) ................................. 19 2.2.3 Motor Controller .............................................................................. 20 2.3 Charge Controller .................................................................................. 32 2.4 Solar Panels .......................................................................................... 33 2.5 Batteries ................................................................................................ 37 2.6 Inverters ................................................................................................ 40 2.7 Master Microcontroller ........................................................................... 41 2.7.1 Microcontroller Comparison ............................................................ 43 2.7.2 Master Microcontroller Selection ..................................................... 47 2.8 Wireless Receiver ................................................................................. 47 2.8.1 Wireless connection comparison .................................................... 47 2.8.2 Bluetooth Receiver Classes ............................................................ 48 2.8.3 Bluetooth Receiver Comparison ..................................................... 48 2.8.4 Bluetooth Receiver Selection .......................................................... 50 2.8.5 Bluetooth Receiver Integration ........................................................ 50 2.9 User Tracking ........................................................................................ 51 2.9.1 Optical User Tracking ..................................................................... 51 i 2.9.2 Ultrasonic Positioning ..................................................................... 52 2.9.3 GPS Tracking.................................................................................. 53 2.10 Mobile Application .............................................................................. 60 2.10.1 iPhone Application ....................................................................... 61 2.10.2 Android Application ...................................................................... 61 2.10.3 Windows Mobile Application ........................................................ 61 2.11 3 Design ......................................................................................................... 64 3.1 Chassis.................................................................................................. 64 3.2 Solar Panel ............................................................................................ 66 3.3 Charge Controller .................................................................................. 69 3.4 Inverter .................................................................................................. 71 3.5 Battery ................................................................................................... 72 3.6 Steering ................................................................................................. 74 3.7 Master Microcontroller ........................................................................... 77 3.8 User Tracking ........................................................................................ 80 3.9 Sensor System ...................................................................................... 84 3.9.1 Previous Projects’ Sensor Systems ................................................ 84 3.9.2 Surface Protrusion Method Comparison ......................................... 86 3.9.3 Gap Detection Method Comparison ................................................ 86 3.9.4 Surface Protrusions ........................................................................ 87 3.9.5 Gaps and Declines.......................................................................... 88 3.9.6 Sensor System Integration .............................................................. 89 3.10 LED Lights.......................................................................................... 91 3.11 Mobile Application .............................................................................. 94 3.11.1 GPS Tracking .............................................................................. 95 3.11.2 Remote Control ........................................................................... 95 3.11.3 Obstacle Avoidance Notification .................................................. 96 3.11.4 OFF Mode ................................................................................... 96 3.12 4 LCD Display ....................................................................................... 62 LCD Display ....................................................................................... 96 Testing......................................................................................................... 98 4.1 Chassis.................................................................................................. 98 4.2 Motor Controller ..................................................................................... 99 4.3 Solar Panel .......................................................................................... 101 ii 5 6 4.4 Servo System ...................................................................................... 102 4.5 Inverter System ................................................................................... 103 4.6 User Tracking ...................................................................................... 104 4.7 Sensor System .................................................................................... 107 4.7.1 Individual Ultrasonic Sensor Testing ............................................. 107 4.7.2 Sensor System Testing ................................................................. 109 4.8 Bluetooth Receiver Testing ................................................................. 111 4.9 Master Microcontroller Testing ............................................................ 111 4.10 Mobile Application ............................................................................ 112 4.11 LCD Display Testing ........................................................................ 113 4.12 Complete system Test ..................................................................... 114 Administrative Content .............................................................................. 116 5.1 Budget ................................................................................................. 116 5.2 Bill Of Materials ................................................................................... 118 5.3 Division of Labor .................................................................................. 119 5.4 Milestones and Timelines .................................................................... 119 5.5 Project Summary ................................................................................. 119 5.6 Conclusion........................................................................................... 121 Appendix ................................................................................................... 122 6.1 Works Cited ......................................................................................... 122 6.2 Reproduction Permission .................................................................... 124 iii 1 Introduction 1.1 Executive Summary The Ultimate Tailgate Station is, in essence, an autonomous cooler on wheels that addresses the common tailgating issues such as transporting heavy loads and powering portable electronic devices. It features a GPS tracking system to track the user’s smart phone and directs its path according to the user’s position. It uses motion sensors to handle object interferences by rerouting the station’s path. Its sustainable energy framework uses a solar panel that not only recharges the station, but offers clean renewable energy to charge external devices. Due to the growing shift towards energy sustainability, a strong emphasis on solar power is considered in order to power the project. The use of this clean renewable energy source allows the system to be self-sustained, while also providing this energy to external devices. Since the applications of this project are not only limited to tailgating (i.e. camping, golfing, picnics), extending its use will further help to reduce environmental impact of nonrenewable energy sources that would otherwise be used to supply power. 1.2 Motivation The age old tradition of college tailgating is perceived by most as an exciting and spirited way to prepare for a university sporting event. However many who have yet to explore the practices of college extracurriculars are not aware of the taxing efforts to transport such tailgating imperatives like a cooler full of beer and ice. Not to mention the fact that these essential commodities must be delivered over great distances from parking spots spread remotely across campus. Another tailgating dilemma is that the charging and powering of technological necessities such as cell phones and speakers suffer from the apparent lack of outlets at most tailgating grounds. Moreover, the use of such outlets is only burning more unnecessary coal and adding to the proverbial carbon footprint. Thus, motivated by the need to make transporting goods easier and provide renewable energy to external devices while also sustaining the system with this provided energy, the Ultimate Tailgate Station is proposed. 1 1.3 Objective and Goals To provide the user with a hands-free hassle-free autonomous transport of heavy payloads To implement an autonomous framework that tracks and follows a user’s current location To promote green renewable energy by creating a self-sustaining system that charges itself using solar power To continue this notion of renewable energy usage by extending power supply to small external devices for users at tailgating events. To put to practice the engineering concepts learned in class through research, design, and testing of the system To create a final product that is fully functional and usable after project submission 1.4 Requirements and Specifications Dimensions o The unit shall be no larger than 3 feet in width, 5 feet in length, and 4 feet in height. o The unit shall be no heavier than 100 pounds unloaded. o The unit should support up to 100 pounds of a full load of goods (i.e. food, drinks, ice, etc.) Power o The system should last at least three hours on a full charge without solar power recharge. o The system shall be able to fully recharge in eight hours under ideal weather conditions. o The system should supply power to small external devices such as cell phone chargers, radio, speakers, mini electronic grill, etc. o The battery should be interchangeably rechargeable between both solar power and wall outlets. User Tracking o The station should track the user’s current location within less than ten feet of accuracy on average. o The station should detect the user’s location from at least 20 feet away. o The station should proceed to follow the user until a command is given otherwise. o The station should update the user’s current location at a rate of at least five times per minute. o The station should follow the user at a walking pace proportional to its distance from the user. 2 Collision Detection o Objects interfering with the path of the station should be detected at least five feet away. o Upon detection, the station should be able to reroute its path around the object to continue tracking the user within a minute of encountering the interfering object. o Collision detection should interrupt current tracking process to reroute vehicle. o Collision detection should not be employed while the user is controlling the vehicle with the remote control feature. Software o The autonomous framework of the system should be dictated by a single microcontroller. o The microcontroller shall be programmable using the high level C programming language. o The system shall respond to user commands via Android Smartphone application. o The user’s Android application shall include a handheld remote control feature to manually guide the station as a fail-safe to autonomous tracking. o The Android application shall be available on the Android market for any user to download. o The Android smartphone should communicate with the vehicle via Bluetooth. o The range of communication between mobile phone and vehicle should be at least 20 feet. Budget o The entire unit and parts for all subsystems shall not exceed $2500 in total costs. o Pre-purchased or pre-owned parts should be incorporated to the design to reduce costs. o Parts shall be both cost-effective and affordable, without sacrificing reliability and performance. Durability o The system should be weather resistant and still operable in the presence of mild rain. o Parts shall be easily replaceable if broken or damaged. o The system should be operable at temperatures as high as 90 degrees and as low as 50 degrees. o The vehicle shall be operable on grassy and concrete terrain without imposing any damage to the unit. 3 Additional Features o The vehicle should include LED lights to notify the user of the different states that the vehicle is in. o The LED lights should be colored for each different state (ie red for stop, green for RC, blue for GPS tracking, blinking yellow for object interference etc) o The system should also include speakers outputting a sound when the vehicle encounters an object. 1.4.1 Master Microcontroller Specifications and Requirements The master microcontroller will be the brains of the vehicle. It will control all of the subsystems of the ultimate tailgate station. The master microcontroller is responsible for all of the decisions made for the vehicle’s movement. There are a variety of different types of microcontrollers made for heaps of applications, but the one best fit for the vehicle’s microcontroller will be unique. A main function of the vehicle is that it can be controlled by an android phone in case of an emergency. Therefore, the microcontroller will need to be compatible with android’s accessory development kit. The software is free and available online. The android phone also needs a way to communicate with the microcontroller. The master microcontroller must have reprogrammable memory. Internal flash or EE prom are a necessity for testing and debugging. The amount of memory needed for the master microcontroller will be dependent upon how many devices that are directly connected to the master microcontroller. The amount of memory will also depend on the amount of instructions needed to move the vehicle and data logging. The master microcontroller must also have the right peripherals. The master microcontroller will connect with the ultrasonic sensors, motor controller, android phone, steering, and LEDs. The outputs of the microcontroller must be connectable to the inputs of the slave subsystems. As far as physical factors that can affect the microcontroller, size will not be an issue. The chassis has a compartment that has more than enough space for all of the small electronic components needed. Temperature of the microcontroller will need to be monitored, since the vehicle will be outdoors most of the day. The microcontroller will need to be located inside of the vehicle, so that it is not in direct line with the sun. 1.4.2 Sensor System Specifications and Requirements When tailgating, there are many people, places, and things that could be potentially harmful to the ultimate tailgate station. Not only are they dangerous to 4 the ultimate tailgate station, the station may be dangerous to them. The vehicle will be able to avoid any kind of contact with the help of a sensor system. The sensor system will be used for protrusion, gap, or sharp incline avoidance. The sensor system needs to be able to cover the entire front of the vehicle, anything the vehicle will have trouble driving over, as well as a wide enough range so that it can turn safely. Since the vehicle is always following and tracking a device, there is only need for the vehicle to move forward. Since the station wants to avoid touching any obstacle, distance accuracy is the most important factor for the sensor system. The station must be able to accurately detect how far obstacles are away from the station in order to avoid them. It must also be able to tell the slope of the ground in the near future so that it does not get stuck with the front or rear wheels hanging above ground. The sensors must be outdoor weather friendly. The station is primarily used outdoors, so effects of sunlight, wind, humidity, and temperature should be considered with selection. Since the station is at least 5 feet long and 3 feet wide, the sensors need to be able to detect at least 4 feet away in order for the station to make a forty five degree turn and avoid the obstacle in front of it. The figure below shows the area in front of the station that needs to be covered. Figure 1-1 – Sensor System Coverage [Figure created by Garrett Lee] 5 In order to detect gaps in the ground and sharp slopes, there will be a distance sensor underneath the front of the chassis. The sensor needs to be able to measure distance as well. This distance will be able to calculate the slope of the ground and check for gaps and ledges. This sensor must be able to detect short distances, or distance less than 2 feet. The figure below shows the area that needs to be covered for gaps and ledges. Figure 1-2 – Underneath Senor Coverage [Figure created by Garrett Lee] 1.4.3 Wireless Receiver Specifications and Requirements The wireless receiver for the ultimate tailgate station will always be used. Whether it is for user tracking or for the remote control, it will always be turned on. The wireless receiver is essential for the communication between the android phone and the microcontroller. The wireless receiver must have at least a 20 foot range. The wireless receiver needs to have a low power draw since it will always be powered on and always connected. 6 Additional Features o The vehicle should include LED lights to notify the user of the different states that the vehicle is in. o The LED lights should be colored for each different state (i.e. red for stop, green for RC, blue for GPS tracking, blinking yellow for object interference, etc.) o The system should also include speakers outputting a sound when the vehicle encounters an object. 7 2 Research 2.1 Past Projects Upon formulating several project ideas, much time was spent researching various senior design projects done in the past. A focused was placed on projects that were not only feasible and relatively cheap to design, but also had a fun and practical use after the fact. More attention was given to project ideas that had even balance of both hardware and software subsystems as well as some complexity in design to encourage learning. One senior design project in particular, The Tailgate Buddy, incorporate many interesting feature and laid the foundation for this current project. 2.1.1 The Tailgate Buddy The Tailgate Buddy is a senior design project at UCF in the fall of 2008. It was designed by Greg Koeppen, John Fucco, John Maskasky, and Ken Kauffman with the motivation to make tailgating at UCF easier. Their project is essentially an autonomous Power Wheels vehicle with a mounted cooler for the transport of food and beverages at tailgating events. Below is a photo of their fully constructed Tailgate Buddy vehicle in use. Figure 2-1 – The Tailgate Buddy [Permission to reprint given by Kevin Kauffman] 8 The project is broken down into several subsystems containing both hardware and software. These subsystems include the drive train, user tracking, avoidance detection, remote control, GPS tracking, water gun, and power supply. The drive train module deals with the mechanical components such as the motor, gears, and drive axel with wheels. In this project, they choose to manipulate the design of a Power Wheels vehicle and utilize its framework as the basis for their vehicle. The user tracking subsystem involves IR transponders to pinpoint the distance and direction of the user in order to route the vehicle accordingly. For avoidance detection, they have researched and implemented an algorithm to reroute the vehicle when the ultrasonic sensors mounted on the front of the unit detect an object in its path. This object detection subsystem also takes advantage of the water gun, which activates when pedestrians interfere with the vehicle’s path. A remote control module is added for users to manually maneuver the Tailgate Buddy in the event that user tracking is not necessary or desired. Here they utilize two channel radio system to control the steering and turning of the unit. A GPS tracking subsystem is added to map the GPS location of the vehicle and store this information to an SD card for later user viewing. The power subsystem supplies power to all these systems using two 12 Volt lead acid rechargeable batteries. All subsystems are connected to the master microcontroller, which controls the operations of each system. Much of the ideas and inspiration for this project was drawn from the design of The Tailgate Buddy. Our project will contain similar user tracking, avoidance detection, and drive train subsystems. However there are certain significant differences. For instance, a heavy focus will be placed on the power supply. As mentioned previously, due to the growing shift towards green energy there is a desire to include a power supply system that charges the vehicle using solar panels in order to promote this notion of renewable energy and sustainability. Also a mobile application will be incorporated to handle remote control of the vehicle, toggle user tracking mode, and include a feature to monitor its current battery life. While these additional features will be added to the Ultimate Tailgate Station, the Tailgate Buddy documentation and design will be used as a reference for this project. 2.1.2 Gaucho: An Internet-Controlled Power Wheels Car Another senior design project worth referencing is the Gaucho, designed by David Antler, Andrew Taylor, and David Huang at the University of Illinois. Their concept is similar to that of the Tailgate Buddy in that they modified a Power Wheels vehicle to respond to user input. It is a more simplistic take on the project; it requires the user to control the vehicle manually via Internet Browser remote control interface. This differs in the sense that it lacks the autonomous user tracking as well as object interference handling. Below is a block diagram of their project. 9 Figure 2-2 – Block Diagram for Gaucho [Permission Pending] The Power Wheels vehicle was previously modified into a remote-controlled vehicle via XBee and then was modernized so that it could be controlled through an Internet browser remote control interface. The block diagram in Figure 2-3 above demonstrates the architecture of the Gaucho project. When the user accesses the remote control application on their mobile application, JavaScript maps the selected button presses to character commands and submits them via HTTP as GET requests. Then the Beagleboard responds to these requests using them as arguments to a script. The microcontroller interprets these inputs and issues commands to the motors. The benefit of this particular project is that, unlike Tailgate Buddy, it features a remote controlled mobile application that interfaces with the microcontroller onboard. This offers some convenience not only for the end user by simply having to access the vehicle’s remote control via mobile device but also for the developers by not having to purchase an extra handheld remote controller to incorporate in the design. 10 2.1.3 Additional Resources Along with the previous projects mentioned above, many other resources will be utilized for our project. There are many forums online that offer tons of information on user submitted projects and ideas that might cater to our needs. One in particular is www.modifiedpowerwheels.com. This site offers an array of threads with topics ranging from the electrical architecture of a Power Wheels vehicle to its modification in power consumption, controls, etc. Other forums on user tracking, solar power supply, and Android app interfacing will be considered for research and design purposes. All authors of any resources used will be credited in the reference list located in the Appendix of this paper. 2.2 Chassis One of the main functions of The Ultimate Tailgate Station project is the automation of the tailgate station to make it easy to move. In order to for this to be possible the station must have a Chassis. There are many requirements that had to be considered when selecting what type of chassis would be used for this project. Deciding if it is better to build a new chassis for this project or simply purchase one from a store or online must also be considered as it can have a large effect on how time and money is used for this project. First, because this project has many components and subsystems the size of the chassis is very important. There are two main factors to consider when picking the size of the chassis. One, how much weight it will be able to support and two the actual physical dimensions of the station. For weight all of the different components that the chassis will have to hold and support must be considered. The Chassis will have to support the weight of the cooler as well as the drinks, food and ice that will be stored inside of it. It will also have to support the weight of the solar panel, GPS tracking system, the sensors for obstacle avoidance and the servo systems. One of the heaviest components in this project, which is all of the batteries that will be needed to power all of the components on our tailgate station, will also need to be mounted and supported. Based on all of the components that the chassis will have to support it was decided that the chassis would be required to hold one hundred pounds. For the actual dimensions of the station there are also two important factors to consider. First, there must be enough area on top of the chassis to mount and hold all of the components that are to be included in this project. The cooler will most likely be the largest and heaviest component that will have to go on the chassis, so the chassis dimensions must be on the order of feet to be able to hold the cooler and be stable. Second, our station may be able to move on its own but in order to get to the location where people will be tailgating or camping, it must be driven there in a car by the owner of the station. For this reason another requirement is that the chassis must be small enough to fit in the bed of a pick-up truck. The requirement was chosen to be a pick-up truck bed as opposed to car because 11 the bed of a pick-up truck will give more flexibility in size than a standard four door car will. Another important factor when deciding on a chassis to use is the size and style of the wheels that will be attached to the chassis. Since this project will be used for events such as tailgating, camping and picnics it will most likely experience a variety of terrains. The Ultimate Tailgate Station will have to be able to drive on concrete, grass, dirt, and other outdoor surfaces. As well as driving on different surfaces the tailgate station must also be able to drive over obstacles such as sticks, rocks, and uneven surfaces. The larger the wheels are the better it will be at handling the different terrains that it will most likely experience. The tires will need to have rims that are at least four inches in diameter so the overall size of the tires will meet this projects requirement. The tires that are selected will also preferably have some sort of tread on them to help the wheels handle the different terrains. With all of these conditions considered the next step is to decide if we will buy all of the parts and build our own chassis or if we will find a chassis that meets all of our requirements and purchase it. When trying to decide whether to build a new chassis or buy a chassis there are many pros and cons to consider for both choices. Building a new chassis is the first idea that was considered for designing the tailgate station. The ability to design the chassis in any way desired was very appealing. This would allow the chassis to be built specifically for this project which could be much better than modifying an existing chassis that already has a different purpose. Another positive of building a new chassis is that it would most likely save money over buying one. The average price online for an electric ride able car, children’s toy, is about 300 dollars. This is a very steep price for the chassis that is needed for this project. The chassis that would be bought online would also come with many extra components that will not be needed in this project, such as the plastic frame, and would most likely remove from the chassis all together. Also considering the toy car is built for children it dives at very low speeds it would require replacing some of the mechanical and electrical components anyway. If a new chassis is to be built only the components that are absolutely necessary to this project would have to be purchased. The main materials that would have to be bought are wood or metal for the frame, four wheels, two axles, hardware to set up the front wheel steering, gears for the shaft rotation of the rear axle, and miscellaneous hardware for holding everything together. I was decided that wood for the frame of the chassis would be better for this project because wood is much easier to work with than metal. No special equipment for cutting metal would be needed. The wood could be cut and constructed using a saw and drill, which are much easier to find and operate than metal working equipment. Wood is also much cheaper to buy then metal. Wooden 2 by 4s have been found online that are 10 inches long selling for five to seven dollars, while comparable pieces of Aluminum are 10 to 15 dollars apiece and comparable pieces of steel are 45 dollars apiece. This alone shows that a considerable amount of money can be saved by building the chassis frame out of 12 wood instead of metal. The wheels, axles, and miscellaneous hardware would be very easy to obtain and should not be too expensive. Lawn mower wheels where considered for the wheels in this project, because they come in different sizes have a decent amount of tread on them and can be easily found at many hardware stores. A simple metal rod would be used for the axels, which can also be easily found at most hardware stores. The last two components, would have to be designed and built, this is where building a new chassis gets to be more difficult. The first challenge with building a new chassis is for the rear axle to rotate some sort of mechanical gear system to transfer the power from the motors to the shaft of the rear axle will be needed. Second, designing the method of steering the front wheels as the back wheels would be rigid. There are two main methods of steering “rack-and-pinion” and “recirculating ball steering”. Ball steering is much more complicated to build than rack-and-pinion steering and requires more complex hardware. For this reason rack-and-pinion steering would be used in designing The Ultimate Tailgate Station. Having considered all of the factors that go into building a new chassis the main advantage would be that a considerable amount of money could be saved. The main disadvantage of building a new chassis is that a lot of time will be need to build the chassis, and time will be very important when in the fabrication stage of this design project. Now lets consider the positives and negatives of buying a chassis that already meets the requirements of this project. If the chassis for this project were to be purchased, the first road block is to find a chassis that is already built that will do all of the things that are required for this project. Many searches have been done to look for stores that sell small premade chassis. The only stores that seem to have anything at all related to this are hobby shops and the chassis that they have are for RC cars and would not be practical for our purposes as they are much too small. A previous project “The Tailgate Buddy” had a similar project and they used the chassis of an old electric ride able car. This seems to be the best solution for purchasing a chassis, because the chassis will be very close in size to the chassis that will be need for this project. This idea was also confirmed after talking to Dr. Richie who suggested to use a similar type of car for this project. Buying an electric toy car has many advantages, other than just providing the chassis, for this project. One of the most important things to consider when buying a pre-built chassis is that it will meet all of the requirements of this project. An advantage of buying an electric toy car online is that it will come with some specifications as to weight limitations and dimensions, these dimensions can be compared directly to what is required for this project and a decision can be made if the chassis will meet the two major requirements for size and weight of this project. Another advantage of purchasing an electric toy car is that it will have many of the components that are needed for this project and they will already be built and incorporated together. This will help to save a lot of time when the chassis needs to be built. Instead of having to design and build the chassis frame and then figure out how to mount 13 and install all of the drive train components to the frame, an existing fame could just be modified. Only the parts that are not needed from the store bought frame will have to be removed. The parts that are needed for the project but do not meet the projects specifications can be replaced. These components will be things like the motors that run the rear axle and the batteries that run the motors. These components will only be replaced so the area of the chassis they are taken from is where the replacement can most likely go. This will ultimately depend on which chassis is purchased, if a chassis is purchased. While it would save some money to buy the materials and build a chassis, it would also take a lot of time to design everything and figure out how it will all fit together. One concern is that the electric toy cars that are on the major store websites are between two hundred and four hundred dollars. Luckily on other websites such as ebay and craigslist these very same cars can be found “Used” for much cheaper, around one hundred dollars. The last concern that was considered was the fact that the chassis’ that would be bought online are all built for a different purpose than this project. However, it is believed that all of the negatives are outweighed by the time that will be saved by not having to build and design the entire chassis. Also, if something about the pre-built chassis is not up to this projects standard then it can be modified. Based on the information discussed in the previous pages, it was decided to purchase a ride able electric toy car online from a website such as ebay or craigslist. Figure 2-4 – Fisher-Price Cadillac Escalade [Permission Pending] 14 2.2.1 Motors for the Chassis Whether a new chassis is built or purchased for this project, new motors will be needed to increase the speed of the station. If a new chassis is built, it will be built from scratch so motors for propulsion will have to be purchased. If a chassis is purchased (ride able electric toy car) and comes with motors they will most likely be too weak for this project. The motors that come with these types of small cars are intended for very low speeds. The typical motors that come with the cars I found online only allow the car to move at a top speed of 5 mph. We would like our station to move faster than 5 mph, so a new motor will be needed. When it comes to selecting motors there are two primary types of motors to choose from, a gas motor and an electric motor. This project is intended for outdoor use and a gas motor could be used for this reason. However, this project will incorporate a solar panel for renewable energy and thus an electric motor will be better for this application. An electric motor will not require gasoline and will be much easier to work with for this project. Electric motors come in two distinct configurations. The two types of electric motors are the AC motor and the DC motor. These motors differ in many ways, and there are a few aspects to consider when selecting a motor. The method of driving the motor, the method of controlling the motor, the output of the motor, the maintenance required for the motor and of course the price of the motor. Each motor has different advantages and disadvantages so all of these factors will be considered when deciding which motor is best for this project. The main difference between the two types of motors, AC and DC, is the method in which each motor is driven. Deciding which method of driving the motor is the best and most practical for this project is the first step to choosing a motor. AC motors require alternating current to run, while DC motors only require direct current, as the names suggest. DC motors can be run directly from a battery because they allow direct current to flow. AC motors can also be driven by using a battery but a DC to AC inverter is also needed to convert the DC current from the battery to AC current. After the alternating current is produced by the DC to AC inverter the current will then need to be brought to the correct amplitude and frequency for the motor that is to be driven. This means that another control unit will be needed to bring the current to the correct levels to run the AC motor and get the needed output. The AC motor will require a little more hardware to drive the motor than the DC motor will, giving the DC motor the edge in this aspect. The extra hardware that is needed for the AC motor is not very complicated and can be connected directly to a battery but the extra hardware will mean extra cost when purchasing a motor. The method of controlling the motors is actually quite different for both. The DC motors are very simple when it comes to speed control; the motor will have a rated voltage and in most cases can be run at higher or lower voltages than the rated voltage. Providing more or less voltage to a DC motor will allow the motor to reduce or increase the speed. For a DC motor only a device that can regulate 15 the voltage, such as a microcontroller, is needed for speed control and variation. The AC motor is similar to the DC motor in the fact that it only needs a motor controller to control the speed, in this case an AC motor controller. However, the AC motor controller is more complicated than the DC motor controller because it uses the line frequency to adjust the speed instead of the input voltage. The AC line frequency can be controlled using a DC to AC inverter that has the capability; these inverters are more expensive. It is important to also consider how long the AC and DC motors will last and what maintenance is needed for proper operation of both motors. Whichever motor is purchased it will have to be able to last through all of the testing that will need to be performed on this project as well as the successful presentation of this project. There is also a desire to reduce the amount of maintenance that is needed for proper motor operation, the less maintenance that is needed for the motor the better. AC motors require little to no maintenance and if operated within the normal parameters for the given motor the motor should last a very long time, up to 15 years. In terms of years, the AC motor will more than cover the amount of time it will need to be used. Some AC motors online require occasional lubrication of the bearings, while others do not require any lubrication at all. To save time and worry the motors that do not require manual lubrication would be purchased. The DC motor has two distinct types, the brushed and brushless DC motors. Each of these DC motors requires different maintenance and up keep. The Brushless DC motor is very similar to the AC motor in the fact that no maintenance is required and the life expectancy is very long, much longer than is needed for the project. The Brushed DC motor is very different than both the DC brushless and the AC motors. Brush motors require more maintenance and have a shorter life expectancy. The life expectancy is not an issue because even this motor will last much longer than is needed for this project. The brushes in the DC brush motors will need to be inspected regularly; overtime the brushes will wear down and need to be replaced. The process of replacing the brushes does not seem to be overly difficult but if the brushes need to be changed, not only will time be lost in replacing them, but money will also be lost in buying new brushes. Having considered what is needed to power and control both the AC and DC motors as well as what maintenance is required for both, it is now important to determine what the output capabilities of both motors are. This project calls for a motor that is powerful enough to move a station that weighs over one hundred pounds and will be used on varying terrains. To determine if the motor is strong enough to move the station the torque of the motor will need to be determined. Torque is the tendency of the motor to rotate and is measured in N times m (Newtons x meter). The most torque that will be needed at any point in operation of the station will be when the station is starting to move from rest. The better the motor is at moving the station from rest the better it will be for this application. Especially, because the station may have to start and stop a lot when it is following the user or adjusting for obstacle avoidance. 16 It was initially thought that DC motors would have a large advantage in terms of torque over the AC motor but after looking up some AC and DC motors with about the same power output this does not seem to be the case. The AC and DC motors that were compared all had an output of about 200 Watts and were found on Alibaba.com. Alibaba.com is a company that ships all kinds of products all over the world including electrical and mechanical components. For both of the AC and DC motors the starting or peak torque was around 2 N.m, but where the two types of motors differed was in the overall rated torque of the motor. In most cases the DC motors seemed to have a higher overall torque than the AC motors. This is the exact opposite of what was expected. Luckily there was also a good explanation on another website for why this is the case for many of the motors that were compared. The explanation included a very good figure to show the relationship between torque and the speed of the motor for both AC and DC motors. The figure is shown below. Figure 2-5 – Torque vs Speed for both AC and DC motors [Permission Pending] 17 The torque will remain constant until the station reaches its top speed and then the torque will begin to decrease. This is because the motor torque depends on the amount of current being provided to the motor and when the station is accelerating to the max speed the controller will be giving the max current it can provide. As you can see from the figure the DC motor torque decreases at a slower rate than the AC motor once the base speed is achieved. This is the reason that the DC motors usually had a higher overall torque than the AC motors even though there starting torques were very similar. Even though it does not seem to be an issue either way because the starting torque is about the same for both types of motors, the DC motors have the advantage in this category because in general they have a higher overall torque. Based on all of the comparisons that have been made in this section of the report it is believed that the DC motor is better for this application. The DC motor will be much easier to power because only a battery will be needed. Also the method for controlling the DC motor is pretty simple when compared to the AC motor. The DC motors have the advantage in overall torque. DC motors are even cheaper than comparable AC motors. Even if a brushed DC motor is chosen, the advantages of the DC motor over the AC motor will still outweigh the fact that the brushes may have to be replaced on the DC motor. The last step to selecting a motor will be to compare the brushless to the brushed DC motor. In many ways the two DC motors are very similar. The two main areas that the DC brushed and DC brushless motors will differ are maintenance and cost. The DC brushed motor uses brushes, as the name would suggest, and the brushes are used to carry the current in the motor. Over time the brushes will wear down and will need to be replaced. DC brushless motors do not have the brushes and only use magnets to rotate the rotor. For this reason the DC brushless motors will require much less maintenance because no parts will wear down and need to be replaced. The cost however is very important, as this project has a budget of about 1500 dollars and any time that money can be saved without sacrificing quality, it will most likely benefit the project. Brushed motors are generally cheaper than brushless motors, which gives the brushed motors the advantage over brushless motors. The first place we decided to look for motors was on hobby shop websites. Unfortunately the motors at hobby shops were much too small for this project. The next option was to find a motor online that is strong enough to move a vehicle that is about 150 pounds. It was very difficult to think of a similar application to this project to get an idea of the size of motor that would be needed. A website was found however that sells parts for electric scooters, which is actually very close to what will be needed for this project. A scooter is a good comparison for motor strength because there is very little hardware so the weight of the scooter with a person on it will weigh a little more than the person weighs. The motors found on monsterscooterparts.com also provided compatibility with certain scooter. The Razor E200 scooter is compatible with a 24 volt, 200 Watt motor. The weight limit of the Razor E200 scooter was 18 checked and found to be 154 pounds which is right about what is needed for this project. Two 24 volt, 200 Watt motors will be used for this project; one for each rear wheel. Figure 2-6 – 24 Volt, 200 Watt Electric Motor [Permission Pending] The scooters only use one of these motors so the two motors that will be incorporated into The Ultimate Tailgate Station will be run using one 24 volt battery so the two motors together are not too powerful. This will also allow for flexibility in the motor speed, because if it is desired to increase the speed of the motors then only another battery will need to be added in series with the existing battery. The 24 volt 200 watt electric motor with a 5M belt sprocket from monsterscooterparts.com is the motor that will be purchased. This motor will meet the requirements of this project and should be powerful enough to move the weight of the station. This motor is also very reasonably priced at thirty-eight dollars; many of the similarly sized motors that were found were priced around fifty dollars. The motor can be found in Figure XX, shown above. 2.2.2 Power Supply (Batteries for Chassis Motors) The motors that will be powering the drive train of The Ultimate Tailgate Station will be 24 volt motors. These were selected for many reasons which are covered in the Motors research section of this report. One advantage of DC motors is that they can be easily run off of batteries. Not only can they be run directly off of the batteries they can also be run at more or less voltage than the motor is rated 19 for. If the motor is run at a voltage that is higher than the rated voltage there is a good chance the life of the motor will be shortened due to over running the motor. If this is needed the life of the motor should still be long enough for this project’s duration. Inversely, the motor can also be run at voltages that are lower than the rated voltage. The plan for the batteries to the motors is to use one 24 volt battery. The motors are able to be run using one battery because the DC motor controller that is to be purchased can control two motors. The motor controller only has one connection for a battery and the power will be used for both motors. This will save some size and weight, as opposed to two 12 volt batteries, when building and testing the Ultimate Tailgate Station. The motors will be rated to run at 24 volts and the 24 volt battery will first be used for testing. Until the motors, batteries and motor controller are purchased and put through testing it will be unknown what speed can be achieved with these parts. The reason one 24 volt battery is being used is because using less voltage than the motors are rated for will only make the motors run slower and until testing is completed it will be unknown if the speed will meet the requirements of this project. The actual weight of the station is not known yet. It has been estimated that the station will weigh about 150 pounds. If the 24 volt battery is too weak to move the weight of the station then the speed of the motors will have to be increased. If it is desired to increase the speed of the motors then only another battery will have to be added in series to the existing battery to increase the supply voltage to the motors. The next choice would be to use Lithium Ion or a Lead Acid battery. The solar panels will be able to charge either type of battery. The pros and cons of each of these types of batteries will be covered in the battery research section. 2.2.3 Motor Controller Once the motors that will be used for the Ultimate Tailgate Station have been selected it is necessary to find a way to control the motors. The DC motors can be run by connecting a battery directly to the two battery wires of the motor. All that would be needed to control the motors would be a switch to connect and disconnect the batteries from the motors. This will make the station run at one speed because there is nothing there to control the amount of voltage being supplied to the motor. While the station could be operated at one speed only, it may not be the best way to operate the station. When the station is following the user, in autonomous mode, a constant speed may be acceptable. A different speed may be helpful though, when the station is performing obstacle avoidance. This scenario inspired the need to research DC motor control. 20 Steering LED’s Motor Controller Master Microcontroller Ultrasonic sensors Bluetooth Receiver Figure 2-7 – Master Microcontroller Block Diagram [Figure Created by Garrett Lee] In the motor research section it was determined that two brushed DC motors would be used to run the station. For this reason, research was done on DC motor control. It was found that there are multiple ways to control a DC motor. There are two different components that could be used to control the motors; a microcontroller or a DC motor controller. These two types of controllers will be compared in this section to determine which is best for this application. Some of the main factors that will be considered are; ease of use and installation and of course the cost of using each method. Before each of the methods is considered it is important to understand what is needed for the controllers to do. When it comes to making the Ultimate Tailgate Station autonomous the speed will need to be varied. Also, the motor controller should be able to control the direction of the station by changing the direction of each of the motors to make the station turn left and right. Both of these requirements will be helpful in obstacle avoidance as well as user tracking. For the microcontroller other components will be needed to make it control the voltage to the motor. The main component that is needed is an H-bridge. The Hbridge is a very important component and is used by both the microcontroller and 21 the DC motor controller. The h-bridge will allow the microcontroller or DC motor controller to change the direction of rotation of the motor by switching the input to the motor’s power wires. The difference between the two is the microcontroller will need to be hooked up to the H-bridge on a breadboard, while the DC motor controller already has the H-bridge included so no installation is required. The microcontroller will provide the speed and direction of rotation information to the H-bridge and the H-bridge will control the voltage to the motor. When it comes to ease of use and installation, the microcontroller will need to be mounted on a breadboard then connected to H-bridge and then H-bridge will be connected to the DC motor. This can be done using a separate voltage supply or by reducing the voltage from the battery and connecting it to the microcontroller and then the microcontroller can be used to power the H-bridge with its 5 volt supply voltage output. This application has two DC motors, one for each rear wheel, so two Hbridges will be needed; one for each motor. Connecting the DC motor controller to the motors is much simpler. The DC motor controller will first need to be connected to the DC motor power supply. The DC motor controller can then be connected directly to the motor. The battery will power the motor controller as well as the motor. This application requires two motors and luckily there are DC motor controllers that can control multiple motors. If a DC motor controller is selected a model with two channels for motors will be selected so it is applicable to this project. H-Bridge 1 Microcontroller Voltage Regulator DC Motor 1 Motor Power Supply (24 volt) H-Bridge 2 DC Motor 2 Figure 2-8 – Block Diagram for Microcontroller DC motor controls [Figure created by Andrew Boyles] 22 DC Motor 1 Motor Power Supply (24 volt battery) DC Motor Controller DC Motor 2 Figure 2-9 – Block Diagram for controlling motors using DC motor controller [Figure created by Andrew Boyles] Both of these methods for controlling the two DC motors can also include some other components such as diodes and resistors to limit spikes in current when switching and flashback current from the motor. The DC motor controller has a clear advantage in ease of use and installation as much fewer connections are needed to hook up the DC motor controller compared to the microcontroller. When comparing these two methods of controlling the motors it is important to consider what each component is intended for. While a microcontroller would be able to do all of the things that are needed for controlling the motors, the DC motor controller is made to control motors. The motor controller will incorporate an on board microcontroller which means any functions the microcontroller will have the DC motor controller should also have. This will give the DC motor controller a large advantage because the DC motor controller also has many other advantages. The motor controllers that have been researched all seem to have multiple ways of controlling them. This will be helpful to this project because it will allow flexibility if another method of communicating with the motor controller is needed. This will also allow for the possibility of controlling the motors in different ways. The motor controllers can also be connected to a computer and be programmed using the software from the motor controller’s developer. Cost must also be considered when choosing between these two methods of controlling the motors. The biggest drawback to using the DC motor controllers is the price. The prices of the DC motor controllers that were found online range from one hundred to seven hundred dollars. The most expensive DC motor controllers are very large and mostly used for large motors. These motor controllers will not be used, because they are too expensive and for a much larger motor than is needed for this application. The controllers that are on the lower end of the range are much smaller and still have many of the 23 characteristics that are needed. The lower end DC motor controllers found online all seem to come on a small circuit board as opposed to the large box of the high end motor controllers. If a DC motor controller is selected it will be from the low end models that come on a small circuit board. The cost for the microcontroller is not only in the price of the microcontroller like the DC motor controller. For the microcontroller other components will also need to be purchased and added to the cost of using a microcontroller. To start microcontrollers are around fifty or sixty dollars for a model that is large enough for the motors that will need to be controlled. There are much cheaper microcontrollers that can be used for very small application, such as the LED lights in this project. Two H-Bridges will also have to be purchased; one for each motor. H-Bridges are found to cost about two to four dollars online and come on a very easy to use IC. In order to power the microcontroller a small battery could be used and those batteries are about ten to twenty dollars. After looking at all of the prices of the components the microcontroller method clearly has an advantage in terms of price. The DC motor controllers that seem to be the best for this project are even in the range of two hundred dollars. The decision must be made as to whether the price of the DC motor controllers is worth buying over a microcontroller. It is believed that the advantages of buying a DC motor controller outweigh the extra price that will have to be spent. The DC motor controller is very easy to hook up and will require no other components and comes on a prebuilt circuit board. The controller will be able to control two motors which is ideal for this application. Another advantage of the motor controllers is that they have a good amount of memory on the board for storing a program. This can be very helpful when programming the main microcontroller for the entire system. Some of the programming that is needed can be done on the DC motor controller to save space on the Master microcontroller. The fact that the motor controllers are specifically made for controlling motors is another major factor that was considered. The user interface of the software for the motor controllers will make programming the controller much easier. A website was found that sells many different types of motor controllers; Roboteq.com. It was determined in the Motor Research section of this report that DC brushed motors would be used. For this reason the brushed DC motor controllers on Roboteq.com were the first that were inspected. In order to be complete other controllers from Roboteq were inspected. Roboteq has some motor controllers that they classify as their original controllers. After looking into both groups of controllers the possible choices were narrowed down to two controllers; one from the DC Brushed motor controllers and the other from the group of original controllers. The two controllers are the SDC 2150 (Brushed DC motor) and the AX1500 (Original). Both of these controllers were found on Roboteq.com so they were very easy to compare. All of the specs for both controllers were provided on the website as well as links to both the user manual and the Data sheet for each. The main aspects that were checked for each controller are; what input and output 24 capabilities each has, the operating voltage, what methods can be used to communicate with the controller, the amount of memory for programs, and any other components that come with it. Both of these DC motor controllers were chosen because they both have two channels for controlling motors, which is ideal for this project. The operating voltage is very important because the operating voltage must be high enough to handle the amount of voltage that is needed for the motors to run. The operating voltage of the SDC 2150 is between seven and fifty volts. The operating voltage of the AX1500 is twelve to forty volts. The range of voltage for the operating voltage of both controllers will meet the requirements of this project. A 24 volt battery is going to be used, but if one 24 volt battery is not strong enough another 12 volt battery could be added without being too high for the operating voltage range. The SDC 2150 does have a slight advantage in this category because the operating voltage range is 10 volts higher. This will allow another 24 volt battery to be added pushing the motors to their maximum input. One aspect where these two motor controllers differ is in their inputs and outputs. The more options there are for connecting the different inputs and outputs the more options there are when using the controller. The different inputs and outputs for both models of motor controllers are shown below. SDC 2150, DC motor controller Inputs and Outputs 4 inputs for 2 optical encoders 4 analog inputs, with 10-bit resolution 6 Digital general purpose inputs 2 Digital Outputs, 24 volt 1A max Up to 5 Pulse Length, Duty Cycle, Frequency Inputs 5 volt supply output, with 50 mA max AX1500, DC motor controller Inputs and Outputs Input for Optical encoder 4 analog inputs, with 8-bit resolution 3 Digital general purpose Inputs 1 Digital output, 24 volt 1A max 5V supply output, with 100 mA max 25 The SDC 2150 also has the advantage in the inputs and outputs. In general both models of controllers have many of the same inputs but the SDC 2150 has more of the inputs that are the same. The SDC 2150 also has up to five pulse inputs, which the AX1500 does not have. The advantage of the SDC 2150 is very slight because the inputs and outputs that are included with the AX1500 are still more than enough for this application. In order to send control information to the DC motor controller, it was decided that the master microcontroller would be used. Therefore it is important that the motor controller has a serial mode for interfacing with a microcontroller. Both of the motor controllers have a serial interface which uses RS232. There may be a desire to control the motors in different ways, so it will be important to know that the motor controller will be able to be controlled with different methods as well. The different control modes and what is needed to use each of them will be shown in the table below. Both of the motor controllers, the SDC 2150 and the AX1500, have the capabilities in the table shown below. The one difference between these two options is that the AX1500 comes with a four foot RS232 cable for connecting to a computer. The cable gives the advantage to the AX1500 in this category, because both are capable of interfacing using RS232. The RS232 cable will make interfacing much easier, because the motor controller will be able to connect directly to a computer. Figure 2-10 – Roboteq Modes of Operation [Permission Pending] Another goal of choosing a motor controller is that some of the programming for the controller can be done in the motor controller itself to save space on the master microcontroller. Both motor controllers have the capability of writing programs and saving them on the motor controller. One difference between the two controllers is the baud rate of each. The SDC 2150 has a baud rate of 115200, and the AX1500 has a baud rate of 9600. The SDC 2150 would have the advantage here but either baud rate will be high enough for this application. Both controllers will be able to hold enough code for the purposes of this project. The user manual provided for each motor controller is the same. The manual is a general overview of all of the motor controllers and the controller specific information is found on the motor controller’s datasheet. It states in the user manual that a motor that is rated at a higher current than the motor controller 26 must never be used. The motors that were found for this project are rated at 11 amps each. The SDC 2150 is rated at 20 amps per channel, which is high enough for this application. It does say that the controller is rated to only provide 10 amps per channel for an hour. This is concerning, because connecting a motor that is too high of a rated current can ruin the motor controller. The AX1500 is rated at 30 amps per channel and is rated to provide 20 amps per channel for one hour. This means that the AX1500 will provide enough current to the motor in any situation. Another advantage of using the AX1500 is that they can be used with stronger motors. If when testing and using the motors, if it is determined that new stronger motors are required, the AX1500 will provide the flexibility to use a more powerful motor. With the SDC 2150, a stronger motor might not be useable because the controller might not be compatible with a motor that has a higher current rating. In terms of rated current the AX1500 clearly has the advantage. When it comes to wiring the motor controllers, they are both very similar. Both motor controllers only require each motor to be connected and a main battery to be connected. The general wiring schematic for all Roboteq motor controllers is shown below. This schematic has solid black lines, which mean that connection is required, and thin black lines that represent optional connections. The schematic shows a connection to a backup battery this connection is used for protection against the under voltage limit of the controllers. Figure 2-11 – Wiring schematic for AX1500 and SDC 2150 [Reprinted with permission from Roboteq] 27 Both controllers will have an over voltage and an under voltage limit that is intended to protect the motor controller. If the main battery power supply dips below this limit the motor controller will shut off to protect itself. The AX1500 has an option to connect a secondary battery to the motor controller so that it will continue to run even when the main power supply dips below the under voltage limit. The SDC models of motor controllers do not have this option. This option could be very helpful if the station is to be run for a long amount of time or if the station is being used on a day that is not very sunny and cannot recharge the batteries in time to avoid the under voltage limit. The cost of each will also be a factor, but not a limiting factor. As a group it was decided that cost would not be a limiting factor when it comes to quality. The AX1500 costs fifty dollars more than the SDC 2150. This obviously gives the advantage to the SDC 2150 in terms of cost. If the overall benefits of the AX1500 outweigh the benefits of the SDC 2150 the cost will not be a factor. The SDC 2150 does have a few advantages over the AX1500. The SDC 2150 has advantages in operating voltage, total inputs and outputs, program size, and size. Both controllers will are the same height but the SDC 2150 is 2.6x2.6 inches, while the AX1500 is 4.2x4.2 inches. The advantage of the SDC 2150 in size is very small because the total size of the AX1500 is still very compact and will work fine for this application. This seems to be the case for most of the SDC 2150’s advantages. The AX1500 will still be good enough for this project in all of the categories that the SDC 2150 has the advantage in. The advantages of the AX1500 are mostly big advantages. The backup power supply can be very useful in certain situations, but the SDC 2150 does not even have this option. The RS232 cable, for connecting to a computer, which comes with the AX1500, is another major advantage because the SDC 2150 does not come with a RS232 cable. The flexibility that comes with the higher current rating of the AX1500 is also very important. Aside from the flexibility that it provides it also ends the concern that the motors could draw too much current from the motor controller. Based on the advantages of the AX1500, covered in this section it is believed that these advantages more than outweigh the extra cost of the AX1500 and the minor advantages of the SDC 2150. The AX1500 DC motor controller will be used for this project. 28 Figure 2-12 – The AX1500 DC motor controller [Reprinted with permission from Roboteq] Now that a motor controller has been selected the specs of the controller can be found on the controller specific data sheet. Many of the factors previously covered were general to most of the controllers from Roboteq. The figure above shows what the controller looks like but it is also important to know where to connect the different components that will have to work with the motor controller. The datasheet of the AX1500 provides some very convenient pictures showing what the different connections on the motor controller are for. 29 Figure 2-13 – The layout of the AX1500 DC motor controller [Reprinted with permission from Roboteq] Figure 2-14 – The layout of the AX1500 DC motor controller [Reprinted with permission from Roboteq] As you can see in Figure XX there is a fifteen pin connector opposite of the connections to the motor. These pins will have to be used for the different modes that will be utilized with this motor controller. Some of the pins on the connector have different uses depending on what mode is being used for the motor controller. The pin assignments for the AX1500 are shown below. 30 Figure 2-15 – Pin assignments of the AX1500 [Reprinted with permission from Roboteq] 31 2.3 Charge Controller Maximum power point tracking (MPPT) is a certain technique that solar charge controllers use to maximize the amount of power that can be obtained from solar panels. An MPPT system will sample outputs from the solar cells and use the I-V curve to apply the resistance that will be optimum for obtaining maximum power. There are different types of variations of MPPT that charge controllers use to try and obtain this optimum power. Some of these methods include Perturb and Observe, Incremental Conductance, Current Sweep Method, and Constant Voltage. Figure 2-16 – Current Voltage Characteristics [Permission Pending] If a charge controller uses the Perturb and Observe method it will make minor adjustments to the voltage from the array and then once it makes that adjustment it will measure the voltage to see if the power increased. If the power did increase, the controller will continue to adjust the voltage in that direction until it no longer sees the power going up. This is typically the most common method used by MPPT controllers because it easy to implement. However, the downside to this method is that you may see oscillations in your power output. So, if you are using a charge controller on a system that demands extremely steady power output, this may not be the best type of MPPT technique to use. 32 The incremental conductance method gets a little bit more complicated. If an MPPT controller is using this technique it will measure changes in the array of currents and voltages to try and predict what will happen when it changes the voltage. This technique obviously means the controller will have to do a lot more calculations than the ‘perturb and observe’ technique, but generally, it can track changes much faster. The calculations it uses to track these changes are based on comparing the incremental conductance array to the I-V curve to figure out what the maximum power point actually is. With the constant voltage method, power that is being output is stopped, and then the controller will measure the open-circuit voltage. Then it will look at this number, and control it at a ratio that will give you the maximum power point voltage. The MPP has already been determined by calculations done based on the voltage array. This voltage is now the reference voltage. The next time it does this, it will assume that this new Vref is the MPP and use that to determine the new ratio to fix the measured open-circuit voltage at. There are many determining factors to consider before choosing which technique will be best for use in the vehicle. The system will most likely not need to use the incremental conductance method. This technique is complex and requires a lot of computations. It is really most useful when you are in conditions that are always changing and changing quickly because it can adapt to these changes faster. For the purposes of the ultimate tailgate station, dramatic changes in conditions will probably not be seen, and will not need to rely heavily on the controller being able to react to any immediate changes. The perturb and observe method is easier to implement, but it must be decided how steady the output must be for the charging system on the vehicle. According to research, the constant voltage method seems to be the easiest and cheapest way to obtain maximum power from our panel. Some energy is wasted in this method since you have to stop the power that is being delivered to measure the voltage, but this will not cause any major problems for our system. The purpose of the solar panels is to provide renewable energy to the system and energy for small devices we may want to charge, but we will still maintain all functionality if we have some energy losses. 2.4 Solar Panels There are many different types of solar panels in the market right now. The difference in the panels is in the material that is used to make them. Some of these panels are more efficient than others. Efficient meaning that when sunlight hits the panels, more of it is actually turned into electricity than in other panels. Some different types of solar panels include mono-crystalline, poly-crystalline, thin film, solar hot water panels, and many more. Thin film solar panels have been growing in popularity in recent years. Many people like them because the process of producing them is more environmentally friendly than it is in producing other types of solar panels. The cost of 33 manufacturing them is also quite low. Thin film solar panels are also light weight and not very bulky. As their name might suggest, they are also very thin and rather flexible. They are made using different materials than most conventional solar panels are. They are usually made using materials like copper, gallium and selenium instead of being made from silicon or cadmium. Because of this, thin film solar panels typically have a lower energy conversion efficiency than most traditional solar panels would have. Figure 2-17 – Thin File Panel [Permission Pending] So, while these thin film solar panels are cheaper to manufacture, and may be more lightweight and portable than other more common panels, this does not make up for their lack of efficiency. The vehicle is going to require a lot of energy to power all of the subsystems that it is utilizing. It would need to be able to power the motors, motor controller, charge controller, GPS tracking system, obstacle avoidance system, and Bluetooth. Thin film solar cells would not be the best option for this project. The two types of solar panels that will be mainly focused on to choose for this tailgate station will be the monocrystalline and polycrystalline solar panels. These are the most commonly used types of solar panels. The general consensus is that monocrystalline panels are more efficient than the polycrystalline panels are, even though the gap in efficiency has been lessened recently. Monocrystalline solar cells are cut from chunks of silicon that were grown from a single crystal. They are generally used in more expensive solar panels and can perform better in extreme heat. This would be advantageous for the ultimate tailgate stations’ application. In a tailgate environment, temperatures 34 can reach the triple digits and that is more of the norm than the exception. A solar cell that performs better in the normal environment for the station seems too good to be true. Figure 2-18 – Monocrystalline solar panel [Permission Pending] Polycrystalline cells are cut from multifaceted silicon crystals. These are sometimes less efficient than the monocrystalline cells, and therefore take more surface area to get the same amount of wattage that a solar panel utilizing monocrystalline solar cells would. 35 Figure 2-19 – Polycrystalline solar panel [Permission Pending] The two major deciding factors on solar panel selection will be price and size. Because this tailgate station will be an autonomous mobile system, the solar panels that are chosen need to be light enough for the chassis to carry while still maintaining a reasonable speed. Also, they cannot be awkward and bulky. This will make smooth movement of the station very difficult. The price of a solar panel is linked directly with the amount of watts it can generate. Simply put, the more watts that it generates the more expensive it will be. For example, if one solar panel can generate 100 watts, and another can generate twice that amount, then it will most likely cost twice as much. A major advantage of the ultimate tailgate station is that it does not require a large amount of power to run all of the systems. Since it does not require a lot of power, the solar panel that will end up being chosen will be smaller in size. Since only a small panel will be required, there will be more freedom to purchase a higher quality and more efficient solar panel. Two solar panels will be purchased for the final product, one being on each side of the station. With all factors above taken into account, a monocrystalline solar panel will be chosen. They are generally more expensive, but since there are not large amounts of power that need to be generated, the small size and wattage allows for more to be spent on quality. This type of solar cell will be a good fit for the tailgate station because they perform better in higher heat. This product will ideally be used during tailgates for football games, and it is very hot outside during the tailgates due to the time of year and time of day that they are happening. 36 2.5 Batteries Battery requirements: Batteries shall be lightweight so as to not slow down the movement of the vehicle Batteries shall be within size limits of the chassis so that they do not take up too much space in the system Batteries shall be efficient and reliable Batteries shall be environmentally friendly and safe Batteries shall be able to hold a charge for a minimum of 5 hours Batteries shall be able to charge quickly through either solar power or by being plugged into a power outlet The choice of batteries for the tailgate station is a very important design aspect that must be taken into account. The batteries must be efficient and reliable enough to provide power to everything in the station for a reasonable amount of time. The batteries must also be a reasonable price. The batteries that will be focused on as options for the design of this project are Lithium-ion batteries and lead acid batteries. There are a lot of aspects that need to be focused on between these two batteries, and choosing the right one is extremely important because without power the system is useless. It is important that the batteries chosen also interface easily with the systems solar panels and charge controller. Lead acid batteries have been around much long than lithium-ion batteries have. They use a chemical reaction inside the battery balance the charge equilibrium. Figure 2-20 – Lead Acid Battery [Reprinted with permission from Bob Hetherington] 37 There are two types of lead acid batteries. Flooded and sealed/valve regulated lead acid batteries. There are three main differences that make the flooded battery different than the sealed or valve regulated battery. First, the flooded battery has to be upright at all times so that the electrolytes do not leak out. Second, it must be in a well-ventilated area because the gasses created while it is in use need to be able to diffuse. And third, it requires routine maintenance. While flooded lead acid batteries are cheaper than sealed/valve regulated batteries, the over complexity of the battery and then cost of maintenance must be taken into account when making a selection. Once a choice is made between those two types of lead acid batteries, a decision must then be made on which type cycle battery is needed. The two choices are deep cycle and shallow cycle lead acid batteries. Shallow cycle batteries are most commonly used when it is necessary to a high amount of power in a short period of time. Some applications where shallow cycle is useful include igniting something or starting a car. Deep cycle lead acid batteries are used in applications that need to receive a lower amount of power over a longer period of time. Lithium-ion batteries began to be more widely used in recent years. They are named the way they are because a charged lithium ion moves back and forth from the anode and cathode while it is charging and discharging. Figure 2-21 – Lithium-ion Battery [Reprinted with permission from Bob Hetherington] There are many different chemical makeups of lithium-ion batteries, but they can generally be separated into two categories. The first is a lithium iron phosphate battery, and the second are metal oxide batteries. The lithium iron phosphate batteries can deliver more power and are safer to use than the metal oxide batteries, but the metal oxide batteries provide a longer calendar life and can operate at higher temperatures. All types of lithium-ion batteries are deep cycle batteries. The following table will show some comparisons with the battery types that have been discussed above. 38 Flooded lead acid VRLA lead acid Lithium-ion (LiNCM) Energy Density (Wh/L) 80 100 250 Specific Energy (Wh/kg) 30 40 150 Regular Maintenance Yes No No Initial Cost ($/kWh) 65 120 600 Cycle Life 1,200 @ 50% 1,000 @ 50% DoD 1,900 @ 80% DoD Typical state of charge window 50% 50% 80% Temperature sensitivity Degrades Degrades Degrades significantly above significantly above significantly above 25°C 25°C 45°C 100% @20-hr rate 100% @20-hr rate 100% @20-hr rate Efficiency Voltage increments 80% @4-hr rate 80% @4-hr rate 99% @4-hr rate 60% @1-hr rate 60% @1-hr rate 92% @1-hr rate 2V 2V 3.7 V Figure 2-22 – Lead Acid vs Lithium-Ion [Reprinted with permission from Bob Hetherington] One important thing to look at is the life of the battery in certain climates. Typically, lithium-ion batteries will have a longer life cycle in hotter temperatures than a lead acid battery will. This will factor in the decision being made for which battery to use. The tailgate station will generally be used in hotter climates during periods of the day when the temperature is the hottest. As far as the environmental impact of each battery goes, lithium-ion batteries are more environmentally friendly. They use fewer raw materials to make and give off less emission than a lead acid battery would. 39 2.6 Inverters One of the design requirements of the ultimate tailgate station will to be able to provide power to various attachments that can be added. A DC to AC power inverter will be necessary to achieve this requirement. The solar panels that are on the station generate DC power which can directly charge the battery. The battery will then provide AC power to a power strip through the use of the inverter. The budget and design requirements of the project need to be taken into account as the deciding factor for what type of inverter to be used. Either a pure sine wave or modified sine wave will be used. Figure 2-23 – Pure vs. Modified Sine Wave [Permission Pending] Since all batteries use direct current, an inverter will be necessary to change the direct current to alternating current in order to use the power for certain applications. There are four things that need to be looked at when selecting an inverter to convert direct current to alternating current: low harmonic distortion, high surge capacity, low standby losses, and high efficiency. Generally, electronic devices that are very sensitive and require a very high quality waveform with as little harmonic distortion possible will need to use a pure sine wave inverter. Pure sine wave inverters also have a very high surge capacity. This means that they are capable of exceeding the rated wattage for small amount of time. This is good for applications like starting a motor because they will draw a high amount of power at startup. Most electronic devices are able to operate normally using pure sine wave inverters. Modified sine wave inverters 40 try to approximate a pure sine wave. These types of inverters can operate many day to day electric devices that would need to be run off of a battery such as TVs, cell phones, and computers. The reason a modified sine wave inverter would be chosen over a pure sine wave inverter is because they are less expensive. If you are not using very sensitive electronic devices that do not require high accuracy sine waves it would make more sense to save money and use a modified sine wave inverter. However, there is a slight risk involved when using modified sine wave inverters. Modified sine wave inverters sometimes have little jumps in current, and this could potentially damage electronic devices that are plugged into that power source. Advances in technology have made this a very minimal risk now. This is a non-issue with pure sine waves because this signal is, as the name suggests, a pure wave. No fluctuations in the current prevent any damage to devices that are plugged into it. The use of a pure sine wave inverter is usually necessary when using very sensitive equipment that demands the highest reliability and performance such as medical equipment. Seeing as the tailgate station will not utilize any electronic devices that demand the highest standards of power inversion, it makes the decision between what types of inverter to use a little bit easier. There is a pretty steep price difference between pure sine wave inverters and modified sine wave inverters, with the pure wave inverters being the more expensive of the two. The decision was made that the vehicle will utilize a modified sine wave inverter to keep the overall budget of the project lower. This is an area where spending the extra money on a pure sine wave inverter will not really improve the efficiency and reliability that is required by the system. 2.7 Master Microcontroller The master microcontroller will act as the brains of the ultimate tailgate station. The master microcontroller must have enough digital inputs to accept data from the sensor system, Bluetooth receiver, LED’s, and motor control. The master microcontroller must have enough memory to control all of these components, and for data logging. A main function of the ultimate tailgate station is the android remote control for the vehicle. It is also an emergency backup to the autonomous tracking system. In order to use the android phone as a remote control, it will need to be compatible with the android software available. The android phone will also need a way of communicating with the microcontroller. The android phone could actually be connected with wires or wirelessly. After careful consideration, the most effective solution found was the wireless communication. In the tailgate environment, there are generally lots of people and moving objects. The wired connection would transfer data at faster speeds, but it would have its drawbacks. The wireless connection takes advantage of all the open air around us. There is no need to have a cord for 41 people to trip on if it can possibly be avoided. The android phone also is essential for the ultimate tailgate station to work. The emergency backup plan is carried out through the phone. The wired connection makes it physically difficult to actually use. The wireless connection on the other hand reduces the risk of the connection not working. There are two ways of connecting the wireless receiver to the android phone, Wifi and Bluetooth. Each has its advantages and disadvantages. The wifi receiver can have much higher data transfer rates, but it also consumes much more power. The Bluetooth receiver uses less power, but also transfers data a slower rate. The Bluetooth receiver will connect as securely as the wifi connection. Deciding on the acceptable amount of power and acceptable data rate will make one of the wireless connections the most effective choice for the ultimate tailgate station. The ultimate tailgate station’s master microcontroller uses its peripherals to connect to each subsystem. The needs of the subsystem will determine the selection of the microcontroller. The main ways of connecting the microcontroller to its subsystems are digital connections and serial connections. The steering is connected to the master microcontroller digitally. This means that the master microcontroller sends high and low signals that will tell the servo what to do. The master microcontroller sends out a digital signal to the servo. The servo reads in the digital signal and uses it to direct the motor. The motor controller, Bluetooth receiver, and possibly the ultrasonic sensors can be connected serially. The serial connection is an excellent way to transfer data because it is a two-way 8-bit communication. The connection between the master microcontroller and the motor controller, Bluetooth receiver, and ultrasonic sensors will be both sent and received. There are a couple ways of handling the multiple serial connections. One way is to have as many serial connections on the master microcontroller as needed by the motor controller, Bluetooth receiver, and possible ultrasonic sensors. This way would be the simplest, but would not be the most cost effective. It would take up more space on the board too. Having multiple serial ports on the master microcontroller could be the most effective way for the ultimate tailgate station to communicated with the motor controller, Bluetooth receiver, and ultrasonic sensors. The master microcontroller could use the Universal Asynchronous Receiver/Transmitter (UART) to allow this to happen. All of the connections can share the same port with the Universal Asynchronous Receiver/Transmitter. In order for the master microcontroller to decipher whether it is talking to the motor controller, Bluetooth receiver, or ultrasonic sensors, it delays each connection. Each connection has a specific baud rate set. The baud rate will help identify between different connections. The ultrasonic sensors have the option of using pulse width modulation. This means that the master microcontroller has the option to send out analog signals. This is very advantageous when it comes to obstacle detection because distances are typically analog, not digital. Usually microcontrollers have a certain number of pulse width modulation capable pins. As long as the master 42 microcontroller comes with four pulse width modulated pins, it can be effective. Not only will it automatically come with the pins, it will be four less connections to the universal asynchronous receiver/transmitter. 2.7.1 Microcontroller Comparison The selection of the master microcontroller will ultimately be decided based on the interfacing needs of the slave subsystems. For all of the other components, cost has been a factor. For the master microcontroller, cost will not be considered. None of the microcontrollers cost more than 10 dollars, so they are relatively cheap compared to most of vehicles components. 2.7.1.1 ATmega 328 Figure 2-24 – ATmega 328 Microcontroller [Permission Pending] The ATmega 328 is one of the most popular microcontrollers on the market due to the Arduino 328 development board. The Arduino development boards are very user friendly and easily programmable. The Arduino boards also have lots of free libraries and support online. Operating Voltage: 1.8-5.5V DC Current: 40-50mA I/O Pins: 23 pins, 6 PWM Flash Memory: 32kB Interface: 1 UART, I2C Master/Slave SPI Interface 43 Max Operating Frequency: 20 MHz Built in Internal Oscillator Power Save Mode: .75uA 2.7.1.2 ATmega 2560 The ATmega 2560 is another popular microcontroller due to the compatibility with the Arduino Mega 2560. The Arduino boards would be very helpful in the implementation of the vehicle’s design. Figure 2-25 – ATMega 2560 [Permission Pending] Operating Voltage: 1.8-5.5V DC Current: 40-50mA I/O Pins: 86 pins, 15 PWM Flash Memory: 256kB Interface: 4 UART, I2C3 Max Operating Frequency: 16 MHz 2.7.1.3 MSP 430 The MSP 430 is Texas Instruments’ ultra-low powered microcontroller. The microcontroller will always be powered on and having such a low power draw will greatly increase the efficiency of the entire system. The MSP 430 is almost 44 identical to the ATmega 328 with the exception of the current draw and less memory. Figure 2-26 – MSP 430 [Permission Pending] Operating Voltage: 1.8-3.6V DC Current: 40-50uA I/O Pins: 24 pins Flash Memory: 16kB Interface: 1 UART, I2C 2.7.1.4 PIC 18F47J53 The PIC 18F47J53 is a 16 bit microcontroller made by Microchip. The chip contains 44 inputs and output pins which one might call overkill. The multiple serial ports will be very convenient though, since the master microcontroller will need to connect to the motor controller, Bluetooth receiver, and GPS with serial connections. Another advantage to using a Microchip microcontroller is the pick it. The pick it makes the software interfacing with the microcontroller simpler by interfacing a PC to the microcontroller from USB to serial. It makes programming the microcontroller very quick and straightforward. 45 Figure 2-27 – PIC 18F47J53 [Permission Pending] Operating Voltage: 2.0-3.6V DC Current: 40-50mA I/O Pins: 44 pins Flash Memory: 128kB Digital Peripherals: 2-A/E/USART, 2-MSSP(SPI/I2C) Capture/Compare/PWM Peripherals: 7 CCP, 3 ECCP 46 2.7.2 Master Microcontroller Selection The ultimate tailgate station depends on the master microcontroller to make decisions. It is a fundamental component of the complete system. The master microcontroller was selected based on interfacing needs, memory, and support online. When comparing the 4 microcontrollers, they all had very similar characteristics and all made enough peripherals to connect to the subsystems. The master microcontroller had the least amount of overkill, yet made the minimum requirements. The ATmega 328 stood out the most because of its support base. For Arduino, there are tons of libraries, examples, and tutorials online for free. Since none members of our group have experience with programming microcontrollers, the learning curve will be much faster when Spring comes. The ATmega 328 has 14 Digital Pins, 6 of them being PWM. This is more than enough for the ultrasonic sensors and the LEDs. The serial connection will connect to both the Bluetooth receiver and the motor controller. It comes with 32 kB flash memory which is reprogrammable and more than enough for the simple instructions that the master microcontroller. Since the GPS calculations will be handled by the android phone, there is more memory to be freed for the microcontroller. 2.8 Wireless Receiver The android phone is a key component of the ultimate tailgate station. It is important for two subsystems. For the user tracking, it is the tracking device that the station will be tracking. The android phone will use its GPS receiver and compare its position to the position of station. The android device also works as a remote controller in case of emergencies. The microcontroller needs a wireless receiver to connect to the android phone. 2.8.1 Wireless connection comparison Wifi and Bluetooth are two of the most popular ways to connect wireless devices. There are advantages and disadvantages to using each of them. The industry standard for Wifi is IEEE 802.11b. It is offers very fast connections and gives excellent range. Compared to Bluetooth, the range is much further. The problem with Wifi is the sacrifice that it makes for greater range and speed, the power draw. Wifi uses at least 10 times more power than Bluetooth does and that is where Bluetooth becomes advantageous. Bluetooth is very effective at short ranges. For the ultimate tailgate station, the most efficient way to communicate with its android device is through Bluetooth. 47 2.8.2 Bluetooth Receiver Classes The Bluetooth receivers are divided up among 3 classifications proportional to their range. Class 1 Bluetooth radios have a range of 300 feet and are typically used for industrial purposes. Class 2 Bluetooth radios have a range of 33 feet and are common among mobile devices such as phones and computers. Class 3 Bluetooth radios have a range of 3 feet and are used in very specific applications. 2.8.3 Bluetooth Receiver Comparison The Bluetooth receiver is essential for the both functions of the vehicle. The most important factors for choosing the Bluetooth receiver will be cost and range. 2.8.3.1 Roving Networks RN-42 Figure 2-28 RN-42 [Permission Pending] The RN-42 is a small, low powered bluteooth receiver. The advantages of using this receiver are compatibility and the extended support online. It is a common Bluetooth receiver in Bluetooth modules. Bluetooth: 2.1 + EDR, 2.0, 1.2, 1.1 Class: 2 Cost: $16 Interface: UART, USB Current: 3mA connected, 30mA transmit Supply Voltage: 3.3V (10% variability) 48 Frequency Band: 2.412-2.484 GHz Profiles: SPP, DUN, HID, iAP, HCI, RFCOM, L2CAP, SDP Output Power: 4dBm Size: 13.4 x 25.8 x 2 mm Weight: .045 oz 2.8.3.2 Bluegiga WT12i The Bluegig WT12i is a highly integrated bluetooth module. It contains all of the necessary elements from radio to antenna. Figure 2-29 Bluegiga WT12 [Permission Pending] Bluetooth: 2.1 Class: 2 Cost: $30 Interface: UART, USB Current: 3mA active, max: 60mA Supply Voltage: 3.2-3.4 V Integrated antenna Output Power: 1dBm Size: 26 x 14 x 2 mm 49 2.8.4 Bluetooth Receiver Selection The RN-42 and Bluegiga WT12i are very similar in most aspects and they both would work for ultimate tailgate station. They both are class 2 receivers and have the same interfaces. The current draw is also comparable. The RN-42 is nearly half the price of the WT12i and that is the main reason that we are going with the RN-42 for the vehicle. 2.8.5 Bluetooth Receiver Integration The ultimate tailgate station will use the Bluetooth receiver at all times. The station will need to use an android phone for GPS tracking and remote control. The android phone sends signals to the Bluetooth receiver, and then the receiver will send those signals to the master microcontroller. The Bluetooth receiver will be connected to the master microcontroller using a serial connection. Since there is only one serial port on the master microcontroller, a certain baud rate for the connection will need to be set. Otherwise, the master microcontroller may have the Bluetooth receiver and the motor controller set on the same baud rate. The Bluetooth receiver will be connected to the master microcontroller directly. It will use the UART port to connect to the master microcontroller. Figure 2-30 Bluetooth Integration [Figure Created by Garrett Lee] 50 2.9 User Tracking One of the most important subsystems of the project is the user tracking subsystem. It requires that the vehicle calculate its distance and direction from the user in order project its appropriate path. To do this, different location based sensors or methods must be considered. A decision must be made based on which sensor best adheres to the requirements listed in the introduction of this paper. Particularly it is desired that the sensor detect the user from at least 20 feet away and follow with an accuracy of five feet. Keeping these specifications in mind, the following methods for user tracking are considered. 2.9.1 Optical User Tracking A very interesting approach to this user tracking problem is optical user tracking. This involves mounting a camera on the vehicle in order to visually scope out the environment and find the target to follow. To do this, the user must calibrate the system in order to recognize the target foreground (i.e. the user) from the image for detection and tracking. Then, complex image-processing algorithms can be implemented to maneuver the vehicle in such a way that the user’s image is maintained as the center of focus in the vehicle’s viewing range. With a motivation to implement this method of tracking, a focus is placed on research in pedestrian detection, particularly in a fast-paced real-time scenario. Many research papers have reported significant findings on visual tracking and pedestrian detection. One such paper, “Pedestrian Detection at 100 Frames Per Second”, focuses on optimizing pedestrian detection methods for high speed applications such as this one. Here a method is proposed for exploiting geometric context extracted from images and identifying pedestrians for tracking. The picture below shows the tracking algorithm at work in a street environment. Figure 2-31 Pedestrian Tracking at 100 FPS [Permission Pending] 51 The benefit of using this method is that it can differentiate between pedestrians and other components observed in the environment. It also allows for real-time tracking of pedestrians, a requirement for the Tailgate vehicle to function properly. This method can be optimized to track pedestrians (particularly the user) and route the vehicle according to the position of the user on the viewing space. An algorithm can be implemented to cause the vehicle to turn left or right based on the user’s updated position related to the center of focus. However, the research performed in the paper focuses solely on pedestrian tracking. While the results of this paper are effective in its application, there is no emphasis placed on the tracking of a target pedestrian, a goal in mind for this particular project. This limitation prevents this method from tracking the target user. Consider the following scenario. The vehicle begins to track and follow person A until person B walks in front. Based on the tracking algorithm, the entrance of person B may disrupt the tracking of person A, and the vehicle may proceed to follow person B. Likewise, should an obstacle such as a tree or building interfere with the view of person A, the vehicle may lose tracking altogether as a result. These scenarios must be considered as they are likely to happen in a tailgating environment populated with many pedestrians. A boosting algorithm may be implemented to train the vehicle to track a specific user based on appearance in order to prevent the first scenario from happening, though the added complexity may limit its performance. While this vision based tracking method may seem feasible under simple environment conditions, it may be impractical for this particular project. The pedestrian tracking method presented simultaneously tracks all pedestrians in an environment, which is not necessary for this project. The added complexity of algorithms to target a specific user may be difficult to implement. Such algorithms require much memory and computing power to store and process large sets of data, limiting the types of hardware to more expensive units. Another downside to consider is the cost of the camera, a cost that may be replaced with other simpler and more inexpensive methods to implement as an alternative method to vision based tracking. 2.9.2 Ultrasonic Positioning Another method to user tracking is to utilize ultrasonic sensors. Ultrasonic position sensors and switches use ultrasonic waves in combination with light and frequency readings. Specifically, ultrasonic linear position sensors and switches measure distance by using surface acoustic waves and lamb waves that reflect off the target, in this case the user. The ultrasonic sound that is emitted is a vibration at a frequency above the range of human hearing, usually greater than 20 kHz. Ultrasonic linear position sensors transmit a short burst of ultrasonic sound toward a target. The diagram below in Figure 2-32 demonstrates this concept. 52 When the sound is reflected, it returns to the sensor as an echo. The distance between the ultrasonic linear position sensor and the target is then calculated based on the return time of the signal and the propagation velocity of the measurement medium, which in this case would be the propagation velocity in air. Although these sensors require a minimum distance to provide a sufficient time delay for calculation, the minimum distance is small enough for this application that is considered negligible. Objec t Ultrasonic Sensor Figure 2-32 Ultrasonic Sensor Diagram [Figure created by Chris Echanique] While the use of ultrasonic sensors can provide accurate measurements of the relative distance of an object, they may be impractical for this particular application due to the fact that they require a direct line of sight to the target. Since the user’s movement is not restricted to a front line path from the vehicle, this approach will not suffice. Also this restriction prevents ultrasonic sensors from determining the direction of the user with respect to the vehicle, a necessity for this user tracking method to function properly. 2.9.3 GPS Tracking GPS based tracking is an attractive option because of its availability in today’s market. Most mobile smart phones in today’s market come with an embedded GPS receiver and a mapping service to allow the user to have real-time position tracking for a variety of different applications. The availability of this feature can be exploited for use in the user tracking subsystem of this project to reduce total project costs since this method can be easily integrated with a user’s mobile phone. This may make it easier to implement than the vision based tracking method previously mentioned in this section. Also, utilizing the GPS features on a mobile phone is particularly useful if a mobile application is to be developed for this project. This mobile application will allow the user to choose between autonomous user tracking and manual remote control of the vehicle. 53 In order to consider GPS based tracking for the project design, the properties of the GPS receiver must adhere to the requirements and specifications previously listed: User Tracking o The station should detect the user’s location from at least 20 feet away. o The station should update the user’s current location at a rate of at least five times per minute. o The station should track the user’s current location within less than ten feet of accuracy on average. One important requirement of the user tracking system is the minimum radius of detection from the vehicle to the user. This minimum detection radius is crucial for the environment that the system will be tested and used in. Because the user may be several paces ahead of vehicle during its autonomous tracking route, a minimum detection radius must be set to allow the user some flexibility to walk within this specified domain without the system losing track of the user’s location. The specification set for this requires that the station detects the location of the user from at least 20 feet away. This gives the station a reasonable range to track the user from several paces away. Figure 2-33 below demonstrates this concept. User out of bounds User in bounds Detection radius 20 ft Vehicle Figure 2-33 Minimum Radius of Detection [Figure created by Chris Echanique] Based on the diagram above, the specification chosen requires that the system detect the user within the given radius. This specification limits certain types of tracking systems including near field sensors and vision based tracking as 54 previously mentioned. With these types of tracking systems, the user’s location is detected relative to the vehicle. This limits the radius of detection to the maximum range of that type of sensor and thus prevents tracking outside of this region. With GPS tracking, the user’s location relative to the vehicle is computed based on the absolute locations of both the user and the vehicle. In order to implement this method of GPS tracking, both subjects of interest must have a GPS receiver attached to them. The GPS coordinates of the vehicle and the user are used to calculate the distance and direction that the vehicle needs to travel. Exploiting the use of the absolute locations of the user and the system eliminates the need to define a minimum detection radius. Since the locations of both components can be determined by their geographical locations, there is no minimum radius of detection for the system on a global scale. The most important specification to consider is the accuracy of the user tracking method. With near field sensors or vision based tracking, it is not difficult to obtain accurate data of the location of the user as these methods rely on the user’s proximity to the vehicle. With GPS however, the accuracy of the coordinate reading must be considered. The diagram in Figure 2-34 below demonstrates this concept of tracking accuracy. UGPS Ureal re 5 ft Expected Path Calculated Path re Vreal After Tracking Vreal 5 ft Distance Error (<10ft) UGP VGPS S VGPS Ureal Figure 2-34 Diagram of Tracking Accuracy [Figure created by Chris Echanique] 55 A comparison of the expected tracking path and the calculated path of the vehicle based on GPS accuracy is illustrated in the diagram above. The real position of the user (Ureal) and the vehicle (Vreal) are shown with a large blue circle indicating the region of error in accuracy. Based on the coordinate readings from the GPS receivers, the calculated location may fall anywhere within this region of error and the radius (re) of this region depends on the accuracy of the receiver. To calculate the total distance of error, the accuracy of both receivers must be considered. The specification is set to allow for at most ten feet of error between the user and the vehicle. The diagram at the right hand side of Figure 25 demonstrates this concept. In order to adhere to the specifications of the maximum distance error, the GPS receivers must be selected based on their positioning accuracy. As previously mentioned the GPS receivers in today’s modern smartphones provide a simple and cost-effective way to track the user. Most GPS-enabled cell phones employ Assisted GPS, which performs many of the functions of a full GPS receiver by a remote GPS location server. The mobile device contains a very basic GPS receiver that synchronizes to visible satellites and transfers information on the estimated location of the device to the GPS location server over the cellular network. Because of this, the positioning accuracy of mobile phones is significantly compromised and much worse than regular autonomous GPS units. To get a general estimate of the accuracy of GPS-enabled mobile phones, a review of the research performed in this field is necessary. Since most smart phones shared the same Assisted GPS technology, a focus is placed on the iPhone model as a general representative of cell phone positioning accuracy. In a research article titled “Accuracy of iPhone Locations: A Comparison of Assisted GPS, WiFi and Cellular Positioning”, a research experiment was conducted to evaluate the accuracy of GPS positioning in iPhones. This accuracy was then compared to that of an autonomous GPS unit, specifically the Garmin GPSMAP 60Cx unit (with a SiRF III chipset). Figure 2-35 below shows the results of a test reported in the paper. 56 Figure 2-35 Positional Accuracy of iPhone and Garmin Devices [Permission to reprinted granted by Paul Zandbergen] In the figure above, a scatter plot of a single 20-minute field test is presented. It can be seen that the locations determined by the Garmin device are strongly clustered together and are within close proximity to the benchmark location. The maximum horizontal error of these position fixes is approximately 1.4 meters with a root mean square error of 1.0 meters. The Assisted GPS position fixes from the iPhone however exhibit a much greater spread with a maximum error of 18.5 meters and a root mean square error of 8.3 meters. This positional error is much greater than the error witnessed from the Garmin autonomous GPS unit. It would therefore be impractical to rely solely on the GPS receiver embedded in the iPhone framework (or any mobile smartphone for that matter). Instead, other more accurate options that improve upon this provided data must be considered. Because autonomous GPS units tend to perform better under testing conditions than the Assisted GPS modes offered in most smart phones, it would be advantageous to employ this particular type of framework. However, attaching autonomous GPS units to both the vehicle and the user may be impractical. The retail price for such units that have Bluetooth capability for the purpose of this project is nearly two hundred dollars each. This will needlessly drive the total cost of the system up and potentially overcomplicate the problem at hand. 57 An alternative would be to utilize sensors that can improve upon the performance of existing GPS-enable cell phone models. One such sensor that has recently been released into the market is the Garmin GLO™. Using Bluetooth technology, GLO wirelessly pairs to a mobile Android or iPhone device. The GLO can connect to up to 24 more satellites than devices that rely on GPS or Assisted GPS alone by receiving position information from both the GPS and GLONASS satellite constellations. This technology allows the device to lock on to satellites approximately 20% faster and remain connected even at high speed. However its most important specification is its accuracy. The receiver has a 3 meter positional accuracy, though it has been reported to have an average accuracy of 1.5 meters (just under five feet), which may meet the system specification of distance error previously mentioned. The Garmin GLO also meets the third important specification for user tracking, which is the ability to update the user’s location at least five times per second. The GLO receiver has ability to update its position information at 10 Hz, or ten times per second. This is up to ten times more often than the GPS receivers in many mobile devices and thus meets the specification listed. A figure of the Garmin GLO device and a table of its specifications can be seen in Figure 2-34 on the next page. While the Garmin GLO does meet several of the design specifications, there are several drawbacks. First, the user must carry the receiver around at all times for the user tracking system to work. Previously mentioned user tracking methods such as vision based tracking would not require the user to carry anything. Second, two receivers must be purchased, one for the user and one for the vehicle. These receivers are valued at $100 each, thus increasing our budget for the sake of performance gains. Also the design would require that two GLO receivers would be paired up with one phone via Bluetooth. This limits the tracking range to that of the Bluetooth device (typically 30ft). Lastly, a drawback for using GPS in general is the fact that the operating environment is limited to the outdoors as GPS signal is compromise or lost in an indoor environment. 58 Garmin GLO™ Specifications Unit Size WxHxD .70" x 1.65" x 3.04" (1.78 x 4.19 x 7.72 cm) Weight 2.12 oz (60.1 g) Receiver technology GPS+GLONASS WAAS Yes Update Rate 10 Hz Accuracy 3 meters (9.54 feet) Battery Capacity 1100 mAh Battery Life 12 hours Hot Start Time 3-5s Warm Start Time 35s Cold Start Time 60s Figure 2-36 Garmin GLO™ Specifications [Permission to reprint granted by Garmin] 59 2.10 Mobile Application A remote controlled feature for the vehicle is desired as a failsafe and alternative option to autonomous user tracking. The previous senior design project, The Tailgate Buddy, implemented a two channel radio control to manually navigate the vehicle in the event that autonomous tracking is not necessary or desired. Here it would be beneficial to couple both the autonomous user tracking feature and the remote control feature into one device. Since the autonomous tracking requires a GPS signal from a mobile phone, it would be convenient to create a mobile application that can manage the hardware of the phone to use it for both desired features, as well as include an OFF feature to disable these functions. An image of the mobile application prototype is presented in the figure below. In order to design this, all mobile platforms must be considered for start-up cost, ease of implementation, and range of resources and APIs. abec GPS RC OFF Figure 2-37 Mobile Application Prototype [Figure created by Chris Echanique] 60 2.10.1 iPhone Application One of the most important factors to consider for project design is the programming language required for these mobile applications. Languages such as Java and C are familiar to the scope of knowledge of the project members. Platforms that utilize these languages will be highly favored. However iPhone applications call for the use of Objective-C. Although it is a dialect of the common C language, there are certain differences that would require more research to understand and use. Certain tool kits are offered that make it relatively easy to create simple apps without much knowledge of the language, however these tool kits are limited to very simple applications and may not be appropriate for this project. Other factors to consider are the start-up costs and resources. Programming iPhone applications require the use of the iPhone Software Development Kit (SDK). This comprehensive software offers developers with many tools to effectively design a professional quality mobile application. However in order to have the application distributed to the market for use, developers must pay $99 to join the developer program. Not to mention the software is not compatible with Microsoft Windows Operating System, which would require PC-using project members to purchase or borrow an Apple computer for the sole purpose of program. Therefore the barrier of entry for this is high for this particular route. 2.10.2 Android Application A more suitable platform to write such an application is the Android platform. Android applications are written in Java, a language familiar to all members of the group. This in turn will allow project members to focus more time on the development of the mobile application and less time learning a new programming language. Also unlike with iPhone applications, the Android platform does not require developers to pay a membership fee to distribute mobile applications to the market, making the barrier of entry low to start developing. Lastly, Android provides developers with an open development platform, allowing for much more flexibility then the close and limited development platform offered by the iPhone SDK. This makes the Android platform the most favorable to use for this project. 2.10.3 Windows Mobile Application Windows Mobile will not be considered in the design of this project due to its limited presence in the market. Project members own either iPhone or Android cell phone models so the use of Windows Mobile based applications would 61 require the purchase of such phones for testing. This would increase the total costs for the project and thus be undesirable. 2.11 LCD Display The ultimate tailgate station will have the ability to display how much power the batteries currently have remaining using a small LCD screen. Small and basic LCDs are very easy to obtain on websites like Sparkfun, and they are relatively cheap as well. Some characteristics of LCDs that are important to consider when choosing one are the supply voltage they require and the serial interface they have. All microcontrollers run on different voltages, so it is wise to base your choice of LCD off what type of microcontroller that is being used in the design. For example, the supply voltage the LCD requires may be higher than what the microcontroller is capable of supplying. There are two solutions that can be implemented in the design if this is the case. One solution would be to use two separate voltage sources. One would be for the microcontroller and a second for the LCD. The second solution would be to have the ability to step up or step down the voltage source. An MSP430 microcontroller from Texas Instruments will most likely be the microcontroller that is chosen for this process: the reasons being that they are very low power microcontrollers, are very inexpensive, and are very easy to obtain. There is also an abundance of resources available from Texas Instruments and many other websites that provide libraries of functions and examples on how to program these small microcontrollers for various uses. Development boards for the MSP430 are also extremely cheap and readily available so there should be no issues that arise when programming the microcontroller. The MSP430 microcontroller runs on 3.3 volts, like most low power microcontrollers on the market these days do. The group has decided that it did not want to limit the choice of LCD screen being chosen to LCDs that only need a 3.3 volt supply. Limiting the choice of LCD may limit the options on what kind of interface the LCD utilizes. Most LCDs will need a 5 volt supply. Because space is limited inside the ultimate tailgate station, and because of budget purposes, it has been decided that we will only use one power source to power both the microcontroller and the LCD. Since this is the case, a simple circuit will need to be designed to regulate the amount of voltage being used to power the microcontroller. A simple circuit using a resistor, a capacitor, and a Zener diode could be built and connected between the 5 volt DC power supply and the MSP430. This circuit will step down the voltage that is going to the microcontroller to the appropriate 3.3 volts. 62 Figure 2-38 Voltage Regulator [Figure created by Garrett Lee] A basic 16 x 2 character, black on green, 5V LCD will be used for this particular application of the ultimate tailgate station. The LCD will be purchased from sparkfun electronics which is a very common supplier of simple LCDs. This particular LCD utilizes the HD44780 parallel interface chipset which is extremely common and very often used. Because of this face, interface code for this product is readily available all over the internet, and it is free. 63 3 Design 3.1 Chassis The chassis for this project was either going to be purchased then modified, or built from scratch. Both of these scenarios were discussed in the “Chassis Research” section of this report. It was decided that the best option for this project would be to purchase a chassis online and modify it for The Ultimate Tailgate Station. For the chassis a Fisher-Price electric ride-able toy car was purchased on ebay. The average electric ride-able toy car can hold about 130 pounds and the car itself will weigh about 100 pounds. This means that the weight of the completed station should be well within the limit of what the chassis can hold. The first step to designing the chassis will be to strip all of the extra plastic components off until only the main components are left. Some components such as the seats and other covers will not be needed for this project. Once the extra components are removed the modifications that can be made will be determined. There are a number of modifications that can be made. The layout of the components will also be very important to the design off the station. When designing the layout there are a few factors that must be considered. First how efficient the layout of all of the subsystems. It will be important to keep the wiring as short as possible for all of the electronics. Second weight distribution will be a major factor. If too much weight is put in one place this could cause the station to break or the station to tip over while driving. The different options that will be considered will have to cater to the fundamental design that is desired. After discussion the design that is desired is to have the batteries and the circuitry inside of the car. The batteries will be in the middle to keep from putting too much weight on either end of the chassis. The motors will be attached to the two rear wheels. All of the circuitry will be connected between the batteries and the motors, some of the components can be mounted on top of the batteries. A large box will be built and mounted on top of the electric car. This box will be roughly two and a half feet by four feet. These dimensions are subject to change based on the actual dimensions of the electric car. The sides of the box will be a few inches high. The box will be used to hold all of the subsystems. The box will be made of wood so that the components that must be mounted on it can be easily added. The wooden box will make mounting and adjusting the positions of the subsystems much easier because, wood is very easy to work with. The top of the electric car will not be a flat surface to mount the box easily onto. Therefore, some other added support will be needed. To keep the box on top of the electric car as stable as possible, support beams will be attached underneath the box. The actual location of the beams will depend on the layout of the electric car. The support beams can be vertical or can be formed into a right triangle to provide support to the edges of the station that 64 hang over the edge of the electric car. The box will also provide the advantage of having a flat surface to mount all of the subsystems. The actual electric car may not be the best for mounting all of the subsystems because the amount of space will be limited without adding a platform, like the one that is planned on being built. Figure 3-1 Side View of the Planned Chassis Design [Figure created by Andrew Boyles] A cooler is going to be mounted on top of the station, which means extra protection will need to be considered for the hardware. While the cooler will be checked for leaks before it is mounted there is a chance that water could still leak from the cooler over time. Most coolers also have a small drain on the bottom of the cooler for draining excess water from the cooler after use. When the cooler is in use some water may run off the drink or other item that is removed from the cooler. In order to keep this excess water from affecting the electrical components in the project certain precautions must be taken. First of all the plan for the location of the electronics is that they are located near the center to back of the station. The cooler will be placed near the front of the station to not only distribute the weight on the station evenly, but to also keep the possible water leaks from being too close to the electronics. Also the cooler will open such that the front of the cooler is facing out away from the rest of the station. This will prevent water from dripping on to the electronics when someone removes something from the cooler. The last precaution that will be needed will be the leak protection. No matter how careful someone is when using the station and cooler there is still a chance that water can end up outside the cooler, the station is intended for tailgating. For leak protection there will be a small amount of plastic or tarp that is used to line the back side of the cooler to separate the electronics from the possible water leaks. The two solar panels will be mounted on each side of the station. Each solar panel will be attached to a bracket that will attach to the outside of the box on top of the electric car. This bracket will allow the solar panels to extend and retract. When the station is fully charged the panels will not be needed, so they will be 65 able to be folded down to make the station take up less space. This will also be useful when moving the station from one place to another using a truck. With the solar panels folded in the weight will be more compact and lifting the station will be easier, than if the solar panels were still extended. The other components that will be incorporated will be mounted or placed inside of the box that is on top of the car. All of these components will be placed from the center to the back of the station, because the cooler will be mounted on the front of the station. This will also allow the advantage of having all of the components that depend on the electronics, such as the LED status lights, as close as possible to the circuitry that is beneath the box on top of the electric car. 3.2 Solar Panel Solar panel requirements: Panels wired in series shall power two 24 volt DC batteries Each panel shall be under 10 lbs. in weight Panels shall remain within the dimensions of the entire station to maintain balance and weight The ultimate tailgate station will utilize clean, renewable energy provided by solar panels integrated into the design. Since this is a mobile station that will need to carry a payload, the weight and dimensions of the solar panel must be taken into account. Also, since the tailgate station will be in a hostile environment the panels must be durable and reliable. The solar power will be used to generate the power for the battery that runs the motor that is in the chassis and the battery that will power any peripherals that will be added onto the station. This can include such things as an audio system, a charging station, and a USB port. The objective will be to find solar panels that are lightweight and portable, but do not lack in power efficiency and reliability. As far as power goes, solar panels generate DC power so they will be able to power the batteries directly. The tailgate station will be using a motor setup that requires more than just a standard 12 volt DC battery to run. The vehicle will use a 24 volt DC battery to run the motors that are controlling the back wheels. There will also be another battery added to the system that will be responsible for powering the servo system used to steer the front wheels and power any peripherals that are added to the vehicle. This includes the microcontrollers that are used, any LED lighting that the station utilizes, and powering any peripherals that will be added to the station. The secondary power source will most likely be a 12 volt battery. The two solar panels will be responsible for charging the primary 24 volt battery that runs the motor for the back wheels and motor controller as well as the secondary battery that is being used in the system. The factory installed plug to charge from an outlet will still be left intact as a backup to charge these batteries in the 66 event that the solar panels are not functioning as they are intended. For instance, if there is bad weather, and cloudy conditions, the solar panels will not receive enough sunlight to power the batteries of the vehicle. If the batteries do not have any power, the tailgate station will lose all functionality. It would be unwise to rely on the solar charging as the only means to power the vehicle however efficient they may be. Two Renogy 60 watt monocrystalline solar panels will be used to charge the batteries of the vehicle. The maximum power voltage for each of these panels is 24.1 volts. The two solar panels will be wire together in series which will bring the maximum power voltage up to 48 volts. This will be more than enough voltage to power all of the subsystems on the tailgate station. Overcharging of the batteries will not be an issue because of the charge controller that will be implemented in the solar charging station. The two panels that are wired in series are wired directly to this charge controller. The charge controller is then wired directly to the batteries and is responsible for efficiently charging the batteries with the power that is generated by the solar panels. 60 Watt Monocrystalline Solar Panel MPPT Charge Controller 60 Watt Monocrystalli ne Solar Panel 24 Volt Lithium- Ion Battery 12 Volt Sealed Lead Acid Battery DC to AC power inverter Figure 3-2 Solar Panel Block Diagram [Figure created by Marc Bianco] These specific solar panels have a very high conversion efficiency, meaning they convert the sunlight they receive into electric power very well. They are also designed for easy and inexpensive mounting which will be required since one will need to be mounted to each side of the vehicle, and space to mount them is at a premium. They can withstand harsh weather such as wind and snow. Snow will not be a factor, but wind is always something to pay attention to. Another key characteristic of these panels is that perform excellently in low light environments. This is a major plus because if someone is tailgating on a 67 relatively cloudy day, they will not lose a lot of the effectiveness of the solar charging system on the vehicle. These panels also have an operating temperature well within the range of temperatures one would expect while using the tailgate station in everyday situations. Specifications of these solar panels are: Maximum power of 60 W Maximum power voltage of 24.1 V Maximum operating current of 2.53 A Open circuit voltage of 29.5 V Short-circuit current of 2.76 A 72 Monocrystalline solar cells (4 x 18) Dimensions of 33.07 x 26.38 x 1.38 inches Weight of 15.43 pounds Anodized aluminum alloy frame 23.6 inch output cables MC4 connectors Operating temperature of -40°C to +90°C Because the tailgate station will be moving around in such crowded environments it will be required that solar panels are not in the way. They will be designed in such a way that they can retract. While it needs to charge they will open up, and then when it is moving they will fold closed. This will be achieved by designing a hinge to attach the edge of the panels to on each side of the station. This is also necessary because it makes it easier for the sensors that are used in obstacle detection and avoidance to be more accurate. If the solar panels were open all the time instead of being able to fold up then they would also have to take into account the dimensions of the solar panels. However, with them folded up, this is a non-issue. In order to maintain maximum power efficiency the solar power system will utilize a charge controller. The method of charge controlling must be chosen in order to provide a fast and efficient charge to our batteries in the easiest manner possible. 68 3.3 Charge Controller Charge controller requirements: Charge controller shall connect directly to solar panels wired in series Charge controller shall also be connected directly to the two 24 volt DC batteries Charge controller shall improve the efficiency of battery charging by 20% Charge controller shall prevent overcharging of the DC batteries A charge controller will be needed to regulate the current that is drawn by the batteries. This is necessary for safety reasons and to prevent overcharging. If the battery is allowed to overcharge, it can damage the battery or shorten its lifespan. If this happens it will harm the performance and reliability of the system as a whole. The charge controller will be wired directly between the solar panels and the batteries to regulate the current. Many variations of MPPT charge controllers were researched to determine which one best fit the needs of the vehicle. It was determined that the ‘perturb and observe’ and ‘incremental conductance’ methods are going to be too complicated and more costly than the project requires. These methods do have their advantages, but they are not suited to the ultimate tailgate station. Instead, a constant voltage MPPT charge controller will be used on the vehicle. These charge controllers are generally cheaper than the others and will help maintain the budget of the project. The constant voltage charge controller will definitely be able to do the job that is required for charge controlling on this project. A PT 12/24-10 dual voltage 10 amp power tracker charge controller with maximum power point tracking from Solar Converters Inc. will be used in the ultimate tailgate station in congruence with the solar panel and lithium-ion batteries to ensure maximum charging efficiency of the vehicle. Figure 3-3 12/24-10 MPPT Charge Controller [Permission Pending] 69 Charge controller specifications: Nominal voltage of 24 volts Maximum array voltage of 50 volts Maximum output of 10 amps 96% efficiency rating Weighs approximately 0.5 pounds Dimensions of 4.5 x 2.2. x 2.2 inches Battery and PV AWG flying lead connections Operating temperature between -40°C to +60°C Figure 3-4 Charge Controller System [Permission Pending] 70 3.4 Inverter Inverter Design The inverter will be connected to the battery that is independent of the motor control subsystem. The other battery that is in use will be a 12 volt DC battery that will power the microcontrollers and a power strip that will be added to the tailgate station. A 400 watt with 12 volt cables from AIMS Power will be used in the vehicle. This inverter has a small and lightweight design that will fit perfectly into the tailgate station. It is a modified sine wave inverter that comes with all cables necessary to hook up to a 12 volt DC battery and will provide more than enough wattage to run the devices that will be hooked up to it. This inverter also includes very nice safety features. It is always recommended that you do not let a battery completely discharge. This inverter includes a low battery alarm and also has a low voltage shutdown operation to prevent the battery from completely discharging. Figure 3-5 AIMS Power DC to AC inverter [Permission Pending] Specifications of AIMS DC to AC power inverter: Continuous power output of up to 400 watts Surge capability of up to 800 watts DC input operating voltage between 10 and 15 volts Output voltage of 120 volts AC Modified sine wave output 71 Output frequency of 60 Hz Battery low voltage alarm at 10.5 volts (+/- 0.5 volts) Battery low voltage shutdown at 10 volts (+/- 0.5 volts) Operating temperature between -15°C to +55°C (+/- 5°C) Automatic shutdown if operating temperatures are exceeded Two 2-3 prong AC output sockets Dimensions of 6.0 x 4.25 x 2.5 inches Weighs approximately 1.2 pounds 3.5 Battery Given all of the benefits and cons of both of the battery types that have been mentioned above, the best battery choice for this project will be a lithium-ion battery. It will meet the requirements of the tailgate station and will perform better than that lead acid battery will. While in use with the clean, renewable energy that will be generated by the solar panels the lithium-ion batteries will provide the energy needed and perform well under the high temperatures they will be subjected to. A 24 volt lithium-ion battery will be used to power the motor controller of the vehicle. Lithium-ion batteries are lighter than most other batteries that would be used for this purpose, and they have a longer lifespan than the other batteries. They also recharge much faster than other batteries would. Specifications of the lithium-ion battery are: Nominal voltage of 24V Weighs approximately 5 pounds Dimensions of 2.7 x 2.9 x 11 inches Standard charge time between 3 and 4 hours Operating temperature of -20°C to +60°C Lifespan of up to 7 years, which is about 4 times higher than lead acid batteries Safe and environmentally friendly 72 The rest of the subsystems that are used in the ultimate tailgate station will require a secondary power source. Things like the microcontrollers, steering servo, and LED lighting system will run off of this secondary power source. The secondary battery will be tied to a DC to AC power inverter since these applications require an AC power source. A 12 volt sealed lead acid battery will be used as the secondary battery for the vehicle. Figure 3-6 12 Volt Sealed Lead Acid Battery [Permission Pending] This battery will be plugged into a 400 watt DC to AC power inverter. This will be able to provide more than enough power to the other subsystems. The specifications of this battery are as follows: Operating voltage of 12 volts Approximate weight of 7 pounds Low self-discharge rate allows long shelf life Operating temperature of -40°C to +60°C Dimensions of 2.56 x 3.71 x 5.95 inches 73 3.6 Steering A simple microcontroller will be utilized to achieve the autonomous steering. Many microcontrollers provide very good libraries of functions for controlling servo motors. Servos generally have controls and gears integrated within them that make them easily controlled by a microcontroller. This is possible because the shaft is allowed to be positioned at any angle between 0 and 180 degrees. By communication with the other sensors that are integrated into the system, data will be relayed to servo signal on the microcontroller that will tell the servo what angles it needs to be positioned at. Doing this will allow the tailgate station to successfully autonomously steer itself in a reliable and efficient manner. As stated above, servos have three wires. A power wire, a ground wire, and a signal wire. The power wire will need to be connected to an external power source because the board itself will not have enough power to run the servo. As long as the ground of the microcontroller and the external power supply are common this will be an issue. Once the power wires are connected properly the signal wire of the servo will then be connected to one of the digital pins on the microcontroller. The figure below shows a general depiction of what the connections will look like. Note that while an Arduino board is shown in the picture this does not mean that an Arduino is being used in the steering system. The picture is just intended to describe how to connect a servo to a microcontroller using digital pins. Figure 3-7 Servo Connected to a Microcontroller [Permission Pending] 74 After all these connections have been made, the functions that are provided by a microcontroller servo library can be utilized in writing the code to control the servo. The most difficult part of this process will be getting the sensor signals to communicate what needs to be done to the servo signal in a manner that efficiently and accurately steers the vehicle. The choice of what servo to use in the steering system of the front wheels is very important. A servo must be chosen that has enough torque to turn the wheels of the vehicle while its weight is as high as possible. If the servo does not have enough torque, it will not be able to turn the wheels, and the vehicle will lose its capability to avoid obstacles and follow a user’s commands. The vehicle will not be able to use a standard servo that is used in most hobby RC cars. Since this is a much larger vehicle than a standard RC car and will be carrying much more weight, a more heavy duty servo will be required. The servo that is ultimately chosen for use must have enough torque to turn the front wheels of the vehicle with no problem. It must also be able to attach to a microcontroller like any other servo would. An MS530-1 Mega Servo will be used by the vehicle to provide enough torque to steer the front wheels. Figure 3-8 MS530-1 Mega Servo [Permission Pending] A 4 inch mega servo arm will be attached to the shaft to rotate the wheels left and right. 75 Figure 3-9 4” Mega Servo Arm [Permission Pending] The servo arm that is connected to the servo will then be attached to where the steering wheel would normally be. Then, using the positions provided by the microcontroller, the servo will move the arm which will steer the front wheels the appropriate direction. The mega servo can provide up to 2000 oz/in. of torque and can be connected to any receiver or microcontroller just like a normal sized servo would. The mega servo does not have a very high operating voltage which will allow it to be powered by the power supplies currently in place instead of needing its own separate power source. This is a major plus because there will not be a lot of space inside the vehicle, and adding another power source would take up too much room and weight inside the system. It is ideal for the autonomous steering application because it has programmable rotation direction, rotation speed, and neutral points. Specifications of the MS530-1 Mega Servo: Pulse width control system Operating voltage range between 4.8 and 7.4 volts Operating temperature of -20°C to +60°C Operating speed of 0.90 sec/60° (at 7.4 volts) Stall torque of 2000 oz/in. (at 7.4 volts) Coreless carbon brush motor 6 slider indirect potentiometer drive Dual ball bearing MR106 6 inch connector wire Weighs approximately 1.14 pounds Overall dimensions of 2.5 x 3.0 x 5.0 inches (not including servo arm) 76 3.7 Master Microcontroller The figure below shows the pins of the ATmega 328. Figure 3-10 ATMega 328 Pinout [Permission Pending] The master microcontroller will need to connect to multiple serial connections for the motor controller and the Bluetooth connection. Depending on the amount of serial ports on the microcontroller, this could be trivial or rather complex. There are a few ways of doing this. The trivial way is to select a microcontroller with multiple serial connections. It is very advantageous for easiness, but would be more expensive due to the extra hardware. Generally speaking, the cheaper microcontrollers only have one serial connection. Another way is to multiplex the two serial connections and connect the multiplexer to the single serial connection. This way may or may not be cost effective due to the cost of the multiplexer and added wiring. This would only work if the two inputs did not need to work simultaneously. The Bluetooth and motor controller both need to work simultaneously due to the tracking of the user, and the control of the motors. The multiplexer way would not be appropriate for our application. A third way would be to connect the two serial connections to the universal serial connection and set a delay for one of them. This will be the most cost effective way of doing this because no extra hardware is needed as long as a universal serial connection is available. To connect the ATmeega 328, it will use the Serial Peripheral Interface to connect to the motor controller and the Bluetooth receiver. The internal oscillator is built in and will control the clock. The serial input pins of the motor controller and Bluetooth receiver will use the MISO(master in slave out) to send data to the master microcontroller. When the master microcontroller needs 77 to send data to the Bluetooth receiver and motor controller, the MOSI(master out slave in) line will be used. Figure 3-11 Block Diagram of the ATmega 328 [Permission Pending] The master microcontroller will interface with the other subsystems through its input and output pins. The figure below shows the direct microcontroller interfaces. 78 Figure 3-12 Master Microcontroller Interface [Figure Created by Garrett Lee] The connections to the microcontroller are as follows: Motor controller: Serial Bluetooth Receiver: Serial Sensor System: 4 PWM Steering: 1 Digital Input LEDs: 8 digital Outputs 79 3.8 User Tracking After a review of several different user tracking techniques, it has been determined that the GPS-based user tracking method appears to be the most effective and favorable. In order to explain the design of this subsystem, it is helpful to create a diagram of its functionality. Figure 3-1 below illustrates a block diagram of the subsystem. Bluetooth Connection Figure 3-13 Diagram of GPS User Tracking [Figure created by Chris Echanique] First it is important to identify the fact that the user tracking requires two Android smartphones and two Garmin GLO receivers. The receivers are synced to each phone via Bluetooth in order to improve the GPS positioning accuracy of the phone. The Garmin GLO receiver and a mobile phone is mounted on the vehicle to determine its current position. The user is also carrying an Android phone and the Garmin receiver. Both mobile phones are synced together via Bluetooth and the user’s phone is also synced to the vehicle’s Bluetooth for route managing. 80 The mobile application on the user’s phone is responsible for calculating the distance and bearing from the vehicle to the user. In order to do this, five inputs are must be obtained first: The longitudinal coordinates of the vehicle (lon1) The latitudinal coordinates of the vehicle (lat1) The longitudinal coordinates of the user (lon2) The latitudinal coordinates of the user (lat2) The orientation of the vehicle The formula to calculate the distance between two GPS coordinates is given by the following equation: Equation 3.1 Distance Calculation of Two Coordinates where φ1 and φ2 are the latitudes of the vehicle and the user in radians respectively, λ 1 and λ2 are the longitudes of the vehicle and the user in radians, and R is the radius of the Earth given in feet. The formula to calculate the bearing between the two GPS coordinates is given by the following equation: Equation 3.2 Bearing Calculation of Two Coordinates The calculated distance D is a scalar value measured in feet. This is simply used for how far the vehicle needs to travel to catch up with the user. The bearing θ measures the angle offset from due north that the vehicle is with respect to the user. This is measured in degrees. However it is not enough just knowing the distance and the bearing from the vehicle to the user. The bearing is useless in routing the vehicle to the user if the 81 orientation of the vehicle is unknown. Since bearing is defined as the angle between a line connecting the two objects (the vehicle and the user) and the line of longitude, this measurement is relative to the north-south line and not to the orientation of the vehicle. Without the vehicle’s orientation, the user tracking system will not be able to track the user’s turns, limiting it to linear tracking instead of the desired planar tracking. Therefore, the orientation must be considered. The orientation of the vehicle is determined from the mobile phone that is mounted on it. Since most mobile smartphones have a digital compass embedded into its hardware, determining the orientation of the vehicle is simple. The smartphone will be mounted to the front of the vehicle with the top of the phone pointed in the direction of the vehicle’s hood. Therefore the orientation of the vehicle can be determined simply by observing the angular rotation from the phone’s digital compass reading with respect to the northern cardinal direction. Once the orientation is found, the turning angle, or the amount the vehicle must rotation to align with the position of the user, can be calculated. This is done as a difference between the bearing angle and the orientation angle, defined in Equation 3.3 below. Equation 3.3 Turning Angle from Orientation and Bearing where the θ is the turning angle, β is the bearing angle, and α is the orientation of the vehicle with respect to due north. After calculating the distance and the turning angle, these measurements must be converted to tracking speed and rotation radius of the vehicle. The speed of the vehicle will be directly proportional its distance from the user. The vehicle will be stationary when the user is within a range of five feet. Its speed will increase as the user gains more distance from the vehicle, but will reach its max speed when the user is 20 feet away. The turning angle will determine the radius of rotation that the vehicle must perform in order to align with the user’s position. These calculations are performed by the user’s mobile phone and sent to the master microcontroller via Bluetooth. Once the tracking speed and the radius of rotation are found, this routing data is ready to be sent to the master microcontroller on the vehicle for tracking. There are three potential states involved with the user tracking subsystem. These states are user/vehicle alignment, linear tracking, and interruption. 82 State 1: User/Vehicle Alignment The first state that the system enters upon retrieval of routing data is the user/vehicle alignment state. Here the vehicle proceeds to turn to the left or to the right depending on the turning angle calculated from the previous equation. The goal of this state is to adjust the vehicle’s orientation by turning so that it has a direct path to the user. The system enters this state when the turning angle is not zero (implying that the vehicle’s path is not aligned with the user’s position). However there will be a threshold of plus/minus three degrees to compensate for possible discrepancies due to error in the digital compass reading or GPS positioning data. Once the vehicle’s path has been aligned with the user, it enters state two which is linear tracking. State 2: Linear Tracking In the linear tracking state, the vehicle is assumed to be in line with the user’s position. Here, the vehicle has a direct path to the user (provided that no objects have obstructed this path). The vehicle will proceed to move straight as long as the turning angle has not been changed pass the threshold. This implies that the user has either remained stationary or has moved along the path of the vehicle. Should the user’s change in position cause a change in turning angle, the system will transition back to state one to realignment before returning. State 3: Interruption Both states are subject to terminate and enter state three in the event of an interruption. An interruption may be caused by one of three possible events: (1) The system may have detected an obstacle in which the obstacle avoidance will be employed, (2) the remote controller feature has been selected, overriding user tracking, or (3) the OFF switch has been enabled, deactivated the tracking system. A state diagram is presented in Figure 3-3 below demonstrating the possible state transitions. User/Vehicle Alignment Linear Tracking 1 2 3 Interruption Figure 3-14 State Diagram of User Tracking [Figure created by Chris Echanique] 83 3.9 Sensor System The sensor system to the ultimate tailgate station will have a very key role in protrusion and gap avoidance. It will detect when a protrusion or gap is in the way of the vehicle, and the distance that protrusion or gap is from the vehicle. While the sensor system is very important for the autonomous part of the vehicle, it is unnecessary for the remote controlled part. Therefore, the master microcontroller will only be dependent on the sensor system when it needs to be. 3.9.1 Previous Projects’ Sensor Systems There are many other projects online that have similar qualities to the ultimate tailgate station. The main characteristics about where they differ are what obstacles they are trying to sense, and how they are going to sense them. The following two projects, the Tailgate Buddy and Odysseus Rover, model two of the most effective obstacle and gap avoidance methods. In a previous project, the Tailgate Buddy utilizes 3 proximity sensors to detect obstacles in front of the vehicle. The proximity sensors needed to cover a 180 degrees angle in front of the vehicle. The proximity sensors that were used were ultrasonic sensors. All three ultrasonic sensors were serially connected to the slave sensor microcontroller. The Tailgate Buddy’s obstacle avoidance system does not account for gaps or sharp inclines and relies on the navigator not to get the vehicle stuck. Trusting the navigator makes a lot of sense, because obstacles like gaps and sharp inclines are generally easy to get stuck in. The vehicle will have to maneuver around the ground obstacle. In order for the vehicle to remain autonomous, the obstacle avoidance system will be able to maneuver around ground obstacles. A picture of the Tailgate Buddy is shown below. 84 Figure 3-15 Tailgate Buddy Unit [Reprinted with permission from Kevin Kauffman] In another previous project, Odysseus, the obstacle detection avoids objects directly in front of the vehicle and gaps in the ground. It uses three distance sensors. One sensor is located in the front and center of the vehicle. It is connected to a servo motor and pans the whole 180 degrees in the front of the vehicle. Two other ultrasonic sensors are on the front of the vehicle. They are extended from the left and right side of the front and both face down towards the ground. This allows the vehicle to detect shorter objects or gaps in the ground. This method of detection for shorter objects makes a lot of sense, but it also extends the length of the vehicle by a foot in the front of the vehicle. A picture of the Odysseus Rover is shown below 85 Figure 3-16 Odysseus Rover [Permission Pending] 3.9.2 Surface Protrusion Method Comparison The Odysseus Rover uses one ultrasonic sensor connected to a servo motor. The ultrasonic sensor then can pan across the front of the vehicle. While this method works in an environment with few obstacles, it is not effective in a tailgating environment. In the worst case scenario, there can be multiple people and objects in the way of the vehicle at one point in time. The one ultrasonic sensor may only be able to pick up one object at a time depending on which direction it is facing. The ultimate tailgate station must always be able to detect objects over the entire front of the vehicle. The Tailgate Buddy uses 3 ultrasonic sensors directly attached to the chassis. This method covers all angles at all times. It is the most effective way for the ultimate tailgate station to cover all surface protrusions incoming to the station. 3.9.3 Gap Detection Method Comparison The most obvious way of avoiding gaps and sharp declines is for the person navigating the vehicle to just avoid surface protrusions. It would be quick, easy, and save a lot of time and effort. This is the method that the Tailgate buddy 86 used. The ultimate tailgate station requires a gap detection method, so this method will not suffice. The Odysseus rover utilizes two ultrasonic sensors for its gap detection system. Each ultrasonic sensor is connected to a pole and extended about a foot in front of each front wheel. The figure shown above for the Odysseus rover shows the setup of the ultrasonic sensors. The Odysseus rover method will be most effective way for the ultimate tailgate station to do gap detection. 3.9.4 Surface Protrusions The placement of the ultrasonic sensors is very important to maximize the efficiency of the sensor system for the ultimate tailgate station. For surface protrusions, the vehicle will be using three ultrasonic sensors in the front of the vehicle to detect whether there is a protrusion in the way of the front of the vehicle. The vehicle will be tracking someone using global positioning satellite, so it will only be moving forward. The sensors will be able to detect how near or far an object is from the vehicle. This will help the vehicle determine how sharp turns need to be in order to avoid the objects. Two ultrasonic sensors will be placed on the front of the vehicle, furthest to the left and right. One ultrasonic sensor will be in between them in the center. The sensors have a 45 degree horizontal viewing angle. This will allow the two sensors on the edge to be able to see past the left and right edges. The area that the sensors cover past the edges of the vehicle will cover enough ground that we know how sharp of a turn that can be safely made by the vehicle. Ideally, the sensors will cover enough ground so that the vehicle won’t need to make sharp turns. The sensors will be able to detect protrusions far enough away that they can make gradual adjustments. The ultrasonic sensors cannot overlap each other, since they are of the same type. The sensors will be angled away from each other and alternate when they send out pulses to make sure that they do not interfere with each other. With the width of the vehicle being 3 feet wide, the vehicle will need at least 4 feet to be able to maneuver around the obstacle at a 45 degree turn. Therefore, the ultrasonic sensors will need to have a range at a minimum of 5 feet. The figure below shows the placement of the ultrasonic sensors and the range of the ultrasonic sensors. 87 Figure 3-17 Surface Protrusion Sensor Range [Figure Created by Garrett Lee] 3.9.5 Gaps and Declines Gaps and sharp declines are any obstacles lower than ground level. The obstacles above ground level will be detected by the 3 surface protrusion ultrasonic sensors. The chassis will be long enough to hang over the front wheels of the ultimate tailgate station. An ultrasonic sensor will be hung underneath the box to detect gaps. There will not be two ultrasonic sensors because of the width range of the ultrasonic sensors. Since the ultrasonic sensors will have a 45 degree range, the underneath ultrasonic sensor will be able to cover the entire area in front of the vehicle. The underneath ultrasonic sensor will also be able to tell what angle the ground slopes in the near future. If the slope is flat enough, it will not need to be avoided. The underneath ultrasonic sensor will need to communicate with the motor controller to make appropriate decisions. The motor controller can supply however much power is needed to move forward at a relative speed to the navigator. The figure below shows the placement and area that the underneath sensor will cover. 88 Figure 3-18 Underneath Sensor Range [Figure Created by Garrett Lee] 3.9.6 Sensor System Integration The sensor subsystem will use ultrasonic sensors to detect protrusions or gaps in the way of the ultimate tailgate station. The ultrasonic sensors will connect directly to the master microcontroller. The ultrasonic sensors will use the pulse width modulators on the master microcontroller. The analog signals are converted by the ultrasonic sensor to a digital signal. This binary input will be used in an algorithm to detect the distance a protrusion or gap is from the vehicle itself. Figure 3-19 Sensor System Interface [Figure Created by Garrett Lee] 89 Maxbotix LV-EZ1 Pin Output through its pulse width output. The figure below explains the Maxbotix LV-EZ1 pins. Figure 3-20 Maxbotix LV-EZ1 PinOut [Permission Pending] Figure 3-21 Maxbotix LV-EZ1 Pin Out Explanation [Permission Pending] 90 3.10 LED Lights One of the subsystems of the Ultimate Tailgate Station will be a series of LEDs that will show the status of the station. The LED circuit will consist of five LEDs; each LED will be a different color and each color will have a different meaning. Steering LED’s Motor Controller Master Microcontroller Ultrasonic sensors Bluetooth Receiver Figure 3-22 Master Microcontroller Block Diagram [Figure created by Garrett Lee] The first idea for controlling the LED lights was to purchase a very simple microcontroller such as the MSP430 from Texas Instruments. The MSP430 microcontroller would be perfect for this application. The MSP430 is a very cheap low powered microcontroller. LEDs are have a very low power output and only need to be connected to the appropriate pins of the microcontroller to be used. This option was a possibility but if the master microcontroller, which would be sending the control signals to the MSP430, has extra pins the LEDs could be connected directly to the master microcontroller. This will save some wiring and save the trouble of connecting another microcontroller to the station. The master microcontroller that is to be purchased will have many pins for different purposes. It has been decided that eight pins will be reserved on the master microcontroller for the LEDs. 91 One features of the Ultimate Tailgate Station is the Application that is being developed to control the station. Three of the LEDs will be used to show the status of the station based on which mode of operation is selected on the application. The first LED will be a Red LED; this LED will show that the station is in standby mode. Standby mode means that the station will not move and will not follow the user if they move away from the station. The second LED will be a Green LED. This LED will be used to show when the station is in autonomous mode. In autonomous mode the station will follow the user and will execute obstacle avoidance if needed. The last LED that will show the status of the station based on the application will be a Blue LED. This LED will light up when the station is in RC mode. This mode will be used for controlling the station manually through the application. The last two LEDs will be used to tell the status of the Ultimate Tailgate Stations batteries. The station will have multiple solar panels mounted on it. The solar panels will be retractable, so if the station does not need to charge the batteries the panels can be moved to a “closed” position. This will be a simple feature of the station, but retracting the solar panels will not be necessary. For the user to know when the station is no longer charging, a couple status LEDs will be necessary. The first status LED for the stations batteries will be an Orange LED. This LED will light up when the batteries are currently being charged by the solar panels. The last LED will be a Yellow Diffused LED. This LED will light up when the stations batteries are fully charged. This will allow the user to know when the station is fully charged and can be very helpful if the user wants to use a large amount of power from the station. This last LED will be different from all of the previous LEDs. The previous LEDs were all just normal LEDs with a clear plastic cover over the light that emits a different color. The Yellow LED, which is used for showing that the batteries of the station are charged, will have a diffused yellow plastic cover over the LED. The different style for the last LED is only so that LED is more noticeable. This will make it very easy to quickly tell if the station is fully charged. 92 LED Color Meaning Red Standby Mode Green Autonomous Mode Blue RC Mode Orange Batteries Charging Batteries Fully Charged Yellow (Diffused) Figure 3-23 LED Explanation [Figure created by Andrew Boyles] The LEDs in this project are strictly for the benefit of the user. The two different styles of LEDs that are going to be used in this project will be shown below. All of the colors of LEDs that have been discussed in this section have been found online at a reasonable price. All of the LEDs were found online to be between forty cents and two dollars, depending on type and the brightness rating. Figure 3-24 Diffused and Non-Diffuse LEDs [Permission Pending] 93 3.11 Mobile Application After a review of all the different mobile operating system platforms available on the market, the Android platform has be deemed the most flexible and easy to implement for the purposes of this project. In designing of the mobile application, it is important to identify the goals and expectations of the system as a whole. The application should be able to effectively utilize the phone’s onboard hardware and peripherals for data retrieval. This data should be sent to the master microcontroller of the vehicle via Bluetooth. Communication between the user’s phone and the vehicle is crucial for the system to work. The functions of mobile application can be categorized in a series of subtasks. These are as follows: (1) GPS Tracking mode, (2) Remote Control mode, (3) Obstacle Avoidance, and (4) OFF mode. The figure below illustrates the graphical user interface of the mobile application with each of these states identified as buttons at the top of the screen. abec 1 GPS 2 RC 3 OFF y x Figure 3-25 Graphical User Interface of Mobile App [Figure created by Chris Echanique] 94 3.11.1 GPS Tracking When the user selects the GPS tracking mode, the android device will begin collecting GPS coordinate data of both the user and the vehicle’s position. The GPS coordinates obtained will be used to calculate the distance and bearing between both devices based on Equations 3.1 and 3.2. The turning angle will be calculated from the bearing and the orientation angle from Equation 3.3. The speed will be determined as a proportion of the distance to the user, where the speed is zero when the vehicle is within five feet of the user and at its maximum when the distance is greater than 15 feet, as specified below. where s is the speed, d is the distance from the user, c is some constant, and Smax is the maximum speed attainable by the vehicle. The final outputs from these calculations are the speed of the vehicle and turning angle. This data will be set to the master microcontroller of the vehicle via Bluetooth to drive the mechanics. 3.11.2 Remote Control The user may also select the remote control mode on the mobile application’s user interface. Here the GPS tracking system and obstacle avoidance systems are suspended to allow the user manual navigation of the vehicle. A navigation window pane will be featured below the mode selection buttons as seen in the previous figure. The user will be able to navigate the vehicle simply by touching anywhere in this window pane. An arrow will be drawn from the bottom center of the screen to the user’s point of contact on the screen. The magnitude of this arrow will define the magnitude of the vehicle’s speed. The angle formed between this arrow and the vertical line will define the turning angle of the vehicle. This concept can be visualized by the Cartesian coordinate system placed on the figure and the following equations below. where s is the speed of the vehicle, x and y are the coordinates defined by the point of contact with respect to the origin of the arrow vector formed, and θ is the turning angle of the vehicle. 95 3.11.3 Obstacle Avoidance Notification A notification will appear on the screen in the event of an obstacle encounter. This will only occur when the user selects the GPS tracking mode. Here the vehicle will attempt to reroute itself around the obstacle before transitioning back to the GPS tracking state. No computations for obstacle avoidance will be performed by the mobile phone. The master microcontroller will handle the computations necessary for rerouting. 3.11.4 OFF Mode The last mode offers the user the ability to turn the system off. This mode simply disables the user tracking system, obstacle avoidance, and remote control feature. The vehicle remains stationary while on this mode as per the user request. It is important to note that this will not power the system off entirely. This is simply a state that suspends all other states until otherwise designated by the user’s input. 3.12 LCD Display A simple, low level programming language will be used to program the microcontroller and LCD interface. The microcontroller will be connected to the charge controller so that it can read data about how much power is going in, and out of the batteries. Based on this data, it will perform calculations on how much power is remaining in the batteries and then display this information on the LCD. The LCD will need to be mounted somewhere on the outside of the chassis that easily visible to anybody that wants to access it. It will be programmed to read the data off the charge controller at specific time intervals and then display what is available on the LCD for a specific set time. If there is no data currently being read from the charge controller that needs to be displayed, the LCD will dim and then not display anything to save power. It is important that the LCD is design and mounted in such a way that prevents in from being damaged in any way. Ways the LCD could be damaged include getting hit too hard by something or possibly getting wet from rain or other tailgating activities. As a way to solve this problem, a small clear encasing will be designed around the LCD and related components that may be exposed. This case has to be clear that the display can still be easily read, and it must also be well sealed to prevent any possible water intrusion. The LCD must also be put onto an area of the chassis that does not interfere with any of the other subsystems. It must stay be out of the way of each solar panel which will be able to fold in and out for charging purposes. It cannot interfere with any of the sensors that are on this system. If it impedes any of the sensors views, this will negatively affect the obstacle avoidance capabilities of the vehicle. 96 As long as it remains out of the way of any user tracking, obstacle avoidance, or solar charging functions it can be placed anywhere on the outside of the chassis that is visible to users. 97 4 Testing 4.1 Chassis In order to consider the chassis acceptable for this project it is important to test a few key aspects of the chassis. The chassis will be tested when the frame and top platform have already been built. The first aspect that will need to be determined is how much weight the Ultimate Tailgate Station can support. It has been estimated that the overall weight of the station will be around 150 pounds. The testing will start with adding weights to the chassis and checking that the design is structurally sound and does not have any issues holding the weight of all of the subsystems. Second, when the station is in motion it is important that the movement is smooth and sturdy. This test will have to be done with no weight first then with adding weight similar to the first test. This test is done second so that the maximum amount of weight that can be held will have already been determined and will not be exceeded. The last two tests will not only test the chassis but also the motors on the rear wheels. The last two tests are to move the station using the motors as opposed to pushing it. It will first be moved using motors with no weight on the chassis and then with weight added to the chassis. These last two tests will be performed in a very similar fashion to the previous two tests. The highest amount of weight tested in the first test will not be exceeded in this or any of the other tests. For the first test the station will be held still by stopping the wheels with pieces of wood or something similar. This test is important because before testing how the station moves with weight it must be known how much weight to test with. When adding the weights to the chassis they will be added in ten pound increments and five pound increments as the weight approaches the maximum weight that the station will have to support. This will keep from adding too much weight at once and causing something to break due to stress. This test will confirm what amount of weight the station can hold and show any locations that may need reinforcing. To completely check all of the aspects of the station the weights will spread out on all parts of the chassis and also be moved from location to location on the chassis. This will help to show if there are any locations that can cause a problem if too much weight is added to that location. The station is estimated to weigh one hundred and fifty pounds but the testing will test up to two hundred pounds. If the station can support more weight than expected, it will be known that it will be able to support all of the subsystems. This will also give flexibility if another component needs to be added to the chassis which will add more weight, such as another battery if one 24 volt battery is not enough to power the motors. The second test will be needed to make sure the chassis is structurally sound while in motion. First the station will be pushed over a minimum distance of twenty feet on concrete (or asphalt), twenty feet on dirt and twenty feet on grass. 98 When the test is preformed the station will be pushed from directly behind. When being pushed it will be at the same level as the station and will not be pushed at an angle. This test will show that the station has no issues moving over the different terrains. It will also show that the station is stable when it moves and does not fall over. The third test is exactly the same as the previous test except that it will be performed with weight added to the chassis. Once it is known that the station can move without falling over and is stable. It has to be determined that the same can be said when the station has multiple weights on it. The weights will simulate the weight of the subsystems that will ultimately be added to the chassis. The chassis has already shown, from the first test, the most weight that can be supported or that the station can hold the total amount of weight desired. For this reason the weights will be added in larger increments, than the first test, for this test. The weights will be added in twenty pound increments at first and five pound increments as the weight approaches the maximum. Each time more weight is added the push test will be preformed until it has been performed at the maximum weight. The last two tests will not only test the chassis but will also test the motors. The last two tests will be very similar to the previous two tests except instead of pushing the station over the different terrains the motors will propel the station over all terrains. One test will be with no weight and the other will be done with weight being added a little at a time exactly the same way it was done in the previous two tests. These tests will be covered in more detail in the motor testing section of this report. These tests are needed to confirm that the station will meet the requirements of this project. The total amount of weight of all of the subsystems must be able to be supported by the chassis. The station will be autonomous so it will be very important that the station can move easily and has a stable ride. The tests that have been discussed in this section will confirm these requirements. 4.2 Motor Controller The motor controller is one of the main components of this project and without this component the entire project will not work. As soon as this part is obtained it will be important to test it as soon as possible. The controller that was chosen, the AX1500, has an RS232 cable for connecting to a computer, this will be very helpful for testing the controller. The first thing that will need to be tested is that the controller is able to control both of the motors that have been purchased. The controller will be connected to the computer, and using the software for the controller a very simple program to turn the motors on and off can be sent to the controller. If the controller passes this test the next step will be to test that the controller will be able to vary the speed of the motors. 99 Varying the speed of the motors will again be done by providing a simple program to the controller through the RS232 serial connection. The AX1500 has a very user friendly interface that can be used to set the power of the motors. The figure below will show the user interface where user testing can be done. The sliding bar that is labeled with the number “2” will allow the user to adjust the speed of the motors for testing. Figure 4-1 User Interface for the AX1500 Motor Controller [Permission Pending] Legend for the User interface shown above 1. Run/Stop Button 2. Motor Power Setting 3. Measurement 4. Real-Time Strip Chart Recorder 5. Transmit and Receive Data 6. Input Status and Output Setting 7. Data Logging and Timer 8. Joystick Enable 100 Once it is known that the motor controllers work properly and can control the speed of the motors, the final step to testing will be to see if the motor controller can communicate with the master microcontroller. This testing will actually be very similar to the previous test except instead of using the PC connection to send the signals to the motor controller the signals will be received from the master microcontroller. The master microcontroller will have a small external memory device for saving programs for the master microcontroller to run. A very simple testing program will be written and sent to the master microcontroller. The program will be able to test that the motors can turn on and off. The program will also be able to vary the speeds of the motors. If the speed of the motors is successfully varied by the master microcontroller and the motor are able to be turned on and off, then the testing for the AX1500 DC motor controller will be complete. 4.3 Solar Panel Testing is a very important part of the process. Everything will need to be tested before it is put onto the system to ensure that it is working properly. The main parts of the solar panel system that need to be tested are the solar panels themselves, the charge controller, and the batteries that they are delivering power to. Everything will need to be visually inspected to ensure that it is not damaged in any way, and also physically tested to check if it is performing the way it is designed to. Once this subsystem has been tested and adjusted to perform properly, it must then be integrated into the system as a whole and tested to make sure that it operates within the system, and not just on its own. Doing this means ensuring that once the solar panels are mounted to the chassis they still function properly, and making sure that the power being delivered to the batteries is adequate and the batteries are power the servo system and peripherals as they should be. Testing the solar panels themselves is a simple process. A visual inspection is required to ensure that there is no damage to any of the solar cells. And damaged solar cells will reduce the performance and efficiency of this subsystem, and it is of critical importance that the maximum amount of power achievable is being obtained by the panels. Once a visual inspection is complete, and it is determined that there are no physical damages to the exterior of the panels, they will need to be wired together properly and tested to ensure that the wiring was done correctly. The two solar panels will be wired in series, not in parallel, to increase the maximum amount of power they generate. The solar panels will be placed under a heat lamp for testing purposes. They will be connected to the charge controller and wired to a battery. A voltmeter will be used to periodically read the voltages on the battery to ensure that it is charging correctly. However, it must first be determined that battery is in fact good. The tailgate station will have its factory installed charging system left intact for this purpose and for purposes of poor weather conditions. The battery will first be plugged into a wall outlet and allowed to charge to full. The voltmeter will be 101 used to determine that the battery is in fact good, and can obtain a charge. The charge will then be used up on the battery to drain all of the voltage from it, and then connected to the solar system. With the heat lamp providing the solar panels energy, it should start to generate electricity and provide power to the battery. This system will be tested with and without the charge controller connected. The charge controller is intended to maximize the efficiency of the solar panels charging the battery. Multiple tests will be done with and without the charge controller to ensure that it is performing as it should. The amount of time it takes the batteries to charge will be measured and the amount of power that the batteries are receiving will be measured as well. These numbers will be used to determine the effectiveness of the charge controller. These tests shall be conducted on all batteries that the ultimate tailgate station will be utilizing to ensure that each battery is good and that each battery integrates correctly with the system. Once it is determined that all of the parts are working properly they will then be tested in different environmental conditions to see how they can expect to perform in real world applications. The panels will be tested in different temperatures, different weather conditions, and at different angles to obtain the maximum amount of power achievable. It is vital to see how this subsystem will perform in less than ideal conditions to determine if it can still expect to charge the batteries in said conditions. When these tests will be performed will depend entirely on weather conditions. The panels will be tested in cloudy conditions to see if they can still receive some energy from the sun. Our research also indicated that solar panels, as many other electronics, perform better in cooler temperatures. The panels will be tested outside in as many varying temperatures as possible as to obtain and idea of how well the panels perform when it is hotter outside. One of the reasons that the monocrystalline solar panel was chosen was because it performs better in higher temperatures than the polycrystalline cells do according to our research. Because of this fact, testing in higher temperatures should show only a small drop in the efficiency of the system. 4.4 Servo System Extensive tests will need to be done on the steering subsystem to ensure that the server can accurately steer the front wheels of the tailgate station. One of the main goals of the station is for it to autonomously steer itself. The back wheels will not be enough to perform this task by themselves. It is crucial that the front wheels also be able to steer themselves. This subsystem includes a microcontroller and servo that will be connected to the front wheels in order to move them. The servo system will need to be tested independently of the system as a whole, and then also together with the sensor system to ensure that they can successfully communicate with each other. The first tests that will be done will be with simple code telling the servo what angle to position the wheels at. Using the functions in the Arduino servo library, basic code will be written 102 with certain angles to see if the servo moves correctly based on what the microcontroller is telling it to do. Tests will be performed to see how for right, and how far left each front wheel can be turned using the servo, and to see how fast the servo will turn each wheel. These measurements need to be used to take into account when the tailgate station will need to start turning to avoid an obstacle or to follow someone. Once it is determined that the Arduino board can control the servo system independently, it will then need to be integrated together with the sensor system. The obstacle avoidance system will need to tell the servo whether it needs to steer left or right to avoid any obstacles. This will be done by designing an obstacle course for the station to move through. The obstacle course will contain different situations that the tailgate station may encounter in the environments it is intended to be used in. Obstacles will be placed in front of, to the left of, and to the right of the station to ensure that any situation the station may encounter will not be a problem. 4.5 Inverter System The DC to AC power inverter will need to be tested to ensure that it is providing the proper output at the proper frequencies. The claims of safety features such as low voltage alarms and low voltage shutoff will also need to be tested to make sure the inverter is actually doing what it claims it is capable of. A digital multimeter will be used to test the output of the AC power inverter. Figure 4-2 Digital Multimeter [Permission Pending] The output of the AC inverter will be read by the digital multimeter while it is connected to the 12 volt DC battery to ensure it is giving the proper output. The inverter is supposed to set off an alarm when the DC battery it is tied to is reaching a low voltage (around 10.5 volts). The battery will be allowed to discharge to this voltage to see if the alarm does in fact go off. Connecting the digital multimeter to the DC battery will allow one to know when the battery is 103 nearing this low voltage. The inverter should also automatically shut off if the batteries voltage continues to drop. The DC battery will continue to be allowed to discharge to this shutoff voltage to see if the inverter will actually perform the shutoff function. 4.6 User Tracking The user tracking subsystem will be tested based on the three states discussed in the design section: (1) User/Vehicle Alignment, (2) Linear Tracking, and (3) Interruption. A sequence of trials will be conducted to evaluate the effectiveness of each state. Tests will also be performed to adhere to the all the specifications presented, including tracking error, maximum tracking proximity, and location update frequency. State One: User/Vehicle Alignment Test Turning Angle |θ| at 10ft away Expected Response <3° Proceed Forward 15° Realignment in <1 ft 30° Realignment in <2 ft 45° Realignment in <2 ft 90° Realignment in <5 ft 135° Realignment in <8 ft 180° Realignment in <10 ft Pass/Fail Figure 4-3 User/Vehicle Alignment Test The first series of tests that will be conducted deal with the user/vehicle alignment state. Here the vehicle’s orientation with respect to the user’s position will be adjusted to assess the effectiveness of alignment at different turning angles. The turning angle is defined as the angle that is formed between the vehicle’s current line of sight and the line between the vehicle and the user. Tests will be evaluated on a pass or fail grade based on the distance it takes for the vehicle’s path to fully align with the user. The first test will be conducted at less 104 than three degrees to test if the vehicle proceeds to the next state as expected. The remaining series of test will check if the vehicle aligns within the specified maximum distance at varying turning angles. Figure 5-1 above will be used for the assessment. The next series of tests that will be performed involve the second state of user tracking known as linear tracking. Here, it is assumed that the vehicle has already aligned with the user and will begin to follow a direct path to the user. The first test will be conducted at less than five feet. Here, the vehicle is expected to remain stationary. The reason for this is to prevent the vehicle from attempting to track the user at the range of error produced by the GPS positioning device. After this initial test, the remaining tests will be conducted at greater distances from the user. The vehicle is expected to respond by moving toward the user at a speed directly proportional to its distance from the user. When the distance between the vehicle and the user exceeds 15 feet, the vehicle is expected to reach its max speed. Figure 5-2 below will be used for this assessment. State Two: User Tracking Distance Test Distance (ft) Expected Response <5 No movement 8 Starts moving slowly 10 Speed increase proportional to distance 12 Speed increase proportional to distance 14 Speed increase proportional to distance 16 Maximum speed 18 Maximum speed 20+ Maximum speed Pass/Fail Figure 4-4 User Tracking Distance Test 105 The final series of tests to be conducted involve evaluating the response of the system in the event of an interruption. There are three events that cause an interruption during user tracking: (1) remote control mode enabled, (2) obstacle detected in current path, and (3) OFF mode enable. Each of these events will be tested by verifying that the system will effectively transition from user tracking to interruption and vice versa. State Three: Interruption Test Event Expected Response Tracking RC Tracking terminates, User gains control via App RC Tracking RC terminates, Tracking begins at state 1 (User/Vehicle Alignment) Tracking Obstacle Tracking terminates, Obstacle avoidance begins Obstacle Tracking Obstacle avoided, Tracking begins at state 1 (User/Vehicle Alignment) Tracking OFF Tracking terminates, waits for next response OFF Tracking RC terminates, Tracking begins at state 1 (User/Vehicle Alignment) Pass/Fail Figure 4-5 User Tracking Distance Test 106 4.7 Sensor System The sensor system is very important for the safety of the ultimate tailgate station and the safety of others. The vehicle may be small, but it carries a decent amount of force. It is the number one priority for the vehicle to be safe and for others to be safe with the ultimate tailgate station. In order for the station to protect itself from others, it will use the sensor system. 4.7.1 Individual Ultrasonic Sensor Testing Each sensor used on the ultimate tailgate station must be tested individually for accuracy. To test them, they will be connected to the sensor system microcontroller and measured. The sensors will need to be tested for distance accuracy, as well as the range of width and height. The ultrasonic sensors will send a sound pulse toward an object and measure the time of the echo to return. The shape of the pulse will be a cone expanding out to 5 feet. Each dimension of the pulse will need to be tested for accuracy, since the placement of the ultrasonic sensors is a key part of the obstacle avoidance system. The figure below shows the different settings the Maxbotix LV-EZ1 has. The size of objects that can be detected is proportional to the distance from the sensor. The 5 foot distance is the maximum beam width that we have accounted for in our design. Figure 4-6 Maxbotix LV-EZ1 Detection Zone [Permission Pending] 107 The beam width of the ultrasonic sensors will play a key role for the range of the ultrasonic sensors used in obstacle detection. The beam width will also be important for the underneath sensor. For the obstacle detection, the left and right ultrasonic sensors will need to cover areas extended past the edge of the station. Therefore, all 45 degrees range width need to be accounted for. For the center ultrasonic sensor, the complete 45 degree range width is not as necessary. At ranges past 5 feet, the beam widths of the front ultrasonic sensors will overlap. Since both of the side ultrasonic sensors will be sending pulses at the same time, they will cover the center sensor’s farthest edges. The first ultrasonic sensor test will evaluate one individual ultrasonic sensor. An object that is wider than three and a half inches will be placed directly in front of the ultrasonic sensor at a distance of five feet or one-hundred and fifty centimeters away. At that distance and angle, each ultrasonic sensor should not have any issues for detection. All four ultrasonic sensors will be tested this way. They will be compared based on which one is the most responsive for this particular angle and distance. Next, an three and a half inch object will be place at the right edge of the forty five degree beam width and at a distance of five feet away. This will represent the furthest object to the right of the vehicle. Again, each sensor will be compared based on its responsiveness. This same test will be repeated for the left side beam width. The last test will be for near objects. The wheels of the ultimate tailgate station are 12 inches or one foot. The chassis will sit at a distance higher than that. The underneath sensor will sit directly under the front of the chassis. Since the chassis will be sitting above the wheels, the height of the wheels can be used for a minimum distance that the underneath ultrasonic sensor will be from the ground. The underneath sensor will need to be accurate at the whole range width of the sensor since there is only one of them. The beam width will be wide enough to cover the left and right wheels. The underneath sensor will also need to be the fastest working sensor. Each distance recovered by the sensor will be compared to the next. If there is a major change in distance from one pulse to the next, then the master microcontroller will identify this as a ledge. It will adjust the direction and path of the station to avoid it. To test for the best underneath sensor, the responsiveness of the sensor at edges of the beam width will determine which sensor is selected to be the underneath sensor. An assumption will be made that if the underneath sensor is the most responsive at the edges of the beam width, it will also be very responsive in the middle. Nonetheless, the ultrasonic sensor will test an object placed twelve inches away at the center of the beam width. For environment testing of the ultrasonic sensors, there is one particular situation that needs to be accounted for. The underneath sensor will be facing the ground and one particular surface acts a lot like a sponge, the grass. The biggest concern with ultrasonic sensors is a surface that can absorb sound. The grass is a perfect example of this. The beam characteristics listed above show how the beam width increases with distance from the object. The underneath sensor will 108 need to be adjusted so that it can detect the distance the ground is from the chassis. Troubleshooting a grassy surface will be a fundamental issue that needs to be resolved for the underneath sensor. 4.7.2 Sensor System Testing The ultrasonic sensors need to be tested both individually and collectively with the complete system. After each individual sensor is connected and tested, the sensor system needs to test the ultrasonic sensors collaboratively. Since the ultrasonic sensors are of the same type, it is vital that they do not interfere with each other. The underneath sensor will not interfere with the tall sensors, since the plane that its echo produces is perpendicular with the protrusion sensors. For the protrusion sensors, all 3 sensors have the same 2 dimensional plane. They must cover the entire front of the station so that it may maneuver safely. The figure below shows surface protrusion sensor placement and area coverage. Figure 4-7 Surface Protrusion Sensor Range [Figure Created by Garrett Lee] The area that the each ultrasonic covers cannot overlap another they are the same type. They all send out the same type of signal, and will all receive the same echo. To combat this, the outside 2 sensors will be facing away from the center sensors. To absolutely make sure that they will not interfere with each other, the two outside sensors will be delayed compared to the middle sensor. That way, even if the range of the three sensors were to overlap, it would be 109 even harder for them to interfere. The delay of the outside sensors should be in sync with the pulse of the underneath sensor. Since the underneath sensor shares one two dimensional plane with the center protrusion sensor, there is a very unlikely chance that their signals could interfere. It is unnecessary though, and should be avoided by delaying the center protrusion sensor’s echo compared to the other 3 sensor’s echo. Figure 4-8 Outside Surface Protrusion Range [Figure Created by Garrett Lee] The figure above shows the area that the side ultrasonic sensor will cover. The will be delayed with the center ultrasonic sensor, so that they will not interfere with each other. The figure below shows the area that the center ultrasonic sensor will cover. 110 Figure 4-9 Center Surface Protrusion Range [Figure Created by Garrett Lee] 4.8 Bluetooth Receiver Testing The Bluetooth receiver is essential for a functioning ultimate tailgate station. The testing of the Bluetooth receiver will mostly be done in software. The pairing of the device will need to be done with a specific passcode, so that it will not confuse the 2 android phones. Once the Bluetooth receiver is connected to the master microcontroller, it will be ready to be programmed. The programming from the master microcontroller’s standpoint will be more complicated. The baud rate will need to be set for the Bluetooth receiver’s connection. Once the connection is complete, the testing will be finished. 4.9 Master Microcontroller Testing The master microcontroller will need to be tested for functionality. Each pin will need to be individually tested. Once the pins are tested, the connection between each load and the microcontroller will need to be tested. The digital pins will be the most straightforward, but the serial connections can be problematic. Once all of the individual connections are completed, all of them need to be connected and adjusted until the whole system is working properly. 111 4.10 Mobile Application The agile software development method will be used to design and test the mobile application. This is to encourage a more adaptive approach to the software design in the event that some of the specifications and requirements of the system will change. Using this method, the team plans cycling through the steps of planning, requirements analysis, design, coding, unit testing, and acceptance testing until a working product that meets all necessary specifications has been achieved. Unit testing is especially important in verifying the effectiveness of the software. As mentioned previously in the Design section, the mobile application is broken into several subtasks. These individual subtasks must be careful tested to ensure the optimal performance of the system as whole. The mobile application tests involve similar testing of state and transitions as described in the User Tracking Testing section. The difference is that instead of evaluating the responses of the vehicle in a physical testing environment, the class and methods will be evaluated on the outputs produced. The class diagram below shows the classes and data structures that will be coded and how they will interact together. Figure 4-10 Class Diagram of Mobile Application [Figure created by Chris Echanique] These three classes will be instantiated by the main class, which operates the entire mobile application. Integration testing will be employed to test each module of the system. Specifically, a bottom-up approach will be used. The diagram below demonstrates this concept. 112 Main GPS Track Section 1 RC control Section 2 Section 1 Section 2 Figure 4-11 Integration Testing Diagram [Figure created by Chris Echanique] In bottom up testing, each component on the lowest level will be tested individually. Once these components have been accepted as functional, they will be then integrate with the higher level components and tested. This process will continue until the entire system as a whole is tested and accepted. 4.11 LCD Display Testing Before the microcontroller is attached to the charge controller to read the power information it needs to be determined that the basic functionalities of the LCD are working. Using the development board that Texas Instruments provides for the MSP430 microcontroller the LCD will be programmed to interface with the MCU. Online libraries of the HD44780 parallel interface will be referenced to properly interface the two together. Basic strings of characters can be programmed to be sent to the LCD. If the basic strings of characters that are generated while programming are successfully sent to the LCD and successfully displayed then one can assume that LCD is working properly. The circuit design of the voltage regulator will also need to be tested before the LCD display can be implemented into the system. The voltage step down circuit not working properly or not wired together properly with the correct components could lead to disastrous results. The microcontroller could end up receiving way more voltage than is intended which will breakdown the transistors within the MCU. Once these break down and burn up the microcontroller becomes unusable. Testing the circuit design of the voltage regulator is a very simple process. The group will simply design a model of the circuit on a bread board using components that are readily available in the senior design lab. All that is needed is a resistor, a capacitor, and a diode. A 5 volt DC supply will be 113 connected to the board and run through the designed voltage regulate. Using a multimeter to read the output voltage where the microcontroller will eventually be connected should provide the voltage that will be generated. If the voltage is 3.3 volts then the circuit is working as it should, and the microcontroller will be able to run with no problems off of that power supply. If the output voltage measured is too high then something is wrong. The mistake is most likely either in the wiring of the circuit or the in the values of components that were chosen. All wiring will be double checked first. If the measured output is still too high even after checking the wiring then the problem is probably with the components that were chosen. Adjust component values accordingly to obtain a measured output voltage of 3.3 volts. The microcontroller cannot be connected to the 5 volt power supply until the voltage has been stepped down to the appropriate value. 4.12 Complete system Test The complete system of ultimate tailgate station needs to be able to fully function both autonomously and remote controlled. To do this, the application written on the android phone must have a properly working switch. Once the application is completed, each mode can be tested. The remote control part of the Android application will be very easy to test. First the user will need to test that the station will switch from autonomous mode to remote controlled mode. The LED status lights will allow the user to know when the station has changed states. The blue LED will light up when the station is in the remote controlled state. Once the station is remote controlled mode testing will be as simple as driving an RC car. The application will need to be tested in a couple ways. First, the user will need to verify that the station can move. The user will need to touch the user interface on the application and slide their finger straight forward. This will show that the station can move without turning which will be tested later. Once it is known that the station can move, it will need to be verified that the station can accelerate and decelerate. This will again be done by only moving in the forward direction. The acceleration and deceleration can be tested by sliding the user’s finger forward on the applications user control and the sliding it backwards. This should make the station accelerate and decelerate a noticeable amount. If the difference in speed is not able to be noticed then the application or the programming of the motor controller will need to be investigated. The next step in testing the overall system will be to verify that the station can move in the reverse direction. By changing the user controls from forward drive to reverse the user can then control the station the exact same way as reverse. After forward and reverse have been tested the last test for the remote control mode will be that the station can turn without falling or wobbling. This test will be conducted by keeping a constant speed, and sliding the control arrow in the android application to the left and right and seeing if the servo for the two front wheels is correctly adjusting the direction of the tires. After this mode has been tested it will be necessary to test the autonomous mode. 114 The autonomous mode will be selected on the android application. The green LED will light up to indicate that the station is in autonomous mode. When in autonomous mode the user will need to walk in front of the station at a slow pace. In order to tell if the station is correctly working in autonomous mode the user will only need to verify that the station is following them. While walking in front of the station the user will then need to move faster so some distance is between them and the station. This will allow the user to verify that when they are further away from the station that the speed will increase to the maximum speed until it has closed the gap between the user and itself. The last test for autonomously following the user will be to stop in front of the station and see if it will stop next to them. Once this has been confirmed the obstacle avoidance, while in autonomous mode can be tested. To test the obstacle avoidance in autonomous mode, a short pole will be used as the detected obstacle. The obstacle avoidance system utilizes the ultrasonic sensors and motor control simultaneously to safely maneuver around obstacles. This test will not only test the programming of the motors and servos but will also verify that the sensors are mounted in the best locations possible for object detection. To perform these tests the pole will first be set to the right side of the station and the user will walk to the left of the pole, very closely. The station will need to recognize that the pole is there and slightly adjust its direction to move around it to the left. This test will then be repeated with the pole on the left of the station and the user will walk to the right of the pole. After each side has been tested the pole will be moved directly in front of the user. When the user walks up to the pole they will walk tightly around it so that the pole is directly between the user and the station. The station will then have to decide if it should go left or right around the pole and make the proper adjustments to continue to follow the user. These tests will verify that multiple subsystems are working properly together. The last mode that will need to be tested is the stationary mode. This test will be very short. The user will change the mode of the station to stationary; this will be indicated by the red LED status light. The user will then need to walk in front of the station and begin to walk away from the station. If the station does not move it will be known that the stationary mode is correctly working. After all of these tests have been completed the full system testing will be completed. The other subsystems such as the solar panels will not be included in the full system testing because they will be tested on their own. Once they are verified to be working they will not need to be tested again because their function will be independent from the rest of the subsystems. 115 5 Administrative Content 5.1 Budget A breakdown of the expected costs of build materials and services required to construct his project is listed in the table in Figure 6-1. An estimate of each component is given, along with the quantity of parts needed. The total estimate of the costs of this designing this project is just under $2200. The project has been selected for a sponsorship from Progress Energy in compliance with their listed specifications. They require all sponsored senior design projects to incorporate renewable energy or energy sustainability as a part of the design. Since the ABEC project has included a solar panel as a source of renewable energy to be self-sustaining, these specifications have been met. Progress Energy has agreed to supply up to $1500 for parts and labor incorporated in the design of the ABEC project. All component prices and purchases will be documented and reported to the company for payment or reimbursement. Additionally funding will be requested from Progress Energy to make up for the remaining $700 in the expected budget. If they do not provide any further contributions to the project, other sources of funding will be sought out. The four group members have agreed to divide any remaining project costs evenly. The final completed unit remains as property of Progress Energy, unless otherwise noted. 116 Expected Budget Item Number Description Unit Cost Quantity Total Cost 1 Solar Panel $500.00 1 $500.00 2 Charge Controller $200.00 1 $200.00 3 DC/AC Inverter $150.00 1 $150.00 4 Lithium Ion Battery $75.00 1 $75.00 5 Power Wheels Vehicle $250.00 1 $250.00 6 Printed Circuit Board $50.00 2 $100.00 7 Master Microcontroller $50.00 2 $100.00 8 IR Sensors $25.00 3 $75.00 9 Garmin GLO Device $100.00 2 $200.00 10 Speed Controller $300.00 1 $300.00 11 Misc Hardware Components $100.00 1 $100.00 Subtotal $2050.00 Tax 7% Total Expected Cost $2193.50 Figure 5-1 Expected Project Budget 117 5.2 Bill Of Materials Bill of Materials Component Type Name Quantity Battery 24V Li Ion 1 Bluetooth Receiver RN-42 1 Charge Controller PT 12124-10 MPPT 1 GPS Receiver Garmin GLO 2 Inverter AIMS 400 W DC to AC 1 LEDs Generic 1 color 5 Microcontroller Atmega 328 1 Motor Unite Motor Co. Ltd. MY1016 2 Motor Controller Robotech AX1500 1 PCB 4PCB 1 Servo Arm 4" Mega Servo 1 Servo Motor M5530-1 Mega Servo 1 Smartphone Motorala RAZR 1 Smartphone Samsung Galaxy SII 1 Solar Panels Renogy 60 W monocrystalline 2 Ultrasonic Sensor Maxbotix LV-EZ1 5 Figure 5-2 Expected Project Budget 118 5.3 Division of Labor The ABEC project is divided into seven systems. These systems are Chassis, Power Supply, Motor Control, Microcontroller, Sensor, User Tracking, and Mobile Application. Each system is allocated to each of the four group members of the project. Members are responsible for researching, designing, building, and testing the system. The allocations of each of the systems are as follows: Andrew Boyles is responsible for the Chassis; Marc Bianco is delegated both the Power Supply and Motor Control systems; Garrett Lee assumes both the Microcontroller and Sensor system; and Chris Echanique is responsible for User Tracking and Mobile Application. Team members will congregate at least once per week during the spring semester to discuss group progress and any issues that have been encountered. The group will adhere strictly to the milestones and timelines presented in the next section in order to remain on track for project completion. 5.4 Milestones and Timelines Jan. 7-21st: Research and Design Jan. 21st: Order Prototype Parts Jan. 21st-Feb. 25th: Build and Test Prototype Feb. 25th: Order Final Parts Feb.25th-April 1st: Final Testing 5.5 Project Summary To summarize this project as a whole it is best summarize the major subsystems of the project first. The major subsystems include the solar charging system, the sensor systems, the motor control system for rear wheels, and the steering servo system for the front wheels. Each of these subsystems will be integrated together to form the ultimate tailgate station. The solar charging system is the lifeblood the Autonomous Brilliantly Engineered Cooler. Without this it would not be able to receive its clean renewable energy. Two 60 watt solar panels will be mounted onto the sides of the vehicle, one on each side. They will be mounted in such a way so that they can fold out when charging is needed and fold back in while in motion. They must be able to fold back in because the vehicle will need to successfully avoid any obstacles while in motion. Having them fold back in while in motion will keep the vehicle more stable as well. These solar panels are responsible for charging two different 119 power sources: a primary and secondary power source. The primary power source is a 24 volt battery that is responsible for powering the motor controller which runs the rear wheels. This is the driving force of the vehicle. The secondary power source is a 12 volt battery which will be responsible for powering the microcontrollers and servo system that steers the front wheels. This battery will be connected to a DC to AC power inverter to generate the AC power source that these applications require. All power that is generated by the solar panels will be regulated by a maximum power point tracking charge controller to prevent overcharging of the batteries and provide power to the batteries in the most efficient way possible. The motor control subsystem is the driving force of the ABEC. The AX1500 motor controller will be used to control the motors. The motor controller will need to be integrated with multiple subsystems including obstacle avoidance and RC control through the mobile application. Both of the subsystems the motor controller will need to work with will send signals to the master microcontroller. The master microcontroller will then send the signals to the motor controller to correctly power the motors for obstacle avoidance or RC control. The motors will need to be able to run in both directions to move the station forward and backwards. The user tracking system is responsible for effectively navigating the vehicle to the user using GPS-based devices. Both the user and the vehicle will carry Android smartphones synced with Garmin GLO devices to improve on the phone’s GPS positioning accuracy. An Android application will be designed to utilize the GPS framework of the user’s mobile phone for tracking. This application will determine the user’s relative position to the vehicle based on GPS coordinates and route the vehicle accordingly. Additional features will be added to the mobile application to allow the user manual remote control of the vehicle as well as power the vehicle off. The sensor system is responsible for obstacle detection and gap avoidance. It utilizes ultrasonic sensors on the front of the vehicle and underneath the chassis. The sensor system is connected to the master microcontroller through the pulse width modulation ports. The sensor system plays a key role in GPS tracking. The master microcontroller interfaces all of the subsystems of the ultimate tailgate station. It takes in all the data from the sensors and makes decisions for the vehicle. The master microcontroller directly connects to the Bluetooth receiver, motor controller, ultrasonic sensors, steering servo, and LEDs. The LED subsystem is not a major component of the station, but will be very useful in knowing the status of the station. The LEDs will indicate when the station is in autonomous mode, RC mode, and stationary mode. The These LEDs will be green, blue, and red respectively. The final two lights will be for the status of the battery. When the battery is charging the orange LED will light up and when the batteries are fully charged the diffused yellow LED will light up. 120 When all of these separate systems are successfully integrated together the user will receive the ultimate tailgating experience: a mobile autonomous vehicle that can avoid any obstacles that are in its way. The vehicle will be capable of creating clean, renewable energy through the use of its solar panels to power everything inside the station. It will truly bring the tailgating experience to new levels of technology and efficiency. 5.6 Conclusion This project has been an incredible learning experience for all of the group members involved. It has provided an opportunity to branch out and learn more about different fields of engineering and technology. Technologies such as ultrasonic sensors, PV panels, user tracking, motor controllers, servo systems, and mobile applications have been researched in depth by the members of the group. There is still much to learn in the actual part acquisition and building phase of the ultimate tailgate station next semester. Next semester will begin the actual PCB design phase of this project and integration with other acquired parts. With the original idea stemming from Tailgate Buddy, a previous senior design project, the Autonomous Brilliantly Engineered Cooler will have a greatly improved design to deliver the ultimate tailgating experience. 121 6 Appendix 6.1 Works Cited "400 Watt Power Inverter." Theinverterstore.com. N.p., n.d. Web. 9 Nov. 2012. <http://www.theinverterstore.com/400-watt-power-inverter.html>. "AC Motor Guide." Anaheimautomation.com. N.p., n.d. Web. 6 Nov. 2012. <http://www.anaheimautomation.com/manuals/forms/ac-motorguide.php>. "Arduino Servo Motor." Azega. N.p., 23 Feb. 2011. Web. 22 Nov. 2012. <http://www.azega.com/arduino-servo-motor-part-1/>. "Brushless vs Brushed Motors." Dynetic.com. N.p., n.d. Web. 5 Oct. 2012. <http://www.dynetic.com/brushless%20vs%20brushed.htm>. "DC Motor Control Using an H-Bridge." Itp.nyu.edu. NYU, 24 Oct. 2011. Web. 24 Nov. 2012. <http://itp.nyu.edu/physcomp/Labs/DCMotorControl>. "DC Motor Size for a Project?" Yahoo.com. N.p., n.d. Web. 1 Oct. 2012. <http://answers.yahoo.com/question/index?qid=20100928134156AAVC8i 7>. "Different Types of Solar Panels." One Block Off The Grid, 9 Jan. 2012. Web. 4 Nov. 2012. <http://howsolarworks.1bog.org/different-types-of-solarpanels/>. "GE Develops Thin Film Photovoltaic Panels." Web log post. Gotpowered.com. N.p., 17 Apr. 2011. Web. 8 Oct. 2012. <http://gotpowered.com/2011/gedevelops-thin-film-photovoltaic-panels/>. "How to Build a Robot Tutorial - Society of Robots." How to Build a Robot Tutorial - Society of Robots. Society of Robots, 2005. Web. 05 Dec. 2012. "How to Make a Robot – Lesson 4: Understanding Microcontrollers GoRobotics."GoRobotics RSS. Wordpress, 12 Oct. 2010. Web. 05 Dec. 2012. "LEDs." Parts-express.com. N.p., n.d. Web. 20 Nov. 2012. <http://www.partsexpress.com/cat/leds/1395>. "Maintenance of AC Motors." Avstop.com. N.p., n.d. Web. 7 Nov. 2012. <http://avstop.com/ac/apgeneral/maintenance.html>. "Mega Servo." Www.servocity.com. Robotzone, LLC, 6 Jan. 2012. Web. 19 Oct. 2012. <http://www.servocity.com/html/ms530-1_mega_servo.html>. 122 "Motors." Rice.edu. N.p., n.d. Web. 20 <http://www.clear.rice.edu/elec201/Book/motors.html>. Nov. 2012. "PT Charge Controller Manual." Altestore.com. Solar Converters, Inc., 24 Dec. 2010. Web. 8 Oct. 2012. "Renogy 60 Watt Mono Solar Panel." Solarsystems-use.net. Solar Systems USA, Inc., n.d. Web. 28 Nov. 2012. "Scooter Motors." Freeservers.com. Escooterparts, n.d. Web. 3 Oct. 2012. <http://coleco.freeservers.com/motors.htm#MOTOR200U>. "Some Theory behind Obstacle Detection." Some Theory behind Obstacle Detection. Johnson Consulting, 17 Jan. 2007. Web. 05 Dec. 2012. Abishek. "Difference Between DC and AC Motors." Differencebetween.com. N.p., 28 July 2011. Web. 15 Oct. 2012. <http://www.differencebetween.net/technology/difference-between-dc-andac-motors/>. Albright, Greg, Jake Edie, and Said Al-Hallaj. "A Comparison of Lead Acid to Lithium-ion in Storage Applications." Altenergymag.com. LJB Management Inc., Apr.-May 2012. Web. 13 Nov. 2012. Antler, David, Andrew Taylor, and David Huang. "Gaucho." Engr.illinois.edu. University of Illinois, 7 July 2011. Web. Barett, J.T. "Differences of AC vs DC Motors." Ehow.com. N.p., n.d. Web. 15 Oct. 2012. <http://www.ehow.com/info_8072798_differences-ac-vs-dcmotors.html>. Bloch, Michael. "Beginners Guide to Solar Panels." Green Living Tips. N.p., 12 Dec. 2011. Web. 4 Nov. 2012. Drake, John. "MPPT Charge Controllers." N.p., 25 May 2011. Web. 13 Oct. 2012. <http://www.solarseller.com/solar_converters__inc__mppt_charge_control lers___faq.htm>. Kavaiya, Gaurang. "Talk To Multiple Devices With One UART." Talk To Multiple Devices With One UART. Penton Media, 15 Nov. 2007. Web. 05 Dec. 2012. Koeppen, Greg, John Fuoco, John Maskasky, and Kevin Kauffman. "Tailgate Buddy." Eecs.ucf.edu. University of Central Florida, 1 May 2009. Web. L. Van Gool, M. Mathias, R. Timofte, R. Benenson, "Pedestrian detection at 100 frames per second," cvpr, pp.2903-2910, 2012 IEEE Conference on Computer Vision and Pattern Recognition (CVPR), 2012 123 Massa, Donald P. "Choosing an Ultrasonic Sensor for Proximity or Distance Measurement Part 2: Optimizing Sensor Selection." Sensors. Questex Media Group LLC, 01 Mar. 1999. Web. 05 Dec. 2012. ONUR. "Pure Sine Wave vs. Modified Sine Wave Inverters." Civicsolar.com. CivicSolar, Inc., 4 Aug. 2011. Web. 29 Nov. 2012. Shimniok, Michael. "Arduino Takes Control." Web log post. Bot Thoughts. N.p., 7 Jan. 2011. Web. 29 Oct. 2012. <http://www.botthoughts.com/2011/01/arduino-takes-control-of-rc-truck.html>. Stein, Andrea. "DC vs AC Electric Motor." Ehow.com. N.p., n.d. Web. 14 Oct. 2012. <http://www.ehow.com/facts_7708489_dc-vs-ac-electricmotor.html>. Tyson, Jeff. "How Serial Ports Work" 09 February 2001. HowStuffWorks.com. <http://computer.howstuffworks.com/serial-port.htm> 05 December 2012. Upgrayd. "PID Velocity DC Motor Controller." Web log post. Blogspot.com. N.p., n.d. Web. 15 Nov. 2012. <http://upgrayd.blogspot.com/p/pid-velocitymotor-controller.html>. Zandbergen, Paul. A. 2009. Accuracy of iPhone locations: A comparison of assisted GPS, WiFi and Cellular Positioning, Transactions in GIS, 13(s1):5-26. 6.2 Reproduction Permission From: Ken Kauffman [[email protected]] Sent: Wednesday, November 28, 2012 10:13 AM To: John Fuoco Cc: Chris . Subject: Re: Reproduction Permission Request for Tailgate Buddy Photos I don't have an issue as long as they're credited properly. Have John M and Greg been contacted? On Nov 28, 2012 7:13 AM, "John Fuoco" <[email protected]> wrote: Chris, it is fine with me. Is your group working on a version 2? John Fuoco On Tue, Nov 27, 2012 at 11:47 PM, Chris . <[email protected]> wrote: > Hello, my name is Chris Echanique. I am an engineering student from the > University of Central Florida currently working documentation for on a > senior design project. I would like to request permission to use photos from > your previous senior design projects, The Tailgate Buddy, for use in a > technical report. These photos were taken directly from your senior design > website: > http://eecs.ucf.edu/seniordesign/fa2008sp2009/g11/ 124 > Please let me know if you have any questions or concerns. Thank you. > > Sincerely, > > Chris Echanique > Computer Engineering Major > University of Central Florida > Cell: 352 293 1743 > Email: [email protected] From: Chris . Sent: Tuesday, December 04, 2012 5:51 PM To: [email protected] Subject: Reproduction Permission Request for Gaucho Dear David Antler, Hello, my name is Chris Echanique. I am an engineering student from the University of Central Florida currently working documentation for on a senior design project. I would like to request permission to use a figure from your previous senior design project, Gaucho, for use in a technical report. This figure were taken directly from your report. Please let me know if you have any questions or concerns. Thank you. Sincerely, Chris Echanique Computer Engineering Major University of Central Florida Cell: 352 293 1743 Email: [email protected] From: Chris . Sent: Tuesday, December 04, 2012 6:28 PM To: [email protected] Subject: Reproduction Permission Request Dear Dr. Rodrigo Benenson, Hello, my name is Chris Echanique. I am an engineering student from the University of Central Florida currently working documentation for on a senior design project. I would like to request permission to use a figure from one of your publications, Pedestrian detection at 100 frames per second, for a design report. The figure will be used in the research section to illustrate the pedestrian tracking. Please let me know if you have any questions or concerns. Thank you. Sincerely, Chris Echanique Computer Engineering Major University of Central Florida Cell: 352 293 1743 Email: [email protected] 125 From: Paul Zandbergen [[email protected]] Sent: Tuesday, December 04, 2012 5:50 PM To: Chris . Subject: RE: Reproduction Permission Request Chris, I give you permission to use the figure in your report as long as you properly reference the source article. You may have also seen a related publication on the subject: http://www.paulzandbergen.com/files/Zandbergen_Barbeau_JON_2011.pdf Good luck with your project. Paul From: Chris . [[email protected]] Sent: Tuesday, December 04, 2012 2:40 PM To: Paul Zandbergen Subject: Reproduction Permission Request Dear Dr. Paul Zandbergen, Hello, my name is Chris Echanique. I am an engineering student from the University of Central Florida currently working documentation for on a senior design project. I would like to request permission to use a figure from one of your publications, Accuracy of iPhone locations: A comparison of assisted-GPS, WiFi and cellular positioning, for a design report. The attached figure will be used in the research section to evaluate the accuracy of AGPS vs autonomous GPS devices. Please let me know if you have any questions or concerns. Thank you. Sincerely, Chris Echanique Computer Engineering Major University of Central Florida Cell: 352 293 1743 Email: [email protected] From: [email protected] [[email protected]] Sent: Wednesday, November 28, 2012 11:40 PM To: Chris Echanique Subject: Re: Reproduction Permission Request (KMM27018290I15977L0KM) Dear Chris Echanique, Thank you for contacting Garmin International. As you have contacted our technical support department we are unable to convey any kind of permission per se, but the documentation and images we make available for our products can be used by individuals safely in a variety of situations. A list of some of our terms and conditions on Garmin logos and content usage can be found on our website at http://www8.garmin.com/company/newsroom/mediagallery/terms.jsp 126 If you need further assistance please reply to this email or contact us at 1-800-800-1020 Monday-Thursday 8am-6pm Friday 8am-5pm Central. With Best Regards, Christopher Le Product Support Specialist 2nd Shift Garmin Mobile Team Garmin International 913-397-8200 800-800-1020 913-440-8280 (fax) Att: Christopher Le, Associate #5663 www.garmin.com Additional solutions may be found at http://www.garmin.com/garmin/cms/site/us/support/searchsupport Original Message Follows: -----------------------Escalation from KANA On Demand Self Service Subject: Reproduction Permission Request Message: Hello my name is Chris Echanique. I am an engineering student from the University of Central Florida currently working documentation for on a senior design project. I would like to request permission to use a photo of the Garmin GLO device on your website as well as a table of the listed specs for use in a technical report. Please let me know if you have any questions or concerns. I appreciate your timely response. Thank you. 127 128 129 130