1
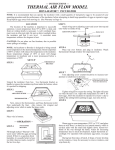
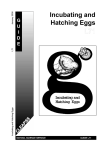
Setting up You Incubator:
Instructions
LOCATION
A room temperature from 70-80 degrees is ideal, with fresh air and no drafts. Be sure no
direct sunlight strikes the incubator and that it sits on a level surface.
SET UP
1. Fill the shorter of the two troughs in the incubator bottom with water, place wire mesh
square on top.
2. Place egg turner on top of wire. Make sure it is running properly beforehand by
plugging it in and observing that the rack is moving. Egg turners move VERY slowly so
you may want to do something else then come back and check it.
3. Place thermometer on top of the egg turner where it may be viewed through the
window.
4. See that air can move under the bottom of the incubator. (through holes in the bottom)
5. Plug in both incubator and egg turner.
THERMOSTAT ADJUSTMENT
1. Turn adjusting screw counter clockwise to increase heat or clock wise to decrease heat.
2. If light is on heat is on.
3. After each adjustment of the thermostat, tighten wing nut to secure the setting.
4. Adjust temperature for 99.5 degrees
5. Add water every few days to smaller trough only so that it is kept filled. Use warm or
room temperature water only. Not COLD!
6. Important: set up your incubator a day or two ahead of when the eggs will be placed
inside so you can make sure the temperature has stabilized.
CAUTION: About half way through the incubation process, you will notice temperature
will begin increasing. You will need to adjust your thermostat accordingly. Check
temperature daily!
SETTING EGGS
1. Place eggs in turner with small ends down. The air sac is at the larger end and
needs to remain at the top.
2. Number the eggs so you can track development.
3. Three days after eggs are set remove the RED vent plug in the top of the
incubator. Leave it off for the remainder of the incubation process.
DEVELOPMENT AND HATCHING
1. On the 18th day, three days before the eggs are due to hatch remove eggs from the
turner and set directly on the wire. Fill the second trough with water. This will
increase the humidity for hatching. If water droplets appear on the window
remove front vent plug. Be sure to maintain proper temperature.
2. Chicks may be removed 24 hours after they start hatching. Extremely wet chicks
should be left in the incubator to dry.
3. Remove the chicks to a brooder. This is simply a box or a container with a
feeder, water dish and clean wood shaving bedding in the bottom. If using a
shallow dish for water, put some marbles in the dish to create less room for the
chicks to drown in.
4. Clean the brooder every day or two, and remove the chicks from the brooder
when cleaning.
HELPFUL HINTS
1. In a classroom setting, mid-week is the best time to set eggs. This will ensure that if
hatching is a day or so early or late, the children will still get to see the process.
2. Set up incubator in room that stays above 65 degrees
3. Check temperature and water daily. Very, very important! Curious hands in a
classroom can quickly turn the incubator temperature control knob and all will be lost.
4. Make calendar for project. Keep track of the day and where the chicks are at in their
development.
DO NOT…
Open the incubator more than necessary
Let water tray become dry.
Add cold or hot water-warm, only room temp or warm.
Help chicks out of their shells.
Assign specific eggs to children. The hatch rate is approximately 60% so that is
7-8 eggs per every dozen. It is heartbreaking to a child when their egg does not
hatch.