1
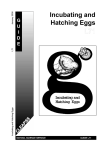
APPENDIX CONTENTS APPENDIX 1.1: DISTRIBUTION LIST ................................................................................................103 APPENDIX 2.1: FIELD EQUIPMENT AND SUPPLIERS..................................................................104 APPENDIX 3.1: DATA RECORDING SHEETS ..................................................................................109 APPENDIX 5.1: METHODS OF CATCHING KIWI AT NIGHT ......................................................110 APPENDIX 6.1: PERMIT/ANIMAL ETHICS REQUIREMENTS ....................................................113 6.1.1 PERMIT REQUIREMENTS ..................................................................................................................113 6.1.2 ANIMAL ETHICS REQUIREMENTS.....................................................................................................114 APPENDIX 6.2: GUIDELINES FOR THE USE OF BLOOD SAMPLING .......................................115 APPENDIX 6.3: SPECIFIC SCIENTIFIC SAMPLING.......................................................................116 6.3.1 6.3.2 6.3.3 6.3.4 DNA SAMPLES ...............................................................................................................................116 BLOOD SMEARS ..............................................................................................................................116 PACKED CELL VOLUME AND SERUM PROTEIN .................................................................................117 BLOOD CHEMISTRY ........................................................................................................................118 APPENDIX 7.1: EMBRYONIC STAGES OF KIWI AS DETECTED BY EGG ...............................119 APPENDIX 7.2: HUSBANDRY PROTOCOLS AT AUCKLAND ZOO, RAINBOW SPRINGS AND WESTSHORE WILDLIFE CENTRE .....................................................................................................120 7.2.1 AUCKLAND ZOO HUSBANDRY PROTOCOLS .....................................................................................120 7.2.2 O.N.E. INCUBATION PROTOCOLS AT RAINBOW SPRINGS, ROTORUA FOR NIBK ...........................130 7.2.3 O.N.E. PROTOCOLS AT WESTSHORE WILDLIFE CENTRE.................................................................136 APPENDIX 9.1: DATA SHEET FOR SICK OR INJURED KIWI .....................................................139 APPENDIX 9.2: DATA SHEET FOR DEAD KIWI OR KIWI EGGS ...............................................140 102 Kiwi Best Practice Manual (September 2003) This copy printed on 29/11/07 Please note that this paper copy may be out of date – please check the internet version or contact your local DOC office to check your copy is current. APPENDIX 1.1: DISTRIBUTION LIST Appendix 1.1 – Distribution list 103 APPENDIX 2.1: FIELD EQUIPMENT AND SUPPLIERS The following is a list of equipment and suppliers. The list of suppliers is not exhaustive and does not imply any special relationship as a preferred supplier. If there is additional equipment that you require for kiwi work, and you cannot find a supplier, please contact a member of the Kiwi Recovery Group. Banding supplies Banding Office, Science & Research Unit, Department of Conservation, PO Box 10-420, Wellington; Ph (04) 4713 246, fax (04) 4713 274. Bands Banding pliers Fingerling tag pliers Blood sampling equipment. Public hospital stores departments nationwide Biolab Scientific Ltd, 29 Shakespeare Rd, P.O. Box 1813, Christchurch; Ph (03) 3663663. 1 or 2 ml syringes, 22 to 26 gauge needles, 70% isopropyl alcohol swabs, microscope slides, coverslips, latex gloves, Hibiclens Skin Antiseptic. EDTA vials Microtainers Corning screwtop vials Centrifuge/ Microspinner Bayer Diagnostic Ltd, Auckland Ames Microspin Circlip Pliers Hardware shops Stanley 7” Compass Tramping/camping or hunting/fishing shops nationwide. Silva compass Electronic Equipment Sony Broadcast Ltd, PO Box 100 045, North Shore, Auckland; Ph (09) 415 7777 Recording minidisc player Appendix 2.1 – Field equipment and suppliers 104 Dick Smith Electronics Ltd Weatherproof horn speaker, 8 ohms resistance. Chargers: (multivoltage max output 500mA) Digital multimeter Batteries: e.g., lead-acid gel Electronics Lab, Science & Research Unit, Department of Conservation, PO Box 10-420, Wellington; Ph (04) 4713 265, fax (04) 4713 279. Amplifier (with or without self-contained battery pack). Specialist equipment made or sourced on request First Aid equipment NZ Safety Ltd, branches nationwide. Protector Safety Ltd, branches nationwide. First Aid Kits Ear-muffs/ear plugs (helicopter work). First Aid supplies GPS Trig Surveying Instrument Co., 7 McCormack Place, Ngauranga, Wellington. Ph (04) 4737935 GeoSystems Ltd, PO Box 8160, 39 Leslie Hills Drive, Christchurch; Ph (03) 343 2333, fax (03) 3432444. NB DOC Staff must use this source. Garmin Summit Garmin 12 Handnets Selected sporting retail shops. (best to get a black net, with an extendable handle) Hospital identification bracelet Public Hospital Stores Departments nationwide Children’s identification bracelet (manufactured by Precision Dynamics Corporation, San Fernando, California 91340, USA). Incubation equipment Underdown Supplies, 153 Erikson Road, Napier. Ph & Fax (06) 8355460 Egg-Lume Candling Lamp (High Intensity) Fertility candler (battery operated). Miracle grip Non-Skid Liner for use in hatcher and brooder Brinsea Hatchmaster incubator Brinsea Polyhatch incubator Brinsea Hatchmaker incubator Dominion Incubators Ltd 83 Duke St Hamilton (07) 847-6084 Appendix 2.1 – Field equipment and suppliers 105 Cocoon parrot brooder, Forced air egg transporter external 12v battery needed. A.B. Incubators Ltd, 40 Old Market St, Mendlesham, Stowmarket, Suffolk, IP14 5SA, England.; Ph (0449) 766471 Egg transporter external 12v battery needed. Insulation tape Supermarkets or hardware stores nationwide Nitto tape (green, blue or black), or 3D Temflex Mirror Motorcycle shops (most mirrors do not come with a long steel rod). Mitre 10 telescopic extendable plumbing and/or mechanics mirror Radio-telemetry equipment Sirtrack Ltd, Private Bag 1403, Goddards Lane, Havelock North, New Zealand.; Ph (06) 877 7736, fax (06) 877 5422; email: [email protected] Telonics TR4 receiver Telonics TR5 receiver Yagi aerials Adult kiwi transmitters, juvenile kiwi transmitters, Chick transmitters. Kiwi Track Ltd (Daryl Olsen), PO Box 62, 6 Station Road, Whakatu 4161, Hawkes Bay, Ph (06) 8774216, Fax (06) 8774251, e-mail: [email protected] , website: www.kiwitrack.com Reflective ribbon Industrial Textiles Ltd Patiki Rd Avondale Auckland Ph 09 8283022 “Star light” 30 m rolls, White, Orange or Yellow Reflective tape Roadsigns and Traffic Control Equipment Ltd, 26 Cashew St, Granada, North Wellington; Ph (04) 232 3774. Signwriters nationwide. Refractometer Shoof International Ltd, Cambridge Westover Scientific RHC-200ATC hand held Safety equipment Appendix 2.1 – Field equipment and suppliers 106 NZ Safety Ltd, branches nationwide Protector Safety Ltd, branches nationwide Trig Surveying Instrument Co., 7 McCormack Place, Ngauranga, Wellington. Ph (04) 4737935 GeoSystems Ltd, PO Box 8160, 39 Leslie Hills Drive, Christchurch; Ph (03) 343 2333, fax (03) 3432444 Ear muffs/ earplugs (for helicopter work) High visibility overalls High visibility vests Torches/ Spotlights Tramping/camping or hunting/fishing shops nationwide. Petzl Duo or Zoom headlamp torches Penlight torches Spotlight and battery case Transponders, inserters and readers National Central Animal Registry Ltd, P.O. Box 15-679, New Lynn, Auckland; Ph (09) 820 0009, fax (09) 828 0455. Trovan transponders Trovan inserter Trovan pocket reader Transport box materials All materials including vents, handles and latches available most general hardware stores. Vernier callipers Specialist engineering shops Mitutoyo (150 or 200 mm) Weighing equipment Watson Victor Ltd, P.O.Box 1180 Wellington; Ph 04 3857 699. Mettler/Toledo weighing scales Banding Office, Science & Research Unit, Department of Conservation, PO Box 10420, Wellington; Ph (040 4710 726. Fax (04) 4713 279. Pesola balances (50 g to 5 kg) Wet-weather notebooks Trig Surveying Instrument Co., 7 McCormack Place, Ngauranga, Wellington. Ph (04) 4737935 GeoSystems Ltd, PO Box 8160, 39 Leslie Hills Drive, Christchurch; Ph (03) 343 2333, fax (03) 3432444 Appendix 2.1 – Field equipment and suppliers 107 Rite in the Rain ‘Hip Pocket No. 146’ Appendix 2.1 – Field equipment and suppliers 108 APPENDIX 3.1: DATA RECORDING SHEETS This file is available in the DOC DME at WGNCR–25111 SAMPLE DATA SHEET TO RECORD ELAPSED TRANSMITTER USE Today exp life repot Adult ( A ) 400 40 is: 7/04/2000 3 6623 Juv ( J ) Chick ( C ) Tx Location Exp life Elasped Date on (sent) J on A2 A2 R 33333 R 33333 400 308 0 92 A4 A4 A4 R 44444 R 44455 R 33342 400 309 279 A6 Sirtrack 40 J8 Office 100 0 C8 C8 R 33492 Office 200 195 0 Date off J off 100 200 30 30 Session Tot. Use J replace Date replace From today 3/03/1999 36222 3/06/1999 5/08/1999 36377 36314 0 3/03/1999 36222 2/06/1999 91 4/06/1999 36315 4/07/1999 1 2 1 1 6 / 0 3 / 2 0 0306 6 0 1 36313 36345 92 91 30 92 91 121 2 / 0 4 / 2 0 0 03 6 6 1 8 36622 36685 6-Apr-00 8-Jun-00 62 36622 6-Apr-00 36624 8-Apr-00 36880 20-Dec-00 257 36658 1 2 - M a y - 0 0 35 100 3/03/1999 36222 8/03/1999 Appendix 3.1 – Data recording sheets 36227 5 5 195 109 APPENDIX 5.1: METHODS OF CATCHING KIWI AT NIGHT This appendix is to be withheld when the manual is released to the general public. When attempting to catch kiwi for the first time, you should be accompanied by a person who is experienced in catching kiwi who can provide guidance during the catching operation. 1. In daylight, scout the territory of the bird you want to catch, to select sites that can be used at night. 2. Identify possible hazards (nearby cliffs, streams) escape routes for kiwi (under fallen logs), or non-target effects (e.g. petrel burrows). 3. A good site within forest is typically a small clearing amongst the undergrowth, clear of major obstacles such as fallen logs, and small dense bushes, and preferably with a clear slope running uphill from the centre of the catching area, or with a fallen log as a ‘backstop’. If possible, GPS the site to find it easily at night. 4. Select a period of moonless nights, or work before or after the moon is above the horizon for catching because kiwi have good eyesight at night. In dense forest this is not as critical because you (and they) can hide in the shadows, but in grassland situations (e.g. river flats) the birds are very wary and stay on forest fringes during moonlight. 5. On arrival at a catching site, extraneous gear such as daypacks should be put in a pile near the centre to reduce the spread of scent, or hung in nearby trees with reflector tape showing the location of the site. In unfamiliar terrain, one person should volunteer to remain at the catching area if a chase ensues, to ensure that people can find their way back to their gear at the end of the chase. 6. It is not necessary to hunt in a group but working in a group will maximise chances of success. You must have at least one assistant nearby, for health and safety reasons. 7. If you are working alone, place yourself with the tape and a hand-net near the centre of the catching area. 8. If you are working in a group, position an experienced kiwi catcher with the tape and a hand-net near the centre of the catching area. 9. Spread the other catchers around at a radius of about 30 m (less in dense vegetation), or if there are few people at least one should be positioned uphill from the tape. 10. Switch off torches once you have found your location and/or people have found a comfortable position to wait. All subsequent communication between catchers should be done by way of short whistles. For instance: ∞ If a bird is heard approaching a person gives a single brief whistle, ∞ A double whistle (mimicking a morepork call) to request the tape to be played again, ∞ A three note call to correct a false whistle, and ∞ A four-note call (double morepork) to check with others if they agree to abandon a site (a single whistle from someone indicates that they disagree). 11. Play kiwi calls using a tape or the Shepherd’s whistle. If using tapes, you may use a small light to find the right recording. It is best to play good recordings from a portable minidisc player because appropriate tracks can be selected at ease depending on the situation. Remember that in low density areas it is unwise to call too often. It is more productive to wait at least 20 minutes between calls. Play calls in the following manner: ∞ Play a male call to attract the attention of birds in the general area. ∞ If the target bird you want to catch is a male use male calls mainly. ∞ If the target bird you want to catch is a female use female calls only. ∞ If trying to catch both males and females (e.g. when monitoring a banded population) play mainly female calls, and occasional duets. ∞ Try to avoid catching birds in the breeding season due to the risk of handling gravid females 12. Vary the calls so that birds do not get habituated to a single call played endlessly around an island or up and down a valley, especially if birds have become wary of being caught from their previous encounters. Appendix 5.1 – Methods of catching kiwi at night This appendix is to be withheld when the manual is released to the general public. 110 13. Play calls more frequently than normal call rates of an individual, but try not to play calls at an abnormal rate, i.e. about 3 calls an hour in a low density population. 14. Although it is probably ideal to play tapes of the local kiwi dialect, and birds often respond best to their own call being played, it is possible to even catch birds using tapes of other kiwi species! 15. After the tape is played be ready to catch a bird. If catching in a group, communication between all catchers is essential during a chase to inform the others where a bird is and what direction it is heading, and catchers should try to herd the bird back towards someone with a hand-net. ∞ Initially, listen for a patter of feet approaching, or just a small twig being broken underfoot. Remember that kiwi can approach at night and pass within 5 m of you undetected. Do not switch torches on and rush at an approaching bird. The bird will go to where the call originated. Let the bird come within the catching circle and let the central person initiate the capture or chase. ∞ If a bird is wary and skirts around the catching area it is sometimes best not to scare the bird by making a play for it. There is always another night, or move to another position and try again. ∞ Sometimes in this situation, the outlying people should try to catch the bird if it is nearby. However, remember that birds are usually just a bit further away than you think. ∞ If a bird has come close and if you have time turn on a small torch with most of the beam shielded by a hand or with red cellophane, to see exactly where the bird is before trying to catch it. 16. Let the experienced person in the centre of the circle to instigate the capture attempt. Turn main lights (spotlights and/or headlamps) on. Place a landing net (as used by fishermen) over the bird, and hold the net flat to the ground until the legs can be subdued and held firmly from the outside, only then can the net be lifted to remove the bird. In scrub country nets are not practical. Catch the bird by the legs. 17. If initial hand-netting is not possible or failed, be aware that most kiwi will attempt to run uphill, or will often run past the site where the tape was played. 18. If the net has been dropped, or entangled in vegetation during a chase catch the bird with bare hands by holding the legs. Never grab hold of a kiwi around the body at any time as the bird may be damaged and may die from any chest injury. 19. Tape the kiwi's legs. 20. Be aware that sometimes a pair of birds will approach, and so it pays to leave one person holding the captured bird some distance away, and return to the catching site to repeat the catching process. 21. If you are working with several people, some of them should process the bird while the others continue the catching. Remember that for some handling techniques you require more than one person to be safe and to obtain a permit. Get it right first time because kiwi learn really quickly and might avoid you next time , but remember that lions are only successful one in every 10 chases! Catching Rowi At Okarito There are slight differences in capture technique used in Okarito for a couple of reasons. One is that the forest is very dense and chasing is just not an option in most circumstances and the other is that rowi are often very aggressive as compared to other taxa. ∞ To catch rowi, always work in pairs, as with more people things often get confusing and more people do not increase the likelihood of catching. ∞ A capture site is set up, and calls are played. ∞ When the birds approach, make sure you are very quiet and do not move at all. Completely dim all lights until the bird is definitely within net range, then use a small glimmer of light to Appendix 5.1 – Methods of catching kiwi at night This appendix is to be withheld when the manual is released to the general public. 111 locate the bird and place the net over it. Keep all movement and noise to a minimum throughout the process. ∞ Sometimes the bird will come straight in and be caught immediately but if it takes a long time do not give up – often birds have stayed within 50 m of a catching site for over 4 hrs while people are whistling, only to eventually be caught. Persistance is usually rewarded when working with kiwi!! It is very rare to catch a bird by chasing it in Okarito and it is not recommended. If all else has completely failed and the catcher is an experienced person it may be worth a go. In that case only one person should chase as any more cause too much confusion when listening for the bird running through the undergrowth. Appendix 5.1 – Methods of catching kiwi at night This appendix is to be withheld when the manual is released to the general public. 112 APPENDIX 6.1: PERMIT/ANIMAL ETHICS REQUIREMENTS 6.1.1 Permit requirements A legal authority under the Wildlife Act 1953 is required for any manipulation of wildlife. This includes collection of samples, banding, capture and translocations. Permission to band kiwi (plus supplies of bands and banding schedules) will be issued by the Kiwi Coordinator (Science and Monitoring) who holds a generic permit to band kiwi anywhere in the country. Do not approach the Banding Office directly, except for supplies of Pesola balances and banding pliers. Permits are issued pursuant to Section 53 of the Wildlife Act 1953 for such activities as collecting blood samples and feathers. Approval for blood sampling is also required from the Department of Conservation Animal Ethics Committee and the Kiwi Recovery Group. Approval for the collection of feathers, including plucking feathers if necessary to accurately determine the origin of feathers, has been given by the Department of Conservation Animal Ethics Committee. An Authority to Export pursuant to Section 56 of the Wildlife Act 1953 is needed to export blood samples to overseas agencies for analysis. Common conditions, partly developed through consultation with Ngai Tahu, are that: ∞ the samples are not to be used for commercial purposes ∞ the samples are not to be donated, sold or otherwise transferred to any third party (beyond exporter and analytical laboratory) ∞ the samples are to be returned to the Department of Conservation in New Zealand at the completion of the study ∞ any genetic sequencing data must be deposited in Genbank (an international register of genetic sequences) within six months of completing the research ∞ a copy of published papers or unpublished reports (e.g. PhD theses) arising from this research shall be forwarded to the Manager, Science & Research Unit, Department of Conservation, PO Box 10-420, Wellington. The Department of Conservation’s Standard operating procedure for the Translocation of New Zealand’s indigenous terrestrial flora and fauna (QD: NH1042) should be referred to for the approval process required for movement of kiwi to new release sites. The Department of Conservation is currently preparing a Captive Management Policy and Technical Guidelines (Captive Management of Species Absolutely Protected under the Wildlife Act: QD: NH1178) which will apply to captive holdings of kiwi. This will be in two parts, (1) policy, and (2) procedure sections. The National Kiwi Coordinator holds copies of ‘A guide to the keeping of brown kiwi in captivity’ and the Kiwi husbandry manual, and both of these documents should be used when drawing up permits. There is no nationwide standard WOF for holders of kiwi though they are required to provide an annual report to individual Conservancies as part of their permit for holding. Almost all native birds in New Zealand, including all kiwi, are fully protected under the Wildlife Act. Provision does exist for them to be cared for in captivity when sick or injured, and in many districts there are people who have become quite skilled at doing this. A MAF clearance is required for each individual kiwi when leaving a zoo. Before using a dog to find kiwi, both the handler and the dog require certification. Appendix 6.1 – Permit/animal ethics requirements 113 6.1.2 Animal ethics requirements The following is based on information provided by Don Newman (SRU) & SJ Owen (CPD) to the combined NAEAC and NAWAC meeting on 22 August 2000: Section 5, subsection (3)(c) of the Animal Welfare Act 1999 recognises that in order to meet statutory management responsibilities, organisations such as DOC (including the NZ Fish and Game Council), regional councils and the Ministry of Fisheries have a significant amount of routine interaction with animals. This includes pest management work and activities such as the capture and identification of animals. The Act makes it clear that certain activities will not come under the definition of “Research, Testing & Teaching” and, therefore, not be subject to the requirements of Animal Ethics Committee (AEC) approval. This exemption covers two categories of activity: ∞ Manipulation of animals that constitutes routine management rather than “research” (e.g., banding of birds for population monitoring); and ∞ Manipulations that form part of a research project but which are performed routinely (e.g., use of surrogate parents for a research project on threatened species management). Such manipulations must be carried out routinely and they must be undertaken to fulfil a responsibility under an Act administered by DOC or under the Fisheries Act. The rationale is that DOC undertake such manipulations regularly and there are formal institutional mechanisms for ensuring that any impact on the animals is minimised (staff training, corporate practice guidelines etc.). Such mechanisms would not necessarily be available in other research institutions such as universities that do not have statutory animal management responsibilities. For more information on whether animal ethics approval is required for an activity, please contact Don Newman (Science and Research Unit). Appendix 6.1 – Permit/animal ethics requirements 114 APPENDIX 6.2: GUIDELINES FOR THE USE OF BLOOD SAMPLING DNA Amount of blood needed Anticoagulant What you can find out Samples needed to get results 0.25 – 0.5 ml None or EDTA Genetic relationships between and among populations. Need at samples from at least 10 individuals What you can find out Parentage/family trees; taxonomic relationships Samples needed to get results Preferably need to sample whole families (parents and chicks) and neighbouring birds (in case of extrapair paternity/maternity) testing. The main problem is the need of large number of samples (genetics) or a complete set of samples (paternity) to provide reliable/useful data. Limitations of the technique Costly, unless part of a study. Techniques Smears PCV and Serum Protein 0.02–0.03 ml 0.05 ml (50 µl) (2030 µl) None Heparinised Presence of Baseline health pathogens and data parasites. Each sample provides a result. However if you want to typify an entire population you will need large number of samples (need to be proportional to the prevalence of the pathogen or parasite in the population). Baseline health data Disease diagnostics Each sample provides a result. Cost $8 per sample Appendix 6.2 – Guidelines for the use of blood sampling Blood Chemistry 0.25-0.5 ml EDTA Baseline health data Each sample provides a result. Each sample provides a result. Requires a data base of “normal” values to be used as a diagnostic procedure. Samples must be refrigerated after collection for the blood to be of any use. Cost little if you can get the equipment loaned. Cost $25.50 per sample, depending on tests done 115 APPENDIX 6.3: SPECIFIC SCIENTIFIC SAMPLING 6.3.1 DNA samples You will need: 100% ethanol (you will need a permit to purchase – consult Hugh Robertson for further information) Corning external thread 2.0 ml cryogenic vial (Biolab Scientific, Christchurch) Plastic/wooden rack for holding 50 vials Method: 1. Before going in to the field, pipette 1.8 ml of 100% ethanol into vials 2. Take blood sample. 3. Remove the needle from the syringe, and empty the syringe contents into the appropriate vial(s). Do not empty the syringe through the needle as the red blood cells can break and adversely affect the DNA tests. Do not put more than 0.4 ml blood into a 2.0 ml vial as it will dilute the absolute alcohol to the point that the DNA can deteriorate. Label the vial clearly with soft lead pencil or with appropriate ink marker pen (note: many inks will run and become illegible when they come into contact with pure alcohol) stating: species, locality, bird identity, date and collector. 4. After removing samples from field bag, shake to make sure blood is not clinging to lid but rather settles to bottom. 5. Store upright in rack in a cool location. Do not store in a freezer. 6. If the alcohol levels in the samples decreases with time in storage, refill. Be careful not to contaminate samples by touching containers with the same pipette. NOTE: ∞ The bottle of ethanol must be securely stored in a dangerous goods cabinet. ∞ Plastic vials with pure alcohol must not be taken on domestic airlines unless declared as a dangerous chemical and carried as freight labelled such. 6.3.2 Blood smears You will need: Microscope slides Cover slips for microscope slides Plastic slide containers Method: 1. Take blood sample as described above. 2. As soon as the needle is withdrawn place a small drop (a large drop will flood the slide) on each of 2-3 microscope slides near the frosted end (with the frosted part uppermost on slides with frosting on only one side). 3. Make a blood smear by placing a 22 x 22 mm cover slip diagonally onto the blood spot in such a way that two opposing corners of the cover-slip overlap the sides of the slide. Allow the blood to spread out and then, in a single smooth action, spread the blood by sliding the cover slip along the length of the slide, holding the corners of the coverslip with your thumb and forefinger. Do not press the cover slip hard against the slide, because bird blood is very delicate compared with mammalian blood. Repeat with the other slides in quick succession. 4. Allow the blood to dry completely; in cold weather hold the slide against the back of your hand or inside of your wrist to heat them up and aid the drying process. Make sure that the slides are completely dry before storing them as they can sweat and the samples deteriorate. Appendix 6.3 – Specific scientific sampling 116 5. Label the frosted part of the slides with a soft lead pencil, stating species, locality, bird identity, date and collector. Ensure that slides are kept separate from each other in commercially-available plastic slide containers, which can hold from 1-5 slides. If you are going to collect samples in the field make sure you take several of these containers. Do not refrigerate. 6. Send samples to: Roger Ellison, Alpha Scientific Ltd 57 Sunshine Ave Ph: (07) 846 2266, Fax: (07) 846 2346) He will report on the appearance of red cells and thrombocytes, presence of blood parasites, and the Whole Blood Count from the slides for $8 + GST per specimen (2-3 slides per specimen). 7. Send results to: Hugh Robertson SRU, DOC, PO Box 10420, Wellington (for wild kiwi) and Richard Jakob-Hoff Auckland Zoo, Private Bag Grey Lynn, Auckland 1002 (for captive kiwi) Both maintain a database of kiwi blood chemistry data and would welcome extra results to be added. 6.3.3 Packed cell volume and serum protein You will need: Portable, battery-operated, centrifuge or microspinner (e.g., Ames Microspin from Bayer Diagnostic), Hand-held refractometer (e.g. Westover Scientific RHC-200ATC Refractometer). Heparinised 9 µl haematocrits Method: 1. Take blood sample as described above. 2. Fill a heparinised haematocrit capillary tube by placing the end in the drop of blood that forms on the leg when the needle is withdrawn, or from the end of the syringe after the needle has been removed. 3. Once completely full, place in a microspinner or centrifuge with an empty capillary tube directly opposite to maintain balance, and spin (this will be a pre-set time on the machine). The spinning will separate the red blood cells from the serum and white cells. 4. Check to make sure that no blood has spilled from the tube while spinning (the tube should be full, with red cells packed at the outside and the serum and white cells on the inside). You can see the white cells as a fine white line between the red packed cells and the clear serum. Record the percentage of red blood cells (PCV) on the gauge inside the spinner. If for some reason, the capillary tube was not entirely full before being placed in the spinner, you can calculate the percentage from the red cell reading divided by the total volume; but this is not accurate if blood has escaped while being spun. 5. To obtain the concentration of serum protein (SP), hold the haematocrit capillary firmly between nails of forefinger and thumb just above the red blood cells, and break the tube. 6. Flush the fluid (serum) out onto a clean refractometer lens of a properly calibrated handheld refractometer (see the relevant instruction manual for details). Appendix 6.3 – Specific scientific sampling 117 7. Cover with the plexiglass cover to spread the sample out evenly without bubbles or dry patches. 8. Wait 30 seconds to allow the sample to equilibrate to the ambient temperature of the refractometer. 9. Face a light source (clear sky, sun, or a torch held 10 cm away) and read the serum protein (SP) scale (in g/100 ml) at the point where the dark and light portions of the screen is sharply divided. 10. Wipe the specimen from the prism and plexiglass plate with a swab. 11. Send data to: Hugh Robertson (SRU, DOC, PO Box 10420, Wellington) and Richard Jakob-Hoff (Auckland Zoo, Private Bag Grey Lynn, Auckland 1002) maintain a database of kiwi blood data and would welcome extra PCV and SP data to be added. 6.3.4 Blood chemistry You will need: Purple topped EDTA tubes (from hospital supplier) Red-topped microtainer Method: 1. Take a blood sample as described above. 2. Squeeze 0.25-0.5 ml from the syringe into a purple top EDTA tube. Seal the tube, label it, shake it well, and refrigerate as soon as possible. It is important that you collect between 0.25 ml and 0.5 ml per tube as the vials come with a set amount of EDTA coating the inside, which will only work for the given amount of blood. A good idea to keep samples cold while in the field is to place some ice cubes into a thermos, then some cotton to separate samples from contacting the ice, and then place the samples there. Floating the samples in cold water inside a thermos is also a good idea, but you must make sure that the samples are securely closed and that the marking in the tube is not going to be lost in contact with water. 3. Any remaining blood can be placed in a red-topped microtainer, shaken, labelled and refrigerated. 4. The EDTA and microtainer samples should be couriered within a few days to a diagnostic laboratory, preferably in a chillybin (or if only a small sample couriered overnight, then a bubble-wrap bag is okay). 5. Send to: Roger Ellison, Alpha Scientific Ltd 57 Sunshine Ave, Hamilton, Ph: (07) 846 2266, Fax: (07) 846 2346 6. Send results to: Hugh Robertson (SRU, DOC, PO Box 10420, Wellington) and Richard Jakob-Hoff (Auckland Zoo, Private Bag, Grey Lynn, Auckland 1002) Appendix 6.3 – Specific scientific sampling 118 APPENDIX 7.1: EMBRYONIC STAGES OF KIWI AS DETECTED BY EGG Ron Goudswaard from Wellington Zoo has published a figure showing approximate stages of development of a kiwi egg through the entire incubation period. Original source: Goudswaard (1985) . Appendix 7.1 – Embryonic stages of kiwi as detected by egg 119 APPENDIX 7.2: HUSBANDRY PROTOCOLS AT AUCKLAND ZOO, RAINBOW SPRINGS AND WESTSHORE WILDLIFE CENTRE The protocols given below have been applied with moderate to good success to Operation Nest Egg eggs and chicks at Auckland Zoo, Rainbow Springs and Westshore Wildlife Reserve. These various guidelines should be used as a general guide to the management of eggs and chicks in captivity (not only for O.N.E.) and may be varied according to local climate, infrastructure, and resources. Not one method is “correct”, but over time certain factors (e.g., hygiene standards) should become standard operating procedures within all captive facilities. Note that before attempting any raising of kiwi eggs or chicks, operators should have had training at an established, permitted captive institution or another institution experienced in breeding kiwi as approved by the Kiwi Coordinator (Research and Monitoring). 7.2.1 Auckland Zoo husbandry protocols Egg hygiene protocol (note this applies to eggs of all bird species) Based on a protocol prepared by Dr. Berend Westera, December 1998. Some key facts ∞ When collected most eggs are already part way through incubation by parents and any penetration of the shell by bacteria is already likely to have occurred. ∞ At this stage keeping eggs dry and warm is more important than cleaning them. ∞ It is important not to add to the bacterial burden of the egg. The egg shell is porous and should be kept from contamination when in your care. ∞ The most contaminated surface your egg is likely to be in contact with is your hand. ∞ The fastest way for bacteria to penetrate the shell is to drop the egg temperature. ∞ Egg handling with unwashed hands is easily the most dangerous activity likely to happen to the egg – this is the risky combination of contamination with temperature drop. Golden rules for egg care ∞ Start with a thoroughly clean and fumigated incubator (including the fan and heating mechanism) at the beginning of each new incubation. ∞ All ledges and surfaces in the incubator room should be cleaned and disinfected. ∞ Handle eggs as infrequently as possible, and for as short a period as possible. ∞ Before handling eggs wash hands with disinfectant (e.g., Antec instant hand sanitiser, or Hibiclens) and thoroughly dry or use disposable gloves. ∞ Eggs should only be in contact with sterile, dry surfaces. ∞ Re-glove or re-sterilise between different incubators or eggs of different species. ∞ Do not allow egg temperatures to drop significantly. ∞ Handle eggs gently and slowly – sudden movements or holding blunt end of egg down can cause strains on membrane between albumin and aircell thus damaging the embryo. ∞ Prolonged candling can also damage the embryo. ∞ Separate hatching eggs from the others as these eggs do not need to be turned in the last few days and, in hatching, release a lot of bacteria. All empty shells should be removed from incubator and incubation room. ∞ For eggs that are exceptionally dirty or where you suspect infection, gently clean eggs by lightly scraping off large pieces of muck with a knife. Take care – if you damage the cuticle you are changing the porosity of the shell and so increase temperature conductivity and moisture loss. ∞ Dip egg in disinfectant (e.g. Techsan – TC – Qual Tech PO Box 4182 Hamilton East or Antec Superhatch Chickguard, NRM, Private Bag 99927, Newmarket), which is warmer than Appendix 7.2 – Husbandry protocols 120 the egg. (e.g. 43-44 °C) for no more than 5 seconds. Carefully change grip so the whole surface is in contact with the solution. This draws bacteria out. ∞ If there is a known infection – dip eggs in antibiotic solution, e.g., Baytril, at lower temperature than egg, e.g. 4-11°C; this draws antibiotics in. Kiwi chick care Protocol prepared by Deidre Vercoe and updated by Andrew Nelson, 2003 Incubation room setup The incubation room is air conditioned with a constant ambient temperature of 20ϒC. Due to Auckland’s humidity, a dehumidifier is also used to reduce the room’s ambient humidity. All windows are blacked out to prevent direct sunlight affecting the temperature of the room or individual incubators. Complete darkness is the ideal condition for egg incubation and candling. Equipment and furnishings in the incubator and brooder room are kept to a minimum to allow effect hygiene management. Arrival of eggs 1. Candle egg to determine fertility. 2. Weigh egg. 3. Examine egg thoroughly for cracks. 4. Wash egg by submerging it in warm (38-40ϒC) Chickguard solution (1% dilution rate) for no longer than 30 seconds. Do not rub egg but gently wipe off dirt. Wear gloves. If cracked do not submerge egg; follow guidelines for dealing with cracked eggs. 5. Pat egg dry using clean paper towels. 6. Weigh egg again. 7. Re candle egg to determine age of embryo development / stage of incubation. 8. Lightly draw in air cell with a 6B soft-lead pencil. 9. Place on a clean flat surface and allow egg to find its centre of gravity then draw a pencil line down the eggs length indicating top centre. 10. If necessary rewrite the identification number on top of egg in pencil. 11. Place egg in appropriate stage incubator with the air cell facing the front. NOTE: If you are dealing with more than one egg arrival at a time, you may leave steps 4-8 until all eggs are settled into the incubator. Ensure all the following has been recorded on data sheet: ∞ ∞ ∞ ∞ ∞ ∞ ∞ ∞ ∞ ∞ Egg weights Egg condition – cracks, embryo development, and age estimation Time when egg was placed into incubator Temperature of incubator Egg history – should be provided by DOC staff: Date and time egg was taken from nest Dam and Sire Movements of Sire to give minimum and maximum possible age of egg 1st or 2nd clutch of season, and number of eggs in clutch Complete the wildlife submission form Often the egg has been measured (length and width, with callipers) by DOC staff in the field. If this has not been done, do so when the egg is next removed from the incubator. On arrival the priority is to get the egg into the incubator and settled. Appendix 7.2 – Husbandry protocols 121 Dealing with cracked eggs Washing - If an egg is cracked, do not wash by immersion, but lightly splash egg with the same egg washing solution as for non-cracked eggs, taking care to avoid the crack itself. Incubation - Eggs with a hairline crack can be incubated as normal or sealed as below. Eggs with a more severe crack can have the crack sealed with nail polish or clean masking tape. Badly smashed eggs can have the sterilised shell of another egg taped over the smashed area. Incubation protocol The incubation protocol is split between 4 age-related stages. Following is a breakdown of the parameters followed throughout each stage. Turning is done in 4 x 45 degree stages spaced evenly throughout the day. Day one: the egg is turned 90 degrees clockwise/to the right in 2 stages, and 90 degrees anticlockwise in 2 stages. (This will bring the top centre line of the egg back to 12 o’clock on the final turn). Day two: the egg is turned 90 degrees anti-clockwise/to the left in 2 stages, and 90 degrees clockwise in 2 stages. This 2-day cycle is repeated as necessary. Stage 1: day 0-9 Incubator Temp Relative Humidity Turning Cooling Still air Brinsea Hatchmaster 36.0 – 36.5ϒ C. 60 – 65% None 1 hour per day, 8am-9am. Stage 2: day 10-55 Incubator Temp Relative Humidity Turning Cooling Still air Brinsea Hatchmaster 36.0 – 36.5ϒ C. 60 – 65% 4 x 45ϒ daily 1 hour per day, 8am-9am. Stage 3: day 56 to internal pip (around day 75) Incubator Still air Brinsea Hatchmaster Temp 35.5 – 36.0ϒ C. Relative Humidity 55 – 60% Turning none Cooling none Appendix 7.2 – Husbandry protocols 122 Stage 4: internal pip to hatch (around days 75-78) Incubator Still air Brinsea Polyhatch Temp 35.5ϒC. Relative Humidity >60% Turning none Cooling none Daily regime 8.00 am: ∞ Record temperatures and humidities (Do so before opening incubator lids). Adjust if necessary. ∞ Weigh eggs. ∞ Record weight, weight loss, density and density loss on data sheet. ∞ Plot weight loss on graph to check that it is within parameters. ∞ Note any egg movements seen by “strawing” in stage 2 eggs or by eye in stage 3 eggs. ∞ For incubation stage 2, turn eggs accordingly. ∞ For eggs in incubation stages 1 and 2, leave the eggs out of the incubator cooling for 1 hour, ensure stopwatch is set as a reminder to return them. 9.00 am: ∞ Return stage 1 and 2 eggs into incubator. ∞ Record 1-hour egg cooling completed on individual record sheets. 11.30 am: ∞ Record temperatures and humidities – adjust if necessary. ∞ Turn stage 2 eggs accordingly. 1.30 pm: ∞ Record temperatures and humidity – adjust if necessary. ∞ Turn stage 2 eggs accordingly. 4.00 pm: ∞ Record temperatures and humidities – adjust if necessary. ∞ Turn stage 2 eggs accordingly. ∞ Look for movement in stage 3 eggs. Eggs are to be kept in darkness except when working in the room as they are light sensitive. Weekly regime ∞ Candle egg. ∞ Draw in air cell enlargements and date. ∞ Dot in new ‘top center’ of egg, (beginning from latest air cell line) if air cell develops off center and the centre of gravity for the egg moves. ∞ Draw picture of development. ∞ Record description of development. ∞ Assess age of embryo and put the egg into the next incubation stage if appropriate. Appendix 7.2 – Husbandry protocols 123 Weight loss An egg should lose between 12-16% of its fresh weight, before it internally pips. With eggs arriving from the wild at differing stages of development there is no way of knowing what the fresh weight was. We use the following method to estimate a general weight loss path: a) On arrival estimate the age of the egg. b) Plot arrival weight at estimated age on graph. c) Calculate back using 1.2g/day and 0.6g/day weight loss calculations, this will give you a minimum and maximum fresh weight range of the egg. Example: egg is 30 days old and weighs 363 grams. 30 x 1.2 = 36 (30 days x 1.2 grams) 30 x 0.6 = 18 (30 days x 0.6 grams) 363 + 36 = 399 363 + 18 = 381 The fresh weight for this egg was likely between 381 and 399grams. ∞ If these values are less than 400 grams this egg is a small egg and should lose between 0.6 and 0.75g/day. ∞ If these values fall between 400-490g it is a medium sized egg and should lose between 0.75-1.0g/day. ∞ If these values are above 490g it is a large egg and should lose between 1.0-1.2g/day. (If the values fall across two categories take the category it fits most closely eg, if upper and lower limits of estimated fresh weight are 450g and 495g this would be assessed as a medium sized egg.) The given example (estimated 381-399 fresh weight) would be assessed as a small egg. The next step is to project forward using the appropriate weight loss per day. d) Calculate the minimum and maximum weights you would expect for this egg at day 75. (The kiwi incubation period is generally between 72 and 84 days – this is obviously a wide range, so to standardise we use day 78 as an estimated hatch day. This would put internal pip at around day 75). Example: 75 days – 30 days = 45 days from current weight until internal pip. 45 x 0.6 = 27 (45 days x lower weight loss range for small egg) 45 x 0.75 = 33.75 (45 days x upper weight loss range for small egg) 363 grams - 27 = 336g (present weight – lower amount of what the egg should lose by internal pip) 363 grams - 33.75 = 329.25g (present weight – upper amount of what the egg should lose by internal pip) By internal pip this egg should weigh between 336g and 329.25 grams e) You can now plot these two weights on the graph at day 75, and draw lines connecting these with your present weight of 363 grams. Your weight loss should remain within the two resulting lines. Appendix 7.2 – Husbandry protocols 124 There doesn’t have to be an equal amount of weight lost each day. There must however be careful attention paid to the weight loss of an egg over a period of days and regular assessment of whether this weight loss is right. Egg losing too much weight? Increase humidity by increasing the surface area of water in the trays or decrease the level of ventilation. Ventilation should never be completely blocked. Egg not losing enough weight? Decrease humidity by reducing the surface area of water in the trays or increase the level of ventilation. Density loss Density is a tool used in conjunction with weight loss to assess the egg is developing within desired perimeters. In this case no set aim had been established with regard to daily density loss, yet wild kiwi eggs incubated at the Zoo see an average daily density loss of between 0.002 and 0.003. To work out daily density loss we need to know the egg weight each day and volume – which will be the same throughout incubation. For egg volume we use the following calculation: Length (cm) x width (cm) x width (cm) x 0.51- (The New Incubation Book, Dr A.F. Anderson Brown 1994) Density is then calculated daily by dividing the eggs weight by the volume. Example: Egg has a volume of 483.67 (round to 2 decimal places) Day 1: weight = 507.77 divided by 483.67 = 1.050 (round to 3 decimal places) 1.050 is the density on day 1. Day 2: weight = 506.96 divided by 483.67 = 1.048 1.048 is the density on day 2. Daily density loss is then recorded as 0.002. (1.050 – 1.048) It is not crucial that the egg has the same density loss each day. What is important is that the average daily density loss is around 0.002 to 0.003 Dead or infertile eggs An infertile egg will continue to lose weight, and the air cell will grow just like a fertile egg. The infertile egg will be clear when candled. A freshly laid egg will also be clear when candled but the air cell will be small (usually smaller then a 50 c piece). Therefore if your clear egg has a large aircell – it is likely to be infertile. If you are unsure – INCUBATE IT. A freshly laid egg will show development (red dot from which veins soon expands with veins) within 10-15 days of being laid. If the clear egg shows no development after this time, you now know for sure that it is infertile and it can be removed. Embryo death can happen at any time during development. Signs can be: ∞ No observable growth/development of veins and embryo over a 7 day period. Appendix 7.2 – Husbandry protocols 125 ∞ Visible breakdown of veins/embryo ∞ Continual lack of movement – movement can be seen by “strawing” from around day 35, and by eye from around day 45. ∞ Contents of egg sloppy and move around a lot when the egg is moved ∞ Distinct edge of aircell breaks down and becomes very ‘fuzzy’ ∞ Egg begins to smell Dead eggs should be removed from the incubator to prevent bacteria affecting other eggs, and a necropsy performed to gain as much information as possible about the cause of death. At incubation temperature a dead egg will break down relatively quickly – and within days you should see definite signs. All dead and infertile eggs should be sealed in a zip-lock plastic bag and refrigerated in wellpadded container. As soon as possible the egg should be delivered to the Vet department, with all relevant details, for a necropsy. Hatching ∞ Temperature set at 35.5ϒC ∞ Humidity should be maintained or increased to 60% when the chick has externally pipped and broken through the shell. ∞ Ensure the hatching egg is in an incubator by itself i.e. with no other eggs. ∞ Ensure the grey brooder matting covers the entire base tray of the incubator. This will provide traction to both the egg and chick once hatched (it stops chicks from injuring their bills on the metal base tray of incubator) ∞ The egg should be stabilised using wads of cotton wool, providing the chick resistance and preventing the egg from rocking around too much. ∞ Record good notes throughout the hatching process. ∞ Refer to the Husbandry manual to give guidelines for a ‘normal’ hatch. Post hatch ∞ ∞ ∞ ∞ ∞ ∞ ∞ ∞ Weigh chick, being careful to support the abdomen. Spray chick’s navel area with betadine. Remove egg shell, remains and wet bulb from incubator Empty incubator water trays If you have taped up any incubator lid air holes, remove tape. Weigh and record weights of egg shell, and residue waste Ensure a TLC is ready at a stable temperature of 34ϒC When the TLC is ready transfer chick. Note – you may leave chick in the hatching incubator for the first 24 hours if necessary, if you do so, reduce the temp after hatch to 34ϒC. Day 1-4 Daily: ∞ Weigh chick – record on data sheet, plot weigh graph. ∞ Check chicks general body condition and positioning. ∞ Spray navel with betadine. ∞ Replace brooder matting if soiled. Use a rolled up towel around edge of TLC for chick to nestle into. ∞ Check faeces are normal – green in colour, with yellow urate component, for first 3 - 5 days on average then slowly shift to a normal bird faecal appearance. ∞ Note chick’s behaviour, especially leg positioning. Appendix 7.2 – Husbandry protocols 126 Day 1 Within the first 24 hours after hatching the temperature is reduced to 30-32ϒC, and the chick is moved from Polyhatch into a Brinsea TLC brooder. Day 2/3 During the second and third days, reduce the temperature at a rate largely governed by the chicks’ behaviour, until the chick is comfortable at 20-24ϒC. Day 4 At the beginning of the forth day, the chick should be ready to transfer to a larger soil lined brooder at room temperature (18-20ϒC). This room temperature applies for the duration of the chicks’ stay indoors – approximately 3 weeks. Chicks that are kept too warm are generally lethargic and very slow to start eating naturally. The brooder should be safe –no nails/screws etc sticking out. Provide a pebble lined shallow dish for water. Provide a shallow flat dish of sand to put food dish on. Sprinkle in several spoon fulls of small stones (like those used to line aquariums) for the chick to ingest for use in the gizzard. Daily Brooder Care 8.30-9.30am ∞ Weigh chick and plot weight graph ∞ Check faeces ∞ Supply fresh bedding (grey brooder matting over towels for first week, towels only thereafter.) ∞ Scrub water dish and refill ∞ Remove old food ensuring any food that has been flicked out of dish is picked up. ∞ Dig over soil/leaflitter ∞ Water soil leaf/litter if necessary ∞ Return chick to brooder; check plumage, eyes, nostrils and general condition when handling. ∞ Supply fresh food during day if chick is not yet eating well at night. 4.00-4.30pm ∞ Supply fresh food ∞ Quietly check on chick and note whether there are any signs that the chick has been active during the day. Feeding/chick weight. Chicks are fed the same diet as adults, but it is cut into small pieces (25mm long, 5mm wide as a guide). The chick’s belly and faecal output should be monitored for absorption of the yolk. Belly should not be distended and faecal colour should now be normal. In general food is introduced to the chick at 8 days old, at this age they should be room temperature (18-20ϒC) and housed in a large soil lined brooder. Chicks that are kept too warm are generally lethargic and very slow to start eating naturally. 25-30% of the chicks hatch weight is expected to be lost within the first 10-12 days. Once a chick reaches 30% weight loss it is force-fed 1 or 2 pieces of artificial diet ox-heart (during the morning weighing), to encourage feeding. If a chick reaches 33% weight loss force-feeding is increased, to twice daily – 4 or 5 pieces of oxheart each time, with the aim of the chick putting on weight over a 24 hour period, until it begins feeding by itself. If a chick exceeds 35% weight loss veterinary advice is sought. Appendix 7.2 – Husbandry protocols 127 From day one a simple tool for monitoring this weight loss is a graph. Calculate and mark in lines for 25, 30 and 33% loss from hatch weight. This will allow for quick, easy identification of the chicks’ progress. Release conditions ∞ Chick should have regained hatch weight before release – on average this takes 3 weeks ∞ Blood samples should be taken – this year we are continuing with baseline data collection of blood ‘normals’ for chicks. Therefore we aim to do this at around 6 days old. ∞ Microchip to be implanted preferably at least 4 days prior to release, so that it can be rechecked on release day. ∞ Vet to check chick prior to release – they may be happy to do pre-release check at the same time as implanting microchip ∞ Day of release – record last weight, check microchip with scanner, measure bill and tarsus lengths. Protocol for O.N.E. chicks hatched in the wild ∞ Chick to be kept separately from those who have hatched at the Zoo. ∞ Chick to be maintained under quarantine status at the vet hospital. ∞ Protective clothing to be worn when handling chicks – gown, gloves, tie back long hair On arrival ∞ Weigh chick ∞ Estimate age – judge by yolksac presence, weight, feather condition etc. ∞ Vet check – remove ticks take blood and faecal samples During stay ∞ Brooder care as normal. ∞ Prior to release – chick needs to be determined as fit for release by vet – good weight and appetite etc – clear faecal (x2) and blood results. Hygiene standards ∞ Hygiene is extremely important in the incubation and brooder rooms. ∞ Only dedicated footwear is worn in the incubation and brooder rooms. Normal footwear is to be removed at the door and incubation footwear is to be worn – this is not to leave the incubation/brooder room. ∞ Lab coats are worn when working with the eggs so that dirty work clothes do not rub against incubators, benches, eggs etc. These are to be washed weekly and when in use are to remain in the incubation room only. ∞ Thoroughly wash and dry hands on entry. Before each egg is handled, sterilise hands with the alcohol gel steriliser. ∞ Keep hair tied back if necessary and refrain from touching hair or face etc after your hands are sterilised. ∞ All equipment that you use in the incubation room – scales, pens, candlers, bench surfaces etc are to be kept clean and sterile by being sprayed down weekly with chickguard solution. ∞ No rubbish bins are provided in the incubation or brooder room. Ensure any rubbish is immediately removed from the rooms. ∞ At the start of the season all incubators should be thoroughly cleaned with trigene/virkon. Hatching incubators/TLC’s/brooder matting should be cleaned twice, after being used by a chick and before being used again. Appendix 7.2 – Husbandry protocols 128 Hygiene schedule MONDAY Clean instruments / change weigh mat / take lab coat for washing TUESDAY Wipe down all surfaces / door handles etc WEDNESDAY Sweep floor THURSDAY Mop floor / wipe boots FRIDAY Restock (data sheets, paper towels etc). Make fresh chickguard solution SATURDAY Wipe down all surfaces / door handles etc SUNDAY Clean wet-bulb wicks When cleaning: Virkon – Fresh dilution used for cleaning incubators/wiping down benches/washing floors etc. When the last of the Virkon is used we are switching to Trigene - as effective, less caustic, less hazardous, more economical. Chickguard – Solution used for egg washing. Can also be used from spray bottle for cleaning surfaces, instruments etc. When the last of the Chickguard is used we are switching to Incusan - as effective, NZ made product, more economical. (Underdown Incubation Supplies, 07 374 8554) Appendix 7.2 – Husbandry protocols 129 7.2.2 O.N.E. Incubation protocols at Rainbow Springs, Rotorua for NIBK For the 2001-2002 season, the following incubation and hand-rearing protocol has been used for North Island brown kiwi eggs at Rainbow Springs and is summarised below. Temperature and cooling regimes Age(days) Temperature (top of egg) (ºC) 1-10 11-55 56 – internal pip Int pip to ext. pip Ext.pip - hatching 35.5 35.5 35.5 32.0 32.0 Cooling Turning 1 hour 1 hour 1 hour 1 hour none none 4 times daily, 45° 2 rolling turns per day No turning No turning Turning regime ∞ Egg turned 4 times daily. Turned 45° each time. ∞ On day 1, egg turned 45° clockwise for the first two turns, then anti-clockwise for turns 3 and 4. This returns the egg’s centre line back to the top. ∞ On day 2, the egg is turned anti-clockwise for the first two turns, then clockwise for turn 3 and 4. Again, the egg ends up in the same position as it started. ∞ Alternating the initial turning direction of the egg each day, prevents the egg from being rotated 360°. Weight loss ∞ Controlled to give between 12-16% loss from estimated fresh weight. ∞ Controlled by filling water trays and covering up to three holes in the incubator lid. General management Arrival of eggs ∞ ∞ ∞ ∞ ∞ ∞ Weigh egg. Candle egg to determine fertility or advanced development Examine egg for cracks Classify severity of cracks Note position of cracks and draw diagram Wash egg by submerging it in warm (30-35ºC) Incusan solution (20ml/1) for no longer than 30 seconds. Gently wipe all dirt/stains from the egg. If cracked do not submerge egg, but follow guidelines for dealing with cracked eggs. NB: the person washing the egg should wear gloves, and have cleaned their hands prior. On finishing washing the egg should only be handled by people with sterilised hands, wearing gloves. Pat egg dry using paper towels ∞ Record details of washing – submerged or splashed? Disinfectant used and concentration. Water temperature. Time in water ∞ Weigh egg again. Move into incubation room ∞ Candle egg to determine age (use pictures in kiwi husbandry manual as guide) ∞ Lightly draw in aircell with pencil – date aircell line ∞ Draw a pencil mark indicating top of egg (where aircell protrudes furthest into egg) Appendix 7.2 – Husbandry protocols 130 ∞ Write the identification number on top of egg in pencil. ∞ Draw diagram of development of egg on sheet provided – note characteristics (colour, calcium deposits, shape, cracks etc.) ∞ Measure length and width of egg at widest point with callipers (can be done later and recorded to speed process up) ∞ Place egg in appropriately adjusted incubator with aircell facing away. Record temperature. ∞ Note time egg placed in incubator, incubator type and number ∞ Move thermometer to correct height (just clear of top of egg) ∞ Place rods to either side but clear of egg ∞ Record details of egg’s history including the following: - date of arrival at Rainbow Springs - dam and sire - date laid (if known) - movements of sire to give minimum and maximum possible age of egg - time egg taken from burrow in the wild - time of arrival at Rainbow Springs - 1st or 2nd clutch - 1st or 2nd egg in clutch - protocol egg placed in - how egg transported to Rotorua Dealing with cracked eggs Washing If an egg is found to be cracked do not wash egg by immersing in water. Egg should be lightly splashed with warm Incusan solution (20 ml/l) away from cracking After washing Eggs with a hairline crack can be incubated as normal or sealed as below. Eggs with a more severe crack can have the crack sealed with nail polish, wax or masking tape. Badly smashed eggs can have the shell of another egg taped over the smashed area. Daily regime ∞ ∞ ∞ ∞ ∞ ∞ ∞ ∞ All eggs to be cooled for 1 hour from 8.30 – 9.30am daily Weigh egg daily (when first taken out to cool) Record weight, weight loss and plot on graph Assess if weight loss is within parameters Turn egg appropriately – turning times 8.30, 9.30, 1.30, 5.00 Record temperature incubator set at and humidity 4 times a day (in and out of incubator) Note any movement seen with tick in column. Eggs to be kept in darkness except when working in the room (eggs are light sensitive) Weekly regime ∞ ∞ ∞ ∞ ∞ ∞ Candle egg Draw in aircell (if bigger) and date Dot in a new ‘top of egg’ line as aircell develops off centre Draw picture of development with good notes Describe development Assess weight loss. Check it is on target (if not remedy the situation accordingly – refer next page) ∞ Check if water trays need topping up Appendix 7.2 – Husbandry protocols 131 ∞ Straw egg while being cooled (record movement which can be seen from approximately 36 days) ∞ Measure aircell size (at widest point) and do cut out map ∞ Photograph egg once or twice during incubation Humidity control Humidity is controlled in the incubator to correct weight loss of the eggs. High humidity gives low weight loss; low humidity gives high weight loss. Use the following method to assess how much weight loss is required with each egg: ∞ When egg arrives estimate age of egg. ∞ Graph weight of egg on arrival on a weight loss graph. ∞ Project back using 1.2 g/day and 0.6 g/day weight loss lines. This will give you the minimum and maximum possible fresh weight of the egg. ∞ If these values are less than 400 g this egg is a small egg and should lose between 0.6-0.75 g/day. ∞ If these values fall between 400-490 g it is a medium-sized egg and should lose between 0751.0 g/day. ∞ If these values are above 490 g it is a large egg and should lose between 1.0-1.2 g/day. ∞ If these values fall across 2 categories take the category it fits most closely, i.e., if upper and lower limits of estimated fresh weight are 450 g and 495 g this would be assessed as a medium-size egg. ∞ Once egg has been given a category project forward using the appropriate weight loss per day. ∞ Humidity should be controlled to give weight loss within these parameters. ∞ There is not an equal amount of weight lost each day. There must, however, be careful attention paid to the weight loss of the egg over a period of days and regular assessment of whether this weight loss is right. ∞ If weight loss is too high or low, humidity in the incubator should be changed to increase or decrease weight loss. Humidity is controlled by the surface area of the water in the trays at the bottom of the incubator. ∞ To increase humidity, increase the surface area of water in the trays. ∞ To decrease humidity, reduce the surface area of water in the trays. The air conditioning in the room should be set at approximately 18ϒC during incubation. A dehumidifier should be considered if weight loss is not achieved due to high humidity in the incubation room but the air conditioning does have a dehumidifying effect as well. A hygrometer should be placed in the room and incubator, and humidity recorded 4 times daily. Hatching ∞ Set temperature at 35.5ºC ∞ Humidity should not be increased until actual hatching begins. This is when the shell begins to flake off not when the chick breaks through to the aircell or pips externally. ∞ Humidity should be raised at this point by filling both water trays in the base of incubator. If humidity still doesn’t appear to be high enough, small dishes of water can also be placed by the water trays. ∞ Place grey matting over base tray when egg pips externally. ∞ The egg should be stabilised using wads of cotton wool either side of the egg. ∞ Cover holes in the lid as a last resort if necessary. Appendix 7.2 – Husbandry protocols 132 Refer to the Husbandry manual and previous notes on hatching to give guidelines for a “normal” hatch. The more information recorded during the hatching period (including time, events and diagrams) the more helpful this will be as a reference in future. Post-hatching ∞ ∞ ∞ ∞ Remove all remains of egg shell from incubator tray Empty water trays Uncover holes in lid of incubator Weigh chick being very careful to fully support the chick (treat it like the egg without the shell) ∞ Swab navel with betadine solution. ∞ Place clean matting on the base of the incubator making sure to completely cover base plate. (Chicks have injured their bills in the holes of the base plate.) ∞ Drop temperature to 32ºC once hatch complete. Watch chick’s behaviour to make sure chick is not shivering. If chick looks uncomfortable raise slightly until behaviour improves. First week of life ∞ Replace grey matting when soiled. ∞ Check droppings to see if they are normal (should be green). ∞ Note chick’s behaviour (standing, walking, sleeping, alert etc) Day 1 Reduce temp to 28ºC before 24 hours is up Day 2 Maintain temperature at 28ºC. At end of day 2, i.e., when 48 hours old, transfer to brooder. Chick may be transferred earlier if high level of activity in incubator is observed. Transfer to brooder (brooder should be filled with peat moss (Yates) Sprinkle small stones in brooder Set temperature in small section to give approximately 28ºC at chick height Supply water Day 3 There should be signs of the chick moving about in the small section of the brooder with possible probe holes seen. Day 4-6 Chick should be out and active. Reduce temperature as chick’s activity level increases active. Signs of activity should be seen in the large section of the brooder, e.g., dirty water and/or probe holes. The chick should be weighed daily and the tummy felt to make sure the yolk is being absorbed. All observations must be noted. Day 7 The artificial diet (roughly ground ox heart mixed with mashed banana porridge and boiled veges) can be introduced, depending on yolk absorption. Day 8 –11 A couple pieces of ox heart can be offered to the chick. This must be done quietly and with as little stress as possible. Usually the chick will begin to start playing with and probing the food and fingers. Day 9-14 Feeding should be encouraged, even if this means force feeding a few pieces until the chick is eating on its own. Particular attention must be paid to the chick’s overall weight loss. This will determine the level of ‘hands-on’ feeding required. It is very undesirable for the chick to lose more than 33% of its hatch weight. Day 15 The chick should be on complete artificial diet and feeding well. N.B. The above are guidelines only. Each chick will behave differently and adjustments should be made accordingly. Appendix 7.2 – Husbandry protocols 133 Care in brooder ∞ ∞ ∞ ∞ ∞ ∞ ∞ ∞ ∞ ∞ ∞ ∞ weigh daily check droppings appear normal (white with darker area – firm). Remove from brooder daily. seed worms every 3 days ensure soil not too dry – water if necessary dig over soil daily so it is not compacted wipe sides of brooder to remove moisture and dirt (ensure inside of lid is wiped) open curtains during the day, close at night windows can be opened during the day if predators cannot enter, close at night check chicks eyes, plumage and general condition when weighed supply fresh food during day also record food eaten overnight and daily note any behaviour observed, e.g., messy eater or calm when handled. If any unusual behaviour appears for an individual chick, investigate. Don’t hesitate to ring another staff member if anything unusual shows up. ∞ chicks moved outside after 2-3 weeks or when they reach approximately 400 g in weight. ∞ upon transferral to the outdoor runs, each chick is dosed with Baycox and given a second dose 10 days later in order to reduce the risk of Coccidiosis. Outside runs ∞ food consumption to be checked and recorded daily ∞ check position of chick each morning ∞ weigh chick daily initially, until chick continues to gain weight. Move weighing to every 2 days, twice a week, weekly, then fortnightly as chick progresses. ∞ during weighing, check eyes, plumage and general condition ∞ a stool sample should be taken 7 days after the second dose of Baycox. Then a stool sample should be taken every week for two weeks, then fortnightly for 1 month (i.e., two samples a fortnight apart) and then monthly. Samples should be checked for parasites (Coccidia, Hetarakis, strongylate, ascariid, capillaria) Hygiene Before incubation begins ∞ incubators sterilised in Incusan solution (15 ml/l) ∞ whole room (every surface) wiped with Incusan solution (15 ml/l) ∞ air conditioning, including filter, cleaned and sterilised with Incusan (15 ml/l) ∞ any other objects taken into brooder room should be wiped with Incusan solution (15 ml/l) ∞ remove curtains and dry clean When entering incubation room ∞ shoes to be removed at outer door ∞ hands to be washed at sink with soap and water and dried well with paper towels ∞ gumboots, full overalls and hair net worn before entering the incubation room ∞ ethyl alcohol hand steriliser to be used on entering incubation room and latex gloves put on When handling egg ∞ change paper towels in weighing dishes daily ∞ do not handle anything else before egg (e.g.) don’t touch your hair/scratch your leg Weekly (or more frequently) ∞ benches and tops of incubators wiped with Incusan solution (15 ml/l) Appendix 7.2 – Husbandry protocols 134 ∞ ∞ ∞ ∞ go to the incubator room before the brooder room where possible overalls/gumboots to be worn in incubator room only (not brooder room) overalls must be replaced weekly sweep and mop floor weekly. Appendix 7.2 – Husbandry protocols 135 7.2.3 O.N.E. protocols at Westshore Wildlife Centre Data supplied by Tony Billing While generic best practice methods can be outlined in document form, it is important to note that regional climate, infrastructure and resources can vary considerably between institutions. For example, the Westshore Wildlife Reserves Kiwi Breeding Facility has a dedicated, specially designed incubator room. Due to the nature of the Hawke’s Bay climate (i.e., extremely hot, dry, summers and reasonably mild winters) the incubator room walls and ceiling at Westshore are 200 mm thick in order to sustain an even ambient temperature year round. Similarly, the external chick rearing pens at Westshore operate at a vastly different climatic condition than other regions do. Egg transportation ∞ If possible, ensure relocation of eggs from in-situ is undertaken in fair weather conditions, avoid transfers in inclement conditions such as heavy rain or snow. ∞ Egg transportation box should be of sturdy construction and lined with shock absorbent material. Westshore uses a wooden box, containing 3 layers of 100 mm sponge foam, which snugly cradles the egg and prevents movement and jarring. The 3 foam layers consist of a base, mid-section and top which exactly fit inside the interior of the box, with a egg shaped ‘cut-out’ in each layer. ∞ Before placing egg into transportation box, place on a flat, firm surface so that egg rolls to its current centre of gravity. Mark the top of the egg to record this. Locating the eggs centre of gravity minimises inadvertent internal movement of the chick or embryo during transportation, which can result in malpositioning (especially during late embryo developments). ∞ Record all pertinent details, such as location, parentage, approximate age of egg, weather etc. This information should be forwarded to the incubating facility upon arrival. ∞ Once the egg is secure in transportation box, avoid any bumping or sudden movements on the carry out to a vehicle. ∞ Once at a vehicle, load transportation box in a secure, level and shock absorbent position. Avoid placing the box on the deck of a truck, or in direct sunlight or heat. ∞ Endeavour, where possible to complete the in situ to ex situ transportation within a 4 hr period. Egg incubation On receipt of an egg/s at an incubation facility, take the following steps: ∞ Check centre of gravity on egg. Determine whether, during transfer, the centre of gravity has altered from the previously marked spot. ∞ Before handling any eggs ensure that hands are thoroughly washed and clean. Use of disposable surgical gloves are recommended when handling eggs, at any time. ∞ Carefully examine egg and check for any abnormalities, such as hairline cracks in shell. Record any abnormalities. ∞ Thoroughly wash and immerse egg in an approved egg sterilisation fluid to reduce any possible introduction of disease into the incubation facility. Note: water temperature should be ‘body heat’ only. Dry egg after wash with disposable paper towels. ∞ Weigh, measure and record all pertinent details onto egg incubation data sheet. (either hard copy or computer) ∞ Mark the egg with its appropriate identification number and place into incubator at appropriate temperature (measured at Top of Egg). Note, incubator should be preset to its stable operating temperatures prior to egg arrival. ∞ Incubation room should sustain an even ambient temperature throughout the day and seasons, should have adequate ventilation and a minimum of direct sunlight. Appendix 7.2 – Husbandry protocols 136 Procedures followed regarding standard daily egg incubation at Westshore are: ∞ Eggs are all incubated at appropriate temperature measured at Top of Egg. ∞ Eggs are weighed daily at a preset time and all data recorded. Any other pertinent comments, such as egg movement, are all recorded. ∞ Once the chick pips internally, it is transferred to a dedicated hatching incubator. All information is recorded. ∞ No manipulation of eggs to aid in kiwi chick hatching is undertaken. Past experience has shown that interference with the chick’s struggle to escape the egg, invariably results in a chick with an exposed and partially unabsorbed yolk sac. The chick’s activities to break free of the egg (unaided) results in the yolk sac being fully absorbed. ∞ Once hatched, eggshell and debris are removed from the hatching incubator and the chick left undisturbed for 24-48 hr. Due to the delicate condition of the chick, do not handle or weigh during this period. Chick rearing ∞ From first day of hatch, chick held at incubation temperature. Each day thereafter, temperature is dropped 2ºC until about Day 7-9 when chick is then acclimatised to ‘room temperature’. ∞ At Day 3 chick is transferred from hatching incubator to a dedicated, temperature controlled brooder. ∞ Brooder comprises 2 sections, (i) small house (able to be temperature controlled) leading to – (ii) small open pen area (non-temperature controlled) area. Area (i) also comprises a dry, non-slip artificial floor. Area (ii) comprises a silt base. Silt is now used as a base as previous experience has indicated that at a very early age kiwi chicks will pick up and swallow any items such as twigs and stones which can become lodged in the birds intestine and cause death. Once the chicks are 2-3- weeks old, this ceases to be a problem. All food and water is offered to the birds in the pen area. ∞ Once the chicks are transferred to the brooder, (which is also located within the incubator room) they are fed for the first, few days of their life on a ‘natural diet’ (earthworms) only. ∞ A finely cut artificial diet is offered once the chick is 5-6 days old. ∞ By day 7-9 the chicks are acclimatised to room temperature. The chicks begin to probe and seek out the artificial diet. ∞ Depending on each chicks progress they remain ‘inside’ until they begin regularly taking the artificial diet and gaining weight. ∞ Transfer the birds to outside, predator proof, small enclosures where the chicks remain until release weight is reached. These outside pens contain a small, grass lined nest (day roost) box and a covered feeding area. Vegetation comprises dense carex grass only. ∞ All chicks are weighed each day (at a pre-set time) and all details and comments recorded. Chick transfer/release Once a kiwi chick has obtained its release weight of 800 g for release into an intensive stoat control area the following procedures are followed: ∞ Client (either DOC or Landcare) is notified of the chick’s progress and likely date release weight will be reached, so that all arrangements for transfer can be made. ∞ Chick is given a veterinary check and samples taken for laboratory analysis. Checks are made for such things as Coccidia. ∞ No bird leaves the facility if it fails any veterinary examination. ∞ Transportation box is a secure small-sized ‘pet transportation’ box, which is well ventilated. ∞ The transportation box is completely filled with dry clean grass. This prevents/restricts excess movement and damage to the bird during transportation. In addition, the grass covering aids in calming the bird and providing a modicum of psychological well being. Appendix 7.2 – Husbandry protocols 137 Chicks in empty transport boxes tend to become extremely stressed during transportation and can be ‘bounced’ around the inside of their box. ∞ Once the chick is secure in its transport box it can be loaded into the transport vehicle. It is important to ensure that the following is addressed. Do not place the bird/box:on an uneven surface in direct sunlight or heat in the presence of an animal, such as a dog near any loud noise such as a stereo near a vehicle exhaust system outlet Ensure all records and data are complete prior to departure. Upon arrival, place bird in a cool, dark, quiet location. Prior to liberation, attach and check transmitter. Record all data. Liberate bird/s into pre-arranged liberation site. Appendix 7.2 – Husbandry protocols 138 APPENDIX 9.1: DATA SHEET FOR SICK OR INJURED KIWI Species: Date: Locality and Grid: Observer and Address: Bill length (mm): Weight (g) and date: Diagnosis/ Cause of injury: (attach veterinary/autopsy report, photographs) Details: (e.g. band no., sex, age, description of rehabilitation) Fate of bird: (attach copy of the veterinary health clearance given before release) Appendix 9.1 – Data sheet for sick or injured kiwi 139 APPENDIX 9.2: DATA SHEET FOR DEAD KIWI OR KIWI EGGS Species: Date: Locality and Grid: Observer and Address: Bill length (mm): or Egg measurements: Cause of death: Weight (g): (attach autopsy report, photograph, etc) Details: (e.g. band no., sex, nest identification) Fate of specimen: Appendix 9.2 – Data sheet for dead kiwi or kiwi eggs 140