1
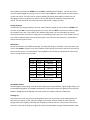
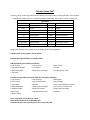
RV Care, Maintenance & Travel Tips An Overview for the Novice Courtesy of www.IconDirect.com “Proper planning and routine care of your RV will lead to years of enjoyment. Your experience on the road will create lifelong memories for you and your family to savor. The camping experience is like time travel to a distant land. It is reminiscent of living in a different time or place.” Randy LaTour Table of Contents 1) Appliances 2) Plumbing 3) Electrical 4) Exterior 5) LP Gas 6) Tires and Wheels 7) Trailer Brakes 8) Plan Before You Go 9) The Pre-‐Flight Checklist 10) Towing Tips 11) Checking In and Setting Up Camp 12) Grilling Out 13) Checking Out 14) Arriving Home and Summer Storage 15) Winterize for Long Term Storage 16) Glossary of Terms 17) Bonus Recipe Appliances Air Conditioner Units: RVs are typically equipped with one or more rooftop air conditioning units. Today’s units are very reliable and require very little maintenance. You should clean the inlet and outlet filters twice a year. Over time the external unit may become covered in debris such as tree leaves. Inspect and clean the condenser unit annually, removing any debris. The condenser unit is situated under the cover located on the roof of the RV. Inspect the A/C cover for cracks. Replacement covers are available at www.IconDirect.com. Always turn the A/C unit off prior to connecting or disconnecting the main power feed outside. This will prevent a surge which can easily damage electrical components. Once the main power is connected, locate the wall mounted thermostat, select A/C, and set the thermostat to your desired temperature. Be aware of any power drop in the campground. If you notice the fan beginning to run slow, this is an indication of low voltage being supplied to your unit. If this occurs, it is best to turn the unit off. Furnace: Modern RVs are equipped with the same creature comforts as your family home including a forced air furnace. The operation is simple; simply locate the wall mounted thermostat, set the unit to heat mode, and set the thermostat to your desired temperature. Today’s units have been designed with numerous safety features and generally include electronic igniters for ease of use. No need to worry about lighting a pilot light. The unit will automatically turn off in the event you run out of propane. If this happens, you will need to go outside, turn off the active bottle, and switch to the backup unit. Return inside and restart the furnace. If you have purchased an older RV with older appliances, refer to your user manual or the label located inside the cover. Both should include detailed instructions on lighting the pilot light and maintaining the furnace. Gas Range: The gas ranges in RVs are similar to the gas range in your home. However, most ranges are not equipped with automatic igniters and must be started manually. To light the cook-‐top burners, use a long lighter or long match, turn the appropriate knob to the light or high position, then set the flame to your desired cooking range. To light the oven, you must first light the pilot light inside the oven. In each case, it may take a moment to purge the air from the line and allow the LP fuel to reach the burner. Clean the cook-‐ top on a regular basis with the same cleaners you use at home. Refrigerator: You should turn the refrigerator on the day before your trip to allow the unit to reach the optimum operating temperature. The majority of fridges are 3 way and will run on LP, 12 Volt DC power, or 120 Volt AC. The most efficient power-‐source on a hot day is the use of LP. However, it may be illegal in some states to operate the refrigerator in LP mode when travelling. The open flame may present a hazard when entering tunnels and refueling your tow vehicle. It is best to switch to the 12 Volt system for travelling. Once you arrive at your destination, switch the unit to the 120 Volt system for the most cost effective operation. Plumbing Shower & Tub: Clean your shower, tub, and sinks with a mild cleaner. Do not use abrasive pads when cleaning. Inspect your tub and shower stall for cracks. Replacement parts are available at www.IconDirect.com. Waste Water (Black Water): Prior to using the toilet for the first time of the trip, add a gallon of water to the black water tank. You can accomplish this task by simply filling and flushing the toilet 2 or 3 times. You should also add a black water chemical deodorant at this time. Most black water deodorants also aid in dissolving solid waste. Environmental friendly chemicals are also available. It is imperative that the proper toilet paper is used in an RV. This easy to dissolve paper is available at all RV stores and the campground store. Water Heater: The 5 gallon water heater in your RV may seem small compared to the 50 gallon heater at home. However, these tiny heaters are very quick to respond to demand and replenish the heated water quickly after each use. The operation of the heater is simple. Just turn the wall switch to the on position upon arrival at your final destination. The LP pilot and burner are self starting. Never attempt to light the pilot manually. If you inadvertently run out of propane or if high winds blow out the flame, the unit will turn off and display a red light. Simply switch LP tanks, turn the switch to the off position, and then return the switch to the on position. It should never take more than 3 attempts to turn the heater on. CAUTION: never travel with the heater on; simply shift the wall switch to the off position. Electrical The electrical system of an RV is a combination of 12 Volt DC and 120 Volt AC. The 12 Volt DC system is used to power small lights when a 120 Volt land line is not available. The 12 Volt system also triggers the trailer brakes. In the event of an emergency, the breakaway system will activate automatically. It may also provide power to your slide out and travel power for your refrigerator as well. The 120 Volt system will power all major appliances: the TV, A/C, and the larger standard light fixtures. When possible, connect your unit to a 120 Volt power source. This is the most efficient use of energy. Exterior Awning: Your awning should be inspected regularly for loose or missing hardware. Clean your awning with a mild detergent and a very soft bristle brush. Special cleaners are available at RV dealers and the campground store. Be sure to allow the awning time to dry completely prior to retracting to the closed position. The locks must be in place for travel. Roof Vents: With exposure to UV rays from the sun, your roof vent covers are susceptible to cracking over time. Inspect for damage and replace as needed. Siding: The exterior of the trailer can be cleaned with automotive soaps or RV soap. Use a soft bristle brush to clean the unit and be sure to rinse thoroughly. RVs are prone to a condition called “Black Streak”. This is caused by oxidation and the buildup of debris. You can purchase a special cleaner called “Black Streak Remover” or you may prefer to try WD-‐40. In either case, be sure to rinse the trailer thoroughly after cleaning. Windows: RV windows can be cleaned using your household cleaning products such as Windex. While cleaning the windows, inspect the caulking seal around the edges. This is one of the more common places for long term water damage to occur. If you notice any cracked or missing caulk, reapply a high quality Butyl caulk. Butyl Caulking is available at your local hardware store or RV dealer. LP Gas RVs are equipped with a pair of LP tanks. The most common sizes of tanks are 20lb, 30lb, and 40lb. Only open one tank at a time. This will ensure you have a back-‐up supply of propane when the initial tank becomes empty. To switch supply, turn the valve of the first tank to the off position, open the valve of the second tank, and move the bypass lever towards the open tank. Be sure to check for leaks at this time. A simple method for checking for the presence of propane leaks is a mixture of soap and water. Apply the mixture to any pipe connections. If a leak is present the LP gas will generate small bubbles in the soap mixture. Inspect the LP cover for cracks and replace as necessary. Replacement covers are available at www.IconDirect.com. Tires and Wheels Tire Selection: Be sure to select a tire with the proper load rating for your vehicle. The weight of your trailer can be found on the nameplate. The nameplate is located on the outside frame of a travel trailer. For motor-‐ homes and trucks, you can find the nameplate on the door frame or wall near the driver’s seat. Michelin Tire is a great resource for RV tires and information. To request a copy of Michelin’s “Recreational Vehicle Tire Guide,” call 1-‐800-‐847-‐3435. Tire Pressure: The key to extending the life of your tires is maintaining the proper tire pressure at all times. You should measure the pressure (PSI) prior to each trip while the tire is cold. Use a high quality tire gauge to ensure an accurate reading. As you travel on the highway, the natural heat buildup will increase the tire temperature. Do not reduce the pressure while the tire is still hot. As the tire cools, pressure will return to its original setting. Refer to the sidewall of the tire for the proper cold tire settings. Tire Inspection: Inspect your tires prior to each trip. Look for deep cracks, wrinkles, bulges, or soft spots in the sidewall. If any of these conditions are present, you must immediately replace the tires. Tire Storage: Over time tires can become cracked due to damage caused by exposure to UV rays. To reduce the long term damage to tires, it is advisable to cover the tires with a suitable tire cover. Various sizes are available at www.IconDirect.com. Wheels: The basic design of the wheel consists of 2 components: a rim and a disc. The disc is the center flat portion which mounts to the axle studs. The rim is the outer diameter which holds the tire in place. Wheels are relatively maintenance-‐free; however, you should inspect them annually. Look for stress cracks or damage from contact with curbs. You should replace the valve stem every 5 years. These can suffer from dry rot over time from constant exposure to the sun and rain. The use of a tire cover from www.IconDirect.com may eliminate the need to replace the valve stems. If you damage a rim, check the rating of the replacement rim to ensure it meets the load rating required for your RV. Not all wheels are created equally. While the basic dimensions may be the same, different brands or part numbers may be constructed of lighter gauge material or even a dissimilar material composition. Fender Skirts: Your fender skirts can crack and wear over time, especially around the screws attaching it to your RV. Before setting out on the highway, make sure the fenders are attached well and will not fly off on the highway. If one needs to be replaced due to age & wear (or a blowout) replacements can be found at www.IconDirect.com. Spare Tire: When performing maintenance and inspection on the trailer tires, don’t neglect the spare. When the time comes to utilize the spare tire, you will be happy to know the spare is road-‐worthy. Brakes Trailer brakes are required by law in most states. Proper use of trailer brakes will improve the safety of your drive and increase the life of your tow vehicle brakes. The 2 most common types are hydraulic surge activated brakes and electric brakes. The hydraulic surge style is activated by pressure applied to a master cylinder similar to that of your tow vehicle. As you apply the brake of the tow vehicle, the trailer attempts to continue forward, which, in turn, applies an equal pressure to the trailer master cylinder. As you apply more pressure to the tow vehicle brake, the trailer brake pressure also increases. Electric brakes are more common and provide similar results, although they do not automatically adjust to the load. When purchasing an electric brake control, it is advisable to upgrade to a system with an adjustable pressure setting. With experience, you will establish standard settings for various conditions. Lower the pressure for city and campground driving. Increase the pressure for highway travel. For both styles, inspect the brakes annually for wear. Test the brakes at low speed prior to each trip. Plan Before You Go Once you have determined your destination, it is wise to call ahead for reservations. When camping in the early days, you could just arrive at the entrance gate and choose between a variety of open sites. Times have changed. There are many campers on the road today. It is best to call ahead to ensure you will have a place to land and call home. You should also plot out your journey in advance. A good modern resource for directions is www.mapquest.com or www.maps.google.com. The Pre-‐Flight Checklist You are just about to remove your perfectly grilled rib-‐eye from the barbeque only to discover you have no plates, cutlery, or steak sauce. To eliminate this frustrating event, you should create a checklist and follow it every time you travel. The example below is a good start, but you should prepare your own list to suit your lifestyle. The sample list is split into three sections. Assign each list or a portion of the list to each member of the family. This can make the task go faster. Whatever you do, don’t forget the Disney tickets. Pre-‐Trip Maintenance Charge Battery Check Tire Pressures Fill LP tanks Inspect Fire Extinguisher Test A/C Test CO Monitor Test Furnace Test Smoke Detector Tighten Lug Nuts Tire Air Pressure Turn on Refrigerator Tools & Equipment Barbeque Batteries Beach Chairs Beach Cooler Beach Umbrella Bike Helmets Bikes Black Water Chemical Bungee Cords Camp Stove Campground Directory Cleaning Supplies Dog Leash Electrical Tape Fire Extinguisher Firewood Fishing Rods Flashlight Games Gray Water Deodorant Grilling Tools Jumper Cables Kiddies Toys Laptop Computer Leveling Blocks Matches or Striker Phone Charger Pliers Portable LP Puppy Clean Up Bags Rain Ponchos Rainy Day Puzzle Roadmap Roadside Flares Scissor Jack Screwdrivers Shovel Spare Fuses Spare Tire Tackle Box Tire Gauge Toaster Water Hose WD-‐40 Wheel Wrench Wood Axe Wrenches Food and Supplies Aluminum Foil Bacon Baking Soda Bread Butter Can Opener Cereal Coffee Condiments Cookies Cups Dish Soap Eggs Favorite Recipe Jelly and Jam Juice Meat Milk Napkins Onions Pancake Mix Peanut Butter Pet Food Pickles Plates Popcorn Potato Peeler Potatoes Pots and Pans Salt & Pepper Sharp Knife Snack Foods Sodas Spices Spirits Sugar Syrup Table Cloth Tea Utensils Vegetables Personal Items, Bath, & Clothing Aspirin Belt Clothing Deodorant First Aid Kit Hairbrush Hand Lotion Hand Soap Insect Repellant Kleenex Lip Balm Makeup Peroxide Pest Strips Pillows PJs Razor Sandals Shampoo & Conditioner Shoes Shorts Socks Sunburn Cream Sunscreen Sweatpants Sweatshirts Swimsuit Tee-‐shirts Toilet Paper Toothbrush Toothpaste Towels Undergarments Warm Jacket Towing Tips Towing Capacity: Tow vehicles have a factory-‐rated towing capacity. You will find this information on the tag located under the hood or inside the door frame. This information may also be noted in your user’s manual. Factory towing packages are available for small trucks and SUVs when you purchase the vehicle. These packages may include transmission coolers, larger brakes, stronger engines, transmissions, and rear-‐end gears. To determine if your tow vehicle is capable of towing your RV, you must also determine the fully loaded weight of the RV. The RV GVWR or Gross Vehicle Weight Rating is the total weight capacity of the trailer axles and tires plus the tongue weight as designed by the manufacturer. This rating can be found in the user’s manual or on the tag located on the outside wall of the RV or on the trailer tongue. Later models may display the GVWR value as UVW or Uploaded Vehicle Weight. You may also check your fully loaded weight by crossing a scale at a truck stop or DOT site. Never exceed the rated capacity of your tow vehicle. This will create an unsafe condition for braking and handling. You will also risk damaging the vehicle. A good rule of thumb is to stay 10% below the maximum rating of the tow vehicle. This will extend the life of the tow vehicle and provide a margin of safety. Storage Capacity: To determine the storage capacity of your RV, subtract the dry weight of your RV from the GVWR. The net value is your NCC or Net Carrying Capacity. On newer units, the NCC is noted on the sticker or tag on the outside of your unit. If you need to carry additional dry goods, you can accomplish this task by ensuring the 3 water reservoirs are empty prior to embarking on your journey. In some models, this can save several hundred pounds of unnecessary weight. In the interest of fuel economy, it is advisable to drain these tanks prior to travel. Ball Hitches: Hitches are offered in many different designs. The important thing to remember is you must match your hitch to the GVWR of your RV. Some easy indicators of the capacity are the style and size of the ball and the size of the receiver. The table below is only a guideline; check with the manufacturer to be certain of the carrying capacity of your model. Ball Dia. 1 7/8" 2" 2" 2" 2 5/16" 2 5/16" Typical Ball Hitch Capacity Bolt Dia. GVWR rating 3/4" 2 000 LBS 3/4" 3,500 LBS 1" 5,000 LBS 1 1/4" 8,000 LBS 1" 6,000 LBS 1 1/4" 12,000 LBS Class 1 2 3 3 3 4 Warning: Check with manufacturer to confirm the capacity for your specific model. Fifth Wheel Hitches: The advantages of purchasing a fifth wheel RV include easier maneuverability, higher weight ratings, and increased driving stability. The GVWR load capacities of fifth wheel hitches vary greatly and are typically between 10,000 LBS and 25,000 LBS. You must confirm this capacity with the manufacturer. Hitching Up: The first time you hitch up, you may need a guide to assist you as you back up. Once aligned with the ball, place your vehicle in park, lower the tongue of the trailer, and lock the ball in place. Raise the tongue of the trailer slightly to facilitate the installation of the torsion bars. Connect the safety chains; ensure the chains do not drag on the ground. Connect the breakaway emergency brake activation cable to the frame of the tow vehicle; ensure some slack remains in the cable. Plug in the lights and test both the brake lights and running lights. Be sure to test the brakes before you get up to speed. Driving Tips: Keep a greater distance between yourself and the car ahead. Even though most trailers are equipped with independent braking systems, with the additional weight of the trailer in tow you will require additional distance to safely bring the vehicle to a complete stop. Parking Tips: Backing your rig into your site can be intimidating. This can be an even more daunting task if attempted at night. It may be best to practice this maneuver in an open parking lot before you travel for the first time. Before attempting to back into your site, exit the vehicle and take a walk on the site to examine for clearance. Your travel buddy should stand to the side and rear of the trailer to guide you and ensure you keep clear of any trees or other obstructions. Some couples may take advantage of a walkie-‐talkie or CB radio. A tip for the rookie driver is to place your hand at the bottom of the steering wheel. Move your hand in the same direction you want the trailer to move. If you find yourself in trouble, simply move forward and try it again. If you just can’t seem to manage this maneuver in tight quarters for the first trip, ask your new neighbor for assistance. Campers are a friendly group and are always willing to lend a helping hand. Checking In and Setting Up Camp Before you unhitch your vehicle, ensure you have adequate clearance to extend your slide-‐out, set up your awning, and open any side access doors. You should also check to see that the unit is level at this time. If the unit is not level, place a 2 x 6 board in front of the trailer tires on the low side of the RV and drive forward until the tires are centered on the boards. Chalk your wheels before you unhook the trailer. Hook up your utilities, including the 120 Volt power source, TV cable or satellite dish, drinking water, and drain hose. Be sure to use a non-‐toxic hose such as the white hose found at your local RV dealer or camping supply store. Extend your slide out; someone should be outside to ensure you have ample clearance to any trees or other obstructions. Extend your awning, set out your chairs, and relax. Grilling Out My favorite part of the trip is the relaxing feeling when I sit in my lounge chair tending the grill. My hunger is stimulated by the aroma, regardless of the dinner fare. Be sure to set up your grill away from your RV It is best to keep away from your awning to prevent a fire should a major flare-‐up occur. After each use, clean your grill. When storing your grill for the trip home, be certain it is cool, and then place it in a large green trash bag. This will keep your storage area clean and prevent grease and ashes from contaminating your nice clean storage area. Camp Fire Sitting around the campfire is a tranquil feeling. It leaves me mesmerized and feeling like I’m in another world. Follow these tips for greater enjoyment and safety. Check with the campground office to confirm if fires are allowed. Occasionally in dry weather, ground fires can create a hazard. Do not leave small children unattended around an open fire. When it’s time to cook the marshmallows and hot dogs, be sure to use the new style extended forks with a reverse tong for safety. Limit your fire to a small size located in the designated fire pit. Be certain all hot embers are fully extinguished before leaving your fire pit unattended. A campfire is not complete without a world-‐famous chili dog. Refer to the attached bonus recipe to complete your camping adventure. Checking out The heartbreaking moment of every trip occurs when it is time to check out and return home to the land of mere mortals. Don’t be sad; use the trip home to start planning your next adventure. Be sure to follow these steps to ensure you have a safe trip home with all of your belongings. Check-‐Out Check Tire Pressures Close Front Window Cover Close Vents Close Windows Disconnect 120 Volt Power Disconnect TV Cable Disconnect Waste Water Line Disconnect Water Line Dump Waste Water Tanks Inspect Site for Belongings Install Rear View Mirrors Lock Door Retract Awning Retract Slide-‐Out Retract Stabilizers Retract Step Retract TV Antenna Retrieve Clothesline Secure Bicycles Secure Loose Items in Refrigerator Secure Loose Items on Shelves Secure Storage Pod Test Trailer Lights and Brakes Tire Blocks Turn Off all Pilot Lights Turn Off Water Pump Walk the site Winterize for Long-‐Term Storage Follow every step in your owner manual to ensure you have properly winterized your unit. Each step in the process is critical to the protection of your plumbing system. Replacing the pipes, pump, and hot water heater would be an expensive endeavor, one which can be easily avoided. Follow these easy steps to ensure you have properly protected your system. a) Completely drain the fresh water tank and close the valve b) Completely drain the gray water tank and keep the valve open at this time c) Completely drain the black water tank and keep the valve open at this time d) Completely drain the hot water heater e) Add 2 gallons of RV Antifreeze to the fresh water tank. It is imperative that you use RV Antifreeze suitable for drinking water. Regular automotive antifreeze is toxic. f) Bypass the hot water tank. This is a critical step, as you shouldn’t run antifreeze through the unit, and doing so would require several gallons of antifreeze to fill the system. g) Turn on the 12 Volt pump h) Open each faucet one at a time until you see a full stream of antifreeze. Don’t forget the shower and toilet. i) Turn the pump off j) Pour a cup of antifreeze down each drain to protect the “P” traps. k) Close the gray water valve l) Close the black water valve Glossary of Terms A/C – Roof top air conditioning unit. Black Water -‐ Waste water from your toilet stored in a reservoir beneath your RV. Butyl Caulk – A malleable, durable caulking used to seal windows, doors, and seams. Chili – My favorite camping food. CO Monitor – A device used to detect poisonous carbon monoxide gas. If carbon monoxide is present, the unit will alert the occupants by means of an audible alarm. DOT-‐Department of Transportation Fresh Water – Drinking water stored in a separate reservoir beneath your RV. Gray Water – Waste water from your shower and sinks stored in a reservoir beneath your RV. GVWR – Gross Vehicle Weight Rating, the maximum allowable weight of our RV in a loaded state. GAWR –Gross Axle Weight Rating, the maximum allowable weight supported on each axle. LP Gas – Liquid Propane fuel stored outside of the RV used to power appliances. NCC-‐Net Carrying Capacity PSI-‐Tire Pressure measured in Pounds per Square Inch P Trap – The curved drain pipe located directly beneath the sink and shower drains. RV – Recreational Vehicle. UVW – Uploaded Vehicle Weight, the total weight of the RV when fully loaded. “Randy’s Racing Chili” Camping, racing, and Chili go hand in hand. Recruit your crew to assist in the preparation of this favorite camping dish. Camping just isn’t complete without a Chili Dawg. Cut recipe in half for a small crew. 2 LBS 2 Cups 1 Cup 4 Cloves 1 1 1 2-‐14oz cans 2-‐12oz cans 2 Ingredients Ground Beef 2 bottles Onion 1 cup Celery 1 Tsp Garlic 2 Tsp Red Pepper 6 TBsp Green Pepper 2 TBsp Jalapeno Pepper 1 Tsp Stewed Tomatoes 3 Tomato Paste 4 Tsp Tomatoes you favorite beer beef bouillon Pepper Salt Chili Powder Cheyenne Pepper Cumin Bay Leaves Worchester Sauce Assign each member of the crew the task of chopping one of the ingredients. Dice the onion, celery, peppers, and tomatoes. Brown 2 LBS of ground beef in a campfire skillet. Add the following and cook for 20 minutes: 1 Cup of Onion ½ Cup of Celery 2 Garlic Cloves 1 Cup of Beef Bouillon ½ Tsp Pepper 1 Tsp Salt 2 TBsp Chili Powder 1 TBsp Cheyenne Pepper 2 Tsp Worchester Sauce 1 Tsp Cumin Transfer to a large Chili Pot over the open fire and add the following: 1 Cup of Onion ½ Cup of Celery 1 Red Pepper 2 Garlic Cloves 1 Cup of Beef Bouillon 1 Green Pepper ½ Tsp Pepper 1 Tsp Salt 2-‐14 oz cans of Stewed Tomatoes 2 TBsp Chili Powder 1 TBsp Cheyenne Pepper 2-‐12 oz cans of Tomato Paste 1 Jalapeno Pepper 4 TBsp Chili Powder 1 TBsp Cheyenne Pepper 3 Bay Leaves 2 Tsp Worchester Sauce 2 Tomatoes 2 Bottles of Beer Cover and simmer on low heat for 1 hour. Remove lid and simmer for 1 additional hour. Remove and spoon over a hot dog or serve as a spicy side dish.