1
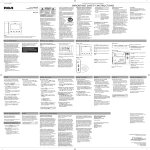
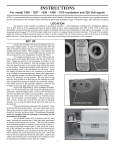
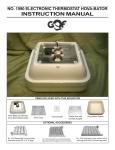
— INSTRUCTIONS —
THERMAL AIR FLOW MODEL
HOVA-BATORTM INCUBATOR
NOTE: It is recommended that you operate the incubator with a small quantity of inexpensive eggs to be assured of your
operating procedure and the performance of the incubator, before attempting to hatch large quantities of eggs or expensive eggs.
Keep Reptile eggs away from moving air. (See Warranty on Page 4).
LOCATION
The location of the machine is important to successful
operation. A room temperature from 70° to 80°F. is ideal, and
fresh air without drafts is necessary. A well ventilated basement room is often just right. Be sure no direct sunlight strikes
the incubator and that it sets level. A consistant room
temperature within a few degrees is best.
CAUTION: Do not place on fine furniture, due to possible
water spillage or leakage.
NOTE: An Incubator or Brooder is designed to bring normal
room temperature to the desired temperature. Room temperture
of 60°F. or below will reduce the temperature in the incubator.
Room temperature change of 10°F. or more will change
temperature in incubator and is more pronounced below a
temperature of 70°F.
STEP 5
Attach wing nut to adjusting screw and screw into top and
onto wafer on inside of top.
ADJUSTING SCREW
WING NUT
WAFER
STEP 6
Place top over bottom and plug in incubator. Watch
thermometer through window for temperature level.
SET UP
THERMOSTAT
BRACKET
STEP 1
STEP 7
Turn adjusting screw counter-clockwise to increase temperature or clockwise to decrease.
Unpack the incubator from box. Use thermostat bracket as
handle to remove the incubator top from inside the bottom, where
it is packed for shipping.
EXHAUST VENT HOLES TO
ALLOW FREE FLOW OF AIR
OVER THE THERMOSTAT
STEP 2
WAFER &
ADJUSTING SCREW
THERMOMETER
Tighten wing nut to secure the setting. The light will come
on when the heat is on. Adjust the temperature for 100°F. for
most eggs. Allow the incubator to operate for at least ½ day to
stabilize the setting before putting in eggs. (see note above).
STEP 8
Next, remove the thermometer, and brass thermostat wafer
from underneath the liner. Also remove the wingnut and
adjusting screw which is under the brass wafer.
STEP 5
Place wire in bottom.
— OPERATION —
STEP 4
INCUBATOR
BOTTOM
Fill trough marked ‘Thermal’ with
warm water while the eggs are being
turned. If there is a question about
humidity, it is usually better to have
too little, than too much, except for
the last two days.
Warm eggs to room temperature (70°F. to 75°F.) and place
them on wire floor. Let them lay in a natural manner, which is
on their sides with the small end slightly down. About twothirds of the way through the hatch, watch for increasing
temperature due to chick development. Adjust thermostat accordingly. For operation with automatic egg turner, see page
two.
During last three days of hatch, if drops of water develop
on the windows, it may be necessary to remove windows, and
wipe them dry.
STEP-9 TEMPERATURE - HAND TURNED EGGS
100oF.
Read temperature of 100oF. with the thermometer resting on
top of the eggs.
STEP 10
Turn eggs 2 times a day. With a pencil mark an on one side and
an “0” on the opposite side of the egg. Turn all eggs so that
“X’s” appear face up. Next turning period turn all “0’s” face
up. Alternate this routine each turning until 3 days before eggs
are due to hatch.
STEP 11
Add water every few days
to the ‘THERMAL’ trough only.
Usually twice a week is sufficient.
The amount of moisture in the
incubator is determined by the surface area of water exposed to the
air. Under high humidity conditions and for some species of birds,
less humidity is required. (The humidity in the incubator can
be reduced by covering part of the water trough with
aluminum foil and securing it with tape) Whenever there are
doubts about the level of humidity in the incubator, less is usually
better than more, except for the last two days.
STEP 12
2 to 3 days before the hatch, stop turning the eggs, and fill both
the ‘THERMAL’ and the ‘CIRCULATED’ troughs with water.
STEP 13
PIace top on the incubator and do not remove until
hatch is complete*. Remove dry chicks, 24 hours after the
first egg hatches, to a brooder that has food and water and
temperatures of about 95oF to 100oF.
Chicks can survive up to 48 hours after hatch without
food or water, but feed and water them as soon as possible to
avoid stress. Some cases may require moving chicks to brooder
to dry.
* After hatch pull red vent plugs to help dry chicks.
2
STEP-14
AUTOMATIC EGG TURNER SET UP
Place eggs in turner with
small ends down and adjust
temperature as instructed.
Place thermometer on top
of eggs
Set up incubator as shown on page 1. If you are using the
automatic egg turner, place it on the wire floor in the bottom of
the incubator. The turner should sit so the motor is opposite the
bottom’s edge marked “FRONT”. The motor cord will exit the
bot. torn in a groove near the motor. The thermometer should be
placed directly on top of the eggs operating at 100oF.
OPERATING TEMPERATURE FOR
EGGS IN AUTOMATIC TURNER
With thermometer resting on top of the eggs, operate the
incubator at 100oF. After first setting adjust temperature up or
down, for early or late hatch.
Three days before eggs are to hatch remove eggs from
turner, lay them on their side on wire floor in their natural
unsupported position. Add water according to instructions.
When turner is removed for hatching, maintain
temperature according to step number nine (9).
CAUTION - About half way through incubation process,
you will note that the temperature will be increasing and you
will have to adjust thermostat down nearly one full turn. This is
normal and is caused by the embryo forming into a chick and
generating heat.
NOTICE
Following Automatic Egg Turner is available for SQUARE
MODEL HOVA-BATOR INCUBATOR to relieve you from the
tedious job of turning eggs several times a day. This turner has
provento produce better hatches.
No. 1611 AUTOMATIC EGG TURNER - Complete with 6 Universal
Egg Racks. Each holds 7 eggs (Total 42) any size from small
Partridge Egg through Large Chicken Egg - Weight- 4 lbs.
QUAIL EGGS maybe set in the above turner by ordering the
following QUAIL EGG RACKS. Just lift out the Universal Egg
Rack and replace with Quail Egg Racks.
No 1686 Carton of 6 QUAIL EGG RACKS - Each rack holds 20
Quail Eggs (Total l20).Weight-2 lbs.
No. 1614 Automatic Egg Turner with 4 goose egg racks; each rack
holds 3-4 goose eggs. Requires No. 2364 & No. 1613 shown below.
Weight - 4 lbs.
NOTICE
Your square Thermal Air Flow HOVA BATOR Incubator may
be converted to a CIRCULATED AIR INCUBATOR that will
operate at a constant temperature for all sizes of eggs and for all
climates. It holds a more uniform temperature, even when
temperatures outside the incubator fluctuates, and has proven to
produce better hatches with healthier and stronger chicks.
No. 2364 “TURBOFAN” KIT - Complete kit to convert any square
model HOVA-BATOR Incubator into a Circulated Air Incubator
110 Volt, Wt. 2 lbs.
No. 1613 Expansion Ring. Adds 1½” headroom for setting larger
eggs, such as goose eggs in circulated air incubators only. (Do
not use in Thermal Air Flow incubator).
POOR HATCH OR NO HATCH
There are many factors involved with the hatching process
and any one can hamper or stop incubation. Old eggs, infertile
eggs, damaged eggs and poor flock health are some of the factors.
Sometimes the thermometer supplied can be a bit off. If the eggs
were of good quality, then adjustments in temperature may be
needed.
The temperatures listed are a starting point. An adjustment
of one or more degrees may correct any problems. IF EGGS
HATCH A DAY OR MORE EARLY, THE TEMPERATURE MAY
BE TOO WARM, SO OPERATE 1 DEGREE COOLER ON THE
NEXT SETTING. IF EGGS HATCH A DAY OR MORE LATE
THEN INCREASE THE TEMPERATURE 1 DEGREE FOR
THE NEXT SETTING. IF THE EGGS HATCH ON TIME, BUT
THE HATCH IS POOR, CONSIDER ADJUSTING THE
HUMIDITY (SEE STEP 11). If no eggs hatched, but some eggs
developed in the shell, then it would be a guess as to which way
to change the setting. Adjust the temperature in this case 2 degrees.
If checking the thermometer for accuracy, use two general purpose
thermometers to see if the reading is within a few degrees of the
other thermometers. Never use a fever thermometer in the
incubator as it will probably read too high in this condition.
Sometimes several settings may be needed to determine the best
temperature setting for a particular thermometer.
Moisture levels (see below) and turning are some other factors.
Review the trouble shooting chart in the instructions.
MOISTURE
The purpose of supplying moisture in and incubator is to prevent
excessive drying of the natural moisture from within the eggs. The
correct amount of humidity can be determined by the size of the air
sack when candled, or by weighing the egg to gauge percent of weight
loss. Both methods require knowledge and experience that first time
operators usually do not have. The Hova-Bator is designed for
simplicity in this matter, and usually works for most species.
If the Hova-Bator has a fan, fill the circulated trough with water
and keep it filled during incubation. If the Hova-Bator is the thermal
air flow or still air type (no fan) and is operated in dry climates, keep
water in the trough marked thermal at all times. If the thermal air
flow unit is operated in moist climates, as found near sea shores or
lakes and river valleys, little or no water may be needed for most
species until the last 2 or 3 days of incubation. In most cases, more
chicks are lost from too high humidity, than from too low humidity.
During the last 2 or 3 days, fill both troughs with water, as
high humidity is needed for the hatch.
TOTAL INCUBATION AND HATCHING TIME
Chicken—21 days.
Quail—23 days.
Cortunix—17 to 18
Pheasant—23 days.
Chukar—23 days.
Turkey—28 days.
Duck—28 to 33 days.
Goose—28 to 30 days.
Parakeet— 18 days.
Parrots—28 days.
Dove—14 days.
Mynah—14 days.
Finch—14 days.
Button Quail—16 days.
Valley Quail—21 to 22 days.
Swan—30 to 37 days.
DIGITAL THERMOMETER
AVAILABLE
Has accuracy of (+/-) 0.18 Degree Fahrenheit. Has
operating range 89.6 to 109.4 Degrees F. No reading is
shown above or below this range. Probe has 18” wire lead
and fits a 1/8” to 5/32” hole. Quick switchable operation
from Fahrenheit to Celsius.
Operates on Alkaline Battery, 1.5 VOLT (No. A76),
with average life of 300 hours. (unit should be switched
off after temperature reading to conserve battery life).
No. 3510 - DIGITAL INCUBATOR THERMOMETER
VENT PLUGS
Remove only when moisture appears on windows, or when
the incubator is used above 6000 feet MSL.
HATCHING
Three days before hatching time, discontinue turning eggs.
If you are using Automatic Turner, it must be removed from
the incubator or eggs moved to a separate incubator for hatching.
Do not attempt to hatch eggs while the turner is in the incubator,
as the slow turning egg racks could crush the chicks. Lay eggs on
wire floor with small end pointed slightly down.
At this time, water will be placed in both the ‘THERMAL’
and the ‘CIRCULATED’ troughs to increase humidity for hatching.
If large water droplets appear on the window after the hatch begins,
remove the red plugs on the top of the incubator. If removing the
plugs does not reduce the humidity enough, it may be necessary to
prop up the top slightly, to facilitate drying. If so, be sure to maintain
proper temperature. Alternately, the top may be removed quickly,
and moisture wiped from the windows to aid drying.
Chicks may be removed 24 hours after they start to hatch.
Extremely wet chicks should be left in incubator to dry. If they
don’t dry in eight or more hours, remove them to a brooder or
heat lamp, with temperatures of 95’F. to 100F.
Plan to remove chicks once a day, as every time incubator is
opened, warm moist air escapes. Avoid chilling of wet chicks.
Some chicks may be late in hatching, so you can leave remain
ing unhatched eggs up to 2 days longer.
BROODING
When chicks are removed from the incubator they must have
a place that is warm and dry. A brooder should have one section
that is heated, with a temperature of 100 degrees (for the first
week) and an unheated section for exercise. Food and water should
be partially in heated area. Temperature should be reduced 5
degrees each week until it is down to 70 degrees. Some types of
chicks need a temperature around 70 degrees until they are nearly
grown.
Incubator top is not satisfactory as a brooder, as there is not
sufficient heat and the chicks may peck it to pieces.
Feed and water chicks at once. Check with your feed dealer
for proper feed for type of chicks you have hatched.
SPECIAL POINTS TO REMEMBER
1. Do not bother the thermostat unless it is absolutely
necessary. The working of the machine may be affected if the
thermostat is tampered with excessively.
2. If the machine does not heat, carefully investigate and see
if you have all connections properly made.
3. Do not over crowd eggs.
4. Keep the eggs clean. Perspiration from the hands or any
sort of grease is injurious, because it stops up the pores of the
shells.
5. Clean your incubator after each hatch with clear water
only. Do not use soap or abrasive cleaners in the watcr troughs, as
this can cause them to leak. THE PLASTIC LINER FOR THE
HOVA-BATOR BOTTOM CAN BE CLEANED USING
DETERGENTS OR DISINFECTANTS.
6. After each temperature adjustment, allow ample time for
temperature to stabilize.
7. Do not open the lid during hatch.
3
INCUBATION TROUBLE SHOOTING CHART
Symptoms
Probable Causes
Suggestions
1. Use young, vigorous males.
2. Do not hold eggs longer than 14 days. Keep
at temperatures of 50°-55°F., in moist
atmosphere. Gather often.
1. Infertility. Too few males, too many
males, males too old, inactive, or frozen
combs and wattles.
2. Embryo died early 1-2 days.
Many clear eggs. No blood.
(Determined by candling,
then broken out appearance).
3. a Check accuracy of thermometer. Check thermostat,
heating element, current supply. Check operating
temperature againstinstructions.
b Do not fumigate at high concentrations during the
first 5 days of age.
4. See suggestions (2) above and see “Note” below
3. a Improper temperature.
b Fumigation
4. Improper care of eggs before setting.
Slight blood rings.
5. See suggestions (3) above.
6. Turn at least 3 times, preferably 5 in 24 hours.
7. Check vitamin and mineral content of breeder mash.
8. Avoid close inbreeding.
9. Increase ventilation of incubator and incubator
rooms, avoid drafts.
5. Temperature too high or too low.
6. Improper turning of eggs.
7. Improper feeding of flock
8. Breeding (low hatchability inherited.)
9. Improper ventilation; insufficient oxygen.
Many dead germs.
10. Increase humidity during incubation (wet bulb
82o-86o) add water to second trough last 3
days (wet bulb 90°-92°) during hatching time.
11. See (3) above and see “Hatching” page 3.
12. See (3 above and see “Hatching” page 3.
13. See (3) above and see “Hatching” page 3.
Pipped eggs not hatching
Hatch non-uniform
Hatching too early.
Hatching too late.
Sticky hatch.
10.
11.
12.
13.
Insufficient moisture.
Too high temperature.
Too low temperature.
Probably too high temperature
Cripples and Malpositions
14.
15.
16.
17.
Temperature too high.
Too low moisture.
Improper turning or setting
Hatching trays too smooth.
*Very large, soft-bodied,
weak chicks.Mushy chicks.
Dead on trays, bad odor.
18. Low average temperature.
19. Poor Ventilation
20. Navel infection in incubator.
18. See (3) above and see “Hatching” page 3
19. See (9) above.
20. Careful cleaning and fumigation of incubator
between hatches.
21. High temperature or wide temperature variations.
22. Low moisture.
21. See (3) above.
22. See (10) above.
Rough navels.
Most frequent
causes of poor
hatches
14.
15.
16.
17.
See (3) above and see “Hatching” page 3.
See (10) above.
See (6) above. Set eggs large end up.
Use wire bottom trays or crinoline.
*CHART INFORMATION FROM UNIVERSITY OF KENTUCKY POULTRY DEPT.
NOTE: If chicks hatch out a day early, indicates termperature was a little too high, so on next setting lower temperature
by ½ oF. for entire incubation period. If chicks hatch a day late, raise temperature ½ oF. for the entire incubation period.
REPLACEMENT PARTS
Part No.
1640N
1641
1778
1642N
1643
1644
1715
1825
3007
1645
1717
3017
Description
Part No.
Top only for - 1602 Without Windows
Pkg. of 2 Windows for 1602N
Top;/-1582 Window Incub./No Hardware
Bottom for Hova.Bator Incubator
Set 4 Heat Element Clips
15" x 15" Wire Flow for Hova-Bator.
Thermostat Switch Complete. 15 Amp
Red Easy Read Incubator Thermometer
Thermostat Wafer
110 Volt 25 Watt Square Heat Element
110 Volt 5’ Cord Set for Incub. & Turner
110 Volt Pilot Light for Hova-Bator
1646
1727
3027
1765
-
-
-
Part No.
1655
1682
1686
1688
1689
1696
Description
220V 25 Watt Square Heat Element
220V 5’ Cord Set for Incub. & Turner
220V Pilot Light for Hova.Bator
Clear Plastic Liner for Hova-Bator Bottom
AUTOMATIC EGG TURNER
110V Turn Motor w/ Electric Cord Attached
Pkg. 2 Egg Rack Retainer for Turner
Pkg. 6 Plastic Quail Egg Rack for Turner
Pkt. 03 Hitch Pin for Egg Rack on Turner
Plastic Connecting Bar/Egg Racks to Motor
Pkg. Plastic Universal Egg Rack for Turner
LIMITED WARRANTY
One year warranty on equipment manufactured by G.Q.F. Notify G.Q.F. Mfg. Co. of any defective items, giving catalogue
number and name of item and just what is wrong with them. Send copy of invoice showing date of purchase. GQF Mfg. Co. will
send replacement or notify regarding return. Returning of items without written permission will be at owner’s expense.
Whereas GQF Mfg. Co. has no control over usage of equipment supplied, it assumes no responsibility for losses or damage
from this equipment other than the replacement of defective parts. No Guarantee on hatchability of eggs. Do not expose electrical
parts to water. Installation of electrical parts should be done by a qualified electrician.
© Copyright 2001, G.Q.F. Mfg., Inc.
4