1
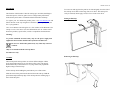
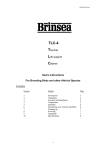
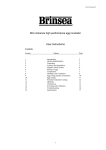
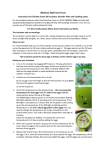
HD500 US Issue 01
Location
Place the EcoGlow chick brooder on the floor where it is not likely to be
trodden on by people or large animals.
Always allow enough clear space around the chick brooder to allow free
movement of chicks. They will find their own comfortable temperature by
moving under (or on top of) the brooder as they require.
A set of inter-locking, plastic Chick Enclosure Panels available from Brinsea®
Products may be used to form a pen.
Connect the lead on the brooder to the lead on the power supply unit.
Connect the power supply unit in a convenient electrical outlet, out of the
reach of animals. The red power indicator on top of the panel will gently
glow and the metal plate under the brooder will get warm.
Maintenance
Disconnect the mains supply before carrying out any maintenance or
moving the brooder.
After use clean thoroughly with Brinsea® Incubation Disinfectant solution.
Do not immerse the panel in water or place any part in liquids over
120°F (50°C). Do not use a dishwasher.
In the event of a problem, please contact your supplier or Brinsea® Products
Service Dept. The product does not contain any user serviceable parts.
Dimensions
Length 13” (320mm), Width 8.5” (207mm), Height 8.5” (210mm).
Weight 1.65 Lbs (750g).
Power consumption: 20 Watts with power supply unit as enclosed.
Brinsea Products Inc, 704 N. Dixie Ave., Titusville, FL 32796 USA
Tel: 321 267 7009 Fax: 321 267 6090(01934) 820250
e-mail: [email protected], website: www.Brinsea.com
®
EcoGlow
CHICK BROODER
User Instructions
HD500 US Issue 01
Introduction
The EcoGlow chick brooder is ideal for rearing up to 20 chicks, ducklings or
most other species of fowl or game. The low voltage heater panel warms
chicks directly and is more economical and safer than infra-red lamps.
To remove an end cap place the panel on its side and gently lever the side of
the end cap out as shown with a large, flat screw driver. The end cap will
easily be released, do not apply excessive force on the screw driver.
Fitting an End Cap
To register your new Brinsea® product please visit www.brinsea.com and
follow the link on the top navigation of the home page to qualify for your
free 2 year guarantee.
Go to www.Brinsea.com and register as a free member of the Brinsea® User
Group to receive the latest news and information such as advance notice
about new products, special offers, exclusive competitions and much more.
Warning!
To provide continued electrical safety only use the power supply unit
supplied for the EcoGlow chick brooder by Brinsea Products Inc.
Do not cover the brooder panel in any way. This may cause it to
overheat.
Only use as intended with the end caps fitted.
For indoor use only.
Assembly
The brooder panel end caps allow use at three different heights. Chicks
prefer the brooder panel to be set low down at first so they can snuggle
underneath as they would in the nest. Very large chicks may require the
higher settings on the end caps.
Fit the end caps while holding the panel sideways on a firm surface.
Slide the corner of the panel into the desired slot in the end cap. Hold the
panel down and push the top edge of the end cap onto the retaining lug so
that it clicks into place.
Removing an End Cap