1
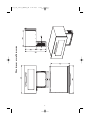
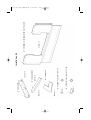
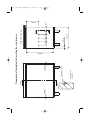
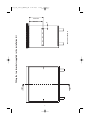
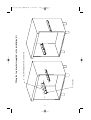
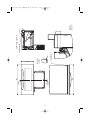
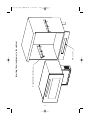
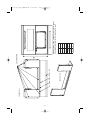
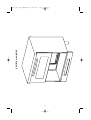
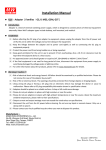
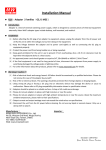
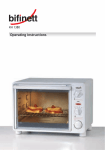
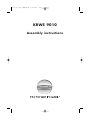
5019_102_00270_INSTAL_GB
6-11-2007
10:45
Pagina 1
KRWS 9010
Assembly instructions
5019_102_00270_INSTAL_GB
6-11-2007
10:45
Pagina 2
5019_102_00270_INSTAL_GB
6-11-2007
10:45
Pagina 3
Installation kit supplied
4
Wine drawer overall dimension
5
Installation kit
6
Preparation of the cabinet for inserting the wine drawer
8
Fitting the two brackets supplied in the installation kit
9, 10
Inserting the wine drawer in the cabinet
13
Inserting the corrugated plastic sheet covering
16
Installation completed
17
5019_102_00270_INSTAL_GB
6-11-2007
10:45
Pagina 4
Installation kit supplied
The wine drawer is designed for built-in installation and must not be used as a free-standing unit.
Installation and maintenance must be carried out by at least two qualified technicians.
INSTALL THE WINE DRAWER ONLY IN POSITION UNDER THE KITCHEN WORKTOP.
Make sure the wine drawer is fixed to the adjacent cabinet with the brackets supplied.
DO NOT INSTALL THE WINE DRAWER IN A COLUMN.
DO NOT INSTALL THE WINE DRAWER ON ITS OWN OR IN A SINGLE CABINET.
Otherwise the wine drawer will be unstable, with risk of tipping over and consequent injury or damage.
Do not start this electrical appliance if it is damaged, does not work properly, is partially disassembled or if
there are broken or missing components, including damaged cable or power socket.
Make sure the power cable is in a position where it cannot be trodden on, tripped over, damaged or
undergo strain.
Do not install or store the appliance in places where it can be exposed to bad weather or temperatures
below freezing.
The min. area in the base board for the passage of air must be at least 200 cm2.
4
6-11-2007
10:45
Pagina 5
Wine drawer overall dimension
5019_102_00270_INSTAL_GB
5
6
SCALE 1:1
N° 14 SCREW 4.8x15 UNI 6955-71 AB
N° 6 SCREW 4.2x13 UNI 6954-71 B
SCALE 1:5
N° 1 COVERING IN CORRUGATED PLASTIC SHEET
10:45
SCALE 1:1
N°1 TEMPLATE
SCALE 1:2
N° 2 SIDE ADHESIVE
SCALE 1:5
Installation kit
6-11-2007
SCALE 1:2
N° 2 BRACKET
5019_102_00270_INSTAL_GB
Pagina 6
5019_102_00270_INSTAL_GB
6-11-2007
10:45
Pagina 7
7
8
SECTION F-F
SCALE 1:1
CHAMFER 014x3.6
100
100
550 MIN.
50 MIN.
100
F
100
316 MIN.
81.5
10:45
VERT.
16 MIN.
F
VERT.-VERT. SECTION
6-11-2007
16 MIN.
VERT.
680 MIN.
Preparation of the cabinet for inserting the wine drawer
5019_102_00270_INSTAL_GB
Pagina 8
VERT.-VERT SECTION
10:45
316 MIN.
60
6-11-2007
VERT.
VERT.
Fitting the two brackets supplied in the installation kit
5019_102_00270_INSTAL_GB
Pagina 9
9
340 MAX.
6-11-2007
10:45
BRACKET
N° 10 SELF-TAPPING SCREWS 4.8x 15 UNI 6955-71B
Fitting the two brackets supplied in the installation kit
5019_102_00270_INSTAL_GB
Pagina 10
10
6-11-2007
10:45
Pagina 11
SCALE 29:200
SCALE 29:200
N° 2 SIDE ADHESIVE
5019_102_00270_INSTAL_GB
11
897
354 MIN.
DETAIL X
SCALE 1:1
10:45
SEE DETAIL Y
DETAIL Y
SCALE 1:1
SEE DETAIL X
VERT.-VERT. SECTION
6-11-2007
VERT.
VERT.
897
5019_102_00270_INSTAL_GB
Pagina 12
12
N° 6 SCREWS UNI 6954-7IB 4.2x13
MIN. 200 Cm2
Inserting the wine drawer in the cabinet
5019_102_00270_INSTAL_GB
6-11-2007
10:45
Pagina 13
13
TEMPLATE
DETAIL X
SCALE 1:2
10:45
14
2. THEN FIX THE WINE DRAWER TO THE CABINET WITH THE SCREWS SUPPLIED.
6-11-2007
1. INSERT THE WINE DRAWER IN THE CABINET
POSITIONING IT SO THAT THE DRAWER SEAL EDGE IS 44 mm. FROM THE FRONT SIDE OF THE CABINET USING THE SPECIAL TEMPLATE SUPPLIED.
SEE DETAIL X
5019_102_00270_INSTAL_GB
Pagina 14
SCALE 33:200
B1
B3
B4
15
B
1
2
2
2
2
3
4
10:45
A
704
716
717
720
722
728
850
REPARATION OF THE CORRUGATED PLASTIC SHEET
COVERING SUPPLIED IN THE INSTALLATION KIT
6-11-2007
SCALE 33:200
B2
CUT AND BEND
5019_102_00270_INSTAL_GB
Pagina 15
6-11-2007
10:45
4 SCREWS 4.8x 15 UNI 6955-71 AB
Inserting the corrugated plastic sheet covering
5019_102_00270_INSTAL_GB
Pagina 16
16
6-11-2007
10:45
Pagina 17
Installation completed
5019_102_00270_INSTAL_GB
17
5019_102_00270_INSTAL_GB
6-11-2007
10:45
Pagina 18
5019_102_00270_INSTAL_GB
6-11-2007
10:45
Pagina 19
5019_102_00270_INSTAL_GB
Printed in Italy
11/07
5019 102 00270
6-11-2007
10:45
Pagina 20
n
GB