1
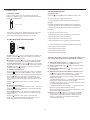
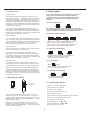
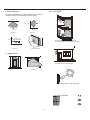
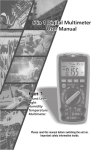
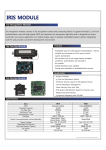
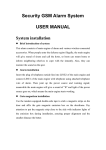
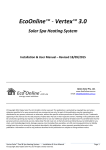
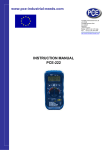
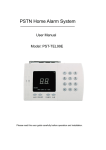
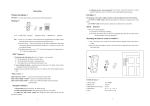
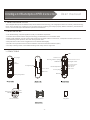
Int e llig e nt Wa t e rpro of PIR d e t e c tor
Us e r m a n u a l
1. BRIEF INTRODUCTION
The Intelligent Waterproof PIR Detector adopt the most advanced technology, 4G holographic aviation war-industry radar technology,
bionic nerve cell radar chip, waterproof, can be widely used for protecting your safety & property. Before installation, please read this
user s manual carefully for safe effective operation and installation.
2. MAIN FEATURE
* Pure wireless design, exquisite appearance, easy for installation & operation.
* 3 wireless sensors tridimensional analyse technology plus Nanometer Lens. Avoid false alarm.
* Military-grade materials, anti-aging outer shell, waterproof. No matter outdoor or indoor area, it will present excellent performance.
* Voice reminding while operation, and voice warning before alarm.
* Self-protection function: Alarm is triggered once it is disassembled illegally
* Work as a control panel which can work with 6 remote controls and 2 wireless Detectors (Max.)
* Can setup 4 working modes , have different working mode in day time and night time.
3. STRUCTURE
LED
dizzy light
bottom cover
detecting distance jumper
PIR Sensor
Lens
windows
waterproof plug
volume adjustment
Power switch
Power jumper
Photosensitive sensor
day/night switch
use mode jumper
Horn jumper
Sub sensor
Sub sensor
Mount slot
Batteries
Waterproof speaker
Emergency
Disarm
remote controller
Arm
Siren
Fix panel
swivel bracket
.1.
4. OPERATION
4.3 Advanced options
4.3.1 Status test:
4.1 Power on/off
press both
There is a little power switch on the back of the device.
Take out the waterproof plug, and press that little switch for
turning on /off the detector.
key and
key, the PIR detector rings. Then:
A). sound only (check detecting distance)
1 sound signifies its detecting distance is at grade one
(longest),
2 sounds signifies its detecting distance is at grade two,
Power switch
3 sounds signifies its detecting distance is at grade three,
4 sounds signifies its detecting distance is at grade four
(shortest).
Back side
After power on, the device speaks"Welcome to use!", then
the flashing light flicker 10 times, 60 second later, the
units enter working status, that means it is armed.
B). flash only (check pulse count)
1 flash means pulse count is grade one (most sensitive)
2 flash means pulse count is grade two
3 flash means pulse count is grade three
4.2 Working with remote controller
4 flash means pulse count is grade four (least sensitive)
C). sound and flash synchronously (check working mode)
1 sound & flash means mode 1
2 sound & flash means mode 2
3 sound & flash means mode 3
4 sound & flash means mode 4
A). Arm: press the" " button, the PIR detector speaks "The
system is armed!", The LED show dim light for 5 seconds,
then goes into guarding status.
After that, the system goes into programmable status. User
can change the settings within 10 seconds as following:
B). Disarm: press the"
"button, the PIR detector speaks
"The system is disarmed" and goes into undefended state.
A). Detecting distance setting: press" "key one time will
increase the detection distance (a grade one time).
C). Siren switch on/off: press the" "button ( for 5 second
still you hear siren ring ) to alternately switch on/off the siren.
B). Pulse count setting: press"
count grade.
D). SOS: press the " " button for 3 seconds, the detector
will give out alarm immediately.
"one time increase a pulse
E). Change reminding voice:
C). Working mode setting: press "
working mode.
Press the button for a long time (about 5 sec) until heard
a lower voice "THE SYSTEM IS ARMED! " Then, while you
arm /disarm the device, the reminding voice becomes lower.
D). Register/code extra sensors/Remote controller: press
the button, the system will make a " Do- " sound, then
flash once, it means you can start to register/code.
Press the button for 5 sec again, you will heard "Do ."
Then, while you arm the detector, it will give out one tone
"Do. ", while you disarm the system, you will hear two tones
"Do Do" .
Press the
setting.
" one time go into next
Trigger the extra sensor/remote controller, when the system
receives the signal,
If it makes ONE sound" Do. " , it means this extra sensor has
already been registered/coded into the system;
button for 5 sec again, it will turn to default
I f it makes TWO sound" Do Do. ", it means this extra sensor
is registered/coded successfully;
F). Change siren setting:
If it makes THREE sound " Do Do Do. ", it means this extra
sensor is not registered/coded successfully;
Press the
button for a long time (about 5 sec) until heard
a warning sound. Then, while alarm, only the light flashing,
no siren sound any more.
When the system reminds: " he system is disarmed. "it will
exit Program Status automatically.
Press the button for 5 sec again , until heard 2 warning
sound. While alarm, the siren sound for 5 second, the light
flashing only.
E). Reset: Press the button for 5 sec until you heard two
sound, then, the LED light for a 2 sec. Wait for a while, 5
sounds means successful operation. After a series of
reaction, The system come back to default setting
(manufacturer's setting).
Press the button for 5 sec again , until heard 3 sec
warning. It turns to default setting, while alarm, the siren
sound & light flashing for 90 sec simultaneity.
.2.
6. Inside jumper
4.3.2 Working mode
Working mode 1:
Notes: The following way to adjust jumpers is just for
your reference under special condition. Remote
Controllers can carry out all the settings & functions,
please don't open the device nor adjust its default
jumpers.
In the Daytime, when it is triggered for the first time, at
beginning, it will warns: " Attention!! You have entered the
area under monitoring! " if the intruder still stays in the
detecting area, the detector will warn again: " Warning! You
have entered restricted area, Please Leave Immediately!
Warning! You have entered restricted area, Please Leave
Immediately! " Then, the siren will alarm and the LED light
will flash at the same time.
A). Power supply jumper
ON: the switch/jumper on the ON position, battery circuit connected.
OFF: the switch/jumper on the OFF position, battery circuit disconnected.
All the recorded data will be deleted one minute's after power is off.
In the Night, when it is triggered, it will directly warn: "
Warning! You have entered restricted area, Please Leave
Immediately! Warning! You have entered restricted area,
Please Leave Immediately! " Then, the siren will alarm and
the LED light will flash at the same time.
B). Detecting distance jumper
Working mode 2:
In the Daytime & Night, when it is triggered, it will directly
warn: " Warning! You have entered restricted area, Please
Leave Immediately! Warning! You have entered restricted
area, Please Leave Immediately! " Then, the siren will
alarm and the LED light will flash at the same time.
When connect to 3-6m, the detecting distance is 3m,
when connect to 5-9m,detecting distance is 4m.
When connect to 6-12m, the detecting distance is 5m,
when connect to 9-18m,detecting distance is 6m.
Working mode 3:
In the Daytime, when it is triggered, only the LED light will
flash, NO voice warning, No siren alarm.
C). Monitoring model setting
In the Night, when it is triggered, it will directly warn: "
Warning! You have entered restricted area, Please Leave
Immediately! Warning! You have entered restricted area,
Please Leave Immediately! " Then, the siren will alarm and
the LED light will flash at the same time.
DAY, the detector works in day mode 24hours.
NORMAL, the dusk is treated as night.
NIGHT, darkness is treated as night.
Working mode 4:
D). Siren setting
Only when the Intelligent detector works with its subwireless PIR sensors, it will take effect. If there is not subwireless PIR detector, it will turn to mode 1 automatically.
Horn
No horn
Horn, the siren will sound while alarming.
No horn, the siren will not sound.
When both of the PIR detector and its sub-wireless PIR
sensor are triggered, it will directly warn: " Warning! You
have entered restricted area, Please Leave Immediately!
Warning! You have entered restricted area, Please Leave
Immediately! " Then, the siren will alarm and the LED light
will flash at the same time.
E). Alarming volume setting
Hi, the voice volume is high;
Lo, the voice volume is low.
5. About the fix panel
7. Technical parameter
Fix panel cover
the mount slot
Power: 6V 4 AA alkali batteries
Voice:>85 dB, Siren:>105dB
Fix panel
Frequency:315 /433MHz
Remote controlling distance: 15m.
Detecting scope: 3 6m
The fix panel has anti-dismantle function. In case it is
removed by someone, the LED light will turn on, then the
system go into emergency alarm for 90 sec. After that, the
system indicate " THE SYSTEM IS DISARMED ", it turn to
disarmed status finally.
Current: Static current<0.2mA,alarm current<300mA
Sensors: low noise dual-element sensors
Flashing light:>1,000,000LUX
Work temperature: -40
While user slip the fix panel back to the mounting slot
completely, the system will give out several tones, then
indicate " THE SYSTEM IS ARMED! " the system goes into
armed status automatically.
to 65
Storage temperature: -45 to 70
Size: 323mmx74mmX71mm
.3.
8. Detecting area
10. CAUTION
The Intelligent PIR detector is a bi-curtain shield detector, only when the
intruders' movement crosses the shields,the detector alarms.
ceiling mount
pattern
wall mount
Pattern
Side view
wall
Side view
Bi-curtains's
included angle
A. Avoid aiming the Lens windows at
moving objects(i.e. swaying trees, flag, etc.)
Top view
Curtain pattern
9. Application
B. Avoid unfirm base or bracket
Gateway
Balcony
C. Avoid strong direct or reflected sunlight
.4.