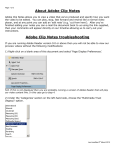
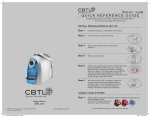
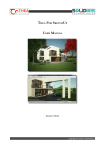
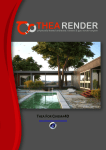
1
SUBSTANCE THEA CONVERTER
www.thearender.com/substance
USER MANUAL
Copyright © Solid Iris Technologies
Revision 01
ABOUT SUBSTANCE THEA CONVERTER
Substance Thea Converter allows you to create a Thea material from a Substance SBSAR file. You can
use the parameters exported with the Substance file to change the look of the textures and also see
the preview of the created Thea material before you save the final result.
You can use any SBSAR file, but with a Substance material based on the Metallic/Roughness PBR
template you ensure that the created Thea material will also be a physically-based one.
1. USER INTERFACE
The Substance Thea Converter interface consists of three parts:
1. Textures Viewer
2. Options
3. Thea Material Preview
You can change the size of each area or even hide one entirely, by clicking on one of the separators
and dragging your mouse left or right.
Figure 1: Substance Thea Converter interface
Figure 2: Separators for resizing the panels
2
Copyright © Solid Iris Technologies
1.1
Textures Viewer
The Textures Viewer presents the textures created from the Substance Engine. There is a different
tab for each texture which has the name of the texture identifier (defined in Substance).
You can view the textures in their original size or make them fit in the available space by changing the
Texture Size option (Menu -> Options -> Texture Size). The textures are recomputed every time a
parameter is changed. If the Metallic/Roughness maps only option is ticked only textures identified
as basecolor, normal, roughness or metallic will be visible (see section 1.3.1).
1.2
Options
In the Options panel you can see the parameters that were saved in the Substance file when it was
published. Parameters hold values used during the material creation process so changing the value of
a parameter results in changes in the appearance of one or more textures.
Here you can tweak these values which causes an immediate regeneration of the affected textures.
This way you can see how the final result is altered. The available options are closely related to the
material structure so they usually vary from file to file.
1.3
Thea Material Preview
In this panel you can specify what textures from the Substance file will be used for the creation of the
Thea material and also see how that material will actually look.
At the top of the panel there is the material preview area which shows the current preview of the
generated Thea material. Below the image, you can see the Refresh button which you can use to
update the preview when the Auto Refresh checkbox is not ticked.
After that, there are three groups of options. The first group contains settings for the material
preview environment and the other two groups allow you to map textures from the Substance file to
the Thea material texture slots. You can collapse or expand any of these three groups by clicking on
its title.
1.3.1
Material Lab
Room
Here you can choose the kind of setting that will be used to render the
Thea material preview.
Size
This option refers to the pixel resolution of the preview, both for the
horizontal and the vertical dimensions.
Quality
The Quality value determines the number of passes that will be used
during the rendering of the preview.
Auto Refresh
When the Auto Refresh checkbox is ticked, a change in a Substance
texture will trigger a regeneration of the material preview using the latest
version of that texture. If the checkbox is not ticked you will have to
manually update the preview using the Refresh button.
3
Figure 3: Material Lab
Options
Copyright © Solid Iris Technologies
1.3.2
Standard Maps
As explained in the start of this document, the Thea material is created in
a physically-based manner if a Metal/Roughness structure is present in
the Substance file. To that purpose, four different maps are essential and
must be specified: Basecolor, Normal, Roughness and Metallic.
Metallic/Roughness maps only
When this checkbox is ticked, each one of the four texture slots is Figure 4: Standard Maps
automatically linked to the texture with the appropriate identifier (for the
Base Color texture slot the texture with the basecolor identifier is chosen,
etc.). If no appropriate texture is found the slot remains empty and no
other textures can be assigned. When the checkbox is not ticked, any
texture can be assigned to any slot.
1.3.3
Advanced Maps
In the Advanced Maps section you can specify additional textures
supported by the Thea material system. Specifically, you can assign a
Bump texture (which will replace any texture assigned to the Normal
slot), an alpha texture which is used for alpha clipping and an emitter
texture. When the Passive Emitter checkbox is ticked the emitter does
not cast any light but only appears emitting light.
Figure 5: Advanced Maps
2. MENU
2.1
2.1.1
File
Open
Allows you to load an SBSAR file.
2.1.2
Open Recent File
Here you can choose to open again one of the last ten opened files.
2.1.3
Load textures from disk
The purpose of this option is to allow you to load existing
textures from the disk, assign them to the available Thea
material textures slots, see the material preview and save the
result as a new Thea material file (mat.thea or mat.pack).
By clicking on a button on the left column a load dialog appears
where you can select the texture you want to load. By clicking
the clear button on the right column any loaded texture is
unlinked from the material.
Figure 6: Load Textures from Disk
When you want to create a new Thea material with the currently
dialog
loaded textures, you can click the Save button.
4
Copyright © Solid Iris Technologies
2.1.4
Batch Conversion
The Batch Conversion option allows you to convert multiple SBSAR files to Thea materials at once.
When you put your mouse cursor over the Batch Conversion option you will see two available
choices: To mat.thea and To mat.pack.:
To mat.thea option will create a new mat.thea file for each Substance file.
To mat.pack option will create a single mat.pack file for all converted files.
After you select one of those options a folder selection dialog will appear. Here you must select the
folder that contains the SBSAR files you want to convert.
When you choose that folder a similar dialog will be presented where you will have to choose the
folder that the output will be saved in.
After you choose the input and the output folders the conversion process will begin. When it is over a
confirmation message will appear.
2.1.5
Save
You can use this option to save a Thea material (mat.thea) file in the same folder where the
Substance file was loaded from.
2.1.6
Save As
Clicking on this option a dialog appears where you can select the directory where the Thea material
will be saved. Furthermore, you can choose wether the new file will be saved as a mat.thea or as a
mat.pack file.
2.2
2.2.1
Options
Texture Size
As also described in the Textures Viewer section, you can use this menu option to choose if the
textures will be presented in their actual size or if they will be scaled to fit the available area.
2.2.2
Substance Engine
Here you can select the specific implementation of the Substance Engine you want to use.
There is a software implementation (CPU) which is always available and depending on the platform
you may have the options of OpenGL, Direct3D 10 or Direct3D 11.
2.2.3
Preferences
Default Load folder
By clicking on the button next to the Default Load folder label you can
choose the folder that will appear every time you click the Open option
(File -> Open).
5
Figure 7: Preferences
Window
Copyright © Solid Iris Technologies
Default Save folder
Similarly to the load folder, here you can set the folder for the Save As action.
Default textures load folder
The default folder that will appear when you try to load an existing texture from disk can be set here.
Save generated maps in new folder
When this option is set to Yes, every time you save a Thea material its textures will be stored in a new
folder that will be placed in the same directory with the material file. This is always the case when
you are doing a batch conversion. When the option is set to No, the textures are saved in the same
directory where the Thea material is.
For more details, download links and resources please visit http://www.thearender.com/substance
6
Copyright © Solid Iris Technologies