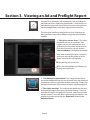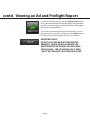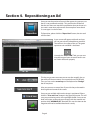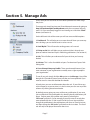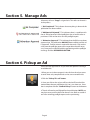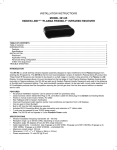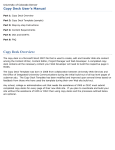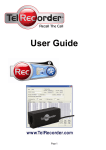
1
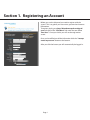
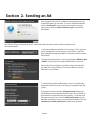
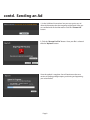
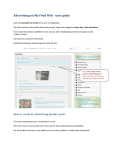
Ad Portal Users Manual
http://direct2amexpub.sendmyad.com
Authored by Time Inc Production
Digital Development
Revision Date: February 6, 2009
Ad Specifications & Contact Info:
www.amexpub.com
media kit
© 2009
Content
Advertiser or Sender
Registering for an account. . . . . . . . . . . . . . . . . . . . 1
Sending an Ad. . . . . . . . . . . . . . . . . . . . . . . . . . 2
Viewing an Ad / Reading Pre-flight Report . . . . . . . . . . . . . 4
Repositioning an Ad. . . . . . . . . . . . . . . . . . . . . . . 6
Manage Ads. . . . . . . . . . . . . . . . . . . . . . . . . . . 7
Pickup an Ad. . . . . . . . . . . . . . . . . . . . . . . . . . 8
Content
Section 1. Registering an Account
Before you use the Ad portal you need to register with the
system. This is to gather your user name, password and contact
information.
To register simply go to http://direct2amexpub.sendmyad.
com and click on the “Click Here” link under the text “First
Time User”? Once you click it you will see the registration
screen.
Once you have filled out all the information click the “I accept
create my account” button at the bottom.
After you click the button you will automatically be logged in.
Page 1
Section 2. Sending an Ad
Once Logged in you will see a welcome message that gives you
a couple of options to start with. To send an ad click the button
next to “Send an Ad”. If you want to never see this message
again you can click the “Don’t show this again” check box at
the bottom.
You will now fill out a Job ticket to give us some information about the ad. Please be accurate to avoid
Miscommunication.
1. Select the publication that the ad is running in. If it is going to
run in multiple titles you can assign it to more titles once it has
been uploaded and approved the first time please see the section
6 for pickups.
2. Fill out the ad information. You have two options CMYK or Spot
+ CMYK. Use only if you intend to have PMS colors in your ad.
You can also choose multiple issue dates. Simply select the first
one from the Issues pull down. Then select another issue date
from the Issues pull down.
3. Verify that the contact information is correct. By default the
information will be what you used when you registered with the
system.
To change the contact click the “Change Contact” button. You
will then be presented with a pull down menu. This list will be everyone who has registered from your company. If you don’t see
the correct persons name. Choose “Add new Contact” you can
then fill in somebody’s name, e-mail and phone number. Click the
“confirm this contact information” check box to continue .
Page 2
contd. Sending an Ad
4. In the Additional Instructions box you can type in any additional information that the magazine might need. Once you
are satisfied with all the information Click the “Choose Ad”
button.
5. Click the “Browse For File” button. Once your file is selected
click the “Upload” button.
Once the upload is complete. You will continue to the next
section of reading preflight report, positioning and approving
your ad to finalize.
Page 3
Section 3. Viewing an Ad and Preflight Report
Once the file is uploaded it will automatically start to preflight to
the American Express Publishing Specifications. Once the ad is finished Processing you will see a preview of it and on the right hand
side the preflight report with some suggested action buttons.
There are three conditions that the ad may have. Depending on
these conditions there will be different suggested action buttons
available.
1. “This Ad has Serious Errors” This means
that the file did not pass preflight. If this
happens you can not continue. You must
go back to your document and fix the error.
Once that is done then you can click the
“Revise Ad Button” and upload the new file.
Note, when reviewing the error if you place
your cursor over the text of the error, the
object in the preview will highlight.
A) By hovering your cursor here...
B) This area will highlight and will help you
identify where the error is.
2. “This Ad Must be repositioned” This means that the file has
passed the preflight but the trim size of the PDF does not match the
specification. You must reposition it before continuing. Simply click
the Reposition button. Please refer to section 4 repositioning an ad.
3. “This Ad has warnings” This indicates that the file has warnings
in the preflight report and may be positioned correctly. Please review the warning on the right hand side. Also, make sure you verify
that the preview is accurate. Both in positioning and content. If you
need to re-position the ad click the “Reposition” button under
Available Actions.
Page 4
contd. Viewing an Ad and Preflight Report
4. If you are satisfied, you can click the “Approve Ad” button.
Once you have approved the ad the magazine will be notified
that they have received an ad and the contact in the job ticket
will get an e-mail notification.
TIP: You do not need to approve the ad at that time. You can
wait to do it later if you want. Simply press the “Back” button.
This will take you to the manage ads view (see section 5).
IMPORTANT NOTE:
DO NOT CLICK THE BACK BUTTON FOR THE
BROWSER. DOING SO WILL NAVIGATE YOU
AWAY FROM THE AD PORTAL AND WILL HAVE
TO RE-SIGN IN. The Ad Portal has it own
“BACK” button and this should be used.
Page 5
Section 4. Repositioning an Ad
Once you see the preview of your ad after processing you may see
that it is not positioned correctly. This could be due to the fact
that the trim does not match the specification that you chose or it
just needs some minor adjustments for example to move the ad
so some type is in the live area.
To Reposition, please click the “Reposition” button, the trim tool
will now load.
A new screen will appear with tools and you
will see your ad with colored boxes around it.
The red box is the safety of the ad. The green
represents trim and Blue is the bleed.
Use only the “SELECTION” Tool, you can now
drag the image of your ad around until it centers within the boxes properly.
To help you get more accurate you can use the magnify glass or
the zoom pull down to zoom in to a particular area of the add.
Then you can use the arrow keys on the keyboard to “Nudge”
the ad into place.
Also, you can turn on center lines if you wish they are located in
lower right hand corner of the screen.
Once you are satisfied with how the image is positioned. Please
click the “Trim and Save” button in the upper left corner. This will
save your positioning and it will re-preflight the file. Once you are
back in the view screen and you are happy with the content and
position click “APPROVE AD”. Reminder this must be done or the
magazine will not be notified that the ad is ready.
Page 6
Section 5. Manage Ads
At any time you can see what ads have been uploaded and what stage
they are in.
To manage ads simply log into your Direct2Amexpub account by going to
http://direct2amexpub.sendmyad.com with your user name and password. Or if you are already logged in and viewing an ad click the “Back”
button (see Section 3).
On the left hand side of the screen you will see some available options.
1. Dashboard- This will take you to a screen that will show you some options of things you can do like send an ad or a revise.
2. Send My Ad- This will start the sending process of a new ad
3. Pickup an Ad- this will allow you to send an ad that is already complete to another American Express Publishing publication. (See section 6)
4. Ads- This will allow you to browse all of your ads that you have uploaded.
5. Ad sizes- This is a list of available ad specs. For American Express Publishing titles.
6. Users/Groups/Company Profile- These are advanced features if you
want someone in your organization to modify access right to people in
your organization.
View by Thumbnail or List
To see all your ads simply click the Ads option under Manage. You will be
brought to a Thumbnail view of every ad that you have uploaded. If you
want to see a list view click the List view button.
In both views you can see information about the ads. If you click on any
ad it will open it so you can view it. In the list view you can sort any of the
columns by clicking the column header.
By default you are going see every ad for every publication. If you want,
you can filter the list by publications by selecting the all publications pull
down. Further more you can filter even more by selecting the
“All Issues” pull down. So for example if you only want to see ads that
were uploaded for the 7/1/09 issue of Travel & Leisure. You would first
change the publication in the publications pull down to Travel & Leisure
and then change the “All Issues” pull down to the Issue date. The list of
ads will only be displayed that are for that issue.
Page 7
Section 5. Manage Ads
Also every ad has a “Stage” assigned to it. This refers to where it is
in the process.
1. “Ad Completed”- This indicates that everything is done and the
publication has been notified.
2. “Ad Materials Rejected”- This indicates there is a problem with
the ad. Either because it failed preflight or the ad needs to be repositioned. Click on the ad to view the preflight report.
3. “Advertiser Approval”- This indicates that the file has not been
approved yet. The publication HAS NOT been notified until the ad
is approved. Further action is required for these ads. Click on the
ad to view the preflight report and re-reposition the ad if necessary. Once you are satisfied with the positioning and the preflight
warnings click the APPROVE AD BUTTON.
Section 6. Pickup an Ad
Once you have approved an ad, you have the option of sending it
to another title.
1.When you are in the manage ads view click on the ad you want
to send. Note: only completed ads can be sent to another title.
2.Click the “Pickup This ad” button.
3. Once you click on the ad you will be asked to fill out the information about the new publication; Ad size, issue dates etc. Once
that is complete click the “Confirm Pickup” button at the bottom.
4. The ad will now be pre-flighted for that publication. NOTE: you
may have to re-position the ad for the new size. Refer to section 3
and 4 for reviewing preflight reports and re-positioning.
Page 8
EOF