1
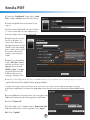
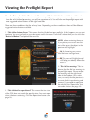
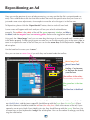
Ad Portal User Manual
http://northcoastmedia.sendmyad.com
REV 8.6.12
Contents
Introduction..................................................................2
Create an Account........................................................3
System Requirements....................................................4
File Requirements.........................................................5
North Coast Media Portal Dashboard...........................6
Sending a PDF..............................................................7
Viewing the Preflight Report.........................................8
Repositioning an Ad...................................................10
Managing Ads............................................................12
Pickup an Ad..............................................................14
Technical Support.......................................................15
1
Introduction
Introduction
Welcome to the Questex Ad Portal!
The Questex Ad Portal is designed for quick and efficient submission of your ad materials. You will
receive immediate feedback and advice for fixing problems. The ad portal is web-based, so no FTP is
Welcome
to the
Coast
Ad Portal!
required. You
canNorth
upload
andMedia
view your
ads anywhere, anytime.
The
Media
Portaltoisget
designed
quick
efficient
submission
of your
ad materials.
This North
serviceCoast
is free,
and Ad
it’s easy
started.for
This
userand
guide
will take
you through
the process
step-byYou
will
receive
immediate
feedback
and
advice
for
fixing
problems.
The
ad
portal
is
web-based,
step.
so no FTP is required. You can upload and view your ads anywhere, anytime.
This service is free, and it’s easy to get started. This user guide will take you through the process
step-by-step.
New Users begin with Step 1
on the following page 6.
Existing SMA
review
thecan
Questex
Portal
Send users
My Adcan
(SMA)
users
reviewAd
the
details
on
page
6
or
jump
right
in
at
Step
2
on
North Coast Media Ad Portal details on page 6, page 7.
or jump right in at Step 2 on page 7.
2
2
Creating an Account
STEP 1: Creating an Account
Registering for a free North Coast Media Ad Portal
account is the first step. To get started, go to
http://northcoastmedia.sendmyad.com
and complete the initial information page.
If you are an existing Send My Ad (SMA) user, you
can use your existing registration by clicking here.
If you are a new user, complete the information
fields to setup your account. Asterisks (*) denote
required information.
This box MUST be checked to continue!
Once you’ve provided all information and have
agreed to the standard terms of service, click the
“I accept, create my account” button at the
bottom of the form, and you will automatically
be logged into your account.
3
System Requirements
To use the North Coast Media Ad Portal you must have these minimum requirements:
• Firefox 7.0, Safari 5.0, Google Chrome, or Internet Explorer 8.
• Adobe Flash Player 10+ to upload and trim ads; available here: http://get.adobe.com/flashplayer
• JavaScript must be enabled
• Cookies for sendmyad.com must be accepted
• Minimum screen resolution of 1024 × 768
4
File Requirements
All advertising material must be single page PDF (if your ad is running as a spread, you must export your file as a one
page PDF file by clicking on the “spread” box when exporting.)
PDFs should conform to the PDF/X-1a specification. However, this is not always possible. If you have any
questions regarding acceptable file formats, please contact your Production Manager directly.
Image Resolution
Image resolution must be greater than 225 dpi and less than 25400 dpi.
Low resolution images may not print as sharply as intended, and we cannot be held responsible for the
quality of the outcome. If the images in your file were originally high resolution, but are being flagged at
a lower resolution, please check your settings, and ensure that your images are not being downsampled
when converting to a PDF. If you would like to proceed with submitting a file that contains low resolution
images, North Coast Media does allow you to approve the ad despite this warning if you believe the image
resolution is sufficient. You assume full responsibility for the print quality of the ad if you approve it.
Document Requirements
If your file has crop marks make sure they are offset at least 18 points or 1/8” (0.125”) to keep them out of
the bleed area of the ad.
Total Ink Density should not exceed 300%.
Document cannot have transparency.
Transparencies can introduce problems to your final page, specifically when placing a PDF containing
transparent objects into Quark. Quark cannot handle transparent data, and flattens it using its own
embedded controls, which may cause unintended results. If you are using an Adobe based design program
(i.e. InDesign), please remember to flatten all linked files before directly distilling a postscript or PDF file.
Document cannot be encrypted.
Font Requirements
All fonts must be embedded.
Document cannot contain any of the following font types:
Artificial Outline fonts
MultipleMaster fonts*
*These fonts may not print properly. Some problems encountered with these font types include type defaulting to Courier, or
files printing with the jagged appearance of a corrupted font. Remember also that all fonts used should be loaded in your font
manager (i.e. Suitcase, ATM and Font Book) before creating your PDF file.
5
Questex
Ad Portal
Dashboard
North Coast
Media
Ad Portal
Dashboard
The “Dashboard” is accessed by clicking on the “Dashboard” link in the upper left of the navigation
bar. Key areas of this screen:
A
Click on the “Send
“Send Files”
Files” link,
link,under
under“Actions”
“Actions”totosend
sendaanew
newad
adtotoNorth
Questex.
Alternately,
you can
Coast
Media. Alternately,
click
on click
the “Send
Ad” My
button
the black
center
of the
you can
on theMy
“Send
Ad”inbutton
in the
blackarea
center
areapage.
of the page.
B
Click on “Print Ads” under the “View” section to process a pickup, view uploaded ads, and
check ad status. Refer to Appendix: Managing an Ad for more information.
C
“Ad Sizes” allows you to view available publications, ad sizes, and related dimensions.
D
“Users”, “Groups”, and “Company Profile” links allow you to set up access for other members of
your organization.
E
Click
Coast
Ad Portal Frequently
Asked Questions
Click these
these areas
areas to
to read
read the
theNorth
Questex
Ad Media
Portal Frequently
Asked Questions
(FAQs). (FAQs).
F
Prefer video? Watch tutorials by clicking either of these links.
G
Get Help at any time by click here. (see Technical Support on page 15).
E
G
A
B
C
D
F
!
!
!
IMPORTANT NOTE: ALWAYS use the system’s “Back” button within the
interface located in the upper left corner of the screen. Using the button in
your browser will back you out of the system, and you will have to log in
again and start the entire process over.
66
Send a a
PDF
Send
PDF
1. From the “Dashboard” view, select “Send
Files” under “Actions” from the left column.
2. Select the publication that the ad is running in.
3. Fill out each field listed. You can click the
“?” next to each item to view additional information about what is being requested.
4. Select the ad size from
the list of ad specs. In
many cases, there may
be separate entries for the
“Bleed” and “Non Bleed”
specs. Make sure to select
the correct ad size that
matches your Insertion
Order.
5. Specify a color profile
in the “Ad Color” option,
pick the one that is most
appropriate to your ad.
CMYK or Spot. Use Spot
on verification from the
Publisher that you are
running a Pantone color.
6. Specify a Proof Type from the list
list of
of available
availableoptions.
options.IfIfyou
youchoose
choosenot
nottotosend
senda aproof,
proof,you
youmust
must
agree to the North
Questex
Proof
Waiver
pop-up
window.
Coast
Media
Waiver
pop-up
window.
7. Select the Issue(s) that you wish to have your ad run in. Note: you can specify multiple issues by
selecting an additional issue from the drop down once the first issue you selected has been added to the
list.
8. In the Additional Instructions box you can type in any
additional information that the magazine might need.
8. Click “Choose Ad”.
9. In the “Step 3 of 3” window, select “Browse For File”
and select the file you wish to upload. Click “Open”.
10. Click “Upload”.
77
Viewing
the
Preflight
Report
Viewing
The
Prefl
ight Report
Once the file
file is
is uploaded
uploaded itit will
willautomatically
automaticallystart
starttotopreflight
preflighttoto
the
Questex
cations.
Once the
the
North
Coastspecifi
Media
specifications.
ad
is
fi
nished
processing
you
will
see
a
preview
of
it
and
on
the
right
hand
side
the
prefl
ight
report
with
Once the ad is finished processing, you will see a preview of it. You will also see
preflight report with
some suggested action
action buttons
buttons.on the right hand side.
There are three conditions that the ad may have. Depending on these conditions there will be different
suggested action buttons available.
1. “This Ad has Serious Errors” This means that the file did not pass preflight. If this happens you can not
continue. You must go back to your document and fix the error. Once that is done then you can click the
“Revise Ad Button” and upload the new file.
NOTE: when reviewing the error
if you place your cursor over the
text of the error, the object in the
preview will highlight.
A) By hovering your cursor
over the error message here...
B) This area will highlight and
will help you identify where the
error is.
2. “This Ad has warnings” This indicates that the file has warnings in
the preflight report. Please review
the warnings on the right hand
side of the window. Also, make
sure you verify that the preview is
accurate, both in positioning and
content. If you need to reposition
the ad click the “Reposition” button under Action (see page 10).
3. “This Ad Must be repositioned” This means the trim size
of the PDF does not match the specification. You must reposition it before continuing. Click the Reposition button (see
page 10).
88
Viewing
the Preflight Report continued
continued - Viewing The Preflight Report
4. If you are satisfied with your results, you can click the “Approve Ad” button. Once you
have approved the ad the magazine will be notified that they have received an ad and the
contact in the job ticket will get an e-mail notification.
5. If you are NOT satisified with the ad’s position or content, click “Reject Ad”. If you reject
the ad, you will be prompted to give a reason and you will have the opportunity to upload a
new file (or select a new ad size).
NOTE: You may only revise a file twice. If you are having difficulties with fixing a file, or
need to do multiple revisions, please contact the Production Manager.
9
9
Repositioning
an
Repositioning
an Ad
Ad
Once you see the preview of your ad after processing, you may see that the file is not positioned correctly. This could be due to the fact that the trim does not match the specification that you chose or it
just needs some minor adjustments, for example to move the ad so the type is in the live area.
To Reposition, please click the “Reposition Ad” button, the trim tool will now load.
A new screen will appear with tools and you will see your ad with colored boxes
around it. The red box is the safety of the ad. The green represents trim box and blue is
the bleed, and the magenta lines are centering guides (these can be toggled on and off).
Using only the “Move Image” tool, you can now drag the image of your ad around until it centers within the boxes properly. To help you get more accurate you can use the magnify glass or the zoom slider to
zoom in to a particular area of the ad. Then you can use the arrow keys on the keyboard to “nudge” the
ad into place.
Use the hand tool to move your “canvas”.
Also, you can turn on center lines if you wish they are located under the tool bar.
Move Image Tool
Move Canvas Tool
Scaling - Can increase
or decrease the size of
your file here
The red box is the safety.
(No text should go outside this box).
The green box is the trim
line.
The blue box is the bleed.
In the example above, the ad is incorrectly positioned. The outer crop marks should line up with the blue
In the example above, the ad is incorrectly positioned. The outer crop marks should line up with the
lines (the blue box), and the inner cropmarks should line up with the green lines (the trim box). All text
blue lines (the bleed box), and the inner cropmarks should line up with green lines (the trim box). All
and critical elements should be inside the red lines (the safety box). Look at the corners of the ad, if your
text and critical elements should be inside the red lines (the safety box). Look at the corners of the ad, if
cropmarks are set up to North Coast Media’s trim size, they should line up with the (green) Trim box. Use
your cropmarks are set up to Questex’s trim size, they should line up with the (green) Trim box. Use the
the arrow keys on your keyboard to “nudge” the ad into place. You can also reduce or enlarge your file by
arrow keys on your keyboard to “nudge” the ad into place. You can also reduce or enlarge your file by
using the
using
the scale
scale feature.
feature.
10
10
Repositioning
an Ad
continued
Repositioning
an Ad
continued -
Once you are satisfied with how the image is positioned, please click the “Trim and Save” button in the
upper right corner. This will save your positioning and will re-preflight the file. Once you are back in the
view screen and are happy with the content and position click “APPROVE AD”, this must be done or
the magazine will not be notified that the ad file is ready.
11
11
Manage
Ads
Manage Ads
At any time you can see what ads have been uploaded and what stage they are in.
To manage ads,
ads simply
your North
Questex
account
going to
with
simply log into your
Coast
Mediabyaccount
byhttp://questex.sendmyad.com
going to
your
user name and password. Or if youwith
are your
already
and
viewing Or,
an ad
click
“Back”
buthttp://northcoastmedia.sendmyad.com
userlogged
name in
and
password.
if you
arethe
already
loggedton
(seeviewing
bottoman
of ad,
page
6). the “Back” button (see bottom of page 6).
in and
click
On the left hand side of the screen you will see the available options.
1. Dashboard - This will take you to a screen that will show you some
options of things you can do like send an ad or a revise.
2. Send Files - This will start the sending process of a new ad.
3. Print Ads - This will allow you to browse all of your ads that you have
uploaded.
4. Ad sizes - This is a list of available ad specifications for the Questex
titles.
5. Users/Groups/Company Profile - These are advanced features if you
want someone in your organization to modify access right to people in
your organization.
To see all your ads simply click the Print Ads option under View. You will be
brought to a thumbnail view of every ad that you have uploaded. If you want to
see a list view click the List view button.
View by Thumbnail or List
In both views you can see information about the ads. If you click on any ad it will open so you can view
it. In the list view you can sort any of the columns by clicking the column header.
By default you are going see every ad for every publication. If you want, you can filter the list by publications by selecting the “All Publications” pull down. Further more you can filter even more by selecting
the “No Issues” pull down.
12
12
Manage
Ads continued
Manage
Ads
continued -
Every ad has a “Stage” assigned to it. This refers to where it is in the process.
1. “Advertiser Approval”- This indicates that the file has not
been approved yet. The publication HAS NOT been notified
until the ad is approved. Further action is required for these ads.
Click on the ad to view the preflight report and re-reposition the
ad if necessary. Once you are satisfied with the positioning and
the preflight warnings click the APPROVE AD BUTTON.
2. “Rejected”- This indicates there is a problem with the ad.
Either because it failed preflight or the ad needs to be repositioned. Click on the ad to view the preflight report.
3. “Ad Completed”- This indicates that everything is done and
the publication has been notified.
13
13
Pickup
PickupAds
Ads
It’s easy to pickup
Coast
pickup an
an ad
ad that
that was
was previously
previouslysubmitted
submittedthrough
throughthe
theNorth
Questex
AdMedia
PortalAd
andPortal,
resubmit it to
run in
anotherit publication.
and
resubmit
to run in another publication.
To pickup your ad, go to the “Print Ads” section under “View” in the tool bar (as previously discussed on
page 12). You can pickup any ad that is in the “Completed” stage—–be sure to confirm that your ad is in
this stage.
Select the ad you would like to pickup by clicking on
its thumbnail.
The ad will then appear in a preview screen. On the
right-hand bar, you will see six buttons: choose “Pickup Ad.”
Once you’ve selected this button, follow these steps to
complete the pickup process:
1. Choose the publication you want to send the ad to
from the drop down menu. Then select your size and
issue. If you have any additional instructions, please
include them in the last box. Then click “Confirm
Pickup.”
2. Your ad will automatically be preflighted again.
If you approve of the ad in the preview box, click
“Approve Ad” to
submit your pickup to Questex.
14
14
Technical
Support
Technical
Support
Send My Ad is loaded with lots of video tutorials. At any point during the process you can click on
Get Help.
Here you will find links to lots of self help resources, including Frequently Asked Questions (FAQs), the
SMA Blog, a link to do a Speed Test on your internet connection if you are having trouble uploading a
file, and lots of Quick Start Videos to help you navigate around the site.
There is also the link Ask a Question. Here you can send an email to the Techinal support staff at SMA
if you encouter a problem and can’t figure out what you need to do next.
15
15