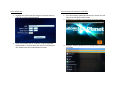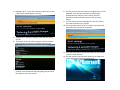
1
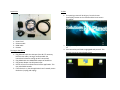
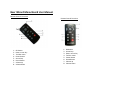
Beer Wizard Menu Board User Manual Remote Control Functions Remote Control Functions 1‐
2‐
3‐
4‐
5‐
6‐
7‐
8‐
1‐
2‐
3‐
4‐
5‐
6‐
7‐
8‐
OK button Return arrow key Task Bar menu Power button Arrow keys Home button Volume up Volume down OK Button Arrow keys Return arrow key Task bar menu Power Button Home Button Volume up Volume Down To Start Accessories 1‐ The opening screen will be all gray. Press the home (pause/play) button on the remote and the home screen will appear. 1‐
2‐
3‐
4‐
Power Cord Ethernet cable HDMI cable Remote Turning on the device 2‐ Highlight the square of 16 boxes as shown above and press ok. 3‐ Press arrow key until ELIO is highlighted and press ok. This will take you to the menu board screen. 1‐ Plug Ethernet cable into LAN port (Use Wi‐Fi if necessary but Ethernet cable is strongly recommended. See instructions below for setting up Wi‐Fi connection) 2‐ Plug HDMI cable into HDMI video output of the device 3‐ Plug power adapter into DC power input 4‐ Device will turn on and auto‐boot into the application. This may take 30‐60 seconds. 5‐ If the device is on, but the application hasn’t started, restart the device. (unplug and replug) Entering URL address 4‐ You should arrive at the menu board screen 5‐ The return arrow (menu button) will return you to the settings page if needed (URL should be pre‐loaded. Can obtain if not or problems occur) 1‐ Using the arrow keys on the remote Highlight the URL box and press the OK 2‐ On the remote press the right arrow key to move the cursor to the far right of the URL box 3‐ This will cause the keyboard to appear on the bottom of the screen 4‐ Delete the current URL and enter the desired URL provided by The Growler Station Corp. 5‐ After completion press the return arrow (or menu) key on the remote to exit the keyboard Setting Time Zone 1‐ Go to settings menu 2‐ Scroll down to highlight date & time and press ok Entering start and end time 1‐ Using the arrow keys on the remote‐ highlight the left hour box in start time, pressing ok will make the keyboard appear on the bottom of the screen 2‐ Delete the current number in the box by using the delete key on the keyboard. Select the desired hour number on the keyboard by using the arrow keys on the remote and press enter to set the starting hour. 3‐ Press the return arrow (menu) to exit keyboard 4‐ Highlight the right minutes box in start time, press ok to make keyboard appear. Enter in the desired minutes starting time using the arrow keys. (24‐hr time 0= hour start, 30= half hour) 5‐ Repeat this same process for the end time hours and minutes. (Note 23:00 = 11:00 PM) 3‐ Scroll down to highlight select time zone and press enter 4‐ Scroll to desired time zone and press enter Enter refresh rate Turn on wireless to connect to local Wi‐Fi 1‐ Highlight the refresh rate box using the remote arrow keys, select ok to make keyboard appear. 2‐ Enter in the refresh rate in “seconds” using the keyboard. (600 seconds= 5 minutes) Press the return arrow (menu) on the remote to exit the keyboard when finished. 1‐ Press home button (pause/play button) on remote, this will take you to the devices home screen 2‐ Highlight the “settings” icon and press ok on the remote 3‐ Highlight “wireless & networks” on settings menu, press ok on remote
4‐ Highlight “Wi‐Fi”, press ok on remote for Wi‐Fi turn on box, a check mark should appear in the box
8‐ Use the arrow keys on the remote to navigate the on screen keyboard, enter the Wi‐Fi password by selecting the appropriate keys and press ok on remote, after the password is entered push the return arrow (or menu) button. 9‐ Use the remote arrows to highlight the “connect” option, press the ok button on the remote 10‐ It will say underneath the “Wi‐Fi” section at the top of the menu when the connection is obtained
5‐ Highlight Wi‐Fi settings in settings menu and press ok on remote 6‐ The box will search for a Wi‐Fi network, find the network you would like to connect to, highlight it and press ok 11‐ Press the home button (pause/play button) on the remote to return to the desk top 12‐ Use the arrows on the remote to select the 16 square box on the right side of the screen and press ok
7‐ If the network is secured, a password will need to be entered, enter the password by highlighting the password box and press ok on the remote Trouble Shooting 13‐ You will be taken to an icon screen, use the arrows on the remote to highlight the Elio icon, press ok
14‐ The menu screen should now launch #1 Problem=screen is black, probably means the menu box is off‐ trouble shoot= Press the return arrow button (menu button), this will take you to the settings page. Change your start/end times and select activate. If your start and end times are ok, you may need to check your time zone settings.