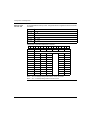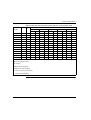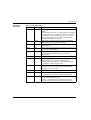
1
Quantum
140 NOA 622 00
User Manual
840 USE 497 00 eng
2
Table of Contents
Safety Information . . . . . . . . . . . . . . . . . . . . . . . . . . . . . . . . . . . . 7
About the Book . . . . . . . . . . . . . . . . . . . . . . . . . . . . . . . . . . . . . . . 9
Part I INTERBUS and INTERBUS Communication with
TSX Quantum 140 NOA 622 00 . . . . . . . . . . . . . . . . . . . . 11
Overview . . . . . . . . . . . . . . . . . . . . . . . . . . . . . . . . . . . . . . . . . . . . . . . . . . . . . . . 11
Chapter 1
General . . . . . . . . . . . . . . . . . . . . . . . . . . . . . . . . . . . . . . . . . . . . 13
At a Glance . . . . . . . . . . . . . . . . . . . . . . . . . . . . . . . . . . . . . . . . . . . . . . . . . . . . . 13
Overview . . . . . . . . . . . . . . . . . . . . . . . . . . . . . . . . . . . . . . . . . . . . . . . . . . . . . . . 14
General Architecture of an INTERBUS Field Bus System . . . . . . . . . . . . . . . . . 15
Chapter 2
Performance. . . . . . . . . . . . . . . . . . . . . . . . . . . . . . . . . . . . . . . . 23
At a Glance . . . . . . . . . . . . . . . . . . . . . . . . . . . . . . . . . . . . . . . . . . . . . . . . . . . . .
Protocols . . . . . . . . . . . . . . . . . . . . . . . . . . . . . . . . . . . . . . . . . . . . . . . . . . . . . . .
Network Control. . . . . . . . . . . . . . . . . . . . . . . . . . . . . . . . . . . . . . . . . . . . . . . . . .
Response Time for the Application . . . . . . . . . . . . . . . . . . . . . . . . . . . . . . . . . . .
Data Transfer Rate per Station . . . . . . . . . . . . . . . . . . . . . . . . . . . . . . . . . . . . . .
Chapter 3
The 140 NOA 622 00 as INTERBUS Master . . . . . . . . . . . . . . . 29
Overview . . . . . . . . . . . . . . . . . . . . . . . . . . . . . . . . . . . . . . . . . . . . . . . . . . . . . . .
The 140 NOA 622 00 as INTERBUS-Master . . . . . . . . . . . . . . . . . . . . . . . . . . .
Possible uses of the 140 NOA 622 00 depending on CPU type . . . . . . . . . . . . .
Comparison of the INTERBUS Master Modules . . . . . . . . . . . . . . . . . . . . . . . . .
Chapter 4
23
24
25
26
27
29
30
32
33
Accessories and Replacement Parts . . . . . . . . . . . . . . . . . . . . 35
Overview . . . . . . . . . . . . . . . . . . . . . . . . . . . . . . . . . . . . . . . . . . . . . . . . . . . . . . .
Accessories and Replacement Parts for Software . . . . . . . . . . . . . . . . . . . . . . .
Accessories and Replacement Parts for Copper Lines. . . . . . . . . . . . . . . . . . . .
Accessories and Replacement Parts for Fibre Optic Cable Technology. . . . . . .
35
36
36
37
3
Part II Module descriptions . . . . . . . . . . . . . . . . . . . . . . . . . . . . . 39
Overview . . . . . . . . . . . . . . . . . . . . . . . . . . . . . . . . . . . . . . . . . . . . . . . . . . . . . . . 39
Chapter 5
140 NOA 622 00: Communication Module for INTERBUS . . . 41
Overview . . . . . . . . . . . . . . . . . . . . . . . . . . . . . . . . . . . . . . . . . . . . . . . . . . . . . . . 41
Brief description . . . . . . . . . . . . . . . . . . . . . . . . . . . . . . . . . . . . . . . . . . . . . . . . . . 42
Description of the Operating and Display Elements (LEDs) . . . . . . . . . . . . . . . . 44
Configuration . . . . . . . . . . . . . . . . . . . . . . . . . . . . . . . . . . . . . . . . . . . . . . . . . . . . 45
Technical Data . . . . . . . . . . . . . . . . . . . . . . . . . . . . . . . . . . . . . . . . . . . . . . . . . . . 48
Part III Software . . . . . . . . . . . . . . . . . . . . . . . . . . . . . . . . . . . . . . . 49
At a Glance . . . . . . . . . . . . . . . . . . . . . . . . . . . . . . . . . . . . . . . . . . . . . . . . . . . . . 49
Chapter 6
Commissioning . . . . . . . . . . . . . . . . . . . . . . . . . . . . . . . . . . . . . 51
At a Glance . . . . . . . . . . . . . . . . . . . . . . . . . . . . . . . . . . . . . . . . . . . . . . . . . . . . . 51
Principle of Commissioning . . . . . . . . . . . . . . . . . . . . . . . . . . . . . . . . . . . . . . . . . 52
Software Startup for using the 140 NOA 622 00 . . . . . . . . . . . . . . . . . . . . . . . . . 53
Shutdown and Startup Procedure of the 140 NOA 622 00 . . . . . . . . . . . . . . . . . 60
Addressing Modes of the Inputs and Outputs . . . . . . . . . . . . . . . . . . . . . . . . . . . 62
Firmware for the INTERBUS Master . . . . . . . . . . . . . . . . . . . . . . . . . . . . . . . . . . 65
Chapter 7
Configuration and Diagnostics. . . . . . . . . . . . . . . . . . . . . . . . . 67
Overview . . . . . . . . . . . . . . . . . . . . . . . . . . . . . . . . . . . . . . . . . . . . . . . . . . . . . . . 67
Diagnostics and Control via the Generic Bus . . . . . . . . . . . . . . . . . . . . . . . . . . . 68
Details about the Status Words . . . . . . . . . . . . . . . . . . . . . . . . . . . . . . . . . . . . . . 71
Chapter 8
Using the PCP Channel . . . . . . . . . . . . . . . . . . . . . . . . . . . . . . . 79
Overview . . . . . . . . . . . . . . . . . . . . . . . . . . . . . . . . . . . . . . . . . . . . . . . . . . . . . . . 79
the PCP channel with the 140 NOA 622 00. . . . . . . . . . . . . . . . . . . . . . . . . . . . . 80
Example of Addressing a PCP Node . . . . . . . . . . . . . . . . . . . . . . . . . . . . . . . . . . 81
Chapter 9
Groups and Alternatives . . . . . . . . . . . . . . . . . . . . . . . . . . . . . . 83
Overview . . . . . . . . . . . . . . . . . . . . . . . . . . . . . . . . . . . . . . . . . . . . . . . . . . . . . . . 83
Groups . . . . . . . . . . . . . . . . . . . . . . . . . . . . . . . . . . . . . . . . . . . . . . . . . . . . . . . . . 84
Alternatives . . . . . . . . . . . . . . . . . . . . . . . . . . . . . . . . . . . . . . . . . . . . . . . . . . . . . 88
Part IV EFB descriptions . . . . . . . . . . . . . . . . . . . . . . . . . . . . . . . . 93
Overview . . . . . . . . . . . . . . . . . . . . . . . . . . . . . . . . . . . . . . . . . . . . . . . . . . . . . . . 93
Chapter 10
IBS_READ: Reading variables via INTERBUS . . . . . . . . . . . . 95
Overview . . . . . . . . . . . . . . . . . . . . . . . . . . . . . . . . . . . . . . . . . . . . . . . . . . . . . . . 95
Brief Description. . . . . . . . . . . . . . . . . . . . . . . . . . . . . . . . . . . . . . . . . . . . . . . . . . 96
Representation. . . . . . . . . . . . . . . . . . . . . . . . . . . . . . . . . . . . . . . . . . . . . . . . . . . 96
Runtime error . . . . . . . . . . . . . . . . . . . . . . . . . . . . . . . . . . . . . . . . . . . . . . . . . . . . 98
4
Chapter 11
IBS_SEND_REQ: Diagnostic query on the
INTERBUS Master 140 NOA 622 00 . . . . . . . . . . . . . . . . . . . . . 101
Overview . . . . . . . . . . . . . . . . . . . . . . . . . . . . . . . . . . . . . . . . . . . . . . . . . . . . . .
Brief Description . . . . . . . . . . . . . . . . . . . . . . . . . . . . . . . . . . . . . . . . . . . . . . . .
Representation . . . . . . . . . . . . . . . . . . . . . . . . . . . . . . . . . . . . . . . . . . . . . . . . .
Runtime errors. . . . . . . . . . . . . . . . . . . . . . . . . . . . . . . . . . . . . . . . . . . . . . . . . .
Examples of Request/Response Blocks . . . . . . . . . . . . . . . . . . . . . . . . . . . . . .
Chapter 12
101
102
102
104
105
IBS_WRITE: Writing variables to INTERBUS PCP nodes . . . 113
Overview . . . . . . . . . . . . . . . . . . . . . . . . . . . . . . . . . . . . . . . . . . . . . . . . . . . . . . 113
Brief Description . . . . . . . . . . . . . . . . . . . . . . . . . . . . . . . . . . . . . . . . . . . . . . . . 114
Representation . . . . . . . . . . . . . . . . . . . . . . . . . . . . . . . . . . . . . . . . . . . . . . . . . 114
Appendices
. . . . . . . . . . . . . . . . . . . . . . . . . . . . . . . . . . . . . . . . . . . . . 117
At a Glance . . . . . . . . . . . . . . . . . . . . . . . . . . . . . . . . . . . . . . . . . . . . . . . . . . . . 117
Appendix A
Example for diagnosis and control of a slave . . . . . . . . . . . . 119
Overview . . . . . . . . . . . . . . . . . . . . . . . . . . . . . . . . . . . . . . . . . . . . . . . . . . . . . . 119
Example for control of a slave via a generic bus. . . . . . . . . . . . . . . . . . . . . . . . 120
Example of Diagnosing a PCP Node . . . . . . . . . . . . . . . . . . . . . . . . . . . . . . . . 121
Appendix B
Upgrading from 140 NOA 611 x0 to 140 NOA 622 00 . . . . . . 125
Overview . . . . . . . . . . . . . . . . . . . . . . . . . . . . . . . . . . . . . . . . . . . . . . . . . . . . . . 125
Requirements for changing from 140 NOA 611 x0 to 140 NOA 622 00 . . . . . . 126
Instructions for upgrading from 140 NOA 611 x0 to 140 NOA 622 00 . . . . . . . 127
Appendix C
Import CMD G4 Projects in SyCon . . . . . . . . . . . . . . . . . . . . . 129
Importing CMD G4 projects into SyCon . . . . . . . . . . . . . . . . . . . . . . . . . . . . . . 129
Glossary
. . . . . . . . . . . . . . . . . . . . . . . . . . . . . . . . . . . . . . . . . . . . . 131
Index
. . . . . . . . . . . . . . . . . . . . . . . . . . . . . . . . . . . . . . . . . . . . . 135
5
6
Safety Information
§
Important Information
NOTICE
Read these instructions carefully, and look at the equipment to become familiar with
the device before trying to install, operate, or maintain it. The following special
messages may appear throughout this documentation or on the equipment to warn
of potential hazards or to call attention to information that clarifies or simplifies a
procedure.
The addition of this symbol to a Danger or Warning safety label indicates
that an electrical hazard exists, which will result in personal injury if the
instructions are not followed.
This is the safety alert symbol. It is used to alert you to potential personal
injury hazards. Obey all safety messages that follow this symbol to avoid
possible injury or death.
DANGER
DANGER indicates an imminently hazardous situation, which, if not avoided, will
result in death, serious injury, or equipment damage.
WARNING
WARNING indicates a potentially hazardous situation, which, if not avoided, can result
in death, serious injury, or equipment damage.
CAUTION
CAUTION indicates a potentially hazardous situation, which, if not avoided, can result
in injury or equipment damage.
840 USE 497 00 June 2005
7
Safety Information
PLEASE NOTE
8
Electrical equipment should be serviced only by qualified personnel. No responsibility is assumed by Schneider Electric for any consequences arising out of the use
of this material. This document is not intended as an instruction manual for untrained
persons.
© 2005 Schneider Electric. All Rights Reserved.
840 USE 497 00 June 2005
About the Book
At a Glance
Document Scope
This manual is intended for users who want to commission and maintain
communication master modules on an INTERBUS system. Knowledge about the
Quantum, the programming software Concept and the bus configuration tool SYC
SPU LF• CD28 M (called SyCon in following texts) is required. Additionally, the
reader should be familiar with INTERBUS.
Validity Note
This User Manual is valid for Concept versions starting with 2.6 SR1 for Microsoft
Windows 98, Windows 2000, Windows XP and Windows NT.
The NOA 622 00 is an INTERBUS connection module and is compatible to
INTERBUS Firmware Generation 4.
The configuration of the INTERBUS takes place using the sofware SYC SPU LF•
CD28 M (called SyCon in following texts). Screen shots and procedures concerning
this software shown in this book refer to version 2.7xx of SyCon.
Related
Documents
Title of Documentation
Reference Number
Quantum Hardware User Manual
840 USE 100 00
Concept User Manual
840 USE 503 00
Note: Current Information about the INTERBUS can be found on the INTERBUS
Club Homepage: http://www.interbusclub.com.
840 USE 497 00 June 2005
9
About the Book
Product Related
Warnings
CAUTION
The guidelines provided should be observed for applications
using controllers with technical safety requirements.
Repairs to components should only be carried out by the manufacturer
for safety reasons and to secure documented system data.
Failure to follow this precaution can result in injury or equipment
damage.
User Comments
10
We welcome your comments about this document. You can reach us by e-mail at
[email protected]
840 USE 497 00 June 2005
INTERBUS and INTERBUS
Communication with
TSX Quantum 140 NOA 622 00
I
Overview
What will you
find in this
section?
This section contains general information concerning INTERBUS and for
configuration with TSX Quantum 140 NOA 622 00.
What's in this
Part?
This part contains the following chapters:
Chapter
1
840 USE 497 00 June 2005
Chapter Name
General
Page
13
2
Performance
23
3
The 140 NOA 622 00 as INTERBUS Master
29
4
Accessories and Replacement Parts
35
11
INTERBUS and INTERBUS Communication
12
840 USE 497 00 June 2005
General
1
At a Glance
Introduction
This chapter describes the most important aspects of data communication via an
INTERBUS system.
What's in this
Chapter?
This chapter contains the following topics:
840 USE 497 00 June 2005
Topic
Page
Overview
14
General Architecture of an INTERBUS Field Bus System
15
13
General
Overview
What is
INTERBUS?
INTERBUS is a serial field bus system used to connect sensors and actuators which
is designed for industrial operating environments.
This field bus system uses the master-slave method. The master manages and
coordinates bus access. It sends and receives data for all connected nodes.
The following nodes can be connected to the INTERBUS (among others):
Branch interface modules
Input/output modules from the TSX Momentum product family
INTERBUS/AS-I Gateways
Frequency converters (ATV 18, 58 and 66)
TegoPower devices
INTERBUS compatible devices from other manufacturers
l
l
l
l
l
l
Note: Current Information about the INTERBUS can be found on the INTERBUS
Club Homepage: http://www.interbusclub.com.
Branch interface
modules
The branch interfaces work as INTERBUS slaves and support then following
functions:
l Make or brake connections to an installation bus, a local bus or a remote bus
connected to the remote bus
l The supply for the bus electronics on the input/output modules (only for branch
interfaces on the installation remote bus)
l Isolation of the remote bus segments
l Reporting faulty functions using a potential-free alarm output
Input/output
modules
The input/output modules from the various product families allow sensors and
actuators to be connected to the INTERBUS field bus system which are used to
control or monitor machines or processes.
14
840 USE 497 00 June 2005
General
General Architecture of an INTERBUS Field Bus System
Overview
840 USE 497 00 June 2005
The INTERBUS is hierarchically structured. The architecture is made up of:
Remote bus with remote bus branches (See Remote Bus, p. 17)
Installation remote bus branches (See Installation Remote Bus, p. 20)
Local buses (See Local Bus, p. 21)
INTERBUS loop (See INTERBUS Loop, p. 21)
l
l
l
l
15
General
INTERBUS
architecture
The following example provides a clear representation of an INTERBUS
architecture:
CPU
Remote bus
TSX Quantum with INTERBUS Master
NOA 622
Remote bus
I/O module
ATV58
Remote bus branch
BK
BK
Installation remote bus
I/O module protect type IP65
Branch
level 1
BK
Remote bus branch
BK
Branch
level 2
BK
Remote bus branch
Branch
level 3
BK
16
840 USE 497 00 June 2005
General
Remote Bus
In the hierarchical structure of the INTERBUS architecture, the remote bus (RB) is
the main part of the bus structure. It is generated by the INTERBUS bus master. This
bus allows the longest distances within a system to be bridged.
The sections between 2 remote bus nodes are called segments. A bus branch
coming from a branch interface is called a remote bus branch.
Remote bus nodes are e.g.
l TSX Momentum modules
l Branch interface modules
840 USE 497 00 June 2005
17
General
Remote Bus
Branch
The remote bus branch is generated by a branch interface. The branch interface
itself is a remote bus node. The I/O modules on the remote bus branch are identical
to those on the remote bus.
INTERBUS network with remote bus branch
INTERBUS
Master
Remote bus
I/O module
Remote bus branch
Remote bus branch
Remote bus
(BK)
Branch interface
Note: With INTERBUS Firmware Generation 4, it is possible to create branches
("branch in branch"), also see picture INTERBUS architecture, p. 16.
18
840 USE 497 00 June 2005
General
Remote bus/
remote bus
branch technical
data
The following tables contain remote bus technical data.
Transfer properties
Transfer procedures
Differential signal transfer according to RS 485
Possible transfer media
Transfer rate
l
l
l
Copper cable, twisted pair, 5 conductor
Fiber optics line (HCS, polymer or glass fiber)
Infrared connection
500 kbit/s
Physical Attributes
Copper cable (Cu)
Maximum length of a segment
Maximum length of the cable
between...
400m
the connection module and the
first branch interface on the
remote bus
400 m
Two branch interfaces
400 m
the connection module and the
last station on the remote bus
12.8 km
Fiber optics line
HCS (200/ Polymer
230Nm)
(980/
1000Nm)
Glass fiber
Maximum length of a segment
300 m
50 m
2 500 m
Maximum length of the connection module and the 300 m
the cable between... first branch interface on the
remote bus
50 m
2 500 m
Two branch interfaces
300 m
the connection module and the 9 600 m
last branch interface on the
remote bus
Minimum length of the cable
(exception INT ↔ INT and INT ↔ BNO: 0.1m)
840 USE 497 00 June 2005
1m
50 m
2 500 m
1 600 m
> 80 km
1m
1m
19
General
Capacitance
Number of branch layers per
branch interface on the RB
main bus
"Branch in branch": Maximum 12
Number of slaves
Maximum 251 on the remote bus and in the entire network
Amount of I/O data
Maximum of 4096 input/output points
Groups
Possible, groups can be switched off
Supply for I/O modules
External supply voltage
Installation
Remote Bus
The installation remote bus (IRB) is a remote bus branch. It is generated by special
branch interfaces. These branch interfaces themselves are remote bus nodes. The
installation remote bus is isolated from the remote bus.
Often, I/O nodes on the installation remote bus have a special safety type (e.g. IP65,
IP67, etc.). The I/O modules on the installation remote bus are special modules that
cannot be used on the remote bus.
Installation
remote bus
technical data
The following tables contain INTERBUS installation remote bus technical data.
Transfer properties
Transfer procedures
RS 485 connection
Possible transfer media
Special cable (Cu, shielded, twisted pair, 8 conductor,
welding resistant) which is suited for
l the supply of input/output modules and sensors
with 24 V
l the data transfer
Transfer rate
500 kbit/s
Physical Attributes
Maximum length of the cable
between...
the branch interface and the first module
50 m
the branch interface and the last module
50 m
Electrical data
Maximum current load on the cable
4.5 A
Capacitance
20
Number of input/output modules
Maximum 251
Groups
Possible, groups can be switched off
Supply for I/O modules
Supply voltage also applied via the I/O bus
840 USE 497 00 June 2005
General
Local Bus
The local bus LB (peripheral bus) is generated by specific branch interfaces. The
modules on the local bus are I/O modules used to create a remote substation in a
switching cabinet. Products from other manufacturers using peripheral bus
technology can be coupled on the 140 NOA 622 00.
Local bus
technical data
The following tables contain INTERBUS local bus systems technical data.
Transfer properties
Transfer procedures
TTL
Possible transfer media
Special cable: CU, shielded, twisted pair, 14
conductor
Transfer rate
500 kbit/s
Physical Attributes
Maximum length of the cable
between...
the branch interface and the first module
1.5 m
two modules
1.5 m
the branch interface and the last module
10 m
Electrical data
Power consumption of a device
20 to 250 mA
Maximum power consumption
800 mA
Capacitance
Number of input/output modules
Maximum 8 modules
Groups
Possible
Supply for I/O modules
Supply voltage via bus cable or externally
Note: Inline modules are configured as local bus nodes in SysCon. For
performance characteristics and configuration details please refer to the
manufacturers specifications.
INTERBUS Loop
840 USE 497 00 June 2005
With the INTERBUS loop, remote sensors and actuators distributed on machines
and systems or e.g. modules with safety type IP67 are networked in a closed ring.
21
General
INTERBUS loop
technical data
The following tables contain INTERBUS loop system technical data.
Transfer properties
Transfer procedures
Modulated current signal
Possible transfer media
CU, unshielded, 2 conductor
Transfer rate
500 kbit/s
Physical Attributes
Maximum length of the cable
between...
the branch interface and the first module
20 m
two modules
20 m
the branch interface and the last module
200 m
Note: When using Loop 1, divide the physical properties values in half.
Electrical data
Maximum power consumption
1.8 A (Loop2), 1.5 A (Loop1)
Capacitance
Number of nodes
22
Maximum 63
Groups
Possible
Supply for I/O modules
Supply voltage via bus cable or externally
840 USE 497 00 June 2005
Performance
2
At a Glance
Introduction
This chapter describes the performance of an INTERBUS field bus system.
What's in this
Chapter?
This chapter contains the following topics:
840 USE 497 00 June 2005
Topic
Page
Protocols
24
Network Control
25
Response Time for the Application
26
Data Transfer Rate per Station
27
23
Performance
Protocols
Overview
The following protocols are possible with the INTERBUS master module
140 NOA 622 00:
l INTERBUS Protocol, p. 24
l PCP Protocol, p. 25
INTERBUS
Protocol
The INTERBUS protocol allows a high data throughput. The I/O data is transferred
in blocks which allow simultaneous and predictable updating of all nodes connected
to the network. The necessary transfer security is guaranteed using a CRC error test
in the protocol. Complex diagnostics make it possible to find the cause and location
of the error. Embedded message protocols allow complex parameter and message
data to be send via the INTERBUS network.
The basic principle of an open bus system is to allow data to be exchanged between
devices from different manufacturers. The data includes commands and I/O data
which is defined as a standard profile and with which the devices operate. Standard
profiles are available for drives, measurement encoders, robot controllers,
pneumatic controlled valves, etc. The INTERBUS protocol, EN 50254, is the
communication standard for these profiles. It represents an open standard for I/O
networks in industrial applications.
INTERBUS
Protocol Format
The protocol for the INTERBUS system has a hardware dependent structure and
was developed as a shift register. The I/O modules are like a chain of shift registers
connected to each other.
The main elements of the network are the two protocol chips. The INTERBUS
Protocol Master Chip (IPMS) on the master module controls the network. The serial
universal Processor Chip (SUPI) connects the I/O node to the network.
Process data words are clocked via the network in each cycle. Process data
containing output data are entered on the SUPI Chip, and then sent from there to
the respective actuator. The process data also contains input data coming from the
SUPI Chip which is sent on to the INTERBUS master. Please note that the process
data words contain input and output data. Therefore 16 clocks are required to
transfer a word. This gives the INTERBUS its extraordinary speed. Another property
of the protocol is that the input and output data is updated at the same time.
24
840 USE 497 00 June 2005
Performance
PCP Protocol
The Peripherals Communication Protocol (PCP) is used to exchange data between
peripheral devices (layer 2 of the OSI model). This protocol guarantees that
messages are broken down and reassembled correctly during transfer. All services
required to make and brake connections, as well as data transfer services are
available.
The PCP protocol is connection and object oriented (Client/Server type). It is only
used on intelligent I/O modules. When a connection is made, the Client and Server
exchange their data using the available object type. Object types are bytes, words,
ASCII characters, arrays, etc.
This protocol is mainly used to send initialization parameters to intelligent I/O
modules. The PCP protocol is only seldom used after the initialization is complete.
Communication on the PCP channel
Loop
Back
Process
Data
Process
Data
Node 1
Node 2
Process
Data
Process
Data
Node 3
Process
Data
PCPData
Node 4
Process
Data
Process
Data
Node 5
Node 6
CRC
Control
Network Control
Network
Operation
During initialization and operation of the network, the IPMS Chip simultaneously
transfers a control data telegram to all SUPI Chips in the network. For the SUPI
Chips to receive these messages at the same time, the shift register must be
bypassed.
INTERBUS
Telegrams
The INTERBUS architecture consists of frame telegrams. Each frame telegram
contains all network data. The identification telegram and the data telegram are the
two types of INTERBUS frame telegrams. Transfer telegrams begin with a "loopback" word. This word is used as code for the end of the identification telegram. All
network data (input and output data) follow the "loop-back" word. The last words in
the transfer telegram are the CRC word and control word. A telegram is sent on the
network between each byte shift.
Network Timing
INTERBUS cycle times are deterministic. They can be calculated with microsecond
precision when considering all network variables. The cycle time mainly depends on
the number of process data words. Please also include the influence of PCP
communication when calculating the INTERBUS system cycle time.
840 USE 497 00 June 2005
25
Performance
Response Time for the Application
At a Glance
The response time for the application is a logical response time which does not
contain the reaction time of the sensor and actuator interfaces.
It is the same as the time span between acquiring an input signal and setting an
output using INTERBUS.
Diagram
The following example provides a clear representation of the response time for an
application.
TSX Quantum with INTERBUS Master
140 CPU 434 12
NOA 622
Remote bus branch
IN1
MOVE
OUT1
Response time
IN1
BK
CPU scan time: 10 ms
Remote bus
170 DAI 340
Remote bus branch
OUT1
BK
170 DAO 840
Calculation
example
26
The table shows the various elements used to calculate the response time of the
application with the 140 NOA 622 00.
Number of I/O words
1
33
65
129
Number of modules
2
18
34
66
CPU scan time (in ms)
3.00
5.00
8.00
10.00
Application response time (in ms)
9.00 to
13.00
18.00 to
26.00
30.00 to
40.00
44.00 to
74.00
840 USE 497 00 June 2005
Performance
Data Transfer Rate per Station
Data transfer rate
The data transfer rate depends on the bandwidth of the PCP channel (1 byte control
information + n bytes user data) and from the INTERBUS polling time.
A bandwidth of...
and a polling time of...
results in a data rate of...
one word per cycle via the
PCP channel
3.27 ms
2.45 kbit/s
4.94 ms
1.62 kbit/s
8.27 ms
0.97 kbit/s
two words per cycle via the 3.27 ms
PCP channel
4.94 ms
7.34 kbit/s
8.27 ms
2.90 kbit/s
3.27 ms
17.13 kbit/s
four words per cycle via
the PCP channel
4.86 kbit/s
4.94 ms
11.34 kbit/s
8.27 ms
6.77 kbit/s
Note: The more words that are transferred together during a cycle, the more
efficient the communication. SyCon supports the shared transfer of 4 words.
840 USE 497 00 June 2005
27
Performance
28
840 USE 497 00 June 2005
The 140 NOA 622 00 as
INTERBUS Master
3
Overview
Introduction
This chapter describes the 140 NOA 622 00 as INTERBUS master.
What's in this
Chapter?
This chapter contains the following topics:
840 USE 497 00 June 2005
Topic
Page
The 140 NOA 622 00 as INTERBUS-Master
30
Possible uses of the 140 NOA 622 00 depending on CPU type
32
Comparison of the INTERBUS Master Modules
33
29
NOA 622 00 as INTERBUS Master
The 140 NOA 622 00 as INTERBUS-Master
Performance
The 140 NOA 622 00 is the INTERBUS master for the TSX Quantum and has the
following performance:
l Can be used with Concept Version 2.5 SR2 and up
l Support of PCP channels (Version 2.0)
In this version, the PCP channel can be up to 4 words, which can be addressed
logically or physically.
l Full compatibility with INTERBUS standards is guaranteed
l Data capacity to address up to 251 nodes
l Branch interfaces for remote bus branches can be configured
l Groups and alternative branches can be defined
l No process data preparation
l Macros and events cannot be created
l Forcing 0x/1x references on INTERBUS nodes is not possible
Note: The software package SYC SPU LF• CD28 M (SyCon) is needed to create
the INTERBUS configuration.
Method of
operation
The following graphic describes the how the 140 NOA 622 00 works.
Switch off
the module
Module is switched off
Configured Module
Communication
function
Switch on
the module
Module in self-test
phase
Reset
Non-configured
Module
Configuration
30
Self-test OK
840 USE 497 00 June 2005
NOA 622 00 as INTERBUS Master
Restrictions
Note: The INTERBUS coupler AS-BDEA-202 does not support INTERBUS
firmware generation 4, i.e. this coupler cannot be implemented together with 140
NOA 622 00. If such a coupler exists in the INTERBUS configuration, the coupler
as well as the following I/O-modules have to be replaced by suitable modules, e.g.
Modicon TSX Momentum modules, in case of convertion to 140 NOA 622 00.
Data exchange
Use as
INTERBUS
master
The table shows how the inputs and outputs are processed in the different operating
conditions:
If
Then
INTERBUS module is in RUN
mode
data is exchanged via the bus
PLC program is running
the inputs and outputs are updated
PLC program is stopped
the inputs are not updated
the outputs are in error mode (i.e. they are held or set to
zero).
140 NOA 622 00 is an INTERBUS master for the TSX Quantum and can only be
operated in the central backplane. A maximum of 251 nodes or 4096 I/O points are
allowed per NOA module.
The maximum number of nodes allowed in the entire INTERBUS configuration for a
Quantum SPS depends on the module type being used. For a typical module with
16 inputs and 16 outputs (e.g. 170 ADM 350 11), around 250 modules can be used
in the entire condiguration.
The INTERBUS slaves are connected to the bus master 140 NOA 622 00 in
Concept via the generic bus. The maximum configuration size of the Generic Bus is
64 kB for all NOA 622 modules together.
After selecting the generic bus in the I/O map, enter the start addresses for the
status and activation words.
The bus and slave specific data is placed in the status area for status information
and diagnostics. You enter a 3x reference here as start address for a range of 207
consecutive words.
Data to control the INTERBUS node is entered in the activation area. You enter a 4x
reference here as start address for a range of 25 consecutive words.
Additional information concerning utilization of the status and activation words can
be found in chapter Diagnostics and Control via the Generic Bus, p. 68.
The INTERBUS slaves can be assigned the following references in Concept:
l 0x/1x references
l 3x/4x references
840 USE 497 00 June 2005
31
NOA 622 00 as INTERBUS Master
Possible uses of the 140 NOA 622 00 depending on CPU type
Number of
INTERBUS
masters
depending on
CPU type
Note: In Modsoft / ProWorx NxT, the 140 NOA 622 00 cannot be operated.
Possible uses with the 140 NOA 622 00
CPU type
Concept IEC and
LL984
Concept LL984
Concept IEC
140 CPU 113 02
Use of the 140 NOA 622 00 is not possible
140 CPU 113 03
max. 2
max. 2
max. 2
140 CPU 213 04
max. 2
max. 2
max. 2
140 CPU 424 02
Use of the 140 NOA 622 00 is not possible
140 CPU 434 12
max. 6
max. 6
-
140 CPU 534 14
max. 6
max. 6
-
Note: For pure Concept LL984 applications you cannot use PCP communication.
Furthermore, only a limited Diagnosis is possible in this case.
32
840 USE 497 00 June 2005
NOA 622 00 as INTERBUS Master
Comparison of the INTERBUS Master Modules
Overview of the
Properties
Properties of the INTERBUS master modules
Physical addressing
840 USE 497 00 June 2005
140 NOA 622 00
140 NOA 611 10
140 NOA 611 00
(x)
x
x
Logical addressing
x
x
-
PCP channel
x
x
-
PCP version
2.0
1.5
-
PCP channel size
1, 2, 4 words
1 Word
-
Configuration test
during
commissioning
x
x
x
Software for bus
configuration
SyCon
CMD Tool
(INTERBUS
Generation 3)
CMD Tool
Text on LED field
x
x
x
Diagnostics display
(3 digits)
-
x
-
Configurable switchoff behavior
x
x
x
I/O addressing
in 0x/1x/3x/4x
registers
in 3x/4x registers
in 3x/4x registers
Configurable
addressing mode
(IEC/984)
x
x
-
Support of remote
bus branches
x
x
x
NOA slot
Central backplane
Central backplane
Central backplane
Transparent mode
-
x
-
Hot Standby support
-
-
-
Number of NOA
modules in the
central backplane
up to 6 (depending on 3
CPU type, see
paragraph Number of
INTERBUS masters
depending on CPU
type, p. 32 )
3
33
NOA 622 00 as INTERBUS Master
Note: If you have the 140 NOA 611 00 or the 140 NOA 611 10 and you want to
replace them by the 140 NOA 622 00, contact the support center for further help.
You will find a brief description in appendix Upgrading from 140 NOA 611 x0 to
140 NOA 622 00, p. 125.
Overview of the
Software
Requirements
Software requirements for use of the INTERBUS master modules
NOA firmware
34
140 NOA 622 00
140 NOA 611 10
140 NOA 611 00
starting with
NOA1_xx.bin
(Exec Loader) or
NOA1_xx.Q12 (SyCon)
starting with 2.0
starting with 1.05
ULEX version
-
starting with 2.02
starting with 2.0
Modsoft / PRoWorx
-
starting with 2.4
starting with 2.4
Concept
starting with 2.5, SR2
starting with 2.1
starting with 1.1
CMD Tool
-
starting with 1.21
starting with 1.21
SyCon
starting with 2.7xx
-
-
840 USE 497 00 June 2005
Accessories and Replacement
Parts
4
Overview
Introduction
This chapter contains a list of accessories and replacement parts for the use of
copper cables and fiber optics.
What's in this
Chapter?
This chapter contains the following topics:
840 USE 497 00 June 2005
Topic
Page
Accessories and Replacement Parts for Software
36
Accessories and Replacement Parts for Copper Lines
36
Accessories and Replacement Parts for Fibre Optic Cable Technology
37
35
Accessories and Replacement Parts
Accessories and Replacement Parts for Software
Software
Components
Installing Accessories and Replacement Parts
Term
Order no.
Sycon (configuration software, assignment for Schneider
Automation)
SYC SPU LF• CD28M
Accessories and Replacement Parts for Copper Lines
Components for
copper lines
List of accessories and replacement parts
Term
Order no.
Programming cable for 140 NOA 622 00, 3.7 m
(Modbus cable)
990 NAA 263 20
INTERBUS cable, 100 cm
170 MCI 100 00
Remote bus cable 100 m
TSX IBSCA 100
Remote bus cable 400 m
TSX IBSCA 400
2
Remote bus cable (Meterware), LiYCY 3x2x0.25 mm
36
KAB3225LI
INTERBUS plug set, 9 pin D-SUB, plug plus socket
170 XTS 009 00
Branch interface for remote bus branch, copper cable
170 BNO 671 0x
840 USE 497 00 June 2005
Accessories and Replacement Parts
Accessories and Replacement Parts for Fibre Optic Cable Technology
Components for
Fibre Optic
Technology
The following components are available for the connection with fiber optic
technology:
Term
Order no.
Branch interface for remote bus branch, fibre optic cable
170 BNO 681 00
Polymer cable
PSM-LWL/KDL/O, by the meter
HCS cable
PSM-LWL/HCS/O, by the
meter
Polymer plug set
PSM-SET-FSMA/4
HCS plug set
PSM-SET-FSMA/4-HCS
Polishing set
PSM-SET-FSMA-POLISH
Cable with plug
PSM-LWL/KDL/2, by the meter
Cable with HCS plug
PSM-LWL/HCS/2, by the meter
Fiber optic adapter with additional voltage supply
OPTOSUB
Fiber optic adapter without additional voltage supply
OPTOSUB PLUS
Note: Supplier for the fiber optic accessories:
Phoenix Contact GmbH & Co;
Homepage: http://www.phoenixcontact.com
840 USE 497 00 June 2005
37
Accessories and Replacement Parts
38
840 USE 497 00 June 2005
Module descriptions
II
Overview
What will you
find in this
section?
In this section, you will find the module description for the communication module.
What's in this
Part?
This part contains the following chapters:
Chapter
5
840 USE 497 00 June 2005
Chapter Name
140 NOA 622 00: Communication Module for INTERBUS
Page
41
39
Module descriptions
40
840 USE 497 00 June 2005
140 NOA 622 00: Communication
Module for INTERBUS
5
Overview
Introduction
This chapter describes the communication module 140 NOA 622 00.
What's in this
Chapter?
This chapter contains the following topics:
840 USE 497 00 June 2005
Topic
Page
Brief description
42
Description of the Operating and Display Elements (LEDs)
44
Configuration
45
Technical Data
48
41
NOA 622 00
Brief description
Features
42
The NOA 622 00 is the INTERBUS master and is used to couple this bus to the
automation device Modicon TSX Quantum.
The module is compatible to the performance of the INTERBUS Generation 4.
840 USE 497 00 June 2005
NOA 622 00
Front View of the
Module
Front view with location of the operating elements
1
140
NOA 622 00
INTERBUS Master
R Active
IBS-RUN
F
Slave
2
3
5
6
remote bus
reset
RS2320
4
7
8
840 USE 497 00 June 2005
1
Color code
2
Display field (LEDs)
3
Standard housing
4
Removable cover
5
Reset button
6
RS 232 C interface
7
INTERBUS interface
8
Module screws
43
NOA 622 00
Description of the Operating and Display Elements (LEDs)
View of the
Display
Representation of the display
140
NOA 622 00
INTERBUS Master
R Active
IBS-RUN
F
Slave
Meaning of the
LEDs
Meaning of LEDs
LED
Color
Status
Meaning
R
green
On
Ready. The switch-on routine was
completed successfully. The firmware is
running correctly and the module is ready
for operations. RAM and checksum are ok.
No firmware, or firmware is being loaded.
Off
Module error.
Active
green
On
The communication with the TSX Quantum
CPU is active.
F
red
On
Fault. An error occurred on the INTERBUS
and at least one node was switched off
intentionally.
IB-S Run
green
On
The INTERBUS is functioning, normal data
transfer.
Flashing
cyclically
The INTERBUS is ready.
No cyclic
flashing
No INTERBUS configuration. (error
message)
On
An INTERBUS node is indicating a module
error.
Slave
44
Flashing
red
840 USE 497 00 June 2005
NOA 622 00
Reset button
Pressing the reset button causes a total reset on the 140 NOA 622 00:
l The bus is reinitialized.
l The bus configuration is reloaded from the CPU to the NOA.
Configuration
Mounting
Location in the
Backplane
Mount the module in any slot on the TSX Quantum central rack and screw it to the
backplane. The module must be screwed into position to ensure correct operation
(EMC).
Mounting the Module
1
2
3
840 USE 497 00 June 2005
1
Insert the module
2
Screw the module to the backplane
3
Backplane
45
NOA 622 00
Connection to
INTERBUS
Remote bus cable connection to the interface labeled "remote bus".
1
INTERBUS
remote bus
6
2
Pin used
7
Pin not used
3
8
4
9
5
Assignments for "remote bus" interface
46
Socket
Signal
Meaning
1
DO
Data, direction of transmission (+), (Data Out)
2
DI
Data, direction of reception (+), (Data In)
3
COM
Reference conductor, isolated (Signal Ground, insulated)
4
GND
Reference conductor for fiber optics interface, grouped
potential (Signal Ground, not insulated)
5
VCCI
Supply voltage for fiber optics interface: 5 V, isolated
6
DO
Transmit negated data (Data Out negated)
7
DI
Receive negated data (Data In negated)
8
VCC
Auxiliary supply for fiber optics interface: 5 V, grouped
potential
Note: Only for connecting OPTOSUB.
9
RBST
RBST coupling (Bridge)
840 USE 497 00 June 2005
NOA 622 00
Connection of
the RS 232C
interface
To connect the RS 232C interface use the data cable 990 NAA 263 20
(Length: 3 m).
1
RS 232 C
6
2
Pin used
7
Pin not used
3
8
4
9
5
Assignments for "remote bus" interface
840 USE 497 00 June 2005
Socket
Signal
Meaning
2
RXD
Received Data
3
TXD
Transmitted Data
5
GND
Reference conductor (Signal Ground)
7
RTS
Switch on transmission unit (Request to Send)
8
CTS
Ready for transmission (Clear to Send)
47
NOA 622 00
Technical Data
Power supply
Data of the supply
Internal via Quantum bus
Data interface
Mechanical
structure
Connection Type
Environmental
conditions
48
5 VDC, max. 0.8 A, typ. 0.7 A
Note: When using fiber optics adapters, the
power consumption increases according to
the adapter used.
Data interface data
INTERBUS
RS 485, isolated (500 VAC test voltage)
RS 232C possible line lengths
according to DIN 66 020, grouped potential
20 m shielded
Mechanical structure data
Format
Width = 40.34 mm (Standard Housing)
Mass (weight)
0.4 kg
Connection method data
INTERBUS
9 pin D-SUB socket
RS 232C
9 pin D-SUB socket for 990 NAA 263 x0
Environmental conditions data
System data
See Quantum User Manual
Power dissipation
Max. 4 W, typ. 3.5 W
MTBF Time (GF)
> 100 000 hours
840 USE 497 00 June 2005
Software
III
At a Glance
Introduction
This section describes the various possibilities regarding configuration, contol and
diagnosis of an INTERBUS application with 140 NOA 622 00 as master module.
What's in this
Part?
This part contains the following chapters:
840 USE 497 00 June 2005
Chapter
Chapter Name
Page
6
Commissioning
51
7
Configuration and Diagnostics
67
8
Using the PCP Channel
79
9
Groups and Alternatives
83
49
Software
50
840 USE 497 00 June 2005
Commissioning
6
At a Glance
Introduction
This chapter provides an overview of commissioning the INTERBUS configuration.
What's in this
Chapter?
This chapter contains the following topics:
840 USE 497 00 June 2005
Topic
Page
Principle of Commissioning
52
Software Startup for using the 140 NOA 622 00
53
Shutdown and Startup Procedure of the 140 NOA 622 00
60
Addressing Modes of the Inputs and Outputs
62
Firmware for the INTERBUS Master
65
51
Commissioning
Principle of Commissioning
Overview
To commission an INTERBUS system, the definition of the physical environment
where the application will be intigrated is needed (e.g. backplane, power supply,
processor, modules or devices, etc.). Then the commissioning of the configuration
with the respective software takes place.
The master configuration is made using Concept starting with version 2.5 SR2.
The configuration of the bus takes place with the help of the configuration software
SyCon.
Principle of
commissioning
The following table describes the individual phases of commissioning.
Phase
Software
Description
Mounting the
140 NOA 622 00
-
The module is inserted in the desired slot in the central backplane.
PLC configuration
Concept
The following entries must be made:
l Enter the NOA 622 in the I/O map
l Enter the configuration parameters for the INTERBUS master
(number and slot, bus start behavior)
l Configuration of the generic bus incl. SyCon software call
Bus configuration
SyCon
Assigning the signal
memory
Concept
Assigning the signal memory to the INTERBUS modules
Programming
Concept
Programming
l respective user program
l respective diagnostics
Load the program and start
the PLC
Concept (Online)
Load the project to the controller.
Then when the conztroller is started, the INTERBUS module is
configured and placed in operation.
Debugging
Diagnosis
Concept / SyCon
To debug the project, Various utilities are available for control of
the inputs and outputs as well as error diagnostics:
l Online diagnostics
l User diagnostics
l LED Display
Documentation
Concept
(Offline or Online)
SyCon
Print various information concerning the bus configuration as the
project
52
The following steps must be carried out:
Enter/read the bus configuration with the SyCon software)
Generate the configuration file *.IB and load the file in Concept
(takes place automatically when ending the SyCon software)
l
l
840 USE 497 00 June 2005
Commissioning
Software Startup for using the 140 NOA 622 00
Overview
The following section provides a brief description of the steps required for the
software startup of the INTERBUS master 140 NOA 622 00.
The steps are divided into the following sections:
l Selecting INTERBUS in Concept, p. 53
l Evaluating the bus configuration with SyCon, p. 55
l Editing the bus configuration in Concept, p. 57
l Configuring the 140 NOA 622 00 yourself, p. 59
Selecting
INTERBUS in
Concept
Proceed as follows to enter the INTERBUS in Concept for using the
140 NOA 622 00:
Step
Action Performed
1
Open the respective project in Concept.
2
Select Project → PLC Configuration → I/O Map → Go To the entry Generic
Bus.
I/O Map
Expansion Size:
Go To:
I/O Drop
1
144
Local/RIO (slot ?)
Cut
Local/RIO (slot ?)
DIO 0 (CPU)
A.-Bits
A.-Bits
DIO 1 (slot ?)
0
0
DIO 2 (slot ?)
Generic bus To insert at the end of the list, select this line
Remote I/O...
3
Insert
OK
Delete
Copy
Status
Cancel
Insert
Edit
...
Help
Click Insert and enter Interbus in the I/O Handler selection dialog box.
IO-Handler selection
Name
Vendor
Interbus
Schneider Automation GmbH
OK
840 USE 497 00 June 2005
Cancel
Help about Type
53
Commissioning
Step
4
Action Performed
Enter the respective references in the Status box and Activate, see also
Diagnostics and Control via the Generic Bus, p. 68
I/O Map
Expansion Size:
Go To:
144
Generic bus
Insert
Delete
Cut
Copy
I/O Drop
Type
Supervisio Input bits Output bits Status Activate
1 Interbus
26
0 300001 400001
0
2 Interbus
26
0 300301 400301
0
To insert at the end of the list, select this line
Remote I/O...
54
OK
Cancel
Insert
Edit
...
...
Help
5
Select the desired INTERBUS and continue with Edit...to the dialog box Generic
Bus Master: Interbus (Board x)
6
Choose Launch Cfg to start the SyCon program for bus configuration
Note: A Bus Configuration imported using the Import command cannot be
overwritten by a configuration that was created using Launch Cfg. To do this you
must first delete the Interbus assignment to the generic bus and re-enter it.
Since the Bus tables for the Generic Bus are created from scratch for every
Import, you must also re-enter all address assignments in Concept when
changes to the existing configuration are made.
840 USE 497 00 June 2005
Commissioning
Evaluating the
bus
configuration
with SyCon
For evaluating the INTERBUS configuration using the SyCon bus configuration tool,
proceed as follows:
Step
Action Performed
1
There are the following possibilities for evaluating the INTERBUS configuration:
l Read the connected INTERBUS configuration using Online → Automatic
Network Scan
Note: Select the Serial Device Driver and assign the corresponding COM
interface.
Connect the NOA 622 to the PC (for the cable see Accessories and
Replacement Parts, p. 35).
l Enter the connected INTERBUS configuration
l For converting an existing generation 4 CMD project to SyCon, seeImport
CMD G4 Projects in SyCon, p. 129.
Note: Further information on this can be found in the SyCon online help or in the
documentation provided on the SyCon CD.
2
The following figure shows a configuration in SyCon:
Master
INTERBUS
Device
140 NOA 622 00
Device0
Node No.
Device 0
INTERBUS
1.0
170 ADI 340 00
Device1
Node No.
Device 1
INTERBUS
2.0
170 BNO 671 01
Device2
INT ERBUS
Node No.
Device 2
3.0
170 ADO 340 00
Device3
INT ERBUS
840 USE 497 00 June 2005
Node No.
Device 3
4.0
170 AMM 090 00
55
Commissioning
Step
3
Action Performed
Save the project and close SyCon.
Result:
The INTERBUS configuration data is accepted by Concept when SyCon is
closed. The list of nodes is displayed in the dialog box Generic Bus Master:
Interbus (Board x).
Generic Bus Master: Interbus (Board 0)
Master
Slaves:
Last slave:
Slave
4 Description:
3 Status table:
Activate table:
Previous
Next
Node
0
1
2
3
INTERBUS G4 Master as NOA622
0
0
Conf. start
Import
Slave
170-ADI-340-00
170-BNO-671-01
170-ADO-340-00
170-AMM-090-00
OK
Cancel
Settings
Mod / Cha
1/1
0/0
1/1
2/3
Settings
Parameter...
Description
Device1
Device2
Device3
Device4
Help
Note: If Concept is Not Connected, a change to the Bus configuration in SyCon
or a new Save in SyCon without changes being made, means that the Concept
project is not the same and must be reloaded.
56
840 USE 497 00 June 2005
Commissioning
Editing the bus
configuration in
Concept
You must now make the following entries for the INTERBUS configuration now in
Concept:
Step
1
Action Performed
In the dialog field enter Generic Bus Master: Interbus (Board x) for every IBS
slave in Slave → Parameter State RAM addresses. You can switch between the
individual slave nodes in the dialog box Slave Parameter using <<Previous and
Next>>.
Slave Parameter
Slave
<< Previous
3
170-AMM-090-00
Device4
Address:
Name:
Description:
Next >>
Channel
Length [Word]:
5
Mod / Cha
Type
1/1
BOOL
2/1
PARAM
2/2
BOOL
Settings
In Ref
In End
100097 100176
Out End
400120 400122
OK
2
Out Ref
Cancel
Help
You can enter values for Params in the area Channel in Settings:
Channel's parameter(s)
Module:
2
Channel:
1
State RAM values
Here configured value(s)
Word
1
2
OK
840 USE 497 00 June 2005
Dec
17476
68
Special
Hex
4444
0044
Bin
0100010001000100
0000000001000100
Cancel
Help
57
Commissioning
Step
3
Action Performed
Check, and if necessary make changes to the settings in Master under Settings
for Timeout and Bus startup behavior.
Master's Settings
Name:
Description:
Interbus
INTERBUS G4 Master as NOA622
Cycle for I/O synchronization
Free running I/O cycle
Sync. to xfer from/to Master
101% SCH-Concept userid 03/04/2003
0
255
Board No.:
Address:
General Setting(s)
Word
Dec
Hex
Bin
Timeout
300
ms
Maximum für
Eingang oder
Ausgang
Bus Startverhalten
Startet nicht, wenn ein Slave fehlt
Startet immer
Slave bestimmt Startverhalten
OK
Abbrechen
Hilfe
Note: Note: The Timeout time selected for the NOA 622 must be larger than or
equal to the CPU Watchdog Timeout to avoid an INTERBUS failure. For larger
configurations or older firmware versions the CPU supervision time and the
Timeout time for the NOA622 must be increased as required, so that the
INTERBUS starts.
4
58
If you want to connect several NOA modules with further INTERBUSconfigurations, repeat step 3 for each NOA (selecting the INTERBUS), table
Selecting INTERBUS in Concept, p. 53, up to step 3, table Editing the bus
configuration in Concept, p. 57.
840 USE 497 00 June 2005
Commissioning
Configuring the
140 NOA 622 00
yourself
Proceed as follows for entering the INTERBUS Master:
Step
Action Performed
1
Select I/O Map → Go To the entry Local/RIO (slot?)
2
In the I/O map for the local backplane under Project → SPS configuration →
I/O map → Edit.... → Module enter module 140 NOA 622 00.
3
Assign the respective INTERBUS to the corresponding NOA using Params in the
140-NOA-622-00 parameter dialog box.
140-NOA-622-00
Assigning the Master Setup
NONE
NONE
01: Interbus
02: Interbus
Output timeout status
Set to zero
Hold last value
Addressing Mode
MSB left (IEC)
OK
840 USE 497 00 June 2005
MSB right (984)
Cancel
Help
4
In the 140-NOA-622-00 parameter dialog box, set the values for the Output
Timeout Status and the Addressing Mode.
5
Confirm the settings with OK
59
Commissioning
Shutdown and Startup Procedure of the 140 NOA 622 00
Introduction
Switch off
behavior of the
140 NOA 622 00
Switch off
behavior of the
140 NOA 622 00
The are different possibilities for the shutdown and startup of the 140 NOA 622 00
as well as the connected INTERBUS and its nodes:
l Switch power supply on and off (switch on routine)
l Press reset button on the NOA module (switch on routine)
l Starting and stopping the INTERBUS via the bits of the activation word (Generic
Bus) (switch on/restart routine)
l Starting and stopping individual INTERBUS nodes (See Switching INTERBUSnodes, p. 61) via the bits of the activation word (Generic Bus) (switch on/restart
routine)
The following routines are started when switching on the NOA:
l Module Self Test
l Load the INTERBUS configuration from the CPU
l Start the INTERBUS, if a valid configuration is available on the NOA
The valences of the outputs (analog and binary) behave in accordance to the
presettings in Concept when the program is stopped.
INTERBUS goes into Stop Mode in the event of a CPU or NOA breakdown, or if the
NOA Timeout is smaller than the CPU Watchdog-Timerout the INTERBUS also
goes into Stop mode. In this case, the valences of the outputs (analog and binary)
are always set to "0".
This behavior applies to all analog and digital outputs on the INTERBUS.
CAUTION
Stopping and starting the INTERBUS using the SyCon tool if the
application program stops.
If the user program stops and you start the INTERBUS using the SyCon
tool, all the outputs are set up "0" even if you set the shutdown
procedure to Hold last value. If you start the INTERBUS under these
conditions using the SyCon tool, the outputs take the last valid status
again (status active when the program was stopped).
Failure to follow this precaution can result in injury or equipment
damage.
60
840 USE 497 00 June 2005
Commissioning
Parameterization in
Concept
The switch off behavior must be configured in Concept. After selecting the 140 NOA
622 00 module in the I/O Map, open the respective parameter dialog using Params.
Here you can choose between the following possibilities:
l The valences of the outputs (analog and binary) are frozen at the last valid value.
or
l The valences of the outputs (analog and binary) are set to "0".
Switching
INTERBUSnodes
When the bus is in operation individual nodes, segments, groups and alternative
branches can be added or switched off. The nodes to be switched are specified
viaactivate word 4x+1 (See Activate, p. 69)in Concept.
The switching operation effects the specified nodes and all the nodes which depend
on it, i.e. all INTERBUS nodes
l which belong to the same bus segment
l which belong to the same group
l which are after an activated INTERBUS node in the physical ring: If, for example,
you switch off a branch interface module, always switch off all remote bus nodes
which follow it, including the branch on the branch interface module.
CAUTION
INTERBUS node for the SUPI 1 generation cause errors in the
switching procedures for the entire INTERBUS architecture.
Nodes from the SUPI 1 generation cannotbe used with the INTERBUS
architecture, if any node of the configuration has to be switched.
Failure to follow this precaution can result in injury or equipment
damage.
840 USE 497 00 June 2005
61
Commissioning
Addressing Modes of the Inputs and Outputs
Overview
In Concept, addresses for each module are assigned individually, therefore this is
not really physical addressing.
Only logical addressing is used in Concept (according to the definition) because the
modules are assigned to the respective registers.
Quasi-physical addressing can be achieved by only using 0x/1x or 3x/4x registers
and assigning them to the bus nodes in increasing order without spaces.
Example
The following diagram provides a clear representation of addressing.
Quantum
CPU
Remote bus
NOA 622
Remote bus branch
Remote bus
Branch interface
16 digital
inputs
16 digital
outputs
Remote bus branch
Branch interface
16 analog
inputs
4 analog
outputs
4 analog
outputs
Addressing
62
Module with ...
Addressing
16 digital inputs
1x1 ... 1x16
16 digital outputs
0x1 ... 0x16
16 analog inputs
3x1 ... 3x16
4 analog outputs
4x1 ... 4x4
4 analog outputs
4x5 ... 4x8
840 USE 497 00 June 2005
Commissioning
Bit Alignment
Mode (IEC/984)
The 140 NOA 622 00 has two bit alignment modes for binary I/O modules:
l IEC Mode
l 984 Mode
Using these two modes, you can define the order of the I/O bits in the I/O words (not
mirrored / mirrored). The following sections show the difference between both
modes.
The bit alignment of the analog I/O modules remains the same in both modes.
To select the bit alignment mode in Concept, open the parameter dialog box for the
NOA module.
Additionally, there is also the difference in data mapping when using 0x/1x or 3x/4x
registers.
Binary 16 Bit I/O
Modules
(in 3x/4x Range)
The addressing of binary 16 bit I/O modules takes place according to the following
scheme:
Bit order in
state RAM
(3x/4x)
Bit order in
INTERBUS Word
(viewed using
Bus Configuration
Tool)
Inputs/Outputs
(on terminals)
Binary 16 Bit I/O
Modules
(in 0x/1x Range)
984 Mode
15
14
13
...
2
1
0
15
14
13
...
2
1
0
15
14
13
...
2
1
0
15
14
13
...
2
1
0
1
2
3
...
14
15
16
1
2
3
...
14
15
16
The addressing of binary 16 bit I/O modules takes place according to the following
scheme:
Bit order in
state RAM
(0x/1x)
Bit order in
INTERBUS Word
(viewed using
Bus Configuration
Tool)
Inputs/Outputs
(on terminals)
840 USE 497 00 June 2005
IEC Mode
IEC Mode
984 Mode
15
14
13
...
2
1
0
15
14
13
...
2
1
0
15
14
13
...
2
1
0
15
14
13
...
2
1
0
1
2
3
...
14
15
16
1
2
3
...
14
15
16
63
Commissioning
Analog I/O
Modules (in 0x/1x
and 3x/4x Range)
The addressing of analog I/O modules takes place according to the following
scheme:
Bit order in
state RAM
(3x/4x)
Bit order in
INTERBUS Word
(viewed using
Bus Configuration
Tool)
Binary 8 Bit I/O
Module (in 0x/1x
and 3x/4x Range)
IEC Mode and 984 Mode
15
14
13
12
11
10
9
8
7
6
5
4
3
2
1
0
15
14
13
12
11
10
9
8
7
6
5
4
3
2
1
0
The addressing of 8 bit modules in the example for the 170 ADM 390 30 (8 outputs)
takes place according to the following scheme:
Bit order in
state RAM
Bit order in
INTERBUS Word
(viewed using
Bus Configuration
Tool)
IEC Mode (3x/4x) and 984 Mode (0x/1x)
15
14
13
12
11
10
9
8
7
6
5
4
3
2
1
0
15
14
13
12
11
10
9
8
7
6
5
4
3
2
1
0
7
6
5
4
3
2
1
0
Inputs/Outputs
(on terminals)
Bit order in
state RAM
Bit order in
INTERBUS Word
(viewed using
Bus Configuration
Tool)
Inputs/Outputs
(on terminals)
64
984 Mode (3x/4x) and IEC (0x/1x)
15
14
13
12
11
10
9
8
7
6
5
4
3
2
1
0
15
14
13
12
11
10
9
8
7
6
5
4
3
2
1
0
7
6
5
4
3
2
1
0
840 USE 497 00 June 2005
Commissioning
Firmware for the INTERBUS Master
Update
Possibilities
Updating the Firmware in the INTERBUS Master can by carried out in two ways:
l Load the updated directly from SyCon to the 140 NOA 622 00 module
or
l Load the updated Firmware via the Quantum CPU using the EXECLoaders
Note: The NOA 622 00 is delivered with Firmware installed. The procedures
described for loading new Firmware are only required if an update is being made.
Further details as well as new Firmware can be supplied by the technical support
on request.
Loading the
Firmware
directly
Loading the
Firmware
Loading the Firmware directly to the INTERBUS Master is carried out via the
RS 232C interface on the 140 NOA 622 00 module.
Step
Action
1
The module is cionnected to the serial interface (COM) on the PC using a
Modbus standard programming cable (see Accessories and Replacement Parts,
p. 35).
2
The Firmware is transfered from the configurator SyCon using Online →
Firmware Download... , follow the menu instructions.
Note: You have to load the Firmware NOA1_xx.Q12 (xx = Version number).
Loading the Firmware in the INTERBUS Master is carried out via the Quantum CPU
with the EXECLoader.
Notice
CAUTION
Blocking Communication with the Module.
Loading the Firmware may not be interrupted under any circumstances
as it means the module can no longer be accessed via the
EXECLoader. Ensure that the neither the communication connection or
the power supply is broken during the load process and do not break
the process using ABORT.
Failure to follow this precaution can result in injury or equipment
damage.
840 USE 497 00 June 2005
65
Commissioning
Load with
EXECLoader
66
To load the Firmware using the EXECLoader tool, carry out the following steps:
Step
Action
1
Create a cable connection between the CPU and the controller. The following
options are supported:
l Modbus Plus
l TCP/IP Ethernet
l Modbus
2
Start the EXECLoader
3
Select the protocol used.
4
Enter the address and with Modbus the transfer parameters for the CPU, which
are to be used for loading the NOA.
5
Select Device Type → Local Head.
6
Enter the NOA slot number in Slot number.
7
Select Select Operation → Transfer EXEC to Device.
8
Enter in Filename ,the names and directory of the NOA Firmware
(NOA1_xx.BIN, xx = Version number)
9
Then press the Close to end the operation.
840 USE 497 00 June 2005
Configuration and Diagnostics
7
Overview
Introduction
This chapter describes configuration and diagnostics.
What's in this
Chapter?
This chapter contains the following topics:
840 USE 497 00 June 2005
Topic
Page
Diagnostics and Control via the Generic Bus
68
Details about the Status Words
71
67
Configuration and Diagnostics
Diagnostics and Control via the Generic Bus
What diagnostic
and control
possibilities
exist?
The INTERBUS slaves are connected to the bus master 140 NOA 622 00 in
Concept via the generic bus. After selecting the generic bus in the I/O map, enter
the start addresses for the Status and Activation words.
Data for bus status and diagnostics is acquired in the status area; data used to
control the INTERBUS nodes is stored in the activation area.
Note: A node can be
l an individual node / segment
l a group
l an alternative branch
Status
The bus and slave specific data is placed in this area for status information and
diagnostics. You enter a 3x reference here as start address for a range of 207
consecutive words.
Overview of the status words
Word
Significance
3x
Error Status (See Word 3x, p. 71)
3x + 1
Global status (See Word 3x +1 to word 3x +8, p. 71)
...
3x + 8
3x + 9
Health status (See Word 3x +9 to word 3x +24, p. 74) of the individual slaves
...
3x + 24
3x + 25
...
Diagnostics status (See Word 3x +25 to word 3x +40, p. 75) of the individual
slaves
3x + 40
3x + 41
Reserved
...
3x + 206
A detailed description of the individual areas can be found in section Details about
the Status Words, p. 71
68
840 USE 497 00 June 2005
Configuration and Diagnostics
Activate
Data to control the slave is entered in this area. You enter a 4x reference here as
the start address for a range of 25 consecutive words.
Overview of the "activation" words
Word
Significance
4x
Control activities (See Word 4x, p. 70)
4x + 1
Node no.(from Concept) of the node for which activity entered in word 4x
should be carried out.
Area: 0 ... 250
4x + 2
Reserved
...
4x + 24
Note: If you add your INTERBUS configuration to Concept using the command
Import, the bus table for the generic bus is completely recreated, i.e. the
"activation" area is deleted (assignment to INTERBUS and content of the words).
840 USE 497 00 June 2005
69
Configuration and Diagnostics
Word 4x
The bits of word 4x have the following meaning:
15 14
13
12
11
10
9
8
7
6
5
4
Bit
Word 4x
(hex)
Significance
0... 7
-
Reserved
8
100
1 = Start INTERBUS
9
200
1 = Stop INTERBUS
10
400
1 = disconnect the node specified in 4x + 1
11
800
1 = connect the node specified in 4x + 1
12 ... 15
-
Reserved
3
2
1
0
CAUTION
Setting the bits at the same time can lead to erroneous behavior
The control bits in word 4x may only be set individually, as the
functions cannot be uniquely mapped for bits which are set
concurrently.
Failure to follow this precaution can result in injury or equipment
damage.
70
840 USE 497 00 June 2005
Configuration and Diagnostics
Details about the Status Words
Overview
The following section provides detailed information about the Generic Bus status
words.
Word 3x
The bits of word 1 have the following meaning: :
15
Word 3x +1 to
word 3x +8
840 USE 497 00 June 2005
14
13
12
11
10
9
8
7
6
5
4
3
2
1
0
Bit
Function
Significance
0
ASH
0 = all configured slaves are OK
1 = at least one configured slave has failed
1
LIC
Toggles with each successful data transfer. Remains 0 or 1 in the
event of an error.
2
BDP
0 = There is no diagnosis message
1 = at least one slave returns an error
3 - 15
-
Reserved
This range contains global status data:
Word
Significance
3x + 1
Global communication errors (See Details about word 3x + 1, p. 72)
3x + 2
Low Byte
Number of the faulty nodes (from Concept: 0 to 250 = Slave, 255
= Master)
High Byte
Error number, see sectionError numbers for the Master, p. 76 or
Error numbers for the slaves, p. 77.
3x + 3
Number of faulty data cycles
3x + 4
Number of Bus re-initializations
3x + 5
Communication Collective Error (See Details about word 3x + 5, p. 73)
3x + 6 to
3x + 8
Reserved
71
Configuration and Diagnostics
Details about
word 3x + 1
The bits of these words have the following meaning:
15 14
13
12
11
10
9
7
6
5
4
3
2
1
0
Bit
Function
Significance
0
CTRL
Control Error
Configuration or runtime error
1
ACLR
Auto Clear Error
Communication with the slave is stopped, Auto Clear End State
achieved
2
NEXC
Non-exchange Error
Communication with at least one slave is faulty; no process data
can be exchanged with it.
3
PRHL
Peripheral error
A short circuit has occurred at a minimum of one slave or there is
no voltage supply present.
4
EVE
Event Notification
At least one faulty process data cycle has been detected, or the
bus has been restarted
5
NRDY
Host Not Ready Notification
1 = INTERBUS communication is not possible.
0 = INTERBUS communication is ok.
6
I1ERR
Outgoing Interface 1 Error
Runtime error in local or installation bus, after an INTERBUS IDScan.
7
I2ERR
Outgoing Interface 2 Error
Runtime error in remote bus after an INTERBUS ID Scan.
8 - 15
Master status:
00 hex
40 hex
80 hex
c0 hex
72
8
OFFLine
STOP
Clear
Operate
840 USE 497 00 June 2005
Configuration and Diagnostics
Details about
word 3x + 5
The bits of these words have the following meaning:
15
13
12
11
10
9
8
7
6
5
4
3
2
1
0
Bit
Function
Significance
0
WARN
Quality Warning
Increased number of faulty data cycles detected within a defined
time period.
1
MWARN
MAU (Medium Acces Unit) WARNING
When using at least one Slave with a fibre optic connection, the
last control stage of the optical diode is reached to guarantee error
free INTERBUS transfer.
Note: This bit is set independently of the transfer medium (copper
wire or LWL), if the INTERBUS node belongs to different SUPI
generations, i.e. if a SUPI 3 (OPC) INTERBUS node comes after
a SUPI 2 node. In this instance the bit has no meaning.
2
MFAIL
MAU (Medium Access Unit) FAIL
At least one Slave has reported a hardware error in the INTERBUS
wiring.
3
PUE
POWER-UP-EVENT (for SUPI 3 INTERBUS node only)
A voltage dip was discovered at a Slave during the runtime.
4 - 15
840 USE 497 00 June 2005
14
Reserved
73
Configuration and Diagnostics
Word 3x +9 to
word 3x +24
The Health-Status of the up to 251 configured slaves is registered in these 16 words
as follows:
Word
Slave - address
3x+ 9
0 ...15
3x + 10
16 ... 31
3x + 11
32 ... 47
...
...
3x + 23
224 ... 239
3x + 24
240 ... 250
Assignment of the slave addresses to the bits:
15 14
Word
13
12
3x +9
11
10
9
3x + 10
8
7
6
5
4
3
2
1
0
3x + 11
...
3x + 23
3x + 24
...
224
240
Bit
Slave Address
0
0
16
32
1
1
17
33
225
241
2
2
18
34
226
242
3
3
19
35
227
243
4
4
20
36
228
244
...
...
...
...
...
...
10
10
26
42
234
250
11
11
27
43
235
-
...
...
...
...
...
...
14
14
30
46
238
-
15
15
31
47
239
-
Bit 0 ... 15 = 0: corresponding module does not run error free
Bit 0 ... 15 = 1: corresponding module runs error free
74
840 USE 497 00 June 2005
Configuration and Diagnostics
Word 3x +25 to
word 3x +40
The diagnosis status of the configured slaves (up to 251) is registered in these 16
words as follows:
Word
Slave address
3x+ 25
0 ...15
3x + 26
16 ... 31
3x + 27
32 ... 47
...
...
3x + 39
224 ... 239
3x + 40
240 ... 250
Assignment of the slave addresses to the bits:
15
Word
14
13
12
3x + 25
11
10
9
3x + 26
8
7
6
5
4
3
2
1
0
3x + 27
...
3x + 39
3x + 40
...
224
240
Bit
Slave address
0
0
16
32
1
1
17
33
225
241
2
2
18
34
226
242
3
3
19
35
227
243
4
4
20
36
228
244
...
...
...
...
...
...
10
10
26
42
234
250
11
11
27
43
235
-
...
...
...
...
...
...
14
14
30
46
238
-
15
15
31
47
239
-
Bit 0 ... 15 = 0: there is no diagnosis message for the corresponding module
Bit 0 ... 15 = 1: there is a diagnosis message for the corresponding module
840 USE 497 00 June 2005
75
Configuration and Diagnostics
Error numbers
for the Master
The following tables shows the error numbers for the Master (Highbyte from 3x+2 =
255)
Error number
76
Description
dec
hex
0
0
No error
52
34
Unknown process data handshake
56
38
No configuration found.
57
39
The INTERBUS processor chip is defective or does not answer.
101
65
The configured ID or length codes do not match the connected
configuration.
102
66
There are too many slaves connected to the master.
103
67
The configuration was changed during the ID scan.
This was caused by an interruption to the ID scan as a result of a nondiagnosed network error.
104
68
Faulty setup of the current network configuration after a main ID scan
105
69
Interruption of the ID scan cycle due to a non-diagnosed network error,
caused by an installation error or a defective slave
106
6A
A previously scanned slave is missing during the next ID scan cycle.
107
6B
Configuration was changed during runtime, a running slave is no longer
answering.
108
6C
No connection to INTERBUS.
Interruption between the master and the first remote bus nodes in the
network.
120
78
The configuration of the local bus is not permitted.
121
79
An invalid group or branch has been configured.
122
7A
A branch number is defined for the slave, but no group number is
defined.
220
DC
The CPU watchdog is faulty, this triggers a runtime error/timeout.
224
E0
Error in the INTERBUS processor communication
840 USE 497 00 June 2005
Configuration and Diagnostics
Error numbers
for the slaves
The following tables show the error numbers for the slaves (Highbyte from 3x+2 <
255)
Error number
dec
hex
0
0
Description
No error
INTERBUS network specific error numbers
30
1E
A slave was not found in the last network scan cycle.
31
1F
A slave returns a different ID code than that given in the configuration.
32
20
The slave returns a different length code than that given in the
configuration.
33
21
Further, non-configured slaves discovered at the interface to the remote
bus, local bus or installation bus branch.
34
22
Further, non-configured slaves detected at the interface to the remote
bus.
36
24
A slave reports a peripheral error.
40
28
Faulty interface to the remote bus, local bus or installation bus branch
41
29
Faulty interface to the remote bus
42
2A
Slave reports a false ID and length code during the last network scan
cycle.
46
2E
Communication with this slave is stopped.
Configuration error in the event of a download from SyCon
840 USE 497 00 June 2005
70
46
An address is occupied twice in the configuration.
71
47
Length of the data set for a slave is wrong
72
48
Length of the process data configuration is wrong
73
49
Length of the additional table is wrong
74
4A
Length of the PCP data is wrong
75
4B
Size of the entire data set is inconsistent.
76
4C
Additional table not consistent.
77
4D
Maximum number of output process data offsets exceeded.
78
4E
Maximum number of input process data offsets exceeded.
79
4F
Maximum number of offset addresses exceeded (> 255).
80
50
Number of slaves different compared to offset.
81
51
The number of output modules does not equal the number of output
offsets.
82
52
The number of input modules does not equal the number of input
offsets.
83
53
The actual output length is not equal to the configured module length.
77
Configuration and Diagnostics
Error number
78
Description
dec
hex
84
54
The actual input length is not equal to the configured module length.
85
55
Overlapping output data configured.
86
56
Overlapping input data configured.
87
57
An output module has also been assigned inputs.
88
58
An input module has also been assigned outputs.
89
59
The output module is defined as an input module.
90
5A
The input module is defined as an output module.
91
5B
The slave was configured in an invalid installation level.
92
5C
The configured ID code is not supported by the slave.
840 USE 497 00 June 2005
Using the PCP Channel
8
Overview
Introduction
This chapter describes how to use the PCP channel.
What's in this
Chapter?
This chapter contains the following topics:
840 USE 497 00 June 2005
Topic
Page
the PCP channel with the 140 NOA 622 00
80
Example of Addressing a PCP Node
81
79
Using the PCP Channel
the PCP channel with the 140 NOA 622 00
How do you use
the PCP
channel?
Communication via the PCP channel (Peripheral Communication Protocol) is
enabled by EFB’s from Concept. Using PCP communication with Concept LL984
programming is not possible.
The following modules are available:
Name
Description
IBS_READ
This module reads data into the state RAM of the PLC from a PCP
slave connected via the INTERBUS.
IBS_WRITE
This module writes data from the status RAM of the PLC to a PCP slave
connected via the INTERBUS.
IBS_SEND_REQ
This module requests data from the specified INTERBUS master and
stores it in the PLC state RAM.
Configuration
limits for the PCP
channel
A NOA 622 00 can serve up to 62 PCP nodes.
The standard buffer length for PCP modules is 64 Bytes. If your PCP module
requires a large buffer length you must set this in the SyCon tool. The maximum
length is 246 Bytes (the same as the largest value that can be set here).
Addressing the
PCP Node
A communications reference (CR) and the NOA slot number is required to set the
address for a PCP node. All PCP nodes can be given unique addresses using these
two parameters.
80
parameters
Description
Communication
reference (CR)
The communication reference (CR) is a continuous number and is
entered in the EFB as the parameter CR. CR is a value between 2 and
62 and is set automatically by SyCon during the bus configuration.
It starts behind the NOA with 2 and increases by 1 from PCP node to
PCP node. The last node on the bus has the highest number.
Slot Number
The INTERBUS network is identified through the slot number where the
node is located. The slot number is entered in the EFB as the parameter
SLOT
840 USE 497 00 June 2005
Using the PCP Channel
Example of Addressing a PCP Node
Example of
Addressing a
PCP Node
The following configuration consists of two INTERBUS networks that are each
controlled by an NOA. The communication references (EFB parameter) run in these
networks from 2 ... 4.As well as the slot number (in this example 8 and 10), the EFBs
of each node can be uniquely identified.
Configurations Example
TSX Quantum
NOA 622 00
Remote bus
Remote bus
Network 1
Node 2
Node 1
Remote bus
Remote bus
Node 3
Remote bus
SLOT = 10
SLOT = 10
Comm. Ref. IEC 68-2-6 FC = 2 Comm. Ref. = 3
SLOT = 10
Comm. Ref. = 4
Network 2
Branch interface
Remote bus
Branch
Remote bus
Node 1
Node 2
Remote bus
Branch
SLOT = 8
Comm. Ref. = 2
SLOT = 8
Comm. Ref. = 3
Node 3
SLOT = 8
Comm. Ref. = 4
You need the EFBs IBS_READ and IBS_WRITE to receive data from your PCP
module or to send data there.
We recommend configuring an EFB for each time a write or read access is made for
each node.
840 USE 497 00 June 2005
81
Using the PCP Channel
Example Number of EFBs
TSX Quantum
NOA 622 00
Remote bus
Network 1
Node 2
Node 1
Remote bus
IBS_READ
(read)
82
Remote bus
Node 3
Remote bus
IIBS_WRITE
(write)
IBS_READ + IBS_WRITE
(read and write)
840 USE 497 00 June 2005
Groups and Alternatives
9
Overview
Introduction
This section describes the use of groups and alternatives.
What's in this
Chapter?
This chapter contains the following topics:
840 USE 497 00 June 2005
Topic
Page
Groups
84
Alternatives
88
83
Groups and Alternatives
Groups
What are
groups?
INTERBUS nodes which are functionally similar can be put together in groups.
Nodes which do not directly follow each other can also be added to a group. Each
node can only be added to one group. You can only add remote bus branches, local
bus or peripheral bus nodes to groups.
Groups nodes and bus segments which are at a physical distance from one another
can be switched on together programmatically by a command using groups.
If you shut down any node in the group, all nodes in this group and any nodes which
happen to be dependant on this node will be shut down also, e.g. a local bus
(peripheral bus) branch which is not assigned to the group ("branch in branch").
The same applies if a node in a group fails.
Configuring
groups
Use SysCon to assign a node to a group. Enter the relevant number here in the
device configuration under Group number.
Valid range for the group number. 1 ... 255
Within a branch all nodes must have the same group number with the exception of
the branch interface module where the branch diverges. The branch interface
module itself may not be assigned to a group.
CAUTION
A remote bus node in the main branch of the INTERBUS
architecture may not be assigned to a group.
If this node was assigned to a group none of the other nodes can be
activated individually. Switching on an off a group via the individual
nodes and via the branch interface module is also not possible in this
case.
The configuration software does not check if the group assignment is
allowed. This must be checked by the user.
Failure to follow this precaution can result in injury or equipment
damage.
84
840 USE 497 00 June 2005
Groups and Alternatives
INTERBUS
architecture with
group definition
INTERBUS network with groups (Display in SyCon)
Master
Device
INTERBUS
140 NOA 622 00
Device0
Node no.
Device 0
INTERBUS
1.0
170 ADI 340 00
Device1
Node no.
Device 1
INTERBUS
2.0
170 BNO 671 01
Group 1
Device2
Node no.
Device 2
INTERBUS
3.0 /1
170 ADO 340 00
Device3
Node no.
Device 3
INTERBUS
4.0 / 1
170 AMM 090 00
Device4
Node no.
Device 4
INTERBUS
5.0
170 BNO 671 01
Group 2
Device5
Node no.
Device 5
INTERBUS
6.0 /2
170 ADO 340 00
Device6
Node no.
Device 6
INTERBUS
7.0 / 2
170 AMM 090 00
Device7
Node no.
Device 7
INTERBUS
8.0
170 BNO 671 01
Group 1
Device8
Node no.
Device 8
INTERBUS
9.0 /1
170 ADO 340 00
Device9
Node no.
Device 9
INTERBUS
10.0 / 1
170 BNO 671 01
Device10
INTERBUS
Node no.
Device 10
11.0 / 1
170 ADO 340 00
Device11
INTERBUS
Node no.
Device 11
12.0 / 1
170 ADO 340 00
Device12
INTERBUS
840 USE 497 00 June 2005
Node no.
Device 12
13.0
170 ADO 340 00
85
Groups and Alternatives
Node behavior
when assigning
to groups
The nodes in a group and thus the entire group can be switched on and off in
Concept via the Activation word 4x (See Activate, p. 69)
Here you specify the individual node which should be switched on and off. If this
node is assigned to a group the entire group is always switched.
Note: When switching off a remote bus node all the following nodes are switched
off whether or not they are assigned to a group.
When a remote bus mode is switched on all the following nodes are switched off
again. Following alternatives and groups are an exception to this. These are
notreconnected. They must either be activated manually or the entire bus must be
restarted so that all nodes are active again.
In the following table the status of the individual nodes after deactivation and then
activation for some example nodes with an without group assignment are shown
(see INTERBUS architecture with group definition, p. 85). A precondition for this is
that the bus was started before a node is deactivated and all nodes are active.
86
840 USE 497 00 June 2005
Groups and Alternatives
Status for all nodes after deactivation and activation for some example nodes
Node
number
Group
Type
Status after
TN 1.0
Deact.
Act.
TN 4.0; Gr. 1
TN 7.0, Gr. 2
TN 8.0
Deact.
Deact.
Deact.
Act.
Act.
TN 11.0, Gr. 1
Act.
Deact.
Act.
TN 1.0
-
I/O
X
J
J
J
J
J
J
J
J
J
TN 2.0
-
BK
X
J
J
J
J
J
J
J
J
J
TN 3.0
1
I/O
X
X
X
J
J
J
J
J
X
J
TN 4.0
1
I/O
X
X
X
J
J
J
J
J
X
J
TN 5.0
-
BK
X
J
J
J
J
J
J
J
J
J
TN 6.0
2
I/O
X
X
J
J
X
J
J
J
J
J
TN 7.0
2
I/O
X
X
J
J
X
J
J
J
J
J
TN 8.0
-
BK
X
J
J
J
J
J
X
J
J
J
TN 9.0
1
I/O
X
X
X
J
J
J
X
X
X
J
TN 10.0
1
BK
X
X
X
J
J
J
X
X
X
J
TN 11.0
1
I/O
X
X
X
J
J
J
X
X
X
J
12.0
1
I/O
X
X
X
J
J
J
X
X
X
J
13.0
-
I/O
X
J
J
J
J
J
X
J
J
J
TN Node number
BK Branch interface module
I/O I/O node
Deact. Node was activated
Act. Node was activated again
X
Node not active (no data traffic)
J
Node active (data traffic)
840 USE 497 00 June 2005
87
Groups and Alternatives
Alternatives
What are
alternatives?
It may be necessary for an application to activate different INTERBUS
configurations while a process is running via a connection point, e.g. for a serial
machine with different variations. This is carried out using so-called "alternatives" or
alternatively switchable groups, which make it possible for the user to connect
differently structured bus segments to the same remote bus output on a branch
interface module.
Using the SyCon configuration software the entire configuration with all the
alternatives is stored in the power-up module. The initial alternative is selected using
the application program.
Configuring
alternatives
Use SysCon to assign a node to an alternative. Enter another alternative here in the
device configuration under Group number beside the Group number
(See Configuring groups, p. 84).
Value range for the alternative: 1 ... 255
The group number and the alternative a separated by a hyphen.
Example: If a node belongs to group 3 and there it belongs to alternative 2, enter
3-2 under Group number.
You can only define alternative nodes within a group. Thus, they have the same
group number but a different alternative number. Exactly one alternative for this
group can be activated. No more than one alternative can even be active at the
same time. The nodes in different alternatives must always have different logical
nodes, i.e. one node can only ever belong to a single alternative, never to more than
one.
Note: An alternative group can only be connected to a remote bus node (branch
interface module). Conversely, the first node in an alternative group must also be
a branch interface module.
An alternative group can also be located an a deeper bus level than the main
remote bus bar.
88
840 USE 497 00 June 2005
Groups and Alternatives
INTERBUS
architecture with
alternatives
definition
INTERBUS network with alternatives (Display in SyCon)
Master
Device
INTERBUS
140 NOA 622 00
Device0
Node no.
Device 0
INTERBUS
1.0
170 ADI 340 00
Device1
Node no.
Device 1
INTERBUS
2.0
170 BNO 671 01
Group 1, Alternative 1
Device2
Node no.
Device 2
INTERBUS
3.0 / 1-1
170 BNO 671 01
Device3
INTERBUS
Node no.
Device 3
Device4
Node no.
Device 4
INTERBUS
4.0 / 1-1
170 ADO 340 00
Group 1, Alternative 2
5.0 / 1-2
170 BNO 671 01
Device5
INTERBUS
Node no.
Device 5
6.0 / 1-2
170 ADO 340 00
Device6
INTERBUS
Node no.
Device 6
Device7
Node no.
Device 7
INTERBUS
7.0 / 1-2
170 ADI 340 00
Group 1, Alternative 3
8.0 / 1-3
170 BNO 671 01
Device8
INTERBUS
Node no.
Device 8
9.0 / 1-3
170 ADO 340 00
Device9
INTERBUS
Node no.
Device 9
10.0 / 1-3
170 ADI 340 00
Device10
INTERBUS
Node no.
Device 10
11.0 / 1-3
170 ADO 340 00
Device11
INTERBUS
840 USE 497 00 June 2005
Node no.
Device 11
12.0
170 ADO 340 00
89
Groups and Alternatives
Hardware configuration to INTERBUS network with alternatives
(see also display in SyCon)
Remote bus
Master
140 NOA 622 00
Remote bus branch
Group 1, Alternative 1
Device0
TN 1.0
I/O module
Device3
TN 4.0
I/O module
Remote bus branch
Device1
TN 2.0
BK
Device2
TN 3.0
BK
or
Device4
TN 5.0
BK
Remote bus
Group 1, Alternative 2
or
Device5
TN 6.0
I/O module
Remote bus branch
Device6
TN 7.0
I/O module
Group 1, Alternative 3
Device7
TN 8.0
BK
Device11
TN 12.0
I/O module
dependant
on Enabled
Alternative
Device8
TN 9.0
I/O module
Device9
TN 10.0
I/O module
Device10
TN 11.0
I/O module
TN Node number
BK Branch interface module
90
840 USE 497 00 June 2005
Groups and Alternatives
In the SyCon configuration every alternative in a group starts with its own branch
interface module. However, in the hardware configuration there is only one other
branch interface module physically available. Switching between the configured
branch interface modules is carried out. for example, by connecting the individual
bus line for the desired alternative to the remote bus interface for the branch
interface module or via special branch interface modules.
Activation and changing between the different alternatives is configured in the
application program. Before you activate an alternative here, you must make sure
that this alternative is connected in the hardware.
Switching
behavior for
alternative
groups
Note: When a bus starts none of the configured alternatives is active. You must
explicitly specify which alternative should be started.
The nodes in alternative groups and thus the entire alternative can be switched on
and off in Concept via the Activation word 4x (See Activate, p. 69)
Here you specify the any node from an alternative group which should be switched
on and off. Then the whole alternative is always switched on.
Note: When a remote bus mode is switched off all the following nodes with and
without groups and alternative assignments are switched off.
When a remote bus mode is switched on all the following nodes are switched off
again. Following alternatives and groups are an exception to this, these are
notreconnected. They must be activated manually.
840 USE 497 00 June 2005
91
Groups and Alternatives
92
840 USE 497 00 June 2005
EFB descriptions
IV
Overview
Introduction
The EFB descriptions are arranged in alphabetical order.
What's in this
Part?
This part contains the following chapters:
840 USE 497 00 June 2005
Chapter
Chapter Name
Page
10
IBS_READ: Reading variables via INTERBUS
11
IBS_SEND_REQ: Diagnostic query on the INTERBUS Master
140 NOA 622 00
101
95
12
IBS_WRITE: Writing variables to INTERBUS PCP nodes
113
93
EFB Descriptions
94
840 USE 497 00 June 2005
IBS_READ: Reading variables via
INTERBUS
10
Overview
Introduction
This chapter describes the IBS_READ block.
What's in this
Chapter?
This chapter contains the following topics:
840 USE 497 00 June 2005
Topic
Page
Brief Description
96
Representation
96
Runtime error
98
95
IBS_READ
Brief Description
Function
Description
You can use this function block to read data into the status RAM of the PLC from a
PCP slave connected via the INTERBUS.
Several function blocks can be configured at the same time, but of these at most 4
can be active at the same time. For these, different communication references
(parameter CR) or the same communications reference with different logical
addresses (parameter index, subindex) can be assigned (see Parameter
description, p. 97). However, for all actual parameters of the individual modules
different addresses must be configured.
Note: EN and ENO should not be used together with this EFB, otherwise output
parameters can become fixed.
Representation
Symbol
Block representation
IBS_READ
96
BOOL
START
ACTIVE
BYTE
UINT
UINT
SLOT
CR
INDEX
DONE
ERROR
STATUS
BYTE
BYTE
SUBINDEX
LENGTH
PCP_Data
BOOL
BOOL
BOOL
WORD
ANY
840 USE 497 00 June 2005
IBS_READ
Parameter
description
840 USE 497 00 June 2005
Description of parameters:
Parameter
Data type
Meaning
START
BOOL
=1: Reading the data from the specified INTERBUS PCP Slave
is started.
The parameter must remain "1" until the operation is completed.
If the parameter remains "1" after the operation is completed,
the EFB starts a new read operation in the next PLC cycle.
Note: If the parameter is set to "0" before the end of the
operation, the operation is stopped.
SLOT
BYTE
Specifies the slot address of the corresponding INTERBUS
Master NOA 622 00 in the Quantum rack.
CR
UINT
Communications reference of the PCP node as defined in the
configuration tool.
INDEX
UINT
Logical address of the PCP node; this address is specified in the
manufacturer's documentation.
SUBINDEX
BYTE
Logical address defined for each element of the specified PCP
node; this address is specified in the manufacturer's
documentation.
LENGTH
BYTE
Number of bytes to be read from the PCP node.
ACTIVE
BOOL
This binary output is set to "1" as long as the read operation is
being executed. It is set to "0" when the operation has
successfully completed or if an error occurs.
DONE
BOOL
=1: a read operation has been terminated without error
ERROR
BOOL
=1: an error occurred during the read operation
The error status can be found in the STATUS parameter.
STATUS
WORD
Specifies the error status; for further information refer to the
section called Runtime error, p. 98.
<Status> = 0: Module inactive, a read operation is being
executed or a read operation has successfully completed
PCP_Data
ANY
The data read from the PCP node is stored here.
Enter a variable here to define the required data type.
The data itself is always stored in n consecutive 4x registers.
n = LENGTH = number of bytes to be read
97
IBS_READ
Runtime error
Error codes in
PCP protocol
98
The following messages are displayed in the STATUS parameter of the EFB:
Error number
Explanation
Hex
Dec
0x00
0
No error
0x41
65
ALI_INITIATE_ERR
Connection could not be activated.
The connection must be activated on the first request by sending an
initialization telegram. If the remote bus node does not confirm the
initialization, the connection cannot be activated and the request is
rejected with this error.
0x43
67
ALI_REJECT_PAR_SRV
Too many parallel services at a communications reference (CR)
0x45
69
ALI_REJECT_PDU_LENGTH
Requested PDU length exceeds the maximum length configured
0x46
70
ALI_REJECT_SRV_NOT_SUPPORT
Requested Service not supported by the Master
0x81
129
ALI_REMOTE_ERR
Error in the use of the remote bus node
The communications partner server has rejected the request and
returned an error.
Possible cause:
l Access to a non-existing object
l Data length of the sent data does not correspond to the data length of
the object
For more information, see Note on error 081hex, p. 99.
0x82
130
ALI_UNKNOWN_SERVICE
Unknown function in a requested message
0x83
131
ALI_LOCAL_ERR
PCP communication is not initialized or is incorrectly initialized for this
slave
Communication reference (CR) for this slave must be checked.
0x87
135
ALI_F_VFD_WRONG_STATE
Local status does not allow a send
The current configuration is not activated on the Master, please
download the configuration.
0x8F
143
ALI_F_TIMEOUT
Remote Bus Node does not respond in time (Timeout)
840 USE 497 00 June 2005
IBS_READ
Error number
Note on error
081hex
Explanation
Hex
Dec
0x97
151
ALI_CR_INVALID
Invalid communication reference (CR)
0x9B
155
ALI_UNKNOWN_SERVICE
Invalid INTERBUS PCP service
F001
61441
A connection to NOA cannot be established or NOA is not available
F010
61456
PCP data not entered in the 4x register
F020
61472
incorrect data length (LENGTH) entered
If the 081hex error message appears in the "STATUS" parameter, four further bytes
with information will be transmitted to the INTERBUS connection module from the
slave that has been affected.
This data will be stored in the first four bytes of the parameter PCP_Data of the
module. Please refer to the documentation of the affected PCP node for the
meaning of this data.
Note: To avoid unintentionally overwriting data we advise you to always configure
4 contiguous bytes here (e.g. for the PCP_Data parameter a word address for two
contiguous free words or a word array with at least two elements).
840 USE 497 00 June 2005
99
IBS_READ
100
840 USE 497 00 June 2005
IBS_SEND_REQ: Diagnostic
query on the INTERBUS Master
140 NOA 622 00
11
Overview
Introduction
This chapter describes the IBS_SEND_REQ block.
What's in this
Chapter?
This chapter contains the following topics:
840 USE 497 00 June 2005
Topic
Page
Brief Description
102
Representation
102
Runtime errors
104
Examples of Request/Response Blocks
105
101
IBS_SEND_REQ
Brief Description
Function
Description
You can use this function block to request data from a specified INTERBUS Master
NOA 622 00 and store it in the status RAM of the PLC.
Note: EN and ENO should not be used together with this EFB, otherwise output
parameters can become fixed.
Representation
Symbol
Block representation:
IBS_SEND_REQ
BOOL
START
ACTIVE
BYTE
ANY
SLOT
REQUEST
DONE
ERROR
STATUS
RESPONSE
102
BOOL
BOOL
BOOL
WORD
ANY
840 USE 497 00 June 2005
IBS_SEND_REQ
Parameter
Description
Block parameter description:
Parameters
Data type Significance
START
BOOL
=1: a request operation is started, i.e. data is read from the
specified INTERBUS Master 140 NOA 622 00 and stored in the
state RAM on the PLC.
The parameter must remain "1" until the operation is complete.
If the parameter remains "1" after the operation is completed, a
new request operation is started by the EFB in the following PLC
cycle.
Note: If the parameter is set to "0" before the operation is
completed, the operation is cancelled.
SLOT
BYTE
Specifies the slot address of the corresponding INTERBUS
Master NOA 622 00 in the Quantum backplane.
REQUEST
ANY
Enter a control block here which starts a specific request to the
NOA, see section Examples of Request/Response Blocks,
p. 105
Enter a variable here to define the required data type.
The data itself is always stored in n consecutive 4x registers.
A minimum of 128 words must be reserved for this area.
ACTIVE
BOOL
This binary output is set to "1" as long as the operation is active.
It is set to "0" when the operation has successfully completed or
if an error occurs.
DONE
BOOL
=1: An operation was stopped without an error
ERROR
BOOL
=1: An error occurred during the request operation
The error status can be found in the STATUS parameter.
STATUS
WORD
Specifies the error status (additional information can be found in
paragraph Runtime errors, p. 104.
<Status> = 0: Module inactive, a request operation is being
executed or a request operation has successfully completed
RESPONSE
ANY
The data received from the NOA 622 00 is placed in a response
block here, see section Examples of Request/Response Blocks,
p. 105
Enter a variable here to define the required data type.
The data itself is always stored in consecutive 4x registers.
A minimum of 128 words must be reserved for this area.
Note: Please note that the same data type always has to be used for the
parameters REQUEST and RESPONSE (e.g. Bool, Word, Word, ByteArray,
derived data types (see Example of Diagnosing a PCP Node, p. 121)...).
840 USE 497 00 June 2005
103
IBS_SEND_REQ
Runtime errors
Error numbers
The following messages are displayed in the STATUS parameter of the EFB:
Error number
Hex
104
Meaning
Dec
1001
4097
Abort by user
2002
8194
One or more control block parameters were modified while the operation
was active (this only applies to operations which require several cycles
for completion). Control block parameters may only be modified in
inactive operations.
2004
8196
l
l
l
l
REQUEST not located on a 4x register
RESPONSE not located on a 4x register
No more 128 words free after the REQUEST address
No more 128 words free after the RESPONSE address
2008
8200
Unauthorized network routing path on slave
2009
8201
Routing path equivalent to their own address
5001
20481
Inconsistent response by the network
6001
24577
No response received
F001
61441
A connection to NOA cannot be established or NOA is not available
F010
61456
Data not stored in the 4x Register
840 USE 497 00 June 2005
IBS_SEND_REQ
Examples of Request/Response Blocks
Overview
You can use the IBS_SEND_REQ block to send the following Requests/Actions
from the CPU to the NOA and INTERBUS node:
Function
Command
(msg.b, msg.a)
Description
Diagnosis (See Request/
66
Response Blocks for
INTERBUS Diagnosis, p. 106)
Request and storage of diagnosis data
specified node
Configuration Changes (See
Request/Response Blocks for
changing the INTERBUS
configuration, p. 109)
76
Changing the active INTERBUS
configuration by enabling blocking of
individually specified INTERBUS nodes
during operation
Connect/disconnect Slaves
(See Request/Response
blocks for connecting/
disconnecting INTERBUS
nodes , p. 111)
82
Connecting/disconnecting the specified
INTERBUS node, groups or branches
Start loading
67
Starts loading parameter blocks for the
INTERBUS node
End loading
69
The loading of the blocks is ended, the
loaded data is enabled
Transfer of configuration
parameters
68
Loading the Master bus parameters or
slaves to the node
Determine Bus Configuration
75
Read the connected INTERBUS
configuration
Note: The following sections contains an overview of the first three function.
Further information on this subject can be found in the SyCon documentation
provided on your SyCon CD.
840 USE 497 00 June 2005
105
IBS_SEND_REQ
Request/
Response
Blocks for
INTERBUS
Diagnosis
You can determine the internal diagnosis for individual nodes using these blocks.
The control block for the REQUEST parameter has the following entries:
Variable
Type
Value
Description
msg.rx
Byte
3
Receiver = IBM Task
msg.tx
Byte
16
Sender = HOST
msg.ln
Byte
8
Length of the message header = 8
msg.nr
Byte
j
Message Number (optional)
msg.a
Byte
0
No Response Number
msg.f
Byte
0
No error
msg.b
Byte
66
Operation: IBM_Device_Diag
msg.e
Byte
0
Not used.
msg.DeviceAdr
Byte
0 ... 250
(255)
Dev_Adr
Node Address (from Concept)
msg.DataArea
Byte
0
Not used.
msg.DataAdr
Word
0
Not used.
msg.DataIdx
Byte
0
Not used.
msg.DataCnt
Byte
0
Not used.
msg.DataType
Byte
0
Not used.
msg.DataFnc
Byte
0
Not used.
The response block of the RESPONSE parameter has the following entries:
106
Variable
Type
Value
Description
msg.rx
Byte
16
Receiver = Node on the HOST
msg.tx
Byte
3
Source Node = IBM-Task
msg.ln
Byte
8+107max
Message Length
msg.nr
Byte
j
Message Number
msg.a
Byte
66
Response = IBM_Device_Diag
msg.f
Byte
0
Error Status
msg.b
Byte
0
No Operation
msg.e
Byte
0
Extensions
msg.DeviceAdr
Byte
0 ... 250
(255)
Dev_Adr
Node Address (from Concept)
msg.DataArea
Byte
0
Data area, not used
msg.DataAdr
Word
0
Data address, not used
msg.DataIdx
Byte
0
Data index, not used
840 USE 497 00 June 2005
IBS_SEND_REQ
Variable
Type
Value
Description
msg.DataCnt
Byte
107
Data Number = Length of the diagnosis
structure
msg.DataType
Byte
0
Data type, not used
msg.Function
Byte
0
Read function, not used
msg.d[0]
Byte
Diagnosis status, p. 107
msg.d[1]
Byte
Real_length_code
msg.d[2]
Byte
Real_ident_code
msg.d[3-4]
Word
Num_of_CRC_errors
msg.d[5]
Byte
Online_error
msg.d[6]
Byte
0 ... 100
msg.d[7...106max]
Diagnosis status
Byte
Diagnosis Error Numbers, p. 108
Byte
reserved, not used
The bits of the diagnosis bytes have the following meaning: :
7
840 USE 497 00 June 2005
Number of entries in the error data buffer
Error data buffer, length max. 100 (50)
Bytes, depends on number of entries
6
5
4
3
2
1
0
Bit
Function
Significance
0
No_Response
Slave does not respond and is missing
1
Error_Buff_Ovfl.
Error Buffer Overflow
2
Peripheral_Fault
Slave has detected a peripheral supply error or short circuit
3
Cfg_Fault
Difference between the Device Ident or Length Code and
the values configured. Check both values configured in
SyCon or in the configuration loaded online
4
Reconfiguration
Slave generated a reconfiguration request
5
Interface_2_Error
Remote bus interface of the slave is faulty and triggers a
Timeout. The interface is disconnected from the Master.
6
Interface_1_Error
The interface to the slave’s remote bus, local bus or
installation bus branch is faulty and triggers a Timeout. The
interface is disconnected from the Master.
7
Deactivated
Slave is deactivated in the current configuration and is not
processed. When the processing of the node is to be
enabled, activate it using SyCon.
107
IBS_SEND_REQ
Diagnosis Error
Numbers
Error numbers
Error numbers
Hex
108
Description
Dec
0
0
no error
1E
30
A slave was not found in the last network scan cycle.
1F
31
A slave returns a different ID code than that given in the configuration.
20
32
A slave returns a different length code than that given in the configuration.
21
33
More non-configured slaves detected at the interface to the remote bus,
local bus or installation bus branch.
22
34
Further, non-configured slaves detected at the interface to the remote
bus.
23
35
A slave was not found in the last network scan cycle.
24
36
A slave returns a peripheral error
25
37
A slave returns a configuration request
26
38
A slave has detected a Checksum Error during data transfer
28
40
Faulty interface to the remote bus, local bus or installation bus branch
29
41
Faulty interface to the remote bus
2A
42
Slave reports a false ID and length code during the last network scan
cycle.
2B
43
Slave missing because of broken INTERBUS connection during runtime
2C
44
Connection to this slave lost because of a faulty network connection in the
local bus branch
2D
45
This slave was the last one that could be contacted by the INTERBUS
scan in the last network scan cycle carried out during runtime
2E
46
Communication with this slave is stopped
840 USE 497 00 June 2005
IBS_SEND_REQ
Request/
Response
Blocks for
changing the
INTERBUS
configuration
You can use this block to change the active configuration of the connected
INTERBUS by enabling or blocking individual nodes.
The control block for the REQUEST parameter has the following entries:
Variable
type
Value
Description
msg.rx
Byte
3
Receiver = IBM-Task
msg.tx
Byte
16
Source Node = HOST
msg.ln
Byte
x
Number of the active slaves 1 ...251 max.
msg.nr
Byte
j
Message Number (optional)
msg.a
Byte
0
No Response Number
msg.f
Byte
0
No error
msg.b
Byte
76
Operation: IBM_Set_Configuration
msg.e
Byte
0
Not used.
msg.d[0]
Byte
1
0
Slave Device 1 enabled
Slave Device 1 blocked
msg.d[1]
Byte
1
0
Slave Device 2 enabled
Slave Device 2 blocked
-
-
-
-
msg.d[x-1]
Byte
1
0
Slave Device x enabled
Slave Device x blocked
The response block for the REQUEST parameter has the following entries:
840 USE 497 00 June 2005
Variable
type
Value
Description
msg.rx
Byte
16
Receiver = Node on the HOST
msg.tx
Byte
3
Source Node = IBM-Task
msg.ln
Byte
x
Message Length
msg.nr
Byte
j
Message Number
msg.a
Byte
76
Response = IBM_Set_Configuration
msg.f
Byte
msg.b
Byte
0
No Operation
msg.e
Byte
0
Not used.
Error status, see Change error numbers
configuration, p. 110
109
IBS_SEND_REQ
Change error
numbers
configuration
110
Error number
Error number
Description
hex
dec
Description
0
0
no error
65
101
An active slave reports a false ID or length code or is missing
67
103
The configuration was changed during the ID scan
68
104
More slaves than expected were detected in a branch
69
105
Timeout when opening an INTERBUS branch
6B
107
Configuration was changed during the runtime, a running slave no longer
responds
9A
154
The following error are triggered:
l msg.ln and the number of slaves configured does not match
or
l not all local bus nodes in the local bus are blocked
or
l following remote bus nodes are not blocked
840 USE 497 00 June 2005
IBS_SEND_REQ
Request/
Response blocks
for connecting/
disconnecting
INTERBUS
nodes
You can use these blocks to connect or disconnect INTERBUS nodes, groups or
branches.
The response block for the REQUEST parameter has the following entries:
Variable
type
Value
Description
msg.rx
Byte
3
Receiver = IBM-Task
msg.tx
Byte
16
Source Node = HOST
msg.ln
Byte
x
Number of the affected slaves 1 ... 251)
msg.nr
Byte
j
Message Number (optional)
msg.a
Byte
0
No Response Number
msg.f
Byte
0
No error
msg.b
Byte
82
Operation:
IBM_Control_Active_Configuration
msg.e
Byte
0
Not used.
msg.d[0]
Byte
0, 1
bSwitch_Code
0 = disconnect the specified slave
1 = connect the specified slave
msg.d[1]
Byte
0 ... 250
first slave number
(Number is equivalent to Device in Concept)
...
...
...
...
msg.d[x]
Byte
0 ... 250
x. slave number
The response block for the REQUEST parameter has the following entries:
840 USE 497 00 June 2005
Variable
type
Value
Description
msg.rx
Byte
16
Receiver = Node on the HOST
msg.tx
Byte
3
Source Node = IBM-Task
msg.ln
Byte
x
Message Length
msg.nr
Byte
j
Message Number
msg.a
Byte
82
Response =
IBM_Control_Active_Configuration
msg.f
Byte
msg.b
Byte
0
No Operation
msg.e
Byte
0
Not used.
Error status, see Connect/Disconnect Error
Numbers, p. 112
111
IBS_SEND_REQ
Connect/
Disconnect Error
Numbers
112
Error numbers (msg.f)
Error number
Description
hex
Description
dec
0
0
no error
65
101
An active slave reports a false ID or length code or is missing
67
103
The configuration was changed during the ID scan
68
104
More slaves than expected were detected in a branch
69
105
Timeout when opening an INTERBUS branch
6B
107
Configuration was changed during the runtime, a running slave no longer
responds
6D
109
An INTERBUS slave can not be connected, because at least one of the
other slaves in the configuration is disconnected.
6E
110
An alternative group cannot be activated because a second alternative is
active in the same group.
840 USE 497 00 June 2005
IBS_WRITE: Writing variables to
INTERBUS PCP nodes
12
Overview
Introduction
This chapter describes the IBS_WRITE block.
What's in this
Chapter?
This chapter contains the following topics:
840 USE 497 00 June 2005
Topic
Page
Brief Description
114
Representation
114
113
IBS_WRITE
Brief Description
Function
Description
You can use this function block to write data from the status RAM of the PLC to a
PCP slave connected over the INTERBUS.
Several function blocks can be configured at the same time, but of these at most 4
can be active at the same time. For these, different communication references
(parameter CR) or the same communications reference with different logical
addresses (parameter index, subindex) can be assigned (see Parameter
Description, p. 115). However, for all actual parameters of the individual modules
different addresses must be configured.
Note: EN and ENO should not be used together with this EFB, otherwise output
parameters can become fixed.
Representation
Symbol
Block representation:
IBS_WRITE
BOOL
START
ACTIVE
BYTE
UINT
UINT
SLOT
CR
INDEX
DONE
ERROR
STATUS
BYTE
BYTE
SUBINDEX
ANY
114
BOOL
BOOL
BOOL
WORD
LENGTH
PCP_Data
840 USE 497 00 June 2005
IBS_WRITE
Parameter
Description
840 USE 497 00 June 2005
Block parameter description:
parameters
Data type
Significance
START
BOOL
=1: Writing data to the specified INTERBUS PCP Slave is
started.
The parameter must remain "1" until the operation is complete.
If the parameter remains "1" after the operation is completed,
the EFB starts a new write operation in the next PLC cycle.
Note: If the parameter is set to "0" before the operation is
completed, the operation is cancelled.
SLOT
BYTE
Specifies the slot address of the corresponding INTERBUS
Master NOA 622 00 in the Quantum backplane.
CR
UINT
Communications reference of the PCP node as defined in the
configuration tool.
INDEX
UINT
Logical address of the PCP node; this address is specified in the
manufacturer's documentation.
SUBINDEX
BYTE
Logical address defined for each element of the specified PCP
node; this address is specified in the manufacturer's
documentation.
LENGTH
BYTE
Number of bytes to be written to the specified PCP node.
PCP_Data
ANY
The content of this register is written to the PCP node.
Enter a variable here to define the required data type.
The data itself is always stored in n consecutive 4x registers.
n = LENGTH = number of bytes to write
ACTIVE
BOOL
This binary output is set to "1" as long as the write operation is
active. It is set to "0" when the operation has successfully
completed or if an error occurs.
DONE
BOOL
=1 : a write operation has been terminated without error
ERROR
BOOL
=1: an error occurred during the write operation
The error status can be found in the STATUS parameter.
STATUS
WORD
Specifies the error status; for further information refer to the
section called Runtime error, p. 98.
<Status> = 0: Module inactive, a write operation is being
executed or a write operation has successfully completed
115
IBS_WRITE
CAUTION
Overwriting input data
If the 081hex error occurs the input data for the PCP data will be
overwritten by the additional information!
Before creating new modules you must make sure that the parameter
PCP_Data contains the desired PCP data.
Failure to follow this precaution can result in injury or equipment
damage.
116
840 USE 497 00 June 2005
Appendices
At a Glance
Introduction
The appendix contains information about Hardware, Software and upgrading
possibilities.
What's in this
Appendix?
The appendix contains the following chapters:
840 USE 497 00 June 2005
Chapter
Chapter Name
Page
A
Example for diagnosis and control of a slave
119
B
Upgrading from 140 NOA 611 x0 to 140 NOA 622 00
125
C
Import CMD G4 Projects in SyCon
129
117
Appendices
118
840 USE 497 00 June 2005
Example for diagnosis and control
of a slave
A
Overview
Introduction
In this chapter you will find an example illustrating how to diagnose and control a
slave.
What's in this
Chapter?
This chapter contains the following topics:
840 USE 497 00 June 2005
Topic
Page
Example for control of a slave via a generic bus
120
Example of Diagnosing a PCP Node
121
119
Examples
Example for control of a slave via a generic bus
Task Description
The connection by a slave to the bus master 140 NOA 622 00 via the generic bus
make is possible to control a slave using as assigned activation word (See Activate,
p. 69). By setting and resetting the individual bits you can start and stop the
INTERBUS and connect and disconnect the specified node.
Possible
solution
The generic bus is assigned a 4x word in the menu window I/O Map in the
Activatefield. With the help of the EFB the desired device address/node number
(4x+1) and the controller are defined using the appropriate bits (4x).
Loading of the address of the slave node in word 4x + 1 via the variable
IBS_Geraete_Nr, e.g. via the Reference Data Editor.
.1.16 ( 1 )
MOVE
IBS_Geraete_Nr
Aktiv_wort_4x1
Input of control sequences, in this case via changes of the literals in the animated
state.
.1.7 ( 2 )
BIT_TO_WORD
120
0
BIT0
0
BIT1
0
BIT2
0
BIT3
0
BIT4
0
BIT5
0
BIT6
0
BIT7
0
BIT8
0
BIT9
0
BIT10
0
BIT11
0
BIT12
0
BIT13
0
BIT14
0
BIT15
Aktiv_wort_4x
840 USE 497 00 June 2005
Examples
Example of Diagnosing a PCP Node
Task Description
With the help of the EFBs IBS_SEND_REQ diagnosis data from a specific node
address should be read. Also, data from the EFB’s parameters should be prepared.
Possible
solution
In order to make the programming more simple, a suitable derived data type (msg)
must be defined. Furthermore, with the help of the EFB the desired values are
loaded into the elements of the structure and started via the EFB IBS_SEND_REQ
call so that the diagnosis data from the specified slave node can be read in.
Information regarding the required data can be found in the block description
IBS_SEND_REQ (See IBS_SEND_REQ: Diagnostic query on the INTERBUS
Master 140 NOA 622 00, p. 101), in section Request/Response Blocks for
INTERBUS Diagnosis, p. 106 and in the SyCon documentation (InterBus Master,
Protocol Interface Manual, Chapter The Message Interface) on your SyCon CD.
Definition of the derived data type msg with the program Concept / Concept DFB :
TYPE
msg:
STRUCT
rx:
Byte;
(*receiver *)
tx:
Byte;
(*sender *)
ln:
Byte;
(*length of the Message Header *)
nr:
Byte;
(*number of the message *)
a:
Byte;
(*response number*)
f:
Byte;
(*error status *)
b:
Byte;
(*command number *)
e:
Byte;
(*extension *)
DeviceAdr: Byte;
(*node address *)
DataArea:
Byte;
(*data area *)
DataAdr:
Word;
(*data address *)
DataIdx:
Byte;
(*data index *)
DataCnt:
Byte;
(*length of diagnose structure *)
DataType:
Byte;
(*data type *)
Funct:
Byte;
(*function *)
d:
Array [0 ..106] OF BYTE; (*error data
buffer *)
END_STRUCT;
END_TYPE
840 USE 497 00 June 2005
121
Examples
Declaration of necessary variables in Concept Variable Editor:
Variable Name
Data type
address
1
device address
BYTE
2
IBS_Geraete_Nr
WORD
400200
3
MSG_REQU
msg
400500
4
MSG_RESP
msg
400700
5
send_requ_active
BOOL
5
send_requ_done
BOOL
5
send_requ_error
BOOL
5
send_requ_status
WORD
5
start_send_request
BOOL
Preparation of the EFBs IBS_SEND_REQ request parameter:
.1.14 ( 3 )
MOVE
device address
MSG_REQU.DeviceAdr
.1.10 ( 4 )
Constants:
Receiver = IBM-Task
MOVE
3
MSG_REQU.rx
.1.11 ( 5 )
Constants:
Sender = Host
MOVE
16
MSG_REQU.tx
.1.12 ( 6 )
Constants:
Length of the message header
MOVE
MSG_REQU.In
8
.1.13 ( 7 )
Constants:
Command: IBM_Device_Diag
MOVE
66
122
MSG_REQU.b
840 USE 497 00 June 2005
Examples
Call for EFBs IBS_SEND_REQ to get the diagnosis data from the desired node
address:
FBI_1_15 ( 8 )
IBS_SEND_REQ
start_send_request
Start
Active
send_requ_active
3
Slot
Done
send_requ_done
Error
send_requ_error
Status
send_requ_status
MSG_REQU
Request
Response
840 USE 497 00 June 2005
MSG_RESP
123
Examples
124
840 USE 497 00 June 2005
Upgrading from 140 NOA 611 x0
to 140 NOA 622 00
B
Overview
Introduction
This chapter provides brief instructions on how to upgrade your system from
140 NOA 611 x0 to 140 NOA 622 00.
What's in this
Chapter?
This chapter contains the following topics:
840 USE 497 00 June 2005
Topic
Page
Requirements for changing from 140 NOA 611 x0 to 140 NOA 622 00
126
Instructions for upgrading from 140 NOA 611 x0 to 140 NOA 622 00
127
125
Upgrading from 140 NOA 611 x0 to 140 NOA 622 00
Requirements for changing from 140 NOA 611 x0 to 140 NOA 622 00
Overview
In principle, changing from 140 NOA 611 x0 to 140 NOA 622 00 is possible.
However, project creation and the type of INTERBUS processing for the NOA 622
are different to the NOA 611x0, therefore you have to make changes in your
Concept project to the I/O mapping and in the user program in addition to the
hardware chan
Note: The INTERBUS coupler AS-BDEA-202 does not support INTERBUS
firmware generation 4, i.e. this coupler cannot be implemented together with
140 NOA 622 00. If such a coupler exists in the INTERBUS configuration, the
coupler as well as the following I/O-modules have to be replaced by suitable
modules, eg. Modicon TSX Momentum modules, in case of convertion to
140 NOA 622 00.
Required
components
126
You need the following components for the upgrade:
Term
Module Number
INTERBUS master module
140 NOA 622 00
Concept XL Version 2.5 SR2
corresponds to the desired language
(see current pricelist from Schneider
Electric)
Software package SyCon Version 2.8xx for bus
configuration and conversion (if necessary)
SYC SPU LF• CD28 M
Programming cable for 140 NOA 622 00
(Modbus cable)
corresponds to the desired length
(see chapter Accessories and
Replacement Parts, p. 35).
840 USE 497 00 June 2005
Upgrading from 140 NOA 611 x0 to 140 NOA 622 00
Instructions for upgrading from 140 NOA 611 x0 to 140 NOA 622 00
Overview
The following sections provide brief instructions on how to upgrade hardware and
the required steps to take in the software.
Hardware
Upgrade
For upgrading hardware to the 140 NOA 622 00, carry out the following steps:
Adjustments in
Concept
Step
Action Performed
1
Document the addresses configured in your current configuration
2
Stop the user program and switch off the PLC.
3
Unplug the INTERBUS connector from the 140 NOA 611x0 and remove the
module from the module rack.
4
Insert the 140 NOA 622 00 in a free slot and connect the IBS cable to the
corresponding connection.
5
Turn the controller on again.
Changes must also be made to Concept for the upgrade to 140 NOA 622 00.
The following table describes the separate phases of the changes:
Phase
Description
PLC configuration
The following entries must be made:
l Configuration of the generic bus incl. SyCon software call
l Enter the configuration parameters of the INTERBUS Master
(number and slot, bus start behavior), as you set in the
140 NOA 611 10 configuration.
l Changing the entries in the I/O map: 140 NOA 611 10 replace
with 140_NOA 622 00
Bus configuration
The following steps must be carried out:
l Enter/read the bus configuration with the SyCon software)
l Generate the configuration file *.IB and load the file to Concept
(happens automatically when closing the SyCon software, if it
was started from Concept)
Assigning the signal
memory
Assign the same state RAM addresses to the INTERBUS modules
as in the 140 NOA 611 10 configuration
The precise sequence of the individual phases can be found in section Software
Startup for using the 140 NOA 622 00, p. 53.
840 USE 497 00 June 2005
127
Upgrading from 140 NOA 611 x0 to 140 NOA 622 00
Required
changes to the
User program
128
Because of the changed INTERBUS processing, you must make the following
changes and modifications to your user program if you have programmed the
corresponding performance:
l Diagnosis:
Programming for the Status and Diagnosis words, that are used for the
140 NOA 611 10, must be altered to the words now active for Diagnostics and
Control via the Generic Bus, p. 68.
l Reconfiguration input for a branch interface
The remote bus branch is no longer connected via the reconfiguration input of the
branch interface. The input only effects the diagnosis status bit for the relevant
node in the status word. Any further evaluation of diagnosis data must be carried
out by the EFB IBS_SEND_REQ. The support center is available to provide any
further information you might require.
l Using the PCP Channel:
You must remove the EFBs/Loadables (ICNT, ICOM) from your user program for
the 140 NOA 611 and integrate the EFBs for the 140 NOA 622 00 (IBS_READ/
IBS_WRITE) according to the configuration in the user program.
840 USE 497 00 June 2005
Import CMD G4 Projects in SyCon
C
Importing CMD G4 projects into SyCon
General
Information
SyCon offers the possibility to import a project from the Configuration and Diagnosis
program IBS CMD G4 by the company Phoenix Contact GmbH.
Save the CMD G4
project as an
ASCII file (*.CSV)
For importing a CMD G4 project in SyCon you need the project as an ASCII file
(*.CSV). Carry out the following steps in IBS CMD G4:
Import ASCII file
in SyCon
840 USE 497 00 June 2005
Step
Action
1
Select Parameters memory:
Click on the corresponding symbol to select the parameters memory.
2
Create ASCII file:
Use the menu Configuration → Write ASCII file → Project files (*.CSV) to
create an ASCII file. All control fields in this dialog box must remain activated.
3
Set ASCII file format:
Use CSV Options to specify the ASCII file format.
The following steps must be carried out to import ASCII file in SyCon:
Step
Action
1
Create New Project
Use the menu File → New and select INTERBUS to create a new project.
2
Select Master:
Use the menu Insert → Master to select the Master.
3
Import ASCII file:
Use the menu File → Import → CMD to start the import.
4
After selecting the ASCII file to import, you must make the settings for the file
format in the IBS CMD G4.
5
Start the import by clicking OK in the dialog box.
Start the import by clicking OK in the dialog box.
129
Import CMD G4 in Sycon
130
840 USE 497 00 June 2005
Glossary
B
BC
Bus coupler : Branch interface module
C
CMD Tool
Configuration, Monitoring and Diagnostic : PC software from Phoenix Contact
for the configuration, monitoring and diagnostics of INTERBUS field bus systems.
I
I/O
Inputs/outputs
IBS
INTERBUS : This field bus system uses the master-slave method. The master
manages and coordinates bus access; it sends the data to all connected nodes and
receives data from these nodes.
IRB
Installation Remote Bus : Installation remote bus
840 USE 497 00 June 2005
131
Glossary
L
LB
Local Bus : Local bus
O
OD
Object Dictionary: Object dictionary; contains all information required to describe
standard objects from type PMS for a certain device (e.g. Robot).
P
PCP
Peripherals Communication Protocol : Protocol for data exchange between
peripheral devices (layer 2 of the OSI model). This protocol guarantees that
messages are broken down and reassembled correctly during transfer. All services
required to make and brake connections, as well as data transfer services are
available.
PD
Process Data Chanel : Channel for process data
PMS
Peripherals Message Specification : Specification for peripheral device
messages. PMS is a user interface according to the MMS model and implemented
on layer 7 of the OSI model. PMS formally defines the services used to make and
brake connections as well as the data transfer services provided by PCP.
The standardized PMS communication services guarantee that the same
communication interface is used for all devices.
R
RB
Remote Bus : Remote bus
Ring
All nodes in a INTERBUS system are connected in a ring formed network.
132
840 USE 497 00 June 2005
Glossary
S
Station on the
local bus
The modules on the local bus are I/O modules used to create a remote substation
in a switching cabinet.
SyCon
System Configurator: Software SYC SPU LF• CD28 M for configuration,
monitoring and diagnostics of field bus systems
840 USE 497 00 June 2005
133
Glossary
134
840 USE 497 00 June 2005
B
AC
Index
Numerics
140 NOA 622 00
Startup Procedure, 60
140 NOA 622 00, 41
Accessories, 35
Description of the LEDs, 44
Description of the Reset Button, 44
Diagnostics, 44
Diagram of the Display, 44
Diagram of the Operating Elements, 43
Mounting, 45
Replacement Parts, 35
Shutdown Procedure, 60
Switch off behavior, 60
Technical Data, 48
140 NOA 622 00 als INTERBUS-Master, 30
A
Accessories for Copper Lines, 36
Accessory Fibre Optic Cable, 37
Addressing, 62
Alternatives, 88
Architecture, 15
Binary 16 Bit I/O Modules, (3x/4x
Range), 63
Binary 8 Bit I/O Module (in 3x/4x-Range),
64
Bit Alignment Mode (IEC/984), 63
C
Changing from NOA 611 x0
Requirements, 126
CMD Import G4 Project, 129
COMM
IBS_READ, 95
IBS_SEND_REQ, 101
IBS_WRITE, 113
Commissioning
Principle, 52
Communication Module
140 NOA 622 00, 41
Diagnostics, 44
Diagram of the Display, 44
Diagram of the Operating Elements, 43
Mounting, 45
Technical Data, 48
Cycle Times
INTERBUS, 25
B
Bit Alignment
170 ADM 390 30, 64
Analog I/O Modules, 64
Binary 16 Bit I/O Modules (0x/1x Range),
63
840 USE 497 00 June 2005
135
Index
D
Data Transfer Rate, 27
Description of the LEDs
Communication Module
140 NOA 622 00, 44
Description of the Reset Button
Communication Module
140 NOA 622 00, 44
Diagnostic query on the INTERBUS Master
140 NOA 622 00, 101
Diagnostics
Communication Module
140 NOA 622 00, 44
Diagram of the Display
Communication Module
140 NOA 622 00, 44
Installation Remote Bus, 20
INTERBUS
140 NOA 622 00 as Master, 30
Architecture, 25
Cycle Times, 25
Protocol, 24
Protocol Format, 24
Telegrams, 25
INTERBUS Loop, 21
INTERBUS Master Modules
Overview, 33
Properties, 33
Software Requirements, 34
INTERBUS nodes
Switching, 61
L
E
Local Bus, 21
Error codes
PCP protocol, 98
EXECLoader, 66
M
F
Firmware, 65
Direct Load, 65
Load via CPU, 65
G
General, 13
Groups, 84
I
IBS_NOA
IBS_READ, 95
IBS_SEND_REQ, 101
IBS_WRITE, 113
IBS_READ, 95
IBS_SEND_REQ, 101
IBS_WRITE, 113
Import
CMD G4 Project, 129
136
Mounting
Communication Module
140 NOA 622 00, 45
N
Network
Control, 25
Operation, 25
Timing, 25
NOA 622 00
Software Startup, 53
O
Operating Elements
140 NOA 622 00, 43
Communication Module, 43
Overview
INTERBUS, 14
840 USE 497 00 June 2005
Index
P
U
PCP
Protocol, 25
PCP channel, 79
Using, 80
PCP protocol
Error codes, 98
Performance, 23
Peripheral Communication Protocol, 25
Protocol
Format, INTERBUS, 24
INTERBUS, 24
PCP, 25
Upgrading from NOA 611 x0
Instructions, 127
W
Writing variables to INTERBUS PCP nodes,
113
R
Reading variables via INTERBUS, 95
Remote Bus, 17
Remote Bus Branch, 18
Replacement Part Fibre Optic Cable, 37
Replacement Parts for Copper Lines, 36
Replacement Parts for Software, 36
Response Time, 26
Runtime error, 98
S
Shutdown Procedure, 60
Software, 49
Software Accessories, 36
Startup Procedure, 60
Status Word
Generic Bus, 71
Switch off behavior, 60
Parameterization in Concept, 61
Switching
Alternatives, 91
Gruppen, 86
Switching INTERBUS nodes, 61
T
Technical Data, 48
Topology, 15
840 USE 497 00 June 2005
137
Index
138
840 USE 497 00 June 2005