1
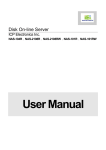
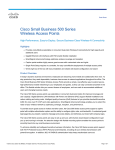
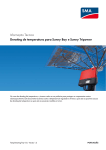
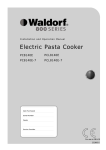
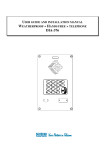
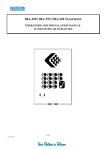
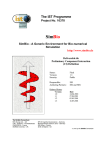
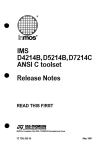
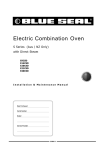
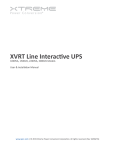
Solar grid‐connected inverter
SOLATRA Installation Guide/User manual
Table of Contents
Installation Manual
Notes on this Manual..............................................................................................................................3
Safety ......................................................................................................................................................3
Unpacking ...............................................................................................................................................6
Installing the Inverter..............................................................................................................................6
Selecting the place of installation...........................................................................................................6
Wall mounting.........................................................................................................................................7
Electrical Connection ..............................................................................................................................8
Overview of the connection area ...........................................................................................................8
Connecting the inverter to the public grid AC isolator ......................................................................... 10
Connecting the inverter to the photovoltaic field DC isolator .............................................................10
DC isolator requirement .......................................................................................................................11
Fuse .......................................................................................................................................................11
Communication.....................................................................................................................................11
Commissioning......................................................................................................................................11
Decommissioning..................................................................................................................................12
Maintenance and Cleaning ...................................................................................................................12
Troubleshooting....................................................................................................................................13
Technical Data.......................................................................................................................................14
User Manual
Notes on this Manual............................................................................................................................16
Safety ....................................................................................................................................................16
Information on the Display ...................................................................................................................19
Maintenance and Cleaning ...................................................................................................................21
Contact..................................................................................................................................................21
2
Installation Manual
Notes on this Manual
This installation guide describes the assembly, installation, commissioning and maintenance of
Solatra inverter of the SLT‐2100TL. Store this manual where it will be accessible at all times. This
guide is for qualified electrical technicians. The tasks described in this manual may only be
performed by qualified electrical technicians only. If you have any questions, please contact your
local dealer or Solatra support centre.
Safety
The Solatra inverter is a solar inverter which converts the DC power to AC power and feed it into the
public grid. The operational limits of inverters must be observed. Improper use may cause lethal
hazard. Inverters may only be operated with PV modules. Do not connect any sources of energy
other than PV modules to the inverter.
•
The installation of Solatra must be performed in full compliance with national and local
standards and regulations.
•
The inverters must be installed by a qualified electrician who is responsible for observing
existing standards and regulations. In addition, opening of the inverter, and any electrical
installation, repair or modification of the inverter may also only be performed by authorized
electrician.
•
Read and understand all the instructions contained in this guide before installing and
commissioning the inverter.
•
The connection to the public grid must be done only after receiving approval from the
distribution utility as required by national and state regulations, and can be done only by
qualified personnel.
•
Enclosure body can get hot during operation. The temperature of some parts of inverter
enclosure can reach over 60°C in normal operation, particularly the temperature of the
cooling fins. Do not touch the part for danger of burn. Mount the inverter in such a way that
it cannot be touched inadvertently.
•
Do not mount the inverter on flammable construction materials.
•
Do not mount the inverter in areas where highly flammable materials are stored.
•
Do not mount the inverter in areas with a risk of explosion.
•
Before cleaning the cooling fins, disconnect the system from the public grid by switching off
the AC circuit breaker and DC circuit breaker (isolator) on the PV generator.
3
Safety symbol used: The following types of safety instructions and general information appear in this
document
Attention
This symbol marks hazards that may lead to severe injuries. There is also
the
Danger of damage or destruction of hardware respectively software.
Info symbol:
1
This symbol marks helpful information
Further symbols to specify sources of danger:
Caution!
Danger of life‐threatening voltage!
Even in disconnected state the device may still provide high contact voltage!
Caution!
Risk of Electric Shock, Do Not Remove Cover. No User Serviceable Parts
Inside. Refer Servicing To Qualified Service Personnel.
Caution!
WARNING – For Continued Protection Against Risk Of Fire, Replace Only
With Same Type And Ratings Of Fuse.
4
Caution!
When the photovoltaic array is exposed to light, it supplies a dc voltage to
this equipment.
Caution!
ATTENTION inverse voltage! Capacitors are discharged 30 minutes After
disconnection DC plugs. See instruction manual!
Caution!
Risk of electric shock – Both AC and DC voltage sources are terminated
Caution!
Hot surface!
Do not touch. Risk of burns.
5
Unpacking
Check all components in the package box and any visible external damage. Contact your dealer if
anything is damaged or missing.
Object
A
B
C
D
E
Description
Solatra inverter
Template
AC connector
Expansion bolts
Installation Guide/User manual
Quantity
1
1
1
3
1
Installing the Inverter
DANGER!
Inverter can cause fires!
• Do not mount inverter directly under the sunlight.
• Do not mount the inverter on flammable construction materials.
• Do not mount the inverter in areas where highly flammable
materials are stored.
• Do not mount the inverter in areas with a risk of explosion.
CAUTION!
Danger of burn injuries due to hot enclosure parts!
Selecting the place of installation
Consider the following requirements when selecting where to install:
y
Mount on the solid surface where is suitable for inverter’s weight and dimensions.
y
Mounting location should have sufficient room around the inverter to enable easy
installation and removal from the mounting surface.
y
Mount in a well ventilated place.
y
Do not expose the inverter to direct sunlight to avoid power production degradation.
y
Install at eye level to ensure operating status display easy to read.
y
The ambient temperature should be below 40°C to ensure optimal operation.
y
The recommended minimum clearances around the inverter are shown below:
6
30cm
30cm
30cmm
50c
Wall mounting
1.
Use template to mark the position of the holes and drill the holes.
2.
Place two top expansion tube into the holes if necessary then insert the appropriate screws
and washers.
3.
Attach the inverter to the wall through top mounting bracket at back of the inverter.
4.
Screw the inverter to the wall through bottom mounting bracket at back of the inverter.
Only tighten the screws hand‐tight.
5.
Check to ensure the inverter is firmly fastened.
7
Electrical Connection
Overview of the connection area
The following diagram shows the connection areas on the bottom of the inverter.
Object
A
B
C
Description
DC connectors for connecting the PV cables
Socket for AC connection
RS485 communication port
WARNING:
• Make sure electrical design is in compliance with the National and
local standard/regulations.
• Mount the Solatra inverter firmly before making electrical
connections
• When disconnecting Solatra inverter from the grid, always disconnect
the AC switch before DC disconnection.
• The limiting DC input of inverter may not be exceeded:
The maximum input voltage is 600V maximum input current is 18A
WARNING:
Make sure electrical design is in compliance with the National and local
standard/regulations.
WARNING:
Installed in accordance with the National Wiring Rules of Standard AS/NZS
3000.
WARNING:
A DC isolator must be used before the Inverter
8
WARNING:
Mount the Solatra inverter firmly before making electrical connections
WARNING:
When disconnecting Solatra inverter from the grid, always disconnect the AC
switch before DC disconnection.
WARNING:
The limiting DC input of inverter may not be exceeded:
The maximum input voltage is 600V maximum input current is 18A
Attention:
To avoid injuries of your hands we recommend wearing protective gloves
during dismounting and transport of the inverter.
Attention:
Do not remove cover when the machine is operating.
9
Connecting the inverter to the public grid AC isolator
1. Use 2.5mm^2 three cores cable as AC cable.
2. Switch off the circuit breaker or isolator and make sure no voltage is present.
3. Strip approx.30mm from the AC cable and shorten the L N and PE by 4‐5mm.
4. Put cable gland and socket tube through the AC cable.
5. Insert the protective earth PE (green‐yellow) in the screw terminal with the earth sign on the
AC socket and tighten the screw.
6. Insert the neutral conductor N (blue) in the screw terminal N on the socket and tighten the
screw.
7. Insert the phrase L (brown or black) into screw terminal L on the socket and tighten the
screw.
8. Make sure the wires are securely connected.
9. Put socket sleeve onto the socket and click them tightly.
10. Place the AC connection socket tightly onto the AC socket on the inverter.
Connecting the inverter to the photovoltaic field DC isolator
1
Before connection the polarity of connections and DC voltage has to be
measured. Please make sure that on all poles the same number of PV
modules is used in the same circuit, roof alignment and shadow conditions
and therefore identical voltage conditions exist
1
When the photovoltaic array is exposed to light, it supplies a dc voltage to
this equipment
1. Switch off the circuit breaker or isolator and secure against re‐connection.
2. Check the connection cables of the PV modules for correct polarity and the maximum input
voltage of inverter is not exceeded.
3. Check the strings for ground faults.
4. Check the DC plug connector for correct polarity and connect it.
10
DC isolator requirement
A DC isolator must be used before the inverter is installed in accordance with the National Wiring
Rules of Standard AS/NZS3000.
Fuse
For continued protection against risk of fire, replace only with the same type and ratings of fuse.
Communication
The Solatra inverter is equipped with a communication port RS485 interface for communicated with
monitoring data or updating data.
Commissioning
Check the following requirements before commissioning:
•
The inverter is firmly mounted.
•
Correct connection of the AC cable (grid)
•
Correct connection of the DC cable (PV strings)
•
The enclosure lid is securely screwed in place
•
The circuit breaker or isolator is installed correctly
The start‐up procedure is as follows:
1. Switch DC circuit breaker or isolator (PV strings) ON.
2. Switch AC circuit breaker or isolator (grid) ON.
3. After turn the switch on, the Solatra inverter starts the connection sequence. The check
routine is indicated on the LC display. The check routine may take 30 seconds to minutes
depending on the grid condition. The screens are shown the check results during this self
test phrase:
•
“Boosting …”, connection in process
•
Vpv voltage value and status check with specified operating range
•
Grid voltage and frequency value and status check with specified operating range
4. When the self test is completed, the Solatra inverter starts operating and green light stays
on. This means the inverter is operating and converts DC power to feed back the grid.
5. If the self‐test shows a negative result, the inverter will repeat the self‐test procedure until
grid voltage and frequency parameters and configuration are found to be in the specified
range. The red light will turn on once then off.
11
Important note
The inverter clock has to be set to correspond with the local time. Inverter may not work properly if
time setting is incorrect.
Decommissioning
Warning:
DANGER!
Risk of lethal electric shock
Make sure the AC and DC side is switched off
The decommissioning procedure is as follows:
1. Disconnect the circuit breaker or isolator and secure against re‐connection.
2. Using a current measure ensure that there is no current to all DC cables.
3. Unlock all DC plug connectors.
4. Pull out the AC plug connector.
5. Check whether the display and lights have gone out.
6. Ensure that there is no voltage at the DC plugs. Remove all cables from the inverter.
7. Loosen the screw between the inverter and solid mounting surface.
8. Dismount the inverter upward from the solid mounting surface.
Maintenance and Cleaning
Check the correct operation of the inverter at regular intervals. Dust and pollen can cause heat
accumulation that can result in yield losses. Also check the inverter and the cables for visible
external damage. Have repairs carried out if necessary.
Cleaning the Cooling Fins
The heat dissipation of the inverter can be restricted if the cooling fins are dirty. Use a suitable soft
brush to clean the cooling fins. Do not use corrosive, solvent‐containing, abrasive cleaners or
polishes.
CAUTION!
Danger of burn injuries due to hot enclosure parts!
Do not touch the inverter’s enclosure during operation.
12
1
Risk of electric shock from energy stored in capacitor, do not remove cover
Until 30 minutes after disconnecting all sources of supply.
Troubleshooting
Error
Cause
Explanation/Correction
InvRY Fail
Inverter relay damages or PV
power can’t drive the
inverter to start
When sunlight energy is too strong, the
inverter relay may be damaged. If yes,
the Relay needs to be replaced. If not,
reboot the unit or wait for the sunlight
energy getting normal.
GridRY Fail
Grid relay or fuse damages
Replace the grid relay or fuse.
Vgrid Too High
Grid voltage is too high
Grid voltage is too high. Wait for the grid
voltage returns to normal.
Vgrid Too Low
Grid voltage is too low
Grid voltage is too low. Wait for the grid
voltage returns to normal.
Freq Too High
Grid frequency is too high
Wait for the grid frequency returns to
normal.
Freq Too Low
Grid frequency is too low
Wait for the grid frequency returns to
normal.
Iac Too High
Output current is too high
The unit will reboot automatically.
Vpv Too Low
PV voltage is too low
PV voltage too low cannot start the
inverter working.
Vpv Too High
PV voltage is too high
High voltage will damage the unit
components. The unit is force to stop
working.
CtrT Too High
The unit temperature is too
Wait for the unit temperature cool down
13
high
and return to working range.
Vgrid H/L Int
The grid voltage is suddenly
jumping too high or
dropping too low
The unit will reboot automatically to
protect itself.
Vpv<50%
The PV voltage is suddenly
dropping more than 50%
comparing to previous
voltage value
The unit will reboot automatically to
protect itself.
Phase Error
The grid frequency change
suddenly
The unit will reboot automatically to
protect itself.
Time error
The time showed on the
screen hasn’t been set
properly
Inverter clock must be set as local time.
Technical Data
Model
SLT‐2100TL
Nominal input voltage
380V dc
Max input voltage
600 V dc
MPPT operating Voltage range
From 60 V dc to 580 V dc
MPPT efficiency
>99%
Array configuration
One
Max. operating current
15A
Max. short circuit current
18A
Min. operating input power
30w
Max. input power
2300 W
Max. output power
2100W
Grid voltage maximum range
From 205 to 264Vac
Nominal grid voltage
230Vac
Nominal grid frequency
50 Hz
Nominal output current
9A
14
Maximum efficiency
>97%
Internal consumption during stand‐by
<7W
Optimized operating ambient temperature
From‐25°C to +50°C
(from‐13°F to 122°F)
Enclosure protection level
IP65
Audible Noise
<10dBA
Dimensions (H x W x D):
590x360x313mm
Weight
15kg
User Manual
Notes on this Manual
This manual describes the operation of Solatra inverter of the SLT‐2100TL. Store this manual where
it will be accessible at all times. This manual is for qualified personnel. The tasks described in this
manual may only be performed by qualified personnel. If you have any questions, please contact
your local dealer or Solatra support centre.
Safety
The Solatra inverter is a solar inverter which converts the DC power to AC power and feed it into the
public grid. The operational limits of inverters must be observed. Improper use may cause lethal
hazard. Inverters may only be operated with PV modules. Do not connect any sources of energy
other than PV modules to the inverter.
•
The inverters must be installed by an authorized skilled electrician who is responsible for
observing existing standards and regulations. In addition, opening of the inverter, and any
electrical installation, repair or modification of the inverter may also only be performed by
authorized skilled electrician.
•
Enclosure body can get hot during operation. The temperature of some parts of inverter
enclosure can reach over 60°C in normal operation, particularly the temperature of the
cooling fins. Do not touch the part for danger of burn.
•
Do not lay flammable and explosive materials close to the system.
•
Make sure that the system is out of the children’s reach.
•
Do not put any things on top of the inverter.
•
Before cleaning the cooling fins, disconnect the system from the public grid by switching off
the AC circuit breaker and DC circuit breaker (isolator) on the PV generator.
15
Safety symbol used: The following types of safety instructions and general information appear in this
document
Attention
This symbol marks hazards that may lead to severe injuries. There is also the
Danger of damage or destruction of hardware respectively software.
Info symbol:
1
Information provides tips that are valuable for the optimal operation of the
product.
Further symbols to specify sources of danger:
Caution!
Danger of life‐threatening voltage!
Even in disconnected state the device may still provide high contact voltage!
Caution!
Risk of Electric Shock, Do Not Remove Cover. No User Serviceable Parts
Inside. Refer Servicing To Qualified Service Personnel.”
Caution!
WARNING – For Continued Protection Against Risk Of Fire, Replace Only With
Same Type And Ratings Of Fuse.
Caution!
When the photovoltaic array is exposed to light, it supplies a DC voltage to
this equipment.
16
Caution!
ATTENTION inverse voltage! Capacitors are discharged 30 minutes After
disconnection DC plugs. See instruction manual!
Caution!
Risk of electric shock – Both AC. and DC. voltage sources are terminated.
Caution!
Hot surface!
Do not touch. Risk of burns.
Information on the Display
Solatra inverter is supplied with LC display and function keys on front of enclosure lid.
UP
Escap e
Butto n
Butto n
LCD Display
Down
Butto n
Enter
Button
During the operation, the display shows the operating data of the inverter continuously. Use up and
down button to obverse the following main menu diagrams.
Date: 2011/01/15
Time: 11:24:36
Pout: 872W
E‐today: 2.47kWh
Firstly, the date, time, instant inverter power output and
today latest energy production.
Ppeak: 1034W
Vpv: 198.0V
Idc: 5.91A
Next, PV array data includes today maximum power point
reached, instant PV array voltage and instant PV array
current.
Vgrid: 248.9V
Iac: 3.48A
Freq: 49.9Hz
The last, AC power information includes instant grid voltage,
instant AC current and instant grid frequent.
17
User can also obverse the PV system production in certain period of time. By pressing enter button
in the main menu interface display shows submenu list like following diagram. Sub menu list
contains statistics, settings, troubleshoot and information items.
→Statistics
Settings
Troubleshoot
Information
Use up and down button to select “Statistics” and press enter
button.
→7 days
12 months
Select “7 days” to obtain past 7 days operating information.
2011/01/14
Energy: 4.17kWh
RunTime: 9h
Ppeak: 1034W
Use up and down button to choose date. Here it is shown the
date of 2011/01/14 operating information.
7 days
→12 months
Select “12 months” to obtain past 12 months operating
information.
2011/01
Energy: 59.4kWh
RunTime: 110h
Ppeak: 1034W
Use up and down button to choose month. Here it is shown the
January 2011 operating information. Press ESC button to return
submenu list.
Inverter date and time can be set by selecting “Settings” in submenu list. It is important to set the
date and time accurately for inverter operation and data observation. Inverter may switch off
even in the full sun daytime if the inverter time was set as night time.
Statistics
→Settings
Troubleshoot
Information
→2011/01/11
11:24:36
Use up and down button to select “Settings” and press enter
button.
Use up, down and enter button to select and change year,
month, date, hour,
18minute and second. Press enter button to
confirm and ESC button to exit “Setting” function.
Use troubleshoots function to detect any system fault code and history.
Use up and down button to select “Troubleshoots” and
press enter button.
Statistics
Setting
→Troubleshoot
Information
Error1:
None
Error2:
None
Error code will show if the system suffers any
dysfunction. Press ESC button to return submenu list.
Inverter model number and software firmware version can be found in Information item.
Statistics
Setting
Troubleshoot
→Information
Use up and down button to select “Information” and
press enter button.
Mod: SLT‐2100TL
V: 021110321V1.0
Inverter model number and software firmware version is
shown
Maintenance and Cleaning
Check the correct operation of the inverter at regular intervals. Dust and pollen can cause heat
accumulation that can result in yield losses. Also check the inverter and the cables for visible
external damage. Have repairs carried out if necessary.
Cleaning the Cooling Fins
The heat dissipation of the inverter can be restricted if the cooling fins are dirty. Use a suitable soft
brush to clean the cooling fins. Do not use corrosive, solvent‐containing, abrasive cleaners or
polishes.
CAUTION!
Danger of burn injuries due to hot enclosure parts!
Do not touch the inverter’s enclosure during operation.
19