1
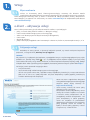
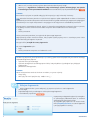
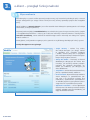
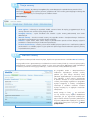
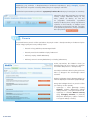
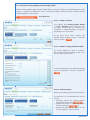
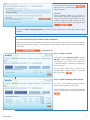
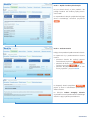
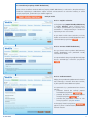
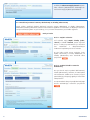
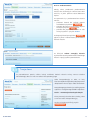
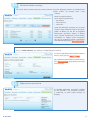
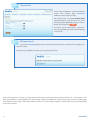
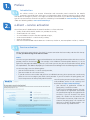
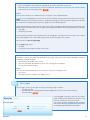
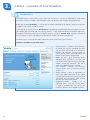
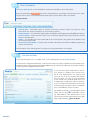
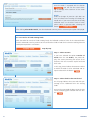
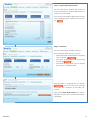
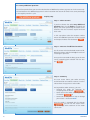
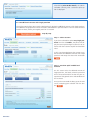
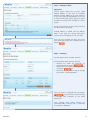
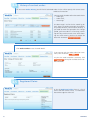
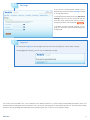
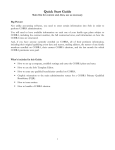
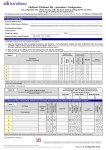
Instrukcja użytkownika Portalu e-klient dla klientów MetLife TUnŻiR S.A. Wersja polska English version Instrukcja użytkownika Portalu e-klient dla klientów MetLife TUnŻiR S.A. Instrukcja ułatwi pierwsze kroki w portalu, stworzonym i rozwijanym z myślą o naszych Klientach 1. 2. 3. Wstęp 3 1.1 Wprowadzenie 3 e-klient – aktywacja usługi 3 2.1 Aktywacja usługi 3 2.2 Kolejne logowanie 4 e-klient – przegląd funkcjonalności 5 3.1 Wprowadzenie 5 3.2 Twoje umowy 6 3.2.1 Wartość umowy 6 3.2.2 Zlecenia 7 3.2.2.1 Zlecenie zmiany podziału procentowego składki 8 3.2.2.2 Zlecenie przeniesienia środków między funduszami 9 3.2.2.3 Deklaracja wpłaty składki dodatkowej 11 3.2.2.4 Deklaracja zawarcia umowy dodatkowej ze składką jednorazową 12 3.3 Twoje dane 13 3.4 Historia zleceń umowy 15 3.5 Zgłoszone roszczenia 15 3.6 Ustawienia 16 3.6 Wylogowanie 16 1. Wstęp 1.1 Wprowadzenie e-klient to internetowy portal informacyjno-transakcyjny stworzony dla Klientów MetLife umożliwiający dostęp do informacji o umowach ubezpieczenia oraz składanie zleceń zmian w polisach. Zakres dostępnych informacji może się różnić w zależności od rodzaju posiadanej umowy ubezpieczenia. Portal dostępny jest poprzez link umieszczony na stronie www.metlife.pl lub bezpośrednio pod adresem www.eklientmetlife.pl. 2. e-klient – aktywacja usługi Portal e-klient przeznaczony jest dla Klientów MetLife TUnŻiR S.A. posiadających: •• polisę, w ramach której MetLife TUnŻiR S.A. udostępnia usługę, •• numer PIN do Telefonicznego Systemu Informacyjnego, •• adres e-mail do otrzymywania danych koniecznych do logowania, •• numer PESEL, •• dostęp do Internetu, •• jedną z zalecanych przeglądarek stron internetowych: Chrome 23; Firefox 16; Internet Explorer wersja 7, 8 i 9. 2.1 Aktywacja usługi Wchodząc na stronę portalu, w pierwszej kolejności sprawdź, czy zostało nawiązane bezpieczne połączenie, a następnie kliknij Pierwszy raz się logujesz?. UWAGA! Aby upewnić się, że połączenie jest bezpieczne, a przeglądarka korzysta z szyfrowanego połączenia przy użyciu protokołu SSL, poszukaj ikony kłódki ( ) – np.: w przeglądarce Internet Explorer znajduję się ona po prawej stronie adresu URL strony. Jeśli ją widzisz, oznacza to, że możesz bezpiecznie rozpocząć aktywację usługi, podając niezbędne dane. Adres wyświetlany przez przeglądarkę internetową powinien zaczynać się od znaków https://. Na kolejnej stronie wprowadź następujące dane: •• Twój numer PESEL, •• numer PIN do usługi Telefonicznego Systemu Informacyjnego. Jeśli nie masz jeszcze numeru PIN, a posiadasz umowę indywidualną, skontaktuj się z naszym Konsultantem pod nr tel. 22 523 50 70 i podaj swój PESEL. Jeśli jesteś ubezpieczony w polisie grupowej, skontaktuj się z Działem Administracji Polis Grupowych. Numer PIN wraz z Regulaminem korzystania z usług Telefonicznego Systemu Informacyjnego otrzymasz pocztą. Więcej informacji na: http://www.metlife.pl, •• numer umowy, wniosku lub numer polisy grupowej: numer Certyfikatu, Jeśli posiadasz umowę indywidualną, numer umowy lub wniosku znajdziesz na wniosku o zawarcie umowy ubezpieczenia lub na Szczegółowej Umowie Ubezpieczenia. Jeśli jesteś ubezpieczony w polisie grupowej, numer ten znajdziesz na potwierdzeniu Ubezpieczenia, przekazanym przy zawieraniu polisy grupowej. Numer ten składać się będzie z numeru polisy grupowej: numeru Certyfikatu: np.: 5099/100:345. Główne menu 3 •• adres e-mail, na który zostaną wysłane dane konieczne do aktywacji usługi. Zapoznaj się z Regulaminem świadczenia usług Telefonicznego Systemu Informacyjnego oraz portalu internetowego e-klient przez MetLife TUnŻiR S.A. oraz Oświadczeniem, a po ich potwierdzeniu, kliknij UWAGA! Dane możesz wpisywać w sposób tradycyjny lub korzystając z opcji wirtualnej klawiatury. Wirtualna klawiatura pozwala na wpisanie hasła poprzez wybór odpowiednich znaków na klawiaturze wyświetlonej na monitorze komputera. Pozwala ona uchronić się przed ewentualnymi programami szpiegującymi zainstalowanymi na naszych komputerach i zaczytującymi znaki wpisywane na standardowej klawiaturze. Po poprawnym wprowadzeniu danych, pojawi się komunikat potwierdzający utworzenie konta w portalu, a na podany w trakcie tworzenia konta adres otrzymasz dwie wiadomości e-mail zawierające: •• login, •• hasło tymczasowe. Hasło tymczasowe potrzebne jest wyłącznie do pierwszego logowania. Login pozostaje Twoim numerem Klienta, który będzie wykorzystywany wraz z ustawionym przez Ciebie hasłem do kolejnych logowań w portalu. Następnie kliknij Przejdź do strony logowania. Na stronie logowania wpisz: •• login, •• hasło tymczasowe otrzymane w wiadomości e-mail. Jeśli dane są poprawne, portal przekieruje Cię na stronę, gdzie zostaniesz poproszony o ustalenie własnego, indywidualnego hasła poprzez: •• wpisanie hasła tymczasowego, •• wpisanie nowego hasła (ustalonego przez Ciebie, którym będziesz się posługiwał przy kolejnych logowaniach), •• powtórzenie nowego hasła. Uwaga! Nowe hasło powinno zawierać minimum 8 znaków, w tym co najmniej: •• cztery litery, •• dwie cyfry lub znaki specjalne (np. !@#$%^&*()_ ). 2.2 Kolejne logowanie Kolejne logowania do systemu odbywają się poprzez wpisanie na stronie logowania: •• numeru login, •• indywidualnego hasła, ustalonego w trakcie pierwszego logowania i zatwierdzenie przyciskiem Po poprawnym zalogowaniu pojawi się strona głów na prezentująca podstawowe dane o umowach udostępnianych przez portal e-klient. W przypadku, gdy zapomnisz lub utracisz hasło, kliknij Nie pamiętasz hasła? na stronie logowanie i postępuj zgodnie z instrukcją. 4 Główne menu 3. e-klient – przegląd funkcjonalności 3.1 Wprowadzenie Ekran domyślny w systemie e-klient prezentuje Twoje umowy, czyli zestawienie posiadanych polis, w ramach których udostępniona jest usługa e-klient. Kliknięcie nazwy umowy spowoduje przejście do szczegółów polisy. Poniżej widoczne są Ostatnie zlecenia – jest to lista ostatnich zleceń złożonych za pomocą portalu. Jeśli nie było takich zleceń, ta sekcja nie pokaże się. Po prawej stronie znajdują się: Powiadomienia np. o zmianie hasła (system nie wymusza zmiany hasła, a jedynie – ze względów bezpieczeństwa – zaleca ją co 30 dni) oraz informacje o formach kontaktu z Towarzystwem: formularz kontaktowy, numer telefonu do Telefonicznego Centrum Informacji oraz adresy biur i agencji MetLife TUnŻiR S.A. Menu główne, umiejscowione na górnym pasku, pozwala na szybki dostęp do kolejnych funkcji systemu. Funkcje dostępne z menu górnego: •• Twoje umowy – zawiera listę umów, dla których dostępna jest usługa, możesz tu sprawdzić m.in. wysokość świadczeń i składek, wartość polisy oraz w przypadku polis z ubezpieczeniowymi funduszami kapita- łowymi złożyć wybrane zlecenie. •• Oferty dla Ciebie – informacje o ofertach dodatkowych dostępnych dla Klienta oraz instrukcja, jak rozszerzyć ochronę ubezpie czeniową bez zbędnych formalności. Za kładka jest widoczna, jeśli dostępna jest oferta dodatkowa. •• Twoje dane – zawiera dane kontaktowe Klienta, jakie są w posiadaniu MetLife TUnŻiR S.A. •• Historia zleceń – daje możliwość sprawdzenia zleceń złożonych za pośrednictwem por talu wraz z ich aktualnym statusem oraz możliwością wydrukowania potwierdzenia. Ta zakładka pojawia się po wykonaniu pierw szego zlecenia za pośrednictwem portalu. •• Zgłoszone roszczenia – to lista zgłoszonych roszczeń wraz z ich aktualnym statusem (etapem realizacji). Zakładka może być niewidoczna, jeśli nigdy nie składałeś roszczenia. Główne menu 5 3.2 Twoje umowy Kliknij Twoje umowy, aby zobaczyć szczegółową listę umów dostępnych za pośrednictwem portalu e-klient. Naciskając przy wybranej umowie, przejdziesz do menu umowy pozwalającego na dostęp do szczegółowych informacji na temat polisy oraz składanie zleceń. Menu umowy: •• Dane ogólne – informacja o wysokości składki, numerze konta do wpłaty, przygotowanych dla tej umowy ofertach oraz terminie wpłaty kolejnej składki. •• Szczegóły umowy – wykaz świadczeń oraz składek z tytułu umowy podstawowej oraz umów dodatkowych. •• Wartość umowy – aktualna wartość umowy. W przypadku umów z ubezpieczeniowym funduszem kapitałowym prezentowana jest również historia rachunku. •• Zlecenia – wykaz zleceń, które można złożyć za pośrednictwem portalu e-klient (dotyczy wyłącznie produktów z ubezpieczeniowym funduszem kapitałowym). •• Historia zleceń umowy – aktualny status zleceń składanych przez portal wraz z możliwością wydruku potwierdzenia. Ta zakładka pojawia się po wykonaniu pierwszego zlecenia odnośnie wybranej umowy za pośrednictwem portalu. 3.2.1 Wartość umowy Jeśli wybrana umowa posiada wartość wykupu, będzie ona zaprezentowana w zakładce Wartość umowy. W przypadku umów z gwarantowanym świadczeniem wartość umowy składa się z wartości wykupu polisy powiększonej o premię nadzwyczajną (udział w zysku) oraz ewentualne dodatkowe środki pochodzące z indeksacji (rachunek inwestycyjny indeksacji), a także o wartość umowy dodatkowej Lokata. W przypadku umów z ubezpieczeniowym funduszem kapitałowym wartość umowy podana jest jako iloczyn aktualnej liczby jednostek zgromadzonych na rachunkach oraz ceny jednostki z dnia wyceny wskazanego w portalu. Wartość ta nie jest równoznaczna z kwotą, która byłaby wypłacona w przypadku wykupu (rezygnacji z) umowy. Szczegółowe informacje o zasadach naliczania wartości wykupu znajdują się w ogólnych warunkach ubezpieczeń. , po ustawieniu Zwróć uwagę na ikonę na niej kursora myszy uzyskasz dodatkowe informacje, jak np. wyjaśnienia trudniejszych pojęć. Można również wyświetlić jednocześnie wszystkie podpowiedzi znajdujące się na danej stronie przez skorzystanie z przycisku Włącz podpowiedzi. 6 Główne menu Wybierając, przy rachunku z ubezpieczeniowym funduszem kapitałowym, opcję szczegóły, uzyskasz dostęp do historii wszystkich transakcji dokonywanych na wybranym rachunku. Po określeniu parametrów wyszukiwania: Typ operacji i Zakres dat zobaczymy interesujące nas transakcje. Domyślnie zakres dat ustawiony jest za ostatni miesiąc. Istnieje możliwość zmiany na inny okres, jednak nie dłuższy niż 365 dni. W przypadku konieczności wyszukania operacji za dłuższy okres, należy wyszukiwanie wykonać w kilku krokach, za każdym razem przeszukując maksymalnie 365 dni. Po wybra niu kryteriów wyszukiwania, należy zatwierdzić dane przyciskiem 3.2.2 Zlecenia Za pośrednictwem portalu e-klient posiadacze aktywnych umów z ubezpieczeniowym funduszem kapita łowym mogą wykonywać cztery rodzaje zleceń: •• Zlecenie zmiany podziału procentowego składki. •• Zlecenie przeniesienia środków między funduszami. •• Deklaracja wpłaty składki dodatkowej. •• Deklaracja zawarcia umowy dodatkowej ze składką jednorazową. Osobą uprawnioną do składania zleceń jest Ubezpieczający lub o ile wynika to z ogólnych warunków ubezpieczenia – Ubezpieczony. Portal daje możliwość złożenia tylko tych zleceń, które są dostępne dla wskazanego numeru rachunku. Złożenie kolejnego zlecenia danego rodzaju jest możliwe dopiero po zrealizowaniu poprzedniego. Dostęp do każdego zlecenia w portalu e-klient jest możliwy na dwa sposoby: •• wybierając z menu głównego umowy Zlecenia, najpierw dokonujemy wyboru rodzaju zlecenia, a następnie rachunku lub •• wybierając w zakładce Wartość umowy opcję szczegóły rachunku, w pierwszej kolejności dokonujemy wyboru rachunku, a następnie rodzaju transakcji. Główne menu 7 3.2.2.1 Zlecenie zmiany podziału procentowego składki Zlecenie zmiany podziału procentowego składki dotyczy przyszłych składek (również dodatkowych), które wpłyną na rachunek po dokonaniu zmiany. Towarzystwo dokona podziału nowych składek pomiędzy fundusze zgodnie ze wskazaniem. Krok po kroku Krok 1 – Wybór rachunku Jeśli wybrałeś opcję Zmień podział składki z zakładki Zlecenia, portal wyświetli ekran, na którym prezentowana jest aktualna lista rachunków z ubezpieczeniowym funduszem kapitałowym oraz ich wartość. W tym kroku wskaż numer rachunku, dla którego będzie składane zlecenie i zatwierdź dane przyciskiem Krok 2 – Wybór nowego podziału składki Na ekranie widoczne są tylko te fundusze, które są dostępne dla posiadanej umowy. Suma wskazań musi wynosić 100%. Po wprowadzeniu danych przejdź do kolejnego ekranu zatwierdzając wskazanie przyciskiem Krok 3 – Podsumowanie Kolejny ekran przedstawia podsumowanie zlecenia. Po zapoznaniu się z podsumowaniem zlecenia możesz: •• przekazać zlecenie do realizacji poprzez zatwierdzenie przyciskiem •• powrócić do ekranu ze zleceniami poprzez wciśnięcie przycisku lub •• powrócić do poprzednich kroków w celu zmiany kryteriów – przycisk wstecz. 8 Główne menu Po akceptacji zlecenia przyciskiem pojawi się ekran z komunikatem potwierdzenia złożenia zlecenia. Uwaga! Zlecenie podziału składki nie ma wpływu na inwestowanie dotychczas zgromadzonych jed nostek. Jeśli chcesz przenieść dotychczas zgro madzone środki do innego funduszu lub fun duszy, złóż odrębne zlecenie wybierając przycisk Po kliknięciu zobacz szczegóły zlecenia wyświetlone zostanie podsumowanie złożonego zlecenia z opcją wydruku. 3.2.2.2 Zlecenie przeniesienia środków między funduszami Poprzez zlecenia przeniesienia środków między funduszami następuje umorzenie wskazanej liczby jednostek wybranego funduszu lub funduszy i zakup jednostek innego funduszu lub funduszy za kwotę pochodzącą z umorzenia. Krok po kroku Krok 1 – Wybór rachunku Jeśli wybrałeś opcję Przenieś środki z zakładki Zlecenia, portal wyświetli ekran, na którym prezentowana jest aktualna lista rachunków z ubezpieczeniowym funduszem kapitałowym oraz ich wartość. W tym kroku wskaż numer rachunku, dla którego będzie składane zlecenie i zatwierdź dane przyciskiem Krok 2 – Wybór funduszy przenoszonych Tu wskaż, z jakich dotychczasowych funduszy będą umorzone środki i w jakiej części. Po wprowadzeniu danych przejdź do kolejnego ekranu zatwierdzając wskazanie przyciskiem Główne menu 9 Krok 3 – Wybór funduszy docelowych Na tym ekranie określ, w jakim podziale i do jakiego funduszu lub funduszy będą przenie sione środki. Po wprowadzeniu danych przejdź do kolejnego ekranu zatwierdzając wskazanie przyciskiem Krok 4 – Podsumowanie Kolejny ekran przedstawia podsumowanie zlecenia. Po zapoznaniu się z podsumowaniem zlecenia możesz: •• przekazać zlecenie do realizacji poprzez zatwierdzenie przyciskiem •• powrócić do ekranu ze zleceniami poprzez wciśnięcie przycisku lub •• powrócić do poprzednich kroków w celu zmiany kryteriów – przycisk wstecz. Po akceptacji zlecenia przyciskiem pojawi się ekran z komunikatem potwierdzenia złożenia zlecenia. Po kliknięciu zobacz szczegóły zlecenia wyświetlone zostanie podsumowanie złożonego zlecenia z opcją wydruku potwierdzenia. 10 Główne menu 3.2.2.3 Deklaracja wpłaty składki dodatkowej Portal e-klient umożliwia złożenie deklaracji wpłaty składki dodatkowej na rachunek z ubezpieczeniowym funduszem kapitałowym. Dodatkowa wpłata zostanie zainwestowana na rachunku funduszy w takich samych proporcjach, jak dzielona jest składka regularna. Krok po kroku Krok 1 – Wybór rachunku Jeśli wybrałeś opcję Wpłać składkę dodatkową z zakładki Zlecenia, portal wyświetli ekran, na którym prezentowana jest aktualna lista rachunków z ubezpieczeniowym funduszem kapitałowym oraz ich wartość. W tym kroku wskaż numer rachunku, na który będzie zainwestowana składka dodatkowa oraz zatwierdź dane przyciskiem Krok 2 – Kwota składki dodatkowej Na tym ekranie wskaż wysokość deklarowanej składki dodatkowej oraz potwierdź zasady inwestowania składki. Po wprowadzeniu danych przejdź do kolejnego ekranu zatwierdzając wskazanie przyciskiem Krok 3 – Podsumowanie Kolejny ekran przedstawia podsumowanie zlecenia oraz informację o numerze konta oraz terminie, w jakim powinna zostać dokonana wpłata. Po zapoznaniu się z podsumowaniem zlecenia możesz: •• przekazać zlecenie do realizacji poprzez zatwierdzenie przyciskiem •• powrócić do ekranu ze zleceniami poprzez wciśnięcie przycisku lub •• powrócić do poprzednich kroków w celu zmiany kryteriów – przycisk wstecz. Po akceptacji zlecenia przyciskiem pojawi się ekran z komunikatem potwierdzenia złożenia zlecenia. Główne menu 11 Po kliknięciu zobacz szczegóły zlecenia wyświe- tlone zostanie podsumowanie złożonego zle cenia wraz z opcją wydruku potwierdzenia. 3.2.2.4 Deklaracja zawarcia umowy dodatkowej ze składką jednorazową Portal e-klient umożliwia złożenie deklaracji zawarcia umowy dodatkowej ze składką jednorazową. Dodatkowa składka jednorazowa zostanie zainwestowana zgodnie ze wskazaniem na odrębnym rachunku. Istnieje możliwość wyboru innych funduszy, niż te, w które inwestowana jest składka regularna. Krok po kroku Krok 1 – Wybór rachunku Jeśli wybrałeś opcję Wpłać składkę jedno razową z zakładki Zlecenia, portal wyświetli ekran, na którym prezentowana jest aktualna lista rachunków z ubezpieczeniowym funduszem kapitałowym oraz ich wartość. W tym kroku wskaż numer rachunku, który będzie rozszerzony o umowę dodatkową ze składką jednorazową oraz zatwierdź dane przyciskiem Krok 2 – Podział składki w umowie dodatkowej Na tym ekranie wpisz wysokość deklarowanej składki jednorazowej, fundusze, w które będzie zainwestowana składka oraz zaznacz przycisk potwierdzający akceptację ogólnych warunków ubezpieczenia. Po wprowadzeniu danych przejdź do kolejnego ekranu zatwierdzając wskazanie przyciskiem 12 Główne menu Krok 3 – Podsumowanie Kolejny ekran przedstawia podsumowanie zlecenia oraz informację o numerze konta oraz terminie, w jakim powinna zostać dokonana wpłata. Po zapoznaniu się z podsumowaniem zlecenia możesz: •• przekazać zlecenie do realizacji poprzez zatwierdzenie przyciskiem •• powrócić do ekranu ze zleceniami poprzez wciśnięcie przycisku lub •• powrócić do poprzednich kroków w celu zmiany kryteriów – przycisk wstecz. Po akceptacji zlecenia przyciskiem pojawi się ekran z komunikatem potwierdzenia złożenia zlecenia. Po kliknięciu zobacz szczegóły zlecenia wyświetlone zostanie podsumowanie złożonego zlecenia z opcją wydruku potwierdzenia. 3.3 Twoje dane Za pośrednictwem portalu e-klient istnieje możliwość złożenia zlecenia zmiany numeru telefonu kontaktowego, adresu e-mail oraz adresu korespondencyjnego. Adres korespondencyjny to adres, na który kierowana będzie korespondencja dotycząca umów ubezpieczenia. Nie musi być to adres zamieszkania. Dostęp do tego typu zlecenia jest możliwy poprzez wybranie z menu głównego zakładki Twoje dane. Krok 1 – Prezentacja aktualnych danych Ekran prezentuje aktualne dane: telefony, adres e-mail oraz adres korespondencyjny. W celu zmiany danych kliknij przycisk Główne menu 13 Krok 2 – Zmiana danych Ważne: Portal umożliwia wprowadzenie jednego adresu. Jeżeli chcesz wprowadzić różne adresy dla swoich umów ubezpieczenia lub kierować korespondencję na skrytkę pocztową, skontaktuj się z nami pisemnie za pośrednictwem formularza kontaktowego dostępnego w portalu lub telefonicznie pod numerem dostępnym w portalu. Na tym ekranie wprowadź nowe dane oraz pozostaw te dane, które są aktualne. Wprowadzony adres weryfikowany jest z książką adresową. Jeżeli wpiszesz nieprawidłowe dane, portal wyświetli komunikat błędu. Po wprowadzeniu poprawnych danych przejdź do kolejnego ekranu, zatwierdzając zmianę przyciskiem Krok 3 – Podsumowanie Kolejny ekran zlecenia. przedstawia podumowanie Po zapoznaniu się z podsumowaniem zlecenia możesz: •• przekazać zlecenie do realizacji poprzez zatwierdzenie przyciskiem •• powrócić do pierwszego ekranu poprzez wybranie przycisku •• powrócić po poprzednich kroków w celu zmiany – przycisk wstecz. Po akceptacji zlecenia przyciskiem pojawi się ekran z komunikatem potwierdzenia złożonego zlecenia. Po kliknięciu zobacz szczegóły zlecenia wyświetlone zostanie podsumowanie złożonego zlecenia z opcją wydruku. 14 Główne menu 3.4 Historia zleceń umowy Na ekranie Historia zleceń umowy możesz zobaczyć wszystkie dyspozycje złożone za pośrednictwem portalu e-klient, ich aktualny status i datę realizacji. Możesz wyszukać zlecenie. Określ kryteria wyszukiwania: •• typ zlecenia, •• status zlecenia, •• zakres dat. Zakres dat domyślnie ustawiony jest za ostatni miesiąc. Istnieje możliwość zmiany na inny okres, jednak nie dłuższy niż 365 dni. W przypadku konieczności wyszukania zlecenia za dłuższy okres, wykonaj wyszukiwanie w kilku krokach, przeszukując za każdym razem maksymalnie 365 dni. Po wybraniu kryteriów wyszukiwania zatwierdź dane przyciskiem Kliknij w numer zlecenia, aby zobaczyć szczegóły dotyczące zlecenia. Jeśli chcesz wydrukować potwierdzenie złożenia zlecenia, kliknij przycisk Aby wydrukować potwierdzenie realizacji zlecenia, kliknij (opcja dostępna dla zleceń zrealizowanych). 3.5 Zgłoszone roszczenia W zakładce Zgłoszone roszczenia znajduje się lista roszczeń z ich aktualnym statusem, tj. informacją, na jakim etapie realizacji się znajdują. Główne menu 15 3.6 Ustawienia Portal e-klient w dowolnym momencie umożliwia zmianę hasła. Wybierz opcję Ustawienia widoczną w prawym górnym rogu. Aby zmienić hasło, na zakładce Zmiana hasła wprowadź obecne hasło oraz dwa razy nowe hasło (spełniające odpowiednie kryteria) zatwier dzając dane przyciskiem Jeśli dane zostały wprowadzone poprawnie, zostanie wyświetlony komunikat potwierdzający zmianę hasła. 3.7 Wylogowanie Użyj przycisku Wyloguj dostępnego w prawym górnym rogu ekranu, aby bezpiecznie wylogować się z portalu e-klient. Po poprawnym wylogowaniu zobaczysz następujący komunikat: Ekrany zamieszczone w niniejszej „Instrukcji użytkownika portalu e-klient dla klientów MetLife TUnŻiR S.A.” oraz zawarte w nich dane są przykładowe i spełniają jedynie rolę informacyjną. Regulamin świadczenia usług Telefonicznego Systemu Informacyjnego oraz Portalu Internetowego e-klient przez MetLife TUnŻiR S.A. stanowi jedyny wiążący i oficjalny dokument precyzujący zasady korzystania z portalu. 16 Główne menu E-klient portal User Manual for MetLife TUnŻiR S.A. customers The aim of this User Manual is to simplify the first steps on this e-klient portal created and developed to meet our customers’ needs 1. 2. 3. Main Menu Preface 18 1.1 Introduction 18 e-klient – service activation 18 2.1 Service activation 18 2.2 Next login 19 e-klient – overview of functionalities 20 3.1 Introduction 20 3.2 Your Contracts 21 3.2.1 Contract Value 21 3.2.2 Orders 22 3.2.2.1 Order for change of premium split 23 3.2.2.2 Transfer of funds among funds 24 3.2.2.3 Pay additional premium 26 3.2.2.4 Additional contract with single premium 27 3.3 Your Details 28 3.4 History of contract orders 30 3.5 Registered Claims 30 3.6 Settings 31 3.7 Log out 31 17 1. Preface 1.1 Introduction An e-klient service is an Internet information and transaction portal created for the MetLife customers to provide them with access to information about insurance contracts and to submit their orders for changes in policies. The range of available information may be different depending on the type of insurance contract involved. The portal is available by link embedded on www.metlife.pl or directly under the following address www.eklientmetlife.pl. 2. e-klient – service activation The e-klient portal is dedicated to the MetLife TUnŻiR S.A. clients who have: •• a policy under which MetLife TUnŻiR S.A. provides the service, •• a PIN number for Call Center, •• an e-mail address to receive the data required to log in, •• an ID Personal Number i.e. Social Security number, •• access to the Internet, •• one of the recommended website browsers: Chrome 23; Firefox 16; Internet Explorer version 7, 8 and 9. 2.1 Service activation While entering the portal website, first check if a secure connection has been made, and then click the option Do you want to log in for the first time? NOTE! To make sure your connection is secure and web browser uses the encrypted transmission with the use of SSL protocol, check for the lock icon ( ) – for example, in the window of Internet Explorer browsers, it is in the right of the web page URL address. If you see it, this means you can start your service activation securely, giving the required data. The address displayed by the web browser should begin with the following letters https://. On the next page, enter the following data: •• your ID Personal Number i.e. Social Security Number, •• your PIN number for Call Center service, •• If you do not have a PIN number and you have an individual contract, please contact our Consultant by phone 22 523 50 70 and give your Social Security Number. If you are insured in the policy group, contact the Department of Group Policy Administration. You will receive your PIN number and the Terms and Conditions service via Call Center by mail. Read more on http://www.metlife.pl, •• your contract or application number or group policy: Certificate number. If you have an individual contract, the contract number or an application are listed on the Specification Page or the application for insurance. If you are insured in the policy group, this number can be found on the Confirmation of Insurance, filed at the conclusion of the policy group. This number will consist of a number of group policies: Certificate number: eg: 5099/100 345. 18 Main Menu •• your e-mail address where the data required for the service activation will be sent. Read The Terms and Conditions service via MetLife TUnŻiR S.A. Call Center and e-klient portal and statement, after accepting, click NOTE! You can enter the data in a traditional way or using the virtual keyboard option. The virtual keyboard permits you to enter the password by selecting relevant characters from the keyboard displayed on your computer screen. It enables protecting you from any possible spyware installed on our computers and caputing the characters typed from a standard keyboard. Having entered the data correctly, on the screen there will be a message confirming creating your account in the portal, and you will receive two e-mail messages to your designated address while creating the account, including: •• your login, •• temporary password. The temporary password is only required for the first logging in. The login will remain your Client number to be used together with a password you generate for the next logins to the portal. Next click the link Go to login page. On the login page, enter: •• the login, •• the temporary password received in the e-mail. If the data is correct, the portal will direct you to the page, when you will be asked to designate your own individual password by typing: •• the temporary password (from e-mail), •• your new password (designated by you to use it during your next logins), •• the new password once again. Note! This new password should consist of 8 characters minimum, including at least: •• four letters, •• two digits or special symbols (e.g. !@#$%^&*()_ ). 2.2 Next login You can log in to the system again entering on the login page as follows: •• the login number, •• your individual password designated while logging in for the first time and accepting with the button Having logged in correctly, there will be a home page viewed, presenting the basic details on the contracts available in the e-klient portal. In the event of losing or forgetting your password, click the link Have you forgotten your password? on the login page and follow the instructions. Main Menu 19 3. e-klient – overview of functionalities 3.1 Introduction The default screen on the e-klient system shows your contracts, i.e. a list of the held policies, under which the e-klient service is available. After clicking the name of contract, you will go to the policy details. Below you will find Last Orders, i.e. a list of the last orders submitted via this portal. If there have not been any orders, this section will not be viewed. In the right of the screen there are: Notifications e.g. about password changes (the system does not make you change your password and – for security reasons – it only recommends the password change every thirty days), information about forms of contact with the Company: contact form, telephone number to the Call Center as well as the addresses of the MetLife TUnŻiR S.A. offices and agencies. The main menu is in the top bar and it enables fast access to the next system functions. Functions available via top main menu: •• Your Contracts – includes a list of contracts, for which the service is provided; and here you can check such things as an amount of benefits and premiums, value of policy, as well as you can submit a selected order as for policies with insurance capital funds. •• Offers for You – gives information about additional offers available to the client and instructions how to expand insurance coverage without unnecessary formalities. This tab is visible if the additional offer is available. • • Your Details – contains the customer contact details that are held by MetLife TUnŻiR S.A. •• Orders History – gives an opportunity to check your orders submitted via this portal including their current status and to print your statements. This tab appears after carrying out your first order via this portal. •• Registered Claims – includes a list of registered claims with their current status (a stage of consideration). This tab can be invisible if you have never lodged any claims. 20 Main Menu 3.2 Your Contracts Click Your Contracts to see the detailed list of contracts provided via the e-klient portal. By pressing the button next to the selected contract, you will go to the contract menu, allowing you to have access to the detailed information about a policy and to submit your orders. Contract menu: •• General Data – information about an amount of premium, account number for payments, offers prepared for this contract and a date of next premium payment. •• Contract Details – a list of benefits and premiums arising from a /basic agreement and additional contracts. •• Contract Value – a current contract value. As far as insurance capital funds are concerned, the account history is also displayed. •• Orders – a list of orders that can be submitted via this e-klient portal (it only applies to the products with the insurance capital fund). •• History of Contract Orders – a current status of orders submitted via this portal including an opportunity to print the statement. This tab appears after executing your first order for the selected contract via the portal. 3.2.1 Contract Value If the selected contract has a surrender value, it will be displayed in the tab Contract Value. As for contracts with guaranteed benefit, a contract value consists of a policy surrender value increased by an extraordinary bonus (share in profit) and possible additional assets coming from indexation (invest index account), as well as by Lokata additional contract value. As for insurance capital fund contacts, the value is shown as a product of the current number of units deposited on the accounts and a price of unit as of the valuation date indicated in the portal. This value is not an equivalent of the amount that would be paid out in case of redemption (withdrawal) from the contract. There is more detailed information on the rules of calculating the surrender value in the general terms and conditions of the insurance. Pay attention to the icon after placing the mouse cursor, you can get further information, such as e.g. explanations of more difficult terms. At the same time you can also view all the hints on a given page, using the button Go into details. Main Menu 21 By selecting the option details next to the insurance capital fund account, you will get access to history of all transactions made on the selected account. Having defined your search parameters: Order Type and Date Range, you can see the transactions you are interested in. The date range is set for the last month by default. There is an option to change it into a different period, however, not more than 365 days. If you need to search the operations for a longer period, you have to do it in a few steps, searching 365 days maximum each time. After choosing the search criteria, you have to accept the data with the button: 3.2.2 Orders Via this e-klient portal, the holders of active insurance capital fund contracts can execute four types of orders for: •• Change of premium split (%). •• Transfer of funds. •• Additional premium payment. •• Additional contract – single premium. A person authorized to submit orders is the policy holder or if it results from the general terms and conditions of the insurance – the insured. This portal gives an opportunity only to submit the orders that are available to the designated account number. Submitting the next order of a given type is possible only when the previous order has been executed. Access to every order in the e-klient portal is possible via two ways as follows: •• while selecting Orders from the main menu Your Contracts, first you choose a type of order, and then a type of account or •• while selecting the option Account Details from the tab Contract Value, first you choose an account and later a type of transaction. 22 Main Menu 3.2.2.1 Order for change of premium split The order for change of premium split (%) applies to the future premiums (including the additional ones) that are to be paid to the account after this change is completed. The Company is to split the new premiums among the funds as requested. Step by step Step 1 – Select account If you have selected the option Change of Premium Split from the tab Orders, the portal will display a screen where the current list of accounts with the insurance capital fund as well as their value are visible. In this step, please indicate the account number to which the order is to be submitted and accept the data with the button Step 2 – Select new premium split On the screen only these funds are viewed that are provided to the held contract. The total has to be 100%. Once you have entered the data, go to the next screen, accepting your selection with the button Step 3 – Summary The next screen shows an order summary. Having read the order summary, you can: •• forward this order for execution by accepting with the button •• come back to the order screen by pressing the button or •• come back to the previous steps to change your criteria – the button Back. Main Menu 23 Once the order is accepted with the button you will see the screen showing a message with statement of the order submission. Note! Order for change of premium split does not have an influence on investing the already collected units. If you want to transfer the already collected assets to the other fund or funds, please submit a separate order, selecting the button After clicking View Order Details, the submitted order summary with a statement print option is displayed. 3.2.2.2 Transfer of funds among funds With the order for transfer of funds among funds, the indicated number of units of the selected fund or funds is redeemed as well as purchase of units of the other fund or funds for the amount resulting from the redemption operation is carried out. Step by step Step 1 – Select account If you have selected the option Transfer of Funds from the tab Orders, the portal displays the screen presenting the current list of accounts with the insurance capital fund and their value. In this step, please indicate the account number to which the order is to be submitted and accept the data with the button Step 2 – Select funds to be transferred On this page indicate the assets and their percentage to be redeemed from the existing funds. Once you have entered the data, go to the next screen, accepting your selection with the button 24 Main Menu Step 3 – Select destination funds On this screen please estimate the amount to be split and select the fund or funds where the assets will be transferred. Once you have entered the data, go to the next screen, accepting your selection with the button Step 4 – Summary The next screen shows an order summary. Having read the order summary, you can: •• forward this order for execution by accepting with the button •• come back to the order screen by pressing the button or •• come back to the previous steps to change your criteria – the button Back. Once the order is accepted with the button you will see the screen showing a message with statement of the order submission. After clicking View Order Details, the submitted order summary with a statemet print option is displayed. Main Menu 25 3.2.2.3 Pay additional premium The e-klient portal allows you to make a declaration of additional premium payment on the insurance capital fund account. This additional payment is to be invested on the account of funds in the same percentage as the regular premium is split. Step by step Step 1 – Select account If you have chosen the option Pay additional premium from the tab Orders, the portal will display the screen presenting the current list of accounts with the insurance capital fund and their value. In this step please select the account number where the additional premium will be invested and accept the data with the button Step 2 – Amount of Additional Premium On this screen write the declared amount of additional premium and acknowledge the rules of investing this premium. Once you have entered the data, go to the next screen, accepting your selection with the button Step 3 – Summary The next screen shows your order summary and information on account number as well as a date when the payment is to be made. Having read the order summary, you can: •• forward this order for execution by accepting with the button •• come back to the order screen by pressing the button or •• come back to the previous steps to change your criteria – the button Back. Once the order is accepted with the button , you will see the screen showing a message with statement of the order submission. 26 Main Menu After clicking View Order Details, the submitted order summary with a statement print option is displayed. 3.2.2.4 Additional contract with single premium The e-klient Portal allows you to make a declaration of signing the additional contract with single premium. This additional single premium will be invested as indicated on a separate account. You can select the other funds than those, where your regular premium is invested. Step by step Step 1 – Select account If you have selected the option Pay single premium from the tab Orders, the portal will display the screen presenting the current list of accounts with the insurance capital fund and their value. In this step please designate the account number to attach the additional contract with single premium and accept the data with the button Step 2 – Premium Split in Additional Contract On this screen write the declared amount of single premium, the funds, where the premium will be invested and thick the box for your acceptance of the general terms and conditions of the insurance. Once you have entered the data, go to the next screen, accepting your selection with the button Main Menu 27 Step 3 – Summary The next screen shows your order summary and information on account number as well as a date when the payment is to be made. Having read the order summary, you can: •• forward this order for execution by accepting with the button •• come back to the order screen by pressing the button or •• come back to the previous steps to change your criteria – the button Back. Once the order is accepted with the button , you will see the screen showing a message with statement of the order submission. After clicking View Order Details, the submitted order summary with a statement print option is displayed. 3.3 Your Details Using e-klient system, it is possible to put an order for the change of the contact phone number, an e-mail address and mailing address. Mailing address is an addres where all correspondence related to contracts will be send. It does not have to be the same as residence address. An access to such order is possible by choosing Your Details from Main Menu. Step 1 – Presentation of current data The screen presents the current data: phone, e-mail address and mailing address. To change the data, click button change data 28 Main Menu Step 2 – Change of Data Important: E-klient system allows you to enter single mailing address. If you wish to introduce different mailing addresses for your contracts or you want your correspondence to be sent to the post office box, please contact us either by phone or contact form available in e-klient system. Please enter new data on this screen and leave the data which is up to date. Entered address is verified with the address book. If you enter the wrong information, e-klient system will display an error message. Once you have entered the data, go to the next screen and accept your selection with the button Step 3 – Summary The next screen shows an order summary. Having read the order summary, you can: •• forward this order for execution by accepting with the button •• come back to the order screen by pressing the button or •• come back to the previous steps to change your criteria – the button Back. Once the order is accepted with the button you will see the screen showing a message with statement of the order submission. After clicking View Order Details the submitted order summary with a statement print option is displayed. Main Menu 29 3.4 History of contract orders On the screen Orders History you will find all submitted orders via the e-klient portal, their current status and date of execution. You can search the order. Define the search criteria: •• order type, •• order status, •• date range. The date range is set for the last month by default. There is an option to change it into a different period, however, not more than 365 days. If you need to search the operations for a longer period, you have to do it in a few steps, searching 365 days maximum each time. After choosing the search criteria, you have to accept the data with the button Click Order number to see the order details. If you want to print the order submission statement, click the button To print the order execution statement, click (the option available for the orders executed). 3.5 Registered Claims In the tab Registered Claims there is a list of claims and their current status, i.e. information about what stage the claims are. 30 Main Menu 3.6 Settings At any time the e-klient portal enables a password change. Select the option Settings viewed in the top right corner. To change your password, on the tab Password Change, enter the current password and the new one twice (meeting the relevant criteria), accepting the data with the button If the data has been entered correctly, a message with statement the password change will be displayed. 3.7 Log out Use the button Log out in the top right corner of the screen to log off the e-klient portal securely. Having logged off correctly, you will see the following message: The screen shots included in this “User’s Manual to the MetLife TUnŻiR S.A. e-klient Portal” and all data presented in them is of example features and represents an informative role. The Service Security Rules for the MetLife TUnŻiR S.A. Call Center and e-klient Portal are the only binding and official document specifying the rules of the use of the portal in detail. Main Menu 31