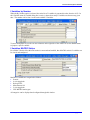
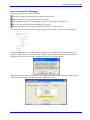
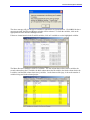
1
1^ SOFTWARE MANUAL
^2 Pewin32 Pro2
^3 PMAC Executive Software for Windows
^4 3A0-PWPRO2-xSxx
^5 Sept. 12, 2005
Single Source Machine Control
Power // Flexibility // Ease of Use
Copyright Information
© 2005 Delta Tau Data Systems, Inc. All rights reserved.
This document is furnished for the customers of Delta Tau Data Systems, Inc. Other uses are
unauthorized without written permission of Delta Tau Data Systems, Inc. Information contained in
this manual may be updated from time-to-time due to product improvements, etc., and may not
conform in every respect to former issues.
To report errors or inconsistencies, call or email:
Delta Tau Data Systems, Inc. Technical Support
Phone: (818) 717-5656
Fax: (818) 998-7807
Email: [email protected]
Website: http://www.deltatau.com
Operating Conditions
All Delta Tau Data Systems, Inc. motion controller products, accessories, and amplifiers contain
static sensitive components that can be damaged by incorrect handling. When installing or handling
Delta Tau Data Systems, Inc. products, avoid contact with highly insulated materials. Only
qualified personnel should be allowed to handle this equipment.
In the case of industrial applications, we expect our products to be protected from hazardous or
conductive materials and/or environments that could cause harm to the controller by damaging
components or causing electrical shorts. When our products are used in an industrial environment,
install them into an industrial electrical cabinet or industrial PC to protect them from excessive or
corrosive moisture, abnormal ambient temperatures, and conductive materials. If Delta Tau Data
Systems, Inc. products are directly exposed to hazardous or conductive materials and/or
environments, we cannot guarantee their operation.
Pewin32 Pro2 Software Manual
Table of Contents
INTRODUCTION ..............................................................................................................................................................1
Features ............................................................................................................................................................................1
Hardware and Software Requirements .............................................................................................................................1
GETTING STARTED........................................................................................................................................................3
Installing Pewin32 Pro2 ...................................................................................................................................................3
Setting up Communications with PMAC .........................................................................................................................3
Installation Steps ..............................................................................................................................................................3
Software Installation....................................................................................................................................................3
Device Installation and Configuration ........................................................................................................................3
MENU OVERVIEW ..........................................................................................................................................................5
How Menus Work ............................................................................................................................................................5
File Menu .........................................................................................................................................................................5
Configure Menu ...............................................................................................................................................................6
View Menu.......................................................................................................................................................................7
PMAC Resources Menu...................................................................................................................................................8
Backup Menu ...................................................................................................................................................................8
Setup Menu ......................................................................................................................................................................9
Tools Menu ......................................................................................................................................................................9
Window Menu................................................................................................................................................................10
Help Menu......................................................................................................................................................................10
BASIC CONCEPTS .........................................................................................................................................................11
Workspace Management ................................................................................................................................................11
Project Management.......................................................................................................................................................12
Message Window ...........................................................................................................................................................12
The Results.................................................................................................................................................................12
Change Monitor.........................................................................................................................................................13
Interrupt Monitor.......................................................................................................................................................13
Unsolicited Response.................................................................................................................................................14
Uploading Programs from PMAC..................................................................................................................................14
Uploading PMAC Variables ..........................................................................................................................................15
Downloading Files to PMAC .........................................................................................................................................15
Using Macros in the Editor .......................................................................................................................................16
Download Options .....................................................................................................................................................18
Terminal .........................................................................................................................................................................18
Terminal Menu...........................................................................................................................................................19
Selecting DPRAM ASCII Communication .................................................................................................................19
Enable View Interrupts ..............................................................................................................................................19
Changing the Appearance of the Terminal ................................................................................................................20
Watch Window...............................................................................................................................................................20
Watch Menu...............................................................................................................................................................22
Adding Entries to the Watch Window ........................................................................................................................22
Adding Macro Definitions .........................................................................................................................................23
Editing Macros ..........................................................................................................................................................23
Add Multiple Variables..............................................................................................................................................24
Editing Watch Entries................................................................................................................................................24
Position Window ............................................................................................................................................................25
Position Menu............................................................................................................................................................25
Units and Scales ........................................................................................................................................................26
Jog Ribbon .....................................................................................................................................................................26
C.S. Axis Jog Ribbon .....................................................................................................................................................26
Configure Jog Parameters.........................................................................................................................................27
DPR Viewer ...................................................................................................................................................................27
Status Screens.................................................................................................................................................................28
i
Table of Contents
Pewin32 Pro2 Software Manual
Connector Status........................................................................................................................................................28
Motor Status ..............................................................................................................................................................30
Coordinate Systems Status.........................................................................................................................................30
Global Status .............................................................................................................................................................30
MACRO Status...........................................................................................................................................................31
Motor Setup Summary ...............................................................................................................................................32
Motion Programs/PLCs Status ..................................................................................................................................32
Special Programs Status............................................................................................................................................33
PLCC Program Status ...............................................................................................................................................33
PMAC CONFIGURATION ............................................................................................................................................36
I-Variables......................................................................................................................................................................36
I-Variables by Category.............................................................................................................................................36
I-Variables by Number ..............................................................................................................................................38
I-Variables MACRO Station ......................................................................................................................................38
M, P and Q-Variables.....................................................................................................................................................39
Coordinate Systems........................................................................................................................................................39
Encoder Conversion Table .............................................................................................................................................40
Encoder Conversion Table MACRO Station .................................................................................................................43
Modbus Setup Window ..................................................................................................................................................44
Quick Getting Started Steps.......................................................................................................................................45
Modbus Menu ............................................................................................................................................................47
Server Socket Modbus Status Counters .....................................................................................................................47
Client Socket Modbus Status Counters ......................................................................................................................47
Setting up the PMAC Modbus Client/Server Buffer......................................................................................................49
Setting up the PMAC Modbus I69(= I67+$80) Server Buffer .......................................................................................49
Bit Format of Control Panel Motor/Coordinate System Enable Word (Y:I69) .........................................................50
Bit Format of Coordinate System (CS) Feed Pot Override Enable Word (X:I69).....................................................50
Bit Format of Motor/Coordinate System Request Words (Y:I69+1 to 8) ..................................................................50
Setting up the Acc-65ETH I/O Board ............................................................................................................................51
Acc-65ETH I/O Modbus Memory Map......................................................................................................................51
Suggested PMAC ACC-65ETH I/O Memory Map .....................................................................................................51
Suggested Modbus Client Command List for above Memory Map............................................................................51
MACRO RING ASCII ...................................................................................................................................................52
MACRO Ring ASCII Menu ........................................................................................................................................52
Quick Getting Started Steps....................................................................................................................................... 56
EDITORPRO FEATURES..............................................................................................................................................58
Launching EditorPro ......................................................................................................................................................58
Syntax Highlighting ...................................................................................................................................................59
Auto Indenting ...........................................................................................................................................................59
Auto Correction .........................................................................................................................................................59
Debugger Window .....................................................................................................................................................59
Error Tracing ............................................................................................................................................................61
Editor Menu ...................................................................................................................................................................62
EditorPro Setup Window................................................................................................................................................64
PLC Debugger................................................................................................................................................................65
How to Use the PLC Debugger .................................................................................................................................66
PMAC RESOURCES.......................................................................................................................................................70
View CPU Resources .....................................................................................................................................................70
Phase Tasks ...............................................................................................................................................................70
Servo Tasks ................................................................................................................................................................71
RTI Tasks ...................................................................................................................................................................71
Background Tasks......................................................................................................................................................71
View Memory Resources ...............................................................................................................................................71
View Macro Resources ..................................................................................................................................................72
ii
Table of Contents
Pewin32 Pro2 Software Manual
How to Use Macro Resource Manager .....................................................................................................................72
Active Project ............................................................................................................................................................75
Using Macro Resources Manager in the Terminal Window......................................................................................75
Using Macro Resources Manager in the EditorPro ..................................................................................................75
PMAC2 Frequency Calculators......................................................................................................................................76
Main Clock Calculator ..............................................................................................................................................76
I^2T Parameters ........................................................................................................................................................77
OTHER TOOLS ...............................................................................................................................................................78
DPRAM Test..................................................................................................................................................................78
External Tools ................................................................................................................................................................78
Customize Tools Menu ..................................................................................................................................................78
CONFIGURATION FILES.............................................................................................................................................80
Backup and Restore PMAC Configuration Files ...........................................................................................................80
Upload Configuration................................................................................................................................................80
Restore Configuration ...............................................................................................................................................80
Verify PMAC Configuration ......................................................................................................................................80
PEWIN32 PRO2 GENERAL SETUP AND OPTIONS ................................................................................................82
General Setup and Options.............................................................................................................................................82
Default Device ...........................................................................................................................................................82
General ......................................................................................................................................................................82
Download...................................................................................................................................................................83
View ...........................................................................................................................................................................83
PEWIN32 PRO2 HELP ...................................................................................................................................................84
Pewin32 Pro2 Manual ....................................................................................................................................................84
Driver Installation Notes ................................................................................................................................................84
Why am I Not Moving?..................................................................................................................................................84
Why is my Program Not Running? ................................................................................................................................84
About Pewin32 Pro2 ......................................................................................................................................................84
APPENDIX A....................................................................................................................................................................86
Modbus Definition and Design ......................................................................................................................................86
Summary of PMAC Modbus/TCP-IP Features..........................................................................................................86
The PMAC Modbus/TCP-IP Configuration and Buffer Memory Format......................................................................87
Socket Modes (Upper 4 of 8 Bits) ..............................................................................................................................87
PMAC Memory – Modbus Byte Order for Registers .................................................................................................88
Organizing the PMAC Modbus/TCP Client/Server Buffer............................................................................................88
PMAC F/W Modbus Support.........................................................................................................................................88
Exceptions and Issues.....................................................................................................................................................89
PMAC/Turbo Firmware Modbus (I69) Memory Map ...............................................................................................89
iii
Table of Contents
Pewin32 Pro2 Software Manual
iv
Table of Contents
Pewin32 Pro2 Software Manual
INTRODUCTION
The Pewin32 Pro2 is Delta Tau’s PMAC Executive software for Microsoft 32-Bit Windows that enables the
configuration, control and troubleshooting of a PMAC (Programmable Multi-Axis Controller). At its core,
Pewin32 Pro2 provides a terminal, a text editor for editing Motion/PLC programs and a workspace
environment. Additionally, there is a suite of tools used to configure and work with PMAC and its
accessories. Pewin32 Pro2 is a development tool for creating and managing specific PMAC implementations.
This document details all the features of Pewin32 Pro2 and explains how to use Pewin32 Pro2 to
communicate and control the PMAC motion control card. Companion applications such as Plotting, Tuning
and Setup have separate documentation. Knowledge of the basic use of the Windows operating system is
assumed.
Features
This version of the PMAC Executive software is based on the previous versions but has been enhanced in
many ways. Pewin32 Pro2 has the following features:
• Multi-threading of Pewin32 Pro2 real-time display windows
• A thread-safe communication driver makes this version also compatible with the 32-bit version of NC for
Windows software (and any application using the PMAC Driver)
Pewin32 Pro2 provides basic tools to configure, control and diagnose PMACs. Here is a partial list of
Pewin32 Pro2’s features and capabilities:
• Workspace management tools for customizing the interface to Pewin32 Pro2.
• Project management tools for organizing complex projects.
• A terminal window for sending commands directly to the PMAC.
• Position window for displaying the position, velocity and following error of all motors on the system.
• Watch window for real-time system information and debugging.
• A real-time color editor with many options (including error tracking during downloads, color options for
different commands and compatibility with standard C code). Advanced features of the editor include:
•
A real-time PLC debugger. See the editor section for a detailed description.
•
Managing the code syntax and applying appropriate indenting and margins
• Easy handling of PMAC’s thousands of I, P, Q and M-variables including macro support
• Motor, Coordinate System and Global status windows that display PMAC’s status bits in real-time
• Diagnostic routines for debugging motors and motion programs
• Status and upload screens for different programs (including motion programs, PLCs, PLCCs, rotary
buffers, inverse and forward kinematics)
• PMAC resource manager which includes CPU resources, Memory resources, PMAC2 Frequency
calculators, and MACRO resources responsible for keeping track of all macro definitions for an active
project
• Real-time status display of all PMAC’s connectors
• The ability to talk to multiple PMACs on a single computer
• Modbus configuration, upload/download and communication via Socket Client/Server
• Built-in DPRAM Test screen along with a separate application for benchmark times for all modes of
communication
Hardware and Software Requirements
The PMAC Executive for Windows software will run on any computer running Windows 2000 or XP (500
MHz Pentium III or equivalent and up recommended). Of course, the faster the computer, the better. In
addition, the following are needed:
Introduction
1
Pewin32 Pro2 Software Manual
•
•
•
•
•
Microsoft Windows 2000 or Windows XP loaded on the computer
At least 50 MB of free disk space and 128 MB of RAM
A free serial communications port, USB port, Ethernet port, PCI-BUS slot, or an ISA-BUS slot to talk to
PMAC for on-line processing
Any monitor with SVGA resolution (800x600 with at least 256 colors is required)
PComm32 Pro PMAC communications driver (included on the disk)
Pewin32 Pro2 uses the latest driver from Delta Tau. The driver works efficiently with firmware that supports
I63 and I64 (Ctrl-X echo, and Internal Response Tag Enable). Firmware version 1.16F and beyond for nonTurbo and 1.931 and beyond for Turbo PMACs will support these I-Variables. Furthermore, the driver relies
on the positive handshake between PMAC and the host computer. If I3=2, all valid commands terminate with
an <ACK>.
2
Introduction
Pewin32 Pro2 Software Manual
GETTING STARTED
Installing Pewin32 Pro2
Before installing Pewin32 Pro2, read the license agreement included on the CD. To install Pewin32 Pro2
from the Delta Tau Software CD, insert the CD into the CD drive. An auto install menu will open. Click on
the Pewin32 Pro2 from the Suite to launch the Pewin32 Pro 2 installation.
The PMAC communication driver has changed to incorporate all the latest hardware. It is therefore important
to uninstall all old Delta Tau software products before installing Pewin32 Pro2.
The installation program will suggest a directory path where the program files should be copied. Use the
suggested directory location for the installation to make all Pro Suite2 products uniform.
Read the readme32.txt file for last minute additions to this manual. Read the section on the PMAC
communications driver before running Pewin32 Pro2 for the first time. For details on setting up
communications, see the Setting up Communications with PMAC section of this manual.
Setting up Communications with PMAC
No application, including Pewin32 Pro2 and other Pro Suite 2 packages will be used to add, remove or
configure PMACs in the system. Communication settings have been centralized in the operating system,
making the set up of each PMAC much like other devices in the computer (i.e. video card, sound card etc.).
Setup is completed through Windows using the Control Panel’s Add New Hardware Wizard. Following the
steps will install and register the new devices. Before running this application, it is important that all
applications that use the PMAC 32-bit communication driver be shut down. These include Pewin32 Pro2, NC
for Windows, and any applications developed with PcommServer.
Installation Steps
Pewin32 Pro2 installation involves two steps: software installation and device configuration.
Software Installation
Follow these steps for the latest Delta Tau software installation and device configuration:
1. Uninstall all old Delta Tau software packages.
2. Install Pewin32 Pro2 Suite from the CD.
3. Restart the computer.
Device Installation and Configuration
Follow the basic steps outlined in the PMAC Communications Driver Installation and Troubleshooting
manual for device installation and configuration.
Getting Started
3
Pewin32 Pro2 Software Manual
4
Getting Started
Pewin32 Pro2 Software Manual
MENU OVERVIEW
How Menus Work
Pewin32 Pro2 uses a dynamic menu system. This means that the menu at the top of the screen changes
content depending on what window is highlighted. The standard menu displayed when the terminal is
highlights is similar to this:
However, the menu will change when, for example, the Terminal Window is highlighted:
If an option that should be available is not, make sure the proper window is highlighted. If there are many
windows open, use the Window menu item to select the one needed.
Note:
There are user-friendly context sensitive menus, which open in most of the Pewin32
Pro2 Windows. Click the right mouse button over a window to see the context
sensitive menu.
File Menu
The File menu handles several things including:
Menu Overview
5
Pewin32 Pro2 Software Manual
New File – Opens the editor (if not already open) and creates a new file tab named untitled.pmc ready for
editing.
Open File – Opens the editor (if not already open) and loads the selected file.
Note:
See the Editor Features section for detailed description of editor and debugger features.
New Workspace –Saves the current workspace, provided the General Setup and Options has been set to do
so (See Setup | General Setup and Options), closes all open windows, and asks for the name of the new
workspace. Pewin32 Pro2 will load the last workspace opened at the time of exiting the application.
Open Workspace – Closes the current workspace (if any is open) and opens the selected workspace file.
Save Workspace – Saves the workspace whenever this menu item is selected.
Save Workspace As – Renames the active workspace, but first saves the active workspace provided the
General Setup and Options has been set to do so (See Setup | General Setup and Options)
Close Workspace – Closes all open windows and saves the workspace, provided the General Setup and
Options has been set to do so (See Setup | General Setup and Options).
Show Project Manager –Shows or hides the Project Manager.
Upload Program(s) – Uploads the listed motion and PLC programs into a file and then opens that file in the
editor window.
Upload Variables – Allows uploading a range of I, P, Q or M variables into an editor window.
Download File – Allows downloading any file to PMAC with valid PMAC commands.
Exit – Closes the program.
Configure Menu
The Configure menu allows the viewing and changing of the current variable definitions and PMAC feature
parameters. In some of the options that allow a change to a value or definition, the change is sent to PMAC
immediately after the value is changed. This allows automatic verification that the change in the input field
6
Menu Overview
Pewin32 Pro2 Software Manual
has also occurred in PMAC. It also protects against faulty entries, since out-of-range numbers will not be
accepted.
I-Variables – There are two interfaces for listing and setting I variables: by category, or by numerical order.
In addition, a special interface for Macro I-Variables exists.
P-Variables – Allows setting P-variable values.
Q-Variables – Allows setting Q-variable values.
M-Variables – Allows setting M-variable definitions and values.
Coordinate Systems – This menu choice enables the currently defined coordinate systems to be changed or
new ones to be defined.
Encoder Conversion Table – This menu choice allows the entries of the encoder conversion table to be
altered, updated, saved or retrieved.
Encoder Conversion Table MACRO - This menu allows the entries of the encoder conversion table of a
MACRO station to be altered, updated, saved or retrieved.
Modbus Setup – This menu sets up a Modbus for PMAC. Furthermore, it allows the setup of Modbus socket
configurations and starts, stops and reinitializes Modbus commands set over Ethernet and USB modes of
communication.
MACRO Ring ASCII – This menu sets up the MACRO ring for supported PMACs. Furthermore, it allows
the user to establish MACRO ASCII communication over the Ring.
View Menu
The View menu contains many interactive status displays as diagnostic tools. Many of the displays are
updated in real time.
Terminal – Opens a terminal window.
Watch Window – Opens a watch display window. There can be multiple watch windows open.
Position – Opens a position display window. There can be multiple position windows open.
Menu Overview
7
Pewin32 Pro2 Software Manual
Jog Ribbon – Opens a jog ribbon thus allowing jog commands based on desired target counts to be issued. It
further allows jog variables to be configured.
CS Axis Jog Ribbon – Opens a coordinate system Axis jog ribbon thus allowing jog commands based on
desired target counts to be issued. It further allows jog variables to be configured.
Connector Status – Allows the monitoring of the status of PMAC’s connectors.
DPR Viewer – This allows the DPRAM locations in the PMAC to be viewed and changed. All DPRAM
locations are accessible through the DPR Viewer.
Motor Status – Displays the interpretation of status bits associated with a specified motor in real time.
Coordinate System Status – Displays the status of the specified coordinate system in real time.
Global Status – Displays the interpretation of the global status bits in real time.
Macro Status – Displays the status of active MACRO Station.
Motor Setup Summary – Displays the configuration of a specified motor.
Program/PLC Status (and Upload) – Displays the motion program and PLC program numbers, starting
address and size of all programs in PMAC’s memory.
PLCC Program Status – (Compiled PLC) displays the PLCC number, starting address and size of all
compiled PLCs in PMAC’s memory.
PMAC Resources Menu
The PMAC Resources menu contains PMAC’s resources displays as diagnostic tools. In addition, this menu
allows the user to scan and list all the macro definitions in any given project. See the PMAC Macro
Resources section in this manual for a detailed description.
View CPU Resources – Displays PMAC’s CPU load and foreground tasks. Foreground tasks include phase
tasks, servo tasks and RTI tasks.
View Memory Resources – Displays the Memory usage by special tasks inside PMAC.
View Macro Resources – Displays the resource manager and lists all macro variables with key name, macro
name and description.
PMAC2 Frequency Calculators – Launches a setup screen for PMAC2’s frequency calculators.
Backup Menu
The options in this menu allow the saving or restoring of complete or partial portions of PMAC’s
configuration to a disk.
Upload Configuration – Allows saving all or part of PMAC’s configuration to a disk file.
Restore Configuration – Allows restoring all or part of PMAC’s configuration from disk.
8
Menu Overview
Pewin32 Pro2 Software Manual
Verify Configuration – Verifies a previously saved configuration file.
Setup Menu
This menu allows Pewin32 Pro2 to be customized.
General Setup and Options - Allows the customizing of Pewin32 Pro2’s features.
Force All Windows to Device number – Allows the user to switch all windows in PMAC Executive to
communicate with a specific device number. This device number is tagged immediately to all of the closed
windows as well through the workspace file.
Show Message Window – Displays the Message window.
Show Project Manager – Displays the Project Manager window.
Tools Menu
This menu item allows the launching of application tools that complement the Pewin32Pro.
PMAC DPRAM Test – Launches the DPRAM Test screen. The DPRAM test screen is now a part of
Pewin32 Pro2.
PMAC Basic Speed Test – Launches a test program. This test program provides benchmark times for basic
commands under all modes of communication. This program is installed along with Pewin32Pro2.
PMAC Plot Pro 2 – Launches a PMAC Plot program (if it is installed).
PMAC Tuning Pro2 – Launches a PMAC Tuning program (if it is installed).
P1 Setup and Tuning Pro2 – Launches the PMAC1 setup program (if it is installed).
P2 Setup and Tuning Pro2 – Launches the PMAC2 setup program (if it is installed).
Turbo/UMAC Setup Pro2 – Launches the Turbo Setup program (if it is installed).
Geo Brick Setup – Launches the Geo Brick Setup program (if it is installed).
Raw Terminal – This is another very important diagnostic tool which allows users to get all the raw data
from PMAC and displays special characters.
Umac Config Pro2 – Launches the UMAC Configuration Setup program (if it is installed).
Menu Overview
9
Pewin32 Pro2 Software Manual
Customize Tools Menu – Allows adding third party applications in the tool menu. These applications then
can be launched from the tools menu. These applications are listed after the Customize Tools menu option.
Window Menu
This menu is for managing the position and arrangement of any windows currently displayed. It is
dynamically updated to allow easy selection of a specific window. Furthermore, it shows all of PMAC
Executive’s open windows and on selecting a window, brings it to the front.
Help Menu
The Help menu options allow on-line information about PMAC, the Executive program, and the various help
functions to be retrieved. There is also access to the two diagnostic routines provided by Pewin32 Pro2.
Contents – Displays this manual’s content in the help file format.
Why Am I Not Moving? – A diagnostic routine to help determine why a motor is not responding.
Why Is My Program Not Running? – A diagnostic routine to help determine why a program is not running.
About – Displays information about the version of Pewin32 Pro2, including the version number, the
copyright, and legal and licensing notices.
10
Menu Overview
Pewin32 Pro2 Software Manual
BASIC CONCEPTS
Workspace Management
Pewin32 Pro2 can (and does by default) save the layout of the user forms (position, watch window, etc.) and the
Project Manager configuration to a text based INI file. This file keeps track of all the open forms (windows)
including their sizes, device association, update rate, state at the close of previous session, and other parameters
specific to the form. Of course, the workspace file can be edited outside the application, though this is not
likely to be necessary. The default workspace file is Pewin32PRO_default.ini, and is saved in the application
folder.
Pewin32Pro2 Workspace: Project Manager (Upper Left), Message Window (Bottom),
Editor (Center Right)
Because the workspace file can be named anything and saved anywhere, this feature allows for instant
adaptation of Pewin32 Pro2 to specific application types (i.e. Mill, Lathe, Telescope). Open the workspace
from the File menu.
The current workspace name is shown on the main title bar of Pewin32 Pro2. If none is open, create a new
one or open an existing one from the File menu. In addition, a workspace can be renamed by using the Save
as feature, also in the File menu.
Closing the workspace (in the file menu) closes all open forms and limits what can be done within the
Pewin32 Pro2 application.
Upon exiting Pewin32 Pro2, the current workspace will be saved to the active workspace file, by default.
Disable this feature by using the General Setup and Options option under the Setup menu.
The two windows that are fundamental to the workspace are the Project Manager and the Message Window.
These forms can be shown or hidden using the menu (right mouse click). Also, quick closing of these
windows can be done by a single click to the X button that is located to the far left. Usage of these windows
is described next.
Basic Concepts
11
Pewin32 Pro2 Software Manual
Project Management
All applications involving PMAC require some customization. Typically, these customizations are held and
organized in text files. The Project Manager facilitates the quick reference, organization and downloading of
such files.
To use the Project Manager, first add a project by clicking the Add Project button or use the menu (right
mouse click).
The Add Project dialog box allows the name of the project to be specified (i.e. Mill, Lathe) and the PMAC
device to associate it with. The device number is used when downloading the file. To associate a PMAC
device with this project, press the Select/Add Device button and then press Cancel.
Downloading individual files or complete projects can be done by first selecting the item then using the popup menu’s download item. The menu, further allows the addition of files to a pre-existing project and
changing projects name as well as PMAC (Device Number) association.
Message Window
The message window is used extensively by Pewin32 Pro2 to display the results of a variety of things. There
are many options in this window: Results and Interrupt Monitor and UnSolicited Responses are the most
commonly used options.
The Results
This button is used for:
• Logging the file during the downloading of files. Error messages are tagged by file name and line
number thus allowing users to open the file and check the syntax for errors.
12
Basic Concepts
Pewin32 Pro2 Software Manual
Hint:
When downloading a file that reports errors, double click on the Error within the
Results window to quickly load and edit the offending line.
•
•
Backing up, restoring and verifying files.
Error messages and other important messages (e.g., USB plug-in/unplug and timeout during ASCII
commands) generated by PcommServer
Change Monitor
The Change Monitor button reports behind-the-scenes PMAC variable assignments done by Pewin32 Pro2 or
other applications that have adopted the practice of reporting such changes. For example, any I-variable that
is assigned by Pewin32 Pro2 is reported.
Interrupt Monitor
This button displays the selected interrupts once they are received from PMAC.
Interrupts are enabled first in the Properties of the PmacSelect window and then captured according to
specific masks by the terminal screen’s interrupt enabling window.
Basic Concepts
13
Pewin32 Pro2 Software Manual
Unsolicited Response
This page displays unsolicited messages from PMAC. It also requires an enable switch in the General Setup
and Options menu’s View option. On the view page, a monitor period is also specified.
The unsolicited messages are displayed as follows:
Note:
If there are SEND or CMD statements which cause PMAC to send unsolicited strings to
the host PC, close all windows except the terminal window to ensure these strings are
captured and displayed robustly. Other open windows, which periodically poll PMAC,
can inadvertently destroy unsolicited responses.
Uploading Programs from PMAC
Pewin32 Pro2 gives the ability to retrieve motion programs and PLCs into an editor window. From the File
menu, select Upload Programs (motion programs and PLCs). This lists all motion programs and PLCs in
the PMAC. Select any or all programs using the check boxes and click Upload to save them in a specified
file as well as open them in the editor.
14
Basic Concepts
Pewin32 Pro2 Software Manual
Note:
Back up PLCCs and other pertinent information using the Backup\Save Config option.
Uploading PMAC Variables
The upload variables option allows the uploading of a range of variables.
Specify the type of variables and the range. The maximum To: value depends on the type of PMAC used.
Downloading Files to PMAC
The Downloading Files option allows the transfer of the contents of a file on disk to PMAC’s memory. This
is useful for transferring new or modified PLC or motion programs and/or variable values and definitions to
PMAC. Suspend any PLCs (CTRL-D from the terminal) or motion programs (CTRL-A from the terminal)
during a download.
Basic Concepts
15
Pewin32 Pro2 Software Manual
There are three different ways to transfer files from a hard or floppy disk to PMAC:
1. Use the Download File option from the File menu.
2. Download directly from an editor window.
3. Use the context sensitive menu (right mouse click) from within the Project Manager. Here a single file or
the whole project may be downloaded at once.
Using Macros in the Editor
While using any text editor window, there is the ability to define custom commands by use of user-defined
macros. By using macros, PMAC programs can be coded to read in English, making it much easier to
interpret what a motion or PLC program is doing without having to look up every command in the PMAC
User Manual. A macro definition is nothing more than a substitution name (that is invented) which is used in
place of any valid PMAC command (like GATHER or DWELL), command phrase (like OPEN PROG 1 or M1>Y:$FFC2,8,1), or variable (like P1, M22, Q342, etc.). At the beginning of the program file (or at least
before macro definitions are actually used), the macro definitions are declared using the #define command
(which can be lower or upper case). Examples of using this command are:
#define
#define
#define
#define
pressure P1
turn_on_pump M1=1
collect_data GATHER
seconds NULL
Note:
The Parse File for Macros box in the Download Options menu under Setup, General
Setup and Options must be checked so that the program can process #define and
#include statements properly.
When the PMAC Executive Program is downloading the file from the text editor, if the #define command
is encountered and if the File Contains Macros or PLCCs box is checked in the Download Options window,
the definition is stored in PC memory (nothing is actually sent to PMAC). When the macro name is
encountered later on, the PMAC Executive Program will send the actual PMAC command phrase/variable for
the particular macro so that PMAC only sees a valid PMAC command/variable (instead of sending pressure to
PMAC, P1 is sent for the above example). The only exception to this is when a macro is defined as a NULL.
In this case, nothing is sent to PMAC – it is available merely to provide units to numeric values for further
macro elaboration. See the sample program listing below for examples on how to use the NULL definition.
Remember that PMAC never sees the macro names – when the downloaded program is listed, standard
PMAC commands are seen.
A few rules must be followed when declaring and using these macro definitions. The macro name may
contain any unique sequence of characters (upper/lower case letters, numbers, symbols, etc.), but must be
separated from the #define command and the macro’s definition by a space (as seen in the above
examples). The macro name (like gas_pressure, turn_on_pump, collect_data) may not contain any spaces.
However, the underscore character _ may be used to separate words for ease of reading. The PMAC
Executive Program will differentiate between upper and lower case for the macro names, so take care when
mixing upper and lower case letters. If trying to use a macro definition that has not been previously defined
properly (because it was misspelled or the upper/lower case letter sequence does not match, i.e., pressure and
Pressure), the program will download that line as is and may result in an error generated by PMAC. Also,
remember not to use the same name for two different macro definitions.
Macro definitions contained in other files on a disk may be used instead of or in addition to existing
definitions in the file being downloaded. The command to do this is the #include command:
#include "macro.pmc"
#include "names"
16
Basic Concepts
Pewin32 Pro2 Software Manual
#include "program.def"
It is useful to create a file that contains nothing but macro definitions, and then have several motion programs
include these definitions so that they can use the macros. This can help keep the size of program files small
when many macro definitions are being used. The rule to follow when using the #include command is that
the file name (any legal DOS file name) must be enclosed in quotes and must be separated from the
#include command with a space. The same rules stated above for naming the macros also apply here,
including the amount of PC memory used.
To best illustrate the potential of using macros, here is an example program using cleverly defined macro
names:
#define msec
NULL
#define revs/sec
NULL
#define set_acc_time_of
TA
#define set_S_curve_time_of
TS
#define set_feedrate_of
F
#define set_move_time_of
TM
#define feedrate_time_units
I190
#define setup_gather_pointer
M88->X1,18 M89>X1,19
#define free_up_memory_space
DEL GAT DEL TRACE
#define reserve_memory_for_gather DEFINE GAT
#define start_gathering_data
M88=1M89=1
#define stop_gathering_data
M89=0
#define motor1_is_axis
#1->
#define select_coordinate_system
&
#define clear_coordinate_system
UNDEFINE
#define move_X_to_position
X
#define move_Y_to_position
Y
#define move_Z_to_position
Z
#define sit_there_for
DWELL
#define repeat_as_long_as
WHILE
#define end_of_loop
ENDWHILE
#define increment_repetition_count P1=P1+1
#define repetition_count
P1
#define repetition_limit
3
#define begin_program
OPEN PROG
#define end_program
CLOSE
;Now, let's use our new macro definitions!...
free_up_memory_space
setup_gather_pointer
select_coordinate_system1
clear_coordinate_system
motor1_is_axis 2000X
begin_program 2 clear
feedrate_time_units = 1000 msec
set_acc_time_of 200 msec
set_S_curve_time_of 50 msec
repetition_count = 0
set_feedrate_of 1 revs/sec
start_gathering_data
repeat_as_long_as(repetition_count<repetition_limit)
move_X_to_position 2
sit_there_for 300 msec
move_X_to_position 0
sit_there_for 400 msec
Basic Concepts
17
Pewin32 Pro2 Software Manual
increment_repetition_count
end_of_loop
stop_gathering_data
end_program
reserve_memory_for_gather
Download Options
There are several options associated with the downloading of files. These are accessed through the SetupGeneral Setup and Options menu option.
Parse File for Macros COMPILE PLCCs – Select this if the file being downloaded contains PLCCs or uses
the #include or #define statements.
Create Log File – To generate a log file of the download process, select this box. This is useful for
debugging a large program.
Create Map File – A map file tells what symbols are matched to what definitions.
Do not download – Have Pewin32Pro2 process the files downloaded to a compiled format (output file has a
*.56K file extension), but don't download to PMAC.
Display Warning if PLCs are running before downloading – If this box is checked, Pewin 32 Pro 2 checks
for running PLCs every time a file is downloaded. If they are running, a notification is received prior to
download.
Terminal
The Terminal represents a direct connection to a PMAC. There are two parts to the Terminal: the Entry and
the Response windows. Any characters that are typed at the keyboard are sent to PMAC after pressing the
Enter key. Any characters that are sent from PMAC to the PC are displayed in the Response window in a
color corresponding to the current communications mode. If any command is rejected by PMAC, an error
code is shown as well as its description (and possible remedies) displayed in red text (assuming I6 is set to 1,
the default). Always read this text, as it may affect the application.
18
Basic Concepts
Pewin32 Pro2 Software Manual
The entry window keeps track of all unique commands sent to PMAC. To retrieve a previously sent
command, press the Down Arrow key to view the bottom right of the window, select and press Enter. This
is useful especially when, for example, a lengthy command phrase such as RHY$C000,20 must be typed
constantly.
Terminal Menu
Terminal menu allows the user to select or remove DPR ASCII communication, or view interrupts and
change the terminal’s appearance.
Selecting DPRAM ASCII Communication
By selecting DPRAM ASCII communication, the DPRAM communication can be enabled or disabled
provided that PMAC has DPRAM and it is configured.
Note:
Only ISA and PCI modes of communication support DPRAM ASCII communication.
Enable View Interrupts
This option allows the masking of any or all interrupts for display. Refer to the Hardware Reference manual
of the PMAC for jumper settings. Furthermore, consult the PMAC Communication Driver User manual for
configuring all ISA type PMACs. Interrupts on all PCI type PMACs are supported and enabled.
Basic Concepts
19
Pewin32 Pro2 Software Manual
Note:
Only ISA and PCI modes of communication support Interrupts.
Changing the Appearance of the Terminal
Select the Terminal window so that the Terminal options appear. Choose the Terminal | Select Colors or
Terminal | Select Font options to change the appearance of the terminal.
This window has other useful features such as Clear Terminal, Copy, Copy Terminal to Notepad, Set Buffer
Size and Show Macro Names in the terminal.
Watch Window
The Watch window allows the watching of any response to any valid PMAC command, address or variable in
real time. In addition, defined macro names may be selected from the .tbl files created when PLCs and PMCs
are downloaded to PMAC, or custom macros may be defined.
20
Basic Concepts
Pewin32 Pro2 Software Manual
Each entry is divided into two sections. The first is the actual PMAC command used, and the second is the
value returned from PMAC. If there is a MACRO definition, then the main entry is the MACRO name and
the PMAC command is enclosed in parenthesis. When visible, the Watch window update rate, like other
active windows, is by default set to 1 second. However, it can be changed to as fast as 1 msec or as allowed
by the computer and PMAC.
Note:
Currently a total of 250 variables can be listed in a single watch window.
Basic Concepts
21
Pewin32 Pro2 Software Manual
Watch Menu
When the Watch window is highlighted, the main menu changes to:
Open Watch – Use this to open a watch table previously saved. The saved files have a .WTB extension.
Save Watch – Use this to save a watch table for future use.
Add Item – Use this to add new watch entries to the watch table. The Add Multiple Variables option has
been added to this menu for simultaneous addition of variables. See the Add Multiple Variable section in this
manual for details.
Delete Item – This deletes the currently highlighted item.
Edit Item – Allows changing the format in which return values are displayed. The available options are
decimal, hex and binary. See the Editing Watch Entries section in this manual.
Clear All Items – Clears (deletes) all items in the watch table.
Show Macro Definitions – Allows displaying or hiding macro definitions in the Watch window.
Open Macro Table – Use this to open a macro definition table.
Edit Macro Table – Use this to edit a macro definition table.
Select Color|Select Font – Allows changing the general appearance of the Watch window including
background color, text color and font style.
Adding Entries to the Watch Window
Add a Variable
When the Watch window is highlighted, press the Insert key or select Add Item from the Watch menu to
open the Add a Variable window.
22
Basic Concepts
Pewin32 Pro2 Software Manual
Type in the PMAC command to watch the status of and click the Add button. The entered command will
then be displayed in the watch window. Add as many items as needed, then click the Done button to return to
the Watch window. In addition, select any defined macros from the macro drop down list. From this
window, the macro table can be edited, by clicking on the Edit Macro Table button. The Add Multiple
Variables button allows adding multiple variables to the Watch window. Multiple variables can be added in
this window by separating every variable with a semicolon. For example, to add four variables to the Watch
window at the same time, type: p1;i130;q10;m1. The Include Non Macro Variables check box allows
including all the non-macro variables to the drop down list box, which are added the Watch window.
Adding Macro Definitions
Pewin32 Pro2’s Watch window has a built in macro management facility. You are able to load and save
macro files (like those produced by downloading files to PMAC) as well as add, edit and delete entries in
those files. Once these macros are set up, instead of typing variables into the Add Watch dialog, you can
select them from the macro list and view their status in the Watch window.
Simply select the entry you wish to watch and select the Add button.
Editing Macros
Pewin32 Pro2’s watch table contains a full macro configuration utility. This will allow creating, editing and
deleting macros as well as saving and loading macro tables to disk.
These macros can then be selected from the list in the Add Watch Item window. Clicking the Add or Edit
buttons to assign or change a macro.
Specify a macro name and its corresponding PMAC command or variable and click the Edit button to add or
change a macro definition in the macro list.
Click the Remove button to remove the currently highlighted macro definition. Click the Remove All button
to clear all the entries.
To display PLC or PMC macros in the Watch window, load the .tbl file (created when the PLC or PMAC was
downloaded) by clicking the Load button. Select the appropriate file and press the Enter key. Once a macro
table has been loaded, it name is displayed in the Add Watch window. Open the flist box by clicking on the
small arrow button to the right of the command line to display a list of loaded macro definitions.
The Load and Save buttons prompt for a file and perform the specified operation.
Basic Concepts
23
Pewin32 Pro2 Software Manual
Add Multiple Variables
A new interface, Add Multiple Variables has been added to the Watch window. This allows the adding of
more than one variable in the Watch window. It also allows the adding of more than one macro variable to
the Watch window.
Editing Watch Entries
When the Watch window is highlighted, double click on any item or select Edit Item from the Watch menu
opens the Edit Item window. In this window, the watch entries can be formatted to display their data in a
number of different ways.
1. Select the format the entry will be returned in. If expecting the response as a string (i.e. TYPE), decimal
(i.e. RX0) or hex (i.e. ?).
2. Select the numerical display mode from the selection in the middle and the number of bits of this entry to
use in the display.
The bit mask is used for a bit-wise Boolean AND operation. The resulting value is displayed in the Watch
window. To show all bits (the whole number), set the mask to:
FFFFFF for 24-bit display
FFFFFFFFFFFF for 48-bit display
If the Use Separator check box is selected, separators will break up the display. Binary numbers have
commas every four bits (nibble); decimal numbers have commas every three decimal places left of the
decimal point; hex numbers are separated by spaces every four places.
24
Basic Concepts
Pewin32 Pro2 Software Manual
Position Window
The Position window displays motor position information. Select the appropriate window to display the
position, velocity, or following error separately or in combination for all eight motors simultaneously. The
position can be displayed for all motors.
Position Menu
When the Position window is highlighted, the menu changes to:
Position – Allows the displaying or hiding of the position. Position display can be combined with velocity
and/or following error displays.
Velocity – Allows the displaying or hiding of the velocity. Velocity display can be combined with position
and/or following error displays.
Following Error – Allows the displaying or hiding of the following error. Following error display can be
combined with position and/or velocity displays.
Restore Default Values – Reverts all settings to Pewin32 Pro 2’s default settings, including display mode,
cts/unit, dec. places, rollover and units for position and velocity.
Select Font|Select Color – Allows changing the appearance of the Position window.
Next Set Of Motors – Allows the display of any one set of the motors for Turbo PMACs. By pressing the
Page Up, Page Down or the UpArrow or DownArrow keys, it is possible to change to the next set of motors
in that order.
Position of 32 Motors – Allows the display of position only for all 32 motors for Turbo PMACs.
Basic Concepts
25
Pewin32 Pro2 Software Manual
Units and Scales
Position and velocity units – Allows setting scaling and unit parameters for each motor. It also has the
option to display or hide any motor.
To change the scale factor for displayed information, enter the appropriate number of encoder counts per user
units (i.e to have 10,000 CTS = 1 inch, enter 10000). Next, specify a name for the user units (i.e. inch, deg,
rev). Select the velocity units (i.e. per ms, per second or per minute). Enter in a value for optional rollover
(i.e. 360 if the user units are degrees). A value of 0 for rollover indicates no rollover. Lastly, specify how
many decimal places to the right of the decimal point to have displayed (for inches, use a value of 3 so that
inches are displayed as 2.002 inches). These parameters affect only the way information is displayed in the
Position window. They have no connection to PMAC itself.
Note:
Only an active (Ix00 = 1) motor’s parameters can be modified.
Deselecting the Display check box associated with a motor will cause the Position window to not display
information about that motor. This allows systems to display or hide any given motor.
Jog Ribbon
This window allows the moving of any motor in either direction by using push buttons. It further allows the
viewing and reconfiguring of jog parameters of any motor. Other buttons include home, kill, specify target
position, and feedrate control slider.
C.S. Axis Jog Ribbon
This screen allows the move of pre-defined axes in a given coordinate system in either direction by using
push buttons. It further allows the viewing and reconfiguring of jog parameters of any motor. Other buttons
include kill, specify target position, and feedrate control slider. The move commands use the PMAC’s online
command “!X”, where X specifies the coordinate system definition variable. C.S. Axis jog supports multiple
axes and is available in the selection radio buttons. C.S. Axis Jog Ribbon is only available for Turbo PMACs.
26
Basic Concepts
Pewin32 Pro2 Software Manual
Incremental jog determines the current axis position and then advances the axis for the increment distance in
the specified direction.
Configure Jog Parameters
This screen allows the viewing and changing of core Jog parameters to a desired specification.
DPR Viewer
DPRAM viewer screen shows the start address on the PMAC side as well as its equivalent PC offset. DPR
viewer allows the displaying and changing the contents of any location in the DPRAM from the host
computer.
Basic Concepts
27
Pewin32 Pro2 Software Manual
Note:
DPR viewer is valid for ISA, PCI, USB and Ethernet modes of communication with
DPRAM available and configured mode only.
Status Screens
The View menu allows viewing how programs, motors, coordinate systems, and global parameters and
connectors are organized and functioning in PMAC. With many of these, parameters can be monitored in
real-time.
Connector Status
This option allows the monitoring of the status of PMAC’s connectors. Currently, Pewin32 Pro2 supports the
J2(JPAN), J3(JTHW), J5(JOPT), J7(JMACH2) and J8(JMACH1) connectors for PMAC1 style board and
J2(JTHW), J3(JIO) J9 thru J12 (JMACH) connectors for PMAC2 style boards. For PMAC Ultralite boards
only J2(JTHW) and J3(JIO) are supported. PEWIN selects automatically which connectors may be
monitored depending on the PMAC series.
PMAC1 series
PMAC2 series
When a selection from this window is made and the OK button is clicked, the status window showing the
connector and its respective pins is displayed. The colors of the pins change with the state of the pin, true or
false. Pins that are inaccessible through the software are marked with an asterisk (*).
28
Basic Concepts
Pewin32 Pro2 Software Manual
A Condensed Status Window
Condense/Expand – Places the status window into condensed mode. In this mode, only the pins and their
respective numbers are displayed.
Beep on Change – When selected, the system will beep each time a parameter changes.
Color Setup – This opens the Status Colors window which allows changing the display colors used in the
current connector status window.
Select the colors to use for True and False state displays.
Basic Concepts
29
Pewin32 Pro2 Software Manual
Motor Status
This display shows the interpretation of the status bits of the specified motor in real time. This is done by
continually inquiring the PMAC for corresponding X and Y registers of each motor. The corresponding
registers are displayed also for each motor. True conditions are highlighted. The Page Up, Page Down,
UpArrow, and DownArrow keys allow the selection of which motor to examine. This status screen is
equivalent to the “?” command at the terminal screen.
Only the full mode of display is provided. This status screen is equivalent to the ? command at the terminal
screen.
Coordinate Systems Status
This display shows the status of the specified coordinate system in the real-time fashion. This is done by
continually inquiring the PMAC for corresponding X and Y registers of each coordinate system.
Corresponding registers are also displayed for each coordinate system. True conditions are highlighted.
Pressing the Page Up, Page Down, UpArrow, and DownArrow keys changes the coordinate system being
examined.
Only the full mode of display is available. Unlike Non-Turbo PMACs’ coordinate system status (48-bit
wide), Turbo PMACs must be polled for three registers (72-bit wide) in order to get the status of each
coordinate system. This status screen is equivalent to the ?? command at the terminal screen.
Global Status
This display shows the Global status bits of the PMAC in real time. This is done by continually inquiring the
PMAC for X:$3 and Y:$3 for non-Turbo PMACs and X:$6 and Y:$6 for Turbo PMACs. True conditions are
highlighted.
30
Basic Concepts
Pewin32 Pro2 Software Manual
Only the full mode of display is available. The global status screen is equivalent to the ??? command at the
terminal screen.
MACRO Status
This display shows the interpretation of the 24 status bits of the specified MACRO Station in real time. This
is done by continually inquiring the PMAC for active Node’s I3 variable by using the command MS0, I3.
True conditions are highlighted.
Basic Concepts
31
Pewin32 Pro2 Software Manual
Motor Setup Summary
This feature displays the configuration of the specified motor. This option reads key PMAC memory
locations and then displays the information in a useful way. The main parameter settings for the motor are
displayed. This screen can be helpful in determining problems when trying to servo a motor. To select a
particular motor, use the Page Up or Page Down key. The Esc key closes this screen.
Motion Programs/PLCs Status
This opens a window that displays information about all the motion programs and PLCs in PMAC’s memory.
For each program found, the program number, the program starting address and the total amount of PMAC
memory occupied by the program are displayed. The screen further allows the selection of any or all
programs or PLCS for uploading and editing.
32
Basic Concepts
Pewin32 Pro2 Software Manual
Special Programs Status
This window displays information about special programs including Forward and Inverse Kinematics and
rotary buffers in PMAC’s memory. For each program found, the program number, the program starting
address and the total amount of PMAC memory occupied by the program are displayed. The screen further
allows the selection of any or all programs for uploading and editing.
PLCC Program Status
This option opens a window that displays information about all the PLCCs in PMAC’s memory. The value of
I5 and what that value means to PMAC is displayed. I5 is the I-variable that determines which PLCCs can be
enabled. For each PLC, the number, starting address and size are displayed as well as whether the PLC is
currently active. PLC totals are given at the bottom of the screen. Use the File menu options to save or print
this information.
Basic Concepts
33
Pewin32 Pro2 Software Manual
34
Basic Concepts
Pewin32 Pro2 Software Manual
Basic Concepts
35
Pewin32 Pro2 Software Manual
PMAC CONFIGURATION
I-Variables
At the heart of the PMAC’s configuration are its I-variables. These determine what makes a PMAC specific
to a given application. Because of the large number of I-variables and their importance, two interfaces for
manipulating them have been developed. This section shows the windows that would display if using a
PMAC. PMAC2 and other PMACs should be detected and may have different windows.
Note:
Changing I variables in these windows or in the terminal does not change the values
stored in PMAC’s non-volatile memory (EPROM or flash ram). Use PMAC’s SAVE
command to permanently save the changed values.
I-Variables by Category
Selecting the By Category list-option will present the I-variables separated by major categories. Which
categories are shown is dependent on the type of PMAC.
For a PMAC PC, the categories and their respective windows will look like:
General I-Variables
36
PMAC Configuration
Pewin32 Pro2 Software Manual
Motor-Specific I-Variables
Coordinate System-Specific I-Variables
Global Gate-Array I-Variables
Other important categories include:
• VME/DPRAM setup I-Variables
• Data Gathering I-Variables
• A/D Processing I-Variables
• Servo IC Setup I-Variables
• ECT I-Variables
• Hardware Channel N I-Variables
PMAC Configuration
37
Pewin32 Pro2 Software Manual
I-Variables by Number
When the By Number option is selected, the entire list of I-variables is presented in order from 0 to 1023. In
the I-Variable menu (I-Variable dialog box is active), choose how many I-Variables are shown at any given
time. The number can be from 1 to the total available I-Variables.
To move through the list, use the two arrow buttons on the right side of the window or use the Go To button
to jump to a specific variable.
I-Variables MACRO Station
For a PMAC Ultralite if the MACRO station is connected and enabled, then MACRO station’s I-variables can
be viewed and configured.
MACRO I-variables are categorized as follows:
• General
• 4-Axis piggyback
• Node-specific
• Miscellaneous I/O
• 2-Axis piggyback
• CPU MACRO station gate
All categories can be displayed and configured through this window.
38
PMAC Configuration
Pewin32 Pro2 Software Manual
M, P and Q-Variables
This variable window behaves similarly to the I-variable window described above. It enables the viewing and
changing of the value or definition of any of PMAC’s M-variables. The M-variables pointer must be
formatted properly. Refer to PMAC’s memory map for addresses to point to. A listing of suggested Mvariables pointers may be downloaded to PMAC by pressing the Download Suggested M-variables button.
To update the values column, click the Refresh button. To refresh periodically, check the Update
Periodically checkbox. Once a modification is attempted however, this update feature turns itself off
automatically. To restart it, re-check the Update Periodically checkbox.
Coordinate Systems
This menu choice enables the currently defined coordinate systems to be altered or new ones to be defined.
For motors to move within motion programs, they must first be assigned to an axis within one (and only one)
of the eight (sixteen for Turbo) possible coordinate systems. Any motor may be assigned to any valid axis
(X, Y, Z, A, B, C, U, V, or W) or coordinate system, provided the motor has not been previously assigned to
another axis or defined in another coordinate system. To move from one coordinate system to the next, use
the Page Up and Page Down keys. Assignments are downloaded to PMAC’s internal memory as motors are
added or removed from the current axis definition window.
PMAC Configuration
39
Pewin32 Pro2 Software Manual
Coordinate System to Modify-Monitor – This field displays the number of the coordinate system within
PMAC that is currently being viewed. Use the + and - buttons or the Page Up and Page Down keys to step
through the coordinate systems.
Current Axis Definitions – This window lists all motors and their corresponding axis definitions for the
current coordinate system.
Edit – This button opens a dialog box where the axis definition selected in the current axis definition window
can be edited. To remove a motor definition, use the Remove button.
Remove – This button removes the motor selected in the current axis definition window from the coordinate
system. Once a motor has been removed from the current axis definition, it will appear in the Available
Motors window, and is available again for axis assignment.
Available Motors – This window lists all the PMAC motors that are available to be assigned to a coordinate
system. A motor is available if it is not already defined in any coordinate system.
Add – This button adds the motor selected in the Available Motors window to the current axis definition
window. When you press this button, a window opens where the axis definition for the motor can be entered
before it is added to the coordinate system.
View all Coordinate Systems – This option opens a window containing a list of all PMAC coordinate
systems and their axis definitions. The coordinate system definitions can be edited in this window, but this
information can be printed.
Done – This closes the Configure Coordinate Systems window. For Turbo PMAC systems, a message box
may open indicating the optimal setting for I68 (Maximum Coordinate System).
Encoder Conversion Table
This menu choice allows the entries of the encoder conversion table to be changed, updated, saved or
retrieved. This table must be changed in order to use the various types of feedback devices other than the
default 1/T Conversion that typically is used for incremental encoders. Each feedback device will have an
entry in the table for which PMAC will process every servo period. In order for PMAC to interpret a
particular feedback device correctly, the raw data must be converted to the proper format. The choices within
this dialog box enable the user to change the conversion process easily, without getting into any meticulous
details. Refer to the PMAC User Manual for specific information on how to edit the conversion table
manually (i.e. using PMAC memory read and write commands) or the help menu.
The table entries may be scrolled through using the Page Up and Page Down keys. Alter the conversion
method by selecting one of the conversion types. To change the encoder source address, type a new address
or select the one from the pull-down list. To leave the conversion table editing without making any changes
in PMAC, click Done or press Esc. To update the modified encoder table entry, press the Download Entry
button.
40
PMAC Configuration
Pewin32 Pro2 Software Manual
Entry Number – This field contains the number of the encoder conversion table entry currently being
viewed. Use the up and down buttons or the Page Up and Page Down keys to step through the encoder
conversion tables. There are 256 possible table entries.
Entry, Source and Processed Data Addresses – The Entry Address is for informational purposes only. It
tells where within PMAC’s memory this Encoder Conversion table entry is located. Notice by scrolling
through the entries that PMAC’s Encoder table entries are in a contiguous block of memory.
The Source Address field tells PMAC where in its memory is the raw data to use in the conversion process.
Choose from the drop down list, or type in another own address. Typically, this address can be found by
reading the manual specific to the type of feedback being used.
Finally, the Processed Data Address field is where PMAC stores the result of the conversion calculations.
This location is useful because it is needed to configure other features in PMAC (i.e. Master Position
Feedback address Ix03, Electronic gearing Ix05, etc.), typically by setting I variables.
Conversion Type – This field contains the conversion type for the current entry. Select this entry and press
Enter or click on the down arrow to the right of this field to view a list of common conversion types. Select a
conversion type from this list using a mouse or the keyboard arrow keys. To use a conversion type not shown
in this list, enter the data manually from the terminal. Refer to the section entitled Encoder Conversion Table
in the PMAC User Manual for help with this process.
After the Conversion Type is selected, a window appears with the following fields:
Inc with Inv-T Ext
Short for incremental with 1/T extension. For incremental encoders, the source address must be one
of the DSP-GATE encoder counters. The source address list box will contain the standard entries for
the PMAC Type.
Most applications will use the 1/T-extension conversion method that uses timers associated with each
counter to estimate fractional resolution.
Those who have set up to use the parallel sub-count interpolation must use a source address of one of
the odd-numbered encoders. A typical setup address in this case would be $C010 hex, which
provides parallel extension of the encoder 5 counter using encoder 6’s flags.
A-D Register
This conversion choice picks up data from the top 16 bits of a 24-bit word. It is intended for use with
the A/D converter registers in the DSPGATES, which are fed by Acc-23 or Acc-28(A or B). The
source address list box will contain the standard entries for the PMAC.
A typical address for an A/D register would be $C006, which provides the conversion of the ADC2
register. With A/D conversion, there is no rollover (software extension) performed.
Parallel with and without Filter
The four choices Parallel Y without Filter, Parallel Y with Filter, Parallel X without Filter, and
Parallel X with Filter differ only in the use of X or Y memory space and whether or not the filter is to
be used. If providing position information to PMAC as a parallel data word (as from an absolute
encoder or processed from a laser interferometer), use this conversion method. The parallel data
word may come from either the X or Y memory space. Usually, this data is brought in on an ACC-14
board, which is in the Y-memory space. The source address list box will contain the standard entries
for the PMAC.
Parallel-feedback conversion requires a double (for non-filtered) or triple (for filtered) entry in the
conversion table. The second entry – filtered or non-filtered – specifies the size of the feedback word
used. The entry is a 24-bit word in which each bit actually used for the parallel feedback is a one; the
unused bits above are zeros (parallel feedback should always be connected starting at bit 0 of the data
word). For a 12-bit absolute encoder, this entry would be $000FFF hex; for 14 bits, it would be
PMAC Configuration
41
Pewin32 Pro2 Software Manual
$003FFF hex. The maximum entry permitted is for 19 bits: $07FFFF hex. The count can be
software-extended by PMAC, permitting rollover. If more than 19 bits of true absolute position are
needed, the power-on position can be read to full range using Ix09 and Ix10; from then on, position is
kept through rollover using the conversion table.
The converted data from the parallel word is put in the X data word matching the last (2nd or 3rd)
setup word for the entry. This is the address that should be used by the motor I-variable that picks up
position (Ix03, Ix04, or Ix05). For instance, if the first setup entry (address Y:$720) in the conversion
table were $30FFD0 hex (filtered parallel data), the size entry would be in Y:$721, and the maximum
change entry would be in Y:$722 hex. The converted data would be placed in X:$722 hex. If this
were the position feedback for motor #1, Ix03 would be set to $722 hex (1826 decimal).
Note:
The parallel data word from a laser interferometer is not true absolute position
information because the interferometer is fundamentally an incremental sensor. For
this arrangement, there is no need to wire more than 19 bits of data to the ACC-14 (in
fact, 16 bits is sufficient). Position reference is established by a homing procedure, and
full range is achieved by using rollover to extend the range of the count in software.
Filter-Max Change
The parallel data word filter simply sets a maximum amount the data word is permitted to change in a
single servo cycle. This value should be entered in the filter box in hex. If PMAC sees a change
larger than this in the source data word, the converted data only changes by the maximum amount.
There is no permanent loss of position information if the filter kicks in. This filtering permits
protection against spurious changes on high-order data lines, while not delaying legitimate changes at
all. This maximum amount is the third setup entry for the encoder in the Y-memory portion of the
conversion table. It should be set slightly greater than the maximum actual velocity expected on the
sensor.
Time Base
A time-base conversion is a scaled digital differentiation. Every servo cycle, it calculates the
difference between the value of the source register for this cycle and the value for the last cycle, and
multiplies the difference by the scale factor. The scale factor can be entered under the Bit
Enable/Time Base input box. The most common use for the resulting value is for the time-base
(Feedrate override) control, which makes the speed of PMAC execution proportional to an external
frequency (usually the speed of a master device).
Triggered Time Base
This is similar to the time base conversion described above, but with the added feature of
synchronizing time base following upon a hardware trigger. Refer to the PMAC User Manual for
further reference.
Inc with Parallel Ext
Short for Incremental Encoder with Parallel Extension. Those who have set up to use the parallel
sub-count interpolation for incremental feedback would use this option. In this case, the source
address must be one of the odd-numbered encoders. A typical source address would be $C010, which
provides parallel extension (i.e. interpolation) of encoder #5 counter using encoder #6’s flags.
Inc without Parallel Ext
Short for "Incremental Encoder without Parallel Extension." Those who have set up to use the
parallel incremental feedback without interpolation would use this option.
42
PMAC Configuration
Pewin32 Pro2 Software Manual
Summing Table Entries to Another
For Turbo PMACs, select the Summing of Conversion Table Entries for the conversion type.
Turbo allows several options when using this conversion type. Add a table entry to it by disabling the
second entry. In addition, either negate the first, second or both table items to be summed. Lastly,
integrate the results (summation of the results).
For non-Turbo PMAC’s choose the Add with Previous Entry option. This will result in the sum of
this entry and the previous entry in the table. Setting this option to Additive in entry number 3 for
instance, would result in the summation of entry 2 and entry 3 at the address of location 3. This
permits the servo feedback to sum two sensors. (If the polarity of the sensors or their counters is
opposite, this provides the difference of the sensors. This can be useful for Doppler-type sensors,
where the reference wave and the shifted-frequency wave are fed into different counters, one counting
up, the other counting down; summing the two counters provides position.)
Bits Enabled Mask
This field contains a scale factor used when the appropriate bit is enabled. The most common use for
the resulting value is for the time-base (Feedrate override) control, which makes the speed of PMAC
execution proportional to an external frequency (usually the speed of a master device).
Max Change
This limits the magnitude that the input value is allowed to change between scans.
Conversion Shifting of Parallel Data
To have fractional parts of the position or a MACRO station base system, then specify that in the
conversion shifting of parallel data.
View All Entries of Table – This option opens a window containing a list of all the defined encoder
conversion table entries in PMAC’s memory. This window can then be saved to disk or printed.
Download Entry – This option sends the encoder conversion table configuration to PMAC’s memory. Every
time changes are made to the table, it must be downloaded using this button. At this point, the table will
actually be in use by PMAC. An altered encoder conversion table configuration must be stored in PMAC’s
permanent EPROM memory (using this button) if it is to survive a power down or cycle reset.
Done – This closes the Configure Encoder Conversion Table window. This will not download the present
encoder conversion table entry to PMAC. Use the Download Entry to PMAC button to send this entry to
PMAC.
Encoder Conversion Table MACRO Station
For a PMAC Ultralite with MACRO station enabled, this menu allows the entries of the encoder conversion
table for MACRO station to be altered, updated, saved or retrieved. Conversion types are similar to the main
Encoder conversion table.
PMAC Configuration
43
Pewin32 Pro2 Software Manual
Modbus Setup Window
This window displays the existing Modbus TCP Ethernet configuration.
Modbus is available for Turbo PMAC with firmware versions 1.941 and later and some non-Turbo PMACs
that have Ethernet and firmware version 1.17C. In addition, a 100 Mbps Ethernet interface must be present,
and the Modbus option must be installed in the Ethernetprocessor. If the option is not on the system, call
Technical Support to obtain the option.
Note:
This basic screen is available for all modes of communication. However, some of the
functions inside are available only for USB and Ethernet modes of communication.
44
PMAC Configuration
Pewin32 Pro2 Software Manual
Quick Getting Started Steps
Setting TCP-IP Addresses
•
•
For the local network, the first three IP addresses of each device on it should be the same. For example,
192.6.94.x.
The subnet mask should be set to 255.255.255.0 allowing up to 255 Ethernet addresses on your local
network.
Enable Modbus
1. Select Configure->Modbus Setup to get something like the window above.
2. Set the User Buffer (UBUF) to 256 words or greater in the Set UBUF size field. Modbus will use the last
256 words of the user buffer. If previously defined, add 256 to it.
3. Set I67=1.
4. Select the Enable I69 checkbox and set the Addr Offset = 128 if you are going to use the Modbus
Control Panel feature (see below).
5. Click Setup Modbus Buffer button. This will set the Modbus configuration buffer to default.
PMAC Configuration
45
Pewin32 Pro2 Software Manual
6. If the Modbus option is available on your system, I67 will return the non-zero value start address of the
Modbus buffer. It will be at the end of RAM – 256.
Setting up PMAC as Modbus Server using the I69 Control Panel Feature
1. Design your Modbus Client buffer to be the same image as the PMAC I69 DPR Control Panel image.
(See Appendix A.)
2. Select the Enable I69 checkbox and set the Addr Offset = 128 if it has not been done.
3. Set up a socket (1 –3) as a Modbus Server.
4. Click the Update PMAC button. (This issues a SAVE and $$$ command to the PMAC.)
5. Begin Modbus Client communication and monitor the Modbus status counters (select your Server socket
number as the active socket) for valid activity. Click the Refresh button.
6. If no counter activity, verify that the Setting TCP-IP addresses step was done correctly.
Setting up PMAC as Modbus I/O Server
1.
2.
3.
4.
Design the Modbus Server I/O in accordance with the Modbus definition and design in Appendix A.
Set up an unused socket (1 –3) as a Modbus Server.
Click the Update PMAC button. (This issues a SAVE and $$$ command to the PMAC.
Begin Modbus Client communication and monitor the Modbus status counters (select your Server socket
number as the active socket) for valid activity. Click the Refresh button.
5. If no counter activity, verify that the Setting TCP-IP addresses step was done correctly.
Setting up PMAC as Modbus Client
1.
2.
3.
4.
5.
6.
7.
8.
9.
10.
11.
12.
13.
Design the Modbus Server I/O in accordance with the Modbus definition and design in Appendix A.
Set up an unused socket (1 –3) as a Modbus Client.
Set up the Server IP address.
Select Test Network to test your network connection to the entered IP address. If it fails you do not have
a Ethernet connection to this device.
Set up the Timers (four are available for different rates) for desired output rates.
Set up one Client list command (FC=3 (Read registers), Timer = 0, Modbus Ref. # = 0 or 1, PMAC Ref. #
= 0, Count = 1).
Click the Update Command button to add the command to the Client command lists.
Then click the Update PMAC button. (This issues a SAVE and $$$ command to the PMAC.
This will send out a simple Modbus command to verify connectivity between the Client and the Server.
Monitor the Modbus status counters (select the client socket # as the active socket) for valid activity.
Click the Refresh button.
If no counter activity, verify that the Setting TCP-IP addresses Step was done correctly.
Now Delete the Command and setup the desired Client lists to the Server.
Click the Update PMAC button. (This issues a SAVE and $$$ command to the PMAC.)
Save a Backup of your Modbus Configuration
1. Click the Save to File button for a backup configuration.
This set up screen generates something like the following backup Modbus configuration file:
; PMAC:4 V1.941T4 05/12/2005
UMAC TURBO: Ethernet Port
; Configuration saved on 06/01/05 at 17:53:34
46
PMAC Configuration
Pewin32 Pro2 Software Manual
;
; Modbus Global socket configuration...
;
WL:$10700,$100000000000,$000000000000
WL:$10703,$200000000000,$000000000000
WL:$10706,$300000000000,$000000000000
WL:$10709,$400000000006,$0000C0A80307
;
; Global Timers...
WL:$1070C,$000048256271
; socket 3 commands
Modbus Menu
Save to File – saves the latest changes in a configuration file.
Update PMAC – downloads the latest changes to PMAC, SAVEs & $$$.
Reinitialize Command List – rereads the PMAC Client List into the Modbus processor
Stop Command List – stops the processing of the Client command list in the Modbus processor
Start Command List – starts the processing of the Client command list in the Modbus processor (only
required if they have been stopped)
Refresh Status Counters – uploads and displays 16-bit Modbus status counters
Clear Status Counters – clears all Modbus counters and displays their latest status.
Server Socket Modbus Status Counters
Nak Err Cnt – PMAC did not respond to Modbus data request.
Busy Err Cnt – PMAC was busy, possibly SAVE, $ or $$$.
Addr Err Cnt – Modbus Reference address out of range (Valid register references 0-255).
Cmd Err Cnt – Illegal Modbus command (See supported Modbus commands).
Modbus Cnt – Valid Modbus command.
Client Socket Modbus Status Counters
Nak Err Cnt – Server response to Modbus data request.
Busy Err Cnt – Server response to Modbus data request.
Addr Err Cnt – Server response to Modbus data request.
Cmd Err Cnt – Server response to Modbus data request.
Pmac Err Cnt – Unable to write Server response data to PMAC.
Modbus Cnt – Valid Modbus commands.
PMAC Configuration
47
Pewin32 Pro2 Software Manual
Note:
The Modbus Status Counters are only active on Modbus Server and Client sockets.
48
PMAC Configuration
Pewin32 Pro2 Software Manual
Setting up the PMAC Modbus Client/Server Buffer
PMAC Modbus/TCP Client/Server buffer size is fixed at 128 x 32 bits.
Mapping a Modbus/TCP Reference Number to the PMAC Reference for Coils or Discretes:
PMAC Reference Buffer Offset (I67+$80)
Modbus Coil or Discrete Reference Number
X:0
Y:0
X:1
Y:1
15 – 0
31 – 16
47 – 32
63 – 48
Note:
PMAC memory Bits 16 – 23 are not used and Coil 0 is Bit 0 X: mem and Coil 15 is Bit
15 X:mem. Coil 16 is Bit 0 Y: mem and Coil 31 is Bit 15 Y:mem.
When laying out Coil or Discrete Memory, always allocate the full 32 bits of PMAC
X: and Y: memory. Do not allocate 16 bits of Coil and 16 bits of Register memory at
the same PMAC memory offset.
Mapping a Modbus/TCP Reference Number to a PMAC Reference for 16 bit Word Registers:
PMAC Reference Buffer Offset (I67+$80)
Modbus Register Reference Number
X:0
Y:0
X:1
Y:1
0
1
2
3
Setting up the PMAC Modbus I69(= I67+$80) Server Buffer
PMAC Address
(I69 +)
PMAC/Modbus
Word Reference
Number
$0
0/1
$1
$2
$3
$4
$5
$6
$7
$8
$9
$A
$B
$C
$D
$E
$F
2/3
4/5
6/7
8/9
10/11
12/13
14/15
16/17
18/19
20/21
22/23
24/25
26/27
28/29
30/31
PMAC Configuration
X: Memory Parameter
Y: Memory Parameter
Coordinate system feed pot override
enable
Coordinate 1 system feed pot override
Coordinate 2 system feed pot override
Coordinate 3 system feed pot override
Coordinate 4 system feed pot override
Coordinate 5 system feed pot override
Coordinate 6 system feed pot override
Coordinate 7 system feed pot override
Coordinate 8 system feed pot override
Reserved
Reserved
Reserved
Reserved
Reserved
Reserved
Reserved
Motor/Coordinate System Enable
Motor/Coordinate System 1 Request
Motor/Coordinate System 2 Request
Motor/Coordinate System 3 Request
Motor/Coordinate System 4 Request
Motor/Coordinate System 5 Request
Motor/Coordinate System 6 Request
Motor/Coordinate System 7 Request
Motor/Coordinate System 8 Request
Reserved
Reserved
Reserved
Reserved
Reserved
Reserved
Reserved
49
Pewin32 Pro2 Software Manual
Bit Format of Control Panel Motor/Coordinate System Enable Word (Y:I69)
Bit
0
1
2
3
4
5
6
7
15 – 8
Control Panel Motor/Coordinate System Enable Mask
(Set bit to enable; PMAC clears on taking action)
Motor/Coordinate System # 1 + Mtr/CS offset
Motor/Coordinate System # 2 + Mtr/CS offset
Motor/Coordinate System # 3 + Mtr/CS offset
Motor/Coordinate System # 4 + Mtr/CS offset
Motor/Coordinate System # 5 + Mtr/ CS offset
Motor/Coordinate System # 6 + Mtr/CS offset
Motor/Coordinate System # 7 + Mtr/CS offset
Motor/Coordinate System # 8 + Mtr/CS offset
Turbo Mtr/CS offset is limited to 31 (PMAC not used)
Bit Format of Coordinate System (CS) Feed Pot Override Enable Word (X:I69)
Bit
0
1
2
3
4
5
6
7
15 – 8
Set bit to enable CS Feed Pot Override, clear bit to disable
Coordinate System # 1 + CS offset
Coordinate System # 2 + CS offset
Coordinate System # 3 + CS offset
Coordinate System # 4 + CS offset
Coordinate System # 5 + CS offset
Coordinate System # 6 + CS offset
Coordinate System # 7 + CS offset
Coordinate System # 8 + CS offset
Turbo CS offset is limited to 8 (PMAC not used)
Bit Format of Motor/Coordinate System Request Words (Y:I69+1 to 8)
Bit
Request (1 = action requested; 0 = no action requested)
0-7
(Reserved for Delta Tau Future Use)
8
Jog-Minus (Motor Only) *
9
Jog-Plus (Motor Only) *
10
Pre-Jog (Motor Only)
11
Start (RUN) (Coord. Sys. Only)
12
Step (STEP/QUIT) (Coord. Sys. Only)
13
Stop (ABORT) (Coord. Sys. Only)
14
Home (Motor Only)
15
Feed Hold (HOLD) (Coord. Sys. Only)
* When both Jog-Minus and Jog-Plus are set, motor will stop
50
PMAC Configuration
Pewin32 Pro2 Software Manual
Setting up the Acc-65ETH I/O Board
Acc-65ETH I/O Modbus Memory Map
Hardware I/O
Modbus Word Reference
Number
Modbus Discrete of Coil
Reference Number
Digital Inputs 15
0
Digital Inputs 23 16
(upper 7 bits are not used)
Analog Input 1
(12 bit ADC)
0
1
Input Discretes 15 - 0
Input Discretes 23 - 16
(bit 8 = 24VOK, others are zero)
NA
2
(lower 12 bits are data, upper 4
bits status)
3
(lower 12 bits are data, upper 4
bits status)
4
5
Analog Input 2
(12 bit ADC)
Digital Outputs 15 0
Digital Outputs 23 16
(upper 6 bits are not used)
Analog Output 1
(12 bit DAC)
Analog Output 2
(12 bit DAC)
6
(upper 12 bits are not used)
7
(upper 12 bits are not used)
NA
Input/Output Coils 15 - 0
Input/Output Coils 23 - 16
(bit 8 = Relay1 ON, bit 9=Relay2
ON and remaining bits are not
used)
NA
NA
Suggested PMAC ACC-65ETH I/O Memory Map
PMAC
ADDRE
SS (I67
+)
PMAC
MODBU
S
REGIST
ER REF.
#
$90
32/33
PMAC
MODBU
S
DISCRE
TE/COI
L
REF. #
512 - 535
$91
$92
34/35
36/37
576 - 599
$93
38/39
ACC-65E
MODBUS
REGISTER
(DISCRETE
- COIL)
REF. #
PMAC X:
MEMORY
PARAMETER
PMAC Y: MEMORY
PARAMETER
0/1 (0-23)
DIGITAL INPUTS 15
–0
ADC INPUT 1
DIGITAL OUTPUTS
15 – 0
24VOK &
DIGITAL INPUTS 23 – 16
ADC INPUT 2
RLY1, RLY2 &
DIGITAL OUTPUTS 23 –
16
DAC OUTPUT 2
2/3
4/5 (0-23)
6/7
DAC OUTPUT 1
Suggested Modbus Client Command List for above Memory Map
MODBUS FUNCTION
CODE
23 READ/WRITE –
WRITE
23 READ/WRITE –
READ
MODBUS
REFERENCE #
4
PMAC REFERENCE
#
36
MODBUS COUNT
0
32
4
4
This will process all the Inputs and Outputs in one Modbus command. This Modbus Client command is
required to transfer all the I/O data to/from the PMAC and the ACC-65ETH I/O board via Modbus/TCP-IP.
PMAC Configuration
51
Pewin32 Pro2 Software Manual
MACRO RING ASCII
This screen allows the user to do the initial MACRO Ring setup using the MACRO Ring Order ASCII
communication method. To best utilize the features of this screen you should upgrade the firmware for all the
MACRO stations including the Turbo PMAC to be of a date later than May 01, 2005. First in setting up your
MACRO Ring is the setting up of the Ring Controller from which all MACRO ASCII communication
originates. Also important is insuring that all MACRO stations are running at the same phase frequency (See
I6800 for the Ring Controller). As an aid in setting up frequencies other than the default go to the drop down
window PMAC Resources ->PMAC2 Frequency Calculators.
MACRO Ring ASCII Menu
52
PMAC Configuration
Pewin32 Pro2 Software Manual
Detect MACRO Ring – Detects an existing MACRO Ring without changing the station numbers or clearing
any faults that may exist. This is to be used after all MACRO Stations have a station number.
Setup Ring Controller – Setups up the core variable in the Ring controller for optimal MACRO ASCII
communication. It allows user to clear previous setting if any and can be started from defaults settings.
Reinit. MACRO Ring – Clears all previous station numbers and then assigns new numbers starting from
station number 1 until the last station is detected. It is recommended to save the settings once Reinit MACRO
Ring is complete. This should be done when setting up from scratch or adding a station to the ring.
Ring Check – Another nice feature of MACRO Ring ASCII screen is its ability to setup default Ring error
detection control variables, locating Ring errors/breaks, clearing the errors and restoring the integrity of the
MACRO Ring for all stations.
Default Ring Settings – Sets the Ring Check period to 20 milliseconds (a function of the servo & I8 clocks).
The errors to approximately 10 % of the samples and the remaining synch packets to 90 % of the samples. If
you want to set your own, set the period first to get the number of samples and then adjust the sum of the
errors and synch packets to be less than the number of samples.
Update Ring Controller – Will write your changes to I80, I81 and I82 to the Ring Controller.
Update All Stations – Will set all stations on the Ring to the approximately the same ratio of errors and
synch packets to the sample period and then send a MACSTA0SAVE and a MACSTA$$$ to SAVE and $$$
all stations on the Ring.
Check Ring Errors – Will get the recorded Ring errors (MI5) at all stations including the Ring Controller
Check Ring Break – If a Ring Break Message has been received or has been detected, it will display the
Station Number that detected the Ring break.
Check Ring Faults – Will clear the Ring of a Break condition if it has been reconnected and will send a
CLRF message to all Stations on the Ring.
PMAC Configuration
53
Pewin32 Pro2 Software Manual
Start MACRO ASCII – Initiates MACRO ASCII communication to the active station. In case the station is a
MACRO station, the following message pops up along with the standard yellow message in the main form.
Notes:
1. During MACRO ASCII mode all windows except Terminal, Watch and
MACRO status stop responding with the PMAC. These windows
however, continue to communicate in their normal mode.
2. PMAC users are strongly recommended to close all other windows
before starting MACRO Ring ASCII communication.
3. In addition to above diagnostic windows, file open, close and download
are allowed during MACRO Ring ASCII communication.
If the MACRO Station is another Turbo PMAC, all windows are active but instead of communicating with
the Ring Controller they will be communicating with the Turbo PMAC MACRO Station.
Stop MACRO ASCII – Terminates MACRO ASCII communication to the active station by issuing the
command “CTRL_T”.
Reset All Stations to Default – Resets all stations on the Ring to default value thus removing the station
number and other configuration related variables. It issues the command “MACSTA0$$$**” followed by a
CTRL_T.
Reset All Stations to Last Saved – Resets all stations on the Ring to last saved values. It issues a command
“MACSTA0$$$” followed by a CTRL_T.
Save All Stations Variables – Saves all stations on the Ring. It issues the command “MACSTA0SAVE”
followed by a CTRL_T.
Clear All Stations Faults – Clears faults from all stations. It issues a CLRF command to the Ring Controller,
a “MACSTA0CLRF” followed by a CTRL_T to the Stations on the Ring and another CLRF command to the
Ring Controller.
Station Specific Commands – include, Reset Station to Default “MACSTA#$$$**” where # is station
number, Reset Stations to Last Saved “MACSTA#$$$”, Save Station Variables “MACSTA#SAVE” and
Clear Station Faults “MACSTA#CLRF.” Note when you issue the Reset Station to Default you will need
to Reinit. MACRO Ring.
Select PMAC – Allows user to select a different Turbo PMAC as the Ring controller. Note if you intend
connecting to another PMAC while communicating to a Ring Controller do not Force All Windows to
this PMAC.
Backup Ring – When communicating to the Ring controller, backup option is enabled. This allows user to
backup Ring configuration parameters of the Ring controller along with all stations on the ring including
54
PMAC Configuration
Pewin32 Pro2 Software Manual
configuration variables, PLCC if any, MP, and MM-variable definitions of supported MACRO stations.
Backup configuration is saved in an “MRO” type file by default. The MRO file is for initial setup of all the
stations on the Ring which would include the Ring frequency, Station binding (addressing Master and Slaves)
and the Ring Check parameters. It will also backup parameters that can only be done in the MACRO ASCII
mode like MACPLCCs and MM variable definitions. Below is a sample portion of this file.
; PMAC:4 V1.941T4 05/12/2005
UMAC TURBO: Ethernet Port
; Configuration saved on 05/31/05 at 18:49:41
;
; Ring Controller Configuration parameters
; VID: 1 DELTA TAU
; SID: 0000000000000000
; TYPE: TURBO2, X4
; VER: 1.941T4
; DATE: 05/12/2005
; CID: 603382
I85=0
; I20=7A400: MACRO IC # 1 present
I6800=6527
I6801=0
I6802=3
I6807=0
I6840=$4070
I6841=$FC333
I70=$333
I71=$333
I78=32
I79=32
I80=45
I81=2
I82=13
; Station # 1 Configuration parameters
; VID: 1 DELTA TAU
; SID: 0
; TYPE: •ERR003
; VER: 1.197
; DATE: 05/23/05
; CID: 602804
; Description: MACRO Station 8 Axis
; MI4=$801000
MI992=$00197F
MI997=$000000
MI998=$000000
MI995=$0040C0
MI996=$0F7300
MI8=$000020
MI9=$000004
MI10=$000004
PMAC Configuration
55
Pewin32 Pro2 Software Manual
MI11=$000001
; Station # 2 Configuration parameters
; VID: 1 DELTA TAU
; SID: 0000000000000000
; TYPE: TURBOU, X4
; VER: 1.941T4
; DATE: 05/27/2005
; CID: 603182
; Description: Turbo Ultralite
; I20=$78400: MACRO IC # 1 present
I6800=6527
I6801=0
I6802=3
I6807=0
I6840=$4050
I6841=$4FC000
I70=$0
I71=$0
; I21=$79400: MACRO IC # 2 present
I6850=6527
I6851=0
I6852=0
I6857=1
I6890=$48
I6891=$0
I72=$0
I73=$0
I78=32
I79=32
I80=45
I81=2
I82=13
I85=2
Restore Ring – Once active, will restore MACRO Ring, full configuration. NOT IMPLEMENTED YET.
Display MACRO Status – This button is active while the ASCII communication mode to a MACRO slave
station but not another Turbo PMAC.
Quick Getting Started Steps
•
Select Configure->MACRO RING ASCII
Setup the Ring Controller
•
•
Select Setup Ring Controller. You can start from default ($$$***) or not.
If you desire to change the Ring frequency you should do that later.
Setup the Stations on the Ring
1. Normally when starting from scratch you should reset all MACRO stations to default. To do
this select MACRO RING ASCII -> Reset MACRO Ring -> Reset All Stations to
Default.
56
PMAC Configuration
Pewin32 Pro2 Software Manual
2. Next select the Reinit MACRO Ring button. This set all the MACRO Station’s Station
Number (STN) to the order they are in the Ring.
3. If you desire to change the MACRO Ring frequency now is the time to do that. Change the
Ring Controller’s I6800. If you are going to change the Phase (I6801) and Servo (I6802)
dividers, do that now.
4. Now select the Save Changes button. When it asks Would you like to save to all stations
on the Ring select Yes. This will update all the stations on the ring to the same Ring (also
phase) frequency and save their station numbers (STNs).
5. Next go through the list of MACRO stations under Stations Detected and bind them to a
Master/Node address in the Ring Controller’s MACRO IC list. Some MACRO Stations like
the MACRO 8 & 16 axis binding addresses are determined by their SW1 and SW2 settings.
(Note for the 16 axis MACRO CPU a SW1=14 setting allows you to setup MI996 and
MI1996 to your desired Ring Order and binding.) So change these to your desired setting
and then select the Station MACRO RING ASCII -> Station Specific Commands -> Save
Stations variables and then MACRO RING ASCII -> Station Specific Commands ->
Reset Stations to Last Saved. This should update the MI996 settings for the selected
station.
6. Now Select the Ring Controller and then the Ring Check button. You can now setup each
station for Ring integrity testing. The easiest is to select the Default Ring Setting and then
the Update All Stations buttons. This set the ring check period to 20 milliseconds, the error
count to about 10 % and the sync packet count to 90%. The Update All Stations will set all
the stations on the ring to these same settings. You can individually adjust each station by
selecting the station and changing its ring integrity parameters. Note for the Ring Controller
setup the period first, Update Ring Controller to get the number of samples, then set the
errors (I81) and synch packets (I82). I81 + I82 must be less than or equal to the number of
samples. Also note I8 must be set to get the correct number of samples.
7. Now you can Backup Ring to keep a record of your changes to all stations on the Ring.
8. Restore Ring (not implemented yet) will allow you to restore a Ring to your saved settings.
PMAC Configuration
57
Pewin32 Pro2 Software Manual
EDITORPRO FEATURES
Launching EditorPro
EditorPro is Pewin32 Pro2’s text editor used for writing PMAC programs. To open a file for editing, select
Open File from the File menu. To create a new file, select New File from the File menu.
Pewin32 Pro2’s editor has many features, which include:
• PLC Debugger
• Syntax highlighting
• Auto indenting
• Auto correcting
• Debugger window
• Error Tracing during PMAC download
In addition to the above features, there is a status bar on the bottom of the EditorPro window. The first
column of the status bar shows the current row and column of the cursor. The second column shows if this
text file has been modified, and the third column shows the full name of the active file. Every active window
has its own specific name, which is the name of the opened file. EditorPro does not allow two files with the
same name and path to be opened. If attempting to open the same file twice, the EditorPro will display a
message asking to replace the opened file with the one trying to be opened.
If yes is clicked, the contents of the opened file will be replaced with the one trying to be opened.
58
EditorPro Features
Pewin32 Pro2 Software Manual
Syntax Highlighting
In the EditorPro, all the known variables, keywords, and commands have a separate color and separate font
style. All items including font colors, size and the styles can be customized in the Setup window. The Setup
window can be accessed from the Editor menu.
Auto Indenting
Indenting is a useful tool for keeping track of the beginning and ending point of the loops or conditions in the
PMAC programs. For example, the code block below does not have any indenting.
If(p1=0)
P1=P1+1
If(p2=0)
P2=P1+1
If(p3=0)
P3=P3+1
EndIf
EndIf
EndIf
However, once reformatted with indentation the same code looks like:
If(p1=0)
P1=P1+1
If(p2=0)
P2=P1+1
If(p3=0)
P3=P3+1
EndIf
EndIf
EndIf
Notice that the code with the indenting is easier to understand. The auto indenting property can be turned on
or off in the Setup window.
Auto Correction
Auto correction corrects every line of code typed in the EditorPro and enforces the correct PMAC coding
syntax. It modifies only the IF, WHILE, and ELSEIF conditions. Auto correction will not change the size,
and style of the fonts (except IF, WHILE, and ELSEIF). For example:
if((p1=1 and p3=0)or m1=0)
p1=100
end if
will be modified as:
If ((p1 = 1 And p3 = 0) Or m1 = 0)
p1=100
EndIf
Debugger Window
One of the more useful tools of the EditorPro is the debugger window.
EditorPro Features
59
Pewin32 Pro2 Software Manual
When double clicking on any variable inside the programs, this window will display indicating the value of
that variable. If double clicking on an M variable, it will display the value and the definition of that M
variable. In addition, if the variable is a macro, then it will display the macro definition too. For example,
look at the following code:
When P1 is double clicked, the window will appear displaying the value of the P1.
When is M1 double clicked, the window will appear displaying the value of the M1.
When is Machine_Output_1 is double clicked, the window will appear displaying the value of the machine
output.
60
EditorPro Features
Pewin32 Pro2 Software Manual
Additionally, the variable can be updated in real time by using a window. By clicking on the Blue arrow on
the top right corner of this window, check the update check box, and the value of the selected variable will be
updated in real time.
In addition, the update rate can be changed.
Another feature of the window is that the value of the selected variable can be changed. Change the value and
click the Apply Changes button.
Error Tracing
The Editor Prokeeps track of the errors during the download operation. If there are any errors during the
download, the errors will show up in the message window. When the errors are double-clicked, the error line
in the EditorPro will be highlighted.
For example, when the error is double-clicked, the incorrect line of code will be displayed and highlighted.
EditorPro Features
61
Pewin32 Pro2 Software Manual
Editor Menu
To open the Editor menu, select the Editor from the main menu, or right click in the editor. There is another
static menu on top of the Editor window which links to some of the functions in the editor menu. In addition,
some of the items in the editor menu have shortcut keys.
Open Source/Header File (Ctrl+H): If there are any header files included in the program, clicking on this
menu item will open the header file. If the file being worked on is not a header file and there are no header
files included in that program, then EditorPro will create a new header file with the same name as the file, but
with an extension of .H. However, before it creates the file it will ask to save and include the newly created
header file in the program.
If Yes is clicked, EditorPro will include the header file in the main program automatically and will save it as
well.
62
EditorPro Features
Pewin32 Pro2 Software Manual
If the file being worked on is a header file with the extension .H, then EditorPro will try to open a file with the
same name but with a different extension. For example, if the header file name is Sample Program.h then it
will try to open the file Sample Program.pmc or with any other extension. If the file does not exist, then the
following window will appear:
This window allows a file for the header file to be created with the same name but with a different extension.
Click the Apply button and Editor Pro will create the new file and will ask the following question:
If Yes is clicked, the new file will be saved and the header file will be included in the newly created file.
Open File At Cursor: If a header file has been included in the main program, placed the cursor on that line
and it will open the file. Generally, the line is of the form #Include FileName.
Close (Ctrl+Del): This closes the active window (Active tab).
Close All: This closes all the windows.
Include: Include prompts with an open dialog box from which the filename can be selected to be included in
the program.
Find (Ctrl+F): This allows a search for any word in the program.
Replace(Ctrl+R): This allows finding and replacing any words.
Download File(Ctrl+D): This downloads the contents of any active window (Active Tab).
Cut(Ctrl+X): This removes any selected word. By cutting, you are removing the selected text and
copying it on the clipboard.
Paste(Ctrl+V): This inserts any word that was cut or copied to the clipboard. The paste location would
be where the cursor is.
Copy(Ctrl+C): This copies any selected word to the clipboard.
Undo(Ctrl+Z): Undoes the last actions.
EditorPro Features
63
Pewin32 Pro2 Software Manual
Redo(Ctrl+Y): Redoes the last actions.
Save(Ctrl+S): Saves the contents of the active window (Active Tab). If the file does not exist, then the
Save As function will be executed.
Save As: Allows any file to be saved under a different name.
Print(Ctrl+P): Prints the contents of the active window. It can also print any selected text.
Setup: Opens the Setup window.
Select PMAC: Allows a different PMAC device to be selected for the active window. Every window (Tab)
of the EditorPro can have a different PMAC device.
EditorPro Setup Window
In the Setup window, change the general, font and font color settings of the EditorPro. In addition, the setting
of variables for Debugger is done in this window.
On the General page, the following options can be selected:
• Toggle the Auto Correction Mode.
• Toggle the Auto Indent Mode.
• Enable or disable the margin of the Editor window.
• Change the tab size.
On the Font Setup page, the following options can be selected:
• Change the font name and font size of the whole Editor window.
• Change the font styles for every defined variable that is included in the list box. To change the font style,
select an item from the list of variables and select one of the Bold, Italic, or None font styles.
64
EditorPro Features
Pewin32 Pro2 Software Manual
Every time the setting of a variable is changed, the change will be reflected in the following window, so the
changes can be seen before applying the modified settings.
On the Color Setup page, the colors of the variables provided in the variable list can be changed. To change
the color of any item, select the item from the list and click on the Change the Color button. When the
Select a Color window appears, select the desired color.
In addition, the Only Black and White check box can be selected to convert the colors of all the variables to
black. As explained above, all the changes will be reflected immediately in the sample window provided in
the setup window, so the changes can be seen before they are applied.
A Set the defaults button is provided in the Setup window to reset the settings for the EditorPro window to
the defaults. Notice that Set the defaults button will set only the default values of the selected tab in the
Setup window. To set default values for all the settings, click on each tab individually and reset them.
PLC Debugger
The PLC Debugger is used to debug the PLC programs at run time by putting the break points on the desired
lines or by stepping through the program.
EditorPro Features
65
Pewin32 Pro2 Software Manual
How to Use the PLC Debugger
The PLC debugger uses the following buttons:
Run PLC program (F5): Runs the PLC program in debug mode.
Pause program (F6): Pauses the running PLC program.
Step through program (F7): Steps through every line of code within the running PLC.
Stop PLC program (F8): Stops the running PLC program.
Breakpoint button (F9): Puts a break point on the desired line of the program.
The following is an example of how to use the debugger. The example is based on the following PLC.
p1=0
Open Plc1 Clear
p1=p1+1
If (P1 > 1000)
If (M1 = 0)
M1 = 1
Else
M1 = 0
EndIf
P1 = 0
EndIf
close
Click on the Run button or press F5 to start the debugger. The debugger will first download the PLC
program to make sure there are no errors in the program. If there are no errors in the program, then the
debugger will ask to set some P or M variables which will be used in the debugger.
When Yes is clicked in the message window, the debugger will display the Setup window so the desired
variables that will be used by the debugger can be added or selected.
66
EditorPro Features
Pewin32 Pro2 Software Manual
In the middle of the Setup window, there is a highlighted message showing the number of variables that must
be selected. Select the desired variables and click Add. They will be added to the list. After adding the
variables, click the Apply button.
The debugger will show the variables that are being used.
When Yes is clicked on the Variables required window, the debugger creates the debug mode program and
downloads it to the PMAC and it enables the program.
EditorPro Features
67
Pewin32 Pro2 Software Manual
To Pause through the program, click on the Pause button (or press F6). By clicking on this button, the line
that the PMAC is running in the program will be highlighted. To go to the next line that PMAC will execute,
click on the Step button (or press F7). PMAC will execute a line with every click of the Step button.
Another way to do this is to put a breakpoint on any line of the program. The program will stop on any line
containing a breakpoint. To put the breakpoint on a line, click on that line and click on the Breakpoint
button (or press F9).
After satisfying the conditions within the PLC, the program will stop on the line on which there is a
breakpoint.
To stop the execution of the program, click on the Stop button (or pres F8).
68
EditorPro Features
Pewin32 Pro2 Software Manual
Notes:
1. The PLC debugger modifies the original program and then downloads this
modified (enlarged) version to the PMAC. Replace this enlarged version with the
original program that debugger has corrected or verified. Therefore, download
the original program after debugger has finished with it.
2. Do not disable the PLC program from the terminal window while in the debug
mode. To stop the program, click on the Stop button.
3. Do not put DISABLEPLC commands in the PLC program; it will crash the debug
mode operation.
4. The PLC debugger is designed to debug one PLC program at a time.
EditorPro Features
69
Pewin32 Pro2 Software Manual
PMAC RESOURCES
View CPU Resources
This section is a new addition to Pewin32 Pro2 software and details the CPU load distribution among
foreground tasks and background tasks.
Three types of foreground tasks include phase tasks, servo tasks and RTI tasks.
Phase Tasks
The following window shows the details of phase tasks:
70
PMAC Resources
Pewin32 Pro2 Software Manual
Servo Tasks
The following window shows the details of servo tasks:
RTI Tasks
The following window shows the details of RTI tasks:
Background Tasks
The sum of all of the above tasks makes a Foreground task on the PMAC CPU. The rest of the time is left for
background tasks. Typical background tasks include:
• PLC and PLCC 1-31
• General housekeeping
• DPRAM background data reporting functions
View Memory Resources
The Memory Resources window lists PMAC’s memory allocation and usage for following buffers:
• Gather buffer
• Lookahead buffers
• Cutter Comp buffers
• Rotary Program buffers
• Transformation Matrix buffer
• Backlash Comp tables
• Torque Comp tables
• Lead Screw Comp tables
• User buffer
PMAC Resources
71
Pewin32 Pro2 Software Manual
View Macro Resources
The Resource Manager is a tool for managing all of the PMAC macro variables within a project defined in the
project manager.
How to Use Macro Resource Manager
The Macro Resource Manager’s functionality is based on the Pewin32 Pro2 Project Manager. To use the
Macro Resource Manager, create a project within the project manager and include the files to use to create the
resource manager. The Macro Resource Manager will scan all the files included within a project and will find
all the definitions in the files. In addition, it will detect all the duplicate definitions and allow the definitions
that will be used in the Project Manager to be selected.
To start using the Resource Manager, click on the desired project name and then from the menu items on the
Pewin32 Pro2, select the PMAC Resources and then View Macro Resources.
72
PMAC Resources
Pewin32 Pro2 Software Manual
If the project contains any program with duplicate definitions, the following form will display to select the
definitions that will be used in the Macro Resource Manager.
The Duplicate Key Names window has two columns. The left column lists all the duplicate key names within
the selected project. The right column shows the macro definitions for the selected key name from the left
column. Location shows the file location of the definition. In the Duplicate key names window, select the
desired macro name for the selected key. To select the macro name, click on a key name. The macro column
will show the macro names defined for the selected key name. Select the desired macro name to associate the
key name with the selected macro name. After the selection, click the Apply button to include the filtered
definitions in the Macro Resource Manager. To exclude any of the definitions, click on Cancel. In addition,
the duplicate window is a warning that tells you that within the same project there has been multiple key
names defined for the same macro name. After clicking on the Apply or Cancel button, the Resource
Manager window will appear on the Pewin32 Pro2 window.
If there are PMAC variables that have been used more than once for different key names, the Resource
Manager will show a warning message, indicating which variable type has been used more than once within a
project. Thereafter, Macro Resources Manager will highlight the variables. If there are multiple variables
used for different keys, the following message will pop up.
PMAC Resources
73
Pewin32 Pro2 Software Manual
The above message will give the type of variables in which there are inconsistencies. Click OK if the above
message appeared; the Resource Manager window will be activated. To check the variables, click on the
appropriate tab in the Resource Manager window.
If there are inconsistencies in the P and M-variables, click on P-variables to see the highlighted variables.
The Macro Resources Manager creates five columns. The first column shows all the macro variables, the
second column shows the P-variables, the third column shows the M-variables, the fourth column shows the
I-variables, and the fifth column shows the Q-variables. On the bottom of the page, it shows the number of
variables being used in the selected project.
74
PMAC Resources
Pewin32 Pro2 Software Manual
Active Project
An active Project is the project that the last Resource Manager was created for. The last resource manager
will show the active project when the Pewin32 Pro 2 is re-launched. The active project is always visible at
the bottom of the Project Manager pane.
Using Macro Resources Manager in the Terminal Window
The Resource Manager allows using the definitions within the terminal window. This means that it is not
necessary to type a PMAC variable in the terminal window; instead, use the definitions that are created in the
project and included in the Resource Manager. To use this feature, go to the terminal window and press
CTRL+ALT+A simultaneously. An attached list window will be opened, which includes all the key names
within the project manager. Select the desired key name, or type it and then press Enter. The key name will
be placed in the terminal window command list. Press Enter one more time and the command will be sent to
the PMAC.
It is not necessary to use CTRL+ALT+A every time this feature is used; the key can be typed in the
command area. However, every time a new Resource Manager is created, reload the new table by using
CTRL+ALT+A.
Using Macro Resources Manager in the EditorPro
The Resource Manager allows the use of the definitions within the EditorPro. This means that it is not
necessary to type the key names in the editor window; instead, use the definitions that are created in the
project and included in the Resource Manager. To use this feature go to the editor window and press
CTRL+ALT+A simultaneously on any line to include in the definition. A list box including all the key
names within the project manager will display at the cursor location.
PMAC Resources
75
Pewin32 Pro2 Software Manual
Select the desired key name, or type it and then press Enter. When Enter is pressed, the key name will be
placed in the editor window. A message will display, asking for the file name of the file in which the
definition has been included.
When Yes in the message window is clicked, the editor will include the file name in the first line of the
program.
Notes:
1. Key names in the Macro Resource Manager are unique. There cannot be more
than two identical key names with different macro definitions.
2. Macro names are not unique. There can be more than one definition for the
same macro name. For example, M101 can be defined as Output_1 and
On_Off_Switch.
PMAC2 Frequency Calculators
This window covers two sub-windows, which in turn, sets PMAC2 I-variables according to desired frequency
settings.
Main Clock Calculator
The first window calculates frequency related I-variables and then saves them to a PMAC file.
76
PMAC Resources
Pewin32 Pro2 Software Manual
I^2T Parameters
The second window calculates I^2T protection I-Variables.
PMAC Resources
77
Pewin32 Pro2 Software Manual
OTHER TOOLS
DPRAM Test
Pewin32 Pro2 now has DPRAM Test as an MDIChild form. The entire DPRAM is tested for integrity of all
PMAC locations by writing to each bit and then verifying the data both from PMAC side as well as Host
computer side. Finally all locations are cleared before the DPRAM test is complete.
This window allows the DPRAM test to run continuously and stop on the first error.
External Tools
These features are actually separate applications with their own manuals. However, these programs may be
launched from within the Pewin32 Pro2 Tools menu.
Application
BASICSPEEDTEST.EXE
PMACPLOTPRO.EXE
PMACTUNINGPRO.EXE
P1SETUP32PRO.EXE
P1SETUP32PRO.EXE
TURBOSETUPPRO.EXE
UMACCONFIG.EXE
GEOBRICKSETUP.EXE
RAWTERMINAL.EXE
Customize Tools Menu
This menu allows adding third party applications that can be launched from within Pewin32 Pro2. Once
defined, the applications path is saved in the file PEWIN32PRO.INI in the Windows folder for future
sessions. The steps involved in the initial setup include:
1. Press Add New for a new application.
2. Type Caption Text in the Menu Text edit box.
3. Type the correct path for the application in the Executable Path edit box. The … button on the right side
allows browsing the drives for the correct path if needed.
4. Add additional arguments in the Run Time Arguments edit box if needed.
5. Click Update to add this application in the customize Tool menu.
78
Other Tools
Pewin32 Pro2 Software Manual
6. To delete any application from the list, select the item to delete and click Delete. The menu will re-adjust
the remaining applications in the list.
Other Tools
79
Pewin32 Pro2 Software Manual
CONFIGURATION FILES
Backup and Restore PMAC Configuration Files
The Backup menu options allow all or part of PMAC's configuration to be saved, restored, and verified.
Upload Configuration
This menu item enables the uploading of any combination of motion programs, PLC programs, I, P, Q, and
M-variable values, M-variable definitions, custom servo algorithms, other important memory locations, lead
screw compensation tables, and coordinate system definitions and save them to disk. Items selected will be
uploaded and written to an ASCII file when the OK button is clicked. This file serves as a backup for safety
reasons and may be used to duplicate configurations on other similar PMAC cards.
Note:
PLCCs are firmware specific. Therefore, a configuration file that uses PLCCs is only
valid for that type and version of PMAC.
Restore Configuration
This option is used to restore the contents of a backup file (created with the Save Configuration option) to
PMAC. The file is simply downloaded to PMAC. Therefore, the File\Download File menu option may also
be used.
Verify PMAC Configuration
This feature allows the contents of any previously uploaded configuration file to be compared with the
contents in PMAC’s memory. It provides a good way to validate the backup file created by the Upload
Configuration option described above.
Note:
Only files that have no #include statements can be validated (i.e., files backed up
using the Single Backup File option).
80
Configuration Files
Pewin32 Pro2 Software Manual
Configuration Files
81
Pewin32 Pro2 Software Manual
PEWIN32 PRO2 GENERAL SETUP AND OPTIONS
General Setup and Options
Multiple setup options allow the setting of the workspace, device, download and other miscellaneous options.
Default Device
If there are more than one PMAC in the system, the selection of a default device will be important because the
Pewin32 Pro2 application can anticipate what device to use when opening up a new dialog box. The Pewin32
Pro2 may also ask for the device number every time a new dialog box is opened.
When checked, “Ask for Device number at the start of Pewin32 Pro2”, Pewin32 Pro2 asks for device number
one time and then this device is stored as default device number for all subsequent wnidows.
General
Use this window to configure Pewin32 Pro2 to save settings upon exiting the application. Settings include
window placement, device number, different watch tables and other scales and unit settings.
This release contains yet another debug tool. When checked, The Save session log file saves a log file
(PewinSessionLog.Txt) in the Pewin32 Pro2 folder and writes important information about PMAC in it at the
specified time interval.
82
Pewin32 Pro2 General Setup And Options
Pewin32 Pro2 Software Manual
Download
There are five different download options available as indicated in the window below:
View
The Project Manager and Message window can be toggled off and on within this tab. This page also controls
the viewing of unsolicited messages.
Force All Windows to Device Number
This selection forces all windows to communicate to a specific device number. It further updates the
workspace to use the new device number for any new window.
Show Project Manager and Message Windows
Show Project Manager –Displays the Project Manger window.
Show Message Window – Displays the Message window.
Pewin32 Pro2 General Setup And Options
83
Pewin32 Pro2 Software Manual
PEWIN32 PRO2 HELP
Pewin32 Pro2 Manual
From the Help menu, choose Contents to view this document in help format. Alternatively, pressing F1 will
also open the contents in addition to locating context sensitive information.
Driver Installation Notes
This Adobe Acrobat format document “DT Driver_Install.PDF” provides details of all driver installations and
is a great tool for troubleshooting any communication or other configuration issues. It gives a detailed
procedure for firmware downloads.
Why am I Not Moving?
This menu choice can save many hours of searching and frustration in tracking down problems associated
with running a motor – especially if new to PMAC. A condition may be happening in which a motor simply
will not run, despite being sure that all the parameters have been set properly. This menu option will look at
the configuration and cite possible (warnings) or definite causes of problems preventing the motors from
running. To use this self-diagnostic feature, specify a particular motor.
Why is my Program Not Running?
This menu choice can also save many hours of searching and frustration in tracking down problems
associated with running the program. A condition may be happening in which a program simply will not run,
despite being sure that all the parameters have been set properly. This menu option looks at the configuration,
and cites possible or definite causes of problems preventing the motion programs from running. To use this
self-diagnostic feature, specify a particular coordinate system.
About Pewin32 Pro2
This window displays Pewin32 Pro2’s version and release date along with any service pack, if installed.
84
Pewin32 Pro2 Help
Pewin32 Pro2 Software Manual
Pewin32 Pro2 Help
85
Pewin32 Pro2 Software Manual
APPENDIX A
Modbus Definition and Design
The PMAC Modbus/TCP-IP design allows for up to four independent Ethernet socket connections. Each of the
four sockets can be defined as a client (master) or server (slave). The first two Ethernet sockets default to
PMAC/TCP-IP ports, the first for PMAC ASCII and the second for PMAC Interrupt protocols (UMAC only).
If it is desired to use all four sockets as Modbus/TCP-IP ports, then the USB connection must be used for
PMAC ASCII communication. The configuration of these four sockets is defined in PMAC memory pointed to
by the I67 variable. The Modbus configuration and I/O buffer is in the last 256 words of the defined PMAC
UBUF. To activate the Modbus/TCP feature, the developer must define a UBUF => 256 words and then set I67
> 0. A reading of I67 will then return the start address of the Modbus buffer. At power on the USB processor
reads I67 to get its address and configuration data.
Summary of PMAC Modbus/TCP-IP Features
•
•
•
•
•
•
•
•
86
Up to four independent Modbus/TCP Client or Server Ethernet connections.
The scheduler of Modbus Client Command Lists can be run once, max rate or at four timer rates (5 msec
– 1.275 sec).
Up to 96 Modbus Client command lists that can be modified in a PMAC PLC and then restarted.
Data logging of Modbus commands with Valid, Busy, Nak, Cmderr, Adrerr counters for each socket.
Easy Modbus enabling in the PMAC by defining a User Buffer of >= 256 and setting I67 != 0. To disable
the Modbus feature set I67=0 or the User Buffer < 256. This design does not change the location of any
of the other PMAC buffer pointers and puts the Modbus buffer always at the last 256 memory locations in
the UBUF.
Host Port PMAC RDY bit allows the Modbus communication to be suspended efficiently when such
commands as a $$$ or SAVE are issued.
Full Pewin USB or Ethernet communication allowed while Modbus communication is occurring.
Supported Client Modbus/TCP Function Code Command Lists
FC
Command Description
3
16
1
2
4
5
6
15
23
Read Multiple Registers x 125 words
Write Multiple Registers x 125 words
Read Coils x 255 coils
Read input discretes x 255 discretes
Read Input Registers x 125 words
Write One Coil
Write a single Register
Write Multiple Coils x 255 coils
Read & Write Multiple Registers x 120 words
Appendix A
Pewin32 Pro2 Software Manual
The PMAC Modbus/TCP-IP Configuration and Buffer Memory Format
Offset
from I67
0
23
X Memory
0
Sock #0 Mode
TBD (16 bits)
(upper 4 of 8 bits)
IP future
IP future Server IP0
Future Spare
Repeat above for Sockets 1-3
TBD (8
TBD (8
Period Timer 4
bits)
bits)
(8 bits)
TBD
TBD
TBD
Start of first Client Modbus Cmd List
1
2
4-0xB
0xC
0xD
0xE
0xF
0x10
0x69
0x80
23
Y Memory
0
TBD (8 bits)
Client CmdListStrt
(8 bits)
Server IP2
Client CmdListEnd
(8 bits)
Server IP3
Server IP1
Future Spare
Repeat above for Sockets 1-3
Period Timer 3
Period Timer 2 Period Timer 1
(8 bits)
(8 bits)
(8 bits)
TBD
TBD
TBD
Start of first Client Modbus Cmd List
Start of 16 bit Client/Server Modbus
Buffer
Start of 16 bit Client/Server Modbus Buffer
Socket Modes (Upper 4 of 8 Bits)
0
1
Socket not active
Server TCP, PMAC ASCII protocol.
IP Address = 0.0.0.0
Server TCP, PMACtoClient Interrupt ASCII string.
IP Address = 0.0.0.0 - Only available on Turbo UMACs.
Server Modbus/TCP-IP. IP Address not used.
Client Modbus/TCP-IP. IP Address of Server.
2
3
4
The IP Addresses 192.6.94.5 are stored as IP0=192, IP1=6, IP2=94, IP3=5
Socket Rules
1. Only one PMAC ASCII socket (mode = 1)
2. Only one PMAC interrupt socket (mode = 2)
3. If all four sockets are used for Modbus, then use USB for PMAC ASCII communication.
Period Timers 1-4: are used in scheduling each Modbus Client command List. They are in units of 5
milliseconds and have an 8-bit range of 0 to 255 = 1.275 seconds. Timer 0 is maximum rate and Timers 5-7
are one-shots (only send the command once).
Client Modbus Cmd List Format
•
•
•
CmdLstStrt and CmdLstEnd must not overlap into another Client Socket command list.
CmdLstEnd is the last Command List plus one. List length = End-Strt
Maximum Cmd List Size = 0x10 – 0x69 (96 commands)
Modbus Client Command List Memory Format
X:23
16
Timer (3 bits)/
Function Code (5 bits)
X:15
Modbus Reference
Number (16 bits)
0
Y:23
16
Count (length)
(8 bits)
Y:15
0
PMAC Reference
Number (16 bits)
There are two Reference Numbers, a Modbus one and a PMAC one. The PMAC one is the offset into the
PMAC Modbus Server/Client buffer where the Modbus data is read from or written to. The Modbus one is
sent over Modbus/TCP-IP with the data.
Appendix A
87
Pewin32 Pro2 Software Manual
Note:
The PMAC and Modbus reference numbers are actual offsets and do not abide by the
standard Modbus reference number where you subtract one from it to get the offset
into memory. These Reference numbers start a zero and not one.
All commands take up one memory location except the (FC 23) read/write registers. It takes up two command
list locations.
PMAC Modbus/TCP Client/Server Buffer Size is fixed at 128 x 32 bits.
PMAC Memory – Modbus Byte Order for Registers
PMAC X: Memory
PMAC Bits 15
Modbus Byte 1
8
PMAC Bits 7
Modbus Byte 2
PMAC Y:Memory
0
PMAC Bits 15
Modbus Byte 3
8
PMAC Bits 7
Modbus Byte 4
0
Note:
PMAC memory Bits 16 – 23 of X: & Y: memory are not used.
Organizing the PMAC Modbus/TCP Client/Server Buffer
The PMAC and the Modbus/TCP-IP are independent processes. In order for there not be conflicts of the two
processors read modify and writing to the same memory, the following is recommended:
• Memory that is going to be Coil/Discrete (Bit) memory must be organized as full 32 bits (both the 16 bits
of PMAC X and Y memory)
• As a Modbus Server or a Client, the memory should be organized as written by Modbus and read by
PMAC or read by Modbus and written by PMAC. The data flow is in one direction. A processor can
read its own output memory but it is a violation write to your input memory.
• Never split PMAC X and Y memory area into both Input and Output.
PMAC F/W Modbus Support
Special PMAC Modbus programming control is provided in the form of the PMAC Ready and CMD List
Disable bits. These bits provide some control in a PLC of the PMAC Modbus operations. The Ready bit when
reset stops Client command list processing and as a Server sends out a Busy error over the Modbus/TCP. This
bit is mainly for control by the firmware for such commands as a SAVE or the $$ type commands. Pewin
communication to PMAC will cause this bit to be set back to the Ready state even though the user may have
reset it in a PLC. The CMD List Disable when set stops Client command list processing and when reset, the
CMD List is reread into the USB/Modbus processor. This allows the user to modify the CMD List in a PLC to
be sent over Modbus/TCP. Normally, the USB/Modbus processor reads only the Client CMD List after power
on. However, there is a Pewin command that allows the command list to be reread into the USB/Modbus
processor.
The location of these bits are as follows:
• Turbo: PMAC_READY ->X:$FFFFC2,3 ; CMD List Disable ->X:$FFFFC2,3
•
88
PMAC: PMAC_READY ->X:$FFC2,4 ; CMD List Disable ->X:$FFC2,4
Appendix A
Pewin32 Pro2 Software Manual
Exceptions and Issues
1. When starting PMAC in Bootstrap mode or doing a power on phasing, the Ethernet sockets determined by
I67 configuration memory will not be initialized. The I67 Modbus configuration memory is read at power
on. For a PMAC (non Turbo), a phasing command ($) stops background processing so this should not be
done immediately after power on. The Modbus F/W will assume the default of I67 = 0.
2. If there is a large background PLC or large servo needs, the Modbus I/O will be slowed as a function of
these since it is done as a background task.
PMAC I69 – This allows the user to connect any memory to the firmware DPR Panel feature. Making a
Modbus memory layout be an exact image of the DPR Panel memory and setting I69 to this Modbus memory
allows the user to directly control a PMAC via Modbus without using PLCs.
The following is a description of how to map and use the PMAC DPR Panel feature with Modbus:
This feature allows control of eight coordinate system feed pot overrides and eight coordinate system or motor
actions. To allow full Turbo control, offset values were added to allow for control of the sixteen coordinate
systems and thirty-two motors. The X:memory controls the feed pot override and the Y:memory controls the
coordinate system or motor actions. For the feed pot changes, an enable bit is set in X:I69+0 and the value is
set into X:I69+1 to 8. The value is multiplied by 256 and put into the desired feed pot register. So for a default
value of 100 % for I10 (3713991), put 3713991/256 = 14508 into the register. The limits of this register must
be kept at 0 to 32,767.
For controlling the coordinate system or motor actions, set the action request into Y:I69+1 to 8 and then set the
enable bit in Y:I69+0. These enable bits are cleared when the action is executed.
PMAC/Turbo Firmware Modbus (I69) Memory Map
PMAC
Address
(I69 +)
PMAC/Modbus
Reference
Number
$0
0/1
$1
$2
$3
$4
$5
$6
$7
$8
$9
$A
$B
$C
$D
$E
$F
2/3
4/5
6/7
8/9
10/11
12/13
14/15
16/17
18/19
20/21
22/23
24/25
26/27
28/29
30/31
Appendix A
X: Memory Parameter
Coordinate System Feed Pot Override
Enable
Coordinate 1 System Feed Pot Override
Coordinate 2 System Feed Pot Override
Coordinate 3 System Feed Pot Override
Coordinate 4 System Feed Pot Override
Coordinate 5 System Feed Pot Override
Coordinate 6 System Feed Pot Override
Coordinate 7 System Feed Pot Override
Coordinate 8 System Feed Pot Override
Reserved
Reserved
Reserved
Reserved
Reserved
Reserved
Reserved
Y: Memory Parameter
Motor/Coordinate System Enable
Motor/Coordinate System 1 Request
Motor/Coordinate System 2 Request
Motor/Coordinate System 3 Request
Motor/Coordinate System 4 Request
Motor/Coordinate System 5 Request
Motor/Coordinate System 6 Request
Motor/Coordinate System 7 Request
Motor/Coordinate System 8 Request
Reserved
Reserved
Reserved
Reserved
Reserved
Reserved
Reserved
89