1
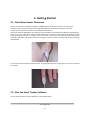
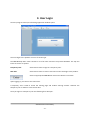
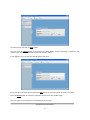
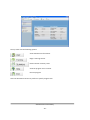
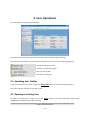
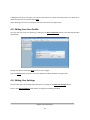
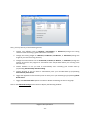
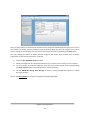
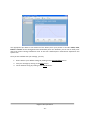
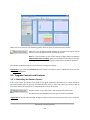
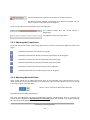
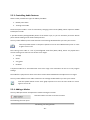
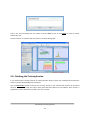
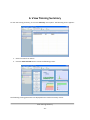
Heart Tracker 3 Home Edition Breathing Exercise Trainer User’s Manual Version 3.0 Copyright© 2007‐2010 Biocom Technologies. All rights reserved. Biocom Technologies makes no claim that its products treat or heal. BIOCOM’s products are designed to measure and monitor physiological change. Professional should work within the scope of their licenses and/or certifications when interpreting or applying data derived from BIOCOM’s products. This product is to be used for research and educational purposes only. Table of Contents Table of Contents .......................................................................................................................................... 2 Technical Support ......................................................................................................................................... 3 1. Basic Concept ............................................................................................................................................ 4 2. Getting Started .......................................................................................................................................... 6 2.1. Pulse Wave Sensor Placement .......................................................................................................... 6 2.2. Start the Heart Tracker Software ...................................................................................................... 6 3. User Login ................................................................................................................................................. 8 4. User Operations ...................................................................................................................................... 11 4.1. Switching User Profiles .................................................................................................................... 11 4.2. Deleting an Existing User ................................................................................................................. 11 4.3. Editing Your User Profile .................................................................................................................. 12 4.4. Editing User Settings ........................................................................................................................ 12 5. Conducting a New Training Session ........................................................................................................ 16 5.1. Training Goals .................................................................................................................................. 16 5.2. Training Means ................................................................................................................................ 16 5.3. Training Protocol ............................................................................................................................. 16 5.4. Start a Training Session .................................................................................................................... 17 5.5. Program Controls and Features ....................................................................................................... 18 5.5.1. Controlling the Session Process ............................................................................................... 18 5.5.2. Adjusting the Graph Scales....................................................................................................... 19 5.5.3. Adjusting the Breath Pacer ...................................................................................................... 19 5.5.3. Controlling Audio Features ...................................................................................................... 20 5.5.4. Adding a Marker ....................................................................................................................... 20 5.6. Finishing the Training Session .......................................................................................................... 21 6. View Training Summary .......................................................................................................................... 22 6.1. Adjusting the Graph Scales .............................................................................................................. 23 6.2. Printing Report ................................................................................................................................ 23 6.3. Entering Session Comments ............................................................................................................ 23 6.4. Viewing Other Sessions ................................................................................................................... 24 6.5. Deleting Training Sessions ............................................................................................................... 24 7. View Training History .............................................................................................................................. 25 7.1. Adjusting the Graph Scales .............................................................................................................. 25 7.2. Printing Report ................................................................................................................................ 26 8. Get Help .................................................................................................................................................. 27 9. Exit Heart Tracker .................................................................................................................................... 28 Credits ‐ 2 ‐ Technical Support Customer Support Phone: Web‐site: E‐mail: Fax: Contact your local dealer www.biocomtech.com [email protected] 360‐859‐2410 Call your local dealer for: Product setup Software installation Product troubleshooting Hardware use Software use According to our customer support policy we charge all customers $60.00 an hour with $15.00 increments for all incoming calls and $75.00 an hour when we return calls. Each new customer has one hour of technical support free. If your computer and peripherals comply with our system requirements and configured properly, there is enough time to get the product up and running within this hour. Any support related to hardware repair, accessories and supplies replacement is free of charge. Any reports on possible software bugs found, software comments and suggestions are more than welcome. Please send them to us by fax or e‐mail. Technical Support ‐ 3 ‐ 1. Basic Concept The human organism is under the continuous control of the autonomic nervous system (ANS). The ANS is evolutionarily the oldest part of the human nervous system that cannot be voluntarily controlled by our thoughts. The main purpose of the ANS is to control all organs and systems to maintain optimum performance of the organism influenced by various internal and external factors. This control is carried out by the two branches of the ANS called the sympathetic nervous system (SNS) and the parasympathetic nervous systems (PNS). Generally SNS causes the so‐called “fight or flight” response needed to mobilize all of our organisms’ resources to withstand any stress factors (stressors) ‐ certain changes in outer or inner environment that cause discomfort or even harm to our organisms. Once the immediate threat of stressor is alleviated, PNS takes control of the organism, bringing it back to normal optimum function. Strong functioning of both the SNS and PNS allows our organisms to function effectively over time. Chronic long‐term stress often causes malfunctioning of ANS regulatory functions, which can become a precursor of various detrimental health conditions. Under chronic stress, the PNS primarily suffers. This results in an inability to adequately regulate body function. This fact shows a strong reason to give people a tool to positively affect on PNS to bring it back to normal functioning. Everybody knows that human muscles become stronger and function more effectively if regular physical exercises are given to them. Same can be done to the PNS. Fortunately there is a key element of PNS that can be positively affected in a special training regimen serving as a sort of exercise to the PNS. This is the mechanism of baroreflex. Its basic function is to regulate heart rate (HR) depending on actual level of blood pressure (BP) in central blood vessels, primarily in aorta. Its main goal is to provide an adequate blood supply to all vital organs, such as brain, heart, lungs, etc. There are special sensory cells in the aorta wall called baroreceptors that sense the level of BP and send the signals to the brain structures via special nerves. Those baroreceptors, nerve fibers and specific brain structures are all part of the PNS. Their job is to check the BP level and send signal back to heart to set certain level of HR. It works in such a way that if BP in aorta drops, HR rises and vice versa. This mechanism adjusts the HR to maintain balance and keep the blood supply sufficient. Thus to train PNS system we need to have a positive impact on the baroreflex mechanism to cause increased stimulation of PNS. It appears that deep breathing is an easy mind controlled way to do such stimulation providing an effective exercise regimen to the PNS. It was found that baroreflex mechanism is exceptionally responsive to periodic stimulation at certain rate, particularly at 0.1 Hz (also called the resonant frequency), which can be provided when breathing deeply and evenly at 6 breaths per minute. This regimen is especially effective when such breathing is controlled by a specially established visual and/or auditory pacer (or metronome). Below is a diagram describing how baroreflex mechanism works. Activating Your Software ‐ 4 ‐ Below is the diagram showing relationship between breathing, BP and HR as per details above. This diagram shows that when breathing occurs at resonant frequency, HR should have the most profound oscillations synchronous with breathing. By the end of deep inhalation HR reaches its maximum level and respectively by the end of exhalation HR reaches its minimum level. This physiological phenomenon, also known as respiratory sinus arrhythmia (RSA), sets the ground for a training technique as a key element of the Heart Tracker product. The training tool has means to provide both visual and auditory breath pacer as well as the way to read actual HR. Breathing according to breath pacer and observing actual HR establishes a biofeedback loop, which is essential to have a successful training outcome. Important! It is important to understand that none of the physiological data measured by the Heart Tracker is to be used for diagnostic purpose. The information being recorded will vary greatly between individuals. Age, heart irregularities, chronic conditions all could affect the reading by this instrument. Important! Individuals should use this instrument for achieving better function of the internal regulatory mechanisms. It is important to understand that no dramatic improvement could happen overnight. Regular use of this tool (10‐20 minutes per day) should gradually bring your regulatory systems to better function enhancing your overall health condition. Activating Your Software ‐ 5 ‐ 2. Getting Started 2.1. Pulse Wave Sensor Placement You can record heart rate data using Biocom HRM‐02 pulse wave sensor with an ear‐clip probe. The device has a small plastic box with a long USB cable and round stereo‐type jack connector. A separate ear‐clip sensor probe is connected to the device box. Connect the device USB cable to any USB port in the computer. The software will detect it automatically. Place an ear‐clip on the left or right ear lobe. Make sure it is placed so that small glass windows on the inside surfaces of the clip are in good contact with soft tissue of the ear lobe. Be aware that proper placement will affect the quality of pulse wave signal. Small ear lobes or earrings may make placement more difficult. In some cases when earlobe placement does not give good pulse wave signal the ear‐clip can be placed on a finger. 2.2. Start the Heart Tracker Software You can start the Heart Tracker software in two possible ways: Getting Started ‐ 6 ‐ Option 1: Double‐click this shortcut icon on the Windows desktop screen to start the Heart Tracker. Option 2: Use the Windows menu as follows: 1. Click the Start button on Windows task bar. 2. Select All Programs menu option. 3. Select BIOCOM TECHNOLOGIES folder from the menu list. 4. Select Heart Tracker HE folder from the menu list. 5. Select Heart Tracker HE option from the open folder menu. Getting Started ‐ 7 ‐ 3. User Login Once the program started, the following application window opens: You must login to the product as a user of certain type. The User ID drop‐down menu contains a list of all users stored in the product database. The top two items on the list are special: Temporary User Select this list item to login as a temporary user. New User Select this list item to create a new user account and login to the product. Select an appropriate User ID then click on this button to continue. Upon logging in, you come to the main menu. A temporary user is able to access the training page and conduct training sessions. However the temporary user is unable to save session data. Once you login as a temporary user the following form will open: Administrator Functionality ‐ 8 ‐ Fill out the form and click the Save button. You may click the Cancel button to proceed to the Main Menu without specifying a temporary user profile. In this case your profile will contain only default values. If you logged in as a new user the following form will open: Enter your data into each field and click the Save button to save information entered in this form. Click the Cancel button to cancel this operation and return to the product login. Once you login as an existing user the following form will open: Administrator Functionality ‐ 9 ‐ The top menu has the following options: View and edit user information. Begin a training session. Review session summary data. View the program user’s manual. Exit the program. Click the selected menu item to perform a specific program task. Administrator Functionality ‐ 10 ‐ 4. User Operations Once you login the following form will open: It shows the summary of your personal information and individual program settings. The User Operations Menu is on the left side of the screen. Here, you have the following options: Switch existing user profiles. Delete an existing user profile. Edit your user profile. Edit your user settings. 4.1. Switching User Profiles If you wish to switch user profiles, click on the Switch User button in the User Operations Menu. This action will take you back to the login screen. 4.2. Deleting an Existing User To delete an existing user, simply click on the Delete button in the User Operations Menu while highlighting the profile that you wish to delete. Regular User Operations ‐ 11 ‐ A dialog box will open and warn you that the selected user’s records and session data are about to be deleted. If you wish to proceed choose Yes. Upon deleting current user the program will take you back to the login screen. 4.3. Editing Your User Profile You may edit your own user profile by clicking on the User Information button. The following window should open: Change any data and click the Save button to save changes. Click the Cancel button to return to the User Operations Menu without saving the data. 4.4. Editing User Settings You may edit your user settings and preferences by clicking on the Edit User Settings button. Click on the General Settings menu button to display the following window: Regular User Operations ‐ 12 ‐ Here, you may take any of the following actions: 1. Change your difficulty level to Beginner, Intermediate, or Advanced (Change the scoring criteria to make achieving a good score easier or harder). 2. Change the training length to 5 Minutes, 10 Minutes, 15 Minutes, or Unlimited (Change the length of your actual training sessions). 3. Change the accumulation time to 30 Seconds, 1 Minute, 2 Minutes, or 5 Minutes (Change the amount of time for the program to accumulate some sample data before your training score will show up). 4. Choose whether or not you wish to automatically start recording your session data by (un)checking Automatically Start Recording. 5. Choose whether or not you wish to automatically save your recorded data by (un)checking Automatically Save Result. 6. Toggle the appearance of the breath pacer to assist you in your breathing by (un)checking Show Breath Pacer. 7. Toggle the Heart Rate Filter option to enable or disable smoothing the heart rate graph. Click on the Advanced Settings menu button to display the following window: Regular User Operations ‐ 13 ‐ Here you may choose to customize the sounds that are played to indicate how well you have scored in your session. To do this, choose a sound from one of the drop‐down lists for each category (or a custom one by clicking on the + button). You may choose to loop the sound by (un)checking the Loop option. You may change the option to display specific image on the screen with variable level of opacity proportional to the training score level. To do this: 1. Check the Use feedback image checkbox. 2. Select the image from one of the drop‐down list (or a custom one by clicking on the + button). 3. You may choose to show the image only once the score reaches certain level by (un)checking the Start at Score option and entering the score threshold level. 4. Use the Standard Training Score Average to select a moving average filter option to smooth the score changes. Click on the Pacer Model menu button to display the following window: Regular User Operations ‐ 14 ‐ Use appropriate spin‐boxes to set durations of the breath pacer cycle phases in seconds: Inhale, Hold, Exhale and Pause. These setting determine the default pacer rate. However you can set an initial pacer rate to be used in training to different value. In this case a default pacer model will be adjusted to this specific rate. Once you are satisfied with your settings, you may: 1. Revert back to your default settings by clicking on the Reset Defaults button. 2. Save your settings by clicking on the Save button. 3. Cancel without saving by clicking on the Cancel button. Regular User Operations ‐ 15 ‐ 5. Conducting a New Training Session 5.1. Training Goals The main goal of the training provided by Heart Tracker is to stimulate your baroreflex mechanism and “exercise” your parasympathetic nervous system. Refer to the description above for details on the physiological background of this process. Deep and paced breathing must be used for stimulating baroreceptors and inspire a response of your parasympathetic nervous system resulting in HR oscillations synchronous with breath cycle. These oscillations in HR are also called RSA waves. So the goal of this training session is to achieve high amplitude RSA waves and keep them high throughout the entire session. Please stay focused on keeping breathing according to the breath pacer to generate best RSA waves possible. Loss of focus in paced breathing will cause loss of synchronicity and decrease of RSA waves, which means a decrease of the stimulation of the parasympathetic nervous system. 5.2. Training Means Heart Tracker employs breath cycle patterns as a tool to trigger, generate and maintain RSA waves. A specific breath cycle pattern is presented as a breath pacer you must follow. The software allows you to create various breath cycle patterns by means of setting specific breathing rates. 5.3. Training Protocol The Heart Tracker provides several simple training protocols: 5 minutes training 10 minutes training 15 minutes training Unlimited time training Each training session starts with a data accumulation phase when physiological data is being accumulated for proper calculations. You can choose different options of accumulation time. The shorter accumulation time is the sooner you will begin getting the training score to show up. However the shorter accumulation time the less sensitive the score will be to small changes in smoothness (coherence) of heart rate oscillations caused by paced breathing (also known as RSA waves). Once the accumulation phase is over, the software starts calculating a key parameter called the Score (also referred as Training Score, RSA Score). This calculation is based on using a patented algorithm that evaluates oscillations of HR data to quantitatively measure the strength of your RSA waves created in response to paced breathing. Conducting a Training Session ‐ 16 ‐ The following training parameters are evaluated and displayed during the session: Score The actual training score level. Capability The best achieved score level. Sustainability The most frequent score level. By default, the software automatically enables the breath pacer upon starting the session. You have to follow the pacer throughout the session. However the software will start showing the score only upon preset accumulation time elapses. So do not be discouraged when you don’t see the score values at the beginning of the session. The height of the breath pacer bar does not represent the volume of your breathing. It is only there to demonstrate what rhythm your breathing pattern should take. Adjust your actual breathing volume to a comfortable level (to avoid hypo‐ or hyperventilation). Once the training phase is over, the software automatically brings up a session summary. Then session data can be either saved to your record or discarded. 5.4. Start a Training Session Before starting a new training session: 1. Have your pulse wave sensor connected. 2. Hook up your ear‐clip. 3. Start the Heart Tracker software and bring its main menu. 4. Click the Training menu option. The following screen appears: Conducting a Training Session ‐ 17 ‐ Make sure to synchronize your breathing pattern with the pacer to achieve the best results. Make sure you are getting stable readings of the pulse wave signal and HR data then click this button to start the training session. Note: It is not necessary to click on this button to begin session recording if Automatically start recording option was enabled in the program settings. The program will initiate recording once stable heart rate data is detected. The session will automatically finish once preset training time elapses. Important! If you chose the Unlimited duration option, the session will run indefinitely until you click the End Session button. 5.5. Program Controls and Features 5.5.1. Controlling the Session Process If for some reason the quality of the pulse wave signal significantly decreases so it causes the HR to become unstable (typically jumping unrealistically high and / or low), this makes your session data of little value. When this happens it is recommended to restart the session. Click this button to stop the session and automatically start it over. This button remains disabled until training score becomes available. Important! All of your data collected during the session will be permanently lost when you restart the session. Conducting a Training Session ‐ 18 ‐ Click on this button to stop the session and save the data collected. This button remains disabled until training score becomes available and you collect at least 1 minute worth of training data. There are two indicators at the bottom of the training screen: This indicator shows how the current session is progressing. This indicator shows your pulse wave. 5.5.2. Adjusting the Graph Scales At the top right corner of each of the two graphs, there is a series of buttons that adjust the scale of the graph. This button maximizes and minimizes the graph. This button automatically adjusts the vertical (amplitude) scale of the graph. This button increases the vertical (amplitude) scale of the graph. This button decreases the vertical (amplitude) scale of the graph. This button increases the horizontal (time) scale of the graph. This button decreases the horizontal (time) scale of the graph. 5.5.3. Adjusting the Breath Pacer Heart Tracker allows you to adjust the breath pacer to accommodate your training exercise to your needs. Although in most cases 6 breaths per minute pacer rate is used as a default rate you can change it to lower or higher rates with ease. Use the + and – controls to adjust the breath rate. The adjustment takes effect immediately. This pacer rate adjustment can only be made before session recording starts. Once it is started, this control becomes disabled. If Automatically start recording option was enabled in the program settings this control will be disabled at all times. Conducting a Training Session ‐ 19 ‐ 5.5.3. Controlling Audio Features Heart Tracker provides two types of auditory feedback: 1. Breath pacer audio 2. Training score audio The breath pacer audio is a set of continuously changing musical tones (MIDI), which represent audible breath pacer model. It provides auditory distinguishable phases of the breath cycle, so you can intuitively sense the breath pacer without looking at the visual breath pacer bar. You may select different pacer audio schemes in the settings window before you start your session. Click the speaker button on the pacer caption bar to turn the audible breath pacer on. Click it again to turn it off. The training score audio is a set of preconfigured audio files (WAV, MP3), which are played when current training score hits into one of four score ranges: Average Good Very good Excellent A separate audio file is associated with each score range. This association can be set in the program settings. The audio file is played once when score value crosses threshold between two adjacent score ranges. You may select different score audio schemes in the settings window before you start your session. Click the speaker button on the score graph caption bar to turn the score audio on. Click it again to turn it off. 5.5.4. Adding a Marker You may add special time‐stamped event markers during the session. Click this button to create a new event marker. The following form will open: Conducting a Training Session ‐ 20 ‐ Type in any text associated with this marker and click Save to save it. Click Close to create a marker without any text. Once the marker is created it will be shown on the Heart Rate graph: 5.6. Finishing the Training Session If you selected the training protocol of limited duration Heart Tracker will automatically finished the session once the specified duration is elapsed. Use the End Session button to finish your training session if you selected the protocol of unlimited duration. You can also stop the session with preset duration before its time elapses. Once session is stopped the session data will be stored in the user’s record. Conducting a Training Session ‐ 21 ‐ 6. View Training Summary To view the training summary, click on the Summary menu option. The following screen appears: 1. Select a session from the list. 2. Click the View Selected button to view the following screen. The following training parameters are displayed on this session summary screen: View Training Summary ‐ 22 ‐ Difficulty Difficulty level set for the training session. Duration Total duration of the training session. Mean HR Mean heart rate calculated for the whole session. Score The training score level at the end of the session. Capability The best achieved score level during the session. Sustainability The most frequent score level during the session. 6.1. Adjusting the Graph Scales Here, you can use the buttons at the top right corners of each screen to adjust the graphs. This button maximizes and minimizes the graph. This button automatically adjusts the vertical (amplitude) scale of the graph. This button increases the vertical (amplitude) scale of the graph. This button decreases the vertical (amplitude) scale of the graph. This button increases the horizontal (time) scale of the graph. This button decreases the horizontal (time) scale of the graph. 6.2. Printing Report Click on the Print button to print out a hard copy of the session summary report. 6.3. Entering Session Comments You may write comments and attach them to a session summary report. To do this go into a session summary report and write in the field at the bottom of the screen. View Training Summary ‐ 23 ‐ The comments will be automatically saved. 6.4. Viewing Other Sessions To view the session summary reports for other sessions select an appropriate session date / time from the list on the left side of the screen. Alternatively you can click on the Summary button, then highlight another session and click on View Selected. 6.5. Deleting Training Sessions Click on this button to delete current session data. The following message will pop up to confirm: Click Yes to delete. Warning! Deletion will permanently destroy currently selected training session data. View Training Summary ‐ 24 ‐ 7. View Training History This mode is used to view the history of training achievements across all training sessions stored in the record. To view the training history: 1. Click on the Summary menu option. 2. Click on the View History button on the menu on the left. The following screen appears: Scroll down the view to see all history graphs. 7.1. Adjusting the Graph Scales You can adjust the scales of these graphs using the buttons in the top right corners of the graphs. This button increases the vertical (amplitude) scale of the graph. This button decreases the vertical (amplitude) scale of the graph. View Training History ‐ 25 ‐ 7.2. Printing Report Click on the Print button to print out a hard copy of the training history report. View Training History ‐ 26 ‐ 8. Get Help To obtain help information about software operations, click the Help at the top of the screen. This manual will open in PDF format in a separate window. Use the table of contents to navigate through the document. Close the Help window to go back to the program window. Get Help ‐ 27 ‐ 9. Exit Heart Tracker To exit Heart Tracker, click on the Exit button at the top of the screen. Exit Heart Tracker ‐ 28 ‐